Rocking Moses Basket Stand - Baby bed My Child - Free user manual and instructions
Find the device manual for free Rocking Moses Basket Stand My Child in PDF.

| Product Type | Baby bed stand |
| Brand | My Child |
| Model | Rocking Moses Basket Stand |
| Intended Use | Supporting a Moses basket for infant sleeping |
| Material | Wood (pine) and metal hardware |
| Dimensions (Approx.) | Length: 80 cm, Width: 45 cm, Height: 55 cm |
| Weight Capacity | Up to 9 kg (infant + basket) |
| Product Weight | Approximately 5 kg |
| Assembly Required | Yes, with included instructions and tools |
| Cleaning Instructions | Wipe with a damp cloth; do not use harsh chemicals |
| Safety Features | Stable base, non-slip feet, safety locking mechanism |
| Compatibility | Fits most standard Moses baskets (approx. 70-80 cm length) |
| Age Range | From birth to approx. 6 months (when baby can sit up) |
| Certification | Complies with European safety standards (EN 1130) |
| Warranty | 1 year against manufacturing defects |
Frequently Asked Questions - Rocking Moses Basket Stand My Child
User questions about Rocking Moses Basket Stand My Child
0 question about this device. Answer the ones you know or ask your own.
Ask a new question about this device
Download the instructions for your Baby bed in PDF format for free! Find your manual Rocking Moses Basket Stand - My Child and take your electronic device back in hand. On this page are published all the documents necessary for the use of your device. Rocking Moses Basket Stand by My Child.
USER MANUAL Rocking Moses Basket Stand My Child
natural_image
Line drawing of a child's bench with metal frame and circular top (no text or symbols)ROCKING MOSES BASKET STAND
Important Information:
Before you begin assembly, please read these directions. See next page for important warning statements on this product. After product is assembled make sure all bolts and screws are securely tightened.
WARNING
- IMPORTANT — Read the instructions carefully before use and keep them for future reference.
- WARNING: Use only on a firm ground which is horizontal, level and dry.
- WARNING: Do not let other children play unattended near the carry cot and stand.
- WARNING: Do not use if any part is broken, torn or missing. Only use My Child approved parts.
- When the stand is not in use, it must be put away.
- This stand is designed to hold a Moses Basket with a base between 68-79cm long and 30-37cm wide.
- If you use POWER TOOLS to assemble this product, use on the LOWEST SETTING to avoid over tightening and splitting the wood.
- To prevent entrapment, do not place the Moses Basket and Stand near to other objects.
• After product is assembled make sure all screws are securely tightened. - Regularly check that fixings are secure. Natural wood product: Clean with damp cloth.
• DO NOT use bleach, solvents or abrasives.
PART LIST

natural_image
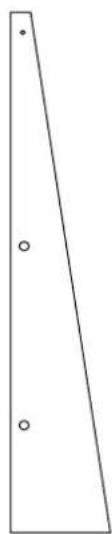
Simple geometric shape resembling a trapezoid with two small circles at the base (no text or symbols)(1) Leg
Part #: 07-35277
(2 pcs)
natural_image
Simple geometric shape resembling a right trapezoid with two small circles at the base (no text or symbols)(2) Leg
Part #: 07-35266
(2 pcs)

(3) Side Rail (One with Warning Label attached)
Part #: 07-35124
(2 pcs)

natural_image
Simple curved line drawing with no text, numbers, or symbols(4) Curved Base Rail
Part #: 07-35170
(2 pcs)

(5) Dowel Cross Rail
Part #: 07-35121
(4 pcs)

natural_image
Two horizontal rectangular bars with circular holes, no text or symbols present(6) Plastic Rail
Part #: 07-35100
(2 Pcs)
HARDWARE
S e t # / 0 8 - 0 7
Fixtures and Fittings supplied (actual size)
| Ref. | Name | QTYE | 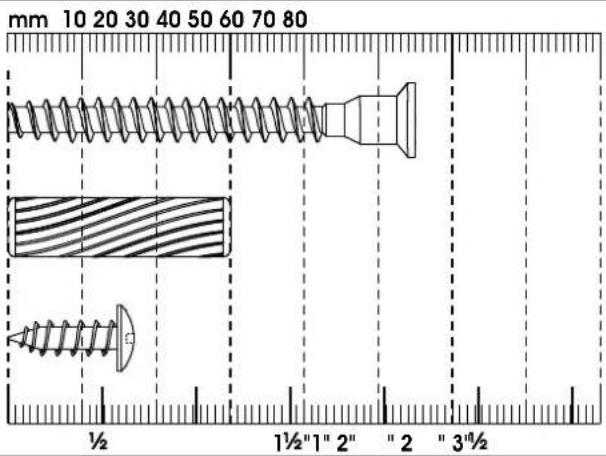 | Head | |
 | 55mm Allen Head Screw#07-07000-SV | 20 |  | ||
| B | 30mm Wood Pin#07-35001 | 4 |  | ||
 | 17mm Screw#07-01300 | 8 |  |
Fixtures and Fittings supplied (not to scale)
| D | Allen Key#07-00001 | 1 | 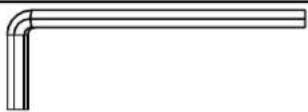 |
ASSEMBLY INSTRUCTIONS
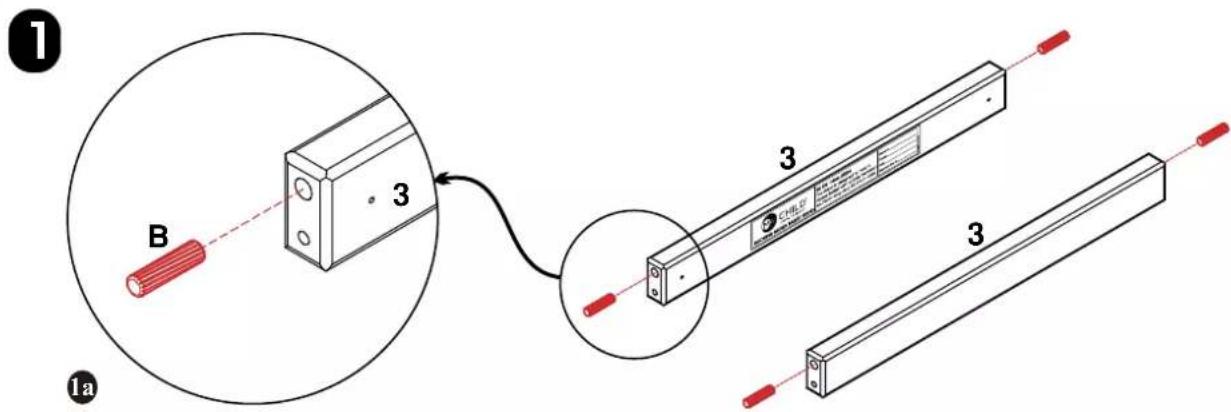
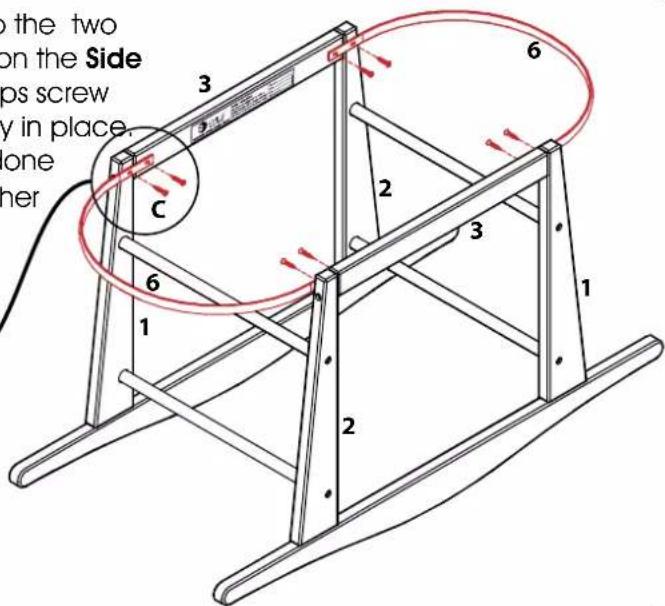
- Insert Wooden Pins (B) into the top hole on the Side Rails (3) on both ends. Repeat for other side rail.
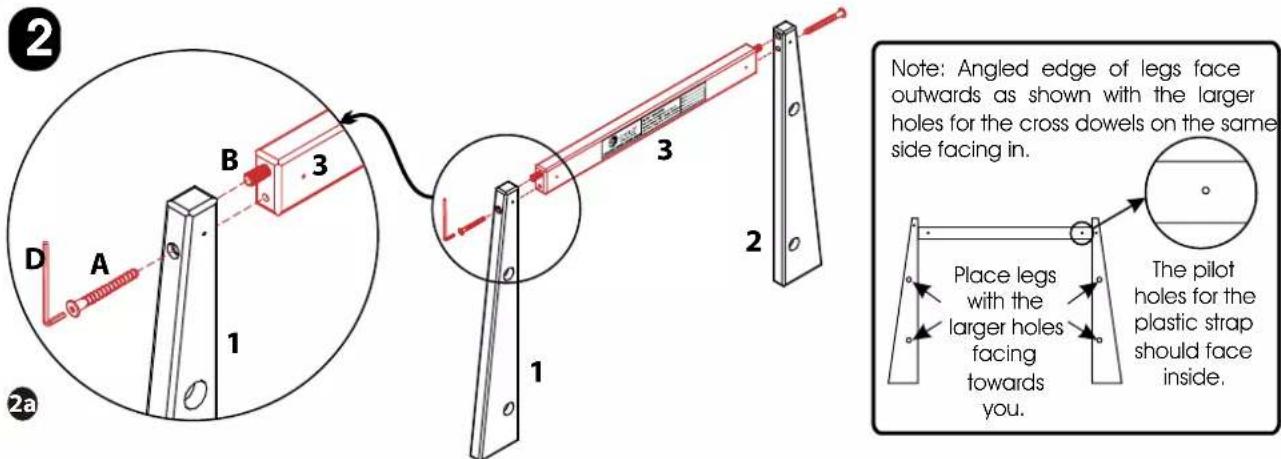
-
To attach the Side Rail (3) to the Legs (1 & 2) simply line up the wooden pins you inserted in Step 1 into the top hole on the flat surface of the legs. Ensure that you have one (1) leg and one (2) leg as shown in image. Bolt together using the 55mm Allen Head bolt (A) tightening with Allen key (D). Repeat for other side.
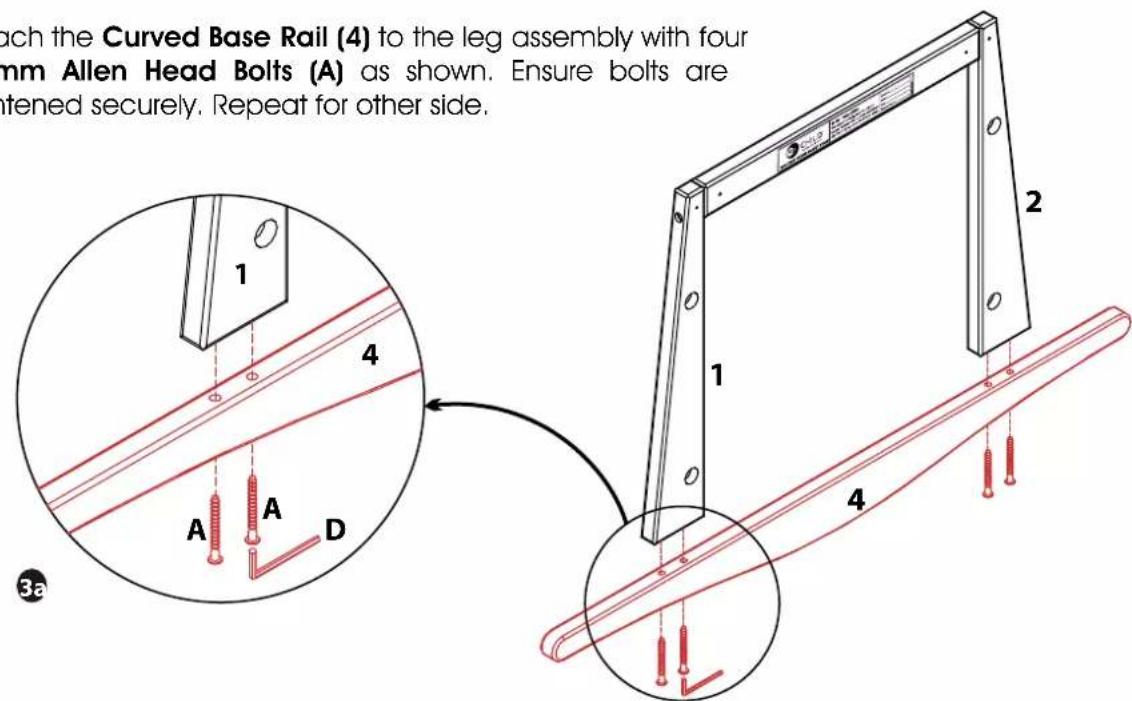
-
Attach the Curved Base Rail (4) to the leg assembly with four 55mm Allen Head Bolts (A) as shown. Ensure bolts are tightened securely. Repeat for other side.
ASSEMBLY INSTRUCTIONS
4

- Insert one of the end of the Dowel Cross Rails (5) into the large hole on the side assembly. The dowel should go into the hole tightly as shown in 4a. Some gentle tapping may be required. Bolt the dowel into place with a 55mm Allen Head Bolt (A) and tighten in place. Repeat for the three other ends of the dowels.
5
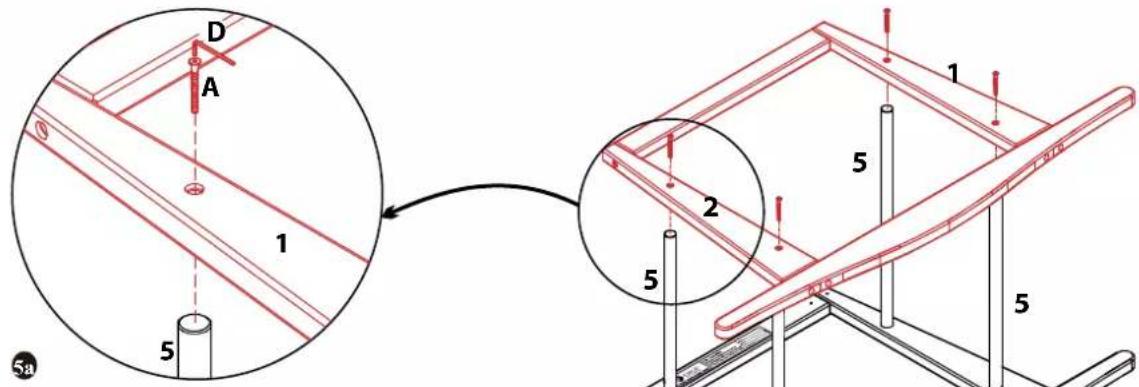
- Place partially assembled unit on its side as shown. Line up the second side assembly with the four dowels and press together. Ensure the dowels are fully inserted into the holes. Secure in place with four 55mm Screws (A) as shown.
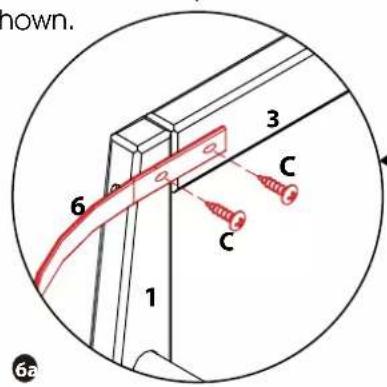
6
Attach the Plastic Rail (6) by first lining up the two holes on the end with the two guide holes on the Side Rails (3) as shown in 6a. You will need a Philips screw driver for this task (not supplied). Screw firmly in place. Repeat for other end of plastic rail. When done simply attach the other plastic rail to the other end as shown.
Notes:

CHILD®
TRAVEL, HOME, PLAY
Kooltrade Ltd.
3 Orbital Way, Denton
Manchester, M34 3QA
Product Packaging Information
Model #: ____
Colour: ____
Date:
Shipment Ref. #:
MADE IN CHINA