
WA23A8377GV - Washing machine SAMSUNG - Free user manual and instructions
Find the device manual for free WA23A8377GV SAMSUNG in PDF.


| Product Type | Top Load Washing Machine |
| Brand | Samsung |
| Model | WA23A8377GV |
| Capacity | 2.3 cu. ft. (approx. 15 lbs) |
| Dimensions (W x H x D) | 27 x 40.5 x 30 inches (68.6 x 102.9 x 76.2 cm) |
| Net Weight | 120 lbs (54.4 kg) |
| Power Supply | 120 V, 60 Hz, 10 A |
| Energy Consumption | Approx. 0.5 kWh per cycle |
| Water Consumption | Approx. 15 gallons per cycle |
| Spin Speed | Up to 700 RPM |
| Wash Cycles | Normal, Heavy Duty, Delicates, Quick Wash, etc. |
| Key Features | Self Clean, Smart Care, Vibration Reduction |
| Control Type | Electronic with LED Display |
| Drum Material | Stainless Steel |
| Noise Level (Wash/Spin) | Approx. 65/75 dB |
| Installation Type | Freestanding |
| Maintenance | Regular cleaning of lint filter and drum |
| Safety Features | Child Lock, Overflow Protection |
| Spare Parts Availability | Authorized service centers and online retailers |
| Repair Service | Manufacturer warranty and third-party services |
Frequently Asked Questions - WA23A8377GV SAMSUNG
User questions about WA23A8377GV SAMSUNG
0 question about this device. Answer the ones you know or ask your own.
Ask a new question about this device
Download the instructions for your Washing machine in PDF format for free! Find your manual WA23A8377GV - SAMSUNG and take your electronic device back in hand. On this page are published all the documents necessary for the use of your device. WA23A8377GV by SAMSUNG.
USER MANUAL WA23A8377GV SAMSUNG
What you need to know about the safety instructions 4
Important safety symbols 4
Important safety precautions 5
Critical installation warnings 6
Installation cautions 7
Critical usage warnings 8
Usage cautions 9
Critical cleaning warnings 9
Installation 10
What's included 10
Installation requirements 11
Step-by-step installation 12
Before you start 19
Detergent guidelines 19
Smart Check 21
Laundry guidelines 22
Operations 27
Control panel 27
Simple steps to start 28
Auto cycles 28
Special features 30
SmartThings 33
Open Source Announcement 34
Maintenance 35
Cleaning 35
Troubleshooting 41
Checkpoints 41
Information codes 45
English2
Specification 48
Specification sheet 48
Safety information
Congratulations on your new Samsung washing machine. This manual contains important information on the installation, use and care of your appliance. Please take some time to read this manual to take full advantage of your washing machine's many benefits and features.
What you need to know about the safety instructions
Please read this manual thoroughly to ensure that you know how to safely and efficiently operate the extensive features and functions of your new appliance. Please store the manual in a safe location close to the appliance for future reference. Use this appliance only for its intended purpose as described in this instruction manual.
Warnings and Important Safety Instructions in this manual do not cover all possible conditions and situations that may occur. It is your responsibility to use common sense, caution and care when installing, maintaining and operating your washing machine.
Because the following operating instructions cover various models, the characteristics of your washing machine may differ slightly from those described in this manual and not all warning signs may be applicable. If you have any questions or concerns, contact your nearest service center or find help and information online at www.samsung.com.
Important safety symbols
What the icons and signs in this user manual mean:

WARNING
Hazards or unsafe practices that may result in severe personal injury, death and/or property damage.

CAUTION
Hazards or unsafe practices that may result in personal injury and/or property damage.

NOTE
Indicates that a risk of personal injury or material damage exists.
These warning signs are here to prevent injury to yourself and others.
Please follow them explicitly.
After reading this manual, store it in a safe place for future reference.
Read all instructions before using the appliance.
As with any equipment that uses electricity and moving parts, potential hazards exist. To safely operate this appliance, familiarize yourself with its operation and exercise care when using it.
English4
Important safety precautions

WARNING
To reduce the risk of fire, electric shock, or injury to persons when using your appliance, follow basic precautions, including the following:
- This appliance is not intended for use by persons (including children) with reduced physical, sensory or mental capabilities, or lack of experience and knowledge, unless they have been given supervision or instruction concerning use of the appliance by a person responsible for their safety.
- For use in Europe: This appliance can be used by children aged from 8 years and above and persons with reduced physical, sensory or mental capabilities or lack of experience and knowledge if they have been given supervision or instruction concerning use of the appliance in a safe way and understand the hazards involved. Children shall not play with the appliance. Cleaning and user maintenance shall not be made by children without supervision.
- Children should be supervised to ensure that they do not play with the appliance.
- If the supply cord is damaged, it must be replaced by the manufacturer, its service agent or similarly qualified persons in order to avoid a hazard.
- The new hose-sets supplied with the appliance are to be used and that old hose-sets should not be reused.
Safety information
- For washing machines having ventilation openings in the base, the installation instructions shall state that the openings must not be obstructed by a carpet.
- For use in Europe: Children of less than 3 years should be kept away unless continuously supervised.
- CAUTION: In order to avoid a hazard due to inadvertent resetting of the thermal cut-out, this appliance must not be supplied through an external switching device, such as a timer, or connected to a circuit that is regularly switched on and off by the utility.
- This appliance is intended to be used in household only and it is not intended to be used such as:
–staff kitchen areas in shops, offices and other working environments;
-farm houses;
-by clients in hotels, motels and other residential type environments;
—bed and breakfast type environments;
-areas for communal use in blocks of flats or in launderettes.
Critical installation warnings

WARNING
The installation of this appliance must be performed by a qualified technician or service company.
- Failure to do so may result in electric shock, fire, an explosion, problems with the product, or injury.
Plug the power cord into a wall socket that meets local electrical specifications. Use the socket for this appliance only, and do not use an extension cord.
- Sharing a wall socket with other appliances using a power strip or extending the power cord may result in electric shock or fire.
English6
- Ensure that the power voltage, frequency, and current are the same as those of the product specifications. Failure to do so may result in electric shock or fire. Plug the power plug into the wall socket firmly.
Remove all foreign substances such as dust or water from the power plug terminals and contact points using a dry cloth on a regular basis.
- Unplug the power plug and clean it with a dry cloth.
- Failure to do so may result in electric shock or fire.
- Plug the power plug into the wall socket so that the cord is running towards the floor. If you plug the power plug into the socket in the opposite direction, the electric wires within the cable may be damaged and this may result in electric shock or fire.
This appliance must be properly grounded.
Do not ground the appliance to a gas pipe, plastic water pipe, or telephone line.
- This may result in electric shock, fire, an explosion, or problems with the product.
- Never plug the power cord into a socket that is not grounded correctly and make sure that it is in accordance with local and national regulations.
Do not install this appliance near a heater or any inflammable material.
Do not install this appliance in a humid, oily or dusty location, or in a location exposed to direct sunlight or water (rain drops).
Do not install this appliance in a location exposed to low temperatures.
- Frost may cause the tubes to burst.
Do not use an electric transformer.
• This may result in electric shock or fire.
Do not use a damaged power plug, damaged power cord, or loose wall socket.
• This may result in electric shock or fire.
Do not pull or excessively bend the power cord.
Do not twist or tie the power cord.
Do not hook the power cord over a metal object, place a heavy object on the power cord, insert the power cord between objects, or push the power cord into the space behind the appliance.
• This may result in electric shock or fire.
This appliance should be positioned so that the power plug, the water supply taps, and the drain pipes are accessible.
Installation cautions
CAUTION
This appliance should be positioned in such a way that the power plug is easily accessible.
- Failure to do so may result in electric shock or fire due to electric leakage.
Safety information
Critical usage warnings

WARNING
If the appliance is flooded, turn off the water & power supplies immediately and contact your nearest Samsung Customer Service.
- Do not touch the power plug with wet hands.
- Failure to do so may result in electric shock.
If the appliance generates a strange noise, a burning smell, or smoke, unplug the power plug immediately and contact your nearest service center.
- Failure to do so may result in electric shock or fire.
In the event of a gas leak (such as propane gas, LP gas, etc.), ventilate immediately without touching the power plug. Do not touch the appliance or power cord.
- Do not use a ventilating fan.
- A spark may result in an explosion or fire.
Do not let children play in or on the washing machine. In addition, when disposing of the appliance, remove the lid.
- If trapped inside the product, children may suffocate to death.
Do not wash items contaminated with gasoline, kerosene, benzene, paint thinner, alcohol or other inflammable or explosive substances.
- This may result in electric shock, fire, or an explosion.
Do not touch the power plug with wet hands.
• This may result in electric shock.
Do not insert your hand or a metal object under the washing machine while an operation is in progress.
• This may result in injury.
Do not attempt to repair, disassemble, or modify the appliance yourself.
- Do not use a fuse (such as copper, steel wire, etc.) other than a standard fuse.
- When the appliance needs to be repaired or reinstalled, contact your nearest service center.
- Failure to do so may result in electric shock, fire, problems with the product, or injury.
- In this case, the product will not be covered by the standard warranty provided by Samsung and no responsibility can be attributed to Samsung for malfunctions or damages resulting from doing it.
Unplug the power plug when the appliance is not being used for long periods of time or during a thunder or lightning storm.
- Failure to do so may result in electric shock or fire.
Do not put your hand into the spinning tub during the spin cycle.
- This may result in injury. If the tub does not stop spinning within 15 seconds after you open the lid, contact your nearest Samsung Customer Service.
Do not let children (or pets) play in or on your washing machine. The washing machine lid does not open easily from the inside and children may be seriously injured if trapped inside.
English8
Do not use the water to exceed 50\ °C when using the hot water in your washing machine. Plastic parts may be deformed or damaged, and this may result in electric shock or fire.
Usage cautions

CAUTION
When the washing machine is contaminated by a foreign substance such as detergent, dirt, food waste, etc., unplug the power plug and clean the washing machine using a damp, soft cloth.
- Failure to do so may result in discoloration, deformation, damage, or rust.
The product you have purchased is designed for domestic use only. Using the product for business purposes qualifies as a product misuse. In this case, the product will not be covered by the standard warranty provided by Samsung and no responsibility can be attributed to Samsung for malfunctions or damages resulting from such misuse.
Do not stand on the appliance or place objects (such as laundry, lighted candles, lighted cigarettes, dishes, chemicals, metal objects, etc.) on the appliance.
- This may result in electric shock, fire, problems with the product, or injury.
Do not press the buttons using sharp objects such as pins, knives, fingernails, etc.
• This may result in electric shock or injury.
Critical cleaning warnings

WARNING
Do not clean the appliance by spraying water directly onto it.
Do not use the a strong acidic cleaning agent.
Before cleaning or performing maintenance, unplug the appliance from the wall socket.
- Failure to do so may result in electric shock or fire.
Installation
Follow these instructions carefully to ensure proper installation of the washing machine and to prevent accidents when doing laundry.
What's included
Make sure all the parts are included in the product package. If you have a problem with the washing machine or the parts, contact a local Samsung customer centre or the retailer.

01 Lid
02 Speed Spray
03 Bleach compartment
04 Filter
05 Levelling feet
06 Control panel
07 Bubble Kit
08 Detergent drawer
09 Power cord
10 Drain hose
English10-

NOTE
- Lid: Make sure to keep the lid closed while the washing machine is operating.
- Filter: This collects lint that builds up from the laundry being washed.
- Levelling feet: Adjust the feet to level the washing machine on a flat floor.
Installation requirements
Electrical supply and grounding

WARNING
- AC 220-240 V / 50 Hz fuse or circuit breaker is required.
- Use an individual branch circuit specific to the washing machine.
- Do NOT use an extension cord.
- Use only the power cord that comes with the washing machine.
- Do NOT connect the ground wire to plastic plumbing, gas lines, or hot water pipes.
Levelling
- To prevent tumbling or noise, install the washing machine on a solid, flat floor without a platform or bricks.
- Keep the washing machine at 10 cm from each adjacent wall.
Water supply
- Make sure water taps are easily accessible.
- Turn off the taps when the washing machine is not in use.
- Check for any leaks at the water hose fittings on a regular basis.
Drain
- Make sure the drain hose is not clogged.
- We recommend a standpipe in height of 90-100 cm. The drain hose must be connected through the hose clip to the standpipe, and the standpipe must fully cover the drain hose. The standpipe specifications mentioned here are only applicable to pump-type models.
Installation
Step-by-step installation
STEP 1 Select a location
Location requirements:
- Solid, level surface without carpeting or flooring that may obstruct ventilation
- Away from direct sunlight
- Adequate room for ventilation and wiring
- The ambient temperature is always higher than the freezing point (0 °C)
- Away from a heat source
Anti-rat panel (applicable models only)
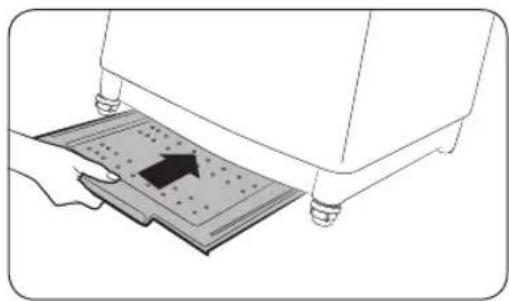
The washing machine comes with the Anti-rat panel that protects small animals such as rats from entering the machine.
Insert the panel into the bottom of the machine. To facilitate the work, slightly lift up the bottom front.
NOTE
- Some models feature the Anti-rat panel that must be inserted from the rear bottom of the model. For this model, insert the Anti-rat panel before levelling the machine. To facilitate the work, slightly lift up the bottom rear.
- Availability of the Anti-rat panel depends on the model.
English12-
STEP 2 Levelling your washing machine

See if the washing machine is level by checking the position of the tub:
- Slide the washing machine into position.
- Open the lid of the washing machine, and pour the water into the tub to just below the pulsator level.
-
If the washing machine is level, the pulsator(A) is positioned at the centre of the washing machine as shown in the figure.
-
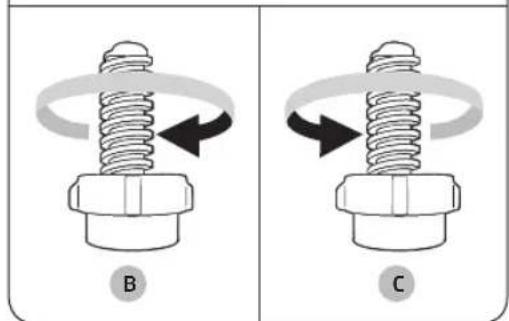
If the washing machine is not level, level your washing machine by turning the levelling feet clockwise or anticlockwise as necessary.

NOTE
Turn the levelling feet clockwise (B) to lower the washing machine, and anticlockwise (C) to raise the washing machine.
Installation
STEP 3 Connect the water hose

Connect the water hose to the water tap.
- Remove the adaptor (A) from the water hose (B).

- Use a Phillips screwdriver to loosen four screws on the adaptor.
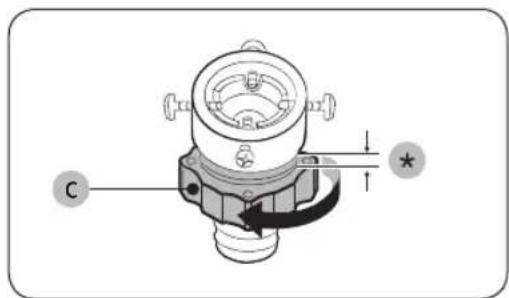
- Hold the adaptor and turn part (C) in the arrow direction to loosen it by 5 mm (*).

-
Insert the adaptor into the water tap, and tighten the screws while lifting up the adaptor.
-
Turn part (C) in the arrow direction to tighten it.
English14-

- While holding down part (D), connect the water hose to the adaptor. Then, release part (D). The hose fits into the adaptor with a clicking sound.

- Connect the other end of the water hose to the inlet valve on the back of the washing machine. Turn the hose clockwise to tighten.

- Open the water tap and check if there are any leaks around the connection areas. If there are water leaks, repeat the steps above.
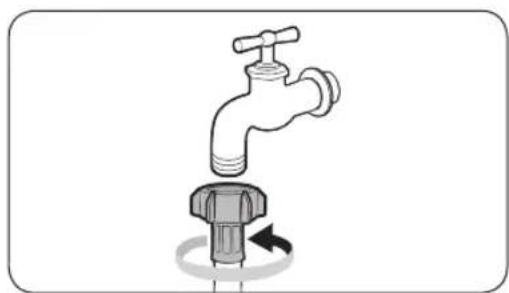
- If using a screw type of water tap, connect the water hose to the water tap as shown.
Installation

WARNING
Stop using the washing machine if there is a water leak, and contact a local Samsung service centre. Otherwise, this may cause electric shock.

CAUTION
Do not stretch the water hose by force. If the hose is too short, replace the hose with a longer, high-pressure hose.

NOTE
- After connecting the water hose to the adaptor, check if it is connected properly by pulling the water hose downwards.
- Use a standard type of water tap. If the tap is square-shaped or too big, remove the spacer ring before inserting the tap into the adaptor.

For models with an additional hot water inlet:
- Connect the red end of the hot water hose to the hot water inlet on the back of the machine.
- Connect the other end of the hot water hose to the hot water tap.
English16
STEP 4 Position the drain hose

General type
- Press and hold down the joint ring, and insert it into the drain hose.

- Insert the drain hose into the drain outlet. Make sure to connect them firmly using the joint ring. The drain hose is extensible. Adjust the length of the drain hose as needed.

CAUTION
- Do not exceed 3 m (*) for the total length of extended hoses.
- Do not let the drain hose run over doorsills that protrude 5 cm (**) or more from the floor.

CAUTION
Do not run the drain hose under the bottom of the machine.
Installation
STEP 5 Power on
Plug the power cord into a wall socket featuring an AC 220-240 V / 50 Hz approved electrical outlet protected by a fuse or circuit breaker. Then, press POWER to turn on the washing machine.
STEP 6 Running a test cycle
Run a test cycle as follows to check if your washing machine is properly installed.
- Load about 6 pounds of laundry into the tub.
- Press POWER to turn on your washing machine.
- Turn the Cycle Selector to RINSE+SPIN.
- Press and hold Hold to Start to start the test cycle.
- The washing machine should not rock or vibrate excessively when water is supplied or when washing or spinning, and should drain well during the spin cycle.
NOTE
- If water leaks while water is being supplied or drained, check the water connections. Refer to the "Connect the water hose" section on page 14 for instructions.
- If the washing machine rocks and vibrates excessively, level your washing machine again. Refer to the "Levelling your washing machine" section on page 13 for instructions.
STEP 7 Calibration Mode
Your Samsung washing machine detects the laundry weight automatically.
For more accurate weight detection, please run Calibration Mode after the installation.
To run Calibration Mode, follow these steps:
- Remove laundry or any contents in the machine.
- Press and hold Water Level and Delay End simultaneously for at least 3 seconds when the power is turned on.
- Press and hold Hold to Start to activate Calibration Mode.
- The pulsator rotates clockwise and anticlockwise approximately 1 minute.
- When Calibration Mode is finished, "0" appears on the display, and the washing machine automatically turns off. The washing machine is now ready for use.
English18-
Before you start
Detergent guidelines
The washing machine provides a two-compartment dispenser for detergent and fabric softener. The bleach compartment is located on the left side of the tub.

- Softener compartment (A): Add a recommended amount of fabric softener into the softener compartment.
- Detergent compartment with Bubble Kit (B): Apply a recommended amount of detergent (liquid or powder) into the compartment.
- Bleach compartment (C): Add non-chlorine bleach as instructed by the manufacturer.
NOTE
- Do not pour colour-safe bleach into the bleach compartment.
- Use the softener compartment only for liquid fabric softeners.
To apply detergents

- Open the door.
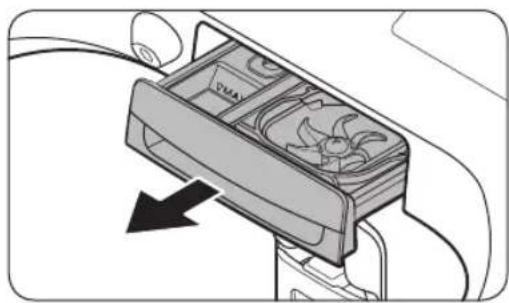
- Locate the detergent drawer, and slide it open.
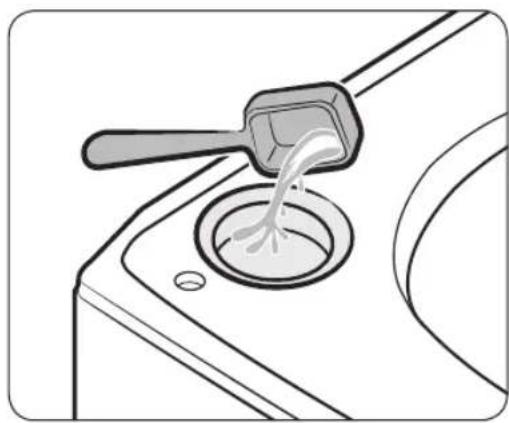
- Apply detergent (liquid or powder) into the detergent compartment.
NOTE
- Do not exceed the max line on the Bubble Kit (A) when you put detergent (liquid or powder) into the detergent compartment.
- You can remove the Bubble Kit and add the powder detergent if the required amount of powder detergent for your laundry exceeds the bubble kit's maximum line.
Before you start

- Add a recommended amount of fabric softener into the softener compartment.

- Add a recommended amount of non-chlorine bleach into the bleach compartment.
NOTE
Do not exceed the max line when applying the cleaning agents.
CAUTION
Do not pour undiluted liquid chlorine bleach directly onto the load or into the tub. This may cause fabric damage.
NOTE
- It is normal for a small amount of water to remain in the detergent compartments at the end of the cycle.
- When adding colour-safe bleach, it is recommended to use liquid detergent.
- Do not use liquid fabric softener that is too sticky as it may not mix with the water sufficiently.
English20
Smart Check
To enable this function, you must first download the Samsung Smart Washer app at the Play Store or the Apple Store, and install it on a mobile device featuring a camera function.
The Smart Check function has been optimised for Galaxy & iPhone series (applicable models only).
- Press and hold Wash Time + Rinse Times simultaneously for 3 seconds to enter the Smart Check mode.
- The washing machine starts the self-diagnosis procedure and displays an information code if a problem is detected.
- Run the Samsung Smart Washer app on your mobile device, and tap Smart Check.
- Put the mobile device close to the washing machine's display so that the mobile device and the washing machine face each other. Then, the information code will be recognised automatically by the app.
- When the information code is recognised correctly, the app provides detailed information about the problem with applicable solutions.
NOTE
- The function name, Smart Check, may differ depending on the language.
- If there is strong reflected light on the washing machine display, the app may fail to recognise the information code.
- If the app fails to recognise the Smart Check code consecutively, enter the information code manually onto the app screen.
Before you start
Laundry guidelines
Checkpoints
- Check for stains or dirt. Apply a little detergent to a white towel. Rub the white towel and the dirty clothes together to transfer the dirt or colour to the white towel.
• Before washing, pre-treat the sleeves, collars, dress hems, and pockets by brushing with detergent. - Wrinkle-processed clothes made of wool must be specially treated by tightening them with threads before washing. Remove the threads after washing and drying is complete.
CAUTION
- Do not place or keep blankets in the tub.
- Do not put candles or a heat source in or on the washing machine.
-
Do not wash these clothes:
-
Neckties, brassieres, jackets, suits, and coats can be easily deformed by shrinking or discolouring on the surface. These clothes are mostly made of rayon, polynosic, cuff, and/or blended fabric.
- Wrinkle-processed, embossed, or resin processed clothes easily deform merely by soaking in water.
Clothes that are easily discoloured made from cotton, wool, wrinkled silk, leather wear and accessories, and leather ornamented clothes and accessories. - Waterproof sheets, mattresses, or wool quilts, rain covers, fishing jackets and trousers, skiwear, sleeping bags, diaper covers, sweat suits, vehicle covers for automobiles, bicycles, and motorcycles, bath rugs, and other waterproof items.
English22
STEP 1 Sort
Sort the laundry according to these criteria:
- Care Label: Sort the laundry into cottons, mixed fibres, synthetics, silks, wools, and rayon.
• Colour: Separate whites from colours. - Size: Mixing different-sized items together in the tub improves the washing performance.
- Sensitivity: Follow the cloth-specific instructions on the care label of delicate items such as pure, new woollen items, curtains, and silk items.
NOTE
Make sure to check the care label on the clothing, and sort them accordingly before starting the wash.
STEP 2 Empty pockets
Empty all the pockets of your laundry items, and remove dirt and/or soils from them.
- Metal objects such as coins, pins, and buckles on clothing may damage other laundry items as well as the tub.
- Turn clothing with buttons and embroideries inside out.
- If pants or jacket zippers are open while washing, the tub may be damaged.
- Zippers should be closed and fixed with a string.
- Clothing with long strings may become entangled with other clothes. Make sure to tie the strings before washing.
Before you start
STEP 3 Use a laundry net or wash certain items separately
- Brassieres (water washable) must be placed in a laundry net. Metal parts of the brassieres may break through and tear other laundry items.
- Cashmilon, large volume garments, and lightweight clothes (lace-decorated clothes, lingerie, nylon stocking, and synthetic fabrics) may float on water during washing and cause problems to the machine. Use the laundry net or wash them separately.
- Do not wash the laundry net by itself without other laundry. This may cause abnormal vibrations that could move the washing machine and result in injury.
CAUTION
Make sure to soak inflatable items (such as blankets, and cotton-filled or microfibre quillets) in water before you run a cycle.
• Inflatable items may cause damage to the laundry or the machine during the wash or drying process.
- Regardless of the size, blankets or quilts are safer and cleaner to wash one item at a time. Two different-sized blankets in the same load may compromise the drying performance due to unbalanced loads.
To input a blanket
Fold the blanket as shown, and then put it on the plastic area (A) of the tub before inserting into the tub.
![graph TD A["Initial Slices"] --> B["Preparation"] B --> C["Post-Sampling"] C --> D["Stacked Breast"] D --> E["Beefing with Stop-Loop Condition"] E --> F["Final Breast with Cover"]](/content/2026/05/1011822/images/2724e35487a0f4f5bede2fbb24f300fc855f7a1c46ac09c09cec138adad06841.jpg)
English24
STEP 4 Prewash (if necessary)
• To remove stains and dirt on collars, sleeves, hems, and pockets, apply detergent lightly and brush off.
- Use powder or liquid detergents. Do not use soap, as this may remain on the tub after washing.
- Prewash white socks, sleeves, and collars with a little detergent and a brush.
CAUTION
Make sure the laundry is inserted completely.
- Any exposed part of the laundry may cause damage to the machine or the laundry itself, or a water leak.
• Make sure the laundry does not exceed the plastic area (A) in the above figure.
STEP 5 Determine the load capacity
Make sure the laundry does not exceed the plastic area (A) in the figure on page 24. Otherwise, it may cause the washing machine to not wash properly or cause damage to the machine or the laundry itself, or a water leak.
NOTE
When washing bedding or bedding covers, the wash time may be lengthened or the spin efficiency may be reduced. For bedding or bedding covers, the recommended load capacity is 3.5 kg or less.
CAUTION
If the laundry is unbalanced and the "Ub" information code is displayed, redistribute the load. Unbalanced laundry may reduce the spinning performance and cause damage to the machine or the laundry itself.
Before you start
STEP 6 Apply a proper detergent type
The type of detergent depends on the type of fabric (cotton, synthetic, delicate items, wool), colour, wash temperature, and degree of soiling. Always use “low suds” laundry detergent, which is designed for automatic washing machines.
CAUTION
- Use an appropriate amount of detergent. Excess amounts of detergent do not produce much improvement in washing results but cause damage to the laundry due to deteriorated rinsing performance.
- Bleach is strong alkali in nature, causing damage to or discolouration of the laundry.
- Use a longer or added rinse cycle when using powder detergent that is very likely to remain on the laundry and cause bad odours after washing is complete.
- If an excessive amount of detergent is used especially in cold water, the detergent doesn't dissolve well, ending up with contaminated laundry, hoses, and/or tub.
- In case of timed washing, do not apply detergent directly to laundry or the tub. The laundry may be discoloured. Use the detergent drawer.
- When washing wool using the Wool cycle, use only a neutral detergent to avoid discolouring the laundry.
NOTE
- Follow the detergent manufacturer's recommendations based on the weight of the laundry, the degree of soiling, and the hardness of the water in your local area. If you are not sure about the water hardness, contact a local water authority.
- Do not use detergent that tends to be hardened or solidified. This detergent may remain after the rinse process, blocking the drain outlet.
English26
Operations
Control panel

| 01 Cycle Selector Turn the dial to select a cycle. | |
| 02 Display | Displays the current cycle information and estimated time remaining, or an information code if the washing machine needs to be checked. |
| 03 Water Level Press to change the water level manually. | |
| 04 Wash Time | Press to select the wash time from 9/15/21/27 or press and hold to start wash cycle only. (50min+ can be selected only in some countries under certain condition.) |
| 05 Rinse Times | Press to change the number of rinses (maximum 5 rinses) or press and hold to start rinse cycle only. |
| 06 Spin Speed | Press to select a different spin speed or press and hold to start spin cycle only. |
| 07 Air Turbo | Press this button to speed dry your laundry. Air Turbo function can only be selected if a SPIN cycle is set. |
| 08 Speed Spray | Use this function to shorten the wash cycle while saving energy and water consumption. |
| 09 Delay End | Press to finish the wash at a specified time. To cancel the Delay End settings, simply turn off the washing machine. You can set the Delay End time up to 24 hours. |
| 10 Smart Control | Remote control is available. If you connect with a wireless router without activating the Smart Control function, you can only monitor the laundry situation. |
| 11 Alarm Off | You can turn the sound on or off for all cycles. When the sound is off, turns on. |
| 12 Soak | Press to add soaking time at the start of a cycle for better stain removal. |
| 13 POWER | Press to turn on/off the washing machine. |
Operations
14 Hold to Start
Press and hold to start an operation, or press to stop an operation temporarily.
Simple steps to start

- Press POWER to turn on the washing machine.
- Turn the Cycle Selector to select a cycle.
- Change the cycle settings (water level, wash time, rinse count, and/or spinning speed) as necessary.
- To add an option such as Delay End, press the corresponding button.
- Press and hold Hold to Start.
To change the cycle during operation
- Press Hold to Start to stop operation.
- Select a different cycle, and repeat steps 2-3 above if necessary.
- Press and hold Hold to Start again to start the new cycle.
Auto cycles
| Cycle Description | Max load (kg) | |
| NORMAL | For most fabrics including cottons, linens, and normally soiled items. | Max |
| HEAVY DUTY+ | For sturdy, colourfast fabrics and heavily soiled items. | Max |
| CLEAN WASH | Featuring additional rinses to ensure that the laundry is rinsed thoroughly. | Max |
| TOWEL | For bath towels, washcloths, and mats. | 16.0 |
| BEDDING | For bulky items such as comforters, blankets, and sheets.For best results, wash only a single type of bedding. | 3.5 |
English28
| Cycle Description | Max load (kg) | |
| BABY CARE | Featuring a extra rinses to help remove the remaining detergent effectively. | 16.0 |
| QUICK WASH | For lightly soiled items that you want to finish washing quickly. | 4.0 |
| DELICATES | For sheer fabrics, bras, lingerie, silks, and other handwash-only fabrics. For best results, use liquid detergent. | 2.0 |
| 40°C STAIN WASH | Heats the supplied water up to a custom temperature of 40 °C and uses the water to clean heavily soiled or stubborn items in an effective way.The washing machine heats water in this cycle to wash, and the optimal load is below 5 kg.The default water level is 4, and you can change it from level 1 to 5.NOTEThe actual water temperature may differ from the temperature indicated in the cycle name depending on the environment you use. | 5.0 |
| HYGIENE STEAM | Heats the supplied water up to a custom temperature of 60 °C and uses the water to clean heavily soiled or stubborn items in an effective way.The washing machine heats water in this cycle to wash, and the optimal load is below 5 kg.The default water level is 4, and you can change it from level 1 to 5.NOTEThe actual water temperature may differ from the temperature indicated in the cycle name depending on the environment you use. | 5.0 |
| RINSE+SPIN | For loads that need rinsing only or to add rinse-aided fabric softener to. | Max |
| ECO TUB CLEAN | Select this to clean the tub. The powerful spinning force removes impurities and bad odours from inside the tub.A blinking ECO TUB CLEAN indicator reminds you that it is time to clean the tub using Eco Tub Clean. For details, see theCleaningsection in this manual. | - |
Operations
Special features
Child Lock
The Child Lock function locks the washing machine door to prevent children from climbing into and suffocating inside the tub.
Activating the Child Lock function
Press and hold Water Level and Wash Time simultaneously for approximately 3 seconds.
- When you activate the Child Lock function, the Child Lock indicator blinks.
Using the Child Lock function
If the lid is opened when the Child Lock function is on, "dC" is displayed and an alarm sounds.
- If the water level in the tub is above the safe water level, "dC" is displayed on the LED display and the washing machine starts to drain water by force after 30 seconds.
- If the water level in the tub is above the safe water level and the Child Lock function is turned on while the lid is open, "CL" is displayed on the LED display, even if the washing machine is turned off, and the washing machine drains water by force.
- When Child Lock is on and the washing machine is off, if the water in the tub is above the safe water level and the lid is opened, "CL" is displayed on the LED display. No alarm sounds, but the washing machine drains the water. When the draining operation finishes, the power automatically turns off again.
- After the compulsory drain, "CL" blinks at 1 second intervals and the washing machine enters the "CL" mode. (When the washing machine is in the "CL" mode, only the POWER button works.)
- To cancel the "CL" mode, turn the power off and then on again.
- To cancel the "dC" mode, deactivate the Child Lock function. To deactivate the Child Lock function, press and hold Water Level and Wash Time simultaneously for at least 3 seconds.
English30
Deactivating the Child Lock function
Press and hold both Water Level and Wash Time simultaneously for approximately 3 seconds.
- When you deactivate the Child Lock function, the Child Lock Indicator is turned off.
- The Child Lock function prevents children or the infirm from accidentally operating the washing machine and injuring themselves.
WARNING
If a child enters the washing machine, the child may become trapped and suffocate.
CAUTION
- Once you have activated the Child Lock function, it continues working even if the power is turned off.
- Forcing the lid open can result in injury or damage to the product.
NOTE
To add laundry after you have activated the Child Lock function, you must first deactivate the Child Lock function.
Delay End
You can set the washing machine to finish a cycle later. The hour displayed indicates the time the wash will finish.
- Select a cycle. Then, change the cycle settings if necessary.
- Press Delay End repeatedly until a desired end time is set.
- Press and hold Hold to Start. The lamp indicator next to the Delay End button turns on, and the timer starts.
- To cancel Delay End, restart the washing machine by pressing POWER.
Real-life case
You want to finish a two-hour cycle 3 hours from now. To do this, add the Delay End option to the current cycle with a 3-hour setting, and then press and hold Hold to Start at 2:00 p.m. The washing machine starts operating at 3:00 p.m. and ends at 5:00 p.m. Provided below is the timeline for this example.

Operations
Speed Spray
Use this function to shorten the wash cycle while saving energy and water consumption. This function is only available in the NORMAL cycle.
- Press POWER to turn on the washing machine.
- Turn the Cycle Selector to NORMAL.
- Press Speed Spray.
- You can set the Rinse Times option if necessary.
-
Press Hold to Start.
-
The washing machine starts to detect the laundry weight. The pulsator and the tub rotate during this process.
- When the weight detection is complete, the washing machine automatically sets the water level and displays it in the control panel.
-
When the water level is displayed in the control panel, press Hold to Start to pause an operation.
Then, add detergent and fabric softener in the detergent drawer according to the selected water level. -
Press and hold Hold to Start.
Alarm off
To turn the sound on or off, press Alarm Off.
- You can turn the sound on or off for all cycles.
- When the sound is off, turns on.
Soak
Use Soak if the laundry is heavily contaminated or stained. Soak improves the wash performance by adding a soak cycle. Soak adds 20 minutes to the cycle time.
When Soak is complete, the wash cycle starts without draining water.
Air Turbo
Press this button to speed dry your laundry. Air Turbo function can only be selected if a SPIN cycle is set.
- Turning on the Air Turbo function will add extra 30 minutes to the spinning process.
English32
SmartThings
Wi-Fi connection
On your smartphone, go to Settings and turn on the wireless connection and select an AP (Access Point).
- This appliance supports the Wi-Fi 2.4 GHz protocols.
Download
On an app market (Google Play Store, Apple App Store, Samsung Galaxy Apps), find the SmartThings app with a search term of "SmartThings". Download and install the app on your device.
NOTE
The app is subject to change without notice for improved performance.
Log in
You must first log into SmartThings with your Samsung account. To create a new Samsung account, follow the instructions on the app. You don't need a separate app to create your account.
NOTE
If you have a Samsung account, use the account to log in. A registered Samsung smartphone user automatically logs in.
To register your appliance to SmartThings
- Make sure your smartphone is connected to a wireless network. If not, go to Settings and turn on the wireless connection and select an AP (Access Point).
- Open SmartThings on your smartphone.
- If a message of "A new device is found.", select Add.
- If no message appears, select + and select your appliance in a list of devices available. If your appliance is not listed, select Device Type > Specific Device Model, and then add your appliance manually.
- Register your appliance to the SmartThings app as follows.
a. Add your appliance to SmartThings. Make sure your appliance is connected to SmartThings.
b. When registration is complete, your appliance appears on your smartphone.
Operations
Open Source Announcement
The software included in this product contains open source software. You may obtain the complete corresponding source code for a period of three years after the last shipment of this product by contacting our support team via http://opensource.samsung.com
It is also possible to obtain the complete corresponding source code in a physical medium such as a CD-ROM; a minimal charge will be required.
The following URL http://opensource.samsung.com/opensource/SMART_AT_051/seq/0 leads to the download page of the source code made available and open source license information as related to this product. This offer is valid to anyone in receipt of this information.

NOTE
Hereby, Samsung Electronics, declares that the radio equipment type appliance is in compliance with Directive 2014/53/EU. The full text of the EU declaration of conformity is available at the following internet address: The official Declaration of conformity may be found at http://www.samsung.com, go to Support > Search Product Support and enter the model name.
Wi-Fi max transmitter power : 20 dBm at 2.412 GHz - 2.472 GHz
English34
Maintenance
Cleaning
Keep the washing machine clean to prevent deteriorated performance and to preserve its life cycle.
Exterior
- Use a soft cloth to wipe up all detergent, bleach, or other spills as they occur.
- Clean the control panel with a soft, damp cloth. Do not use abrasive powders or cleaning pads. Do not spray cleaners directly on the panels.
Eco tub clean
Regularly run this cycle to clean the tub and to remove bacteria from it.
- Makes sure the tub is completely empty.
- Press POWER to turn on the washing machine.
- Turn the Cycle Selector to ECO TUB CLEAN. You can also use Delay End with ECO TUB CLEAN.
- Press and hold Hold to Start.
NOTE
If the washing machine is installed and used in a humid place, bacteria in the air may adhere to the humid surface of the tub and foster mould growth, which is harmful to your health. To keep your washing machine tub clean, use the ECO TUB CLEAN cycle once every 1-2 months (or when the ECO TUB CLEAN indicator turns on) to clean the tub.
CAUTION
- Only run ECO TUB CLEAN when the tub is completely empty. This may cause damage to the laundry or a problem with the washing machine.
-
Depending on the conditions and surroundings in which the washing machine is used, the degree of contamination in the tub or the result of the ECO TUB CLEAN cycle may vary. When using the ECO TUB CLEAN cycle, pour 200 ml of chlorine bleach evenly on the bottom of the tub.
-
Excessive use of chlorine bleach may cause product malfunction. Do not mix chlorine bleach with other substances (such as vinegar, citric and oxygen bleach, etc.)
- Mixing chlorine bleach with these substances can generate harmful gas. When using chlorine bleach, make sure to ventilate the surrounding area. If you have used the washing machine for a long time without cleaning the tub or if you are cleaning the tub for the first time, some residue may remain in the tub after the ECO TUB CLEAN cycle.
- Run an additional RINSE+SPIN cycle to completely remove residue. Though stainless tubs do not rust easily, they may get rusty in the following cases; if rust should occur, wipe them with neutral detergent on a sponge or soft cloth.
- If any metallic objects (safety pins, hairpins, etc.) that rust easily are left in the tub for a long time. - If chlorine bleach is left in the tub for a long time.
-If an excessive amount of chlorine bleach is used in the tub.
Maintenance
Eco tub clean reminder
- The ECO TUB CLEAN indicator reminds you of cleaning the tub when necessary. If you happen to see the indicator blinking after washing is complete, remove the laundry and run the ECO TUB CLEAN cycle.
- You can ignore this reminder and continue to run cycles normally because this is not a system failure. However, the reminder remains active for 6 consecutive cycles immediately after each cycle is complete.
- To keep the tub clean, it is recommended to run ECO TUB CLEAN on a regular basis.
POWER TUB CLEAN 📋
Use this function if you have not performed the ECO TUB CLEAN cycle or need more powerful tub cleaning performance. You can add detergent to clean the tub more thoroughly.
- Make sure the tub is empty.
- Press POWER to turn on the washing machine.
-
Press and hold Soak for 3 seconds. -Pour 200 ml of chlorine bleach evenly on the bottom of the tub.
-
Press and hold Hold to Start.
WARNING
- Do not put any items in the tub while running the POWER TUB CLEAN cycle. The items may get damaged or discoloured.
- Depending on the conditions and surroundings in which the washing machine is used, the degree of contamination in the tub or the result of the POWER TUB CLEAN cycle may vary.
English36
Filter

- Press down the upper area of the filter case to remove.

- Unlock the cover, and clean the filter with running water and a brush.
Maintenance

- When cleaning is complete, close the cover and reinsert the filter case to the original position. You will hear a clicking sound when the filter case fits in.
Mesh filter

-
Use pliers to pull out the mesh filter from inside the water inlet as shown.
-
Use a soft brush to clean the mesh filter with running water.

- Reinsert the filter. Make sure it is tightened against water leaks.
English38-
Detergent drawer

- Fully pull out the detergent drawer.

- To remove, pull the detergent drawer while pushing the ends of each side.

- Remove the Bubble Kit (A) from the compartments. Rinse the Bubble Kit (A) and the drawer in warm water and clean with a soft brush.

- Clean the drawer opening thoroughly with a small, non-metallic brush.
Maintenance

-
Return the Bubble Kit (A) to the detergent compartment. Replace the drawer by placing the drawer rail (A) on the compartment rail (B) while tilting the drawer downward.
-
Fully push the drawer back to close.
English40-
Troubleshooting
Checkpoints
If you encounter a problem with the washing machine, first check the table below and try the suggestions.
| Problem Action | |
| Does not turn on. | Make sure you use rated power for the product.Make sure the power cord is completely plugged in.Check the fuse or reset the circuit breaker. |
| Does not start. | Make sure the door is closed.Make sure the water taps are open.Make sure to press or tap Hold to Start to start the washing machine.Make sure Child Lock is not activated.Before the washing machine starts to fill, it will make a series of clicking noises to check the door lock and does a quick drain.Was the door opened during the spinning cycle? Close the door, and press or tap Hold to Start to resume.The machine enters Standby or is in a soaking cycle. Please wait.Check the fuse or reset the circuit breaker. |
| Water is not supplied. | Make sure you press or tap Hold to Start after selecting the water supply.Make sure the water taps are open.Is the filter net at the water supply hose connector clogged? Clean the filter net by brushing with a toothbrush.Is the water supply cut off? If the water supply is cut off, close the tap and power off.Straighten the water supply hoses.Open and close the door, then press or tap Hold to Start.If the water pressure is low, it takes longer to start washing.If the water level is not as high as necessary or lower than expected, use the level selector to adjust the water level. |
| After a cycle, detergent remains in the automatic dispenser. | Make sure the washing machine is running with sufficient water pressure.Make sure the detergent drawer is properly inserted.Remove and clean the detergent drawer, and then try again. |
Troubleshooting
| Problem Action | |
| Vibrates excessively or makes noise. | Make sure the washing machine is set on a level floor. If the floor is not level, use the levelling feet to adjust the washing machine.Make sure the washing machine is not contacting any other object.Make sure the laundry load is balanced.Make sure the laundry is spread evenly in the washing machine.Spread out the laundry evenly and start again.Make sure the space around the washing machine is free of objects.Humming is produced normally during operation.Objects such as coins can cause noise. Remove these objects from the washing machine after washing is complete. |
| Stops. | Plug the power cord into a live electrical outlet.Check the fuse or reset the circuit breaker.Close the door, and press or tap Hold to Start to start the washing machine. For your safety, the washing machine will not spin unless the door is closed.Before the washing machine starts to fill, it will make a series of clicking noises to check the door lock and does a quick drain.There may be a pause or soak period in the cycle. Wait briefly and the washing machine may start.Make sure the inlet hose screens at the taps are not clogged.Periodically clean the screens.This problem occurs temporarily due to low voltages, and will be solved when power recovers. |
| The ECO TUB CLEAN alarm does not turn off. | When the machine is diagnosed to be cleaned, the ECO TUB CLEAN indicator blinks for an hour. This recurs 6 consecutive times until you run the ECO TUB CLEAN cycle. This is normal, and not a system failure. To keep the tub clean, it is recommended to run the cycle once every 1-3 months. |
English42-
| Problem Action | |
| Fills with the wrong temperature water. | Fully open both water taps.Make sure the temperature selection is correct.Make sure the hoses are connected to the correct water taps. Flush water lines.Disconnect the hoses and clean the screens. The hose filter screens may be clogged.While the washing machine fills, the water temperature may change as the automatic temperature control feature checks incoming water temperature. This is normal.While the washing machine fills, you may notice just hot and/or just cold water going through the dispenser when cold or warm temperatures are selected. This is a normal function of the automatic temperature control feature as the washing machine determines the water temperature. |
| Door (Lid) locked or will not open. | While the washing machine is operating, press or tap Hold to Start to stop the washing machine. It may take a few moments for the door lock mechanism to disengage. |
| Does not drain and/or spin. | Check the fuse or reset the circuit breaker.Make sure the electrical voltage is normal.Make sure the washing machine is plugged in.Make sure the drain hose is pointed downward. (Natural drain models only)Make sure the drain hose is not clogged.Make sure the drain hose is not kinked.Straighten the drain hose. If there is a drain restriction, call for service.Close the door, and press or tap Hold to Start. For your safety, the washing machine will not spin unless the door is closed. |
| Load is wet at the end of the cycle. | Use the High or Extra High spin speed. (Applicable model only)Use high efficiency (HE) detergent to reduce oversuding.Load is too small. Small loads (one or two items) may become unbalanced and not spin completely. |
Troubleshooting
| Problem Action | |
| Leaks water. | Make sure all hose connections are tight.Make sure the water supply hose's rubber packing is in the correct position. Screw tightly again.Make sure the end of the drain hose is correctly inserted and secured to the drain system.Avoid overloading.Use high efficiency (HE) detergent to prevent oversuding.Make sure the water supply hose is not kinked.If the water supply is too strong, water may leak. Close the water tap a little.Make sure water is not leaking from the water tap. If so, repair the water tap. |
| Excessive suds. | Use high efficiency (HE) detergent to prevent oversuding.Reduce the detergent amount for soft water, small loads, or lightly soiled loads.Non-HE detergent is not recommended. |
| The spin basket or drain/ supply hose is frozen. | Use warm water to disconnect the water supply hose and drain hose. Soak them in warm water.Fill the spin basket with warm water, and then wait for about 10 minutes.Put a hot towel on the drain hose connector.Reconnect the water supply hose and drain hose, and check if water is supplied properly. |
| Water drains out immediately. | Make sure the drain hose is not clogged, and is hung over the drain hose hook. Fill the spin basket halfway with water, and try spinning again.Lift the end of the drain hose to prevent water from draining. Fill the spin basket halfway with water, and then run spinning after releasing the drain hose.Make sure the drain hose is installed correctly. See the installation section of this user manual and adjust the position of the drain hose as instructed. |
| Stains on clothes.• Clean the filter. | |
| Has odours. | Excessive suds collect in recesses and can cause foul odours.Run cleansing cycles to sanitise periodically.Dry the washing machine interior after a cycle has finished. |
If a problem persists, contact a local Samsung service centre.
English44-
Information codes
If the washing machine fails to operate, you may see an information code on the display. Check the table below and try the suggestions.
| Code Action | |
| 1C | The Water Level sensor is not working properly.Check Water Level Sensor wire harness.If the information code remains, contact a customer service centre.NOTEWhen the washing machine displays "1C", the washing machine drains for 3 minutes and the POWER button is inoperative during this time. |
| 3C | Check the motor for operation.Try restarting the cycle.If the problem continues, call for service. |
| 4C | Water is not supplied.Make sure the water taps are open.Make sure the water hoses are not clogged.Make sure the water taps are not frozen.Make sure the washing machine is operating with sufficient water pressure.Make sure that the cold water tap and the hot water tap are properly connected.Clean the mesh filter as it may be clogged.NOTEWhen the washing machine displays "4C", the washing machine drains for 3 minutes and the POWER button is inoperative during this time. |
| 4C2 | Make sure the cold water supply hose is firmly connected to the cold water tap. If it is connected to the hot water tap, the laundry may be deformed with some cycles. |
| 5C | Water is not draining.Make sure the drain hose is not frozen or clogged.Make sure the drain hose is positioned correctly, depending on the connection type.Clean the debris filter as it may be clogged.Make sure the drain hose is straightened all the way to the drain system.If the information code remains, contact a customer service centre. |
| 8C | Check the MEMS sensor.Power off the washing machine. Wait 2-3 minutes, power on the washing machine, and then try again.If the problem continues, call for service. |
Troubleshooting
| Code Action | |
| 9C1 | The electronic control needs to be checked (Over Voltage Error).Check the PCB and wire harness.Check if power is supplied properly.If the information code remains, contact a customer service centre. |
| 9C2 | Low voltage detected.Check if the power cord is plugged in.If the information code remains, contact a customer service centre. |
| AC6 | Inverter Communication problem.Check the Inverter PCB and wire harness.If the information code remains, contact a customer service centre. |
| dCdC1 | The washing machine did not properly lock the door.Make sure the door is properly closed.Make sure laundry is not caught in the door.If the information code remains, contact a customer service centre. |
| HC | High temperature heating check.If the information code remains, contact a customer service centre. |
| LC | Check the drain hose.Make sure the end of the drain hose is placed on the floor.Make sure the drain hose is not clogged.If the information code remains, contact a customer service centre.NOTEWhen the washing machine displays “LC”, the washing machine drains for 3 minutes and the POWER button is inoperative during this time. |
| OC | Water is overflowed.Restart after spinning.If the information code remains on the display, contact a local Samsung service centre. |
| PC | When position of the clutch can't be detected.If the information code remains, contact a customer service centre. |
| PC1 | After position of the clutch is detected, if the signal of the clutch hall goes wrong.If the information code remains, contact a customer service centre. |
English46
| Code Action | |
| Ub | Spinning does not work.Make sure laundry is spread out evenly.Make sure the washing machine is on a flat, stable surface.Redistribute the load. If only one item of clothing needs washing, such as a bathrobe or pair of jeans, the final spin result might be unsatisfactory, and an “Ub” check message will be shown in the display. |
If any information code keeps appearing on the screen, contact a local Samsung service centre.
Specification
Specification sheet
| Type | Top loading washing machine | ||
| WA25B8377** WA23A8377** | |||
| Capacity (kg) 25.0 23.0 | |||
| Power consumption (W) | AC 220-240 V / 50 Hz | 1400-1650 | |
| Dimensions (mm) W700 x D748 x H1151 W700 x D748 x H1131 | |||
| Net weight (kg) 62.0 61.0 | |||
| Water pressure (MPa (kg·f/cm2)) 0.05 - 0.78 (0.5 - 8.0) | |||
| Spin speed (rpm) 700 | |||

NOTE
- Asterisk (*) means variant model and can be varied (0-9) or (A-Z).
- The design and specifications are subject to change without notice for quality improvement purposes.
English48-
Memo
Memo


Memo
SAMSUNG
QUESTIONS OR COMMENTS?
| COUNTRY CALL OR VISIT US ONLINE AT | ||
| THAILAND | Hotline no : 12821800-29-3232 (Toll free for all product) | www.samsung.com/th/support |
| MYANMAR +95-1-2399-888 www.samsung.com/mm/support | ||
| CAMBODIA 1800-20-3232 (Toll free) www.samsung.com/th/support | ||
| LAOS +856-214-17333 www.samsung.com/th/support | ||

DC68-04154B-01
เครื่องซักผ้า
คู่มือผู้ ใช้
WA25B8377**/WA23A8377**
SAMSUNG
สารบัญ
01 ผาปิด
02 ฉีดน้ำ
03 ช่องใส่สาร公共交通
04 ตัวกรอง
05 ชาตั้งปรับระดับ
06 แผงควบคุม
07 ชุดำฟอง
08 ช่องใส่ผงซักพอก
09 สายไฟ
10 ท่อน้ำทึง
ไทย10-

หมายเหตุ
หมายเหตุ
การติดตั้ง
ประเภทหัวไป
ข้อควรระวัง
ข้อควรระวัง
หมายเหตุ
ไทย38-
ช่องใส่ผงซักฟอก
உོམནྟེ:
01 32:02 33:03 03 04:05:06:07:08:09:10
- root of the following equations and equations of the equation of the equation of the equation of the equation of the equation of the equation of the equation of the equation of the equation of the equation of the equation of the equation of the equation of the equation of the equation of the equation of the equation of the equation of the equation of the equation of the equation of the equation of the equation of the equation of the equation of the equation of the equation of the equation of the equation of the equation of the equation of the equation of the equation of the equation
2 2014

උජිජු: අඩාඩ්ජාජාජාජාජාජාජාජාජාජාජාජාජාජාජාජාජාජාජාජාජාජාජාජාජාජ්ජිජු: අඩාඩ්ජාජාජාජාජාජාජාජාජාජාජාජාජාජාජාජාජාජාජාජ්ජිජු: අඩාඩැජිජු: අඩාඩැජිජු: අඩාඩැජිජු: අඩාඩැජිජු: අඩාඩැජිජු: අඩාඩීජිජු: අඩාඩීජිජු: අඩාඩීජිජු: අඩාඩීජිජු: අඩාඩීජිජු: අඩාඩුජිජු: අඩාඩුජිජු: අඩාඩුජිජු: අඩාඩුජිජු: අඩාඩුජිජු: අඩාඩීජිජු: අඩාඩීජිජු: අඩාඩීජිජු: අඩාඩීජිජු: අඩාඩේව,
உིམོདྭེ:
0326000 3241:320:
⚠️ ∞∞
⚠️ ∞∞
- ഉංක්රාවිය
- ഉིགྱུསྒྱོ་བྱིན་ཀྱི་ལྟེ་མཐའིགྱོ་བྱི།
- ωδ[δωρδωρδωωδωρδω]ωδ[(ωρδωρδωρδωρδ)ωηωρδω]
© Consolidated
యర వార్టిం:
యర వార్టిం:
3006 4 010000000000000000000000000000000
⚠️ clover clover clover
Setting (wireless connection: AP (Access Point)
உரைய்புவெ
ජාජ්යේ
Samsung Electronics 2014/53/ EU 2014/53/ EU 2014/53/ EU 2014/53/ EU 2014/53/ EU 2014/53/ EU 2014/53/ EU 2014/53/ EU 2014/53/ EU 2014/53/ EU 2014/53/ Wi-Fi 2.412 GHz – 2.472 GHz 20 dBm
###:###: ### ###
བསྟན་ཞེ།
amplitude: quark charge
odds odds: odds odds
amplitude: quark charge
amplitude: quark charge
amplitude: quark charge
amplitude: quark charge
උප්රාන්වියාන්යුල:
amplitude: quark charge
- INSTALLATION 10
- BEFORE YOU START 19
- OPERATIONS 27
- MAINTENANCE 35
- TROUBLESHOOTING 41
- SAFETY INFORMATION
- WHAT YOU NEED TO KNOW ABOUT THE SAFETY INSTRUCTIONS
- IMPORTANT SAFETY SYMBOLS
- WARNING
- CAUTION
- NOTE
- IMPORTANT SAFETY PRECAUTIONS
- CRITICAL INSTALLATION WARNINGS
- INSTALLATION CAUTIONS
- CRITICAL USAGE WARNINGS
- USAGE CAUTIONS
- CRITICAL CLEANING WARNINGS
- INSTALLATION
- WHAT'S INCLUDED
- INSTALLATION REQUIREMENTS
- ELECTRICAL SUPPLY AND GROUNDING
- LEVELLING
- WATER SUPPLY
- DRAIN
- STEP-BY-STEP INSTALLATION
- STEP 1 SELECT A LOCATION
- LOCATION REQUIREMENTS
- ANTI-RAT PANEL (APPLICABLE MODELS ONLY)
- STEP 2 LEVELLING YOUR WASHING MACHINE
- SEE IF THE WASHING MACHINE IS LEVEL BY CHECKING THE POSITION OF THE TUB
- STEP 3 CONNECT THE WATER HOSE
- CONNECT THE WATER HOSE TO THE WATER TAP
- FOR MODELS WITH AN ADDITIONAL HOT WATER INLET
- STEP 4 POSITION THE DRAIN HOSE
- GENERAL TYPE
- STEP 5 POWER ON
- STEP 6 RUNNING A TEST CYCLE
- STEP 7 CALIBRATION MODE
- BEFORE YOU START
- DETERGENT GUIDELINES
- TO APPLY DETERGENTS
- SMART CHECK
- LAUNDRY GUIDELINES
- CHECKPOINTS
- STEP 1 SORT
- SORT THE LAUNDRY ACCORDING TO THESE CRITERIA
- STEP 2 EMPTY POCKETS
- STEP 3 USE A LAUNDRY NET OR WASH CERTAIN ITEMS SEPARATELY
- TO INPUT A BLANKET
- STEP 4 PREWASH (IF NECESSARY)
- STEP 5 DETERMINE THE LOAD CAPACITY
- STEP 6 APPLY A PROPER DETERGENT TYPE
- OPERATIONS
- SIMPLE STEPS TO START
- TO CHANGE THE CYCLE DURING OPERATION
- AUTO CYCLES
- SPECIAL FEATURES
- CHILD LOCK
- ACTIVATING THE CHILD LOCK FUNCTION
- USING THE CHILD LOCK FUNCTION
- DEACTIVATING THE CHILD LOCK FUNCTION
- DELAY END
- REAL-LIFE CASE
- SPEED SPRAY
- ALARM OFF
- SOAK
- AIR TURBO
- SMARTTHINGS
- WI-FI CONNECTION
- DOWNLOAD
- LOG IN
- TO REGISTER YOUR APPLIANCE TO SMARTTHINGS
- OPEN SOURCE ANNOUNCEMENT
- MAINTENANCE
- CLEANING
- EXTERIOR
- ECO TUB CLEAN
- ECO TUB CLEAN REMINDER
- POWER TUB CLEAN 📋
- FILTER
- DETERGENT DRAWER
- TROUBLESHOOTING
- INFORMATION CODES
- SPECIFICATION
- MEMO
- SAMSUNG
- เครื่องซักผ้า
- สารบัญ
- หมายเหตุ
- การติดตั้ง
- ประเภทหัวไป
- ข้อควรระวัง
- ช่องใส่ผงซักฟอก
- உོམནྟེ
- 2 2014
- உིམོདྭེ
- © CONSOLIDATED
- యర వార్టిం
- 3006 4 010000000000000000000000000000000
- உரைய்புவெ
- ජාජ්යේ
- བསྟན་ཞེ།
- AMPLITUDE: QUARK CHARGE
- ODDS ODDS: ODDS ODDS
- උප්රාන්වියාන්යුල
Brand : SAMSUNG
Model : WA23A8377GV
Category : Washing machine