
ScanNCut CM250 - Paper Cutter BROTHER - Free user manual and instructions
Find the device manual for free ScanNCut CM250 BROTHER in PDF.


| Product Type | Electronic Cutting Machine |
| Brand | Brother |
| Model | ScanNCut CM250 |
| Cutting Area | 12" x 24" (305 x 610 mm) |
| Max Cutting Thickness | Up to 2 mm (depending on material) |
| Blade Type | Standard and deep blades (interchangeable) |
| Display | 4.85" LCD touchscreen |
| Connectivity | USB port (for pattern import) |
| Power Supply | AC 100-240V, 50/60 Hz |
| Power Consumption | 60 W (max) |
| Dimensions (W x D x H) | Approx. 19.7" x 8.5" x 9.8" (500 x 216 x 249 mm) |
| Weight | Approx. 12.8 lbs (5.8 kg) |
| Supported Materials | Fabric, paper, cardstock, vinyl, iron-on, felt |
| Built-in Patterns | Over 600 designs included |
| Seam Allowance | Selectable: 3, 5, 7, 10 mm; 1/4", 1/2", 5/8" |
| Cutting Speed | Adjustable (slow to fast) |
| Blade Holder | Auto blade detection |
| Warranty | 1 year limited warranty |
| Compatible Software | CanvasWorkspace (free download) |
| Included Accessories | Standard mat, blade (standard), blade holder, USB cable, power cord, quick start guide |
Frequently Asked Questions - ScanNCut CM250 BROTHER
User questions about ScanNCut CM250 BROTHER
0 question about this device. Answer the ones you know or ask your own.
Ask a new question about this device
Download the instructions for your Paper Cutter in PDF format for free! Find your manual ScanNCut CM250 - BROTHER and take your electronic device back in hand. On this page are published all the documents necessary for the use of your device. ScanNCut CM250 by BROTHER.
USER MANUAL ScanNCut CM250 BROTHER
Basic Quilting Guide - Making a Quilt -

natural_image
Geometric grid pattern with shaded and dashed squares (no text or symbols)1 Preparing Materials and Equipment
O Fabric ...... We recommend 100% cotton that is not too thick.
○ Quilt batting ...... Normally, medium-thick 100% polyester batting is used. There is also cotton batting.
○ Thread ...... Since there are various types, for example, for piecing, for quilting, for hand-sewing and for machine-sewing, select the type appropriate for the desired purpose and use.
○ Sewing needles/pins...... Since there are various types, for example, for piecing and for quilting, select the type appropriate for the desired purpose.
○ Quilting pencil (erasable pen, etc.) ... Use to copy patterns onto fabric and to draw quilting lines.
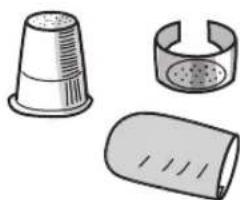
○ Thimble .... Use to protect your fingers when quilting.
Place a thimble on the middle finger of your right hand to push the needle and on the middle or index finger of your left hand to stop the needle.
○ Quilting hoop .... Use the hoop for quilting with a cleaner finish.
O Thread clipper
○ Iron/press
O Measuring stick
natural_image
Illustration of three different plastic components: a conical stack, a cross-sectional view, and a cylindrical container (no text or symbols)
2 Cutting Pieces (Fabric)
Refer to "Cutting Around Drawings" in the Operation Manual to specify a seam allowance and draw the pattern lines, and then cut out the pieces. Be sure to observe the following instructions.
1 Check the fabric grain (weaving direction).
Lengthwise-grain fabric Hard to stretch
→ Crosswise-grain fabric Slightly stretched
✗ Bias-grain fabric Easy to stretch
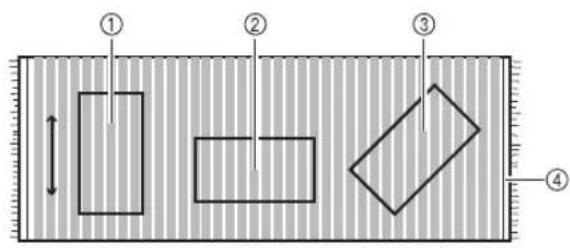
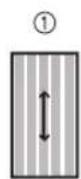


①Lengthwise-grain fabric
②Crosswise-grain fabric
③Bias-grain fabric
④Selvage
* When making pieces from patterned fabric, the pattern has priority over the fabric grain.
* Observe the fabric grain on the pattern if it is indicated.


2 If a seam allowance will be drawn, attach the fabric with the wrong side facing up.
Align the lengthwise grain with the insertion direction.

①Standard mat
②High tack adhesive fabric support sheet (An additional purchase may be required depending on the machine model.)
③Wrong side of fabric
3 Select the patterns, and then arrange them. If the fabric grain and pattern angle are not aligned, rotate the pattern.
* Pre-installed patterns will automatically be arranged with their grain along the lengthwise grain of the fabric.

flowchart
graph TD
    A["Input Symbol"] --> B["Process Step"]
    C["Input Symbol"] --> D["Process Step"]
    E["Input Symbol"] --> F["Output Box"]
    G["Input Symbol"] --> H["Output Box"]
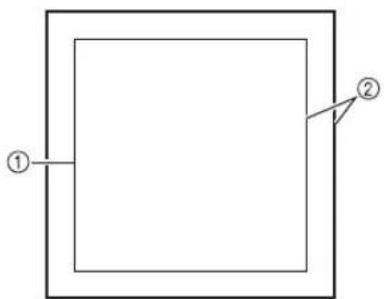
4 Specify the seam allowance.
Widths that can be specified with this machine: 3 mm, 5mm, 1/4", 7mm, 10mm, 1/2", 5/8"
Standard seam allowance
| Patchwork 5 mm (3/16"), 1/4", 7 mm |
| Appliqué 3 mm (1/8"), 5 mm (3/16") |
natural_image
Simple geometric diagram with two concentric squares and a labeled arrow pointing to the inner square (no text or symbols)①Stitching line
②Seam allowance
3 Basic Hand Sewing Techniques

Memo
- If you are using a sewing machine to make the quilt, refer to your machine's instruction manual for information about the straight stitch, reverse/reinforcement stitch and appliqué stitch. When sewing pieces together without sewing reverse/ reinforcement stitches, sew fine stitches, which have a short stitch length.
Thread knot
Make a knot at the end of the thread to secure it.

Wind the thread 2 or 3 times around the needle.


Hold the wound thread and pull out the needle.

①Thread knot

Use scissors to cut off any excess thread.
Running stitch
Sew fine stitches when sewing pieces together.

①2 mm (1/16 inch)
Blindstitch
Attach appliqués so that threads are imperceptible.
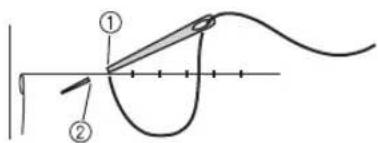
①Insert the needle
②Feed out the needle
Backstitch
At the beginning and end of stitching, sew one backstitch, and then secure the thread to prevent it from becoming loose.
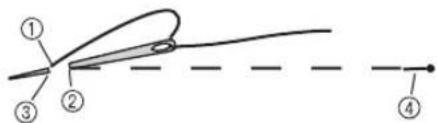
①Feed out the needle
②Insert the needle
③Feed out the needle
④Backstitch
French knot
At the end of stitching, sew a backstitch, make a knot, and then cut the thread.

Place the needle at the end of stitching.

①Backstitch

Wind the thread twice around the needle, hold the wound thread with your finger, and then pull out the needle.
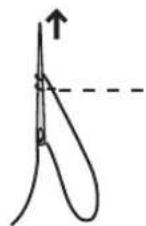
Seam starting or ending point Set in seam
When sewing pieces together, sew to the corner of the stitching line.

1 Sew the pieces together. At the beginning of stitching, make a knot in the thread, insert the needle in front of the stitching line, and then sew one backstitch.

①Wrong side of fabric
②Stitching line
2 At the end of stitching, sew one backstitch, and then make a french knot at the corner.
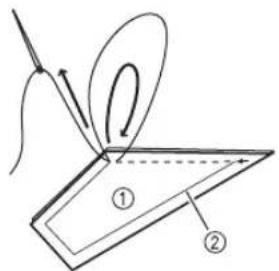

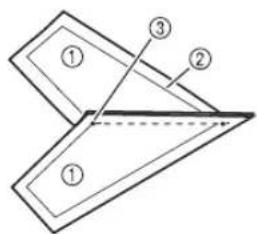
①Wrong side of fabric
②Stitching line
③End point
Continuously sew together multiple pieces of fabric by sewing each side without cutting the thread.
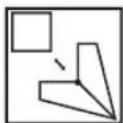
: Right side of fabric
□: Wrong side of fabric
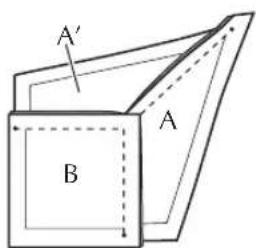
1 Sew pieces A' and B together. At the end point, pass the needle to the opposite side of A'.

①End point
2 Feed the needle out to the end point of A.

①Start point
3 Overlap A and B, and then continue sewing.

4 Sewing Pieces Together to Make the Top (Patchwork)
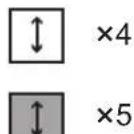
Using two types of fabric, prepare 4 square pieces from one and 5 from the other. (Refer to the illustration below.)
Cut the pieces with a seam allowance.

1 Sew pieces together into rows.
Fold over seam allowances in alternating directions.

flowchart
graph TD
    A1["A"] <--> B1["B"]
    B1 <--> A2["A"]
    B2["B"] <--> A3["A"]
    A3 <--> B3["B"]
    B3 <--> A4["A"]
    A4 <--> B4["B"]
    B4 <--> A5["A"]

    subgraph Section ①
        direction TB
        direction LR
    end

    style Section ① fill:#f9f,stroke:#333
    style Section ② fill:#ccf,stroke:#333
    style Section ③ fill:#cfc,stroke:#333
    style Section ④ fill:#fcc,stroke:#333
①Seam allowance
2 Sew the rows together to complete it.

flowchart
graph TD
    A1["A B A"] --> B1["B A B"]
    B1 --> C1["A B A"]
    C1 --> D["3x3 Grid Structure"]
    style A1 fill:#ccc,stroke:#333
    style B1 fill:#ccc,stroke:#333
    style C1 fill:#ccc,stroke:#333
    style D fill:#ccc,stroke:#333
Sewing method
1 Align the pieces with their right sides together, and then pin them.
At the beginning of stitching, insert the needle one stitch in front of the stitching line.

①Right sides together
②Stitching line
③Pin
④Thread knot
2 Sew one backstitch, and then continue sewing a running stitch.

①Thread knot
②Backstitches
3 At the end of the stitching, sew one backstitch.
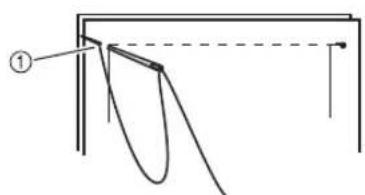
natural_image
Pure mechanical diagram showing a curved component with a dashed line and labeled point (①), no text or symbols present.①Backstitches
4 Make a French knot.

①French knot
②Thread knot
Sewing appliqués
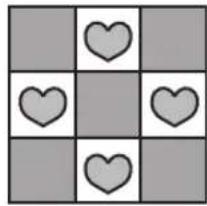
1 Cut the appliqué pieces with a seam allowance applied.
(Example: 4 hearts)
2 Make cuts 1 mm (1/16 inch) from the stitching line.

①1 mm (1/16 inch)

Note
●Make more cuts in tight curves.
3 Place the pattern on the appliqué piece, and then fold over the seam allowance using an iron or press.
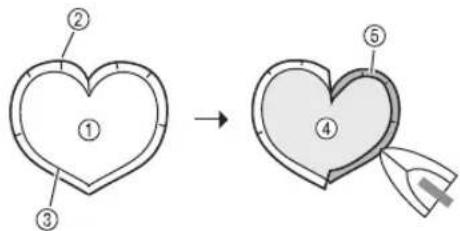
①Wrong side of fabric
②Cut
③Stitching line
④Pattern
⑤Right side of fabric
4 Mark the base fabric.

natural_image
Simple heart outline with dashed outline, no text or symbols present5 Remove the pattern, and then place the appliqué piece on the base fabric.

flowchart
graph TD
    A["Heart Symbol ①"] --> B["Arrow to Solid Circle"]
    B --> C["Dashed Circle"]
①Right side of fabric
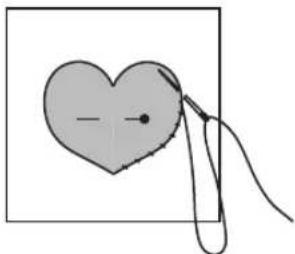
6 Attach the appliqué piece to the base fabric with blindstitching.
natural_image
Simple line drawing of a heart shape with a string, no text or symbols present5 Drawing Quilting Lines
After the top (patchwork) is finished, draw the quilting lines. Use a quilting pencil or erasable pen to lightly draw the lines. Draw with a light color on dark fabric.
Sample quilting lines
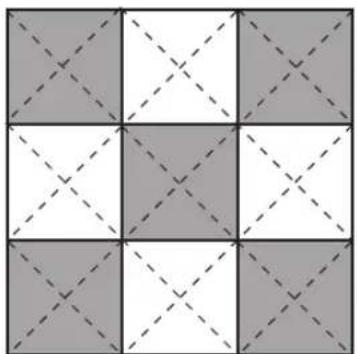
Diagonal grid
Quilt a diagonal grid. This is frequently used to securely sew the fabric together.
natural_image
Grid pattern with shaded and dashed squares (no text or symbols)Diagonals
Quilt parallel diagonal lines.

natural_image
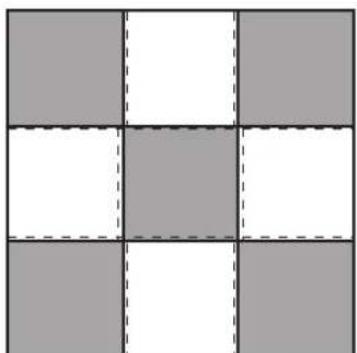
Grid pattern with shaded and dashed diagonal lines forming a 3x3 grid (no text or symbols)In-the-ditch
Quilt at the edge of the pieces on the sides where the seam allowance was not folded onto.
natural_image
3x3 grid with alternating gray and white squares, no text or symbols presentOutline
Quilt 3 to 4 mm (1/8 to 3/16 inch) inside the edge of each piece.

natural_image
Grid pattern with nine squares, each containing a dashed square (no text or symbols)Grid
Quilt a vertical and a horizontal line through the center of each piece.

natural_image
3x3 grid pattern with alternating dark and light squares, no text or symbols presentBlock
Quilt patterns.

natural_image
Grid pattern with geometric shapes (crosses, circles) and dashed lines on a gray background, no text or symbols present.6 Basting
After drawing the quilting lines, overlap the backing fabric, quilt batting and top (patchwork), in order, and then baste them together.
1 Prepare quilt batting and backing fabric 3 to 4 cm (1-3/16 to 1-9/16 inches) larger than the top, overlap the three layers, and then secure them with pins.

①Wrong side of fabric
②Quilt batting
③Top
④Pin
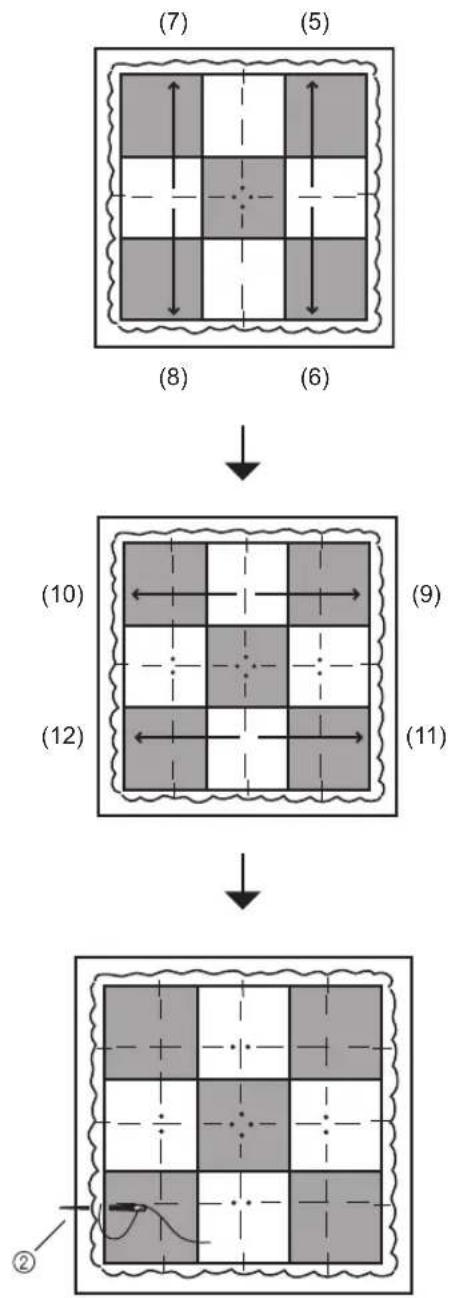
2 From the center to the outside, baste a grid pattern in the order shown in the illustration. At the beginning of stitching, make a thread knot. At the end of stitching, sew a backstitch, and then cut the thread.

①Beginning of stitching

flowchart
graph TD
    A["(5) Grid with shaded cells"] --> B["(6) Grid with white dots inside a square"]
    B --> C["(7) Grid with gray fill and white border"]
    C --> D["(8) Grid with white and white lines inside a rectangle"]
    D --> E["(9) Grid with gray fill and white dots inside a square"]
    E --> F["(10) Grid with white and white lines inside a rectangle"]
    F --> G["(11) Grid with white dots inside a rectangle"]
    G --> H["(12) Grid with white and white lines inside a rectangle"]
    H --> I["② Label at bottom right"]
②Backstitch
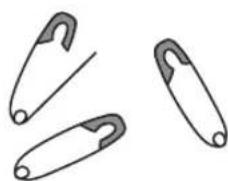
* When quilting small items, basting pins can also be used.
natural_image
Three types of metal clips with handles, shown in side profile (no text or symbols)7 Quilting
Quilting order
From the center to the outside, sew symmetrically in the order shown in the illustration.

flowchart
graph TD
    A["① (1) → (2)"] --> B["② (2)"]
    B --> C["③ (3)"]
    C --> D["④ (4)"]
    D --> E["⑤ (5)"]
①Beginning of stitching
Beginning stitching
1 Insert the needle a short distance from the beginning, and then pull the thread to bring the knot between the top and backing fabric in order to hide it.

①Start of quilting
②2 to 3 cm (3/4 to 1-3/16 inches)
③Quilting lines
④Thread knot
⑤The thread knot is inside.
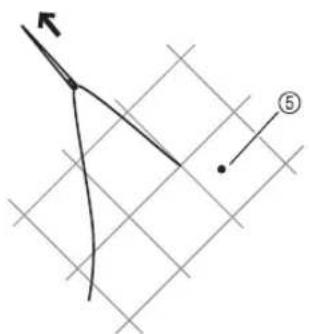
2 At the beginning of stitching, sew one backstitch.
Be sure to pass the needle through the three layers (top, quilt batting and backing fabric) when quilting.
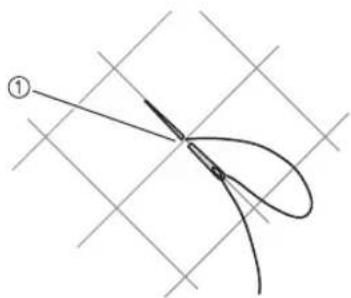
natural_image
Pure geometric diagram with intersecting curved lines and a labeled point (①), no text or symbols present.①Backstitch
Ending stitching
1 Sew one backstitch, make a french knot, and then insert the needle into the same hole again to bring the knot between the top and backing fabric in order to hide it.

①Backstitches
②Thread knot
③Top
④Quilt batting
⑤Back of fabric
⑥French knot
2 After quilting and removing the basting stitching, cut off the excess backing fabric and quilt batting, leaving for the bias tape a finished width of 7 mm (1/4 inch) from the edge of the top (patchwork).

①Top (patchwork)
②Cut off, leaving for the bias tape a finished width from the edge of the top.
8 Binding (Finishing Fabric Edges)
After quilting, cover the edges with bias tape to finish them.
Making bias tape
Make bias tape with a finished width of 7 mm (1/4 inch).
Draw a 35-mm-wide (1-3/8 inches) strip at a 45° angle on the fabric, and then cut it out.
Draw a line 7 mm (1/4 inch) from the edge of the bias tape.
Sew the strips together to a length of 15 to 20 cm (6 to 8 inches) plus the length of the four sides of the quilt.
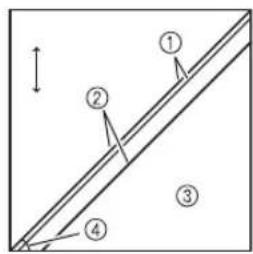
①7 mm (1/4 inch)
②35 mm (1-3/8 inches)
③Wrong side of fabric
④45°
Connecting bias tape sections
With their right sides together, align the ends of two sections, and then sew them together with 7 mm (1/4 inch) seam allowance.
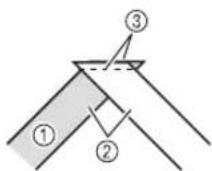
①Right side of fabric
②Right sides together
③7 mm (1/4 inch)
Binding
1 Align the 7 mm (1/4 inch) line with the stitching line of the quilt, and then sew. Fold over 1 cm (3/8 inch) of the end of the bias tape.

①7 mm (1/4 inch)
②Wrong side of bias tape
③Stitching line
④Fold over 1 cm (3/8 inch).
⑤Right side of quilt
2 At the corner, fold the bias tape out at a 45irc angle.

①45°
3 As shown in the illustration, fold it at a 90° angle, and then sew along the 7 mm (1/4 inch) line.

①7 mm (1/4 inch)
4 In the same way, sew all along the edges and return to the folded back end of the bias tape. Cut off any excess bias tape.

①Overlap the fold.
②Excess bias tape
5 Turn the quilt over, cover the seam allowance with the bias tape, and then finish it with blindstitching.
The corner will be mitered as shown in the illustration.
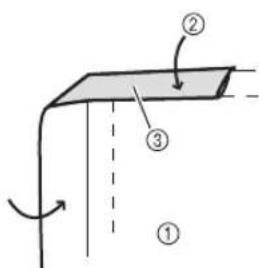
①Wrong side of fabric
②Fold in three
③Right side of bias tape

①Wrong side of fabric
②Blindstitch
③Fold in three

①Wrong side of fabric
②Mitered
③Blindstitch

①Mitered
②Right side of quilt

Memo
●Binding sewn with a sewing machine will be securely attached.
With binding sewn by hand, secure with a half-backstitch.


- Basic Quilting Guide - Making a Quilt -
- Preparing Materials and Equipment
- Cutting Pieces (Fabric)
- Check the fabric grain (weaving direction).
- If a seam allowance will be drawn, attach the fabric with the wrong side facing up.
- Select the patterns, and then arrange them. If the fabric grain and pattern angle are not aligned, rotate the pattern.
- Specify the seam allowance.
- Basic Hand Sewing Techniques
- Memo
- Thread knot
- Running stitch
- Blindstitch
- Backstitch
- French knot
- Seam starting or ending point Set in seam
- Sewing Pieces Together to Make the Top (Patchwork)
- Sewing method
- Sewing appliqués
- Note
- Drawing Quilting Lines
- Sample quilting lines
- Diagonal grid
- Diagonals
- In-the-ditch
- Outline
- Grid
- Block
- Basting
- Quilting
- Quilting order
- Beginning stitching
- Ending stitching
- Binding (Finishing Fabric Edges)
- Making bias tape
- Connecting bias tape sections
- Binding
Brand : BROTHER
Model : ScanNCut CM250
Category : Paper Cutter