USER MANUAL LWR734E16Q AEG
Welcome to AEG! Thank you for choosing our appliance.

In our drive to be sustainable, we are reducing paper assets and provide full user manuals online. Access your full user manual at aeg.com/manuals

Get usage advice, brochures, troubleshooting, service and repair information at aeg.com/support

Buy accessories, consumables, and original spare parts for your appliance at aeg.com/shop
Subject to change without notice.
CONTENTS
- SAFETY INFORMATION......2
- SAFETY INSTRUCTIONS......6
- PRODUCT DESCRIPTION....7
- TECHNICAL DATA....9
- INSTALLATION....9
- CONTROL PANEL....14
- DIAL AND BUTTONS....17
- SETTINGS.... 22
- BEFORE FIRST USE....23
- THE AUTODOSE TECHNOLOGY (AUTODOSING)...... 23
- PROGRAMMES....30
- WI-FI - CONNECTIVITY SETUP 38
- DAILY USE....40
- DAILY USE - WASHING & DRYING......44
- DAILY USE - DRYING ONLY....46
- FLUFF IN THE FABRICS......47
- HINTS AND TIPS......48
- CARE AND CLEANING.... 50
- TROUBLESHOOTING....58
- CONSUMPTION VALUES....62
- QUICK GUIDE......64
- ENVIRONMENTAL CONCERNS....69

Before beginning the installation and use of this appliance, carefully read the supplied instructions.
The manufacturer is not responsible for any injuries or damage that are the result of incorrect installation or usage.
Always keep the instructions in a safe and accessible location for future reference.
1.1 Children and vulnerable people safety

WARNING!
Risk of suffocation, injury or permanent disability.
- This appliance can be used by children aged from 8 years and above and persons with reduced physical, sensory or mental capabilities or lack of experience and knowledge if they have been given supervision or instruction concerning the use of the appliance in a safe way and understand the hazards involved.
- Children between 3 and 8 years of age and persons with very extensive and complex disabilities shall be kept away from the appliance unless continuously supervised.
- Children of less than 3 years of age should be kept away from the appliance unless continuously supervised.
- Children should be supervised to ensure that they do not play with the appliance.
- Keep all packaging away from children and dispose of it appropriately.
- Keep detergents away from children.
- Keep children and pets away from the appliance when the door is open.
- If the appliance has a child safety device, it should be activated.
- Children shall not carry out cleaning and user maintenance of the appliance without supervision.
1.2 General Safety
- This appliance is for washing and drying domestic-type machine-washable and dryable laundry only.
- Do not use the dryer function if laundry has been soiled with industrial chemicals.
- This appliance is designed for single household domestic use in an indoor environment.
- This appliance may be used in offices, hotel guest rooms, bed & breakfast guest rooms, farm guest houses and other similar accommodation where such use does not exceed (average) domestic usage levels.
- Do not change the specification of this appliance.
- The appliance shall be installed as a freestanding product or below the kitchen worktop if space margins permit.
- Do not install the appliance behind a lockable door, a sliding door or a door with a hinge on the opposite side, that would prevent the appliance door from being fully open.
- Connect the mains plug to the mains socket only at the end of the installation process. Make sure that the mains plug is accessible after installation.
- The ventilation opening in the base must not be covered by a carpet, mat, or any floor covering.
- WARNING: The appliance must not be supplied through an external switching device, such as a timer, or connected to a circuit that is regularly switched on and off by a utility.
- Ensure good air ventilation in the room where the appliance is installed to avoid the backflow of unwanted gases into the room from appliances burning gas or other fuels, including open fires.
- Exhaust air must not be discharged into a flue which is used for exhausting fumes from any appliances burning gas or other fuels.
- The operating water pressure at the water entry point from the outlet connection must be between 0.5 bar (0.05 MPa) and 10 bar (1.0 MPa).
- The appliance maximum load is 10.0 kg. Do not exceed the maximum load of each programme (refer to the "Programmes" chapter).
- The appliance must be connected to the water mains using the new supplied hose sets, or other new hose sets supplied by the Authorised Service Centre.
- Old hose sets must not be reused.
- If the mains power supply cable is damaged, it must be replaced by the manufacturer, its Authorised Service Centre or similarly qualified persons to avoid an electrical hazard.
- Wipe away lint or packaging debris that has accumulated around the appliance.
- Items that have been soiled with substances such as vegetable or mineral oil, acetone, alcohol, petrol, kerosene, spot removers, turpentine, waxes and wax removers should be washed separately with an extra amount of detergent before being dried in the washer dryer.
- Do not use the appliance if items have been soiled with industrial chemicals.
- Do not dry unwashed items in the wash dryer.
- Items such as foam rubber (latex foam), shower caps, waterproof textiles, and rubber backed articles and clothes, or pillows fitted with foam rubber pads should not be dried in the washer dryer.
- Fabric softeners, or similar products, should only be used as specified by the product manufacturer's instructions.
- Remove all objects from items that could be a source of fire ignition such as lighters or matches.
- WARNING: Never stop the washer dryer before the end of the drying cycle unless all items are quickly removed and separated so that residual heat can dissipate.
- The final part of the washer dryer cycle takes place without heat (cool down cycle) to ensure that items reach a temperature that will not cause damage to them.
- Do not use high pressure water sprays and/or steam to clean the appliance.
- Clean the appliance with a moist cloth. Use only neutral detergents. Do not use abrasive products, abrasive cleaning pads, solvents or metal objects.
- Before any maintenance operation, deactivate the appliance and disconnect the mains plug from the socket.
2. SAFETY INSTRUCTIONS
2.1 Installation

The installation must comply with relevant national regulations.
- Follow the installation instructions supplied with the appliance.
- Do not install or use the appliance where the temperature can be less than 0°C or where it is exposed to the weather. Always keep the appliance vertical when it is being moved. Make sure that there is air circulation between the appliance and the floor.
- Remove all the packaging and the transit bolts.
- The floor area on which the appliance is to be installed must be flat, stable, heat resistant and clean.
- Keep the transit bolts in a safe place. If the appliance is to be moved in the future, they must be reattached to lock the drum to prevent internal damage. Always take care when moving the appliance as it is heavy. Always use safety gloves and enclosed footwear.
- Do not install or use a damaged appliance.
- Do not install the appliance where the appliance door cannot be fully opened.
- Adjust the feet to have the necessary space between the appliance and the flooring.
- When the appliance is in its permanent position, check if it is levelled correctly with the aid of a spirit level. If it is not, adjust the feet accordingly.
2.2 Electrical Connection

WARNING!
Risk of fire and electric shock.
- WARNING: This appliance is designed to be installed / connected to a grounding connection in the building. Always use a correctly installed shockproof socket.
- Do not use multi-plug adapters and extension cables.
- Do not pull the mains cable to disconnect the appliance. Always pull the mains plug.
- Do not touch the mains cable or the mains plug with wet hands.
2.3 Water Connection
• The inlet water shall not exceed 25 °C. - Do not cause damage to the water hoses. - Before connection to new pipes, pipes not used for a long time, where repair work has been carried out or new devices fitted (water meters, etc.), let the water flow until it is clean and clear. - Ensure that there are no visible water leaks during and after the first use of the appliance. - Do not use an extension hose if the inlet hose is too short. Contact the Authorised Service Centre for the replacement of the inlet hose. - When unpacking the appliance, it is possible to see water flowing from the drain hose. This is due to the testing of the appliance with the use of water in the factory. - You can extend the drain hose to maximum 400 cm. Contact the Authorised Service Centre for the other drain hose and the extension. • Make sure that there is access to the tap after the installation.
2.4 Use

WARNING!
Risk of injury, electric shock, fire, burns or damage to the appliance.
- Do not put flammable products or items moistened with flammable products in, near or on the appliance.
- Do not touch the glass door while a programme operates. The glass can get hot.
- Do not dry damaged (torn, frayed) items that contain padding or fillings.
- If laundry has been washed with a stain remover, carry out an additional rinse cycle before starting a drying cycle.
- Make sure that all metal objects are removed from the laundry.
- Dry only fabrics that are suitable to dry in the appliance. Follow the cleaning instruction on the item label.
- Do not sit or stand on the open door of the appliance.
- Do not dry dripping wet clothes in the appliance.
- Do not let hot items to touch the plastic parts of the appliance.
- Remove a detergent ball (if used) before starting a drying programme.
- Do not use a detergent ball if setting a non-stop programme.
2.5 Service
• To repair the appliance, contact the Authorised Service Centre. Use original spare parts only. - Please note that self-repair or non-professional repair can have safety consequences and might void the guarantee. - The following spare parts are available for at least 10 years after the model has been discontinued: motor and motor brushes, transmission between motor and drum, pumps, shock absorbers and springs, washing drum, drum spider and related ball bearings, heaters and heating elements, including heat pumps, piping and related equipment including hoses, valves, filters and aquastops, printed circuit boards, electronic displays, pressure switches, thermostats and sensors, software and firmware including reset software, door, door hinge and seals, other seals, door locking assembly, plastic peripherals such as detergent dispensers. The duration may be longer in your country. For further information, please visit our website.
3. PRODUCT DESCRIPTION
3.1 Special features
Your new washer-dryer meets all modern requirements for effective treatment of laundry with low water, energy and detergent consumption and proper care of fabric.
- The Wi-Fi connection and Remote Start enable you to start a cycle, to interact with your washing machine and to check the washing cycle status in remote control.
- The ProSense technology detects the laundry load size defining the programme
circuit boards, electronic displays, pressure switches, thermostats and sensors, software and firmware including reset software, door, door hinge and seals, other seals, door locking assembly, plastic peripherals such as detergent dispensers. The duration may be longer in your country. For further information, please visit our website.
- Please note that some of these spare parts are only available to professional repairers, and that not all spare parts are relevant for all models.
- Concerning the lamp(s) inside this product and spare part lamps sold separately: These lamps are intended to withstand extreme physical conditions in household appliances, such as temperature, vibration, humidity, or are intended to signal information about the operational status of the appliance. They are not intended to be used in other applications and are not suitable for household room illumination.
2.6 Disposal
- Disconnect the appliance from the mains electrical and water supplies.
- Cut off the mains electrical cable close to the appliance and dispose of it.
- Remove the door catch to prevent children or pets from becoming trapped in the drum.
- Dispose of the appliance in accordance with local requirements for the disposal of Waste Electrical and Electronic Equipment (WEEE).
duration in 30 seconds. The washing programme is tailored to the laundry load and the type of fabric without consuming more time, energy and water than necessary.
- The STEAM mode is a quick and easy way to refresh the clothes. The gentle steam phase removes odours and reduces creases in dry fabrics so they need little ironing.
The steam relaxes the fibres and reduces fabric creasing. Ironing will be easier!
- The AutoDose technology automatically dispenses the right amount of detergent according to the load; the drawer has two integrated tanks (detergent + softener or second detergent type) and two additional chambers for detergent and additives manual load. It gives the highest use flexibility.
- The AEG Steam Fragrance - thanks to the steam mode - offers the perfect
solution for refreshing even the most delicate garments without washing. Use the delicate fragrance exclusively developed by AEG to add a pleasant feeling of "just-washed" garment to the removing odours and wrinkles action.
3.2 Appliance overview
1 Worktop 2 Detergent dispenser with AutoDose tanks and manual compartments 3 Control panel 4 Door handle 5 Rating plate 6 Drain pump filter
7 Feet for levelling the appliance 8 Drain hose 9 Inlet hose connection 10 Mains cable 11 Transit bolts 12 Hose support
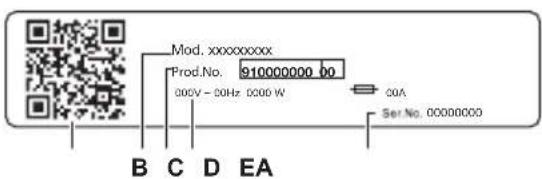
The rating plate reports:
A. QR code B. Model name C. Product number D. Electrical ratings E. Serial number
Scan the QR code with the camera to download our App from the app store on your smart device and follow the required steps. Register your product and get the most out of it.
- Access your appliance details, documentation and articles on how to use the best features (User Manual also available at aeg.com/manuals) • Get usage advice, troubleshooting, service and repair information (also available at aeg.com/support) • Buy accessories, Consumable and Original Spare parts for your appliance (also available at aeg.com/shop)
4. TECHNICAL DATA
| Dimension Width/ Height/ Total depth 59.7 cm /84.7 cm /66.0 cm |
| Electrical connection Voltage | | 230 V |
| Overall power | 2100 W |
| Fuse | 10 A |
| Frequency | 50 Hz |
| Level of protection against ingress of solid particles and moisture ensured by the protective cover, except where the low voltage equipment has no protection against moisture | IPX4 |
| Water supply 1) | Cold water |
| Water supply pressure Minimum | 0.5 bar (0.05 MPa) |
| 10 bar (1.0 MPa) |
| Maximum wash load Cotton 10.0 kg | |
| Maximum dry load Cotton | 6.0 kg |
| 4.0 kg |
1) Connect the water inlet hose to a water tap with a 3/4" thread.
5. INSTALLATION

WARNING!
Refer to Safety chapters.
5.1 Unpacking

WARNING!
Remove all the packaging and the transit bolts before installing the appliance.

WARNING!
Read all the installation instructions before proceeding.

WARNING!
Use the gloves.
- Remove the external film. If necessary, use a cutter.
- Remove the cardboard top and the other packaging materials.
- Remove the internal film.
- Open the door, remove the piece from the door seal and all the items from the drum.
- Carefully put the appliance down on its rear side.
- Put the front packaging element on the floor under the appliance.

Make sure not to damage the hoses.
- Remove the protection from the bottom.

- Pull up the appliance in vertical position.
- Remove the power supply cable and the drain hose from the hose holders.

It is possible to see water flowing from the drain hose. This is due to the testing with water of the appliance in factory.

- Remove the three bolts.

- Pull out the plastic spacers.
- Put the plastic caps, that you find in the user manual bag, in the holes.


We recommend that you keep the packaging and the transit bolts for any movement of the appliance.

Accessories delivered with the appliance may vary depending on the model.
5.2 Positioning and levelling
- Install the appliance on a flat hard floor.

Make sure that carpets do not stop the air circulation below the appliance. Make sure that the appliance does not touch the wall or other units.
- Loosen or tighten the feet to adjust the level.

WARNING!
Do not put cardboard, wood or equivalent materials below the appliance feet to adjust the level.
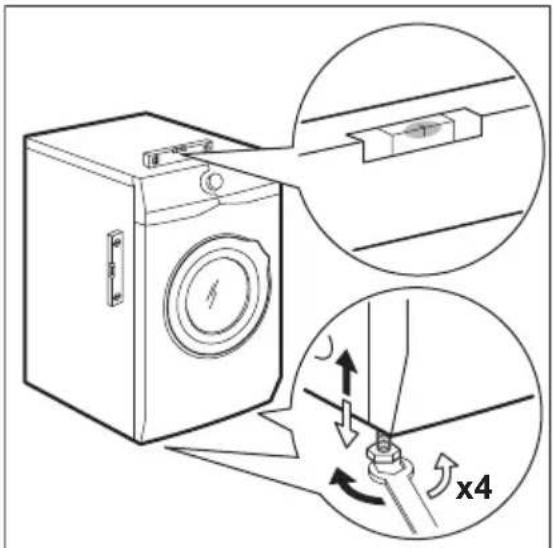
The appliance must be level and stable.

A correct adjustment of the appliance level prevents the vibration, noise and the movement of the appliance when in operation.

When the appliance is installed on a plinth, use the accessory described in chapter 'Accessories'. Read carefully the instructions supplied with the appliance and with the accessory.

5.3 Wooden Floor installation
If you install the appliance in a wooden floor please make sure to use fixing plates to secure appliance feet.
Read carefully the instructions supplied with the accessory.
5.4 The inlet hose
- Connect the water inlet hose to the back of the appliance if needed. Usually, it is
already installed at the factory.
- Position it toward left or right depending on the position of the tap. Make sure that the inlet hose is not in vertical position.
- If necessary, loosen the ring nut to set it in the correct position.
- Connect the water inlet hose to the cold water tap with 3/4" thread.
Some models can contain an inlet hose with a water stop device. It prevents any leaks in the hose because of its natural ageing. The sector in the window shows this fault A. If this occurs, close the water tap and contact the authorized service center for information to replace the hose.


WARNING!
The inlet water shall not exceed 25° C.

CAUTION!
Make sure that there are no leaks from the couplings.

Do not use an extension hose if the inlet hose is too short. Contact the service centre for information on inlet hose replacement.
5.5 Water-stop device
The inlet hose has a water stop device. This device prevents water leaks in the hose because of its natural ageing.
The red sector in the window «A» shows this fault.
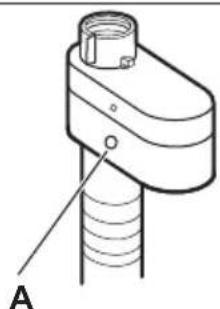
If this occurs, close the water tap and contact the authorized service centre to replace the hose.
5.6 Water drainage
The drain hose should be positioned at a height of not less than 60 cm and not more than 100 cm from the floor.

You can extend the drain hose to a maximum of 400 cm. Contact the authorized service center to purchase the additional drain hose and extension.
It is possible to connect the drain hose in different ways:


(*) Subject to change without notice.
- Connect the drain hose to the spigot and tighten it with a clamp.
- Position the hose directly to a built-in drain pipe in the room wall and tighten it with a clamp.
- Without the plastic hose guide, to a sink spigot - put the drain hose in the spigot and tighten it with a clamp.
- To a stand pipe with vent hole - insert the drain hose directly into a drain pipe or stand pipe.
- The drain hose can be bent into a U shape and put around the plastic guide. On the edge of a sink - fasten the guide to the water tap or to the wall.
i
Make sure that the drain hose makes a loop to prevent particles going into the appliance from the sink.
i
Make sure that the plastic guide cannot move when the appliance drains and the drain hose end is not immersed in the water. There may be a return of dirty water into the appliance.
Buy accessories from an authorized supplier.
i
The end of the drain hose must always be ventilated, i.e. the inner diameter of the drain pipe (min. 38 mm - min. 1.5") must be larger than the external diameter of the drain hose.
5.7 Electrical connection
At the end of installation you can connect the mains plug to the mains socket.
The rating plate and the 'Technical Data' chapter indicate the necessary electrical ratings. Make sure that they are compatible with the mains power supply.
Check that your domestic electrical installation can take the maximum load required, also taking into account any other appliances may also be in use.
Connect the appliance to an earthed socket.

The power supply cable must be easily accessible after installing the appliance.
For any electrical work required to install this appliance, contact our Authorised Service Centre.
The manufacturer does not accept any responsibility for damage or injury through failure to comply with the above safety precaution.
6. CONTROL PANEL
6.1 Control panel description
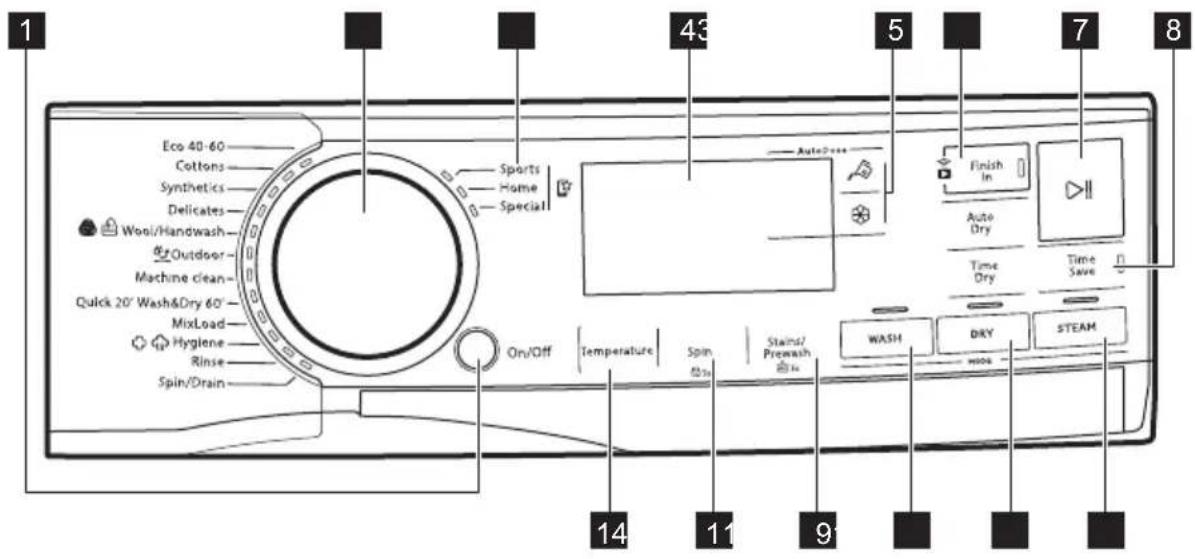
i
The options are not selectable with all washing programmes. Check the compatibility between options and washing programmes in the "Options compatibility with programmes" paragraph in the "Programmes" chapter. An option can exclude another one, in this case the appliance doesn't allow you to set the incompatible options together.
Make sure the screen and touch buttons are always clean and dry.
1 On/Off push button ① 2 Programme dial 3 Favourite programmes 4 Display 5 AutoDose Liquid Detergent and Fabric Softener touch buttons 6 Finish In touch button and Remote Start touch button 📋 7 Start/Pause touch button
8 Time Save touch button 9 STEAM mode touch button 10 DRY mode, Time Dry and Auto Dry touch buttons 11 WASH mode touch button 12 Stains/Prewash touch button and permanent Extra Rinse option 📁3s 13 Spin touch button and permanent Child Lock option 📋 3s 14 Temperature touch button
6.2 Display

| Washing phase indicator. It flashes during pre-wash and wash phase. |
| Rinsing phase indicator. It flashes during rinse phase. |
| Spinning and draining phase indicator. It flashes during spin and drain phase. |
| Drying phase indicator. |
| Steam phase indicator. |
| Anti-crease phase indicator (available via APP only). |
| Door locked indicator. |
| Add garments indicator: it lights on when the programme starts and the user can still pause the appliance and add more laundry. |
| Eco programme indicator: it lights on when the selected programme and options have an eco profile. |
| Finish In indicator. |
| ProSense | ProSense indicator. |
| Remote connection indicator.Wi-Fi connection indicator. |
 | The digital indicator can show:Programme duration (e. g., washing and/or drying phase).[WAG2]The time shown when the programme is set could not correspond to effective duration and change after ProSense phase.Maximum load.Finish in time (e. g., 2hCycle end ( )DWarning code (e.g.)E20Liquid detergents and softener quantity indicator: 88ml . Refer to "The AutoDose technology (Autodosing)" chapter.When working with the APP: , (access point), (update). Please refer to the chapter 'Wi-FI - Connectivity setup'. |
 | Maximum load indicator. The value is shown for three seconds after programme selection, alternated with cycle duration. |
 | Maximum laundry indicator. It blinks if the laundry amount exceeds the declared load. |
 | AutoDose liquid detergent tank indicator. When it lights, appliance automatically doses the detergent. |
 | These indicators will appear next to and when increasing or decreasing the automatic detergent or softener dosage. |
 | AutoDose status indicator. It lights when AutoDose function for additives is disable. |
 | These indicators appears when setting the automatic detergent or softener dosage. (refer to "The AutoDose technology (Autodosing)" chapter) |
| Indicators for options downloadable via App only |
| [3AWS] | Drying time indicator. |
 | Iron drying indicator. |
 | Cupboard drying indicator. |
 | Extra drying indicator. |
 + + | Linked mode indicator. It lights when both AutoDose tanks are linked and filled with the same detergent. AutoDose function for softener is disable: the indicator disappears and the display shows two liquid detergent tank indicators.These indicators will appear next to and when increasing or decreasing the automatic detergent or softener dosage. |
| 88° | The Temperature area:Temperature indicatorCold water indicator |
| 1888 | The spin area:Spin speed indicatorNo Spin indicator. Spin phase is off. |
| dB | Extra Silent indicator. |
| Rinse hold indicator. |
| Child safety lock indicator. |
| Pre-wash indicator. |
| Stain indicator. |
| Extra Rinse indicator. |
7.1 On/Off ①
Pressing this button for a few seconds activates or deactivates the appliance. Two different tunes sound while switching the appliance on or off.
As the Stand-by function automatically deactivates the appliance to decrease energy consumption in some cases, you may need to activate the appliance again.

The default selected programme, at machine switch on, is always the Eco 40-60 programme, also after wake up from standby.
For more details, refer to the Stand-by paragraph in the Daily Use chapter.
7.2 Programme dial
By rotating the programme dial it is possible to select the desired programme.
7.3 Favourite programmes

These selector positions are available after the appliance has been connected to Wi-Fi.
The favourite programmes can be set and saved via App only, choosing from the available ones which are divided into the three categories indicated on the control panel.
Once the favourite programmes have been set, you can select one of them via App or by turning the programme dial to the relevant position: the relevant LED comes on and the information on the display is updated accordingly.

The favourite programmes can be cancelled through the related App command or by pressing the Factory Default key combination.
7.4 Introduction
The options/functions are not selectable with all washing programmes. Check the compatibility between options/functions and washing programmes in the "Programme Chart". An option/function can exclude another one, in this case the appliance doesn't allow you to set the incompatible options/functions together. Make sure the screen and touch buttons are always clean and dry.
7.5 AutoDose Liquid Detergent and Fabric Softener
By means of this buttons you can:
• : activate and deactivate the automatic detergent loading. • : activate and deactivate the automatic fabric softener loading.
Refer to "The AutoDose Technology (Autodosing)" chapter for more details.
7.6 Finish In
Set this option as last after program and other options selection, otherwise it can be cancelled if you change some setting.
This option allows choosing the time within which a program should terminate. The program end can be postponed by one 1 hour every button touch until 24 hours maximum.
The display shows the normal program duration alternatively with the set programme end time (expressed in hours 0h). The minimum selectable time corresponds to rounded up hour of the maximum duration of a program (e.g. if the cycle duration lasts 3:15 hours, the minimum selectable time will be 4h).
After programme start, the door is locked and the appliance starts the ProSense phase. When load estimation ends, on the display the icon of running phase blinks and the time digit counts down in steps of one hour and in steps of 1 minute during the last hour.
Remote start
To activate it:
- Touch the Finish In button. The remote indicator ▶ starts blinking.
- Touch the Start/Pause button within 3 seconds to confirm it. The related icon ▶ appears steadily on display and the door is locked.
i
If you set a program via App and it does not match with the knob position, APP text appears alternating with program duration.
The remote start can be deactivated in different ways:
- before the cycle has started: touch this button and then press the Start/Pause ▷∥ button within 3 seconds: the door unlocks;
- after the cycle has started: press the Start/Pause button - the door unlocks - and then touch this button;
- switch the appliance on and off;
- at the end of the cycle, when the door unlocks.
7.7 Remote start
A quick touch of this button activates the Remote Start function that allows you to start, pause and stop the appliance remotely.
The related led comes on and the related icon appears on display.
i
If you set a programme via App and it does not match with the knob position, APP text appears alternating with programme duration.
Press and hold this button for longer time to provide two other functions:
- Hold it down for 3 seconds until a click sounds: the Wi-Fi is turned on and off.
- Hold it down for 10 seconds until a double beep sounds and — appears on the display: to reset the Network Credentials.
7.8 Start/Pause ▷∥
Touch the Start/Pause Button to start, pause the appliance or interrupt a running programme.
7.9 Time Save
With this option you can decrease the programme duration.
- If your laundry is normally or lightly soiled, it may be advisable to shorten the washing programme. Touch this button once to decrease the duration.
- In case of smaller load, touch this button twice to set an extra quick programme. In this case, the temperature 95°C is not selectable.
The LED of the button is on and the display shows the set programme duration.
i
This option can also be used to shorten the steam mode duration.
7.10 Temperature
When you select a washing programme, the appliance automatically proposes a default temperature.
Touch this button repeatedly until the desired temperature value appears on the display.
When the display shows the indicators and -, the appliance does not heat the water.
7.11 Spin
When you set a programme, the appliance automatically selects the default spin speed.
Touch this button repeatedly to:
- Change the spin speed.
i
The display shows only the spin speeds available for the set programme.
- Activate the Rinse Hold option.
The water of the last rinse is not drained out to prevent the fabrics from creasing. The washing programme ends with water in the drum and the final spin phase is not performed.
The display shows the indicator □ The drum turns regularly to reduce creasing.
The door stays locked. The drum turns regularly to reduce creasing. You must drain the water to unlock the door.
Touch Start/Pause button: the appliance performs the spinning phase and drains the water.
- Activate the Extra silent option.
All spinning phases (intermediate spin and final spin) are suppressed and the programme ends with water in the drum. This helps to reduce creasing.
As the programme is very quiet, it is suitable for use at night time when cheaper electricity tariffs are available. In some programmes the rinses are performed with more water.
The display shows the indicator √
The door stays locked. The drum turns regularly to reduce creasing. You must drain the water to unlock the door.
Touch the Start/Pause button: the appliance performs only the draining phase.
- No Spin - - -
Set this option to deactivate all spin phases. The display shows the indicator
---. The appliance performs only the draining phase of the selected washing programme. Set this option for very delicate fabrics. The rinses phase uses more water for some washing programmes.
i
The appliance empties the water out automatically after approximately 18 hours.
7.12 Stains/Prewash
Press this button repeatedly to activate one of the two options or both.
The relevant indicator comes on in the display.
- Stains
By setting this option, the indicator + appears close to detergent symbol, and the appliance will automatically dose an extra amount of detergent when automatic detergent tank is enabled. If automatic detergent tank is Off, it is possible to run this option as in traditional appliance by filling detergent or additive in the manual compartment.
i
If you press detergent tank button while Stains option is active, AutoDose function is switched off, but Stains option still remains active in manual mode.
- Prewash
Use this option to add a pre-wash phase at 30 °C before the washing phase. This option is recommended for heavily soiled laundry, especially if containing sand, dust, mud and other solid particles.
i
When selecting a pre-wash phase and AutoDose is active, the appliance will automatically dose the detergent. When AutoDose is switched off, put the detergent/additive in a dosing ball inside the drum.
The options can increase the programme duration.
7.13 WASH mode
When the appliance is switched on, the led of this button lights on to indicate that a washing cycle will be performed.
If you press this button when drying or steam mode are active, the cycle returns to wash only mode. In this way you can cancel drying and steam mode during set up, or the drying mode if you pause the cycle before the drying phase starts.
7.14 DRY mode
Press this button once to add a drying phase at the end of washing phase. Both WASH and DRY leds light on.
Press this button twice to perform a drying phase only. Only the DRY is on.
To return to wash only mode, press the WASH during set up or when you pause the cycle before the drying phase starts.
7.15 Time Dry
In the programme where it is selectable, touch this button to set the time that suits the fabrics you have to dry (refer to "Timed drying" table). The display shows the set value.
The drying mode must be already set.
Each time you touch this button the time value increases by 5 minutes.
You cannot set all time values for different types of fabrics.
7.16 Auto Dry
First activate the drying mode by means of relevant button and then touch this button to set one of 3 automatic dryness levels proposed by the appliance.
On the display the relevant dryness indicator goes on:
- Iron dry. Laundry to be ironed.

- Cupboard dry: laundry to be put in store.

- Extra-dry: laundry to be fully dried.

You cannot set all automatic levels for each type of fabrics.
7.17 STEAM mode
The STEAM mode can be used for reducing wrinkles and odours on garments (such as cottons, synthetics, mixed fabrics, including delicates and woollens) that just need to be refreshed, in just 25 or 30 minutes (depending on the programme) avoiding washing.
The fabric fibres are relaxed and afterwards ironing becomes effortless. When the cycle is completed, quickly remove the laundry from the drum. The recommended maximum load is 1 kg.
The indicator blinks on the display during steam phase.
The cycle duration can be reduced to 15 minutes by using the Time Save option.
DO NOT set this mode with the following types of items:
- Items that are not suitable for tumble drying.
- Items with the label "Dry clean only".

Do not use any detergent!
The STEAM mode does not remove particularly intense odors and does not perform any hygienic cycle.
After the steam treatment, the laundry may be damp. Hang items out for a few minutes.
The fragrance (AEG Steam Fragrance)
The AEG Steam Fragrance allows you to refresh even your delicate clothes, removing wrinkles and adding freshness with a gentle fragrance developed exclusively by AEG. By refreshing your garments with steam, rather than running full wash cycles, you will keep your clothes looking and feeling new longer. You can even safely use the fragrance with Cashmere and Steam programmes - if they are available - for delicate fabrics like cashmere and wool. When treating smaller loads, reduce the fragrance dosage and the cycle duration: in only fifteen minutes, your clothes will regain that "just washed" feeling.
Read carefully the instructions supplied with the fragrance.
DO NOT:
- Tumble dry the garments treated with fragrance. Its benefit would evaporate.
- Use the fragrance for purposes other than those described here.
- Use the fragrance on new garments. New garments may contain residual finishing compounds that are not compatible with it.

The fragrance is available on the AEG web shop or from authorized dealers.
8. SETTINGS
8.1 Introduction

When pressing a key combination, do not tilt your fingers downwards. The sensors of the underneath buttons are sensitive and may interfere with your choice.
8.2 Acoustic signals
This appliance is provided with different acoustic signals, that operate when:
- You activate the appliance (special short tune).
- You deactivate the appliance (special short tune).
- You touch the buttons (click sound).
- You make a wrong selection (3 short sounds).
- The programme is completed (sequence of sounds for about 2 minutes). • The appliance has a malfunction (sequence of short sounds for about 5 minutes).
- When a laundry overload is detected during ProSense phase (a double sound played once).
To activate/deactivate this option, hold down the DRY button until a beep or a double beep sounds.

If you deactivate this function, the acoustic signals stop playing at the end of the programme only.
8.3 Child Lock
With this option you can prevent children from playing with the control panel.
To activate/deactivate this option, hold down the Spin button until ☐ comes on/goes off on the display.
The appliance will default to this option after you switch it off.
With this option you can permanently have an extra rinse when you set a new programme.
To activate/deactivate this option, hold the Stains/Prewash button pressed for 3 seconds until the indicator comes on/goes off on the display.
When it is activated, the appliance will default to this option after you switch it off or change/reset the programme.

This option increases the programme duration.
9. BEFORE FIRST USE
i
During installation or before first use you may observe some water in the appliance. This is residual water left in the appliance after a full functional test in the factory to ensure the appliance is delivered to customers in perfect working order and is no cause for concern.
- Make sure that all transit bolts have been removed from the appliance.
- Make sure that the electrical power is available and the water tap is open.
- Make sure to fill the AutoDose tanks with liquid detergent and fabric softener ✿. Refer to "AutoDose basic setting" paragraph in "The AutoDose technology" chapter.
- Pour 2 litres of water inside the drum.
This action activates the drain system.
- Set and start a programme for cotton at the highest temperature without any laundry in the drum.
This removes all possible dirt from the drum and the tub.
10. THE AUTODOSE TECHNOLOGY (AUTODOSING)
i
Read this chapter carefully.
10.1 Introduction
Right detergent and fabric softener dosage takes better care of the laundry and ensures good wash performances.
Too much detergent damages your clothes and too little doesn't ensure good wash performances.
This appliance is equipped with an auto dosing system able to automatically provide the right detergent and fabric softener dosage to preserve the fabric integrity and colour brightness.


AutoDose liquid detergent tank.

AutoDose fabric softener tank.
The appliance is pre-set by the factory to suit most users habits.
Once started the programme, the appliance will automatically release the right amount of detergent and softener according to the real fabric load, if AutoDose is activated and the
indicators and/or are visible on the display.
i
In some programmes, AutoDose is
deactivated (the indicators and/or are not displayed and the display shows OFF) because there are garments requiring special detergents or treatments. If this is the case, pour the detergent and other treatments in the proper manual filling compartment. Please refer to "AutoDose and options compatibility with programmes" in "Programmes" chapter.

i
Further explanations on AutoDose and activation of advanced settings are available downloading the APP.
10.2 Detergent dispenser with AutoDose tanks and manual compartments

When using detergent and any other treatments, always follow the instructions that you find on the packaging of the detergent products. We recommend not to exceed the maximum indicated level in each compartment (MAX
If both AutoDose tanks are enabled in the set programme, liquid detergent and fabric softener are automatically loaded.
If one of the AutoDose tank or both are disabled (OFF) in the set programme, proceed by manually filling in the proper manual compartment.

- AutoDose tanks for liquid detergent and fabric softener.

WARNING!
Do not put powder detergent in the AutoDose compartment.
- Manual compartment for washing phase: powder or liquid detergent.

When using liquid detergent, make sure that the special container for liquid detergent is inserted. Refer to the "Manual filling the detergent and additives" paragraph in this chapter. The liquid detergent container is supplied inside the drum.


• Manual compartment for liquid additives (fabric softener, fabric conditioner, starch). • MAX
Maximum level for detergent/
additives quantity.
10.3 AutoDose basic setting
The factory pre-set doses for a large load are 90 ml for detergent tank and 25 ml for fabric softener tank: the optimal configuration to meet majority of use condition. The appliance will use these settings to calculate the precise dosage for each wash based on load size.
However, under extreme conditions (very soft or very hard water) and particular type of detergent (such as super compact), we recommend to adjust the pre-set dosage by following the indication given on detergent and fabric softener container: e.g when using super compact detergent you may need to reduce the pre-set dosage considerably.
If the washing results are not satisfying or there is too much foam during washing, you may need to change the factory setting. Read in the paragraph 'AutoDose configuration mode' how to change the basic setting, but before:
- Identify the water hardness level. Check the water hardness level in your area. The levels are generally indicated as: soft, medium and hard. If necessary, please contact your local water authority to check the water hardness in your area.
- Identify the customized detergent dosage.
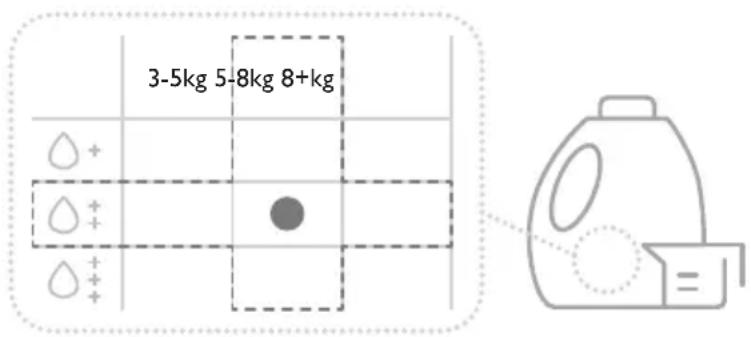
Check the label in the detergent/fabric softener container and identify the quantity to use. For the detergent the suggested quantity of detergent is the combination of three different factors:
• Water hardness level (see the following table); - Normal soil level;
- Rated capacity of the appliance (e.g. maximum load capacity 10.0 kg). If the rated capacity on the detergent container label refers to lower capacity appliances, the customized dosage should be increased by 20% referring to the proposed dosage.

As example for a machine with rated capacity 8 kg, medium water, normal soil level the dosage is recognised by the crossing in the detergent label dosages.
Water hardness levels
| Levels Water hardness range |
| °f1) | °d2) | °e3) | mmol/l ppm |
| Soft <15 <8 <10 <1.4 <140 |
| Medium 4) | 15 - 25 8 - 14 0 - 17 1.5 - 2.5 150 - 250 |
| Hard >25 >14 >17 >2.5 >250 |
1) French degrees 2) German degrees 3) English degrees 4) Factory setting, able to satisfy most of the use conditions.
10.4 AutoDose configuration mode

Enter the AutoDose configuration mode before proceeding with any programme setting. The configuration mode may cancel temporary settings.
- Press the On/Off ① button for a few seconds to activate the appliance.
- Wait about 10 seconds for appliance internal check.
- To enter configuration mode, hold pressed the Temperature and the Spin
buttons simultaneously for a few seconds until SET and the blinking detergent tank and softener tank indicators appear in the display. After 10 seconds without interacting with the control panel, the appliance exits configuration mode.

- Touch the related tank buttons to toggle the function off and on. The display shows OFF when a tank is disabled, or shows the tank indicator when it is enabled.

- To set the basic dosage, touch the related tank buttons until the default dosage laundry product and two arrows on the bottom of the display appear. Touch the Temperature button repeatedly to decrease the dosage and the Spin button to increase it: the minimum step is 1 ml (each single step) or 10 ml (when the button is held pressed).

- After about 10 seconds, the display returns to the programme information screen, or hold pressed the Temperature and the Spin buttons again to exit immediately.
10.5 Filling the detergent and additives on AutoDose system
i
Please read "Detergents and other treatments" in the "Hints and tips" chapter.
i
We recommend that you do not exceed the maximum indicated level (MAX).
- Open the detergent dispenser.

- Lift up the AutoDose cover lid.

- Gently pour only liquid detergent into the AutoDose detergent tank. Fill up to the maximum indicated level. MAX

- Gently pour only liquid softener into the AutoDose fabric softener tank. Fill up to the maximum indicated level. MAX

- Lower down the AutoDose cover lid.

- Gently close the detergent dispenser, till click engagement.

10.6 AutoDose low level indication

Do not refill the AutoDose tanks unless appliances indicates that one or both tanks are empty.
When the activated tank reaches a low level of detergent, related indicator blinks slowly and continuously on the display.
It will stop blinking when the compartment is refilled.
If tank is not refilled, once a programme has started, the indicator will stop blinking and stay steadily lit. Once the programme is finished, it will start blinking again.
Unless AutoDose is turned OFF, if a compartment has reached low level, the set dosage for that compartment will be shown by the display for a few seconds each time the drawer is opened, to remind refill is needed.
If in both tanks detergent level is low, both indicators blink, but only the set dosage for detergent will be displayed.

If the tanks are filled before the appliance is powered on for the first time, the AutoDose indicator will not blink.

CAUTION!
The tanks refill must be carried out with the same brand and type of detergent/fabric softener/additive used before, otherwise clean the tanks before refilling.
10.7 Switching from AutoDose to manual dosing
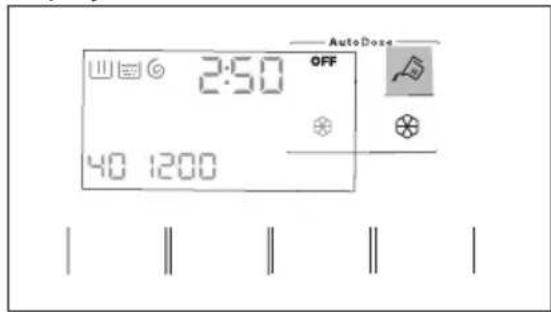
It is possible to disable AutoDose function for one or both tanks by pressing related button symbol.
Example:
- To switch Fabric Softener tank off, press the softener button until the display shows OFF.

- If you need to use a different detergent than the ones present in AutoDose tanks, you can switch Detergent tank off by pressing the detergent button until the display shows OFF.
10.8 Deactivating the AutoDose
If you want to use the machine ONLY manually, you can deactivate the AutoDose functionality. Once you have entered the AutoDose configuration mode by a long press of Temperature and the Spin buttons:
- Tap on the detergent button or the softener button until display shows OFF: the AutoDose is excluded completely for related tank or both.

- After about 10 seconds the display returns to the programme information screen.
10.9 Manual filling the detergent and additives
You may need to use a different detergent or fabric softener than the ones used in the AutoDose tanks. First, make sure that the AutoDose tanks are disabled and then pour the detergent and/or other treatments in the manual compartments.
i
Do not exceed the maximum indicated level (MAX)
- Open the detergent dispenser.

- Put the powder detergent in the compartment. When using liquid detergent, refer to "Manual filling the liquid detergent".

- If desired, pour the fabric softener in the
compartment Manual

- Gently close the detergent dispenser, till click engagement.

Manual filling of liquid detergent: 1. Insert the container for liquid detergent.

- Pour the liquid detergent into the compartment.

- Gently close the detergent dispenser until it clicks into place.


If the machine has not been used for more than 4 weeks with filled tanks, detergent/softener can become viscous or dry out. It is necessary to clean the drawer as indicated in the 'Care and Cleaning' chapter.
10.10 Drawer open indication
When a programme is running, the detergent drawer must always be closed.
A sensor in the drawer detects if the drawer is open (or not properly closed) while the programme is running. In such case, the appliance will immediately pause.
If you press the Start/Pause button, an error sound is generated and everything in
the display will turn off except the AutoDose indicators remain lit for a few seconds. Then the display returns to the previous paused state.
This will happen even if the user turned AutoDose off.
To restart the programme, ensure the drawer is properly closed and press Start/Pause ▷|| button.
11. PROGRAMMES
11.1 App and additional hidden programmes
The App provides you with a wide choice of additional hidden programmes. Connect the appliance to the App and you will be able to choose the programme that suits your needs most.
You can also memorize any of the hidden cycles in the favourite programme positions. To select the programme from the appliance directly, refer to the "Favourite programmes" paragraph in the "Dial and buttons" chapter.

Programme names are subject to change depending on market requirements without notice.
In the App you can find a complete description of each programme.
| Sportswear | Bed Linen | Baby | Easy Iron |
| Daily Training | Duvet | Denim | Anti-Allergy Vapour |
| Down Jackets | Towels | Linen | 1 Item Fast |
| Soccer/Rugby | Pet Hair | Business Shirts | |
| Skiing Gear | | Steam Cashmere | |
| Running Shoes | | | |
11.2 Programme Chart
| ProgrammeDefault temperatureTemperature range | Referencespin speedSpin speedrange | Maximumload | Programme description |
| Eco 40-60 (Wash only mode)_1)2) | -400 rpm 10.0 kg | | White cotton and fast-coloured cotton. Normally soiled items. |
| Eco 40-60 + Cupboard dry level (Wash & Dry mode)_3)2) | -400 rpm 6.0 kg | |
| Eco 40-60 + Cupboard dry level (Dry only mode) | -6.0 kg White cotton and fast-coloured cotton. |
| Cottons40 °C95 °C - Cold | -400 rpm 10.0 kg | | White cotton and coloured cotton. Normally, heavily and lightly soiled items. |
| Synthetics30 °C60 °C - Cold | 1200 rpm1200 rpm - 400rpm | 4.0 kg | Synthetic items or mixed fabric items. Normally soiled items. |
| Delicates30 °C40 °C - Cold | 1200 rpm1200 rpm - 400rpm | 2.0 kg | Delicate fabrics such as acrylics, viscose and mixed fabrics requiring gentler washing. Normally and lightly soiled items. |
| Wool/Handwash40 °C40 °C - Cold | 1200 rpm1200 rpm - 400rpm | 1.5 kg | Machine washable wool, hand washable wool and other fabrics with «hand washing» care symbol4). |
| Outdoor30 °C40 °C - Cold | | | Do not use fabric softener and make sure that there is no softener residue in the detergent dispenser. |
| 1200 rpm1200 rpm - 400rpm | 2.0 kg | Outdoor clothing, technical, sport fabrics, waterproof and breathable jackets, shell jackets with a removable fleece or inner insulation. |
| By performing a combined wash and dry programme, the drying phase also acts as water repellent restorer. Make sure that the garment care label permits tumble drying. |
| Machine Clean60 °C | 1200 rpm1200 rpm - 400rpm | - | Maintenance cycle with hot water to clean and freshen the drum and to remove residue that may cause odour. Before running this cycle, remove all items from the drum. Pour a cup of chlorine bleach or a washing machine cleaner in the washing phase compartment of the detergent dispenser. DO NOT use both together5).If you set the DRY mode with this program, the appliance will perform a cycle to remove fluff inside the drum. |
| Quick 20' Wash&Dry60'30 °C40 °C - 30 °C | 1200 rpm 1.0 kg Programme to treat up to 1 kg ofmixed syntheticshirtsload in 20 minutes only. Add a drying phase to have a complete wash&dry treatment in 60 minutes. |
| MixLoad30 °C60 °C - 30 °C | 1600 rpm1600 rpm - 400rpm | 5.0 kg | Cotton and mixed synthetic fabrics. Ideal to wash your daily load in a short time, for a better clothes care and good cleaning already at 30°C. |
| Hygiene60 °C | rpm - 400 rpm 10.0 kg | White cotton items. This high-performance wash programme combined with steam vapour, removes more than 99,99% of bacteria and viruses6) keeping the temperature above 60°C throughout the washing phase; with an additional action on the fibers thanks to a vapour phase, an enhanced rinsing phase ensures a proper removal of detergent and micro-organism residues. This programme ensures also a proper reduction of pollens/allergenic items. |
| Rinse | rpm - 400 rpm 10.0 kg | | To rinse and spin the laundry. All fabrics, except woollens and very delicate fabrics. Reduce the spin speed accordingly to the type of laundry. |
| Spin/Drain | rpm - 400 rpm 10.0 kg | | To spin the laundry and to drain the water in the drum. All fabrics, except woollens and delicate fabrics. |
1) According to Commission Regulation EU 2019/2023. This programme at default temperature and spin speed, in washing only mode, with rated capacity 10.0 kg is able to clean normally soiled cotton laundry declared to be washable at 40 °C or 60 °C, together in the same cycle.
i
For the reached temperature in the laundry, the programme duration and other data, please refer to 'Consumption Values' chapter.
The most efficient programmes in terms of energy consumption are generally those that perform at lower temperatures and longer duration.
2) The temperature of this programme is not visible and indicated, it is automatically set. 3) According to Commission Regulation EU 2019/2023. This programme at default temperature and spin speed, in washing and drying mode, with rated capacity 6.0 kg and with Cupboard dry level performs the wash and dry cycle able to clean normally soiled cotton laundry declared to be washable at 40 °C or 60 °C, together in the same cycle and, after drying phase, the laundry can be immediately stored in a cupboard. 4) During this cycle the drum rotates slowly to ensure a gentle wash. It can seem that the drum doesn't rotate or doesn't rotate properly, but this is normal for this programme. 5) After the drum cleaning, run a further rinse cycle with empty drum and no detergent to remove any residue of bleach. 6) Tested for Staphylococcus aureus, Enterococcus faecium, Candida albicans, Pseudomonas aeruginosa and MS2 Bacteriophage in external test performed by Swissatest Testmaterialien AG in 2021 (Test Report No. 202120117).
Programme options compatibility

AutoDose
| Programme | Eco 40-60 | Cottons | Synthetics | Delicates | Wool/Handwash | Outdoor | Machine Clean | Quick 20' Wash&Dry 60' | MixLoad | Hygiene | Rinse | Spin/Drain |
| Options |
| AutoDose Deter-gent | ■■■■ | ■ | ■ | | | | | | | | | |
| AutoDose Fabric Softener | ■■■■ | ■■■ | | | | | | | | | | |
| Others | | | | | | | | | | | | |
| Spin (Spin reduc-tion) | ■■■■■■ | ■■■■ | | | | | | | | | | |
| Rinse Hold | ■■■■■ | ■■■ | | | | | | | | | | |
| dBExtra Silent | ■■■ | | | | | | | | | | | |
| No Spin | | | | | | | | | | | | ■1) |
| Stains2) | ■■ | ■ | | | | | | | | | | |
| Prewash | ■■ | | | | | | | | | | | |
| Extra Rinse | ■■■ | ■ | ■■■ | | | | | | | | | |
| Auto Dry | ■3) | ■▲▲▲▲▲▲▲■ | | | | | | | | | | |
| Time Dry ■■■■■ | ■■ | | | | | | | | | | | |
| Time Save4) | ■■■ | | | | | | | | | | | |
| STEAM5) | ■■■■ | ■■ | | | | | | | | | | |

1) If you set the No Spin option, the appliance performs draining only. 2) This option is not available with temperature lower than 40 °C. 3) Not selectable with Iron Dry level. 4) If you set the shortest duration, we recommend that you decrease the load size. It is possible to fully load the appliance, however the washing results can be less satisfactory. 5) The steam phase duration can be reduced by means of the Time Save button.
▲ = Only Cupboard dry level is available.
Suitable detergents for each programme
| Programme Universal powder1) | Liquid Univer-sal | Liquid for col-oureds | Delicates woollens | Special |
| Eco 40-60 ▲ ▲ ▲ -- -- | | | | |
| Cottons ▲ ▲ ▲ -- -- | | | | |
| Synthetics ▲ ▲ ▲ -- -- | | | | |
| Delicates -- -- -- ▲ ▲ | | | | |
| Wool/Handwash -- -- -- ▲ ▲ | | | | |
| Outdoor -- -- -- ▲ ▲ | | | | |
| Quick 20' Wash&Dry 60' | -- ▲ ▲ -- -- | | | |
| MixLoad -- ▲ ▲ -- -- | | | | |
| Hygiene ▲ ▲ -- -- ▲ | | | | |
1) At temperature higher than 60 °C the use of powder detergent is recommended. ▲ = Recommended -- = Not recommended
11.3 Woolmark Wool Care - Blue

- The wool wash cycle of this machine has been approved by The Woolmark Company for the washing of wool garments labelled as “hand wash” provided that the products are washed
11.4 Automatic drying
according to the instructions on the garment label and those issued by the manufacturer of this washing machine. M1230.
- The wool drying cycle of this machine has been tested and approved by The Woolmark Company. The cycle is suitable to dry wool garments which are labelled "hand wash" provided that the garments are washed in a Woolmark endorsed hand washing cycle and dried according to the instructions issued by the manufacturer. M1224.
The Woolmark symbol is a Certification mark in many countries.

Initial cycle times for programmes with Auto Dry option are only estimates, the actual drying time may slightly differ from the time displayed.
Dryness Level Type of fabric Load
| [57X8]Extra DryFor towelling materials | Cottons and Linen(bathrobes, bath towels, etc) | up to 6.0 kg |
| [C2A/W6] | Cottons and Linen(bathrobes, bath towels, etc) | up to 6.0 kg |
| Synthetics and mixed fabrics(jumpers, blouses, underwear, household and bed linen) | up to 4.0 kg |
| Delicate fabrics(acrylics, viscose and delicate mixed fabrics) | up to 2.0 kg |
| Wool items(woollen jumpers) | up to 1.0 kg |
| Outdoor sporting garments(outdoor clothing, technical, sport fabrics, waterproof and breathable jackets, shell jackets) | up to 2.0 kg |
Dryness Level Type of fabric Load
Iron Dry Suitable for ironing
Cottons and Linen (sheets, tablecloths, shirts, etc) up to 6.0 kg 11.5 Timed drying
| Dryness Level Type of fabric Load (kg) | Spin speed (rpm) | Suggested duration (mins) |
| Extra DryFor towelling materials | Cottons and Linen(bathrobes, bath towels, etc) | 6.01600 | 245 - 265 |
| 4.0 | | 1600 | 165 - 185 |
| 2.0 | | 1600 | 125 - 135 |
| Cupboard DryFor items to be stored | Cottons and Linen(bathrobes, bath towels, etc) | 6.01600 | 235 - 255 |
| 4.0 | | 1600 | 155 - 175 |
| 2.0 | | 1600 | 115 - 125 |
| Synthetics and mixed fabrics(jumpers, blouses, underwear, household and bed linen) | 4.01200 | 135 - 145 |
| 1.0 | | 1200 | 40 - 50 |
| Delicates(acrylics, viscose and delicate mixed fabrics) | 2.01200 | 140 - 160 |
| 1.0 | | 1200 | 70 - 80 |
| Wool(woollen jumpers) | 1.01200 | 110 - 130 |
| Outdoor sporting garments(outdoor clothing, technical, sport fabrics, water-proof and breathable jackets, shell jackets) | 2.01200 | 140 - 160 |
| 1.0 | | 1200 | 70 - 80 |
| Iron DrySuitable for ironing | Cottons and Linen(sheets, tablecloths, shirts, etc) | 6.01600 | 170 - 190 |
| 4.0 | | 1600 | 105 - 125 |
| Dryness Level Type of fabric Load (kg) | Spin speed (rpm) | Suggested duration (mins) |
| 2.0 | 1600 | 75 - 85 |
12. ⓤWI-FI - CONNECTIVITY SETUP
This chapter describes how to connect the smart appliance to the Wi-Fi network and to link it to mobile devices.
By this functionality you can receive notifications, control and monitor your appliance from your mobile devices.
The Wi-Fi functionality is off as factory default setting.
To connect the appliance to enjoy the full range of features and services you need:
- Wireless network at home with internet connection enabled.
- Mobile device connected to wireless network.
Wi-Fi module parameters
| Frequency | 2.412 - 2.472 GHz for European market |
| Protocol IEEE 802.11b/g/n |
| Encryption WPA, WPA2, WPA3 |
12.1 QR code on rating plate
QR code can be used in two ways:
- Scan the QR code with the built-in camera app to download our app from the App store on your smart device and follow the required steps.
- Pairing your smart device with appliance to simplify the process. Scan the QR code with QR code scanner built-in our app.
12.2 Installing and configuring the App

The App allows you to control your laundry through a mobile device.
It contains a large number of programmes, useful features and product information tailored perfectly to the appliance.
Through the app you can select the programmes already available from the appliance control panel, plus unlock additional programmes available only from a mobile device.
Additional programmes can change over the time along with new versions of the app.
It's personalized laundry care - all from your mobile device.
When connecting the appliance to the application, stand near it with your mobile device.
Make sure that your mobile device is connected to the wireless network.
- Go to the App Store on your smart device or scan QR code (see 'QR code on rating plate' paragraph).
- Download and install our app.
- Start the application. Select the country and language and login with your email and password. If you do not have an
account, create a new one following the instructions in the App.
- Follow the instructions on the App for the appliance registration and configuration.
12.3 Configuring the appliance wireless connection
- Press the On/Off button for a few seconds to activate the appliance. Wait about 10 seconds before proceeding with wireless configuration.
- Select a programme by turning the programme dial.
- Press and hold the Finish In and the Auto Dry buttons simultaneously for a few seconds until a 'click' sounds. Release the buttons. Appears on the display for 5 seconds and the indicator starts blinking.
The wireless module begins starting up.


Make sure that your APP is ready for connection.
- After about 10 seconds, (Access Point) appears on the display.

The access point will be open for about 5 minutes.
- Configure the App on your smart device and follow the instructions to connect the appliance to your Wi-Fi network.
- If the connectivity is configured, when the programme information screen returns, the indicator is on the display.


Every time you switch the appliance on, the appliance takes about 10 seconds to connect to the network automatically. When the indicator stops blinking the connection is ready.
To switch the wireless connection off, press and hold the Finish In and the Auto Dry buttons simultaneously for a few seconds until the first acoustic signal. Release the buttons. Off appears on the display for 5 seconds.

If you switch the appliance off and on again, the wireless connection is automatically off.
To remove the wireless credentials, press and hold the Finish In and the Auto Dry buttons simultaneously for a few seconds until the second acoustic signal: —— appears on the display for a few seconds.
12.4 Remote Start
The Remote Start enables you to start a cycle in remote control.

The Remote Control activates automatically when you press the Start/Pause button to start the programme, but it is also possible to start a washing programme remotely. This function is deactivated when door is open.
When the App is installed and the wireless connection is complete, you can activate the Remote Start:
- Touch the Remote Start button and the indicator blinks on the display for a few seconds.

- Touch the Start/Pause button to activate the Remote Start before the indicator stops blinking.
The indicators and appear on the programme summary screen and the door is locked. Now it is possible to start the programme remotely.
i
When touching the Start/Pause ▷|| button after the indicator □□□ stops blinking, the Remote Start is not activated, but the set programme starts.
To remove the Remote Start, tap on the Remote Start button and confirm by pressing the Start/Pause button.
12.5 Over-the-air update
The App may propose an update for your appliance.
The update is accepted via App only.
If a programme is running, the App notifies that the update will start at the end of the programme.
During the update, the appliance shows UPd in the display.
Do not switch off or unplug the appliance during update.
The appliance will be usable again at the end of the update, without any notification about successful update.
If an error occurs, the appliance shows Err in the display: just press any buttons or turn the knob to return to normal use.
12.6 Wi-Fi Always On
The Wi-Fi Always On function is available in the App.
This function keeps the appliance connected to the network even when the appliance is turned off.
The indicator goes on and off intermittently.
It is possible to turn the appliance on by pressing the On/Off button or through the App.
i
The Wi-Fi Always On function may affect your energy consumption.
13. DAILY USE

WARNING!
Refer to Safety chapters.
13.1 Activating the appliance
- Connect the mains plug to the mains socket.
- Open the water tap.
- Press the On/Off button for a few seconds to activate the appliance.
A short tune sounds. The appliance automatically proposes a default programme. The relevant indicator illuminates.
The display shows the default programme, Eco 40-60, cycle duration, the maximum load (for a few seconds), the default temperature,
the default spin speed and the indicators of the phases making up the programme.
13.2 Loading the laundry
- Open the appliance door.
- Shake the items before you put them in the appliance.
- Put the laundry in the drum, one item at a time.
Make sure not to put too much laundry in the drum.
Close the door firmly.


CAUTION!
- Make sure that no laundry stays between the seal and the door. There is a risk of water leakage or damage to the laundry.
- Washing heavily oiled, greasy stains could cause damage to rubber parts of the appliance.
13.3 Using detergent and other treatments
If both AutoDose tanks are enabled in the set programme, detergent and fabric softener are automatically loaded.
If one of the AutoDose tanks or both are disabled (OFF) in the set programme, proceed by manually filling the product in the proper compartment.
13.4 Setting a programme

If you wish to change the automatic detergent or fabric softener dosage, enter the AutoDose configuration mode before proceeding with any programme setting. The configuration mode may cancel temporary settings. Please refer to "AutoDose configuration mode" paragraph in "The AutoDose Technology (Autodosing)" chapter.
- Turn the programme dial to select the desired washing programme. The related programme indicator comes on.
The Eco 40-60 is the default proposed programme when the appliance is turned on, the one to which the information of the energy label relates.
The indicator of the Start/Pause button flashes.
The display shows an indicative programme duration, the maximum declared load for the set programme (only for a few seconds), the default temperature, the default spin speed and the washing phase indicators (when available).
- To change the temperature and/or the spin speed, touch the related buttons.
- If desired, set one or more options by touching the related buttons. The related indicators come on in the display and the given information changes accordingly.

In case a selection is not possible an acoustic signal sounds.
13.5 Starting a programme

WARNING!
Make sure that the detergent dispenser is firmly closed, otherwise programme won't start.
Touch the Start/Pause button to start the programme.
The related indicator stops flashing and stays on.
The programme starts, the door is locked.
The display shows the indicator :
i
The drain pump can operate shortly before the appliance fills water.
13.6 Starting a programme with the Finish In option
- Touch this repeatedly until the display shows the desired time within the programme should end. The indicator comes on.
- Touch the Start/Pause button.
The drum starts rotating to perform the ProSense estimation, if foreseen in the selected programme.
- The appliance starts the countdown to the end of the programme and the programme will start at the right moment to end at the time set through this option.
To change or cancel this option:
- Switch the appliance off using the On/Off button.
- Switch the appliance on again.
- Set the programme again.
13.7 The ProSense load detection
ProSense
i
The programme duration shown on the display refers to a medium/high load.
After setting a washing programme, the
ProSense icon lights up on the display if the programme supports it.
After touching the Start/Pause button, the ProSense starts the laundry load detection:
- The appliance detects the load in the first 30 seconds: the indicator flashes, the bars under the icon move back and forth, and the drum rotates briefly.
- When the drum stops rotating, the display shows the new programme duration, which may increase or decrease, adjusted
according to the load detected. The number of bars indicates the load in quarters (from 1 to 4, with 4 bars in case of overload), and the maximum declared load indicator comes on again. After a further 30 seconds, the water filling starts.
i
In case of drum overload, the maximum declared load indicator
comes on again with the MAX indicator blinking. In this case, during these 30 seconds, it is possible to pause the appliance and remove the exceeding garments.
Once removed the exceeding garments, touch the Start/Pause ▷∥ button to start the programme again. The ProSense phase can be repeated up to three times (see point 1).
Important! If the laundry amount will not be reduced, the washing programme starts anyway, despite the overload. In this case, it will be not possible to guarantee the best washing results.
i
About 20 minutes after the programme start, the programme duration could be adjusted again depending on the capacity of water absorption of the fabrics.
i
The ProSense detection is carried out with complete washing programmes only (no skipping phase selected).
i
The ProSense is not available with some programmes, such as Wool/Handwash, programmes with short cycles and without washing phase.
13.8 Programme phase indicators
When the programme starts the indicator of the running phase flashes and the other phase indicators are steady on.
E.g. the washing or pre wash phase is
running:

When the phase ends, the relevant indicator stops flashing and remains steady on. The next phase indicator starts flashing.
For example, the rinse phase is running:

If you select the STEAM option, the steam phase indicator comes on.
13.9 Interrupting a programme and changing the options
When the programme is running, you can change only some options:
- Touch the Start/Pause button. The related indicator flashes.
- Change the options. The information shown in the display changes accordingly.
- Touch the Start/Pause button again. The washing programme continues.
13.10 Cancelling a running programme
- Press the On/Off button to cancel the programme and deactivate the appliance.
- Press the On/Off button again to activate the appliance.
Now, you can set a new washing programme.

If the ProSense phase is already carried out and the water filling is already started, the new programme starts without repeating the ProSense phase.
The water and the detergent are not drained out in order to avoid waste. The display shows the maximum duration of the programme, updating it about 20 minutes after the starting of the new programme.
13.11 Opening the door - Adding garments
While a programme or the delay start operates, the appliance door is locked.

If the temperature and level of the water in the drum are too high and/or the drum still rotates you cannot open the door.
You can easily open the door for adding or removing some items when the icon is lighted on.
- Touch the Start/Pause button.
In the display the related door lock indicator goes off.
- Open the appliance door. If necessary, add or remove the items.
- Close the door and touch the Start/Pause button.
The programme or the delay start continues. When the icon + goes off, the door can be opened when the programme is complete. You may also set a spinning or draining programme/option and then press Start/Pause button. If the spin and drain programmes are not available in the programme dial, they can be set via App.
13.12 End of the programme
When the programme has finished, the appliance stops automatically. The acoustic signals operate (if they are active).
In the display all washing phase indicators become steady and the time area shows
The indicator of the Start/Pause button goes off.
The door unlocks and the indicator goes off.
MAX flashes at the end of the programme in case of overloaded drum.
- Press the On/Off button to deactivate the appliance.
After five minutes from the end of the programme, the energy saving function automatically deactivates the appliance.
i
When you activate the appliance again, it proposes Eco 40-60 as default programme. Turn the programme dial to set a new cycle.
- Remove the laundry from the appliance.
- Make sure that the drum is empty.
- Keep the door and the detergent dispenser slightly ajar to prevent mildew and odours.
- Close the water tap.
13.13 Draining water out after end of cycle
If you have chosen a programme or an option that does not empty out the water of the last rinse, the programme is completed, but:
- The display shows the indicator, the option indicator or and the door locked indicator. The indicator of the running phase shes.
- The drum still turns at regular intervals to prevent the creases in the laundry. • The door stays locked.
- You must drain the water to open the door:
- If necessary, touch the Spin button to decrease the spin speed proposed by the appliance.
- Touch the button:
- If you have set , the appliance drains the water and spins.
- If you have set, the appliance only drains the water.
The option indicator □ or dB goes off, while the indicator Ⓤ flashes and then goes off.
- When the programme is completed and the door locked indicator goes off, you can open the door.
- Press the On/Off button a few seconds to deactivate the appliance.
In any case, the appliance empties the water out automatically after approximately 18 hours.
13.14 Stand-by option
The Stand-by function automatically deactivates the appliance to decrease the energy consumption when:
- You do not use the appliance for 5 minutes before you touch the Start/Pause ▷II button.
Press the On/Off button to activate the appliance again.
• After 5 minutes from the end of the washing programme.
Press the On/Off button to activate the appliance again.
The appliance proposes Eco 40-60 as default programme.
Turn the programme dial to set a new cycle.
i
If you set a programme or an option that ends with water in the drum, the Stand-by function doesn't deactivate the appliance to remind you to drain the water.
i
If the Wi-Fi Always On function is active, only the indicator goes on and off intermittently.
14. DAILY USE - WASHING & DRYING

WARNING!
Refer to Safety chapters. This appliance is an automatic washer dryer.
14.1 NON-STOP programme - Washing and drying mode

Not all programmes are compatible with drying mode.
In some washing programmes, you can combine WASH and DRY mode for running a complete wash&dry programme. Proceed as follows:
- Press the On/Off button for some seconds to activate the appliance.
- Load the laundry one item at a time.
- Put the detergent and the additives in the appropriate compartment.
- Turn the programme dial to the washing programme. The display shows the default temperature and spin. If necessary, change them according to your laundry. The display also shows the maximum recommended load for washing phase.
- Set the desired options, if there are available.
- Touch the DRY mode button once to activate also the drying function. The leds of the WASH and DRY indicators come
on. The indicators and - appear in the display. The display also shows the maximum recommended load for a washing and drying programme (e.g. 6.0 kg for cottons).

When drying a large laundry load, make sure that the garments are not rolled up and that are uniformly distributed in the drum.
14.2 Washing and Drying - Automatic levels
The default level is the cupboard dry
— ≡ ≡ one. In some programmes you can change the drying level.
- Tap on the Auto Dry button repeatedly until the display shows the required
dryness level. The indicators in the display illuminate accordingly:
a. Iron dry for cotton items; b. Cupboard dry: for cotton and synthetic items; c. Extra-dry for cotton items.


The time value on the display is the duration of both cycles washing and drying.

To have a good drying by using less energy and in a shorter time, the appliance does not let you set a too low spin speed for the items to be washed and dried.
- Touch the Start/Pause button to start the programme. The ProSense estimation starts.
In the display the door locked indicator goes on, the indicator of the running phase starts flashing.
The display also shows the remaining programme time.
14.3 Washing and Timed Drying
You can also exclude the automatic drying mode, and choose a drying time manually:
- Tap on the Time Dry button repeatedly to set the desired time value (see the "Timed drying" table in the "Programmes" chapter). The Auto Dry I indicator goes off and the indicator comes on.
The minimum timed drying is 10 minutes. Each time you tap on this button the time value increases by 5 minutes. The display shows the set new time value.
- Touch the Start/Pause button to start the programme. The ProSense estimation starts.
In the display the door locked indicator comes on and the indicator of the running phase starts flashing.
The display also shows the remaining programme time.
14.4 At the end of the drying programme
• The appliance stops automatically. - The acoustic signals operate (if they are active). - In the display comes on. - The LED of the Start/Pause button goes off. The door locked LED goes off. - Press the On/Off button for some seconds to deactivate the appliance.

After some minutes from the end of the programme, the energy saving function deactivates the appliance automatically.
- Remove the laundry from the appliance.
- Make sure that the drum is empty.

After the drying phase, clean the drum, the seal, and the inside of the door with a wet cloth.
15. DAILY USE - DRYING ONLY

WARNING!
Refer to Safety chapters.

This appliance is an automatic washer dryer.
15.1 Preparation to drying
- Press the On/Off button for some seconds to activate the appliance.

With a drying-only programme the display does not show the maximum load and the ProSense estimation is deactivated.
- Load the laundry one item at a time.
- Turn the programme dial to the programme suitable for the items to dry.
- Tap on the DRY button twice to exclude washing and perform drying only. The LED of the DRY button is on. The indicators and - appear in the display.

When drying a large amount of laundry, to ensure good drying performance, make sure the laundry is not rolled up and is evenly distributed in the drum.
15.2 Drying - Automatic levels
The default level is cupboard dry.
In some programmes, you can change the drying level.
- Tap the Auto Dry button repeatedly until the display shows the required dryness level. The indicators on the display illuminate accordingly:
a. Iron dry: for cotton items; b. Cupboard dry: for cotton and synthetic items; c. Extra-dry: for cotton items.


The time value on the display is the duration of both the washing and drying cycles.
i
To achieve good drying results while using less energy and in a shorter time, the appliance does not allow you to set a spin speed that is too low for items to be washed and dried.
- Press the Start/Pause button to start the programme.
On the display, the door locked indicator turns on, and the indicator for the running phase starts flashing.
The display also shows the remaining programme time.
15.3 Timed Drying
You can also disable the automatic drying mode and choose a drying time manually:
- Tap the Time Dry button repeatedly to set the desired time value (see the "Timed drying" table in the "Programmes" chapter). The Auto Dry indicator turns off and the indicator comes on.
The minimum timed drying is 10 minutes. Each time you tap on this button the time value increases by 5 minutes. The display shows the set new time value.
- Touch the Start/Pause button to start the programme.
In the display the door locked indicator comes on and the indicator of the running phase starts flashing.
The display also shows the remaining programme time.
15.4 At the end of the drying programme
• The appliance stops automatically. - The acoustic signals operate (if they are active). - In the display comes on. - The led of the Start/Pause button goes off. The door locked goes off - Press the On/Off button for some seconds to deactivate the appliance.
i
After some minutes from the end of the programme, the energy saving function deactivates the appliance automatically.
- Remove the laundry from the appliance.
- Make sure that the drum is empty.
i
After drying phase, clean the drum, the seal and the inside of the door with a wet cloth.
16. FLUFF IN THE FABRICS
During the washing and/or drying phase, some types of fabric, (sponge, wool, sweatshirt) could release fluff.
The released fluff could stick to the fabrics during the next cycle.
This inconvenience increases with technical fabrics.
To prevent fluff in your laundry:
- Do not wash dark fabrics after you have washed and dried light-colored fabrics (hand towels, wool, sweatshirts), and vice versa.
- Dry this type of fabric in the open air when they are washed for the first time.
- Clean the drain filter. • After the drying phase, clean the empty drum, the gasket, and the door with a wet cloth.
To remove fluff from inside the drum, proceed as follows:
• Empty the drum. - Clean the drum, the gasket, and the door with a wet cloth. - Set the Machine Clean programme and the DRY mode.
- Touch the Start/Pause button to start the programme.
17. HINTS AND TIPS

WARNING!
Refer to Safety chapters.
17.1 The laundry load
- Divide the laundry into: white, coloured, synthetics, delicates, and wool.
- Follow the washing instructions on the laundry care labels.
- Do not wash white and coloured items together.
- Some coloured items can discolour with the first wash. We recommend that you wash them separately for the first couple of times.
- Turn multilayered fabrics, wool and items with printed illustrations inside out.
• Pre-treat stubborn stains.
- Wash stubborn stains with a special detergent.
- Be careful with curtains. Remove the hooks and put the curtains in a washing bag or pillowcase.
- A very small load can cause balance problems with the spin phase leading to excessive vibration. If this occurs:
a. interrupt the programme and open the door (refer to "Daily Use" chapter); b. manually redistribute the load so that the items are spaced evenly around the tub; c. press the Start/Pause button. The spin phase continues.
- Button up pillowcases, close zippers, hooks and poppers. Tie up belts, cords, shoelaces, ribbons and any other loose elements.
- Do not wash laundry without hems or with cuts. Use a washing bag to wash small and/or delicate items (e.g. underwired bras, belts, tights, shoelaces, ribbons, etc.).
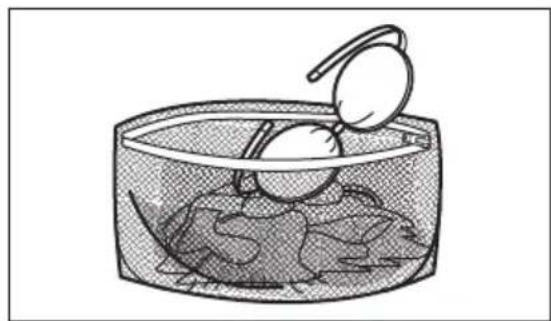
• Empty pockets and unfold the items.
17.2 Stubborn stains
For some stains, water and detergent is not sufficient.
We recommend that you pre-treat these stains before you put the items in the appliance.
Special stain removers are available. Use the special stain remover that is applicable to the type of stain and fabric.
Do not spray stain remover on garments near the appliance as it is corrosive to the plastic parts.

17.3 Detergent type and quantity
The choice of detergent and use of correct quantities not only affects your wash performance, but also helps to avoid waste and protect the environment:
- Use only detergents and other treatments specially made for washing machines. First, follow these generic rules:
- powder detergents (also tablets and single-dose detergents) for all types of fabric, excluding delicate. Prefer powder detergents containing bleach for whites and laundry sanitization,
- liquid detergents (also single-dose detergents), preferably for low temperature wash programmes (60 °C max) for all types of fabric, or special ones for woollens only.
- The choice and quantity of detergent will depend on: type of fabric (delicates, woollens, cottons, etc), the colour of clothes, size of the load, degree of soiling, wash temperature, time and hardness of the water used.
- Follow the instructions that you find on packaging of the detergents or other treatments without exceeding the indicated maximum level (MAX).
- Do not mix different types of detergents.
- Use less detergent if:
- you are washing a small load,
- the programme duration has been reduced by the Time Manager button.
- the laundry is lightly soiled,
- there is large amounts of foam during washing.
- When using detergent tabs or pods, always put them inside the drum, not in the detergent dispenser and follow the manufacturer's recommendations.
Insufficient detergent may cause:
• unsatisfactory washing results, • the wash load to turn grey, - greasy clothes, - mould in the appliance.
Excessive detergent may cause:
- sudsing,
- reduced washing effect,
- inadequate rinsing,
- a greater impact for the environment.
17.4 Savings tips
To save water, energy and detergent we recommend that you follow these tips:
- Normally soiled laundry may be washed without prewash in order to save detergent, water and time.
- Loading the appliance to the maximum capacity indicated for each programmes helps to reduce energy and water consumption.
- With adequate pre-treatment, stains and limited soiling can be removed; the laundry can then be washed at a lower temperature.
- To use the correct quantity of detergent, refer to the quantity suggested by the detergent producer and check the water hardness of your domestic system. Refer to 'Water hardness'.
- Set the maximum possible spin speed for the selected programme in order to save energy during drying.
- Preferably, use short cycles at lower temperatures.
17.5 Water hardness
If the water in your area is hard or medium hard, we recommend that you use a water softener additive for washing machines.
The water is hard or medium hard when the hardness exceeds 8dH.
In areas where the water is soft it is not necessary to use a water softener.
To find out the water hardness in your area, contact your local water authority.
Use the correct quantity of water softener. Follow the instructions that you find on the packaging of the product.
17.6 Prepare the drying cycle
- Open the water tap.
- Check if the drain hose is connected properly. Refer to installation chapter for more information.
- For the maximum laundry load of the drying programmes, refer to the drying programmes table.
17.7 Items not suitable for drying
Do not set a drying programme for this laundry:
- Synthetic curtains.
- Pieces of clothing with metal inserts.
- Nylon stockings.
- Quilts.
- Bed covers.
- Duvets.
- Anoraks.
- Sleeping bags.
- Fabrics with residue of hair sprays, nail solvents or similar.
- Garments with foam-rubber or materials similar to foam-rubber.
17.8 Garment labels
When you dry the laundry, obey the indications on the labels of the manufacturers:
• The item can be tumble dried • The drying cycle is at high temperature • The drying cycle is at reduced temperature • The item can not be tumble dried.
17.9 Drying cycle duration
The drying time can change depending on:
• speed of the last spin - dryness level - type of laundry
- weight of the load
17.10 Additional drying
If, at the end of the drying programme, the laundry is still damp, set a short drying cycle again.

WARNING!
To avoid creasing and shrinkage do not overdry the laundry.
17.11 General Tips
Refer to the «Timed drying» table to find the average drying times.
Experience will help you to dry the laundry better. Take note of the duration of the cycles done before.
To avoid the static charge at the end of the drying cycle:
- Use fabric conditioner in the washing cycle.
- Use special fabric conditioner for tumble dryers.
- Do not pour any detergent or softener before a drying cycle.
- Do not dry rough and smooth textiles together, to avoid scorching on smooth garments.
- Remove all objects from garment pockets, especially melting objects. When the drying programme is completed remove the laundry in a short time.
18. CARE AND CLEANING

WARNING!
Refer to Safety chapters.
18.1 Periodic cleaning schedule
Periodic cleaning helps to extend the life of your appliance.
After each cycle, keep the door and the detergent dispenser slightly open to get air circulation and dry the humidity inside the appliance: this will prevent mildew and odours.
If the appliance is not used for a long time: close the water tap and unplug the appliance.
Indicative periodic cleaning schedule:
| Descaling Twice a year |
| Maintenance wash Once a month |
| Clean door seal Every two months |
| Clean drum Every two months |
| Remove fluff inside the drum | Twice a month1) |
Clean detergent dispenser and AutoDose tanks Twice a year
Clean drain pump filter Twice a year
Clean the inlet hose and the valve filter Twice a year
1) Refer to "Fluff in the fabrics" chapter.
The following paragraphs explain how you should clean each part.
18.2 Removing foreign objects
i
Make sure that pockets are empty and all loose elements are tied up before running your cycle. Refer to "The laundry load" in "Hints and tips".
Remove any foreign objects (such as metal clip, buttons, coins, etc) that you may find in the door seal, the filters and the drum. Refer to "Door seal with double lip trap", "Cleaning the drum", "Cleaning the drain pump" and "Cleaning the inlet hose and the valve filter" paragraphs. If necessary, please contact the Authorised Service Centre.
18.3 External cleaning
Clean the appliance with mild soap and warm water only. Fully dry all the surfaces.
Do not use scouring pads or any scratching material.

CAUTION!
Do not use alcohol, solvents or chemical products.

CAUTION!
Do not clean the metal surfaces with chlorine-based detergent.
18.4 Descaling
i
If the water in your area is hard or medium hard, we recommend that you use a water softener for washing machines.
The water is hard or medium hard when the hardness exceeds 8dH.
Regularly examine the drum to check for limescale.
The regular detergents already contain water softening agents, but we recommend to run a cycle with empty drum and a descaling product occasionally.
i
Always follow the instructions that you find on the packaging of the product.
18.5 Maintenance wash
The repeated and prolonged use of low temperature and short programmes can cause detergent deposits, fluff residues, bacterial growth and biofilm formation inside the drum and the tub. This could generate bad odours and mildew.
To eliminate these deposits and hygienize the inner part of the appliance, run a maintenance wash at least once a month:
- Remove all laundry from the drum.
- Deactivate AutoDose function for detergent and softener.
- Run a cotton programme with the highest temperature with a small quantity of powder detergent or, if available, run the Machine Clean programme.
18.6 Door seal
This appliance is designed with a self cleaning draining system, allowing light fluff fibers that fall off the clothes to be drained out with the water. Regularly examine the seal. Coins, buttons, other small items can be recovered at the end of the cycle.

Clean it when needed, using ammonia cream cleanser agent without scratching the seal surface.
i
Always obey the instructions that you find on the packaging of the product.
18.7 Cleaning the drum
Regularly examine the drum to prevent unwanted deposits.
Rust deposits in the drum may occur due to rusting foreign body in the washing or tap water containing iron
Clean the drum with special products for stainless steel.
i
Always follow the instructions that you find on the packaging of the product. Do not clean the drum with acidic descaling products, scouring products containing chlorine or iron or steel wool.
For a thorough clean:
- Clean the drum with special products for stainless steel.
Always follow the instructions that you find on the packaging of the product.
- Remove all laundry from the drum.
- Deactivate AutoDose function for detergent and softener.
- Add a manually small quantity of powder detergent or a specific product into the empty drum, in order to rinse out any left residues.
18.8 Cleaning the detergent dispenser and the AutoDose tanks

CAUTION!
If you change detergent type as brand, concentration, and thickness, then it is suggested to clean the detergent drawer.
Before cleaning, make sure that the all compartments are empty.
To prevent possible deposits of dried detergent, clotted fabric softener, formation of mould in the detergent dispenser and/or clotted liquid additives in the AutoDose tanks, once in a while carry out the following cleaning procedure:
- Open the detergent dispenser. Press the catch as indicated in the picture and pull the detergent dispenser out.

- Remove the insert for the softener and, if inserted, the container for liquid detergent.

- Press the catch on the back as indicated in the picture and lift up the top cover to remove it.


- To remove any detergent residue or if you place wrong additives in the tanks, empty the drawer in a basin or in suitable containers to collect the liquid.

- Wash the drawer and all inserts under running water or clean it with a damp cloth.


CAUTION!
Do not use sharp or metal brushes and sponges. Do not wash drawer in a dishwasher.
- Turn the dispenser upside down and open the bottom cover as indicated in the picture.

- Make sure that all detergent residue is removed from the conveyor. Use only soft damp clothes.
- Put bottom cover back to its position by aligning its holes on drawer hooks as indicated in the picture. Close it till "click" sound.


CAUTION!
Press the bottom cover as indicated in the picture. Make sure that it is closed properly.


WARNING!
Do not clean with any sharp and metal brushes or any tools, pumps or sensors allocated on the back of the detergent drawer. If necessary, use only soft damp clothes.


WARNING!
If some residues remain on the back area of tanks, soak detergent drawer in warm water. Do not use tools to clean it. Before soaking, remove the handle by pressing red button and slide the handle as indicated in the picture.

- Make sure that all detergent residue is removed from the upper and lower part of the recess. Use a small brush to clean the recess.

- Reassemble the drawer as follows: a. Place the handle if it was disassembled.
b. Place the bottom cover and press until a "click" sound is heard. c. Place the top cover on the tanks compartment and press until a "click" sound is heard. d. Replace components on the manual compartment.
- Insert the detergent dispenser into the guide rails and gently close it until a "click" sound is heard. Run the rinsing programme without any clothes in the drum.


To restore functionality, refill tanks with detergent and softener.
18.9 Cleaning the drain pump filter

WARNING!
Disconnect the mains plug from the mains socket.

Regularly check the drain pump filter and make sure that it is clean.
Clean the drain pump filter if:
• The appliance does not drain the water. • The drum does not turn. • The appliance makes an unusual noise because of the blockage of the drain pump. • The display shows the alarm code .E2 1

WARNING!
- Do not remove the filter while the appliance operates.
- Do not clean the pump if the water in the appliance is hot. Wait until the water cools down.
Proceed as described in the following diagrams to clean the pump filter:
Always keep a rag nearby to dry up any water spillages when removing the filter.
- Open the pump cover.
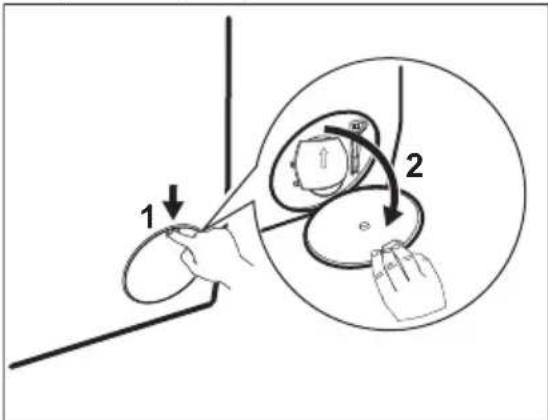
- Place a suitable bowl below the drain pump access to collect the water that flows out.
- Open the chute downwards. Always keep a rag nearby to dry up any water spillages when removing the filter.
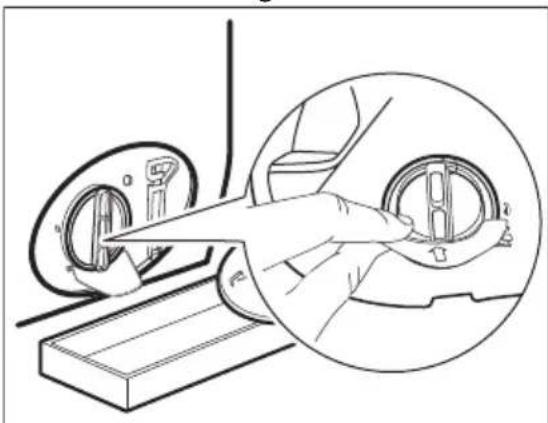
- Turn the filter 180 degrees in anti-clockwise direction to open it, without removing. Let the water flow out.

- When the bowl is full of water, turn the filter back and empty the container.
- Repeat steps 4 and 5 until the water stops flowing out.
- Turn the filter anti-clockwise to remove it.

- If necessary, remove fluff and objects from the filter recess.
- Make sure that the impeller of the pump can rotate. If it does not rotate, contact the Authorised Service Centre.

- Clean the filter under the water tap.

- Put the filter back into the special guides by turning it clockwise. Make sure that you tighten the filter correctly to prevent leakages.

- Close the pump cover.

When you drain the water with the emergency drain procedure, you must activate the drain system again:
a. Put 2 litres of water in the main wash compartment of the detergent dispenser. b. Start the programme to drain the water.
18.10 Cleaning the inlet hose and the valve filter
It is recommended to clean both the filters of the inlet hose and valve occasionally to remove any deposit collected over time:
- Remove the inlet hose from the tap and clean the filter.

- Remove the inlet hose from the appliance by loosening the ring nut.

- Clean the valve filter on the back of the appliance with a toothbrush.

- When you reconnect the hose to the back of the appliance, turn it left or right (not in vertical position) depending on the position of your water tap.

18.11 Emergency drain
If the appliance cannot drain the water, carry out the same procedure described in 'Cleaning the drain pump' paragraph. If necessary, clean the pump.
When you drain the water with the emergency drain procedure, you must activate the drain system again:
- Put 2 litres of water in the main wash compartment of the detergent dispenser.
- Start the programme to drain the water.
18.12 Frost precautions
If the appliance is installed in an area where the temperature can reach values around 0°C or drop below, remove the remaining water from the inlet hose and the drain pump.
- Disconnect the mains plug from the mains socket.
- Close the water tap.
- Put the two ends of the inlet hose in a container and let the water flow out of the hose.
- Empty the drain pump. Refer to the emergency drain procedure.
- When the drain pump is empty, install the inlet hose again.

WARNING!
Make sure that the temperature is higher than 0 °C before you use the appliance again.
The manufacturer is not responsible for damages caused by low temperatures.
19. TROUBLESHOOTING

WARNING!
Refer to Safety chapters.
19.1 Alarm Codes and Possible Failures
The appliance does not start or it stops during operation. First try to find a solution to the problem (refer to the tables).

WARNING!
Deactivate the appliance before carrying out any check.
With some problems, the display shows an alarm code and the Start/Pause Button may flash continuously:

If the appliance is overloaded, remove some items from the drum and/or keep pressed the door while touching the Start/Pause button until the indicator stops flashing (see the picture below).

Problem Possible solution
E11
The appliance does not fill with water properly.
• Make sure that the water tap is open. - Make sure that the pressure of the water supply is not too low. For this information, contact your local water authority. • Make sure that the water tap is not clogged. • Make sure that the inlet hose has no kinks, damages or bends. - Make sure that the connection of the water inlet hose is correct. - Make sure that the filter of the inlet hose and the filter of the valve are not clogged. Refer to 'Care and cleaning'.
| E21The appliance does not drain the water. | Make sure that the sink spigot is not clogged.Make sure that the drain hose has no kinks or bends.Make sure that the drain filter is not clogged. Clean the filter, if necessary. Refer to "Care and cleaning".Make sure that the connection of the drain hose is correct.Set the drain programme if you set a programme without drain phase. If the drain programme is not available in the programme dial, it can be set via App.Set the drain programme if you set an option which ends with water in the tub. |
| E41The appliance door is open or not closed correctly. | Make sure that the door is properly closed. |
| E91Internal fail. No communication between electronic elements of the appliance. | The programme was not finished properly or the appliance stopped too early.Switch the appliance off and on again.If the alarm code appears again, contact the Authorised Service Centre. |
| EH1: Frequency of power supply is out of range.EH2: Supply voltage is too high.EH3: Supply voltage is too low. |
| EF3The anti-flood device is on. | Disconnect the appliance and close the water tap. Contact the Authorised Service Centre. |
If the display shows other alarm codes, deactivate and activate the appliance. If the problem continues, contact the Authorised Service Centre. In case of different problem with the appliance check the table below for possible solutions.
Problem Possible solution
| The programme does not start. | Make sure that the mains plug is connected to the mains socket.Make sure that the appliance door is closed.Make sure that there is no damaged fuse in the fuse box.Make sure that the Start/Pause has been touched.If the delay start is set, cancel the setting or wait for the end of countdown.Make sure that the detergent dispenser is firmly closed.Deactivate the Child Lock function if it is on.Check the position of the knob on the selected programme. |
| The appliance fills with water and drains immediately. | Make sure that the drain hose is in the correct position. The hose may be positioned too low. Refer to "Installation instruction". |
| The spin phase does not operate or the washing cycle lasts longer than usual. | Set the spin programme. If the drain programme is not available in the programme dial, it can be set via App'.Make sure that the drain filter is not clogged. Clean the filter, if necessary. Refer to "Care and cleaning".Adjust manually the items in the tub and start the spin phase again. This problem may be caused by balance problems. |
| Problem Possible solution |
| There is water on the floor. | Make sure that the couplings of the water hoses are tight and there is not water leakages.Make sure that the water inlet hose and the drain hose have no damages.Make sure you use the correct detergent and the correct quantity of it. |
| You cannot open the appliance door. | Make sure that a washing programme that ends with water in tub, has not been selected.Make sure that the washing programme is finished.Set the drain or the spin programme if there is water in the drum. If the spin and drain programmes are not available in the programme dial, they can be set via App.Make sure that the appliance receives electrical power.This problem may be caused by a failure of the appliance. Contact the Authorised Service Centre.If you need to open the door, please read carefully "Emergency door opening".Make sure that the Remote Start Mode is not activated. Deactivate it. |
| The display does not show the wireless indicator | Check the wireless signal.Make sure that the wireless connection is on. Refer to paragraph "Configuring the washing machine wireless connection" in "Wi-Fi - Connectivity setup" chapter.Check your home network and router.Restart the router.Contact your wireless service provider if there are further problems with the wireless network. |
| The App cannot connect to the appliance. | Check the wireless signal.Check if your smart device is connected to the wireless network.Check your home network and router.Restart the router.Contact your wireless service provider if there are problems with the wireless network.The appliance, the smart device, or both, need to be configured again because a new router has been installed or the router configuration has been changed. |
| The App cannot frequently connect to the appliance. | Make sure that the wireless signal reaches the appliance. Try to move the home router as near the appliance as possible or consider purchasing a wireless range extender.Make sure the wireless signal is not disrupted by microwave. Turn the microwave off. Avoid using the microwave and the remote control at the same time. |
| The display shows UPdAll buttons are inactive, except the On/Off | The appliance is downloading any available updates. Wait until the update process is complete. If you deactivate the appliance during update, it resumes when you activate the appliance again. |
| The appliance makes an unusual noise and vibrates. | Make sure the levelling of the appliance is correct. Refer to "Installation instruction".Make sure that the packaging and/or the transit bolts are removed. Refer to "Installation instruction".Add more laundry in the drum. The load may be too small. |
Problem Possible solution
| The programme duration increases or decreases during programme execution. | · The ProSense System is able to adjust the programme duration according to the type and the laundry load size. Refer to "The ProSense System load detection" in "Daily Use" chapter. |
| The washing results are not satisfactory. | · Increase the detergent quantity or use a different detergent.· Use special products to remove the stubborn stains before you wash the laundry.· Make sure that you set the correct temperature.· Decrease the laundry load.· When using AutoDose tanks, make sure that they are not empty.· When using AutoDose tanks, verify the pre-set detergent/fabric softener dosage. Refer to "Basic setting" paragraph in "The AutoDose Technology" chapter.· Make sure that you have cleaned the AutoDose tanks before using different brand and type of detergent, fabric softener or other additives. |
| Too much foam in the drum during the washing cycle. | · Reduce the quantity of detergent or the number of tablets or single-dose detergents.· When using AutoDose tanks, verify the pre-set detergent/fabric softener dosage. Refer to "Basic setting" paragraph in "The AutoDose Technology" chapter. |
| The detergent/fabric softener level does not decrease in the AutoDose tanks after washing. | · This is normal: tanks are quite large and detergent consumption may be not so evident. |
| The appliance does not dry or does not dry correctly. | · Turn the water tap on.· Make sure the drain filter is not clogged.· Reduce the laundry load.· Make sure you have set the correct cycle. if necessary, set again a short drying time. |
| The laundry is full of different colours fluff. | The fabrics washed in the previous cycle released fluff of a different colour:· The drying phase helps to eliminate some fluff.· Clean the clothes with a fluff remover. In case of an excessive amount of fluff in the drum refer to "Fluff in the fabrics" paragraph for more details. |
After the check, activate the appliance. The programme continues from the point of interruption.
If the problem occurs again, contact the Authorised Service Centre.
The necessary data for the service centre are on the rating plate.
19.2 Emergency door opening
In case of power failure or functioning failure the appliance door remains locked. The washing programme continues when the power is restored. If the door remains locked in case of failure, it is possible to open it using the emergency unlock function.
Before opening the door:

CAUTION!
Risk of burns! Make sure that the water temperature is not too high and the laundry is not hot. If necessary, wait until they cool down.

CAUTION!
Risk of injury! Make sure that the drum is not rotating. If necessary, wait until the drum stops rotating.

Make sure that the water level inside the drum is not too high. If necessary, proceed with an emergency drain (refer to «Emergency drain» in «Care and cleaning» chapter).
To open the door, proceed as follows:
- Press the On/Off button to switch the appliance off.
- Disconnect the mains plug from the mains socket.
- Open the filter flap.
- Pull the emergency unlock trigger downward once. Pull it downward once again, keep it tensed and, in the meanwhile, open the appliance door.

- Take out the laundry and then close the appliance door.
- Close the filter flap.
20. CONSUMPTION VALUES
20.1 Introduction

The QR code on the energy label supplied with the appliance provides a web link to the information related to the performance of the appliance in the EU EPREL database. Keep the energy label for reference together with the user manual and all other documents provided with this appliance.
It is also possible to find the same information in EPREL using the link https://eprel.ec.europa.eu and the model name and product number that you find on the rating plate of the appliance.
20.2 According to Commission Regulation Eu 2019/2023
Washing only
| Eco 40-60 pro-gramme | kg kWh Litres hh:mm | %1) | °C | rpm2) |
| Full load 10.0 0.900 61.0 03:55 52.00 37.0 1551 |
| Half load 5.0 0.605 47.0 02:50 52.00 33.0 1551 |
Quarter load 2.5 0.200 38.0 02:30 54.00 23.0 1551
1) Remaining moisture at the end of the spinning phase. The higher is the spin speed, the higher is the noise and the lower is the remaining moisture. 2) Maximum spin speed.
Wash and dry cycle
| Eco 40-60 pro-gramme and Cup-board dry level | kg kWh Litres hh:mm | %1) | °C | rpm2) |
Full load 6.0 3.795 87.0 07:45 0.00 27.0 1551
Half load 3.0 1.980 58.0 05:00 0.00 25.0 1551
1) Remaining moisture at the end of the spinning phase. The higher is the spin speed, the higher is the noise and the lower is the remaining moisture. 2) Maximum spin speed.
Power consumption in different modes
| Off (W) Stand-by (W) Delay start (W) | Networked standby (W) |
| 0.50 0.50 4.00 | 2.001) |
Time to Off/Standby mode is 15 minutes maximum.
1) The energy consumption of the connected function is approximately 17.5 kWh per year. To disconnect this function, please refer to the chapter 'Wi-fi - Connectivity setup'.
20.3 Common programmes - Washing only
i
These values are indicative only.
| Programme | kg kWh Litres hh:mm | %1) | °C | rpm2) |
| Cottons3)95°C | 10.0 2.900 90.0 04:05 44.0 85.0 1600 | | | |
| Cottons60°C | 10.0 1.700 85.0 03:50 44.0 55.0 1600 | | | |
| Cottons4)20°C | 10.0 0.350 85.0 03:00 44.0 20.0 1600 | | | |
| Synthetics40°C | 4.0 0.800 55.0 02:15 35.0 40.0 1200 | | | |
| Delicates5)30°C | 2.0 0.400 60.0 01:05 35.0 30.0 1200 | | | |
| Wool30°C | 1.5 0.300 65.0 01:05 30.0 30.0 1200 | | | |
1) Remaining moisture at the end of the spinning phase. The higher is the spin speed, the higher is the noise and the lower is the remaining moisture. 2) Reference indicator of the spin speed. 3) Suitable for washing heavily soiled textiles. 4) Suitable for washing lightly soiled cottons, synthetic and mixed fabrics. 5) It also performs as quick washing cycle for lightly soiled laundry.
20.4 Common programmes - Wash and dry
i
These values are indicative only.
| Programme | kg kWh Litres hh:mm | %1) | °C | rpm2) |
| Synthetics40°C | 4.0 2.800 85.0 05:00 1.00 40.0 1200 | | | |
1) Remaining moisture at the end of the spinning phase. The higher is the spin speed, the higher is the noise and the lower is the remaining moisture. 2) Reference indicator of the spin speed.
21. QUICK GUIDE
21.1 Daily use
![graph LR A["1:20"] --> B["AutoDrive"] B --> C["3:50:40° 1200"] C --> D["✓"]](/content/2026/05/1011062/images/ecce9e0280d07b5c386aaff35e7dccc0d8617571a76685c9d8f2e1de80bec9e2.jpg)
- Connect the mains plug to the mains socket.
- Open the water tap.
- Push the On/Off button to turn the appliance on (1).
- Turn the programme dial to set the desired programme (2).
- Set the desired options by means of the corresponding touch buttons (3).
- Put the laundry in the drum, one item at a time without exceeding the maximum suggested load. Close the door and make sure that no laundry stays between the seal and the door.
- When using AutoDose tanks, the detergent and fabric softener are uploaded automatically. Make sure that tanks are not empty.
When using manual compartments, pour the detergent and other treatments in the proper compartment.

21.2 Cleaning the drain pump filter
1
2


3
Clean the filter regularly and, especially, if the alarm code appears on the display.

When using a liquid detergent in manual compartment, insert the container for liquid detergent.
- To start the programme, touch the Start/Pause button (4). • The appliance starts.
- At the end of the programme, remove the laundry.
- Push the On/Off button to turn the appliance off.
21.3 Programmes
| Programmes Load Product description |
| Eco 40-60_1)_2) | 10.0 kg3) | Low energy cycle for cottons. Decreases temperature and extends time to reach good washing results. |
| Cottons | 10.0 kg3) | White and coloured cotton fabrics. Ideal for normal and heavy soil. |
| Synthetics | 4.0 kg Synthetic items or mixed fabric items. |
| Delicates | 2.0 kg Delicate fabrics such as acrylics, viscose, polyester items. |
| Wool/Handwash | 1.5 kg Machine washable wool, hand washable wool and delicates. |
| Outdoor | 2.0 kg Modern outdoor sporting garments. |
| Machine Clean | - Maintenance cycle for drum cleaning. |
| Quick 20' Wash&Dry 60' | 1.0 kg Short programme to treat mixed synthetic shirts up to 1 kg. |
| MixLoad | 5.0 kg | Cotton and synthetic items. This programme ensures a good washing performance in a short time. |
| Hygiene | 10.0 kg3) | White cotton items. This programme removes more than 99,99% of bacteria and viruses4). It also ensure a proper reduction of allergens. |
| Rinse | 10.0 kg3) | All fabrics, except woollens and very delicate fabrics. Pro-gramme for rinsing and spinning. |
Programmes Load Product description
| Spin/Drain | 10.0 kg3) | To spin the laundry and to drain the water in the drum. All fabrics, except woollens and delicate fabrics. |
1) According to Commission Regulation EU 2019/2023. This programme at default temperature and spin speed, in washing only mode, with rated capacity 10.0 kg is able to clean normally soiled cotton laundry declared to be washable at 40 °C or 60 °C, together in the same cycle.

For the reached temperature in the laundry, the programme duration and other data, please refer to 'Consumption Values' chapter.
The most efficient programmes in terms of energy consumption are generally those that perform at lower temperatures and longer duration.
2) According to Commission Regulation EU 2019/2023. This programme at default temperature and spin speed, in washing and drying mode, with rated capacity 6.0 kg and with Cupboard dry level performs the wash and dry cycle able to clean normally soiled cotton laundry declared to be washable at 40 °C or 60 °C, together in the same cycle and, after drying phase, the laundry can be immediately stored in a cupboard. 3) The load of this programme is not visible on the display. 4) Tested for Staphylococcus aureus, Enterococcus faecium, Candida albicans, Pseudomonas aeruginosa and MS2 Bacteriophage in external test performed by Swissatest Testmaterialien AG in 2021 (Test Report No. 202120117).
Loading the appliance to the maximum capacity indicated for each programme
helps to reduce energy and water consumption.
Suitable detergents for each programme
| Programme Universal powder1) | Liquid Univer-sal | Liquid for col-oureds | Delicates woollens | Special |
| Eco 40-60 ▲ ▲ ▲ -- -- | | | | |
| Cottons ▲ ▲ ▲ -- -- | | | | |
| Synthetics ▲ ▲ ▲ -- -- | | | | |
| Delicates -- -- -- ▲ ▲ | | | | |
| Wool/Handwash -- -- -- ▲ ▲ | | | | |
| Outdoor -- -- -- ▲ ▲ | | | | |
| Quick 20' Wash&Dry 60' | -- ▲ ▲ -- -- | | | |
| MixLoad -- ▲ ▲ -- -- | | | | |
| Hygiene ▲ ▲ -- -- ▲ | | | | |
1) At temperature higher than 60 °C the use of powder detergent is recommended.
▲ = Recommended
-- = Not recommended
21.4 Detergent type and quantity.
- Use only detergents and other treatments specially made for washing machines. First, follow these generic rules:
- powder detergents (also tablets and single-dose detergents) for all types of
fabric, excluding delicate. Prefer powder detergents containing bleach for whites and laundry sanitization,
- liquid detergents (also single-dose detergents), preferably for low temperature wash programmes (60 °C max) for all types of fabric, or special ones for woollens only.
- Do not mix different types of detergents.
- Use less detergent if:
- you are washing a small load,
- the laundry is lightly soiled,
- there is a large amount of foam during washing.
- When using detergent tabs or pods, always put them inside the drum, not in the detergent dispenser, and follow the manufacturer's recommendations.
Insufficient detergent may cause:
- unsatisfactory washing results, - the wash load to turn grey, - greasy clothes, - mould in the appliance.
Excessive detergent may cause:
- - sudsing, - reduced washing effect,
- - inadequate rinsing,
- - a greater impact on the environment.
21.5 Periodic cleaning schedule
Periodic cleaning helps to extend the life of your appliance.
After each cycle, keep the door and the detergent dispenser slightly open to get air circulation and dry the humidity inside the appliance.
If the appliance is not used for a long time: close the water tap and unplug the appliance.
Indicative periodic cleaning schedule:
| Descaling Twice a year |
| Maintenance wash Once a month |
| Clean door seal Every two months |
| Clean drum Every two months |
| Remove fluff inside the drum | Twice a month |
| Clean detergent dispens-er and AutoDose tanks | Twice a year |
Clean drain pump filter: Twice a year
Clean the inlet hose and the valve filter: Twice a year
Regularly examine the drum to check for limescale. We recommend running a cycle with an empty drum and a descaling product occasionally.
Removing foreign objects
i
Make sure that pockets are empty and all loose elements are tied up before running your cycle.
Remove any foreign objects (such as metal clips, buttons, coins, etc.) that you may find in the door seal, the filters, and the drum. If necessary, please contact the Authorised Service Centre.
Door seal
This appliance is designed with a self-cleaning draining system, allowing light fluff fibers that fall off the clothes to be drained out with the water. Regularly examine the seal and if necessary clean as described in the following diagram. Coins, buttons, and other small items can be recovered at the end of the cycle.

Clean it when needed, using ammonia cream cleanser agent without scratching the seal surface.
If necessary, remove fluff and objects from the filter recess.
21.6 Wi-Fi - Connectivity setup
This chapter describes how to connect the smart appliance to the Wi-Fi network and to link it to mobile devices.
By this functionality you can receive notifications, control, and monitor your appliance from your mobile devices.
The Wi-Fi functionality is off as factory default setting.
To connect the appliance to enjoy the full range of features and services you need:
- Wireless network at home with internet connection enabled.
- Mobile device connected to wireless network.
Wi-Fi module parameters
| Frequency 2.412 - 2.472 GHz for European market |
| Protocol IEEE 802.11b/g/n |
| Encryption WPA, WPA2, WPA3 |
Configuring the appliance wireless connection
- Press the On/Off button for a few seconds to activate the appliance. Wait about 10 seconds before proceeding with wireless configuration.
- Select a programme by turning the programme dial.
- Press and hold the Finish In and the Auto Dry buttons simultaneously for a few seconds until a 'click' sounds. Release the buttons. Appears on the display for 5 seconds and the indicator starts blinking.
The wireless module begins starting up.

Make sure that you APP is ready for connection.
- After about 10 seconds, (Access Point) appears on the display.
The access point will be open for about 5 minutes.
- Configure the App on your smart device and follow the instructions to connect the appliance to your Wi-Fi network.
- If the connectivity is configured, when the programme information screen returns, the indicator is on the display.

Every time you switch the appliance on, the appliance takes about 10 seconds to connect to the network automatically. When the indicator stops blinking the connection is ready.
To switch the wireless connection off, press and hold the Finish In and the Auto Dry buttons simultaneously for a few seconds until the first acoustic signal. Release the buttons. Appears on the display for 5 seconds.

If you switch the appliance off and on again, the wireless connection is automatically off.
To remove the wireless credentials, press and hold the Finish In and the Auto Dry buttons simultaneously for a few seconds until the second acoustic signal sounds.
Symbol \~appears on the display for a few seconds.
22. ENVIRONMENTAL CONCERNS
Recycle materials with the symbol .Put the packaging in relevant containers to recycle it. Help protect the environment and human health by recycling waste of electrical and electronic appliances. Do not dispose of
appliances marked with the symbol with the household waste. Return the product to your local recycling facility or contact your municipal office.
- Remove the three bolts.

i

WARNING!


AutoDose container for liquid detergent.

AutoDose rinse aid container.
10.6 AutoDose low level indicator light

- Press the Start/Pause button to activate remote start before the indicator light stops blinking.
The indicator lights are shown on the program overview screen, and the door locks. The program can now be started with the remote control.

CAUTION!
17.2 Difficult stains
- Press the lock on the back as shown in the picture, and lift the top cover up to remove it.

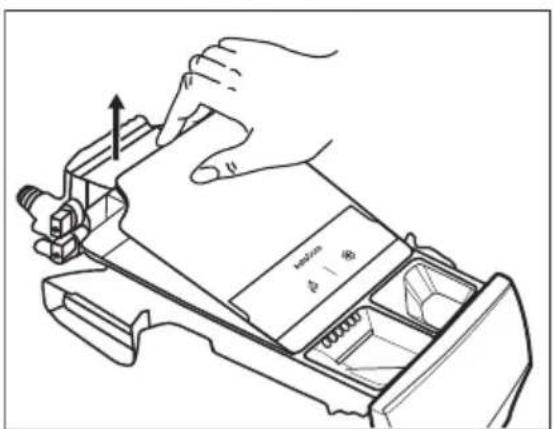

CAUTION!

WARNING!

WARNING!


Programs Load Product description
1. ⚠SAFETY INFORMATION


WARNING!

- Lower the AutoDose lid.


NOTE!
17.2 Difficult stains

NOTE!

WARNING!

WARNING!


WARNING!


The detergent (AEG Steam Fragrance)

AutoDose fabric softener compartment.
| Sportswear | Bed Linen | Baby | Easy Iron |
| Daily Training | Duvet | Denim | Anti-Allergy Vapour |
| Down Jackets | Towels | Linen | 1 Item Fast |
| Soccer/Rugby | Pet Hair | Business Shirts | |
| Skiing Gear | | Steam Cashmere | |
| Running Shoes | | | |
11.2 System table
- Press the Start/Pause button


CAUTION!


17.3 Type and amount of detergent


CAUTION!

CAUTION!

WARNING!

WARNING!
- Assemble the drawer as follows:

- Clean the filter under the water tap.

Problem Possible solution
1 Top plate 2 Detergent dispenser with AutoDose containers and manual chambers 3 Control panel 4 Door handle 5 Rating plate 6 Drain pump filter
- Remove the three bolts.

- Pull out the plastic spacers.
- Insert the plastic caps (supplied in the bag with the user manual) into the holes.

i
We recommend that you keep the transport bolts in case you need to move the product later.
i
The product must stand level and stable.


WARNING!


(*) Subject to change without notice.
- Connect the drain hose to the pipe stub and secure it with a clamp.
- Position the hose directly into a built-in drain pipe in the wall and secure it with a clamp.
- Without the plastic hose guide, to a drain stub – place the drain hose onto the pipe stub and secure it with a clamp.
- To a vertical pipe with vent hole – insert the drain hose directly into a drain pipe or a vertical pipe.
- The drain hose can be bent into a U-shape and placed around the plastic guide on the edge of a sink – attach the guide to the water tap or the wall.


Options cannot be selected for all washing programs. Check the compatibility between options and washing programs in the "Compatibility of options with programs" section in the "Programs" chapter. An option may exclude another. In this case, the product will not allow you to set incompatible options at the same time.
Fragrance (AEG Steam Fragrance)

AutoDose container for liquid detergent.

AutoDose fabric softener container.
- Only pour liquid detergent carefully into the AutoDose detergent tank. Fill up to the maximum indicated level MAX.

- Close the AutoDose lid.

12. WI-FI - SETTING UP THE CONNECTION
This chapter describes how to connect the smart product to the Wi-Fi network and connect it to mobile devices.

CAUTION!


CAUTION!

CAUTION!

WARNING!

WARNING!
- Clean the filter under a water tap.

- Remove the three bolts.


WARNING!

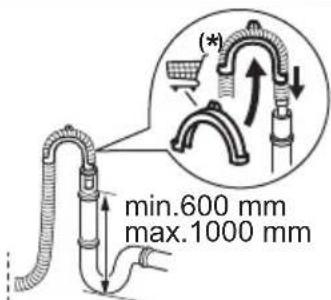

The fragrance (AEG Steam Fragrance)

- Lower the AutoDose lid.


PRECAUTIONS!
17.2 Difficult stains
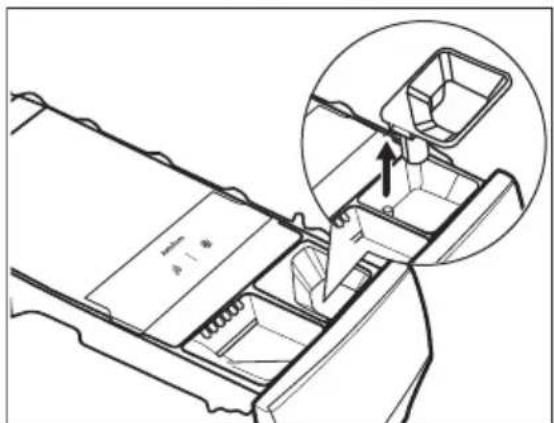

⚠ PRECAUTIONS!
⚠ PRECAUTIONS!
WARNING!

WARNING!
The software in this product contains components that are based on free and open source software. AEG gratefully acknowledges the contributions of the open software and robotics communities to the development project.
To access the source code of these free and open source software components whose license conditions require publishing, and to see their full copyright information and applicable license terms, please visit: http://as.g.opensoftwarerepository.com (folder NUJS)



