
GM3A-RSTX - Car audio interface PAC - Free user manual and instructions
Find the device manual for free GM3A-RSTX PAC in PDF.


| Product Type | Car Audio Interface / Adapter |
| Brand | PAC |
| Model | GM3A-RSTX |
| Compatible Vehicles | Select General Motors (GM) models with factory amplified systems |
| Power Supply | 12V DC (vehicle battery) |
| Operating Voltage | 10.5 - 15.5V DC |
| Current Draw | Less than 500 mA |
| Dimensions (L x W x H) | 2.5 x 1.5 x 0.75 inches |
| Weight | 0.2 lbs (approx. 90 g) |
| Input Connector | Vehicle-specific harness (included) |
| Output Connector | Standard aftermarket radio harness (included) |
| Main Functions | Retains factory chimes, OnStar, door locks, and RAP functionality |
| Installation Type | Plug-and-play, no wire cutting required |
| LED Indicator | Power / data status (red/green) |
| Material | ABS plastic housing |
| Cable Length | Approx. 12 inches (30 cm) from module |
| Operating Temperature | -20°C to 85°C (-4°F to 185°F) |
| Certifications | CE, RoHS compliant |
| Warranty | 1-year limited warranty |
| Safety Precautions | Disconnect vehicle battery before installation; use proper fuse rating |
| Maintenance | Keep dry and clean; no user-serviceable parts inside |
| Spare Parts Availability | Hardware not sold separately; contact PAC support for replacements |
Frequently Asked Questions - GM3A-RSTX PAC
User questions about GM3A-RSTX PAC
0 question about this device. Answer the ones you know or ask your own.
Ask a new question about this device
Download the instructions for your Car audio interface in PDF format for free! Find your manual GM3A-RSTX - PAC and take your electronic device back in hand. On this page are published all the documents necessary for the use of your device. GM3A-RSTX by PAC.
USER MANUAL GM3A-RSTX PAC
Introduction and Features
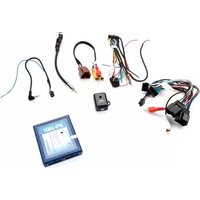
The GM3A-RSTX interface allows the replacement of a factory radio in select General Motors vehicles with 29-bit LAN radios. Using this interface will retain factory features such as OnStar, steering wheel controls (SWC), warning chimes, Rear Seat Controls (RSC), factory XM Radio and the BOSE amplifier when the original radio is removed. Use of this interface also allows you to program two radio functions to each SWC button by using short press long press dual command functionality. The GM3A-RSTX also provides data bus driven outputs such as retained accessory power (RAP), vehicle speed signal (VSS), illumination, reverse trigger and parking brake.
Important Notes
- These instructions only apply to R.2.6.6.19 or later revisions. The revision info can be found on a small white sticker on the interface and packaging.
- The radio select rotary switch on the side of the interface must be adjusted to the proper radio setting before plugging the interface into the vehicle (see next page for setting chart).
- The interface comes pre-programmed for all of the vehicles factory SWC functions and does not require programming unless you wish to re-assign the SWC functions or utilize short press long press dual command functionality. The SWC can always be restored to default settings by following the procedure outlined on page 2.
- RSC buttons that are identical to the SWC will mimic the SWC one for one.
- The LED will flash whenever a SWC button is pressed.
Wiring Connection Chart
Aftermarket Radio Connections
| Yellow * +12v from RP Advanced | |
| Yellow * +12v from vehicle | |
| Black ** Ground from RP Advanced | |
| Black ** Ground from vehicle | |
| Red Acc. Output | |
| White | Front Left + input |
| White / Black | Front Left - input |
| Grey | Front Right + input |
| Grey / Black | Front Right - input |
| Green | Rear Left + input |
| Green / Black | Rear Left - input |
| Purple | Rear Right + input |
| Purple / Black | Rear Right - input |
| Light Green Parking Brake Output (-) | |
| Pink Vehicle Speed Output | |
| Blue Not Used | |
| Blue / White Amp Turn On Input | |
| Orange / White Illumination Output (+) | |
| Purple / White Reverse Output (+) | |
| Brown Loop | Mute Loop - See installation note 8. |
SWC Connector
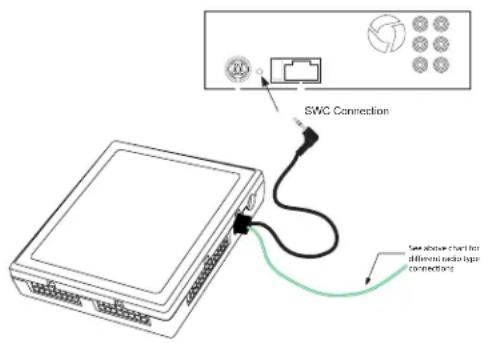
| Blue / Yellow | Kenwood, Newer JVC |
| 3.5mm Jack | Alpine, JVC, Clarion, Pioneer, Sony, Fusion, Boyo, Dual, Lightning Audio, Visteon or Advent |
IMPORTANT NOTES REGARDING YELLOW AND BLACK WIRE CONNECTIONS
* Connect both Yellow wires from the RP Advanced harnesses to the radio's 12v constant input
** Connect both Black wires from the RP Advanced harnesses to the radio's ground input.
Illustration / Schematic
Wiring
![graph TD A["Power and speaker connections"] --> B["PAC"] C["Vehicle Connections"] --> B D["Aftermarket Radio Connections"] --> B B --> E["Factory reverse camera and auxiliary input retention harness"] style B fill:#f9f,stroke:#333,stroke-width:2px](/content/2026/05/1010311/images/7cfb426fa1db998bfaa036e3920e2680ca21b1f00d48b2755ffab18021692a08.jpg)
SWC Connection
Installation Steps

SET RADIO SELECT SWITCH
| Alpine | JVC | Kenwood / Lightning Audio | Clarion / Nakamichi | Pioneer / Other* | Sony | Fusion |
| 1 | 2 | 3 | 4 | 7 | 8 | 9 |
*Other - Dual / Axxera, Jensen, Rockford Fosgate
-
The radio select rotary switch on the side of the interface must be adjusted to the proper radio setting before plugging the interface into the vehicle.
-
Make all connections as described in the chart on page 1. Be sure to connect both Yellow wires (one from vehicle harness and one from RP Advanced harness) and both Black wires (one from vehicle harness and one from RP Advanced harness) while making these connections.
- Factory installed amplifiers will determine the audio output connection. If the vehicle has a factory installed amplifier, use the factory amplifier audio location. If a factory installed amplifier is not present, use the non-amplified factory audio location.
- If the vehicle is equipped with a Premium BOSE system, connect the subwoofer and center channel RCA inputs to the aftermarket radio. If the aftermarket radio to be installed does not have a dedicated center channel or sub output, do not use this cable. To ensure best sound performance, channel summing is not recommended. Use this cable according to the outputs that are available.
- If the vehicle is equipped with a reverse camera and the aftermarket radio has a reverse camera input, connect the Yellow RCA plug on the Brown connector to the aftermarket radio's reverse camera input.
- If the aftermarket radio is equipped with an auxiliary input and you wish to retain the factory XM tuner, plug the RCA connectors from the interface into the radio's auxiliary input.
- Plug the CMX chime module in if necessary (If the vehicle chimes when the radio is removed, the CMX is not necessary). PLEASE NOTE: In order to get the best possible sound out of the CMX, please mount it in a place free and clear of any obstructions, preferably as close as possible to the bottom of the dash pointing down toward the floor of the vehicle.
- The Mute loop (if not cut) will turn the accessory output off when an OnStar or Bluetooth call is made or received. If the aftermarket radio has a mute input cut this loop and connect the inner Brown wire (next to the Blue / White wire) to the mute input.
- Connect the SWC wire according to the chart on page 1 (aftermarket radio MUST support a wired remote input).
- If you wish to reassign functions to the SWC follow the programming instructions in the next section.
Default Steering Wheel Control Programming
IMPORTANT! The interface comes pre-programmed for the functions listed in the chart below and does not require programming unless you wish to re-assign the SWC functions, or utilize short press long press dual command functionality. The SWC can always be restored to default settings by pressing the program button on the side of the interface once and waiting for the timeout.
Default SWC Button Assignments
| Alpine JVC Kerwood Clarion Pioneer Sony Fusion | |||||||
| Volume + | Volume + | Volume + | Volume + | Volume + | Volume + | Volume + | Volume + |
| Volume - | Volume - | Volume - | Volume - | Volume - | Volume - | Volume - | Volume - |
| Source | Source | Source | Source | Source | Source | Source | Source |
| Track + | Track + | Track + | Track + | Search + | Track + | Track + | Track + |
| Track - | Track - | Track - | Track - | Search - | Track - | Track - | Track - |
| Voice | Voice | Voice | Voice | Voice | Voice | Voice | Mute |
| Play/Pause | Preset + | Preset/Disc - | Disc/FM+ | Band | Preset + | Preset + | Audio |
Optional Steering Wheel Control Programming
If you wish to re-assign the SWC functions, utilize short press long press dual command functionality or select between Factory/Aftermarket mode, the interface must be programmed in the specific order shown in the chart on page 4. If you come across a function in the chart that your steering wheel does not have, or you do not want to program, press and release the program button on the side of the interface to skip that function. The LED will flash off and on confirming that you have successfully skipped that function and are ready to proceed to the next one.
Optional Steering Wheel Control Programming (cont.)

SET RADIO SELECT SWITCH
| Alpine JVC | Kenwood / Lightning Audio | Clarion / Nakamichi | Pioneer / Other* | Sony Fusion | ||
| 1 2 3 4 7 8 9 |
*Other - Dual / Axxera, Jensen, Rockford Fosgate
The Mute and Source buttons long press commands can be set to control the factory OnStar / XM functions or given the ability to control the aftermarket radio. This option can be set using the program button on the side of the interface. The default setting for these buttons is factory mode which controls the factory OnStar and XM tuner. If these buttons are set to aftermarket mode, OnStar must be accessed by using the factory controls located on the rearview mirror, and the factory XM tuner can no longer be accessed.
Factory Mode
- The SWC Mute and Source buttons are programmed to control OnStar and Factory XM. They cannot be programmed for short press / long press dual command functionality and are blocked from doing so.
- Preset right button can be programmed for dual commands. However, when XM Control is on, radio commands are disabled temporarily. The Preset right button will control XM preset up.
- When XM control is off the Preset right button will send radio commands as normal.
Aftermarket Mode
- OnStar control through the SWC Mute button is disabled. This will free up the Mute button to send mute radio command and a second function.
- In order to program the Source button for short press / long press in vehicles with external XM tuner, you must unplug the XM tuner.
Use the function chart on the next page as a guide to program the functions in the proper order for your new radio
- Turn the key to the ignition position.
- Press and release the programming button on the side of the interface the number of times that corresponds with either factory or aftermarket mode. One press will set factory mode and two presses will set aftermarket mode. The LED will blink each time the button is pressed.
- Once you have chosen either factory or aftermarket mode, after 2.5 seconds the LED will come on solid. At this point you have two options:
A. To restore the SWC to factory default settings: Simply wait 7 seconds and the LED will blink 3 times indicating the interface has timed out. The default settings are now restored and no further action is required.
B. To program custom SWC assignments: Proceed to step 4 - With the LED on, press the first button to be learned on the steering wheel, the LED will turn off. At this point you have two options:
A. For short press functionality: Release the button within 1.5 seconds. The LED will turn back on.
B. For long press functionality: Hold the button until the LED starts blinking. Release the button and the LED will go back to solid. - If you need to program more buttons, repeat step 3 for each additional audio function on the steering wheel.
- If you come across a function in the chart that your steering wheel does not have, or you do not want to program, press and release the program button on the side of the interface to skip that function.
- Once programming is completed, wait seven seconds. The LED will flash three times indicating end of programming.
- Test the interface for proper functionality. Whenever a SWC is pressed the LED on the interface should blink. If any function does not work, repeat the programming steps.
Optional Steering Wheel Control Programming (cont.)
Optional Programming Order
| Alpine | JVC | Kenwood | Clarion | Other * | Pioneer | Sony | Fusion | |
| 1 | Volume + | Volume + | Volume + | Volume + | Volume + | Volume + | Volume + | Volume + |
| 2 | Volume - | Volume - | Volume - | Volume - | Volume - | Volume - | Volume - | Volume - |
| 3 | Mute | Mute | Mute | Mute | Mute | Mute | Mute | Mute |
| 4 | Preset + | Source | Source | Source | Preset + | Preset + | Preset + | Source |
| 5 | Preset - | Track + | Play | Search + | Preset - | Preset - | Preset - | Track + |
| 6 | Source | Track - | Track + | Search - | Source | Source | Source / End Call | Track - |
| 7 | Track + | Band / Disc + | Track - | Band | Track + | Track + | Track + | Audio |
| 8 | Track - | Preset / Disc - | Disc / FM + | Send / End | Track - | Track - | Track - | Power |
| 9 | Power | Select | Disc / AM - | Send | Band | Band | Band | |
| 10 | Enter / Play | Attenuation | Answer | End | Answer ** | Phone Menu | Power / End Call | |
| 11 | Band / Program | Phone Receive | Voice | Voice | End ** | Answer Call | Voice / Answer / End Call | |
| 12 Receive | Phone Reject On Hook PTT ** End Call | Voice (Android Auto & Car Play) Answer / End Call*** | ||||||
| 13 | End | Voice | Off Hook | Voice | ||||
| 14 | Voice | Power | Mute | |||||
| 15 | Preset + | |||||||
| * Dual / Axxera, Jensen, Rockford Fosgate ** Jensen ONLY ***XAV-AX100 / 200 Only | ||||||||
Testing and Verification
- Turn the ignition on. The LED on the interface will turn on and the +12v accessory wire will turn on.
- Turn on the radio and check balance and fade. Note: Premium factory amplified systems will not fade as neither the aftermarket radio, or the RP Advanced interface have the ability to control the amplifier's fader.
- Verify that the factory subwoofer (if present) is playing.
- Verify that all SWC are functioning properly for both the aftermarket radio and OnStar. To adjust OnStar volume, press the OnStar button on the mirror, then use the volume buttons on the SWC to adjust the level. The volume will raise a total of 8 times before returning to the original level.
- Verify that the factory XM tuner is functioning properly.
- Pressing the OnStar button on the rearview mirror will turn off the rear speakers and allow the OnStar audio to be heard in the two front speakers. The OnStar active LED will also turn on. When OnStar disconnects, the radio will un-mute or turn back on and the OnStar LED will turn off. Pressing the Mute / OnStar button on the steering wheel for 1.5 seconds will also activate OnStar.
- Turn off vehicle and remove key. RAP will be active and keep the radio on for 10 minutes, or until the driver's door is opened.
- The LED and radio will turn off when RAP turns off or the driver's door is opened.
- Use the 4-position selector switch located on the side of the CMX module to select the best chime output volume for your specific installation. Setting 1 being loudest and 4 softest.
![graph TD A["CMX chime module"] --> B["Switch"] B --> C["Device with ω"] style A fill:#f9f,stroke:#333 style B fill:#ccf,stroke:#333 style C fill:#cfc,stroke:#333](/content/2026/05/1010311/images/817fcdafb0ecd91159f4ffac319791a1946b4a0abe9e4a19a994fb30e1c9b7e9.jpg)
Using Rear Seat Audio Controls
Using the Radios Dual Zone Source Using the Factory XM Radio Tuner

- Press the power button to turn the RSE Controls on. When Radio is displayed on the RSE Controls, the aftermarket radios rear speaker output will be heard through the headphone jacks. Putting the aftermarket radio into dual zone mode should change the output level of the rear speakers to a fixed level. This allows precise user adjustment from the level knobs on the RSE Controls (refer to aftermarket radio owners manual for model specific dual zone operation).
- The seek arrows and PROG button will control the radio as programmed by the SWC interface. These buttons are mapped to the SWC buttons as stated above.
- Pressing the SRCE button will toggle between the Factory XM tuner and the Radio as the RSE source. Pressing the power button will turn the RSE Controls off as well as turning the key off. The seek arrows and PROG button will continue to operate as stated (with the exception of SRCE which has no function) when the Rear Seat Controls are turned off.
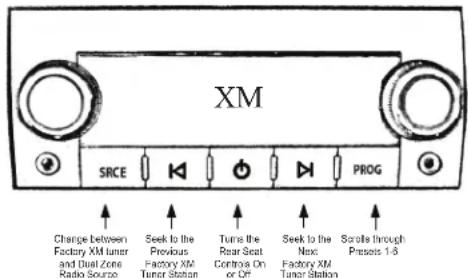
- Press the power button to turn the RSE Controls on. If Radio is displayed press the SRCE button to select factory XM tuner mode. When XM followed by the channel number is displayed factory XM tuner audio will be heard through the headphone jacks.
- The Seek arrows will control the factory XM radio tuner and select the desired station.
- The PROG button will scroll through Presets 1-6
- Pressing the SRCE button will toggle between the Factory XM tuner and Radio as the RSE source. Pressing the power button or turning the key off will turn off the RSE Controls.
- The factory XM tuner must remain serviced to take advantage of this feature. Visit www.xmradio.com for a complete up-to-date channel listing and service options
- In order for the RSE controls to properly work the XM tuner, the front XM controls must be set to off.
Using the Factory XM Tuner With the SWC
- To activate the XM controls press and hold the “Source” button until a chime is heard. The Driver Information Center (DIC) in the instrument cluster will display “XM Control On” or display XM text.
- Arrow up moves forward through the channels. The channel name and song name will be displayed on the DIC.
- Arrow down moves backwards through the channels. The channel name will be displayed on the DIC.
- To store a preset, first choose the preset location by pressing the "Play" button repeatedly. The DIC will display the XM preset locations. When the desired preset location is displayed, tune to the desired station, then press and hold the "Play" button until a chime is heard. "Preset Saved" will then be
- To recall a preset simply press the "Play" button repeatedly until the desired preset is displayed.
- To de-activate the XM controls press and release the "Source" button. Do not hold the Source button to exit XM control.

PLEASE NOTE: You MUST be installing an aftermarket radio that is equipped with an auxiliary input to be able to retain the factory XM audio. If the vehicle is equipped with steering wheel controls other than the ones pictured here, you will not be able to control the factory XM tuner as the required buttons are not present.
Rear Seat Entertainment (RSE); If equipped
1. Vehicles equipped with an overhead screen only:
In this application the GMRVD must be used in order to feed A/V into the factory screen from an aftermarket head unit (head unit must support A/V out). With the GMRVD, A/V will be passed from the aftermarket head unit to the rear screen and audio can be heard through the headphones. The GMRVD will also pass the Auxiliary inputs on the rear of the center console to the aftermarket head unit.
2. Vehicles equipped with an overhead screen AND headrest monitors:
In this application the headrest monitors will function independently from the overhead monitor. Neither video or audio can be passed to or from the headrest monitors. The overhead monitor will function exactly as described in #1.
OnStar Volume Adjustment for Vehicles w/o SWC
- If SWC buttons are not present you must use the programming button on the interface to control the OnStar audio level during an OnStar connection.
- When OnStar is active pressing the programming button will raise the audio level 4 times before returning to the original level.

Press the programming button on the side of the interface while OnStar is active to adjust the OnStar volume
Technical Support and Product Updates (Firmware)
The GM3A-RSTX can be updated with new firmware as it becomes available using the PAC-UP interface updater (sold separately). Please visit www.PAC-audio.com/firmware for available updates.
Technical Support
support@PAC-audio.com
866-931-8021
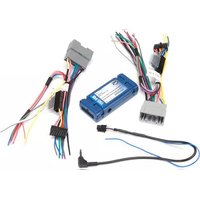
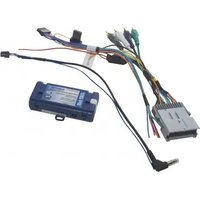
- INTRODUCTION AND FEATURES
- IMPORTANT NOTES
- WIRING CONNECTION CHART
- IMPORTANT NOTES REGARDING YELLOW AND BLACK WIRE CONNECTIONS
- ILLUSTRATION / SCHEMATIC
- INSTALLATION STEPS
- DEFAULT STEERING WHEEL CONTROL PROGRAMMING
- OPTIONAL STEERING WHEEL CONTROL PROGRAMMING
- OPTIONAL STEERING WHEEL CONTROL PROGRAMMING (CONT.)
- FACTORY MODE
- AFTERMARKET MODE
- USE THE FUNCTION CHART ON THE NEXT PAGE AS A GUIDE TO PROGRAM THE FUNCTIONS IN THE PROPER ORDER FOR YOUR NEW RADIO
- TESTING AND VERIFICATION
- USING REAR SEAT AUDIO CONTROLS
- USING THE FACTORY XM TUNER WITH THE SWC
- REAR SEAT ENTERTAINMENT (RSE); IF EQUIPPED
- VEHICLES EQUIPPED WITH AN OVERHEAD SCREEN ONLY
- VEHICLES EQUIPPED WITH AN OVERHEAD SCREEN AND HEADREST MONITORS
- ONSTAR VOLUME ADJUSTMENT FOR VEHICLES W/O SWC
- TECHNICAL SUPPORT AND PRODUCT UPDATES (FIRMWARE)
Brand : PAC
Model : GM3A-RSTX
Category : Car audio interface