Akoya P55018 (MD 20408) - Screen MEDION - Free user manual and instructions
Find the device manual for free Akoya P55018 (MD 20408) MEDION in PDF.

| Product Type | 23-inch LED-backlit TFT Monitor |
| Model | Akoya P55018 (MD 20408) |
| Screen Size | 58.4 cm (23 inches) |
| Aspect Ratio | 16:9 |
| Resolution | 1920 x 1080 pixels (Full HD) |
| Brightness | 250 cd/m² (typical) |
| Contrast Ratio | 1000:1 (typical) |
| Dynamic Contrast Ratio | 5,000,000:1 |
| Response Time | 14 ms (grey-to-grey typical); 5 ms (overdrive) |
| Input Voltage | 100-240 V~, 50/60 Hz |
| Power Consumption (max) | 30 watts |
| Standby Power | < 0.5 watt |
| Weight (with stand) | Approx. 3.5 kg |
| Weight (without stand) | Approx. 3.3 kg |
| Dimensions (with stand) | 529 x 370 x 199 mm (W x H x D) |
| Dimensions (without stand) | 529 x 315 x 46 mm (W x H x D) |
| Wall Mount Standard | VESA 100 x 100 mm |
| Video Inputs | VGA, DVI-D, HDMI |
| Audio | 3.5 mm stereo input, headphone jack, built-in speakers |
| Package Contents | Monitor, DVI cable, VGA cable, audio cable, power cord, monitor stand, documentation |
| OSD Languages | Multiple languages available (e.g., English, German, French) |
| Additional Features | ECO mode, dynamic contrast (DCR), overdrive, picture mode, Kensington lock slot |
| Cleaning Instructions | Use a soft, lint-free cloth; avoid solvents, corrosive detergents, and water droplets |
Frequently Asked Questions - Akoya P55018 (MD 20408) MEDION
User questions about Akoya P55018 (MD 20408) MEDION
0 question about this device. Answer the ones you know or ask your own.
Ask a new question about this device
Download the instructions for your Screen in PDF format for free! Find your manual Akoya P55018 (MD 20408) - MEDION and take your electronic device back in hand. On this page are published all the documents necessary for the use of your device. Akoya P55018 (MD 20408) by MEDION.
USER MANUAL Akoya P55018 (MD 20408) MEDION
natural_image
Front view of a black horizontal monitor with 'MEDION' branding on the front panel (no additional text or symbols visible)58.4 cm / 23" LED-Backlight-Monitor
MEDION® LIFE® P55018 (MD 20408)
Contents
- Notes on how to use these instructions....3
1.1. Symbols and key words used in these instructions ....3
-
Proper use .... 3
-
Package contents.... 3
-
Safety instructions.... 4
4.1. Operating safety 4
4.2. Installation location 4
4.3. Repairs 5
4.4. Environmental temperature 5
4.5. Power supply....5
-
Notes on conformity....6
-
Initial operation 7
6.1. Installation 7
6.2. Preparations at your PC 7
6.3. Supported monitor settings 8
6.4. Supported settings in video mode 8
6.5. Monitor settings for Windows ^ XP 9
6.6. Monitor settings under Windows Vista "....10
6.7. Monitor settings under Windows "7....10
6.8. Monitor settings under Windows ^® 8....10
6.9. Connecting the monitor 11
6.10. The monitor work space.... 11
-
Connections and operating elements....12
-
Setting the screen....13
8.1. Using the OSD menu.... 13
8.2. The OSD menu....13
-
Power-saving options....15
-
Customer service 15
10.1. Troubleshooting....15
10.2. Do you need more help? 16
-
Cleaning....17
-
Disposal 17
-
Pixel defects on screens 18
-
Technical data 19
-
Legal notice 20
1. Notes on how to use these instructions

Please be sure to read these operating instructions carefully and follow all instructions given. This guarantees reliable operation and a longer life expectancy for your monitor. Always store these instructions near your monitor. Keep the operating instructions so that you can pass them on with the monitor if you sell it.
1.1. Symbols and key words used in these instructions
 | DANGER!Warning of immediate risk of fatal injury!WARNING!Warning: possible mortal danger and/or serious irreversible injuries!CAUTION!Warning: possible light or moderate injuries! |
 | CAUTION!Please follow the guidelines to avoid property damage. |
 | NOTE!Additional information on using the device! |
 | WARNING!Warning: danger of electric shock! |
 | WARNING!Warning: danger due to excessive volume! |
| • Bullet point/information on operating steps and results | |
| ► Tasks to be performed | |
2. Proper use
- This TFT monitor is designed exclusively for the playback of video and audio signals from external devices, such as computers, whose connections and screen resolutions match the specified technical data of the TFT monitor. Any other use is deemed as improper.
- This device is intended for use in dry, indoor areas only.
- This device is intended for private use only. The device is not intended for use by companies in the heavy industry sector. Use under extreme environmental conditions may result in damage to the device.
- This device is not suitable for use with VDU workstations in accordance with §2 of the German VDU workstation regulation.
3. Package contents
Please check your purchase to ensure all items are included and contact us within 14 days of purchase if any components are missing. The following items are supplied with your monitor:
- Monitor
- DVI cable
- VGA cable
- Audio cable
- Power cord
- Monitor stand
- Documentation
4. Safety instructions
4.1. Operations safety
- This device is not intended for use by people (including children) with reduced physical, sensory or mental abilities or by those without experience and/or knowledge, unless they are supervised by a person responsible for their safety or they have been instructed in its use by that person. Children should be supervised to ensure they do not play with this device.
- Keep packaging material such as plastic film out of reach of children. There is a risk of suffocation if used improperly.
- Never open the monitor's casing (electrical shock, short circuit and fire hazard)! Do not attempt to modify the device yourself.
- Never insert any objects through the slots and openings into the inside of the monitor (electrical shock, short circuit and fire hazard)!
- The slots and openings on the monitor are for ventilation purposes. Do not cover these openings (overheating, fire risk)!
- Do not put any excessive pressure on the display. There is a risk that the screen may break.
- Caution! There is a risk of injury if the display is broken! Recover all broken pieces using protective gloves and send them to your Service Centre for proper waste disposal. Then wash your hands with soap because chemicals may have leaked out.
- To avoid damaging the screen, do not touch it with your fingers or sharp objects.
Contact customer services if:
• the power cable is burnt or damaged
• liquid has penetrated the monitor
• the monitor is not operating correctly
- the monitor has been dropped or the housing is damaged.
4.2.Installationlocation
- Keep your monitor and all connected devices away from moisture and avoid dust, heat and direct sunlight. Non-compliance with these instructions can lead to faults or damage to the monitor.
- Do not use the device outdoors because external elements such as rain, snow, etc. could damage it.
- Avoid exposing the device and the mains adapter to water droplets or spray and do not place any liquid-filled containers (vases or similar) on or next to the device or the mains adapter. Li- quids penetrating the device may impair the electrical safety of the product.
- Do not place any open flames (candles or similar) on or near the device.
- Make sure that there is enough clearance from the sides of the furniture unit. Ensure a minimum clearance of 10 cm around the device for sufficient ventilation.
- Place and operate all the components on a stable, level and vibration-free surface in order to prevent the monitor from falling down.
- Avoid glare, reflections and excessive bright-dark contrast to protect your eyes and guarantee pleasant workstation ergonomics.
• Take regular breaks when working at your monitor to prevent tenseness and fatigue.
4.3. Repairs
• Repairs to your monitor should only be carried out by qualified specialists.
- if a repair must be carried out, please contact only our authorised service partner.
4.4. Environmental temperature
- The monitor can be operated at an ambient temperature of +0^ to +35^ with a relative humidity of < 80% (non-condensing).
- When switched off, the monitor can be stored at temperatures from -20^ to +60^ .
DANGER!
After transporting the monitor, wait until the appliance has reached room temperature before switching it on.
Large changes in temperature or fluctuations in humidity can cause moisture build-up within the monitor due to condensation. This can cause an electrical short-circuit.
4.5. Power supply
WARNING!
In order to disconnect the power to your monitor or to completely isolate the device from voltage sources, remove the mains plug from the mains socket.
- Operate the monitor only at a 100–240 V\~ 50/60 Hz earthed safety contact socket. Contact your electricity provider if you are not sure if the socket is earthed or not.
- For extra safety, we recommend using an overvoltage protection device to prevent your monitor from sustaining damage as a result of power surges or lightning strikes.
- To disconnect the power supply from your monitor, pull the mains plug from the power outlet.
- The power outlet must be close to the monitor and easy to access.
- To prevent non-permissible heating up, do not cover the mains adapter.
- The socket must be close to the monitor and easy to access.
- Position the cable so that it cannot be stepped on or tripped over.
- To avoid damaging the cable, do not place any objects on it.
- Please note: The standby switch of this device does not cut it off from the mains completely. The device also consumes power in standby mode. In order to disconnect the device completely from the power supply, pull the mains plug out of the power outlet.
- Keep the device at a distance of at least one metre from sources of high-frequency or magnetic interference (televisions, loudspeaker, mobile telephones, etc.) to avoid malfunctions and data loss.
- Despite the most modern production methods as a result of the highly complex technology, in rare cases there may be individual or multiple pixel drop-outs (dead pixels).
5. Notes on conformity
Medion AG hereby declares that product conforms to the following European requirements:
• ISO 9241-307 Class II standard (class of pixel defect)
• EMC Directive 2004/108/EC
• Low Voltage Directive 2006/95/EC
• RoHS Directive 2011/65/EU.
• Ecodesign Directive 2009/125/EC (Commission Regulation 1275/2008)
However, this device is not equipped with any complete function for minimizing consumption in accordance with the eco-design directive. This function is generally defined or specified for this product category using the connected end device (Personal Computer).
6. Initial operation

PLEASE NOTE!
The display has a special anti-reflective coating. The film used for this purpose cannot and must not be removed!
6.1. Installation
Attach the monitor stand as shown in the illustration. Carry out this step before connecting the monitor.
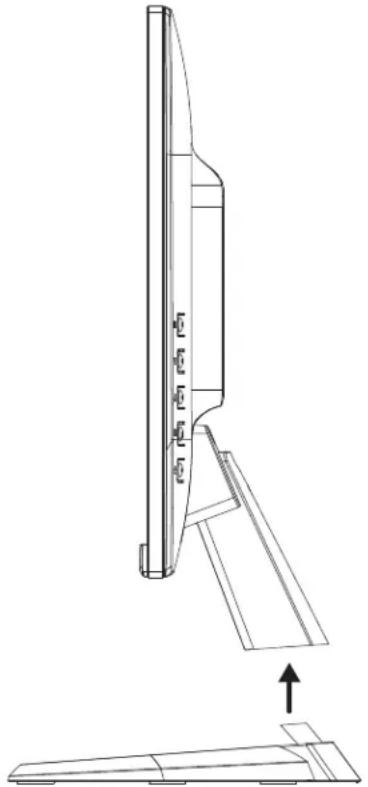
natural_image
Technical line drawing of a mechanical component with an arrow indicating assembly or force direction (no text or symbols present)6.2. Preparations at your PC
If you have been operating your computer with a CRT monitor, it may be necessary to make some adjustments. This is necessary if your previous monitor used settings for its operation that will not be supported by your new monitor.
The monitor displays up to 1920 x 1080 pixels. This resolution corresponds to the physical resolution. Monitors achieve full image quality with the physical resolution. If you change to a display with different settings, the display may not, in certain circumstances, appear in the full screen area.
Distortions can also occur, especially for fonts.
Before you connect the new monitor, use your old PC monitor to set a resolution and image frequency that is supported by both monitors.
Then shut down the PC and connect the new monitor.
After rebooting the PC, you can adjust the monitor settings for the device as described.
6.3. Supported monitor settings
This monitor supports the following modes
| Resolution Horizontal frequency | Vertical frequency | |
| 720 x 400 31.47 kHz 70 Hz | ||
| 640 x 480 31.47 kHz 60 Hz | ||
| 640 x 480 35.0 kHz 67 Hz | ||
| 640 x 480 37.8 kHz 72 Hz | ||
| 640 x 480 37.5 kHz 75 Hz | ||
| 800 x 600 35.15 kHz 56 Hz | ||
| 800 x 600 37.8 kHz 60 Hz | ||
| 800 x 600 48.0 kHz 72 Hz | ||
| 800 x 600 46.87 kHz 75 Hz | ||
| 832 x 624 49.72 kHz 75 Hz | ||
| 1024 x 768 48.36 kHz 60 Hz | ||
| 1024 x 768 56.48 kHz 70 Hz | ||
| 1024 x 768 60.0 kHz 75 Hz | ||
| 1152 x 864 67.0 kHz 75 Hz | ||
| 1152 x 870 68.6 kHz 75 Hz | ||
| 1280 x 768 47.0 kHz 60 Hz | ||
| 1280 x 960 60.0 kHz 60 Hz | ||
| 1280 x 1024 63.98 kHz 60 Hz | ||
| 1280 x 1024 80.0 kHz 75 Hz | ||
| 1440 x 900 56.0 kHz 60 Hz | ||
| 1440 x 900 71.0 kHz 75 Hz | ||
| 1400 x 1050 65.1 kHz 60 Hz | ||
| 1600x 1200 75.0 kHz 60 Hz | ||
| 1680 x 1050 65.0 kHz 60 Hz | ||
| 1920 x 1080* 67.0 kHz 60 Hz |
*Recommended resolution (physical)
6.4. Supported settings in video mode
480i/480p
576i/576p
720p
1080i/1080p
6.5. Monitor settings for Windows XP
For Windows XP ^® , adjust the monitor settings in the Windows program "Display Properties". The program can be started as follows:
- right-click on the Windows desktop and left-click on "Properties".
Or:
- Start the "Display" program from the "Control panel".
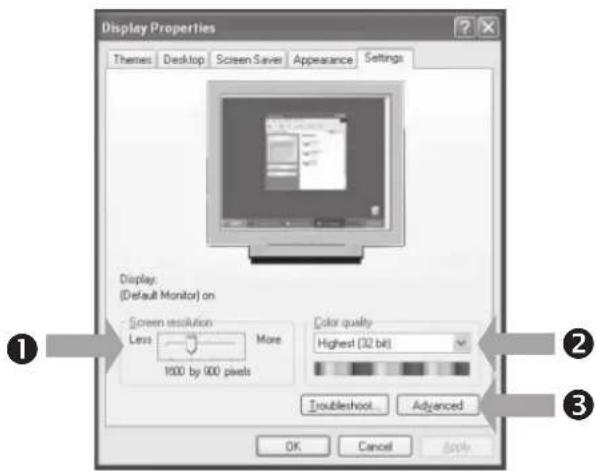
Set the resolution under "Screen resolution" (①).
"Colour quality" (②) lets you set the colour depth (number of displayed colours). Your monitor supports a maximum colour depth of 16 million colours, which corresponds to 32 bit, or "real colour".
The refresh rate can be set under "Advanced" (③).
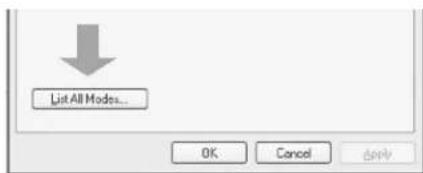
Depending on the configuration of your computer, a window appears displaying the properties of your graphics card.
Under "Graphics card" you can set the desired value in the selection field "List all modes".

NOTE!
If your setting does not comply with the values supported by your display, it is possible that you may not see a picture.
In this case, reconnect your previous monitor and set the applicable values according to the above-stated options under "Display Properties".
6.6. Monitor settings under Windows Vista®
For Windows Vista ^® , adjust the monitor settings in the Windows program "Customize appearance and sounds". The program can be started as follows:
Right-click on the Windows desktop and left-click on "Customize".
Or:
▶ Via Start ⇒ Control Panel ⇒ customise appearance and sound with a double left click.
▶ Open the display menu in order to adjust the resolution and frequency.
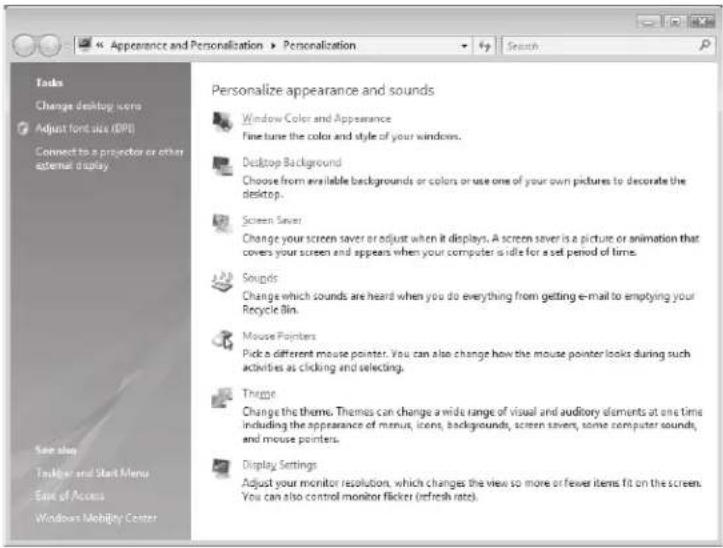
6.7. Monitor settings under Windows ^® 7
For Windows ^® 7, adjust the monitor settings in the Windows program "Appearance and Personalization". The program can be started as follows:
Right-click on the Windows desktop and left-click on "Customize".
Or:
▶ Via Start ⇒ Control Panel ⇒ Appearance and Personalization by double-clicking the left mouse button.

▶ Choose the menu Display Adjust screen resolution in order to adjust the resolution and frequency.
6.8. Monitor settings under Windows® 8
Open the "screen resolution" setting. Point the mouse curser at the top right-hand corner of the screen and then move the mouse curser downwards.
Then click on „Search“.
▶ Enter "Display" in the search field.
Then click on "Settings" and afterwards on "Display".
The "Screen resolution" window will be displayed.
Click on the "Resolution" list and select the desired resolution.
6.9. Connecting the monitor
Prepare your computer for the monitor as necessary so that the correct settings are available for your monitor.
▶ Make sure that the monitor is not connected to the mains (mains plug is not yet inserted) and the monitor and the computer are not switched on.

NOTE!
Only one type of connection can be used at the same time.
6.9.1. Connecting the signal cable
Connect the signal cable to the matching VGA, HDMI or DVI connections on the computer and the monitor.
6.9.2. Connecting the audio cables
Connect the audio cable to the matching audio jacks on the computer and on the monitor.
6.9.3. Connecting power supply
Connect the power cord to the power connector of the screen.
Now connect one end of the supplied power cord to the device and then plug the other end into an electrical outlet. The mains power outlet must be close to the monitor and easy to access. (Use the same electric current as for the PC).
6.9.4. Switching on the monitor
▶ Switch on your screen with the power switch at the back of the device.
▶ Use the On/Standby button at the front of the device to switch on your monitor.
▶ Then switch on your computer.
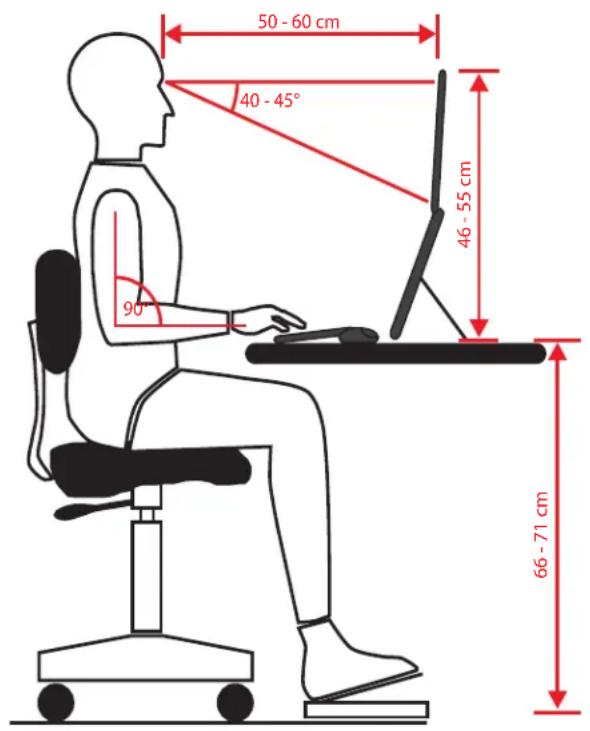
6.10. The monitor work space
Please note: The monitor should be set up in such a way as to avoid reflections, glare, and excessive contrast.
7. Connections and operating elements
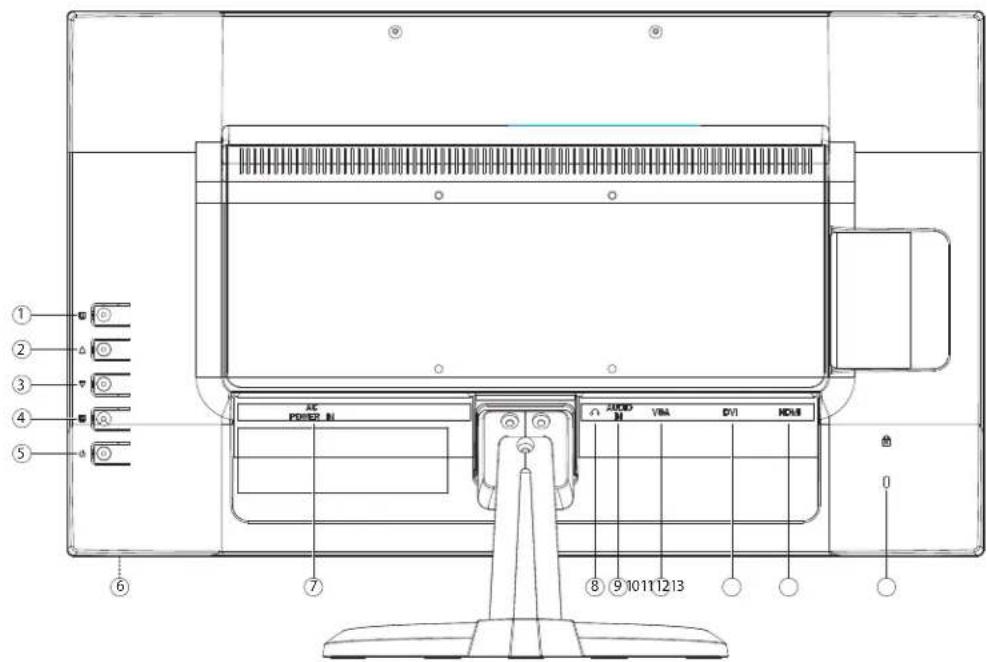

PLEASE NOTE!
It is absolutely essential to avoid exerting pressure on the front of the display when using the device. Risk of breakage! Do not touch the front of the display when pressing the buttons; use your thumbs to hold the device at the sides.
1) This button starts the OSD (on screen display). Press the button to exit the OSD.
①+ ③ Blocking of On/Standby button, with deactivated OSD
①+ ② Blocking of the OSD menu button, with deactivated OSD
To activate/deactivate, keep the key combination pressed down until the displayed bar has moved completely from left to right. A corresponding message will appear on the screen.
2) When the OSD is switched on, select a parameter with this button and increase the value.
If you are not in the OSD: direct call up of the PICTURE MODE menu.
3) When the OSD is switched on, select a parameter with this button and decrease the value.
If you are not in the OSD: direct call up of the CONTRAST/BRIGHTNESS menu.
4) Confirm the choice of the parameter to be changed with this button.
If you are not in the OSD: Select input source.
5) This button lets you switch the monitor on or switches to the standby mode.
6) Power LED indicates the operating status (at the front side of the device)
7) Power supply (AC POWER IN)
8) Headphone jack

WARNING!
Using headphones/earphones at high volume can result in permanent damage to your hearing. Before pressing play, set the volume to the lowest setting. Start playback and increase the volume to a comfortable level.
Using headphones/earphones to listen to a device at high volumes for an extended period can damage your hearing.
9) Audio connection 3.5 mm stereo jack (AUDIO IN)
10) D-Sub mini 15-pin connection (VGA)
11) DVI-D 24-pin connection (DVI)
12) HDMI connection (HDMI)
13) Opening for Kensington® lock. This serves to protect the monitor from theft
8. Setting the screen
The OSD (On Screen Display) menu lets you set specific screen parameters.
8.1. Using the OSD menu
1) Touch the button ① to activate the OSD.
2) Use the ②/③ buttons to select the options from the main menu.
3) Confirm your selection with the ④ button.
4) Touch the ① button to exit the OSD.

NOTE!
The OSD fades out automatically if you do not touch any button at the monitor within the pre-set time.
8.2. The OSD menu
The following explains the main functions or setting possibilities of the OSD.
| AUTOMATIC ADJUSTMENT | utomatically adjusts the horizontal and vertical position, phase (fine tuning) and pulse frequency (H size) (only in VGA mode) | |
| CONTRAST / BRIGHTNESS | CONTRAST For setting | the picture contrast |
| BRIGHTNESS For adjusting the brightness of the picture | ||
| DCR Here you can switch the DCR function (dynamic contrast) on and off | ||
| ECO Switch the ECO on and off. Contrast and brightness adjustment as well as DCR are deactivated in ECO mode | ||
| OD Activate/deactivate the overdrive function. When the function is activated, the reaction time is reduced from 14 ms (typ.) to 6 ms (grey to grey, typ.) | ||
| INPUT SOURCE Switch the signal input here | ||
| AUDIO ADJUSTMENT | VOLUME | Sets the sound output of the loudspeakers |
| MUTE | Enables the choice of mute On/Off | |
| AUDIO INPUT | Choose the source that is used for the audio input (HDMI or Line In)(only in VGA mode) | |
| COLOUR SETTING | For selecting the colours to improve brightness and colour saturation | ||
| COOL Adds blue to the screen and generates a cooler white | |||
| NORMAL Adds red to the screen and generates a warmer white and a more intense red | |||
| WARM Adds green to the screen and generates a darker hue. | |||
| USER COLOUR Individual settings for red (R), green (G) and blue (B) | |||
| PICTURE MODE offers an optimal display environment corresponding to the displayed content | |||
| INFORMATION | Displays information about the current input signal from the graphics card of your computer | ||
| MANUAL IMAGE ADJUSTMENT | Horizontal size, H/V position, fine tuning, sharpness, video mode setting and picture mode | ||
| H./V. POSITION Sets the horizontal and vertical position of the video image (only in VGA mode) | |||
| HORIZONTAL SIZE Sets the width of the screen (only in VGA mode) | |||
| PHASE Fine adjustment to improve the image on the screen. Incorrect adjustment, horizontal image error can appear (only in VGA mode). | |||
| SHARPNESS For adjusting the sharpness for a signal which does not comply with the physical resolution of the screen (only for resolutions <1920x1080) | |||
| VIDEO MODE ADJUSTMENT Choose a video mode of the options FULL SCREEN und 4:3. This option is only available when the resolution of the picture is no native 16:9 picture. | |||
| MENU SETTING | Language, OSD position, OSD time out and background | ||
| LANGUAGE SELECT Makes it possible for the user to choose from the available languages | |||
| OSD POSITION Horizontal and vertical setting of the OSD position | |||
| OSD TIME OUT To automatically switch off the on screen display (OSD) after a preset time has elapsed | |||
| OSD BACKGROUND Enables switching on and off of the OSD background | |||
| AUTOMATIC SHUTDOWN Select if the product will automatically switch to standby mode when not in operation (in HDMI mode only) | |||
| MEMORY RECALL | For restoring the factory settings for video and audio control | ||
9. Power-saving options
This monitor switches to different power-saving modes which are specified by the respective computer/operating system. This complies with the current requirements for reducing the energy consumption.
The monitor supports the following types of power-saving modes:
| Status | Power consumption (nominal value) | Colour of operating light | Standby (approx.) |
| ON | 30 watts (max.) | blue | - |
| READY | < 0,5 watt | orange | 2 seconds |
Depending on the operating system, the monitor remains in the power-saving mode until you press a key or move the mouse (if available).
To switch from the READY state to the ON operating mode, the monitor needs roughly 2 seconds.
10. Customer service
10.1. Troubleshooting
If problems occur with your monitor, make sure that the monitor has been properly installed. If the problems persist, then read this chapter for information about possible solutions.
10.1.1. Check cables and connections
Start by carefully checking all the cable connections. If the power indicator lights are not on, ensure that the monitor and the computer are properly connected to the power supply.
10.1.2. Faults and possible causes
10.1.3. The monitor does not show a picture:
Check:
• Power supply: The mains cable must firmly inserted in the socket and the power switch must be switched on.
- Signal source: Please check if the signal source (computer or similar) is switched on and that the connection cables are firmly inserted in the sockets.
- Refresh rates: The current refresh rate must be suitable for the monitor.
• Power-saving mode: Press any key or move the mouse to deactivate the mode.
- Screen saver: If the computer's screen saver is activated, press any key on the keyboard or move the mouse.
- Signal connector: If the pins are bent, contact your customer service.
- Set the applicable values for your monitor.
10.1.4. The picture flickers up/down or is inconsistent:
Check:
• Signal connector: If the pins are bent, contact your customer service.
• Signal connector: The connectors of the signal cable must be inserted firmly in the sockets.
- Graphics card: Check if the settings are correct.
- Refresh rates. Select valid settings in your graphics settings.
• Monitor output signal. The monitor output signal of the computer must match the technical data of the monitor.
- Remove disruptive devices (cordless phones, loudspeakers or similar) from the environment of the monitor.
- Avoid using monitor extension cables.
10.1.5. Characters are shown dark, the picture is too small, too big, or not centred, etc.:
- Adjust the respective settings.
10.1.6. Colours are not shown cleanly:
- Check the signal cable pins. If the pins are bent, contact your customer service.
- Adjust the colour settings in the OSD menu.
- Avoid using monitor extension cables.
10.1.7. The display is too bright or too dark:
- Check if the video output level of the computer matches the technical data of the monitor.
- Select Autom. adjustment to optimise the settings for brightness and contrast. For optimisation, the display should show a text page (e.g. Explorer, Word, ...).
10.1.8. The picture shakes:
- Check if the operating voltage matches the technical data of the monitor.
- Select Autom. adjustment to optimise the settings for pixels and phase synchronisation. For optimisation, the display should show a text page (e.g. Explorer, Word, ...).
10.2. Do you need more help?
If the above suggestions did not solve your problem please contact us. The following information would help us:
• How is your computer configured?
• What peripheral devices do you use?
• What messages appear on the screen?
- What software were you using when the problem occurred?
- What steps have you already taken to try and rectify the problem?
- Please provide your customer number if you have one.
11. Cleaning
You can increase the lifespan of your monitor with the following measures:

CAUTION!
None of the parts inside the housing require cleaning or maintenance.
• Always unplug the device and disconnect all cables before cleaning.
- Do not use solvents, corrosive or aerosol detergents.
- Clean the screen with a soft, lint-free cloth.
- Make sure that no water droplets remain on the monitor. Water can cause permanent discolouration.
- Do not place the screen in strong sunlight or near ultraviolet light.
- Store the packaging material in a safe place; always use this box to transport the monitor.
12. Disposal

Packaging
Your device has been packaged to protect it against transportation damage. The packaging is made of environmentally friendly material which can be recycled.

Device
At the end of its service life, the device should not be disposed of with the household rubbish. Enquire about the options for environmentally friendly and appropriate disposal.
13. Pixel defects on screens
For active matrix TFTs with a resolution of 1920 x 1080 pixels, each of which consist of three sub-pixels (red, green, blue), there are a total of approx. 6,2 million control transistors in use. Due to this very high number of transistors and the associated extremely complex manufacturing processes used, occasionally one or more pixels can fail or become incorrectly controlled.
In the past, there were a number of approaches for defining the permitted number of pixel defects. However, these approaches were mostly very complicated and varied from one manufacturer to the next. When handling warranty issues for all of its display products, MEDION therefore adheres to the strict and transparent requirements of the standard ISO 9241-307, Class II; which has been briefly summarised below.
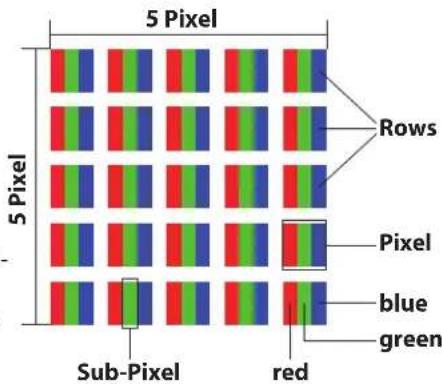
The ISO standard ISO 9241-307 defines, amongst other things, the generally applicable guidelines relating to pixel defects. Pixel defects are categorised into four fault classes and three defect types. Every individual pixel consists of three sub-pixels, each of which is assigned a basic colour (red, green, blue).
| Pixel fault class | Defect type 1Continuously lit pixel | Defect type 2Continuously blackpixel | Defect type 3Defect sub-pixellit black | |
| 0 | 0 | 0 | 0 | |
| I | 1 | 1 | 2 | 1 |
| 1 | 3 | |||
| 0 | 5 | |||
| II 2 2 5 | 0 | |||
| 5-n* | 2xn* | |||
| 0 | 10 | |||
| III 5 15 50 | 0 | |||
| 50-n* | 2xn* | |||
| 0 | 100 | |||
| IV | 50 | 150 | 500 | 0 |
| 500-n* | 2xn* | |||
| 0 | 1000 |
n^*=1,5
The table describes the maximum number of pixel failures allowed on the screen, before a warranty claim arises. A warranty claim may be applicable if the above number of defects in a category is exceeded.
14. Technical data
Model P55018 (MD 20408)
Screen size 58.4 cm (23"), TFT with LED-backlight
Format (aspect ratio) 16:9
Input voltage 100-240 V \~, 50/60 Hz
Resolution 1,920 x 1,080 pixels
Brightness 250 cd/m² (typ.)
Contrast ratio 1,000:1 (typ.)
Dynamic contrast ratio 5,000,000:1
Response time 14 ms typ. (grey to grey)
5 ms typ. (overdrive, grey to grey)
RGB input, analogue VGA 15-Pin D-SUB
3.5 mm headphone jack
User control OSD
Temperatures In operation: 0 °C to +35 °C
Not in operation: -20 °C to +60 °C
Humidity In operation: < 80%
(non-condensing) Not in operation: <90%
Weight (with stand) approx. 3.5 kg
Weight (without stand) approx. 3.3 kg
Dimensions with stand (WxHxD) approx. 529 x 370 x 199 mm
Dimensions without stand (WxHxD) approx. 529 x 315 x 46 mm
Wall mounting: Vesa standard, hole spacing 100 x 100 mm ^1
Power consumption (stand-by): <0.5 watt
Power consumption (in operation): 30 watts (max.)
CE
15. Legal notice
Copyright © 2014
All rights reserved.
This operating manual is protected by copyright.
Mechanical, electronic and any other form of reproduction is prohibited without the written permission of the manufacturer
Copyright is owned by the company:
Medion AG
Am Zehnthof 77
45307 Essen
Germany

The operating manual can be reordered via the service hotline and is available for download via the service portal at www.medion.com/gb/service/start/.
You can also scan the QR code above and download the operating manual onto your mobile device via the service portal.
bar
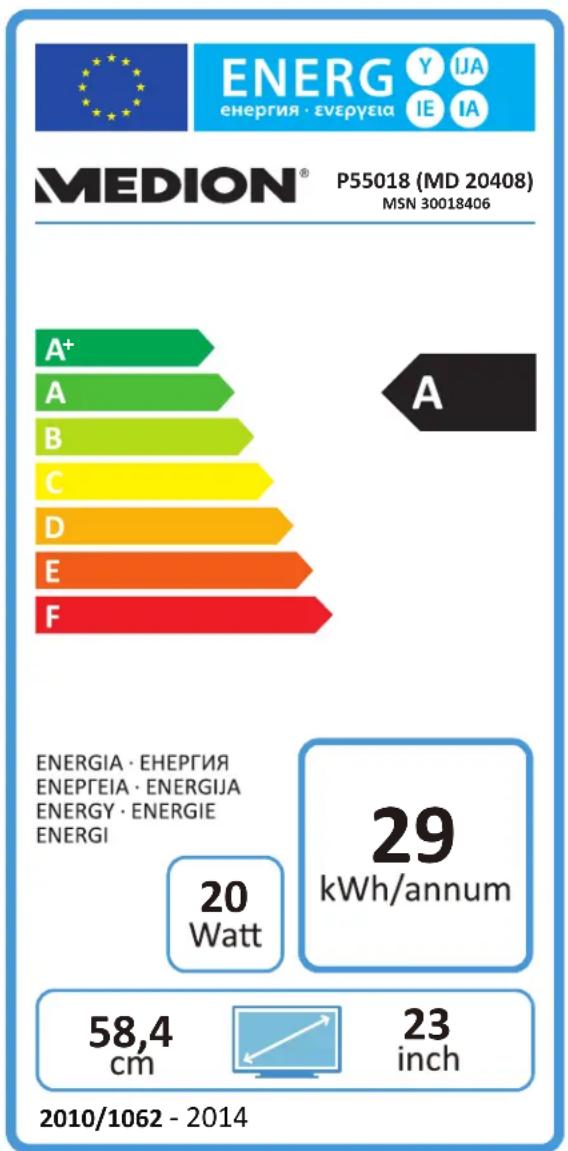
MEDION® P55018 (MD 20408) MSN 30018406 | Category | Value | | :--- | :--- | | A+ | 20 | | A | 22 | | B | 24 | | C | 26 | | D | 28 | | E | 30 | | F | 32 | Energy - Energie / Watt: 20 | | Energy - Energie / inch: 23 | 2010/1062 - 2014 ENERGIA · Energie / kWh/annumMEDION®
UK
Medion Electronics Ltd.
120 Faraday Park, Faraday Road, Dorcan
Swindon SN3 5JF, Wiltshire
United Kingdom
Hotline: 0333 32 13 106
(National rate)
Fax: 01793 71 57 16
To contact us by email please visit the „Service and Support“ section of our website at www.medion.co.uk.
www.medion.co.uk
