
Micro F-1 G6 - Wireless transceiver Wireless Solution - Free user manual and instructions
Find the device manual for free Micro F-1 G6 Wireless Solution in PDF.


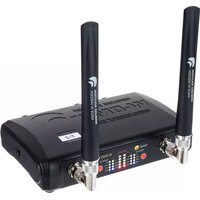
| Product Type | Wireless DMX Transceiver (FLEX: Transmitter or Receiver) |
| Model | Micro F-1 G6 |
| Brand | Wireless Solution |
| Dimensions (W x D x H) | 100 x 40 x 65 mm (3.94 x 1.57 x 2.56 in) |
| Weight (without battery) | 190 g (4.60 oz) |
| Power Supply | Micro USB 5V DC ±10%, 500 mA max |
| Radio Technology | Frequency Hopping Spread Spectrum (FHSS) |
| Frequency Band | 2.4 GHz ISM band |
| Operating Modes | TX (Transmitter), RX (Receiver), FLEX (switchable), plus compatibility modes: G3, G4, G4S, G5, CRMX (optional) |
| Compatibility | Backward compatible with Generation 3 and CRMX protocol (with license) |
| DMX/RDM Support | DMX512 and RDM (RDM LED indicator) |
| Connector | 5-pin XLR male (F-1 model) |
| Bluetooth | Yes, for configuration via W-DMX Configurator app (iOS/Android) |
| Configuration | Via front-panel button or W-DMX Configurator app |
| Firmware Update | Over-the-air via Bluetooth using the app |
| Security | PIN code protection (reset via 7 button presses) |
| Operating Temperature | 0° to 45°C (32° to 113°F) |
| Storage Temperature | -10° to 50°C (14° to 122°F) |
| Maximum Humidity | 90% non-condensing |
| Included Accessories | Quick start leaflet, AC/DC USB power supply, Velcro strap |
| Compliance | CE, UKCA, FCC (ID: XRSTIMOMWAN201), Industry Canada Class B |
| Intended Use | Professional lighting control only, indoor use |
Frequently Asked Questions - Micro F-1 G6 Wireless Solution
User questions about Micro F-1 G6 Wireless Solution
0 question about this device. Answer the ones you know or ask your own.
Ask a new question about this device
Download the instructions for your Wireless transceiver in PDF format for free! Find your manual Micro F-1 G6 - Wireless Solution and take your electronic device back in hand. On this page are published all the documents necessary for the use of your device. Micro F-1 G6 by Wireless Solution.
USER MANUAL Micro F-1 G6 Wireless Solution
Wireless Solution Sweden AB
2022-09-30
Contents
Safety information 4
English....4
Deutsch....4
Introduction 5
The W-DMX™ Technology 5
User interface 7
Hardware 8
Contents included 8
Operation 9
Basic setup – Linking devices 9
Unlinking devices 9
Individual unlink 9
Group unlink 10
Linking multiple transmitters with multiple receivers 10
Switching FLEX mode 10
Changing MODE 10
W-DMX™ Configurator app & Bluetooth 11
Setting PIN code 11
Reset PIN code 11
Turning Bluetooth on/off 12
Frequency usage 12
Upgrades and Updates 13
CRMX™ upgrade 13
Firmware Update 13
Compliance information 14
CE 14
UKCA 14
FCC 14
FCC Information to User 14
FCC Guidelines for Human Exposure 14
FCC Declaration of Conformity 14
FCC Radio Frequency Interference Warnings & Instructions 15
Industry Canada 15
Safety information
English
- Please read these instructions and safety instructions carefully before using this product.
- Keep these instructions for future reference.
- Never plug the product into the mains supply while it is still in its packaging. Never cover during use.
- Only use indoors and in dry spaces, except where otherwise explicitly stated.
- Verify that the product has not been damaged in transport before you make use of it.
- Keep the product out of the reach of animals, children and persons who require supervision.
- This product is intended for professional use only.
- Always place the product on a stable, solid and flat base or safely secure it.
- Do not use the product near hot surfaces or objects.
- Repairs must only be carried out by a qualified person.
- Note that the connected voltage and current corresponding to the sticker on the product.
Deutsch
Welcome to the Wireless DMX family! We hope you enjoy your brand-new devices – Wireless Solution is the industry’s leading system for transmitting and receiving DMX signals reliably, and we thrive on avid users like you who use our products. We appreciate all your constructive feedback!
Before you use, you must know: there are two main operating modes:
• [TX] Transmitter (to transmit DMX data as wireless signals)
• [RX] Receiver (to receive wireless signals and output as DMX)
All G6 products are backward compatible to Generation 3. In order to operate in compatibility mode, please refer to 6.5 in this manual. By using the product in a compatibility mode, you will lose some of the features present in other modes. Please refer to our helpdesk service if you want to find more about which features you won't be able to use in compatibility mode.
W-DMX™ G6 is compatible with CRMX™ protocol from LumenRadio AB. To use CRMX™ in your WDMX™ G6 product you will need to install the appropriate license on your device. This can be done using the W-DMX™ Configurator App.
You may find W-DMX ^™ being used by several lighting manufacturers – this protocol, if specifically named “W-DMX ^™ ” will work in an identical way as a branded Wireless Solution product, and it is therefore compatible with our transmitters and receivers.
The W-DMX™Technology
W-DMX ^™ is engineered by Wireless Solution Sweden to provide the same quality, reliability and performance as any wired DMX link. The technology allows you to establish point-to-point links, point-to-multipoint and multipoint-to-multipoint:

flowchart
graph TD
    subgraph_PointToMultipointOperation["Point-to-multipoint operation"]
        A1["设备 TX"] --> B1["信号线"]
        B1 --> C1["接收端"]
        C1 --> D1["接收端"]
        D1 --> E1["接收端"]
        E1 --> F1["接收端"]
    end

    subgraph_MultipointToMultipointOperation["Multipoint-to-multipoint operation"]
        A2["设备 TX"] --> B2["信号线"]
        B2 --> C2["接收端"]
        C2 --> D2["接收端"]
        D2 --> E2["接收端"]
        E2 --> F2["接收端"]
    end
Figure 1: Topologies
W-DMX ^™ is unique in its use of advanced radio technologies that are also used in mobile phones and military communication.
Rather than using fixed frequency channels, W-DMX™ uses Frequency Hopping technology to continually check the radio channels for interferences and to rapidly move operation to clear radio channels.
User interface
Though the interface display appears simple, there is a lot of information you can read back, which will help you properly set up your system and help you understand how your devices are operating.
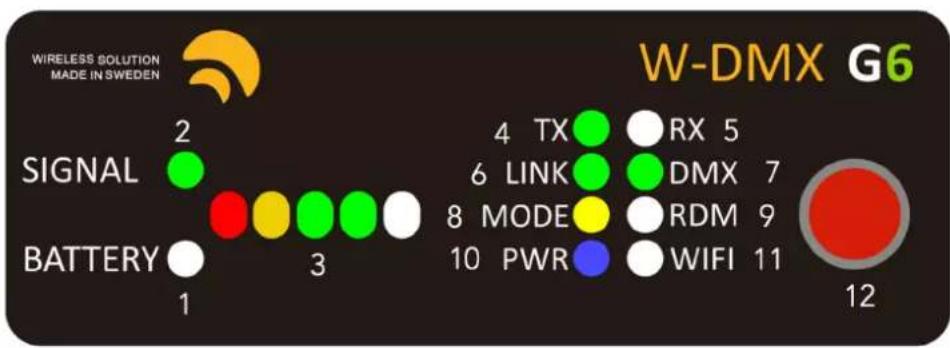
Figure 2: Front panel overlay
- BATTERY Not used on the MicroBox series.
- SIGNAL Indicates that the Signal status is showing signal strength.
- SIGNAL STATUS On a receiver; indicates the received signal quality. On a transmitter; indicates the configured output power.
- TX Device is operating as a transmitter.
- RX Device is operating as a receiver.
- LINK On a transmitter; states it's ready to establish a link. On a receiver;
• Off: not linked to any transmitter
• On: active link from a transmitter
- Blinking: Linked to a transmitter but link is lost [either the transmitter is outof-range or turned off].
-
DMX Indicates whether DMX data is present.
-
MODE Indicates the radio mode [See chapter 3.4].
-
RDM Flashes when there is RDM traffic activity.
-
PWR States power condition of the device.
-
WIFI Not used on the MicroBox series.
-
Red function button.
Hardware

Figure 3: Front panel overlay
- Kensington security slot
- XLR 5 pin (Female on R-512 models, male for F-1 models)
- Power switch - Power switch only works when operating with batteries, not with USB power.
- Micro USB 5V power connector - Power supply function only, 5DVC ±10%/500mA max.
Contents included
When you purchase a new MicroBox, the following items are included:
- MicroBox device (F-1 or R-512)
- Quick start leaflet
•AC/DC USB power supply
•Velcro strap
Working Temperature: 0° to 45° Celsius, storage temperature -10° to 50° Celsius. Max. humidity 90%.
Dimensions: W x D x H: 100 x 40 x 65 mm [3.94" x 1.57" x 2.56"] | Net: 190g [4.60 oz.] (w/o battery)
Operation
All W-DMX ^™ G6 devices uses similar user interfaces, however some model-specific differences may apply.
Basic setup - Linking devices
A basic setup is defined by the link between two devices. This means that, in order to send data from a transmitter to a receiver, it's necessary to link the devices:
Press the red function button, on the transmitter momentarily and the LINK LED starts flashing.

Figure 4: Front panel overlay
NOTE: All available (currently unlinked) receivers, as long as they are turned on and compatible with the transmitter's radio mode, will pair with this transmitter. The LINK LED of each receiver will flash for 5 seconds, and then stay static once linked up.
There is no limit of the number of receivers that can link up with a transmitter – there can be an infinite number of receivers all paired with a single transmitter.
Unlinking devices
There are two ways to unlink devices – individual unlink, or group unlink:
Individual unlink
Press and hold the red function button, on each receiver that you wish to unlink, for at least 3 seconds. The LINK LED will turn off.
Group unlink
Press and hold the red function button on the transmitter for at least 3 seconds. This will unlink all currently powered receivers that are linked to this transmitter.
Linking multiple transmitters with multiple receivers
When multiple receivers need to be linked up with different transmitters, repeat the process in 6.1., but turn off all receivers you do not wish to pair up. For example:
- If you have 2 transmitters and 10 receivers, pair the first transmitter to 5 receivers, while the last five are turned off.
• After that, turn the last five receivers, and pair them to the second transmitter.
NOTE: This will not affect any receiver that has already been paired up.
Switching FLEX mode
F-1 units can be changed between transmitter or receiver.
FLEX mode determines if the unit is used in transmit mode (TX) or receive mode (RX):
- Press the red function button rapidly 5 times.
- Press and hold the red function button for at least 3 seconds.
- The LINK and DATA LEDs will flash alternating.
- Each time you press the red function button you will step through the available modes, this will be indicated by a flashing RX or TX LED.
- Press and hold the red function button
Changing MODE
There are a few operating modes within all W-DMX™ products using different generations of the communication protocol. The W-DMX G6 supports several modes to maximize compatibility with different generations of equipment. When operating as an RX the device will automatically switch to the correct mode depending on the mode of the transmitter that is linking to it.
The following modes are supported when operating as an RX (CRMX requires the CRMX option):
| MODE LED | |
| G3 | Green |
| G4 | Red |
| G4S | Violet |
| G5 | Amber |
| CRMX | White |
While operating as a TX you can change between modes at any given moment:
- Press the red function button rapidly 3 times.
- Press and hold the red function button for at least 3 seconds.
- Each time you press the red function button you will step through the available modes; this will be indicated by the MODE LED.
- Press and hold the red function button to save and exit.
NOTE: When operating as TX, some modes are not supported.
NOTE: All changes shall be made to the transmitter. It's necessary to re-link all receivers after changing control modes.
W-DMX™ Configurator app & Bluetooth
All configuration and operation can be performed from the W-DMX™ Configurator app that is available from App Store on iOS and Google Play on Android.
W-DMX™ Configurator app, search for "W-DMX Configurator" on App Store or Google Play.
Setting PIN code
To avoid unauthorized access to W-DMX™ G6 devices, it is recommended to set a PIN code for your device. This is done from the W-DMX™ Configurator app.
Reset PIN code
If you have forgotten your PIN code, you can reset it by following the following procedure:
- Press the red function button rapidly 7 times.
- Press and hold the red function button for at least 3 seconds.
- The device will now reboot with the PIN code disabled.
Turning Bluetooth on/off
The MODE LED will flash with a blue light every two seconds when Bluetooth is enabled. When Bluetooth is disabled, no blue flashes will appear on the MODE LED.
Bluetooth can be switched on or off at any time:
- Press the red function button rapidly 2 times.
- Press and hold the red function button for at least 3 seconds.
- The device will now reboot with the Bluetooth mode toggled.
Frequency usage
Sometimes there are cases that require some extra frequency planning. To make this easier for you, the W-DMXTM Configurator app provides a number of pre-set options for frequency usage;
•Full band
- Lower or upper half
- Lower, mid or upper third
Selecting any of these settings, except for Full band, limits the device's frequency hopping so that it leaves the other parts of the bands untouched.
Upgrades and Updates
Before starting to install any upgrade options, make sure you have updated to the latest firmware version.
CRMX™ upgrade
CRMX^TM – the radio protocol of LumenRadio's wireless DMX and RDM systems – can be used by your BlackBox G6 units. It requires a software option that can be purchased separately. Install the option using the W-DMX™ Configurator app.
Firmware Update
Wireless Solution is committed to developing and improving its wireless technology – this means that we every now and then releases new firmware versions. Sometimes it might be added functionality, but since even the best makes mistakes sometimes – we might release bug fixes also. All G6 products is updateable via our W-DMX™ Configurator App for iOS and Android.
New firmware versions will be downloaded automatically in the W-DMX™ Configurator app.
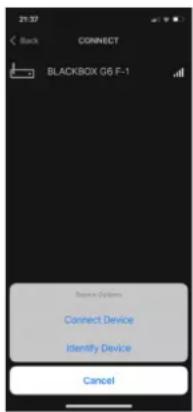
Instructions for installing firmware updates from the app:
- Start the W-DMX Configurator app on your iOS or Android device.
- Click "Connect" and you will be presented with a list of nearby devices. The list is sorted by an approximated distance.
- Click a device in the list and choose "Identify Device" if you are unsure which unit to connect to.
- Click "Connect Device" to connect to the desired device.
- In the main screen of the app, click "Firmware" to automatically update to the latest firmware for your device.

Compliance information
CE
This product complies with the Essential Requirements of RED (Radio Equipment Directive) of the European Union (2014/53/EU). This product meets the requirements of relevant conformance standards.
A detailed Declaration of Conformity is available upon request from the manufacturer.
UKCA
This product complies with the relevant statutory requirements in the United Kingdom. This product meets the requirements of relevant conformance standards.
A detailed Declaration of Conformity is available for market surveillance upon request from the manufacturer.
FCC
FCC IDENTIFIER: XRSTIMOMWAN201
FCC Information to User
This product does not contain any user serviceable components and is to be used with approved antennas only. Any product changes or modifications will invalidate all applicable regulatory certifications and approvals.
FCC Guidelines for Human Exposure
This equipment complies with FCC radiation exposure limits set forth for an uncontrolled environment. This equipment should be installed and operated with minimum distance of 20 cm between the radiator and your body. This transmitter must not be co-located or operating in conjunction with any other antenna or transmitter.
FCC Declaration of Conformity
We Wireless Solution Sweden AB, Johan Willins gata 6, 416 64 Gothenburg, Sweden, declare under our sole responsibility that this product complies with Part 15 of FCC Rules. Operation is subject to the following two conditions:
• This device may not cause harmful interference, and
- This device must accept any interference received, including interference that may cause undesired operation.
FCC Radio Frequency Interference Warnings & Instructions
This equipment has been tested and found to comply with the limits for a Class B digital device, pursuant to Part 15 of the FCC Rules. These limits are designed to provide reasonable protection against harmful interference in a residential installation. This equipment uses and can radiate radio frequency energy and, if not installed and used in accordance with the instructions, may cause harmful interference to radio communications. However, there is no guarantee that interference will not occur in a particular installation.
If this equipment does cause harmful interference to radio or television reception, which can be determined by turning the equipment off and on, the user is encouraged to try to correct the interference by one or more of the following methods:
- Reorient or relocate the receiving antenna
- Increase the separation between the equipment and the receiver
- Connect the equipment into an electrical outlet on a circuit different from that which the radio receiver is connected
- Consult the dealer or an experienced radio/TV technician for help.
Modifications made to the product, unless expressly approved by LumenRadio AB, could void the user's right to operate the equipment.
Industry Canada
This digital apparatus does not exceed the Class B limits for radio noise emissions from digital apparatus set out in the Radio Interference Regulations of the Canadian Department of Communications.

- Contents
- Safety information 4
- Introduction 5
- User interface 7
- Hardware 8
- Operation 9
- Upgrades and Updates 13
- Compliance information 14
- Safety information
- English
- Deutsch
- The W-DMX™Technology
- User interface
- Hardware
- Contents included
- Operation
- Basic setup - Linking devices
- Unlinking devices
- Individual unlink
- Group unlink
- Linking multiple transmitters with multiple receivers
- Switching FLEX mode
- Changing MODE
- W-DMX™ Configurator app & Bluetooth
- Setting PIN code
- Reset PIN code
- Turning Bluetooth on/off
- Frequency usage
- Upgrades and Updates
- CRMX™ upgrade
- Firmware Update
- Compliance information
- CE
- UKCA
- FCC
- FCC IDENTIFIER: XRSTIMOMWAN201
- FCC Information to User
- FCC Guidelines for Human Exposure
- FCC Declaration of Conformity
- FCC Radio Frequency Interference Warnings & Instructions
- Industry Canada
Brand : Wireless Solution
Model : Micro F-1 G6
Category : Wireless transceiver