
KMV-25 - Meat Grinder Pro-Cut - Free user manual and instructions
Find the device manual for free KMV-25 Pro-Cut in PDF.


| Product Type | Electric Meat Grinder |
| Model | KMV-25 |
| Brand | Pro-Cut |
| Motor Power | 1200 W (peak) |
| Voltage / Frequency | 120 V / 60 Hz |
| Grinding Capacity | Approx. 2.5 kg/min |
| Dimensions (L x W x H) | 30.5 x 20.3 x 35.6 cm |
| Net Weight | 5.2 kg |
| Material | Stainless steel cutting blade, aluminum body |
| Included Accessories | 3 grinding plates (fine, medium, coarse), 1 stuffing tube, 1 pusher |
| Main Functions | Meat grinding, sausage stuffing |
| Safety Features | Thermal overload protection, non-slip feet, safety lock lid |
| Cleaning and Maintenance | Disassemble after each use; wash parts in warm soapy water (hand wash only) |
| Spare Parts Availability | Blades, plates, and stuffing tube available separately |
| Repairability | User-serviceable: replaceable blades and plates; motor service by technician |
| Certifications | ETL, FDA food contact approved |
| Warranty | 2 years limited |
Frequently Asked Questions - KMV-25 Pro-Cut
User questions about KMV-25 Pro-Cut
0 question about this device. Answer the ones you know or ask your own.
Ask a new question about this device
Download the instructions for your Meat Grinder in PDF format for free! Find your manual KMV-25 - Pro-Cut and take your electronic device back in hand. On this page are published all the documents necessary for the use of your device. KMV-25 by Pro-Cut.
USER MANUAL KMV-25 Pro-Cut
READ THIS MANUAL BEFORE USING THE EQUIPMENT FOR THE FIRST TIME.
507092-B
INSTRUCTIONS FOR OPERATION, SERVICE AND MAINTENANCE OF THIS EQUIPMENT
CONTENTS: PAGE
I. INTRODUCTION 1
II. UNPACKING 2
III. INSTALLATION 2
IV. OPERATION 2
V. CLEANING 3
VI. MAINTENANCE 5
VII. ELECTRICAL SPECIFICATIONS
5
I.- INTRODUCTION:
Congratulations!, you have acquired a meat grinder, which is made of long lasting materials that should give you years of trouble free operation and durable service. Before you unpack your new equipment, please, read completely this manual.
IMPORTANT!: it is of vital importance that you and any person that will operate this unit thoroughly read this manual.

WARNING!:
This equipment must be connected to a thermal connection, not use the equipment if it is not properly grounded. If the power cord is damaged, it must be replaced by your authorized technician or dealer.
This equipment must be connected to a thermal connection. Do not use the equipment if it is not properly grounded.

The appliance is not be used by persons (including children) with reduced physical, sensory or mental capabilities, or lack of experience and knowledge, unless they have given supervision or instruction. Children being supervised not play with the appliance.

Never perform service, cleaning or maintenance on this unit while connected to a power source.

Warning! Never introduce hands or fingers inside the tumbler or between the tracking wheels. Do not operate without lid in place.

Do not leave the machine unattended while in operation & turn it off when it is not being used.
II.- UNPACKING
While unpacking the vacuum tumbler take special care in removing the components and make sure that all are accounted for and check possible shipping damage:
1 Tank (1)
1 Lid Tank (2)
1 Cabinet and Chasis
*Note: for reference numbers see "Vacuum tumbler diagram for components" (Central pages)
III.- INSTALLATION:
The Meat grinder is ready to use. Before to install it, you only need to verify the next points:
- Electrical installation meets the required specification of the equipment.
- Place has an adequate illumination and level floor.
- Room is clean and meets with the hygienic conditions for food processing.
IMPORTANT!:
Completely Wash the lid, tank and the top valve before using for the first time.
IV.- OPERATION:
The normal procedure to operate the Meat tumbler is:
1.- Clean the tank and place it in vertical position.
2.- Put all the ingredients into the tank.
3.- Place the transparent lid on the top of the tank. Be sure that this cover is centered as well as settled down on the "O"-Ring rubber gasket.
4.- Insert the hose free end into the cover valve. Open the valve
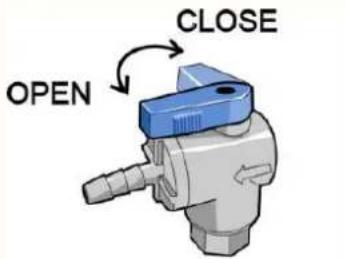
FIG.2 MANUAL VALVE
*Note: The valve must be opened while the vaccum level ir reached.

IMPORTANT!
Max. load tank capacity 44 lbs. Never exceed this capacity.
5.- Turn the selector knob to "ENABLE VACUUM" position (Fig. 3). The recommended level for a good product is between 12inHg and 15inHg (40KPa and 50KPa respectively):
6.- Press the "ENABLE VACUUM" button (located at the left of the selector knob) to start the vacuum cycle (Fig. 3).
7. Once the vacuum level is reached, turn the knob selector to the central position (turned OFF) and close the valve.
8,- Disconnect the hose from the cover valve and insert in to its pin.
9.- Hold the tank in horizontal position and place it on the wheels of tumbler. The cover must face to the outside of the machine.
*Note: Do not open the valve to avoid food leakage
10.- Turn the selector knob (Fig. 3) to "ENABLE TUMBLER" position in order to activate the timer.
a) Adjust the knob of the timer (fig. 3) in order to set the desired time (marinating cycle) according to the product that will be processed.

CAUTION!
If the timer is set up in a certain time position previously, the equipment will start to tumbler if the selector is turned to "ENABLE TUMBLER" position.
b) The marinating cycle will star when after the knob timer is turned to the desired time. The tank will rotate until the set time is reached.
c) If you want repeat the marinating cycle just turn to the desired time of the timer and the marinating cycle will start again.
-
Once the tumbling is finished take the tank down of the wheels and place it in vertical position in order to normalize the pressure and take the food out of the tank.
-
With the tank in vertical position, open the valve and wait for several seconds until the environment pressure is reached. Uncover the tank.
-
Take the food out and wash and rinse very well the tank for the next mixing.
IMPORTANT!
Give a maximum of 15 minutes of continue use and give a rest of 20 minutes, to continue with the tumbling cycle.

FIG. 3 CONTROL PANEL
V.- CLEANING
Cleaning and caring of the Meat Tumbler is very important to obtain and excellent performance of the machine and satisfaction with the flavors. It's important the Tumbler keeps always clean, so the user must follow the next indications:
a) Cleaning must be performed daily. To do this, the Tumbler must be unplugged from the electric power outlet.
b) The tank must be cleaned before the food loading takes place. (See Next Section)
c) The tank must be cleaning between loading to avoid flavor mixes.
*Note: Unplug the equipment if it will not be used for a long period of time
d) Due that the built materials are stainless steel and the food grade plastics, it's recommended to use soft soaps to perform the cleaning, as well as soft & wet cloths to do the rising. It's huge important that NO soap traces remain on the Tumbler, specially inside the tank, because the food may be contained.
e) The tank can be cleaned with a water stream, but the rest of the equipment NOT.
f) NEVER use abrasives cleaners with Chlorine, Vinegar, Acid or fibers, since it can affect the protective coating of the stainless steel and generate oxidation.
g) Clean the Tumbler as soon as the tank leakage occurs.
HOW TO CLEAN THE TANK

CAUTION!: Always disconnect the machine from the power source before executing any service of maintenance.
Turn Off and unplug always the Meat Tumbler from the electric power supply before any service or maintenance.
- Remove the tank (1) from its support (3 & 4) in the Meat Tumbler.
- Remove the paddles located inside of the tank. Using one hand, hold firmly the tank and pull the paddle upwards in order to release it from pins. (See figure 4).

Fig. 4 RELEASE BLADES
- Wash and clean paddles separately with adequate detergent. Use a soft cloth to dry the excess of water.
- Using a soft bristle brush (not provided) and adequate detergent, clean well between pins and wall of the tank to eliminate any surplus or debris food. (See Fig. 5)
- After eliminate any surplus from pins, wash the entire inner and external surface of the tank using a soft cloth (never abrasive cloths).
-
Rinse with plenty water the internal and external wall of the tank. Using a soft cloth dry the excess of water.
-
Clean well between joints to avoid rests of meat keep long period of time in the equipment since they can be a health risk.
- It's recommendable to clean the tank and paddles before and after daily use.

CAUTION!:
Avoid use of abrasive cleaners, acid, fibers, chlorides (such as chlorine bleach), on stainless Steel surfaces will cause pitting, corrosion, and metal discoloration. Allowing salty solutions to evaporate and dry on stainless Steel may also contribute to corrosive conditions.

Fig. 5 HOW TO CLEAN TANK
VI.- MAINTENANCE
Unplug always the Meat Tumbler from the electric power outlet before any service or maintenance. Replace the air filter yearly, at least.
It's recommended that a cleaner technician check this machine, yearly.
VII.- ELECTRICAL SPECIFICATIONS (depend on your equipment. See the identification Plate).
| EQUIPMENT VOLTAGE CURRENT FREQUENCY | |||
| VAC | 110 V~ | 1.5 A 60 Hz | |
| 220 V~ 1.0 A 50 or 60 Hz | |||
ELECTRIC DIAGRAM
The electric diagram for this unit is located inside the cabinet.

!WARNING!:
The cabinet for this equipment must be opened by qualified personnel only. For any problem or doubt related to electric specifications and connections, please call toy your authorized dealer.
ANNEX, TANK SLIDING SETTING
If the tank slides out of the wheels when rotates, verify the base level. If unevenness exists, it must be compensated fitting the frontal legs, screw the legs until container does not displace.

Fig. 6 TANK SLIDING SETTING

Brand : Pro-Cut
Model : KMV-25
Category : Meat Grinder