
AV-933 - Alarm Clock Prologue - Free user manual and instructions
Find the device manual for free AV-933 Prologue in PDF.


| Product Type | Alarm Clock Radio |
| Brand | Prologue |
| Model | AV-933 |
| Dimensions (approx.) | 150 x 80 x 100 mm |
| Weight (approx.) | 0.5 kg |
| Power Source | AC 100-240V, 50/60Hz |
| Backup Battery | CR2032 coin cell (for time/alarm retention) |
| Radio Bands | FM (87.5-108 MHz), AM (530-1710 kHz) |
| Alarm Types | Radio or Buzzer |
| Alarm Count | Dual alarms with independent settings |
| Snooze Function | Yes, 9-minute snooze |
| Sleep Timer | Yes, adjustable from 1-90 minutes |
| Display Type | LED (red digits) |
| Display Brightness | Adjustable (high/low/off) |
| Clock Format | 12/24 hour selectable |
| Volume Control | Rotary dial for radio and alarm |
| Antenna | FM wire antenna, AM internal ferrite |
| Speaker | Built-in mono speaker |
| Headphone Jack | 3.5mm for private listening |
| Date Display | Yes (day of week and date) |
| Temperature Display | Room temperature (°C/°F) |
| Cleaning Instructions | Wipe with a soft, dry cloth; do not use liquid cleaners |
| Safety Note | Keep away from water; do not cover ventilation slots |
| Spare Parts Availability | Contact manufacturer or authorized service centers |
| Repairability | Refer to user manual for disassembly; recommended professional service |
Frequently Asked Questions - AV-933 Prologue
User questions about AV-933 Prologue
0 question about this device. Answer the ones you know or ask your own.
Ask a new question about this device
Download the instructions for your Alarm Clock in PDF format for free! Find your manual AV-933 - Prologue and take your electronic device back in hand. On this page are published all the documents necessary for the use of your device. AV-933 by Prologue.
USER MANUAL AV-933 Prologue
Please read the entire instruction manual before use and save it for future reference. We reserve the right for any errors in text or images and for making any necessary technical changes to this document. If you should have any questions concerning technical problems please contact our Customer Services.
Safety
- Do not place naked flames such as wax candles on or near the product.
- Do not place the product on a cramped shelf so that its ventilation restricted.
- Make sure that the wall socket into which the mains lead is plugged is accessible, since the mains lead is used to disconnect the product from the supply.
- Do not cover the ventilation openings of the product.
- Do not expose the product to direct sunlight or very hot, cold or dusty environments. Avoid severe vibration and impacts.
- Do not position the product where it is exposed to moisture or splashing water.
Care and maintenance
Use a soft cloth and a mild detergent to clean the outside of the projector clock. Never use strong cleaning agents or solvents.
Waste management
Follow local ordinances when disposing of this product. If you are unsure about how to dispose of this product contact your municipality.
Specifications
Mains supply 230 V AC, 50 Hz, 5 W
Frequency bands FM 88 - 108 MHz
AM 540 - 1600 kHz
Battery 1 x CR2032
Description of the product
- Projector clock with FM/AM radio.
- Sleep timer and wake-up alarm.
- AUX-IN
Controls and functions
- [AL. 1] Alarm 1 ON/OFF
- [AL. SET] Alarm time setting
- [◀◀ Y-M-D ] Year-month-day
- [▶▶ DST] Summer/winter time setting
- [MODE] Toggle between setting modes
- [AL. 2] Alarm 2 ON/OFF
- [VOLUME +/-]
- [TUNING] Radio channel tuning
- LED display
- Loudspeaker
- [FM/AM] Choice of frequency band, FM or AM
- [RADIO ON/OFF]
- [ SNOOZE/SLEEP/NAP ] Snooze, sleep, nap timer
- [ 180° FLIP ] Rotates the projected time 180°
- [ PROJECTION ON/OFF ] Projection ON/OFF
- [BEEP/RADIO] Choice of alarm: audible signal ("beep") or radio
- Projector
- [ FOCUS ] Focus adjustment for the projected time
- AUX IN 3.5 mm low-level input
- [ RESET ] Resets the unit to its factory default settings
- FM aerial
- Mains lead
- [ DIMMER LOW/HIGH/AUTO OFF ] Display brightness and AUTO OFF setting
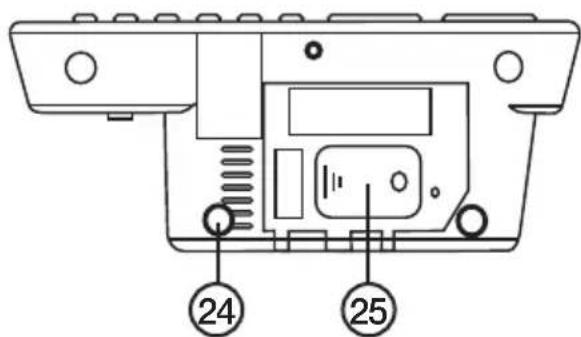
- Product marking
- Battery cover


LED display
-
PM indicator if 12-hour display has been set
-
Standby indicator
-
Indicator for alarm 1
-
Indicator for alarm 2

Getting started
-
Unscrew the screw that secures the battery cover and open the cover.
-
Install one CR2032 battery (3 V) in the battery holder. Pay attention to the polarity. The positive side of the battery must be facing upwards.
Note! If the power fails:
- The purpose of the battery is to supply the projector clock during power failures and to maintain any set alarms. When the power is restored, the clock is once more powered from the wall socket.
- When the projector clock is powered from the battery, the display and the radio are both disabled.
- A special beep is activated at the set alarm time. It is also used instead of the radio if it has been chosen as the alarm signal.
- The alarm will sound for 30 seconds, after which it switches off automatically if no button is pressed.
- Switch the alarm signal off with [RADIO ON/OFF].
- Snooze does not work when the projector clock is being powered from the battery.
- Connect the projector clock to a wall socket.
Use
Time and date
-
Press and hold [ MODE ] for two seconds. The year starts to flash on the display.
-
Press or hold [◀◀ Y-M-D] or [▶▶ DST] to set the year.
-
Press [MODE] repeatedly to set the following in turn: Month – Day – 12/24-hour display – Hours – Minutes. Press repeatedly or hold down [◀◀ Y-M-D] or [▶▶ DST] to do the various settings.
Projector
- Switch the projector on or off with [ PROJECTION ON/OFF ].
- Turn [FOCUS] for a sharp projected image of the set time on the ceiling or wall.
• To rotate the projected time through 180°, press [180° FLIP].
• The maximum distance to the wall/ceiling is: 3 metres.
Radio
- Switch the radio on and off with [RADIO ON/OFF].
- Choose FM or AM with [FM/AM]. An AM aerial is built into the radio.
- Tune in the radio station you want with [TUNING].
- Set the volume you want with [VOLUME +/-].
Alarm 1 and 2
- Press and hold [AL. SET] for two seconds. The setting for hours for alarm 1 flashes and the indication for alarm 1 lights up on the display
- Press or hold [◀◀ Y-M-D] or [▶▶ DST] to set the hours.
- Press [AL. SET] again to set the minutes.
- Press [AL. SET] again to set the weekday interval. Press [◀◀ Y-M-D] or [▶▶ DST] to choose from the following intervals: 1–5 (Monday to Friday), 1–7 (the entire week), 6–7 (Saturday-Sunday), 1–1 (one day of the week).
- Press [AL. SET] again to start setting alarm 2.
Note!: If 1–1 (one day in the week) is chosen, a single digit is shown on the display when [ AL. SET ] is pressed. This is so that the required day of the week (1–7) can be set. Press [◀◀ Y-M-D] or [▶▶ DST ] to set the day you want.
The setting for hours for alarm 2 flashes and the indication for alarm 2 lights up on the display.
- Set alarm 2 in the same way as alarm 1.
- Press [AL. SET] to check the alarm times for alarms 1 and 2 whenever you want.
- Press [AL. 1] to activate/deactivate alarm 1.
- Press [AL. 2] to activate/deactivate alarm 2.
Alarm signal
- Use [BEEP/RADIO] to choose the alarm signal: radio or beep.
- If no button is pressed, the alarm signal or the radio operates for 30 minutes when the alarm is activated. The alarm then switches off automatically and is activated again after 24 hours.
Snooze
- Press [SNOOZE/SLEEP] when the alarm is activated. The alarm is silenced and is activated again after nine minutes.
- The snooze function is switched off automatically after 30 minutes.
- The snooze function is switched off if [RADIO ON/OFF] is pressed.
- If AUTO OFF mode for the display has been chosen, the display lights up when [SNOOZE/SLEEP/NAP] is pressed and then goes out again.
Display
- Set the brightness of the display with [ DIMMER LOW/HIGH/AUTO OFF ]. LOW, HIGH or AUTO OFF.
- With AUTO OFF, the display is unlit but lights up when the alarm is activated.
- In AUTO OFF mode, the time can be checked at any time by pressing any button on the front or top of the projector clock.
Note! When the [ DIMMER LOW/HIGH/AUTO OFF ] control is set to AUTO OFF, the display only goes out after about 10 seconds.
Year and date
To show the set year and date, press [ ◀◀◀ Y-M-D ].
Sleep timer
- With the radio switched on, press [SNOOZE/SLEEP/NAP]. "90" flashes on the display.
- Press [SNOOZE/SLEEP/NAP] again to choose 90, 60, 30 or 15 minutes.
- The radio switches off automatically when the set time expires.
Nap times (preset nap times)
- With the radio switched off, press [SNOOZE/SLEEP/NAP].
- A symbol and "90" flash on the display.
- Press [SNOOZE/SLEEP/NAP] again to choose 90, 80, 70, 60, 50, 40, 30, 20 or 10 minutes' of nap time.
DST
Press and hold [▶▶ DST] for two seconds to toggle between summer time and winter time.
AUX-IN
- Connect a device such as an mp3 player to the 3.5 mm AUX-IN jack.
• The radio is switched off automatically when AUX-IN is used. - Adjust the volume of the mp3 player and the projector clock.
Reset
- If the projector clock does not work properly it may help to reset it.
- Use a pointed object (such as a ballpoint pen or paper clip) to carefully press [ RESET ].
- This restores the projector clock to its factory settings and returns all settings (clock, date and alarm times) to zero.
Projektorklocka
Art.nr 36-4677 Modell AV-933
For consumer contact, please visit
www.clasohlson.co.uk and click on
customer service.
Internet www.clasohlson.co.uk


- SAFETY
- CARE AND MAINTENANCE
- WASTE MANAGEMENT
- SPECIFICATIONS
- DESCRIPTION OF THE PRODUCT
- CONTROLS AND FUNCTIONS
- LED DISPLAY
- GETTING STARTED
- USE
- TIME AND DATE
- PROJECTOR
- RADIO
- ALARM 1 AND 2
- ALARM SIGNAL
- SNOOZE
- DISPLAY
- YEAR AND DATE
- SLEEP TIMER
- NAP TIMES (PRESET NAP TIMES)
- DST
- AUX-IN
- RESET
- PROJEKTORKLOCKA
Brand : Prologue
Model : AV-933
Category : Alarm Clock