
Nextone Stage - Guitar amplifier BOSS - Free user manual and instructions
Find the device manual for free Nextone Stage BOSS in PDF.


| Product Type | Guitar Amplifier |
| Brand | BOSS |
| Model | Nextone Stage |
| Rated Power Output | 40 W |
| Speaker | 30 cm (12 inches) x 1 |
| Power Consumption | 37 W |
| Dimensions | 492 (W) x 248 (D) x 427 (H) mm |
| Weight | 13.4 kg (29 lbs 9 oz) |
| Channels | CLEAN and LEAD |
| Controls | CH SELECT, BOOST, TONE, VOLUME, GAIN, BASS, MIDDLE, TREBLE, DELAY, TAP, REVERB, PRESENCE, MASTER, POWER AMP SELECT, POWER CONTROL, POWER |
| Power Amp Select Types | 6V6, 6L6, EL84, EL34 |
| Power Control Settings | STANDBY, 0.5W, HALF, MAX |
| Input Jack | 1/4-inch phone type |
| Output Jacks | PHONES/REC OUT (stereo 1/4-inch), LINE OUT (1/4-inch), SPEAKER OUT 8Ω and 16Ω (A/B) |
| Effects Loop | EFX LOOP SEND/RETURN (1/4-inch phone type) |
| USB Port | USB B type for recording and editing |
| Foot Control Jacks | CH SELECT/BOOST (TRS), DELAY/GA-FC (TRS) |
| Power Supply | AC 117 V, 230 V, 240 V (depending on region); use supplied power cord |
| Accessories Included | Owner's manual, Power cord, GA-FC sticker |
| Optional Accessories | Footswitch FS-5L/FS-6/FS-7, Expression pedal EV-5/FV-500L/FV-500H, GA-FC |
| Safety Precautions | Use only supplied power cord; do not disassemble; avoid liquids; ensure adequate ventilation |
| Maintenance | Clean with dry cloth; do not use benzine, thinners, alcohol or solvents |
Frequently Asked Questions - Nextone Stage BOSS
User questions about Nextone Stage BOSS
0 question about this device. Answer the ones you know or ask your own.
Ask a new question about this device
Download the instructions for your Guitar amplifier in PDF format for free! Find your manual Nextone Stage - BOSS and take your electronic device back in hand. On this page are published all the documents necessary for the use of your device. Nextone Stage by BOSS.
USER MANUAL Nextone Stage BOSS
natural_image
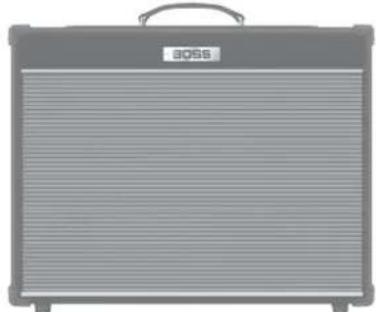
Exterior view of a gray audio amplifier (no text or symbols visible)Nextone Stage
NEX-STAGE
40 W output, 30 cm (12 inch) speaker
natural_image
Exterior view of a gray portable audio amplifier (no text or symbols visible)Nextone Artist
NEX-ARTIST
80 W output, 30 cm (12 inch) speaker
natural_image
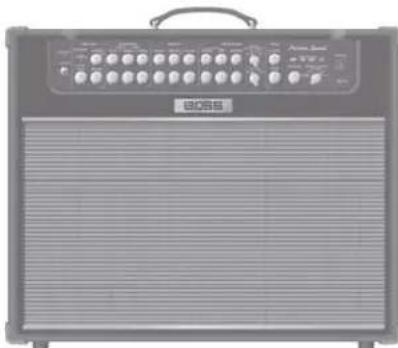
Front view of a black audio amplifier with control panel and buttons (no visible text or labels)Nextone Special
NEX-SPL
80 W output, 30 cm (12 inch) speaker
Owner's Manual
Guitar Amplifier
Nextone Stage
Nextone Artist
Nextone Special
Before using this unit, carefully read "IMPORTANT SAFETY INSTRUCTIONS" (inside front cover), "USING THE UNIT SAFELY" (p. 2), and "IMPORTANT NOTES" (p. 3). After reading, keep the document(s) where it will be available for immediate reference.
© 2018 Roland Corporation
INSTRUCTIONS FOR THE PREVENTION OF FIRE, ELECTRIC SHOCK, OR INJURY TO PERSONS
About ⚠ WARNING and ⚠ CAUTION Notices
| WARNING | Used for instructions intended to alert the user to the risk of death or severe injury should the unit be used improperly. |
| CAUTION | Used for instructions intended to alert the user to the risk of injury or material damage should the unit be used improperly.* Material damage refers to damage or other adverse effects caused with respect to the home and all its furnishings, as well to domestic animals or pets. |
About the Symbols
| ⚠️ | The △ symbol alerts the user to important instructions or warnings. The specific meaning of the symbol is determined by the design contained within the triangle. In the case of the symbol at left, it is used for general cautions, warnings, or alerts to danger. |
| ☒ | The ☑ symbol alerts the user to items that must never be carried out (are forbidden). The specific thing that must not be done is indicated by the design contained within the circle. In the case of the symbol at left, it means that the unit must never be disassembled. |
| ☒ | The ● symbol alerts the user to things that must be carried out. The specific thing that must be done is indicated by the design contained within the circle. In the case of the symbol at left, it means that the power cord plug must be unplugged from the outlet. |
ALWAYS OBSERVE THE FOLLOWING
WARNING
Make sure that the power cord is grounded
Connect mains plug of this model to a mains socket outlet with a protective earthing connection.

To completely turn off power to the unit, pull out the plug from the outlet
Even with the power switch turned off, this unit is not completely separated from its main source of power. When the power needs to be completely turned off, turn off the power switch on the unit, then pull out the plug from the outlet. For this re- outlet into which you choose to connect the cord's plug should be one that is within each readily accessible.

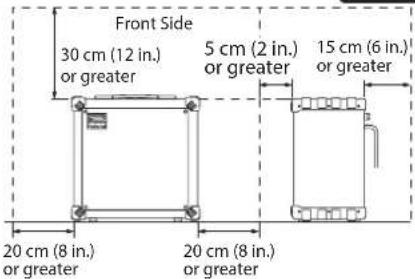
Secure a sufficient amount of space at the setup location
Since this unit normally emits a slight amount of heat, make sure to secure sufficient space around it, as shown below.

Do not disassemble or modify by yourself
Do not carry out anything unless you are instructed to do so in the owner's manual. Otherwise, you risk causing malfunction.

Do not repair or replace parts by yourself
Refer all servicing to your retailer, the nearest Roland Service Center, or an authorized Roland distributor, as listed on the "Information."

WARNING
Do not use or store in the following types of locations
- Subject to temperature extremes (e.g., direct sunlight in an enclosed vehicle, near a heating duct, on top of heat-generating equipment); or are
• Damp (e.g., baths, washrooms, on wet floors); or are
• Exposed to steam or smoke; or are
• Subject to salt exposure; or are - Exposed to rain; or are
• Dusty or sandy; or are - Subject to high levels of vibration and shakiness; or are
- Placed in a poorly ventilated location.
Do not place in an unstable location
Otherwise, you risk injury as the result of the unit toppling over or dropping down.


Connect the power cord to an outlet of the correct voltage
The unit should be connected to a power supply only of the type described as marked on the rear side of unit.

Use only the supplied power cord
Use only the attached power cord. Also, the supplied power cord must not be used with any other device.

Do not bend the power cord or place heavy objects on it
Otherwise, fire or electric shock may result.

Avoid extended use at high volume
Use of the unit at high volume for extended periods of time may cause hearing loss. If you ever experience any hearing loss or ringing in the ears, you should immediately stop using the unit and consult a specialized physician.

WARNING
Do not allow foreign objects or liquids to enter unit; never place containers with liquid on unit
Do not place containers containing liquid (e.g., flower vases) on this product. Never allow foreign objects (e.g., flammable objects, coins, wires) or liquids (e.g., water or juice) to enter this product. Doing so may cause short circuits, faulty operation, or other malfunctions.


Turn off the unit if an abnormality or malfunction occurs
Immediately turn the unit off, remove the power cord from the outlet, and request servicing by your retailer, the nearest Roland Service Center, or an authorized Roland distributor, as listed on the "Information" when:

• The power cord has been damaged; or
• If smoke or unusual odor occurs; or
- Objects have fallen into, or liquid has been spilled onto the unit; or
- The unit has been exposed to rain (or otherwise has become wet); or
- The unit does not appear to operate normally or exhibits a marked change in performance.
Be cautious to protect children from injury
Always make sure that an adult is on hand to provide supervision and guidance when using the unit in places where children are present, or when a child will be using the unit.

Do not drop or subject to strong impact
Otherwise, you risk causing damage or malfunction.

Do not share an outlet with an unreasonable number of other devices
Otherwise, you risk overheating or fire.

Do not use overseas
Before using the unit in overseas, consult with your retailer, the nearest Roland Service Center, or an authorized Roland distributor, as listed on the "Information."

Don't block ventilation openings
Don't allow the unit's ventilation openings to be blocked by a newspaper, tablecloth, curtains, or similar objects.

Don't place burning objects on the unit
Don't place any burning object (such as a candle) on the unit.

Be aware of weather conditions
Use the apparatus in moderate climates.


CAUTION
When disconnecting the power cord, grasp it by the plug
To prevent conductor damage, always grasp the power cord by its plug when disconnecting it.

Periodically clean the power plug
An accumulation of dust or foreign objects between the power plug and the power outlet can lead to fire or electric shock.

At regular intervals, be sure to pull out the power plug, and using a dry cloth, wipe away any dust or foreign objects that may have accumulated.
Disconnect the power plug whenever the unit will not be used for an extended period of time
Fire may result in the unlikely event that a breakdown occurs.


CAUTION
Route all power cords and cables in such a way as to prevent them from getting entangled
Injury could result if someone were to trip on a cable and cause the unit to fall or topple.

Avoid climbing on top of the unit, or placing heavy objects on it
Otherwise, you risk injury as the result of the unit toppling over or dropping down.

Never connect/disconnect a power plug if your hands are wet
Otherwise, you could receive an electric shock.


CAUTION
Disconnect all cords/cables before moving the unit
Before moving the unit, disconnect the power plug from the outlet, and pull out all cords from external devices.

Before cleaning the unit, disconnect the power plug from the outlet
If the power plug is not removed from the outlet, you risk receiving an electric shock.

Whenever there is a threat of lightning, disconnect the power plug from the outlet
If the power plug is not removed from the outlet, you risk causing malfunction or receiving an electric shock.

IMPORTANT NOTES
Power Supply
- Do not connect this unit to same electrical outlet that is being used by an electrical appliance that is controlled by an inverter or a motor (such as a refrigerator, washing machine, microwave oven, or air conditioner). Depending on the way in which the electrical appliance is used, power supply noise may cause this unit to malfunction or may produce audible noise. If it is not practical to use a separate electrical outlet, connect a power supply noise filter between this unit and the electrical outlet.
Placement
- Using the unit near power amplifiers (or other equipment containing large power transformers) may induce hum. To alleviate the problem, change the orientation of this unit; or move it farther away from the source of interference.
- This unit may interfere with radio and television reception. Do not use this unit in the vicinity of such receivers.
- Noise may be produced if wireless communications devices, such as cell phones, are operated in the vicinity of this unit. Such noise could occur when receiving or initiating a call, or while conversing. Should you experience such problems, you should relocate such wireless devices so they are at a greater distance from this unit, or switch them off.
- When moved from one location to another where the temperature and/or humidity is very different, water droplets (condensation) may form inside the unit. Damage or malfunction may result if you attempt to use the unit in this condition. Therefore, before using the unit, you must allow it to stand for several hours, until the condensation has completely evaporated.
- Depending on the material and temperature of the surface on which you place the unit, its rubber feet may discolor or mar the surface.
- Do not place containers or anything else containing liquid on top of this unit. Also, whenever any liquid has been spilled on the surface of this unit, be sure to promptly wipe it away using a soft, dry cloth.
Maintenance
- Never use benzine, thinners, alcohol or solvents of any kind, to avoid the possibility of discoloration and/or deformation.
Repairs and Data
- Before sending the unit away for repairs, be sure to make a backup of the data stored within it; or you may prefer to write down the needed information. Although we will do our utmost to preserve the data stored in your unit when we carry out repairs, in some cases, such as when the memory section is physically damaged, restoration of the stored content may be impossible. Roland assumes no liability concerning the restoration of any stored content that has been lost.
Additional Precautions
- Any data stored within the unit can be lost as the result of equipment failure, incorrect operation, etc. To protect yourself against the irretrievable loss of data, try to make a habit of creating regular backups of the data you've stored in the unit.
- Roland assumes no liability concerning the restoration of any stored content that has been lost.
- Use a reasonable amount of care when using the unit's buttons, sliders, or other controls; and when using its jacks and connectors. Rough handling can lead to malfunctions.
- When disconnecting all cables, grasp the connector itself—never pull on the cable. This way you will avoid causing shorts, or damage to the cable's internal elements.
- A small amount of heat will radiate from the unit during normal operation.
• To avoid disturbing others nearby, try to keep the unit's volume at reasonable levels. -
When disposing of the packing carton or cushioning material in which this unit was packed, you must observe the waste disposal regulations that apply to your locality.
-
Use only the specified expression pedal. By connecting any other expression pedals, you risk causing malfunction and/or damage to the unit.
- Do not use connection cables that contain a built-in resistor.
Intellectual Property Right
- Roland and BOSS are either registered trademarks or trademarks of Roland Corporation in the United States and/or other countries.
• ASIO is a trademark and software of Steinberg Media Technologies GmbH. - This product contains eParts integrated software platform of eSOL Co., Ltd. eParts is a trademark of eSOL Co., Ltd. in Japan.
- Company names and product names appearing in this document are registered trademarks or trademarks of their respective owners.
Top panel
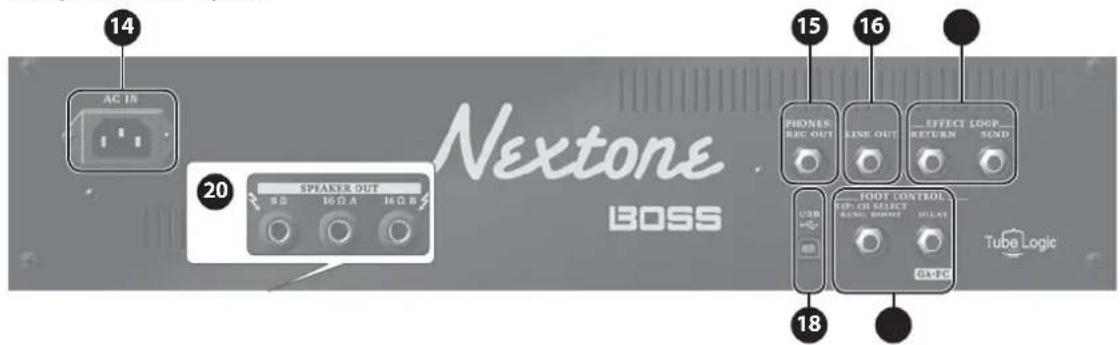
Rear panel/Bottom panel
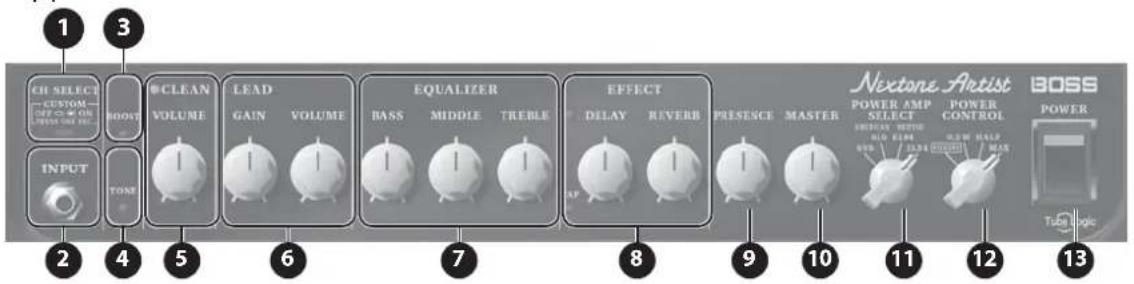
Top Panel
1 [CH SELECT] button
Switches between the CLEAN channel and the LEAD channel. The indicator of the selected channel is lit.
* Hold down this button for one second or longer to select CUSTOM mode. In CUSTOM mode, sound settings can be made only using the dedicated software. http://www.boss.info/
2 INPUT jack
Connect your electric guitar here.
3 [BOOST] button
Boosts the gain. On the CLEAN channel, this produces a pleasant crunch sound. On the LEAD channel, this produces hard distortion.
4 [TONE] button
On the CLEAN channel, this makes the mid- and high-frequency ranges sparkle, producing a crisp sound. On the LEAD channel, this produces a fat tone.
5 CLEAN channel
Lets you create a broad range of sounds from undistorted clean sound to light overdrive.
[VOLUME] knob
Adjusts the volume of the clean channel.
6 LEAD channel
[GAIN] knob
Adjusts the gain (amount of distortion) of the LEAD channel. Use this knob to change from crunch sound to hard distortion. Turning the [BOOST] button on raises the gain of the LEAD channel.
[VOLUME] knob
Adjusts the volume of the LEAD channel.
7 EQUALIZER
[BASS] knob
Adjusts the sound level of the low-frequency range.
[MIDDLE] knob
Adjusts the sound level of middle-frequency range.
[TREBLE] knob
Adjusts the sound level of the high-frequency range.
8 EFFECT
[DELAY] button
Turns the DELAY on/off.
[DELAY] knob
Adjusts the depth of delay effect.
[TAP] button
Sets the delay time. When you press this button two or more times, the delay time is set to the interval between presses.
[REVERB] knob
Adjusts the reverb depth.
9 [PRESENCE] knob
Adds lustrous outline to the mid- and high-frequency range. This is effective when you want to improve the definition of the sound.
10 [MASTER] knob
Adjusts the overall volume.
11 [POWER AMP SELECT] switch
Selects the type of power amp. Using proprietary Tube Logic technology (p. 11), this applies adjustments to each power tube of the power amp circuit, so that not only the power tubes but also the cabinet speaker is driven optimally.
| Type Explanation | |
| 6V6 | An American-type sound that easily distorts with a sense of drive even at low volumes, and has a distinctively crisp sound. |
| 6L6 | An American-type sound suitable for clean tones with a sense of solidity, and distinctive for its rich mid-frequency range. Also used in high-gain stack amps. |
| EL84 | Distinctive for overdrive sound with rich overtones. A British-type sound that produces a sense of drive at low output. |
| EL34 | Characterized by warm and fat sound with detailed distortion. Raising the gain produces a British-type sound that stands out well. Often used in stack amps. |
12 [POWER CONTROL] switch
Lets you switch the output level of the power amp according to your location or needs. By selecting "STANDBY" you can mute the sound while leaving the unit powered-on. This lets you mute the amp without changing the volume or other settings when you leave the stage, such as between sets of your live performance.
13 [POWER] switch
Turns the power of the Nextone on/off.
Rear Panel/Bottom Panel
14 AC IN jack
Connect the included power cord (p. 11).
Use only the power cord that was included with the unit.
15 PHONES/REC OUT jack
Connect headphones here. You can obtain powerful guitar sounds just as if you were playing through the speaker. To adjust the volume, use the [VOLUME] knob along with the [MASTER] knob.
* If a plug is inserted in this jack, no sound will be output from the Nextone's own speaker. This is convenient if you don't want loud sound to be produced from the speaker, such as when you're practicing at night.
16 LINE OUT jack
Connect this to your PA system or recorder. You can obtain powerful guitar amp sound just as if you were playing through the speaker.
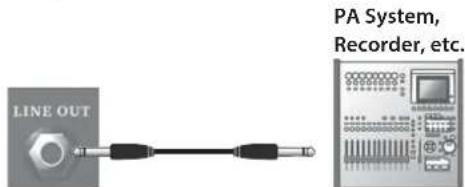
You can use this in conjunction with an external PA system, or to record your performance via direct line while monitoring the sound from the Nextone's speaker.
Adjust the output level using the [VOLUME] knob. Since the [MASTER] knob does not affect the output, you can turn down the [MASTER] knob so that sound is output to a connected device without any sound being produced from the amp itself.
17 EFX LOOP SEND/RETURN jacks
Connect an external effect device (mono).
Connect the SEND jack to the input of your external effect device, and connect the output of your external effect device to the RETURN jack.
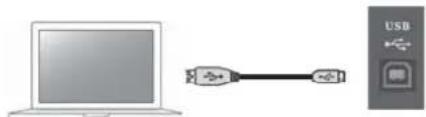
18 USB port
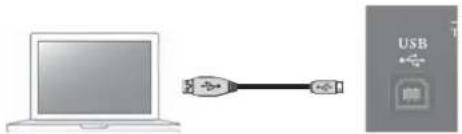
You can use a commercially available USB 2.0 cable to record the sound of the Nextone into your computer. You can also use dedicated software to edit the amp's internal settings.
natural_image
Illustration of a laptop connected to a USB cable and a separate USB icon (no text or symbols on the devices)You must install the USB driver when connecting the unit to your computer.
Download the USB driver from the BOSS website. For details, refer to Readme.htm which is included in the download.
http://www.boss.info/support/
19 FOOT CONTROL
CH SELECT/BOOST jack
If you connect a footswitch (sold separately: FS-6, FS-7, or FS-5L), you can use your foot to turn the BOOST on/off and switch between CLEAN channel and LEAD channel.
DELAY/GA-FC jack
If you connect a footswitch (sold separately: FS-6, FS-7, or FS-5L), you can use your foot to turn the DELAY on/off. If you connect the separately sold GA-FC to switch channels and turn effects on/off.
20 SPEAKER OUT jack
Connect a speaker box. Only use speaker cable to connect the speaker. Do not use any shielded cable designed for use with guitars.
- When the unit is shipped from the factory, the internal speaker is connected to the 8Ω jack. If a plug is connected to the 8Ω jack, sound is not output from the 16Ω (A/B) jacks. If you want to use an external speaker, disconnect the internal speaker's plug from the 8Ω jack.
- If you use the 8Ω jack, you must use a speaker box whose input impedance is 8Ω or higher.
- If you use the 16 (A/B) jacks, you must use speaker boxes whose input impedance is 16 or higher.
To prevent malfunction and equipment failure, always turn down the volume, and turn off all the units before making any connections.
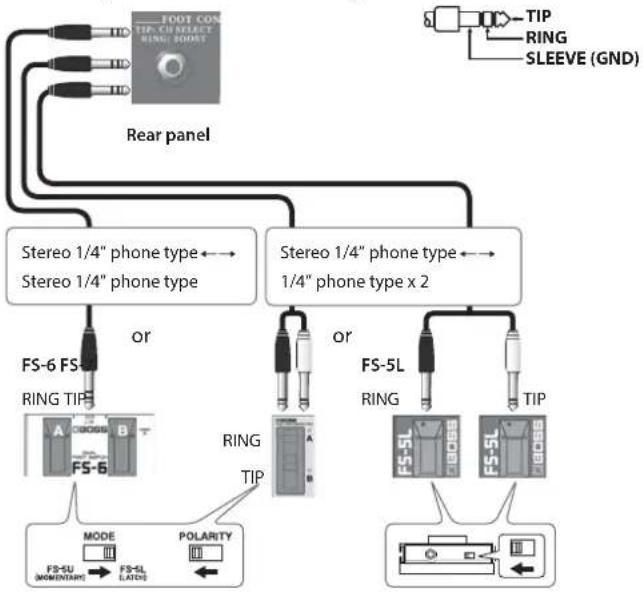
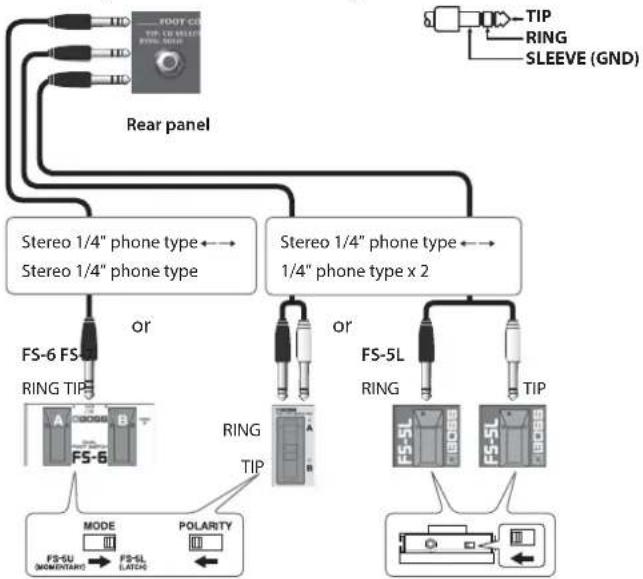
Connecting a Footswitch (Sold Separately)
Connecting the BOSS FS-6, FS-7, or FS-5L
CH SELECT/BOOST jack
* Pin assignment of FOOT CONTROL jack
flowchart
graph TD
    A["FOOT CON TIP-CURRENT RING-BOOST"] --> B["Rear panel"]
    C["Stereo 1/4" phone type"] --> D["RS-6 FS-RING TIP"]
    E["Stereo 1/4" phone type x 2"] --> F["RS-5L RING"]
    G["RS-5L"] --> H["TIP"]
    I["RS-5L"] --> J["TIP"]
    K["RS-5L"] --> L["TIP"]
    M["RS-5L"] --> N["TIP"]
    O["RS-5L"] --> P["TIP"]
    Q["RS-5L"] --> R["TIP"]
    S["RS-5L"] --> T["TIP"]
    U["RS-5L"] --> V["TIP"]
    W["RS-5L"] --> X["TIP"]
    Y["RS-5L"] --> Z["TIP"]
    AA["MODE"] --> AB["Polarity"]
    AC["FS-SU (MOMENTURE)"] --> AD["FS-SL LITER"]
    AE["MODE"] --> AF["Polarity"]
Switch Explanation
TIP Switches between CLEAN channel and LEAD channel.
RING Turns the BOOST on/off.
* The Nextone is compatible with latch-type footswitches (FS-6, FS-7, FS-5L). If you're using an FS-6 or FS-7, set the mode of A and B to FS-5L (LATCH). Momentary-type footswitches (e.g., FS-5U) cannot be used.
DELAY jack
Turns the DELAY on/off.
Rear panel

Connecting the GA-FC
Connect a stereo cable to the GA-FC jack.
* Always use a stereo cable.
* Use cables that do not contain resistors.
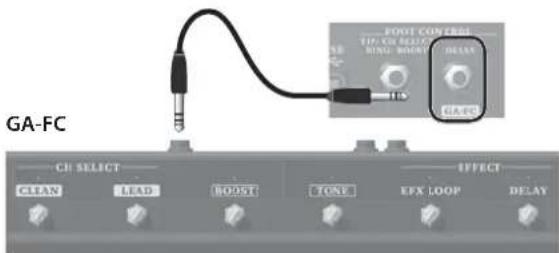
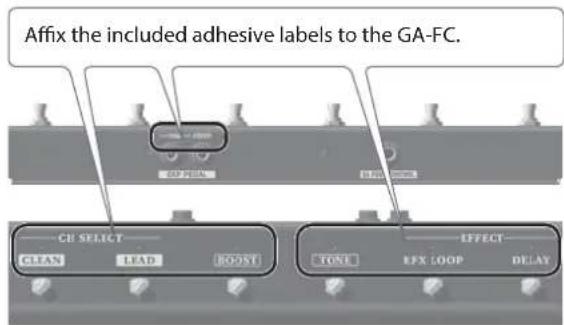
Using the GA-FC
You can switch between CLEAN and LEAD. You can also switch the BOOSTER, TONE, EFFECT LOOP (EFX LOOP), and DELAY on/off.
Using the expression pedals
If you connect an expression pedal (sold separately: Roland EV-5, BOSS FV-500L, BOSS FV-500H), you can use the pedal to vary the volume.
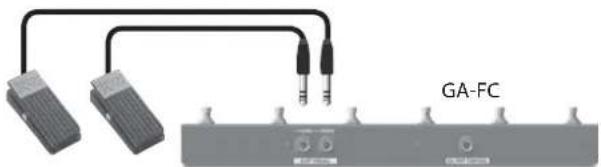
Expression Pedal
Jack Explanation
TAP/INPUT | Adjusts the guitar's signal level that is input to the preamp.
VOLUME Adjusts the master volume.
Setting MINIMUM VOLUME of an expression pedal
With the [MINIMUM VOLUME] knob of an expression pedal, you can set the value for when the pedal is lifted up all the way (lowest value).
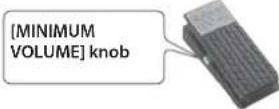
* Use only the specified expression pedal. By connecting any other expression pedals, you risk causing malfunction and/or damage to the unit.
MEMO
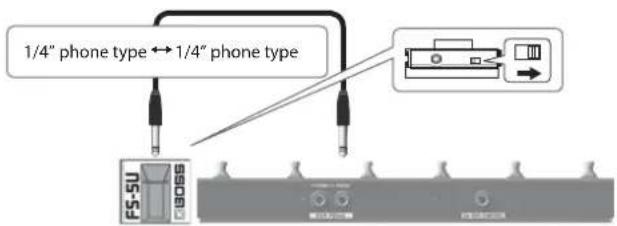
If a footswitch (sold separately: FS-5U) is connected to the rear panel TAP/INPUT jack, you can use it to set the delay time just as you operate the [TAP] button (p. 4).
Top Panel
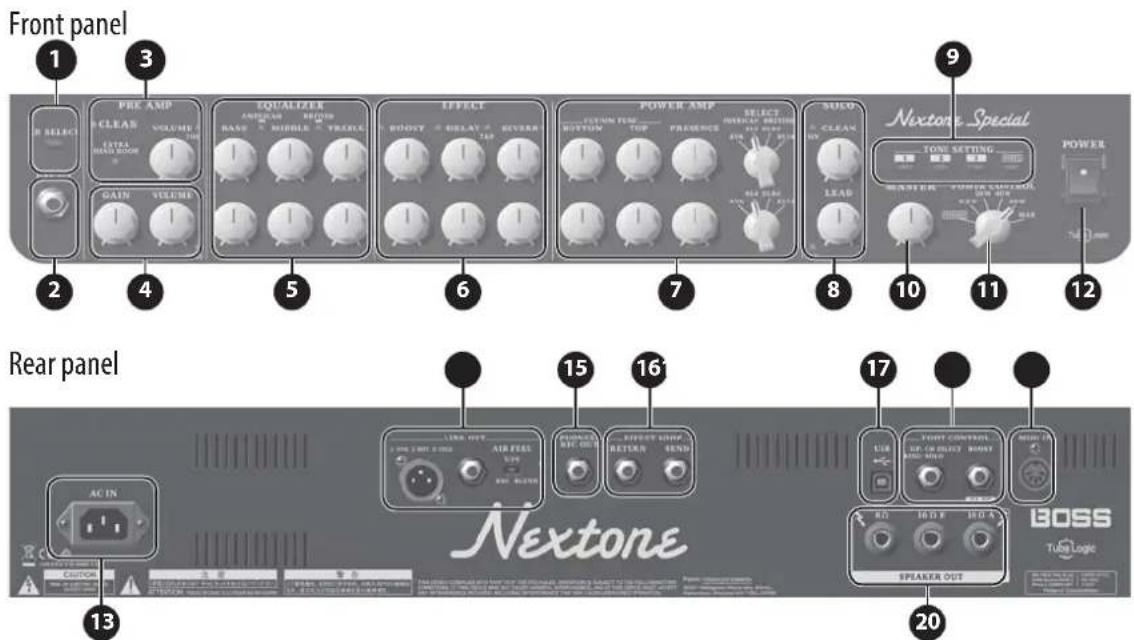
1 [CH SELECT] button
Switches between the CLEAN channel and the LEAD channel.
The indicator of the selected channel is lit.
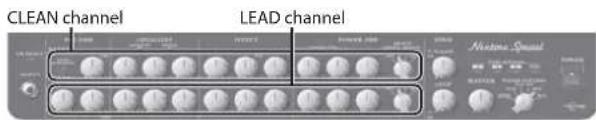
Settings of the PRE AMP, EQUALIZER, EFFECT, and POWER AMP knobs and buttons can be made individually for each channel.
2 INPUT jack
Connect your electric guitar here.
3 PRE AMP (CLEAN channel)
Lets you create a broad range of sounds from undistorted clean sound to light overdrive.
[EXTRA HEAD ROOM] button
Turning this on lets you obtain an even more dynamic response.
[VOLUME] knob
Adjusts the volume of the clean channel.
[TONE] button
Makes the mid- and high-frequency ranges sparkle, producing a crisp sound.
4 PRE AMP (LEAD channel)
[GAIN] knob
Adjusts the gain (amount of distortion) of the LEAD channel. Use this knob to change from crunch sound to hard distortion. Turning the [BOOST] button on raises the gain of the LEAD channel.
[VOLUME] knob
Adjusts the volume of the LEAD channel.
[TONE] button
Produces a fat tone.
5 EQUALIZER
[AMERICAN] / [BRTISH] button
Switches the equalizer type between American and British types.
[BASS] knob
Adjusts the sound level of the low-frequency range.
[MIDDLE] knob
Adjusts the sound level of middle-frequency range.
[TREBLE] knob
Adjusts the sound level of the high-frequency range.
6 EFFECT
[BOOST] button
Turns the BOOST on/off.
[BOOST] knob
Adjusts the gain (amount of distortion).
On the CLEAN channel, this produces a pleasant crunch sound. On the LEAD channel, this produces hard distortion.
[DELAY] button
Turns the DELAY on/off.
[DELAY] knob
Adjusts the depth of delay effect.
[TAP] button
Sets the delay time. When you press this button two or more times, the delay time is set to the interval between presses.
[REVERB] button
Turns the REVERB on/off.
[REVERB] knob
Adjusts the reverb depth.
7 POWER AMP
[BOTTOM] knob
Adjusts the depth of the low-cut filter. If this is turned all the way to the left, the low-cut filter is not applied.
[TOP] knob
Adjusts the depth of the high-cut filter. If this is turned all the way to the left, the high-cut filter is not applied.
[PRESENCE] knob
Adds lustrous outline to the mid- and high-frequency range. This is effective when you want to improve the definition of the sound.
[POWER AMP SELECT] switch
Selects the type of power amp. Using proprietary Tube Logic technology (p. 11), this applies adjustments to each power tube of the power amp circuit, so that not only the power tubes but also the cabinet speaker is driven optimally.
| Type Explanation | |
| 6V6 | An American-type sound that easily distorts with a sense of drive even at low volumes, and has a distinctively crisp sound. |
| 6L6 | An American-type sound suitable for clean tones with a sense of solidity, and distinctive for its rich mid-frequency range. Also used in high-gain stack amps. |
| EL84 | Distinctive for overdrive sound with rich overtones. A British-type sound that produces a sense of drive at low output. |
| EL34 | Characterized by warm and fat sound with detailed distortion. Raising the gain produces a British-type sound that stands out well. Often used in stack amps. |
8 SOLO VOLUME
[ON] button
Turns the SOLO on/off.
[CLEAN] knob / [LEAD] knob
Adjusts the volume of the SOLO.
9 TONE SETTING
[1][2][3] button
Recalls the settings that are saved in each button.
Each button stores the settings of all panel knobs and buttons (except the [MASTER] knob). If you hold down a button for one second, the panel settings are stored in that button.
* To return to the factory settings, turn on the power while holding down the [PANEL] button.
[PANEL] button
Uses the current settings of the panel knobs.
10 [MASTER] knob
Adjusts the overall volume.
11 [POWER CONTROL] switch
Lets you switch the output level of the power amp according to your location or needs. By selecting "STANDBY" you can mute the sound while leaving the unit powered-on. This lets you mute the amp without changing the volume or other settings when you leave the stage, such as between sets of your live performance.
12 [POWER] switch
Turns the power of the Nextone on/off.
Rear Panel/Bottom Panel
13 AC IN jack
Connect the included power cord (p. 11).
* Use only the power cord that was included with the unit.
14 LINE OUT jack
Connect this to your PA system or recorder. You can obtain powerful guitar amp sound just as if you were playing through the speaker.
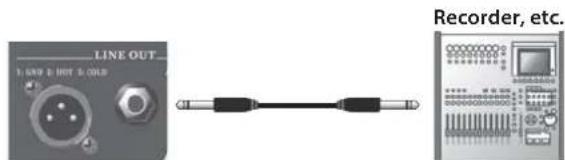
You can use this in conjunction with an external PA system, or to record your performance via direct line while monitoring the sound from the Nextone's speaker.
Adjust the output level using the [VOLUME] knob. Since the [MASTER] knob does not affect the output, you can turn down the [MASTER] knob so that sound is output to a connected device without any sound being produced from the amp itself.
BALANCED OUT jack
These are balanced output jacks for audio signals. Connect them to your mixer.

[AIR FEEL] switch
Specifies the tonal character of the output jacks (LINE OUT, PHONES, USB).
| Setting Explanation | |
| REC Distant-mic sound suitable for recording. | |
| LIVE Close-mic sound suitable for live. | |
| BLEND | A nice blend of distant-mic and close-mic sound, broadly usable for live or recording. |
15 PHONES/REC OUT jack
Connect headphones here. You can obtain powerful guitar sounds just as if you were playing through the speaker. To adjust the volume, use the [VOLUME] knob along with the [MASTER] knob.
* If a plug is inserted in this jack, no sound will be output from the Nextone's own speaker. This is convenient if you don't want loud sound to be produced from the speaker, such as when you're practicing at night.
16 EFX LOOP SEND/RETURN jacks
Connect an external effect device (mono).
Connect the SEND jack to the input of your external effect device, and connect the output of your external effect device to the RETURN jack.
17 USB port
You can use a commercially available USB 2.0 cable to record the sound of the Nextone into your computer. You can also use dedicated software to edit the amp's internal settings.
natural_image
Illustration of a laptop connected to a USB port via an Ethernet cable (no text or symbols present)You must install the USB driver when connecting the unit to your computer.
Download the USB driver from the BOSS website. For details, refer to Readme.htm which is included in the download.
http://www.boss.info/support/
18 FOOT CONTROL
CH SELECT/SOLO jack
If you connect a footswitch (sold separately: FS-6, FS-7, or FS-5L), you can use your foot to turn the SOLO mode on/off and switch between CLEAN channel and LEAD channel.
BOOST/GA-FC jack
If you connect a footswitch (sold separately: FS-6, FS-7, or FS-5L), you can use your foot to turn the BOOST on/off. If you connect the separately sold GA-FC to switch channels and turn effects on/off.
19 MIDI IN jack
You can control the Nextone Special from a multi-effect unit or a MIDI foot controller.
How the MIDI receive channel is specified
| RX CH Operation | |
| 1 | Hold down the TONE SETTING [1] button while turning the power on. |
| 2 | Hold down the TONE SETTING [2] button while turning the power on. |
| 3 | Hold down the TONE SETTING [3] button while turning the power on. |
* Receive channel is set to CH1 when shipped from the factory.
RECOGNIZED RECEIVE DATA
| RX CH 1 - 3 | |||
| OMNI OFF (fixed) | |||
| PC | 1 (00H) PANEL | ||
| 2 (01H) CH 1 | |||
| 3 (02H) CH 2 | |||
| 4 (03H) CH 3 | |||
| CC | #16 CH SELECT | 0 - 63 : CLEAN,64 - 127 : LEAD | |
| #17 SOLO | 0 - 63 : OFF,64 - 127 : ON | ||
| #18 BOOST | |||
| #19 DELAY | |||
| #20 REVERB | |||
| #21 EFFECT LOOP | |||
| #80 GAFC EXP PEDAL 1 | 0 - 127 | ||
| #81 GAFC EXP PEDAL 2 | |||
20 SPEAKER OUT jack
Connect a speaker box. Only use speaker cable to connect the speaker. Do not use any shielded cable designed for use with guitars.
- When the unit is shipped from the factory, the internal speaker is connected to the 8Ω jack. If a plug is connected to the 8Ω jack, sound is not output from the 16Ω (A/B) jacks. If you want to use an external speaker, disconnect the internal speaker's plug from the 8Ω jack.
- If you use the 8 jack, you must use a speaker box whose input impedance is 8 or higher.
- If you use the 16 (A/B) jacks, you must use speaker boxes whose input impedance is 16 or higher.
To prevent malfunction and equipment failure, always turn down the volume, and turn off all the units before making any connections.
Connecting a Footswitch (Sold Separately)
Connecting the BOSS FS-6, FS-7, or FS-5L
CH SELECT/BOOST jack
* Pin assignment of FOOT CONTROL jack
flowchart
graph TD
    A["FOOT CAT"] --> B["Rear panel"]
    C["Stereo 1/4" phone type"] --> D["FS-6 FS-RING TIP"]
    E["Stereo 1/4" phone type"] --> F["FS-6"]
    G["Stereo 1/4" phone type x 2"] --> H["FS-5L RING"]
    I["Stereo 1/4" phone type"] --> J["FS-5L"]
    K["MODE"] --> L["Polarity"]
    M["FS-SU MOUNTAIN"] --> N["FS-SL LATCH"]
    O["TIP"] --> P["TIP"]
    Q["TIP"] --> R["TIP"]
    S["TIP"] --> T["TIP"]
    U["TIP"] --> V["TIP"]
    W["TIP"] --> X["TIP"]
    Y["TIP"] --> Z["TIP"]
Switch Explanation
TIP Switches between CLEAN channel and LEAD channel.
RING Turns the SOLO on/off.
* The Nextone is compatible with latch-type footswitches (FS-6, FS-7, FS-5L). If you're using an FS-6 or FS-7, set the mode of A and B to FS-5L (LATCH). Momentary-type footswitches (e.g., FS-5U) cannot be used.
BOOST jack
Turns the BOOST on/off.
Rear panel

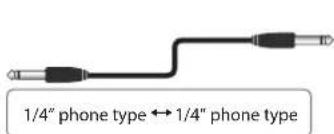
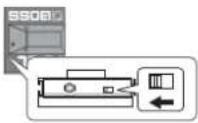
Connecting the GA-FC
Connect a stereo cable to the GA-FC jack.
* Always use a stereo cable.
* Use cables that do not contain resistors.
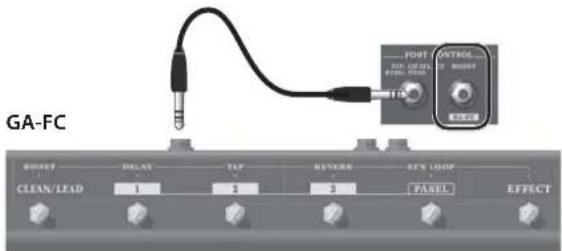
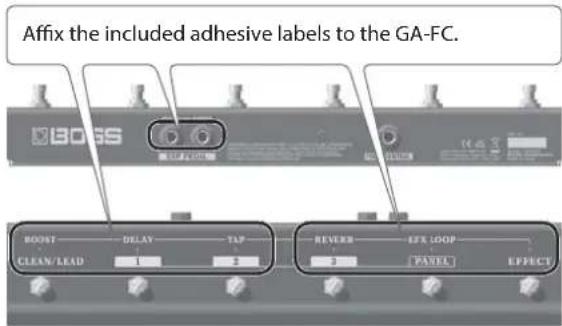
Using the GA-FC
You can switch between the CLEAN channel and LEAD channel, and switch the TONE SETTING selection. You can also turn on/off BOOST, DELAY, and REVERB, and an external effect (EFX LOOP).
When the [1], [2], [3], or [PANEL] switch is selected, you can long-press the same switch to turn SOLO on/off. When SOLO is on, the indicator blinks slowly.
Using the expression pedals
If you connect an expression pedal (sold separately: Roland EV-5, BOSS FV-500L, BOSS FV-500H), you can use the pedal to vary the volume.
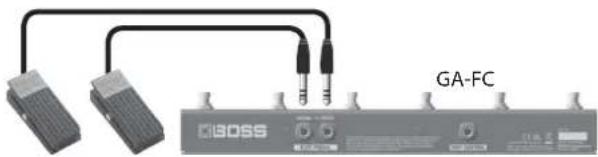
Expression Pedal
Jack Explanation
| INPUT | Adjusts the guitar's signal level that is input to the preamp. |
| VOLUME Adjusts the master volume. | |
Setting MINIMUM VOLUME of an expression pedal
With the [MINIMUM VOLUME] knob of an expression pedal, you can set the value for when the pedal is lifted up all the way (lowest value).
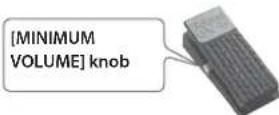
* Use only the specified expression pedal. By connecting any other expression pedals, you risk causing malfunction and/or damage to the unit.
Turning the Power On/Off
* Once everything is properly connected (p. 4–p. 10), be sure to follow the procedure below to turn on their power. If you turn on equipment in the wrong order, you risk causing malfunction or equipment failure.
1. Connect the power cord to an AC outlet.
* Use only the power cord that was included with the unit.
2. Make sure that the Nextone's [MASTER] knob and the volume of the devices connected to the Nextone are set to "0."
* Before connecting your instrument to the Nextone's INPUT jack, set the [MASTER] knob to the minimum setting (far left).
3. Turn on the Nextone.
* Before turning the unit on/off, always be sure to turn the volume down. Even with the volume turned down, you might hear some sound when switching the unit on/off. However, this is normal and does not indicate a malfunction.
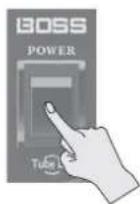
4. Turn on the power of the devices connected to the LINE OUT jack and PHONES/REC OUT jack.
5. Adjust the volume levels for the devices.
Before switching off the power, lower the volume on each of the devices in your system and then TURN OFF the devices in the reverse order to which they were switched on.
* If you need to turn off the power completely, first turn off the unit, then unplug the power cord from the power outlet. Refer to "To completely turn off power to the unit, pull out the plug from the outlet" (p. 2).
About Tube Logic
Warm, bouncy, responsive, dynamic, elastic...these are all terms that guitarists use to describe the satisfying experience of playing their favorite tube amps. Thanks to Roland's Tube Logic, these words can be applied to the Nextone as well.
Dramatically evolved from the first-generation sound of the original Nextone amps from the '90s, today's Tube Logic accurately provides the complex, highly interactive behavior of classic tube designs in meticulous detail, providing the magical "it" factor that takes a guitar amp from a simple sound system to a living, breathing musical instrument. Great feel, distortion control with touch and volume, bloom, sparkle, power supply "sag," and more—everything that players love about a finely tuned vintage tube amp is present in abundance with the Nextone.
| Nextone Stage Nextone Artist Nextone Special | ||||
| Rated Power Output 40 W 80 W 80 W | ||||
| Nominal Input Level | INPUT: -10 dBu (1 MΩ) | |||
| RETURN IN: -10 dBu (100 kΩ) | ||||
| Speaker 30 cm (12 inches) x 1 | ||||
| Controls | [CH SELECT] button[BOOST] button[TONE] button[VOLUME] knob[GAIN] knob[VOLUME] knob[BASS] knob[MIDDLE] knob[TREBLE] knob[EFFECT][DELAY] button[TAP] button[DELAY] knob[REVERB] knob[PRESENCE] knob[MASTER] knob[POWER AMP SELECT] switch (6V6, 6L6, EL84, EL34)[POWER CONTROL] switch (STANDBY, 0.5 W, HALF, MAX)[POWER] switch | [CH SELECT] button[EXTRA HEAD ROOM] button[TONE] button[SOLO] button[VOLUME] knob[BASS] knob[MIDDLE] knob[TREBLE] knob[BOOST] knob[DELAY] knob[REVERB] knob[BOTTOM] knob[TOP] knob[PRESENCE] knob[POWER AMP SELECT] switch (6V6, 6L6, EL84, EL34)[SOLO] knob[TONE] button[SOLO] button[VOLUME] knob[BASS] knob[MIDDLE] knob[TREBLE] knob[BOOST] knob | [DELAY] knob[REVERB] knob[BOTTOM] knob[TOP] knob[PRESENCE] knob[POWER AMP SELECT] switch (6V6, 6L6, EL84, EL34)[SOLO] knob[SOLO] knob[REVERB] knob[BOTTOM] knob[TOP] knob[PRESENCE] knob[POWER AMP SELECT] switch (6V6, 6L6, EL84, EL34)[SOLO] knob[TONE] button[SOLO] button[VOLUME] knob[BASS] knob[MIDDLE] knob[TREBLE] knob[BOOST] knob | [DELAY] knob[REVERB] knob[BOTTOM] knob[TOP] knob['PRESENCE] knob[POWER AMP SELECT] switch (6V6, 6L6, EL84, EL34)[SOLO] knob |
| Indicators | CLEAN, LEADCUSTOM MODEBOOSTTONEDELAYTAP | CH SELECTCLEANEXTRA HEAD ROOMTONESOLOLEADTONESOLO[EQUALIZER> | AMERICANBRITISHBOOSTDELAYTAPREVERB123PANEL | |
| Connectors | INPUT jack: 1/4-inch phone typeREC OUT/PHONES jack: Stereo 1/4-inch phone typeSEND jack: 1/4-inch phone typeRETURN jack: 1/4-inch phone typeLINE OUT jack: 1/4-inch phone typeSPEAKER OUT 16Ω A jack: 1/4-inch phone type | SPEAKER OUT 16Ω B jack: 1/4-inch phone typeSPEAKER OUT 8Ω jack: 1/4-inch phone typeCH SELECT/BOOST jack: 1/4-inch TRS phone typeDELAY/GA-FC jack: 1/4-inch TRS phone typeUSB ← port: USB B typeAC IN jack | INPUT jack: 1/4-inch phone typeREC OUT/PHONES jack: Stereo 1/4-inch phone typeSEND jack: 1/4-inch phone typeRETURN jack: 1/4-inch phone typeLINE OUT jack: 1/4-inch phone typeLINE OUT jack: XLR typeSPEAKER OUT 16 ohms A jack: 1/4-inch phone type | SPEAKER OUT 16 ohms B jack: 1/4-inch phone typeSPEAKER OUT 8 ohms jack: 1/4-inch phone typeCH SELECT/SOLO jack: 1/4-inch TRS phone typeBOOST/GA-FC jack: 1/4-inch TRS phone typeUSB port: USB B typeMIDI IN connectorsAC IN jack |
| Power Consumption 37 W 77 W 88W | ||||
| Dimensions | 492 (W) x 248 (D) x 427 (H) mm19-3/8 (W) x 9-13/16 (D) x 16-13/16 (H) inches | 572 (W) x 248 (D) x 475 (H) mm22-9/16 (W) x 9-13/16 (D) x 18-3/4 (H) inches | 620 (W) x 246 (D) x 530 (H) mm24-7/16 (W) x 9-11/16 (D) x 20-7/8 (H) inches | |
| Weight 13.4 kg (29 lbs) 9 oz) 16.2 kg (35 lbs 12 oz) 18.0 kg (39 lbs 11 oz) | ||||
| Accessories Owner's manual, Power cord, GA-FC sticker | ||||
| Options(sold separately) | Footswitch: BOSS FS-5L, BOSS FS-6, BOSS FS-7Expression pedal: Roland EV-5, BOSS FV-500L, BOSS FV-500H | GA FOOT CONTROLLER (GA-FC) | ||
* 0 dBu = 0.775 Vrms
* This document explains the specifications of the product at the time that the document was issued. For the latest information, refer to the Roland website.
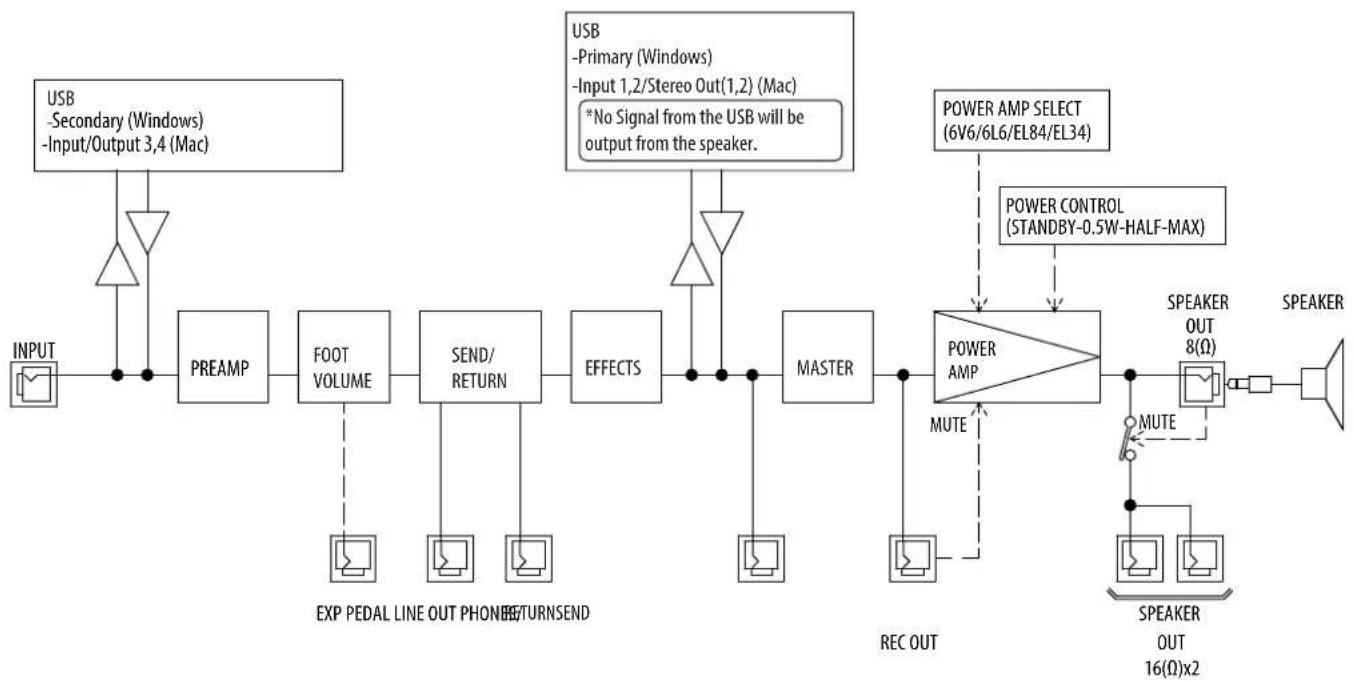
flowchart
graph LR
    A["INPUT"] --> B["PREAMP"]
    B --> C["FOOT VOLUME"]
    C --> D["SEND/RETURN"]
    D --> E["EFFECTS"]
    E --> F["MASTER"]
    F --> G["POWER AMP SELECT (6V6/6L6/EL84/EL34)"]
    G --> H["POWER CONTROL (STANDBY-0.5W-HALF-MAX)"]
    H --> I["SPEAKER OUT 8(Ω)"]
    I --> J["SPEAKER OUT 16(Ω)x2"]
    J --> K["MUTE"]
    K --> L["REC OUT"]
    L --> M["EXP PEDAL LINE OUT PHONE RETURNSEND"]
    N["USB -Secondary (Windows) -Input/Output 3,4 (Mac)"] --> B
    O["USB -Primary (Windows) -Input 1,2/Stereo Out(1,2) (Mac) *No Signal from the USB will be output from the speaker."] --> D
- Owner's Manual
- INSTRUCTIONS FOR THE PREVENTION OF FIRE, ELECTRIC SHOCK, OR INJURY TO PERSONS
- ALWAYS OBSERVE THE FOLLOWING
- WARNING
- Make sure that the power cord is grounded
- To completely turn off power to the unit, pull out the plug from the outlet
- Secure a sufficient amount of space at the setup location
- Do not disassemble or modify by yourself
- Do not repair or replace parts by yourself
- Do not use or store in the following types of locations
- Do not place in an unstable location
- Connect the power cord to an outlet of the correct voltage
- Use only the supplied power cord
- Do not bend the power cord or place heavy objects on it
- Avoid extended use at high volume
- Do not allow foreign objects or liquids to enter unit; never place containers with liquid on unit
- Turn off the unit if an abnormality or malfunction occurs
- Be cautious to protect children from injury
- Do not drop or subject to strong impact
- Do not share an outlet with an unreasonable number of other devices
- Do not use overseas
- Don't block ventilation openings
- Don't place burning objects on the unit
- Be aware of weather conditions
- CAUTION
- When disconnecting the power cord, grasp it by the plug
- Periodically clean the power plug
- Disconnect the power plug whenever the unit will not be used for an extended period of time
- Route all power cords and cables in such a way as to prevent them from getting entangled
- Avoid climbing on top of the unit, or placing heavy objects on it
- Never connect/disconnect a power plug if your hands are wet
- Disconnect all cords/cables before moving the unit
- Before cleaning the unit, disconnect the power plug from the outlet
- Whenever there is a threat of lightning, disconnect the power plug from the outlet
- IMPORTANT NOTES
- Power Supply
- Placement
- Maintenance
- Repairs and Data
- Additional Precautions
- Intellectual Property Right
- Top Panel
- [CH SELECT] button
- INPUT jack
- [BOOST] button
- [TONE] button
- CLEAN channel
- [VOLUME] knob
- LEAD channel
- [GAIN] knob
- EQUALIZER
- [BASS] knob
- [MIDDLE] knob
- [TREBLE] knob
- EFFECT
- [DELAY] button
- [DELAY] knob
- [TAP] button
- [REVERB] knob
- [PRESENCE] knob
- [MASTER] knob
- [POWER AMP SELECT] switch
- [POWER CONTROL] switch
- [POWER] switch
- Rear Panel/Bottom Panel
- AC IN jack
- PHONES/REC OUT jack
- LINE OUT jack
- EFX LOOP SEND/RETURN jacks
- USB port
- FOOT CONTROL
- CH SELECT/BOOST jack
- DELAY/GA-FC jack
- SPEAKER OUT jack
- Connecting a Footswitch (Sold Separately)
- Connecting the BOSS FS-6, FS-7, or FS-5L
- Switch Explanation
- DELAY jack
- Connecting the GA-FC
- Using the GA-FC
- Using the expression pedals
- Jack Explanation
- Setting MINIMUM VOLUME of an expression pedal
- MEMO
- PRE AMP (CLEAN channel)
- [EXTRA HEAD ROOM] button
- [TONE] button
- PRE AMP (LEAD channel)
- EQUALIZER
- [AMERICAN] / [BRTISH] button
- EFFECT
- [BOOST] button
- [BOOST] knob
- [REVERB] button
- POWER AMP
- [BOTTOM] knob
- [TOP] knob
- [PRESENCE] knob
- [POWER AMP SELECT] switch
- SOLO VOLUME
- [ON] button
- [CLEAN] knob / [LEAD] knob
- TONE SETTING
- [1][2][3] button
- [PANEL] button
- [POWER CONTROL] switch
- [POWER] switch
- AC IN jack
- LINE OUT jack
- BALANCED OUT jack
- [AIR FEEL] switch
- EFX LOOP SEND/RETURN jacks
- USB port
- FOOT CONTROL
- CH SELECT/SOLO jack
- BOOST/GA-FC jack
- MIDI IN jack
- BOOST jack
- Turning the Power On/Off
- Connect the power cord to an AC outlet.
- Make sure that the Nextone's [MASTER] knob and the volume of the devices connected to the Nextone are set to "0."
- Turn on the Nextone.
- Turn on the power of the devices connected to the LINE OUT jack and PHONES/REC OUT jack.
- Adjust the volume levels for the devices.
- About Tube Logic
Brand : BOSS
Model : Nextone Stage
Category : Guitar amplifier