ST-IP-D*VF-PRO - Surveillance Camera Security Tronix - Free user manual and instructions
Find the device manual for free ST-IP-D*VF-PRO Security Tronix in PDF.


| Brand | Security Tronix |
| Model | ST-IP-D*VF-PRO |
| Product Type | IP Surveillance Camera |
| Dimensions (approx.) | 70 x 70 x 150 mm |
| Weight | 0.5 kg |
| Power Supply | PoE (802.3af) or 12V DC |
| Resolution | Full HD 1080p (1920x1080) |
| Night Vision | IR LEDs up to 30m |
| Motion Detection | Yes, with email alerts |
| Weather Rating | IP66 (outdoor use) |
| Lens | Varifocal 2.8-12mm |
| Video Compression | H.265+ |
| Storage | MicroSD slot up to 128GB |
| Network | Ethernet RJ45, Wi-Fi optional |
| Audio | Built-in mic and speaker |
| Maintenance | Clean lens with soft, dry cloth |
| Safety | Use PoE surge protector for outdoor |
| Spare Parts | Contact supplier for parts |
| Warranty | 2 years limited |
| Compliance | CE, RoHS |
Frequently Asked Questions - ST-IP-D*VF-PRO Security Tronix
User questions about ST-IP-D*VF-PRO Security Tronix
0 question about this device. Answer the ones you know or ask your own.
Ask a new question about this device
Download the instructions for your Surveillance Camera in PDF format for free! Find your manual ST-IP-D*VF-PRO - Security Tronix and take your electronic device back in hand. On this page are published all the documents necessary for the use of your device. ST-IP-D*VF-PRO by Security Tronix.
USER MANUAL ST-IP-D*VF-PRO Security Tronix
IE Operating Instruction Manual

ST-IP-BT1VF-PRO
ST-IP-BT2VF-PRO

natural_image
Two white security camera units with digital camera modules, shown from different angles (no text or symbols visible)ST-IP-D1VF-PRO
ST-IP-D2VF-PRO
IE Operating Instruction Manual

CAUTION: To reduce the risk of electrical shock do not remove the cover or back of this unit. No user serviceable parts are inside.

CAUTION: To prevent electric shocks and risk of fire hazards, only use the recommended power supply type.
1. UNPACKING and HANDLING
Each unit is shipped assembled and factory tested.
Ensure that all accessories are removed from the container before discarding packing material
2. MECHANICAL INSPECTION
Inspect the front and rear of the equipment for shipping damage. Make sure the equipment is clean, and no connectors are broken, damaged, or loose. If equipment appears to be damaged or defective please contact your distributor or SecurityTronix at 1-610-429-1511 for assistance.
3. SPECIAL ATTENTION
a. The installer must comply with electrical safety standards. There must be sufficient space between the camera's power supply and video line and any high voltage equipment and/or cables.
b. To help ensure the camera's life and proper operation do not point the camera towards the sun or strong light.
c. Do not install the camera in an environment where the temperature is above 113^ F.
d. Do not install the camera near a magnetic field or a high-power motor.
e. Do not mount the camera near a radiator or heater.
f. Only use a dry cloth to clean the camera. If there is dirt that is difficult to remove wipe gently with a mild detergent. Never use strong or abrasive detergents.
g. A minimum 12VDC 1000mA or POE AF(48V DC) must be used. AC power cannot be applied. Using an incorrect power supply will damage the camera.
h. Only qualified installers are allowed to install, test and disassemble the camera.
i. The IR LED angle and lens viewing range are adjusted at the factory. Any change to the camera's lens will affect image quality.
j. The camera is a low voltage product. If installed outdoors proper safety and lightning grounding are required.
Contents
- Brief introduction of IE browsing operation....4
1.1. Installation of plug-ins and login ....4
- IE menu introduction ....5
2.1 Home....5
2.2 Replay 6
2.3 Parameter Setting 7
2.3.1 Video setting....7
2.3.2 OSD setting....8
2.3.3 PTZ setting....8
2.3.4 basic settings ....8
2.3.5 DDNS setting....9
2.3.6 E-Mail setting....10
2.3.7 Wifi setting....11
2.3.8 P2P setting....11
2.3.9 Motion Detect setting....12
2.3.10 Occlusion Detect setting 12
2.3.11 Alarm in out setting....13
2.3.12 Auto capture setting....13
2.3.13 Record setting ....13
2.4 System....13
2.4.1 User setting .... 14
2.4.2 Time setting....14
2.4.3 Initialize setting....15
2.4.4 Device Info setting....16
2.4.5 Storage Device setting....16
2.4.6 System log setting 16
1. Brief introduction of IE browser operation
The Securitytronix IP-PRO series IP cameras have a built in web server and can be accessed using Internet Explorer.
1.1. Installation of plug-ins and login screen
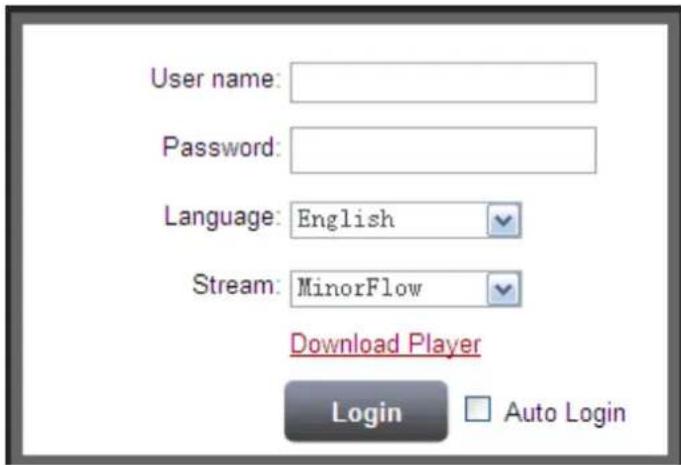
(1) Run IE and input the video camera's IP address and HTTP port in the URL bar.
(2) After successfully connecting to the camera's web server, a login page will appear. Enter a username and password (Both the default username and password are "admin").
(3) Choose the language; either English or Chinese.
(4) Stream: through this option, you can select to preview the main flow or the minor flow of the video camera.
(5) Click the link 'Download Player' to download the player when logging in for the first time.
(6) After the control is loaded, please log in to the video camera again (if you do not want to log in repeatedly, you can select "Auto login"); and images of the video camera are displayed in the preview window.
2. IE menu introduction
The IE (Internet Explorer) interface of the video camera is mainly composed of several main functions
| Home | Replay | Parameters | System |
There are two options at the upper right hand of the IE interface; “Download Player” to download the necessary control and “logout” to log out of the IE interface.
Download Player | Logout
2.1 Home
The Home menu is opened by default after logging in. The video image will appear in the center of the screen. Function buttons are located above the images. An operating panel is located at the right side of the image and the detailed functions are as follows:
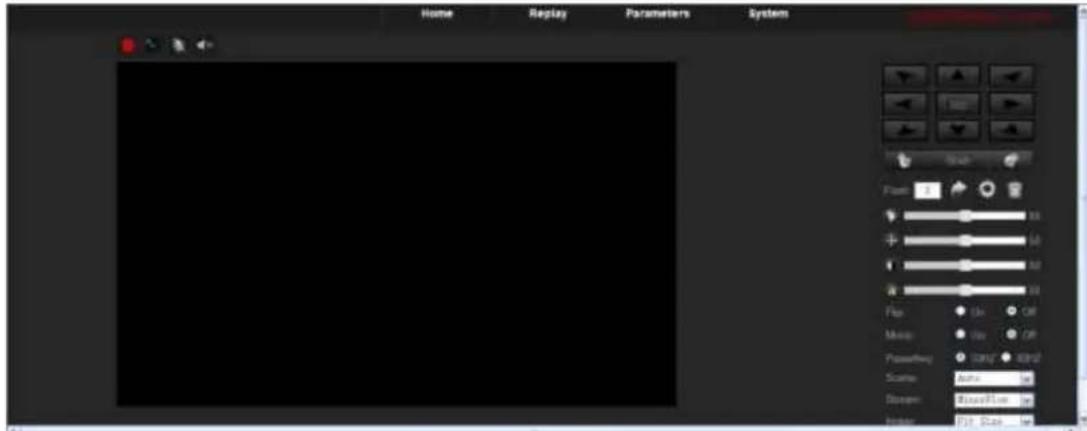

Recording button: Video recording is started after clicking the button; red points will occur in a
previewed image to show that the recording is in process; video recording is ended by clicking the button again; the video is stored in the SD card (if equipped), or in an AVI format. The recorded document not only can be played by a player which supports H/.264 code, but also can be played by the AviReplayer of the video camera.

Snapshot button: By clicking the button, you can take a screen shot.

Talkback button: By clicking this button, sound from the client computer end can be sent to the
video camera; talkback icon will show in the previewed image when the talkback function is turned on; the talkback is turned off by clicking the button again.
IE Operating Instruction Manual

Voice button: by clicking the voice button, the sound function will be enabled (3rd party audio
equipment is needed for audio function); a voice icon will appear in the previewed image when the voice button is turned on; and the voice is turned off by clicking the voice button again.

Note: some functions in the control panel are for PTZ function
2.2 Replay
The replay interface is only used for SD card of the video camera (If equipped).
IE Operating Instruction Manual
2.3 Parameter Setting
In this menu, you can configure the camera to suit the specific install requirements.
2.3.1 Video setting
In this menu, you can set the image video flow of the IP camera, to optimize for network flow. For example, you can reduce the frame number at a low transmission speed to obtain a high-quality image or reduce the image quality to obtain a smooth picture; the following figure is the video parameter setting recommended under normal conditions.

Bit rate: the transmission maximum value of the bit rate data, such as 2048KBps is equal to the size of the 2 MBps image data transmitted per each second and is equal to the maximum value of storing the 256 Kb data document in a computer per each minute; and it is calculated that the maximum video recording volume of a video camera at a code rate of 2048 KBps for a hour is 0.9 Gb.
Frame number: Set the maximum number of frames per second.
Bit Rate Type: CBR (Constant bit-rate)/ VBR (Variable bit-rate). Depending on the available network capacity, the user can tailor the camera bit rate function to better utilize available bandwidth.
Picture quality: This will determine the picture quality of the camera as it is encoding in frames per second.
2.3.2 OSD setting
In the OSD page, a user can set the time and also configure the OSD text.

2.3.3 PTZ setting
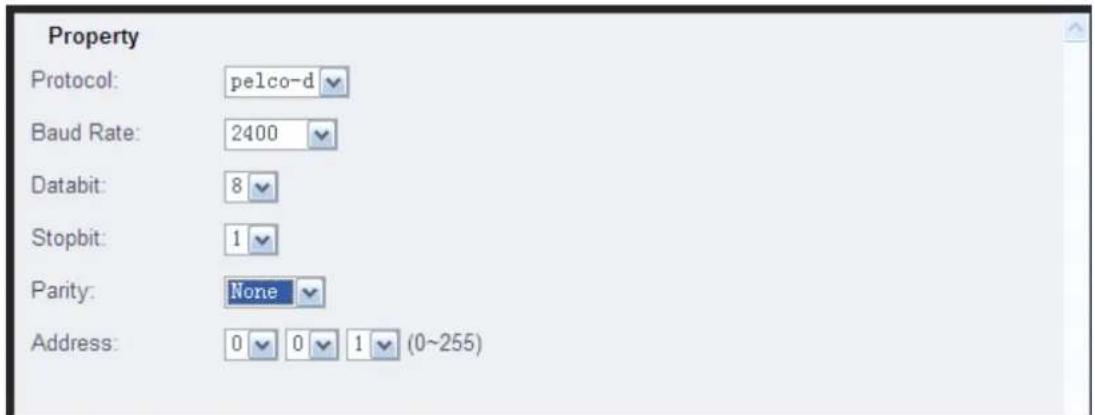
In this page, a user can set the protocol, the baud rate, data bits, stop bits, parity and address.
2.3.4 Basic settings (Network)
Fixed IP Address Setting Page:

Dynamic IP Address Setting Page:

Network mode: This can be set to either Fixed or DHCP (Dynamic Host Control Protocol).
IP Address: LAN IP address of the camera
Subnet Mask: Displays the subnet mask of the camera.
Gateway: the gateway is usually the IP address of the Internet equipment which you access to Internet, such as a router; and setting of correct gateway is necessary when the video camera uses the DDNS, P2P and the like functions.
Domain name resolution address: Specify the DNS server that the camera will use to communicate outside of the local network. Be sure to select a secondary point as a fail over.
PORT:
HTTP: Typically port 80, but this can be changed to tailor a network that may not allow traffic on port 80. Be sure to include the port number in the URL if you are using a non-typical HTTP port.
2.3.5 DDNS setting
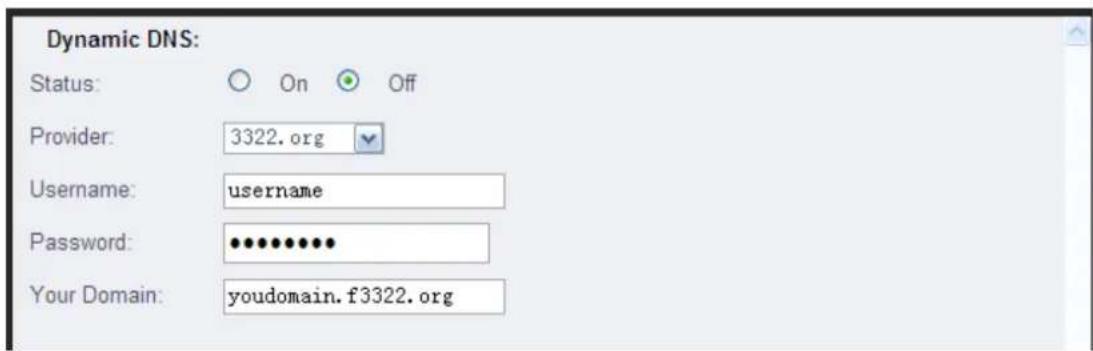
Dynamic domain name: click and select "On" to enable DNS resolution; select a corresponding domain name server provider (at present, only dyndns and 3322 domain name are supported). Enter the appropriate information as required by your DDNS provider.
2.3.6 E-Mail setting
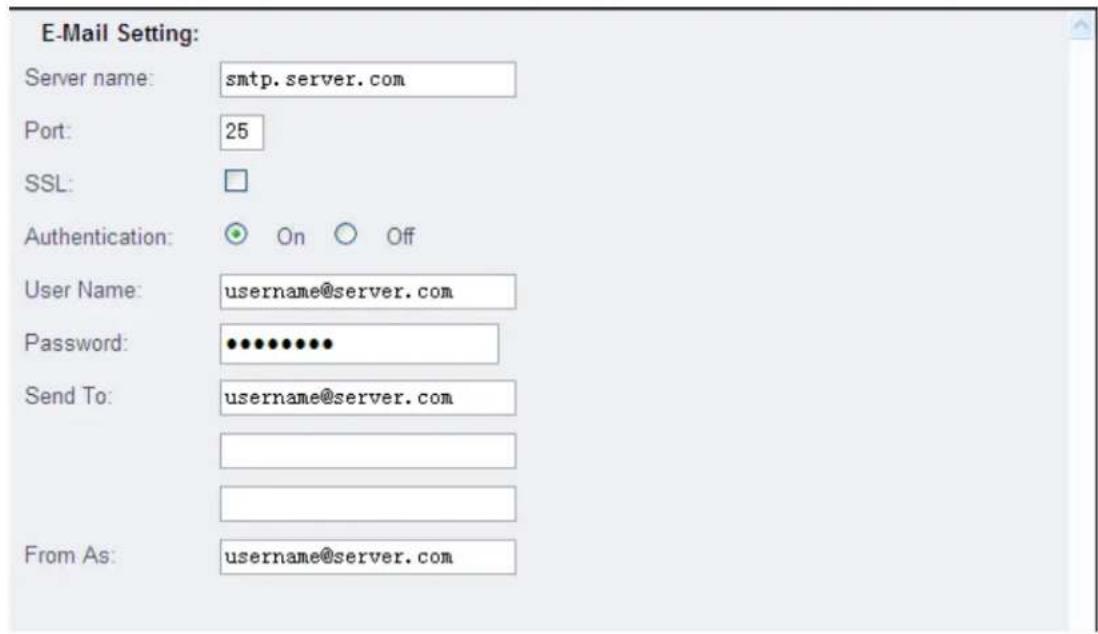
Server name: This will be the originator of the mail service you wish to use.
Port: Typically port 25 (consult your mail service provider for specifics).
SSL: Enable if using secure socket layer (SSL).
Authentication: On or off, depending on what type of mail service is in use.
Send To: set the e-mail you want to send to during alarm/event.
From As: Setup the proxy mail server.
2.3.7 Wifi setting

Wifi Status: Check the "Enable" box to start WiFi service (If camera is equipped).
Search: Selecting this option will search for any available wireless networks.
2.3.8 P2P setting

Status: Select enable to start the P2P service.
2.3.9 Motion Detect setting

Sensibility (Sensitivity): Select the level of motion detection sensitivity.
Schedule: There are 3 modes you can select. Week mode allows you to enable motion detection (MD) according to a weekly schedule. Work mode is configured for a typical office schedule and All day works on a 24/7 schedule.
Time: Click the button 'Time' then select the time period that motion detect works.

other
| Day | Time Preiod1 | Time Preiod2 | Time Preiod3 | |---|---|---|---| | Sun | 0 √ 0 √ ~ 24 √ 0 √ | 0 √ 0 √ ~ 0 √ 0 √ | 0 √ 0 √ ~ 0 √ 0 √ | | Mon | 0 √ 0 √ ~ 24 √ 0 √ | 0 √ 0 √ ~ 0 √ 0 √ | 0 √ 0 √ ~ 0 √ 0 √ | | Tue | 0 √ 0 √ ~ 24 √ 0 √ | 0 √ 0 √ ~ 0 √ 0 √ | 0 √ 0 √ ~ 0 √ 0 √ | | Wed | 0 √ 0 √ ~ 24 √ 0 √ | 0 √ 0 √ ~ 0 √ 0 √ | 0 √ 0 √ ~ 0 √ 0 √ | | Thu | 0 √ 0 √ ~ 24 √ 0 √ | 0 √ 0 √ ~ 0 √ 0 √ | 0 √ 0 √ ~ 0 √ 0 √ | | Fri | 0 √ 0 √ ~ 24 √ 0 √ | 0 √ 0 √ ~ 0 √ 0 √ | 0 √ 0 √ ~ 0 √ 0 √ | | Sat | 0 √ 0 √ ~ 24 √ 0 √ | 0 √ 0 √ ~ 0 √ 0 √ | 0 √ 0 √ ~ 0 √ 0 √ |2.3.10 Occlusion Detect setting
It will trigger the alarm if the camera image is obscured for any reason.

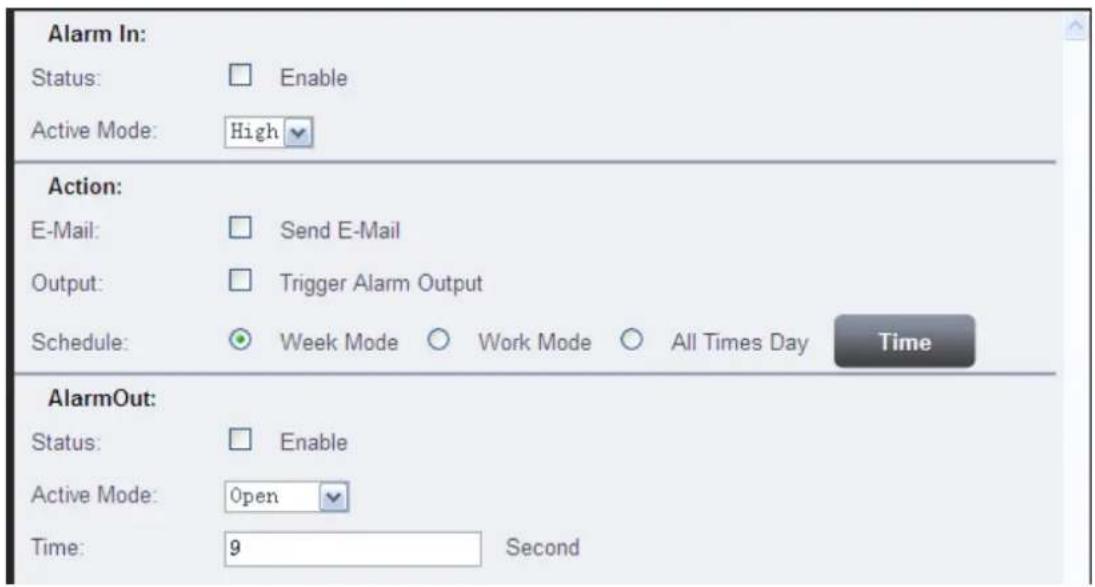
2.3.11 Alarm in out setting
2.3.12 Auto capture setting

In this page, you can set the interval time of still captures and configure an email recipient.
2.3.13 Record setting

2.4 System
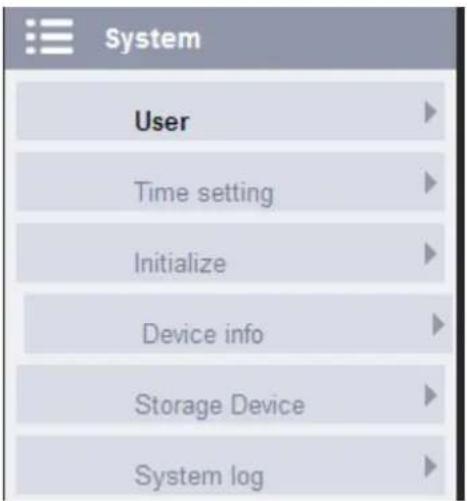
You can set the user, time setting, initialize, device info, storage device and system log in the system setting page.
2.4.1 User setting
In the user settings page, you can amend the user password and create a new user, but cannot change the administrator's username. Each subsequent user created will be a "general" user.
| UserID | Username | Password | Verify Password |
| Administrator | admin | ●●●●● | ●●●●● |
| User1 | guest | ●●●●● | ●●●●● |
| User2 | |||
| User3 | |||
| User4 | |||
| User5 | |||
| User6 | |||
| User7 |
2.4.2 Time setting
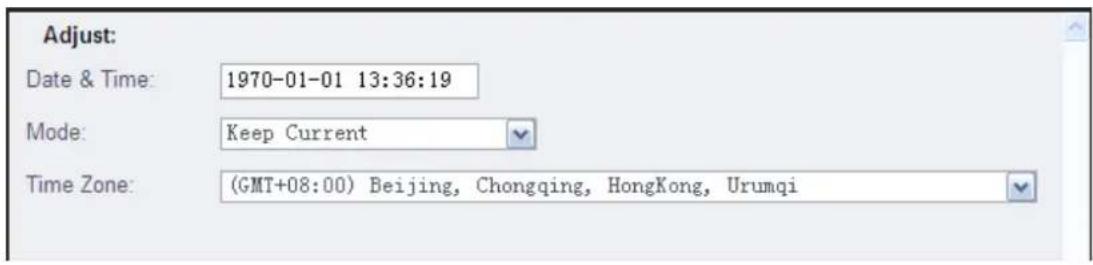
In the time setting page, you can adjust the time manually, synchronize with the computer time or NTP and select the time zone and so on. By setting the correct time zone, the P2P client will display the correct time for their location.
2.4.3 Initialize setting

Reboot: This will reboot the IP camera.
Factory default: recover the default setting of the video camera; the IP address is recovered to 192.168.1.128; and after the factory default, you may need to re-configure some parameters.
System update: in the system update page, you can select the update file and update the cameras firmware.
2.4.4 Device Info setting
Device Info
| Camera Name: | ipc |
| Serial Number: | QVanrVaEkrMAqyaobjBxlxxzyjysQSsX |
| Hard Ver: | 8100-imx122 |
| Software Ver: | V1.1.5.52-X00-Build:20130524D |
| Start Time: | 1970-1-1 9:27:16 |
Network Info
| Connection: | LAN |
| Mac: | 00:f2:61:e4:07:3c |
| IP: | 192.168.1.135 |
| Subnet Mask: | 255.255.255.0 |
| Gateway: | 192.168.1.1 |
| Primary DNS: | 192.168.0.1 |
| Second DNS: |
In the device information page, you can see the camera name, the serial number, the version information and network information.
2.4.5 Storage Device setting
SD Card Info
Status:
no ready
refresh
mount
In this page, you can see the status of SD card.
2.4.6 System log setting
The Log records operating history and motion detection alarm events of the video camera. It is stored in the SD card of the video camera. Through the log page, you can view these records.

For additional support, please contact SecurityTronix Technical Support: support@securitytronix.com
(800) 688-9282 Press "3" for Tech Support, then "2" for CCTV Tech Support.
SECURITYTRONIX 1-Year Limited PTZ and IR Camera Warranty
Securitytronix. (the "Company") warrants to the Original Purchaser that the PTZ or IR Camera is free from defects in workmanship or material under normal use. This warranty starts on the date of shipment of the hardware to the Original Purchaser.
During the warranty period, the Company agrees to repair or replace, at its sole option, without charge to Original Purchaser, any defective component in the PTZ or IR Camera. To obtain service, the Original Purchaser must return the PTZ or IR Camera to the Company properly packaged for shipping. All defective products must be returned to the Company within thirty (30) days of failure. Products must be returned with a description of the failure and Return Merchandise Authorization (RMA) number supplied by the Company. To receive a RMA number and a return shipping address on where to deliver the hardware, call 347-817-4342. The shipping, and insurance charges incurred in shipping to the Company will be paid by Original Purchaser, and all risk for the hardware shall remain with the Original Purchaser until such time as Company takes receipt of the hardware. Upon receipt, the Company will promptly repair or replace the defective unit, and then return said unit to Original Purchaser, shipping prepaid. The Company may use reconditioned or like-new parts or units, at its sole option, when repairing any hardware.
Repaired products shall carry the same amount of outstanding warranty as from original purchase. Any claim under the warranty must include dated proof of purchase or invoice. In any event, the Company's liability for defective hardware is limited to repairing or replacing the hardware.
This warranty is contingent upon proper use of the hardware by Original Purchaser and does not cover: if damage is due to Acts of God (including fire, flood, earthquake, storm, hurricane or other natural disaster), accident, unusual physical, electrical, or electromechanical stress, modifications, neglect; misuse, operation with media not approved by the Company, tampering with or altering of the hardware, war, invasion, act of foreign enemies, hostilities (regardless of whether war is declared), civil war, rebellion, revolution, insurrection, military or usurped power or confiscation, terrorist activities, nationalization, government sanction, blockage, embargo, labor dispute, strike, lockout or interruption or failure of electricity, air conditioning, or humidity control, internet, network, or telephone service
The warranties given herein, together with any implied warranties covering the hardware, including any warranties of merchantability or fitness for a particular purpose, are limited in duration to one year from the date of shipment to the Original Purchaser. Jurisdictions vary with regard to the enforceability of warranty limitations, and you should check the laws of your local jurisdiction to find out whether the above limitation applies to you.
The Company shall not be liable to your for loss of data, loss of profits, lost savings, special, incidental, consequential, indirect, or other similar damages arising from breach of warranty, breach of contract, negligence, or other legal action even if the Company or its agent has been advised of the possibility of such damages, or for any claim brought against your by another party. Jurisdictions vary with regard to the enforceability of provisions excluding or limiting liability for incidental or consequential damages. You should check the laws of your local jurisdiction to find out whether the above exclusion applies to you.
This warranty allocates risks of product failure between Original Purchaser and the Company. The Company's hardware pricing reflects this allocation of risk and the limitations of liability contained in this warranty. The warranty set forth above is in lieu of all other express warranties, whether oral or written. The agents, employees, distributors, and dealers of the Company are not authorized to make modification to this warranty, or additional warranties binding on the Company. Accordingly, additional statements such as dealer advertising or presentations, whether oral or written, do not constitute warranties by the Company and should not be relied upon.
This warranty gives you specific legal rights. You may also have other rights which vary from one jurisdiction to another.
- IE Operating Instruction Manual
- UNPACKING and HANDLING
- MECHANICAL INSPECTION
- SPECIAL ATTENTION
- Contents
- Brief introduction of IE browser operation
- Installation of plug-ins and login screen
- IE menu introduction
- Home
- Replay
- Parameter Setting
- Video setting
- OSD setting
- PTZ setting
- Basic settings (Network)
- PORT:
- DDNS setting
- E-Mail setting
- Wifi setting
- P2P setting
- Motion Detect setting
- Occlusion Detect setting
- Alarm in out setting
- Auto capture setting
- Record setting
- System
- User setting
- Time setting
- Initialize setting
- Device Info setting
- Storage Device setting
- System log setting
- SECURITYTRONIX 1-Year Limited PTZ and IR Camera Warranty
Brand : Security Tronix
Model : ST-IP-D*VF-PRO
Category : Surveillance Camera