
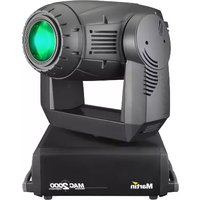
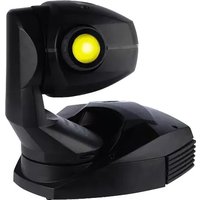
Raptor - Light projector MARTIN - Free user manual and instructions
Find the device manual for free Raptor MARTIN in PDF.


| Product Type | Lighting Fixture |
| Dimensions (L x W x H) | 400mm x 250mm x 150mm |
| Weight | 3.2 kg |
| Power Supply | AC 100-240V, 50/60Hz |
| Power Consumption | 150W |
| Light Source | LED, 100W |
| Beam Angle | 25° |
| Control Protocol | DMX512 |
| Main Functions | Color mixing, strobe, dimmer, pan/tilt |
| Cleaning Instructions | Wipe with a dry, soft cloth. Do not use liquids. |
| Safety Precautions | Disconnect power before cleaning. Avoid looking directly into the light. |
| Spare Parts Availability | Contact Martin authorized service centers. |
| Repairability | Serviceable by qualified technicians only. |
| Operating Temperature | -10°C to 45°C |
| IP Rating | IP20 |
Frequently Asked Questions - Raptor MARTIN
User questions about Raptor MARTIN
0 question about this device. Answer the ones you know or ask your own.
Ask a new question about this device
Download the instructions for your Light projector in PDF format for free! Find your manual Raptor - MARTIN and take your electronic device back in hand. On this page are published all the documents necessary for the use of your device. Raptor by MARTIN.
USER MANUAL Raptor MARTIN
natural_image
Black Raptor device with visible internal display showing interior lighting (no text or symbols on device body)Martin
1 mounting bracket
2 swivel lock
3 clamp hole
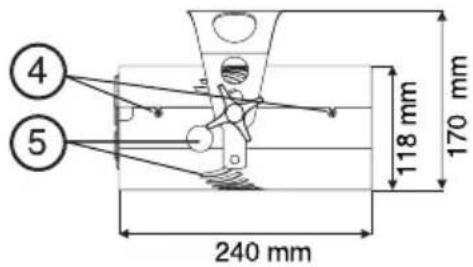
4 lamp screws
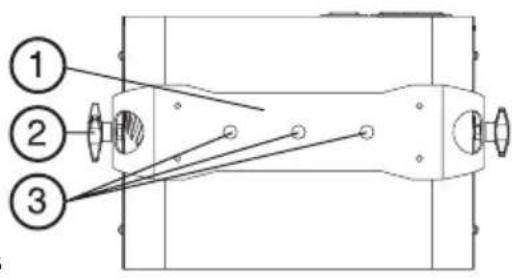
5 air vents

INTRODUCTION
Thank you for selecting the Martin Raptor. This Martin lighting fixture uses a 250 watt halogen lamp, parabolic reflector, effect wheel, 3-color triangular prism, and built-in microphone to project multiple sound-activated beams of colored light.
The packing material is carefully designed to protect the fixture during shipment - always use it to transport the fixture.
The Raptor comes with:
- 500 hour halogen lamp (installed)
- mounting bracket
- power cable
- user manual
SAFETY PRECAUTIONS
The Raptor is not for household use. It is not a toy: it presents risks of serious injury due to electric shock, high heat, and intense light. For safe operation, read this manual before using the fixture and observe all warnings and precautions printed here and on the fixture. If you have questions about how to operate the fixture safely, please contact your Martin distributor or dealer.
- For protection against dangerous electric shock, the fixture must be grounded (earthed). The AC mains supply shall be fitted with a fuse or circuit breaker and ground-fault protection.
- Use only a source of AC power that complies with local building and electrical codes.
- Replace the lamp if it becomes defective or worn out. Allow the fixture to cool for 5 minutes before installing a new lamp.
- Keep all combustible materials (for example fabric, wood, paper) at least 30 cm (12 inches) away from the fixture. Keep flammable materials well away from the fixture.
- Provide a minimum clearance of 10 cm (4 inches) around the fan and air vent.
- When suspending the fixture above ground level, verify that the structure can hold at least 10 times the weight of all installed devices and secure the fixture with an approved safety cable. Block access below the work area whenever installing or removing the fixture.
- When carrying the fixture, lock the mounting bracket securely and do not place a hand over or under the triangular prism.
- Do not expose the fixture to rain or moisture.
- Do not illuminate surfaces within 1 meter (39 inches) of the fixture.
- Do not operate the fixture if the ambient temperature exceeds 40irc C (104°F).
- Never place filters or other objects over the lens or mirrors.
• Refer all service to a qualified technician.
Warning! For protection from dangerous electric shock, the fixture must be grounded (earthed). The AC mains supply shall be fitted with a fuse or circuit breaker and ground-fault protection.
Verify that the power cables are undamaged and rated for the current requirements of all connected devices before use.
The Raptor's mains lead may require a grounding-type cord cap that fits your power distribution cable or outlet. Consult a qualified electrician if you have any doubts about proper installation.
The Raptor's operating voltage is printed on the serial number label near the AC input. Verify that the operating voltage closely matches the AC supply voltage before applying power. Contact your Martin dealer if the voltage on the label differs from the AC mains voltage by more than five percent.
Important! Electric dimmers may damage the electronic components.
Although the Raptor cannot be dimmed, it may be switched on and off remotely using switch packs or the full-on and full-off levels on dimmer packs.
Installing a plug on the mains lead
Following the cord cap manufacturer's instructions, connect the yellow and green wire to ground (earth), the brown wire to live, and the blue wire to neutral. The table below shows some pin identification schemes.
| Wire Pin Marking Screw color | |||
| brown live “L” yellow or brass | |||
| blue neutral “N” silver | |||
| yellow/green | ground | ||
INSTALLATION
3
The Raptor can be permanently installed with suitable 5 mm (3/16 in.) hardware, hung with a rigging clamp, or placed directly on a level surface. For maximum lamp life, provide sufficient ventilation to keep the air around the fixture below 40irc C ( 104irc F) and do not place the fixture directly on or beside a loudspeaker.
There are two positions for attaching the bracket to the fixture. The high position is recommended for mobile applications because it allows the bracket to be folded down for transportation. The low position provides a more compact fit that may be preferable when the fixture is permanently installed.

INSTALLING THE MOUNTING BRACKET
1 Place one plastic washer on each bracket stud.
2 Place the bracket over the studs as shown above.
3 Screw a swivel lock knob on each stud.

natural_image
Pure mechanical component diagram without any text, numbers, or symbolsUSING THE BRACKET AS A FLOOR STAND
1 Install the mounting bracket in either position as described above.
2 Set the fixture upside-down on a stable surface. Adjust the mounting bracket and tighten both swivel locks.
3 Verify that the fixture is at least 1 meter (39 in.) from the surface to be illuminated and at least 0.3 meters (12 in.) from any combustible materials. Verify that the clearance around all air vents and the cooling fan is at least 0.1 meters (4 in.).
INSTALLING WITH A CLAMP OR FASTENERS
Warning! Block access below the work area before proceeding. Always use a secure means of secondary attachment.
1 Verify that the structure can support at least 10 times the weight of all installed fixtures, clamps, cables, auxiliary equipment, etc.
2 If hanging the fixture with a clamp, verify that the clamp is undamaged and can bear at least 10 times the fixture's weight. Bolt the clamp securely to the bracket with a grade 8.8 (minimum) M12 bolt and lock nut, or as recommended by the clamp manufacturer, through the clamp hole in the mounting bracket.
3 If permanently installing the fixture, verify that the hardware (not included) and mounting surface can bear at least 10 times the fixture's weight. The four 6 mm holes and the clamp holes in the mounting bracket may be used.
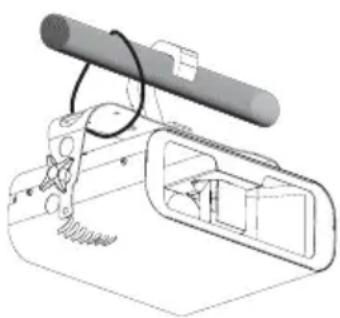
4 Fasten the fixture to the structure. Install a safety cable that can hold at least 10 times the weight of the fixture through/over the support and mounting bracket as shown.
natural_image
Technical line drawing of a mechanical device with no visible text or symbols5 Loosen the swivel locks, tilt the fixture to the desired angle, and retighten.
6 Verify that the fixture is at least 1 meter (39 in.) from the surface to be illuminated and at least 0.3 meters (12 in.) from any combustible materials. Verify that the clearance around the air vent and lamp access plate is at least 0.1 meters (4 in.).
OPERATION
The Raptor is fully automated. The lamp turns on as soon as power is applied and the effects start moving as soon as sound is picked up by the built-in microphone. An Automatic Gain Control (AGC) adjusts sensitivity when the average sound pressure alters.
Although the Raptor cannot be dimmed, it may be switched on and off remotely using switch packs or the full-on and full-off levels on dimmer packs.
Disconnect the fixture from AC power when not in use.
TROUBLESHOOTING
If these remedies do not solve the problem, contact your Martin dealer for service.
| problem probable cause(s) suggested remedy | ||
| No light | No power to the fixture Check connections | |
| Blown fuse Replace fuse | ||
| Burned out lamp Install new lamp | ||
| Fixture overheating | Allow to coolImprove air flow around fixture | |
| No action | Sound too low to activate control circuit | Increase volumeMove speakers closer |
| Electrical malfunction Refer to service technician | ||
| Fuse blows repeatedly E | Electrical malfunction Refer to service technician | |
The lamp is the only user-serviceable part inside the Raptor. Please refer all service to a Martin distributor, dealer, or service center.
LAMP REPLACEMENT
The Raptor is shipped with a Philips 24V/250W ELC 500 hour halogen lamp installed. When replacing the lamp, use only one of the compatible lamps listed on page 11. Installing any other lamp may damage the fixture!
Note: Allow the lamp to cool for at least 5 minutes before moving the fixture. To avoid possible damage, remove the lamp when shipping the fixture.
Warning! Disconnect the fixture from AC power and allow the fixture to cool for 5 minutes before installing a new lamp.
Replacing the lamp
1 Disconnect the fixture from AC power and allow it to cool for 5 minutes.
2 Loosen the 4 lamp access screws and lift off the cover.
3 Slide the old lamp sideways out of the holder. Then remove the socket from the base of the lamp.
4 Push the socket fully onto the pins of the new lamp. Then slide the lamp into the holder until it snaps into place.

natural_image
Technical line drawing of a mechanical housing or enclosure with mounting flanges and internal components (no text or symbols)Loosen screws shown to remove the cover.
5 Replace the cover.

Remove old lamp from holder before disconnecting.

Connect socket to lamp before placing in holder.
REPLACING THE MAIN FUSE
1 Unplug the mains cable from the input socket. Pry open the fuse holder and remove the fuse.
2 Replace the fuse with one of the same type. The fuse rating is listed on serial number label.
SPECIFICATIONS
PHYSICAL
Size (L x W x H) 240 x 400 x 170 mm (9.4 x 15.7 x 6.7 in)
Weight....6.7 kg (14.7 lbs)
Maximum ambient temperature ( Ta ). 40°C (104°F)
Maximum surface temperature 60°C (140°F)
ELECTRICAL
AC input 3-prong IEC male socket
Maximum power and current ..... 270 W, 1.2 A @ 230 V, 265 W, 2.2 A @ 120 V
Wiring options, EU/UK version 230/245 V, 50-60 Hz
Wiring options, US version. 110/120 V, 50-60 Hz
Primary fuse, EU/UK version .....2.5 AT / 250 V, P/N 05020010
Primary fuse, US version 5.0 AT / 250 V, P/N 05020018
INSTALLATION
Minimum distance to combustible materials.... 0.3 m (12 in)
Minimum distance to illuminated surfaces 1.0 m (39 in)
Minimum clearance around fan and air vents 0.1 m (4 in)
Clamp attachment hardware . . . . . . . . . . . . . . . . . . . . . . . 12 mm (0.5 in), grade 8.8 or better
Permanent fastening hardware 5 mm (3/16 in)
COMPATIBLE LAMPS
Philips 24V/250W ELC 500 hr halogen lamp (included)....97000107
Osram 24V/250W ELC 50 hr halogen lamp. 97000104
ACCESSORIES
Martin DMX Switch Pack, 210-245 V ..... 90758200
Martin DMX Switch Pack, 100-130 V ..... 90758300
G-clamp 91602003
Half-coupler clamp 91602005

- INTRODUCTION
- SAFETY PRECAUTIONS
- Installing a plug on the mains lead
- INSTALLATION
- 3
- INSTALLING THE MOUNTING BRACKET
- USING THE BRACKET AS A FLOOR STAND
- INSTALLING WITH A CLAMP OR FASTENERS
- Warning! Block access below the work area before proceeding. Always use a secure means of secondary attachment.
- OPERATION
- TROUBLESHOOTING
- LAMP REPLACEMENT
- Warning! Disconnect the fixture from AC power and allow the fixture to cool for 5 minutes before installing a new lamp.
- Replacing the lamp
- REPLACING THE MAIN FUSE
- SPECIFICATIONS
- PHYSICAL
- ELECTRICAL
- COMPATIBLE LAMPS
- ACCESSORIES
Brand : MARTIN
Model : Raptor
Category : Light projector