
RoboScan Pro 1220 RPR - Scanner MARTIN - Free user manual and instructions
Find the device manual for free RoboScan Pro 1220 RPR MARTIN in PDF.


| Product Type | Document Scanner |
| Model | RoboScan Pro 1220 RPR |
| Brand | Martin |
| Scanning Technology | CCD |
| Optical Resolution | 600 x 600 dpi |
| Color Depth | 24-bit |
| Document Size | Up to A3 (297 x 420 mm) |
| Automatic Document Feeder | Yes, 100 sheets |
| Scan Speed (A4, 300 dpi) | 80 ppm / 160 ipm |
| Interface | USB 3.0, Ethernet, Wi-Fi optional |
| Dimensions (W x D x H) | 585 x 360 x 180 mm |
| Weight | 12 kg |
| Power Supply | 100-240 V AC, 50/60 Hz, 1.5 A |
| Power Consumption | 60 W (max), 5 W (standby) |
| Main Functions | Color, grayscale, mono scanning; automatic duplex; document digitization |
| Maintenance | Clean glass platen and ADF rollers with non-abrasive cleaner; calibrate periodically |
| Safety | Complies with IEC 60825-1 laser safety (Class 1) |
| Spare Parts | Replacement ADF rollers, scanning lamp, power adapter |
| Repairability | Modular design; user-replaceable parts; service manual available |
| Warranty | 2 years limited warranty |
Frequently Asked Questions - RoboScan Pro 1220 RPR MARTIN
User questions about RoboScan Pro 1220 RPR MARTIN
0 question about this device. Answer the ones you know or ask your own.
Ask a new question about this device
Download the instructions for your Scanner in PDF format for free! Find your manual RoboScan Pro 1220 RPR - MARTIN and take your electronic device back in hand. On this page are published all the documents necessary for the use of your device. RoboScan Pro 1220 RPR by MARTIN.
USER MANUAL RoboScan Pro 1220 RPR MARTIN
© 1995-1996 Martin Professional A/S, Denmark.
All rights reserved. No part of this manual may be reproduced, in any form or by any means, without permission in writing from Martin Professional A/S, Denmark.
Printed in Denmark.
Revision #961029-PS. P/N 510061.
section 1
INTRODUCTION
The Roboscan Pro 1220 features 5
About this Manual 7
section 2
INSTALLING THE PRO 1220
Installing the Lamp 8
Fitting the Mains Plug.... 10
Checking the Voltage and Frequency Setting 10
Fitting the Mounting Bracket. 11
Removing the Transport Fixture from the Pan/tilt Assembly ..... 11
section 3
OPERATING VIA A
LIGHTING CONTROLLER
Connecting the Data Link.... 12
Addressing the Pro 1220....13
Controlling 14
section 4
REMOTELY CONTROLLABLE
FUNCTIONS
15
section 5
THE PRO 1220 CONTROL MODULE
dAdr - DMX 512 Address 18
Adr - Martin Link Address. 18
PSEt - Protocol Setup 19
SPEC - Special Functions 19
Po H - Total Power-On Time (Fixture) 21
LA H - Total Lamp-On Time 21
r Po - Resetable Power-On Time 21
r LA - Resetable Lamp-On Time 21
Error and Information Messages 21
section 6
HARDWARE SETTINGS AND
ADJUSTMENTS
Removing and Replacing Modules 23
Voltage and Frequency Setting 24
Lamp Replacement and Adjustment 25
Adjusting the Pan/Tilt Stops 27
Adjusting the Pan/Tilt Dampers.... 28
Regenerating Malfunctioning Lamps.... 29
section 7
MAINTENANCE
30
appendix a
DMX PROTOCOL
31
appendix b
SPECIAL SEQUENCES
36
appendix c
TECHNICAL SPECIFICATIONS
39
section 1
INTRODUCTION
Congratulations on your choice of the Roboscan Pro 1220, designed and manufactured by Martin Professional. The Roboscan Pro 1220 is a high performance, intelligent lighting projector meeting the demands of tomorrow's lighting designers. The rugged construction combined with the use of high quality components ensures that your Roboscan Pro 1220 will perform reliably for many years to come.
The Roboscan Pro 1220 features
LIGHT SOURCE
• 1200 Watt HMI or MSR lamp depending on model.
- Remote ON / OFF via controller.
MOVEMENT
- Smooth and accurate movement at all speeds.
- 176 degree pan in 0.028 degree steps (6,240 positions).
- 85 degree tilt in 0.056 degree steps (1,504 positions).
- 8 and 16-bit tracking available via DMX 512.
- Straight diagonal movements via vector protocol.
COLOR WHEELS
- Two separate and overlapping color wheels each with 9 dichroic colors plus white (only one wheel on Pro 1220 XR).
- Dual-direction, continuous rotation on both wheels.
- Micro-stepping resolution (12,800 steps/360 °).
• Color mixing/splitting. - Hot and cold Color Temperature Correction (CTC) on second color wheel (Pro 1220 CMYR and RPR only).
CMY - INFINITE COLOR MIXING SYSTEM (PRO 1220 CMYR)
- Infinite color selection via CMY color mixing system.
- Instant color change or smooth color fades.
GOBO WHEELS
- 4 rotating and indexable gobos, plus open.
- 9 fixed gobos plus open, with smooth gobo scrolling.
- Micro-stepping resolution (12,800 steps/360 °).
- Fixed and rotating gobos can be combined.
DIMMER / SHUTTER
• High-speed shutter (2 to 16 Hz) for instant black-out and fast strobe.
- 0 to 100% smooth dimming with micro-stepping resolution.
FOCUS
- Motorized focus with precision coated optics.
IRIS
- Motorized iris for different beam diameters.
EFFECT WHEEL (PRO 1220 CMYR / XR)
• 3 and 5 facet prism for multiplying images.
- Frost filter for soft-edged images.
- Hot Color Temperature Correction (Pro 1220 XR only).
ROTATING PRISMS (PRO 1220 RPR)
- 3 rotating and indexable prisms, plus one free position for an optional rotating prism.
MECHANICAL CONSTRUCTION
- Modular design for ease of servicing and flexibility.
- Cover with snap-lock and safety wire provides instant access to serviceable parts.
- Adjustable mounting bracket.
- Four carrying handles.
- The modular design enables future upgrades.
CONTROL, SETTING AND MONITORING
- Can be controlled by DMX 512 or Martin RS-485.
- Simple digital addressing via control module with 4-digit display.
- Simple setting for pan/tilt invert and swap.
• Digital read-out of lamp and fixture usage.
COOLING AND SECURITY.
- Fan speed can be reduced via controller when silent performance is required.
• Overheating protection.
- Access, safety cut-off.
- Power Factor Correction for low current consumption.
About this Manual
This user's manual covers Pro 1220 CMYR / XR fixtures fitted with the following software:
| Device Version(s) Part# | |||
| Pro 1220 CMYR | CPU A Section 2.0 219806 | ||
| CPU B Section 2.0 219806 | |||
| CPU Control Module 3.3 , 3.4 | 219810 | ||
| EPROM A Section 2.6 , 2.7 , 2.8 | 219025 | ||
| EPROM B Section 2.6 , 2.7 219026 | |||
| Pro 1220 XR | CPU A Section 2.0 219806 | ||
| CPU Control Module 3.3 , 3.4 | 219812 | ||
| EPROM A Section 1.4 , 1.5 , 1.6 | 219030 | ||
| Pro 1220 RPR | CPU A Section 2.0 219806 | ||
| CPU B Section 2.0 219806 | |||
| CPU Control Module 1.1 219814 | |||
| EPROM A Section 1.0 219027 | |||
| EPROM B Section 1.1 219028 |
section 2
INSTALLING THE PRO 1220
The Roboscan Pro 1220 is delivered fully prepared from the factory so only a few basic procedures are necessary, and you will be ready to operate your new lighting equipment.
Your Roboscan Pro 1220 package comes complete with the following items:
- Roboscan Pro 1220 CMYR / Pro 1220 XR / Pro 1220 RPR.
- Mounting bracket including fittings.
- 5 metres XLR-XLR cable for control.
- User's manual.
- 15 metres power multi-cable (Pro 1220 Studio Version only).
WARNING!
Before attempting any of the following you must ensure that the fixture is disconnected from the mains supply.
Installing the Lamp
Pro 1220 HMI fixtures uses the double ended HMI 1200 lamp from Osram and Pro 1220 MSR fixtures the single ended MSR 1200 from Philips. Please follow the procedure below in order to install the lamp in a safe and proper way.
HMI 1200 LAMP
- Place the Pro 1220 on a table so that the mirror is up.
- Locate the snap-lock on the fan-end of the fixture and press the small section on the left hand side of this lock, thus releasing the main cover. Now, slide the whole main-cover approximately 3 cm towards the mirror and then remove it upwards, being careful not to damage the mirror while revealing the inside of the fixture.
- Locate the lamp module at the fan-end of the fixture and release the two finger screws which secure the module to the chassis.
- Pull the module straight out of the fixture being careful as you lift and then place it on a surface with the bright side of the reflector upwards.
- Hold the lamp with a clean cloth, avoiding touching the glass envelope with your fingers, and
carefully insert it into the lamp socket.
-
Again, without touching the glass envelope with your fingers, turn the lamp around its centre-axis until the small nipple on the bulb is straight up and thus facing the chassis plate when the lamp module is replaced in the fixture. Then tighten the finger nuts on the lamp, thus securing it to the holder.
-
Carefully clean the lamp using the cleaning cloth provided with the lamp.
-
Replace the lamp module and tighten the two finger screws.
-
Replace the main-cover by locating it back onto the fixture and then slide it towards the fan-end of the fixture. It is necessary to replace the cover in this way as there are some securing points along the side of the case which have to slide into one another to secure the cover correctly. When the cover is in place, simply press the large section of the lock until it clicks and latches into position.
MSR 1200 LAMP
-
Place the Pro 1220 on a table so that the mirror is up.
-
Locate the snap-lock on the fan-end of the fixture and press the small section on the left hand side of this lock, thus releasing the main cover. Now, slide the whole main-cover approximately 3 cm towards the mirror and then remove it upwards, being careful not to damage the mirror while revealing the inside of the fixture.
-
Locate the lamp holder assembly at the fan end of the fixture and turn the two finger screws a quarter turn counter clockwise, thus releasing the assembly from the reflector and lens-modules.
-
Withdraw the lamp socket assembly.
-
Hold the lamp in a clean cloth or by the ceramic base, avoiding touching the glass envelope with your fingers, and then press it firmly into the lamp socket.
-
Carefully clean the lamp using the cleaning cloth provided with the lamp.
-
Replace the lamp holder assembly and tighten the two finger screws.
-
Replace the main-cover by locating it back onto the fixture and then slide it towards the fan-end of the fixture. It's necessary to replace the cover in this way as there are some securing points along the side of the case which have to slide into one another to secure the cover correctly. When the cover is in place, simply press the large section of the lock until it clicks and latches into position.
NOTE: The lamp position has already been adjusted at the factory, however, re-adjustment may be necessary to optimize the light output and the color uniformity from the CMY (Cyan, Magenta, Yellow) system in the Pro 1220 CMYR. Please refer to section 6 - 'HARDWARE SETTINGS AND ADJUSTMENTS'.
Fitting the Mains Plug
The Roboscan Pro 1220 is delivered from the factory without a plug on the mains cable. You will have to fit a suitable plug (one that fits your local mains outlet) before you can connect the fixture to the mains. The double insulated mains cable contains three wires.
- Connect the BROWN wire to the LIVE pin.
- Connect the BLUE wire to the NEUTRAL pin.
- Connect the YELLOW/GREEN wire to the EARTH pin.
NOTE: If you have purchased a Pro 1220 Studio Version (Pro 1220 CMYRST / Pro 1220 XRST) you will find the mains cable attached to the remote ballast box. Use the supplied power multi-cable to connect the ballast box to the Pro 1220 fixture.
Checking the Voltage and Frequency Setting
It is vital that the voltage and frequency setting on your Pro 1220 matches your local power supply. If this is not the case, you will have to rewire the fixture as described in the section called 'HARDWARE SETTINGS AND ADJUSTMENT'. To check whether the factory setting is correct or not, please do as follows:
- Locate on the front of the fixture the serial number label onto which the factory setting for voltage and frequency is printed.
- Now, check the factory setting against your local mains voltage, using the following table.
- Then, check the factory setting against you local mains frequency. If you have a Pro 1220 Studio Version you will find the frequency setting on the serial number label located on the remote ballast box.
| Correct Voltage Setting Local | Mains Voltage | Correct Voltage Setting Local | Mains Voltage |
| 100 V 95 - 110 | V 210 V 200 - 220 V | ||
| 120 V 110 - 130 | V 230 V 220 - 240 V | ||
| 250 V 240 - 260 V | |||
Fitting the Mounting Bracket
The mounting bracket is already fitted onto the Pro 1220, however, you will have to secure it before rigging the fixture.
- Locate the four studs that come out through the bracket on the sides of the Pro 1220.
- Secure the bracket by first fitting the four metal washers and then the four lever handles that came with the Pro 1220.
Removing the Transport Fixture from the Pan/tilt Assembly
In order to protect the mirror and stepper motors from becoming damaged during shipment they have been secured by two black plastic straps.
- First, carefully remove the surface protection foil and warning notice from the mirror.
- Then, remove the black plastic straps.
All effects in the Roboscan Pro 1220 are fully DMX 512 and Martin RS-485 implemented, i.e. you can use any DMX board or the Martin 3032 controller to operate it. All control data are transmitted from the controller's output, via XLR data link cables, to the data input on the Roboscan Pro 1220 (that is the 3 pin XLR male on the front). The data output (3 pin XLR female) on the Roboscan Pro 1220 allows the serial data link to be continued to further fixtures, and this way up to 16 Roboscans Pro 1220s can be connected on the same data link.
Connecting the Data Link
You should follow this instruction carefully in order to make a proper serial data link:
- Connect the data output on your lighting controller to the data input on the Roboscan Pro 1220. If you are using a Martin lighting controller then use the XLR-XLR / DSUB-XLR cable supplied with the controller. Otherwise, use a cable that fits your DMX lighting controller and the Roboscan Pro 1220. This would normally be a cable that adapts from 5 pin XLR to 3 pin XLR and reverses the (+) and (-) signal wires. The following figure shows the proper connections in such a cable (P/N 309162). Please note that the (+) and (-) signal wires swap from the DMX output to the input on the Roboscan Pro 1220.
- If you are using one Roboscan Pro 1220 only, then insert a XLR terminating plug into the unused data output socket on the Pro 1220. If a Martin lighting controller is being used then insert the termination plug that came with the controller (120 Ohm XLR-male). Otherwise, use a termination plug as specified by the DMX controller's manual.
- If you are using more than one lighting fixture with the controller then connect the data output on each fixture to the data input on the following fixture using XLR-XLR cables. The order, in which you connect the fixtures, is not important and has no influence on the channels as far as the controller is concerned - use an order which gives the easiest and shortest cable routing. To ensure proper transmission on the data link it is very important to insert the XLR terminating plug in the last fixture in the link.
NOTE: It is possible to insert other DMX fixtures in the link with 5 pin XLR in and out. In that case you will need a cable that adapts from the 3 pin female output on the Martin fixture to the 5 pin input on the following DMX fixture. The cable should reverse the (+) and (-) signal wires This cable is shown in number two of the following figures (P/N 309163).

The above figure shows the cable to connect from 5-pin DMX output to 3-pin input on Martin fixture (P/N 309162).

The above figure shows the cable to connect from 3-pin output on Martin fixture to 5-pin DMX input (P/N 309163).
Addressing the Pro 1220
If you are using a DMX controller to operate the Pro 1220 you will first have to decide which DMX protocol you will use since this will influence on the number of DMX channels the Pro 1220 requires for operation. The following table shows the four different DMX protocols available. Protocol# 0 is only for use with a Martin controller.
| Protocol # Protocol Type | Pan/Tilt Resolution | Channel Requirements CMYR / XR / RPR | Control Principle | |
| 0 Martin RS-485 | 16 bit 2 / 2 / 2 Vector | |||
| 1 (DMX default) | DMX 512 8 bit 15 / 11 / 13 Trackin | g | ||
| 2 DMX 512 16 bit | 17 / 13 / 15 Trackin | g | ||
| 3 DMX 512 8 bit | 17 / 13 / 15 Vector/Trackin | g | ||
| 4 DMX 512 16 bit | 19 / 15 / 17 Vector/Trackin | g | ||
Roboscan Pro 1220 - operator's manual 13
The control module on the front end of the Pro 1220 allows you to set the DMX protocol and assign the fixture address, which is defined as the first channel from which the Pro 1220 will respond to the controller. If you select a protocol that requires 15 channels and you set the address to channel 10, the Pro 1220 will be using channel 10 to 24 for control. You must address the Pro 1220 fixtures according to your controller configuration, or vice versa, ensuring that you do not have any overlapping channels, thus enabling you to operate each Pro 1220 independently from any other fixture on the link. If two, or more, Pro 1220 fixtures are addressed similarly, they will also respond similarly. Follow this procedure for each of the Pro 1220 fixtures on the link:
- Switch on the Pro 1220 and wait until the fixture 'reset' has finished.
- Press [enter] once in order to access the main-menu and browse through the menu, using the arrow keys, until the display shows 'PSEt'. Now, press the arrow keys until the correct protocol number is displayed and press [enter] to confirm.
- Browse through the menu again, using the arrow keys, until the display shows 'dAdr' or 'Adr'. Depending on whether you want to assign the fixture a DMX or Martin address, confirm by pressing [enter] at 'dAdr' or 'Adr'.
- Use the up and down arrows to select the desired fixture address and confirm by pressing [store].
Controlling
After having addressed all fixtures on the link, you may now start operating these via your lighting controller.
NOTE: After switching on, the Pro 1220s will automatically detect whether a Martin RS-485 or DMX 512 controller is connected. To ensure correct protocol auto-detection it is recommended that the controller is switched on before the Pro 1220s.
If you are using a Martin controller please refer to the manual for that controller for further instructions. If you are using a DMX controller then please refer to the DMX protocol listed in appendix a. All remotely controllable functions are briefly described in the section 4 - 'REMOTELY CONTROLLABLE FUNCTIONS'.
NOTE: The Pro 1220 is fitted with a remotely operated relay, allowing you to turn the lamp on and off from your controller without affecting the rest of the fixture. Therefore, after switching on the Pro 1220 the lamp will remain off until you send the 'Lamp Power ON' command from the controller. Please read the paragraph called 'LAMP' in section 5 - 'REMOTELY CONTROLLABLE FUNCTIONS'. If you attempt to switch on the lamp within 8 minutes after having switched it off, the Pro 1220 will store this 'Lamp Power ON' command, and ignite the lamp when the 8 minute period has expired.
section 4 REMOTELY CONTROLLABLE FUNCTIONS
This section briefly describes the various Pro 1220 functions that can be remotely controlled via the serial data input on the fixture.
LAMP
The Pro 1220 uses a 1200 Watt discharge lamp - the HMI 1200 from Osram or the MSR 1200 from Philips. Both lamps provide a high light output throughout their rated lamp lives of 750 hours. The color temperature is 5600 K for the MSR and 6000 K for the HMI.
A high-power relay inside the Pro 1220 allows you to turn the lamp on and off via your controller and without affecting the rest of the fixture. It is important to note that after switching on the Pro 1220, the lamp will remain off until you send the 'Lamp Power On' command from the controller. Due to the surge of current that is used when starting the lamp, it is recommended that you program a 'Lamp Power On' sequence that will turn on the lamps one at a time with an interval in between each start of approximately 5 seconds.
It is also important to note that both lamps are cold restrike types, meaning that they have to be 'cold' before re-striking is possible. For this reason, you will have to wait 8 minutes after having turned off the lamp before you can turn it back on again. If you attempt to switch on the lamp within 8 minutes after having switched it off, the Pro 1220 will store the 'Lamp Power On' information, and ignite the lamp when the 8 minute period has expired. The message 'Hot' will appear on the control module display at the front end of the Pro 1220. If using a DMX controller to power off the lamp you will have to send the value for a least 5 seconds.
NOTE: To avoid accidentally switching off the lamp, the 'Lamp Off' feature is not supported by DMX unless you enable it on the control module. Please read the section 5 - 'THE PRO 1220 CONTROL MODULE'.
MOVEMENT
The pan/tilt mirror on the Pro 1220 allows you to move the beam to any desired position within the range of 176 by 85 degrees and the micro-stepping control of the motors ensures smooth and accurate movement at all speeds. 6240 positions on pan and 1504 positions on tilt can be reached when using either a Martin controller or 16-bit pan/tilt tracking on DMX. Selecting the B/O speed option will blackout the fixture whilst moving the mirror.
COLOR WHEELS (PRO 1220 CMYR AND RPR ONLY)
The Pro 1220 CMYR has two separate and overlapping color wheels each with 10 color positions -9 of these with dichroic colors and the last one open. Both 'hot' and 'cold' CTCs (Color Temperature Correctors) are available on color wheel 2 and so is a special filter that only allows U.V. light to pass. The wheel can be positioned between two adjacent colors, thus splitting the beam into these colors. The micro-stepping control ensures a smooth scroll at any speed and selecting the B/O speed option will blackout the fixture whilst scrolling at the highest speed. It is also possible to scroll the color wheel continuously forwards and backwards at different speeds. Continuous color scroll also ensures that the Pro 1220 chooses the shortest route when changing from one color to another.
COLOR WHEEL (PRO 1220 XR ONLY)
The Pro 1220 XR has one color wheel with 10 color positions - 9 of these with dichroic colors and the last one open. The wheel can be positioned between two adjacent colors, thus splitting the beam into these colors. The micro-stepping control ensures a smooth scroll at any speed and selecting the B/O speed option will blackout the fixture whilst scrolling at the highest speed. It is also possible to scroll the color wheel continuously forwards and backwards at different speeds. Continuous color scroll also ensures that the Pro 1220 chooses the shortest route when changing from one color to another.
Note that a 'hot' CTC (Color Temperature Corrector) is available on the Prism wheel.
CMY SYSTEM (PRO 1220 CMYR ONLY)
The Pro 1220 CMYR is also fitted with a special color mixing system that allows you to create an almost infinite number of colors. Instant color change is achieved by selecting fast speed. Using a slower speed will provide a smooth color fade into the color selected. Please note that correct lamp adjustment is very important for optimum color uniformity across the beam.
ROTATING GOBOS
Four rotating gobos plus one open are available and each of the gobos can be rotated in both directions. The gobos are optically indexed which allows you to position them at any desired orientation. The B/O speed option blackouts the fixture whilst changing gobo and orientation.
FIXED GOBOS
In addition to the four rotating gobos, the Pro 1220 offers a second gobo wheel with 9 fixed gobos plus one open. These gobos can be combined with the rotating gobos, thus creating interacting gobo patterns. The wheel can be positioned between two adjacent gobos, thus splitting the beam between these gobos. Selecting the B/O speed option will blackout the fixture whilst scrolling at the highest speed.
DIMMER / SHUTTER
High resolution, 0 to 100% smooth dimming is provided by the combined dimmer/shutter system. Use high speed dimming if you wish to open or close the dimmer instantly. It is also possible to strobe at different frequencies (1.6 to 15.6 Hz).
FOCUS
The Pro 1220 uses a motorized focus system which allows remote focusing at any time.
IRIS
The beam angle can be reduced from 18.5^ down to 2.5^ using the iris.
PRISM AND FROST
A separate effects wheel on the Pro 1220 allows you to insert a frost filter or multiplying prisms. The frost filter will make a soft-edge image and the prisms will multiply the beam/image by 3 or 5 times depending on the prism selected. In addition the Pro 1220 XR offers a 'hot' CTC decreasing the color temperature from 5600K to 3400K.
On the Pro 1220 RPR the prisms can be rotated in both directions at a wide range of speeds. It is also possible to program an exact orientation of the prisms, as with the rotating gobos.
FAN
The Pro 1220 is efficiently cooled by means of axial fans. The speed on the two large fans at the rear end of the fixture can be reduced from the controller if very quiet performance is required. Low fan speed reduces the cooling of the fixture and should only be used when necessary and if the ambient temperature is 23 ^ or lower. If the temperature inside the fixture exceeds a certain level (the cut-off threshold), a built-in thermostat automatically powers off the lamp. This situation, which should be avoided, may occur if the fixture is operated with low fan speed over a long period of time in high temperature surroundings.
NOTE: To avoid accidentally switching the fan to low speed, the 'Fan Low' feature is not supported unless you enable it on the control module. Please read section 5 - 'THE PRO 1220 CONTROL MODULE'. Sending a 'fan low' command to the Pro 1220, without having enabled the 'Fan Low' feature, will result in the Pro 1220 automatically switching from low to high fan speed after 3 minutes. After another 3 minutes the fan will resume low speed operation. This high/low cycle will continue until a 'High Fan Speed' command is send to the fixture.
section 5 THE PRO 1220 CONTROL MODULE
The control module on the front end of the Pro 1220 offers several features. You can easily set the fixture address, read the number of lamp hours, enable special soft-features etc. The main-menu is accessed by pressing the menu key - press [enter]. The display will then show one option at a time. Use the arrow keys to browse through the different options in the main-menu (Dadr, Adr, PSEt, SPEC, Po H, LA H, R Po and R LA) and press [enter] if you wish to select one of them. The functions provided are described in the following paragraphs and the function hierarchy is shown below.

flowchart
graph TD
    A["Fixture Address"] --> B["dAdr"]
    A --> C["Adr"]
    A --> D["PSEt"]
    A --> E["SPEC Po H LA H r Po r LA"]
    A --> F[" "]
    A --> G[" "]
    B --> H["1-512"]
    C --> I["1-31"]
    D --> J["0-4"]
    E --> K[" "]
    F --> L[" "]
    G --> M[" "]
    K --> N["PAn"]
    K --> O["tILt"]
    K --> P["PAtl"]
    K --> Q["rES"]
    K --> R["dISP"]
    K --> S["Auto"]
    K --> T["LoFF"]
    K --> U["FAnL"]
    K --> V["SP 1"]
    K --> W["SP16dnLd"]
    N --> X["Inv nInv"]
    N --> Y["Inv nInv"]
    N --> Z["SUAP n SU"]
    O --> AA[" "]
    P --> AB[" "]
    Q --> AC[" "]
    R --> AD["on OFF"]
    S --> AE["on OFF"]
    T --> AF["on OFF"]
    U --> AG["on OFF"]
    V --> AH["St 1 St99"]
    V --> AI["St 1 St99"]
dAdr - DMX 512 Address
Use the arrow keys to select the fixture address when using a DMX controller and press [enter] to confirm or [menu] to cancel. Either way you will return to the main menu.
Adr - Martin Link Address
Use the arrow keys to select the fixture address when using a Martin controller and press [enter] to confirm or [menu] to cancel. Either way you will return to the main menu.
PSEt - Protocol Setup
After switching on a Pro 1220, it will automatically detect whether Martin or DMX signals are received and use the appropriate protocol type. The PSEt (protocol set-up) function allows you to switch protocol and/or protocol type afterwards. Use the arrow keys to select the desired protocol and press [enter] to confirm or [menu] to cancel. Either way you will return to the main menu.
The protocol set-up function is also used to set the default DMX protocol, which is the protocol that is automatically selected if DMX signals are received right after having switched on the fixture.
The following table shows the protocols available:
| Protocol # Protocol Type | Pan/Tilt Resolution | Channel Requirements CMYR / XR / RPR Control Principle | ||
| 0 Martin RS-485 | 16 bit 2 / 2 / 2 Vector | |||
| 1 (DMX default) | DMX 512 | 8 bit | 15 / 11 / 13 | Tracking |
| 2 | DMX 512 | 16 bit | 17 / 13 / 15 | Tracking |
| 3 | DMX 512 | 8 bit | 17 / 13 / 15 | Vector/Tracking |
| 4 | DMX 512 | 16 bit | 19 / 15 / 17 | Vector/Tracking |
SPEC - Special Functions
Selecting this function presents you with a menu of special functions. As in the main-menu, you can browse through the options and select the one displayed by pressing [enter].
dISP
Use the arrow keys to toggle between on and off. Select 'on' by pressing [enter] if you wish the display to blackout 2 minutes after the last pressing of any of the keys in order to avoid audience distraction. Otherwise, select 'off'. The blackout function will not affect the appearance of error and information messages.
Auto
This option can be used to disable the protocol auto-detect function when switching on the fixture.
Use the arrow keys to toggle between on and off. Select 'on', by pressing [enter], if wish the protocol auto-detect function to be enabled after switching on the fixture, and 'off' if you wish to disable the feature.
PAn
This function allows you to invert the pan movement (DMX Protocol only). Use the arrow keys to toggle between Inu for inverted pan and nInu for non inverted and press [enter] to confirm or [menu] to cancel. Either way you will return to the SPEC-menu.
tiLt
This function allows you to invert the tilt movement (DMX Protocol only). Use the arrow keys to toggle between Inu for inverted tilt and nInu for non inverted and press [enter] to confirm or [menu] to cancel. Either way you will return to the SPEC-menu.
Using the Martin 3032 Controller the Pan and Tilt swap can be enabled from the link configuration page.
PAtl
This function allows you to swap the pan and tilt channels in DMX. Use the arrow keys to toggle between SUAP for swapped protocols and n SU for non swapped and press [enter] to confirm or [menu] to cancel. Either way you will return to the SPEC-menu.
dnLd
For factory programming only - do not use.
rES
Pressing enter on this option resets the receiver CPU and enables the auto-detect function.
LoFF
This option allows you to enable/disable the 'Lamp Off' function via DMX. Use the arrow keys to toggle between 'on' and 'off' and select 'on' by pressing [enter] if you wish to enable this feature, and 'off' if you wish to disable the feature.
FAnL
This option allows you to enable/disable the 'Fan Low' function. Use the arrow keys to toggle between 'on' and 'off' and select 'on' by pressing [enter] if you wish to enable this feature and 'off' if you wish to disable the feature.
NOTE: On the Roboscan Pro 1220 ST models, it is not possible to reduce the speed of the tangential fan located at the rear end of the fixture.
SP 1 to SP16
Up to 16 special service and adjustment sequences are available. These are mainly used for servicing purposes. After selecting a sequence, use the arrow keys to step through the sequence. Press [menu] twice to return to the SPEC-menu. Please consult appendix b for table of the sequences
Po H - Total Power-On Time (Fixture)
This option allows you to read the total number of hours that the Pro 1220 fixture has been powered on.
LA H - Total Lamp-On Time
This option allows you to read the total number of hours that the lamp has been powered on.
r Po - Resetable Power-On Time
Selecting this option gives you the number of hours that the Pro 1220 fixture has been powered on. It is possible to reset this counter by keeping the arrow up key pressed for approx. 5 seconds.
r LA - Resetable Lamp-On Time
Selecting this option shows you the number of hours that the lamp has been powered on in the fixture. It is possible to reset this counter by keeping the arrow up key pressed for approx. 5 seconds. For example, reset this counter whenever the lamp is being replaced, thus keeping easy control of the lamp hours.
Error and Information Messages
The following error messages may appear on the display:
LErr
The lamp error message appears if the lamp doesn't ignite within 2 minutes after having received the 'Lamp Power On' instruction from the controller. 'Lamp Error' will not affect the performance of the Pro 1220 once the lamp has been successfully ignited.
ErAb (Pro 1220 CMYR and RPR only)
The 'A/B-Module Error' indicates that there is no communication between the serial data receiver module and the A and B-Section electronic-modules.
Roboscan Pro 1220 - operator's manual 21
ErrA
The 'A-Module Error' indicates that there is no communication between the serial data receiver module and the A-Section electronics-module.
Errb (Pro 1220 CMYR only)
The 'B-Module Error' indicates that there is no communication between the serial data receiver module and the B-Section electronics-module.
ShEr
'Short Error' appears if the Pro 1220 "detects" that the lamp is on but no 'Lamp On' command has been sent. This can occur if the lamp relay has stuck in the on position or the lamp-power feedback circuit has failed.
The following information messages may appear on the display:
Hot
This message appears if you attempt re-strike the lamp within 8 minutes after having switched it off. The Pro 1220 will then store the 'Lamp Power On' instruction and ignite the lamp when the 8 minute period has expired.
Auto / address and PASS
After having switched on the Pro 1220 it will default into protocol auto-detection mode which is indicated on the display which will switch between 'Auto' and the channel number on the previously used fixture address. The message 'PASS' will appear for about half a second when the protocol type (Martin or DMX) has been detected and communication between the electronics-modules verified.
section 6 HARDWARE SETTINGS AND ADJUSTMENTS
The Roboscan Pro 1220 comes fully prepared from the factory, however, lamp adjustment and some pre-setting may be necessary before you can operate the fixture properly. You may also need to readjust some of the mechanical parts after extensive use. The procedures for doing this are carefully described in this chapter.
IMPORTANT!
We recommend that you read the following information carefully before attempting to make any alterations whatsoever. If you do not feel completely confident in making these adjustments you should consult your Martin dealer for assistance.
Removing and Replacing Modules
The Roboscan Pro 1220 has been designed with ease of servicing and maintenance in mind and is constructed in a totally modular fashion. If there is a problem in any particular section, or you want to put in your own custom gobos or you need to clean parts of the fixture, it is a simple operation to remove and replace any module.
WARNING!
Before attempting any of the following you must ensure that the fixture is disconnected from the mains supply.
REMOVING A MODULE
- Remove the main-cover from the fixture as described in the section called 'INSTALLING THE PRO 1220'.
- Locate the module that you wish to remove from the fixture. You will see that there are PCB connectors connecting the module to a wiring loom, remove these connectors taking care to note the location and direction of each one.
- On each side of every module there is a finger screw. Unscrew these two screws and carefully pull the module straight out of the fixture.
REPLACING A MODULE
To replace the module simply reverse the steps above being careful when you replace the module to ensure that it is straight and locates properly: There are two pins on the bottom of the module which have to locate into holes in the inner casing before you are able to re-tighten the finger screws.
Voltage and Frequency Setting
Five voltage and two frequency settings can be selected in any combination on the Pro 1220. To ensure safe and proper operation, it is vital that those settings match your local power supply. The following table lists the correct voltage settings according to your mains supply. The frequency setting is straight forward, since you will either have 50 or 60 Hz - nothing in between.
WARNING!
Before attempting any of the following you must ensure that the fixture is disconnected from the mains supply.
PRO 1220 CMYR / XR / RPR:
- Locate on the front end of the Pro 1220 the Philips screw that secures the small cover over the voltage and frequency terminals.
- Connect the Brown wire labelled 'V' to the correct voltage terminal (see the following table).
- Connect the Brown wire labelled 'F' to the correct frequency terminal.
- Replace and secure the small cover again.
PRO 1220 CMYRST / XRST / RPRST
(STUDIO VERSIONS WITH REMOTE BALLAST)
- Locate on the front end of the Pro 1220 the Philips screw that secures the small cover over the voltage terminals.
- Connect the Brown wire labelled 'V' to the correct voltage terminal (see the following table).
- Replace and secure the small cover again.
- Locate the top-cover on the remote ballast box and remove this. It is secured in either end with two self-tapping bolts.
- You will now see the ballast with a white screw-terminal on the side. Connect the brown wire labelled 'F' to the correct frequency terminal.
- Replace and secure the cover again.
| Correct VoltageSetting Local Mains Voltage | Correct VoltageSetting Local Mains Voltage |
| 100 V 95 - 110 V 210 V 200 - 220 V | |
| 120 V 110 - 130 V 230 V 230 - 240 V | |
| 250 V 240 - 260 V |
Lamp Replacement and Adjustment
To reduce the risk of the lamp shattering it is strongly recommended that the lamp is replaced when the rated average life has been exceeded by 25%. Since the rated average life for both the MSR 1200 and HHI 1200 lamp is 750 hours, they should be replaced before 900 to 950 hours of use. The procedure for installing the lamp is described in section 2 - 'INSTALLING THE PRO 1220'.
The position of the lamp-holder may need to be re-adjusted to ensure optimum performance when the Pro 1220 is installed in its permanent site. Though the Pro 1220 has some built-in sequences for adjustment purposes (appendix b), it is suggested that you use a controller so you can focus the beam on the required distance. The adjustment procedure is as follows:
WARNING!
Whilst adjusting the position of the lamp you will be exposed to extreme heat and intense light. A minor risk of lamp explosion is also present and therefore caution should be taken by covering skin and by wearing eye and face protection. Since the cooling of the lamp is reduced during this adjustment, you should minimize the time used.
Before you start adjusting the lamp, you will have to remove the main-cover from the fixture as described in section 2 - 'INSTALLING THE ROBOSCAN PRO 1220'. Once you have removed the cover, you will see a black access cut-out switch positioned on the dimmer module. This switch serves to cut out the lamp if, for any reason, the main-cover is removed. Before powering on the fixture, and whilst adjusting the lamp position, this switch needs to be held down continuously.
HMI 1200 LAMP
- Locate the 3 adjustment screws on the back of the lamp module and turn all three of them as much counter clockwise as possible.
- Turn only one of the two nearest screws clockwise until the centre axis of the HMI 1200 lamp is parallel to the reflector plate.
- Switch on the Pro 1220 and wait until 'reset' has finished.
- Using the controller, power on the lamp and open the dimmer.
- Still using the controller, move the mirror so that the image is projected onto a flat surface and adjust to a sharp focus.
- Centre the hot-spot (the brightest part of the image) by turning the three adjustment screws one at a time.
- To optimize the brightness turn all three adjustment screws a quarter turn clockwise and then check to see if the result has improved. Repeat this step until there is no more improvement of the light output ensuring that the hot-spot remains centred.
- If you have a Pro 1220 CMYR model, then insert the Cyan, Magenta and Yellow color flags to approximately 75% and make slight adjustments to the screws until the Pro 1220 provides an almost uniform color projection across the entire image. The color should only vary slightly and white edges on the image should be reduced to a minimum.
- Finally, re-assemble the fixture.
MSR 1200 LAMP
- Locate the 4 Philips screws on the top of the lamp holder assembly, and release these slightly, allowing the lamp to move forwards, backwards and sideways.
- Switch on the Pro 1220 and wait until 'reset' has finished.
- Using the controller, power on the lamp and open the dimmer.
- Still using the controller, move the mirror so that the image is projected onto a flat surface and adjust to a sharp focus.
- Centre the hot-spot (the brightest part of the image) by carefully moving the lamp sideways.
- Optimize the brightness by moving the lamp forwards or backwards.
- If you have a Pro 1220 CMYR model, then insert the Cyan, Magenta and Yellow color flags to approximately 75% and make slight adjustments forwards, backwards and sideways until the Pro 1220 provides an almost uniform color projection across the entire image. The color should only vary slightly and white edges on the image should be reduced to a minimum.
- Tighten the four Philips screws, being careful not to move the lamp out of its new position.
- Finally, re-assemble the fixture.
Adjusting the Pan/Tilt Stops
Re-adjusting the mechanical stop on the Roboscan Pro 1220-mirror adaptor is required if the pan or tilt motor intermittently loses steps or leaves the mirror incorrectly positioned after a 'reset' is performed. This error can occur when the recoil of the mechanical reset bounces the mirror and bracket a whole pan or tilt motor step. These adjustments require that your are familiar with the service sequences provided by the control module on the front end of the Pro 1220. If not then please read section 5 - "THE PRO 1220 CONTROL MODULE".

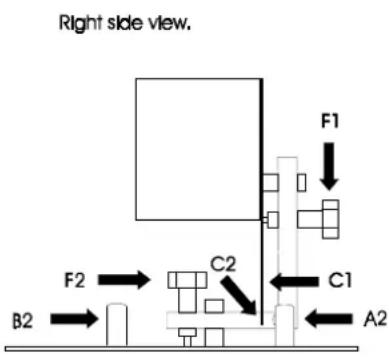
First switch on the Pro 1220, wait until the reset has finished and then select the service sequence named 'SP 6' for Pan/Tilt adjustments.
PAN-MOTOR ADJUSTMENT
- Select 'St 2' (step 2) so that the screw (A1) in the above figure is positioned at the upper mechanical-stop (A2).
- Release the lock-nut on the adjusting screw (A1).
- Turn the screw (A1) clockwise about 1/2 - 1 turn, thereby increasing the distance between the head of the screw and the mechanical Stop (A2).
-
Tighten the lock-nut on screw (A1).
-
Reset the Roboscan Pro 1220 a number of times to check the accuracy of the new reset position.
-
Again, select the service sequence named 'SP 6' and toggle between 'St 2' and 'St 3' whilst checking that adjustment screw (B1) does NOT touch the mechanical stop (B2) during these steps. If it does then adjust screw (B1) accordingly.
TILT-MOTOR ADJUSTMENT
-
Select 'St 4' (step 4) so that the top mechanical-stop (C1) in the previous figure is positioned at the edge of the mirror bracket (C2).
-
Loosen the two allen-screws (E) holding the motor shaft while ensuring that the motor does not slide vertically from its current position.
-
Carefully turn the motor and mirror clockwise (ensure that the motor shaft does NOT turn.) until there is a distance of about 1/2 to 1 mm between the edge of the mirror bracket (C2) and the top mechanical Stop (C1).
-
Tighten the allen-screws.
-
Toggle between 'St 4' and 'St 5', thus moving the mirror between the extreme tilt positions, check that bottom mechanical-stop (D1) does NOT touch the edge of the mirror bracket (D2) during these steps. If it does then re-adjust as described making the distance between (C2) and (C1) even smaller.
Adjusting the Pan/Tilt Dampers
Re-adjustment of the Pan or Tilt dampers is necessary if the end Stop adjustments have caused either of the motors to slide along its axis.
-
Loosen the dampers marked (F1) and (F2) in the previous figure, until the spring-loaded plastic pin is not touching the motor.
-
Select, via the control module, service sequence 'SP11'.
-
Toggle between 'St 1' and 'St 2' in the sequence, thus moving the mirror slowly between the extreme left and right. Whilst the mirror is moving watch the beam movement to ensure that it is smooth. Tighten the pan damper (F2) until the smoothness of the mirror movement is affected and it becomes more 'twitchy'. At this point you should turn the dampers slightly back so that you restore the full smoothness of mirror movement.
-
Similarly, toggle between 'St 3' and 'St 4', thus moving the mirror slowly between the extreme tilt positions and adjust the tilt damper (F1) in the same way you adjusted the pan damper.
NOTE: If the dampers are set to a position that is too loose you will find that the mirror will lose steps when running at higher speeds.
If the dampers are set to a position that is too tight you will find that it will affect the smoothness of the mirror movement at the lower movement speeds.
Regenerating Malfunctioning Lamps
Discharge lamps, like the HMI 1200 and MSR 1200, may refuse to strike if the mains voltage applied to the fixture is too low. Instead, the lamp will burn with a faint blue arc and after a period of time the lamp will become black on the inside. When this happens the lamp will refuse to start at normal voltage. However, in this situation it is possible to regenerate the lamp and so continue its expected life. To do this you should follow the instructions below:
WARNING!
Before attempting any of the following you must ensure that the fixture is disconnected from the mains supply.
- Locate the Philips screw that secures the small cover over the voltage and frequency terminals on the front end.
- Locate the Brown wire labelled 'V'. If this wire is connected to the 120V terminal then move it to the 100V terminal. If the Brown wire is connected to the 230V or the 250V terminal then move it to the 210V terminal.
- Switch on power to the fixture. If the lamp starts let it burn at this voltage for approximately 5 minutes and then switch off again.
- The lamp should now be clear on the inside and ready to re-use at the normal voltage. Disconnect the fixture from the mains and re-connect the Brown wire to the correct terminal as it was before.
- Secure the cover over the voltage terminals before operating the fixture as normal.
If the lamp refuses to start after this procedure of if you prefer not to undertake it yourself, please contact your local Martin Dealer and he will regenerate the lamp in a special fixture for you.
section 7
MAINTENANCE
To ensure optimum and uninterrupted performance from the Pro 1220 it is important to keep it clean at all times. Dusty lenses will reduce the brightness and blocked fans may cause overheating, thus causing the thermostat to cut off the lamp intermittently. Thanks to the modular construction of the Pro 1220, maintenance can be done easily and does not require any special tools. Simply remove the module(s), that you wish to clean, as described in the previous section.
CLEANING THE OPTICAL PATH
You should be very careful when cleaning the color filters, lenses and the reflector. The colored surface on the filters is achieved by means of special coatings and even small scratches may be visible. Use only a clean, soft and lint-free cloth like the ones used for cleaning camera lenses. You may need to wet the cloth in a passive glass cleaning liquid if the filters or lenses are greasy. It may also be necessary to clean the gobos and the iris and special care should be taken not to damage these fragile items.
CLEANING THE FANS
To ensure proper cooling of the fixture it is important that the fans are free from dust. Clean the fans if the air flow seams to be reduced.
CLEANING THE OPTICAL SENSORS
Optical sensors have been placed on the color and the rotating gobo modules. Clean those sensors of dust to ensure reliable and accurate indexing.
appendix a
DMX PROTOCOL
| DMX Channel Offset | DMX Value Effect | ||||||||||
| Pro 1220 CMYR - mode Pro 1220 XR - mode Pro 1220 RPR - mode | |||||||||||
| 1 2 3 4 1 2 3 4 1 2 3 4 | |||||||||||
| 0NOTE!Only withLoFF = on | 0NOTE!Only withLoFF = on | 0NOTE!Only withLoFF = on | 0 - 4950 - 177178 - 199200 - 243244 - 247248 - 251252 - 255 | Strobe, Fan Speed, Reset, Lamp On/OffNo FunctionStrobe On Fast → SlowNo FunctionFan LowLamp Off (T > 5 seconds)ResetLamp On | |||||||
| 0NOTE!Only withLoFF = oFF | 0NOTE!Only withLoFF = oFF | 0NOTE!Only withLoFF = oFF | 0 - 4950 - 177178 - 199200 - 247248 - 251252 - 255 | Strobe, Fan Speed, Reset, Lamp OnNo FunctionStrobe On Fast → SlowNo FunctionFan LowResetLamp On | |||||||
| 1 1 1 | 0 - 255 | Intensity0 → 100% | |||||||||
| 2 - 2 | 0 -10 -20 -30 -40 -50 -60 -70 -80 -90 - 9798 - 105106 - 113114 - 121122 - 129130 - 137138 - 145146 - 153154 - 161162 - 208209 - 255 | Color 1 (Pro 1220 CMYR / RPR)White →Amber →Fern Green →Light Blue →Flame Red →Primary Green →Blue →Orange →Turquoise →PurpleTurquoiseOrangeBluePrimary GreensFlame RedLight BlueFern GreenAmberContinuous Color Scroll CW (fast → slow)Continuous Color Scroll CCW (slow → fast) | |||||||||
| DMX Channel Offset | DMX Value Effect | ||||||||||||
| Pro 1220 CMYR - mode Pro 1220 XR - mode Pro 1220 RPR - mode | |||||||||||||
| 1 | 2 | 3 | 4 | 1 | 2 | 3 | 4 | 1 | 2 | 3 | 4 | ||
| 2 | Color 1 (Pro 1220 XR) | ||||||||||||
| White → | |||||||||||||
| Flame Red → | |||||||||||||
| Pink → | |||||||||||||
| Cyan Blue → | |||||||||||||
| Yellow → | |||||||||||||
| Orange → | |||||||||||||
| Dark Blue → | |||||||||||||
| Magenta → | |||||||||||||
| Primary Green → | |||||||||||||
| Dark Lavender | |||||||||||||
| Primary Green | |||||||||||||
| Magenta | |||||||||||||
| Dark Blue | |||||||||||||
| Orange | |||||||||||||
| Yellow | |||||||||||||
| Cyan Blue | |||||||||||||
| Pink | |||||||||||||
| Flame Red | |||||||||||||
| Continuous Color Scroll CW (fast → slow) | |||||||||||||
| Continuous Color Scroll CCW (slow → fast) | |||||||||||||
| Color 2 (Pro 1220 CMYR / RPR) | |||||||||||||
| White → | |||||||||||||
| CTC 5500 - 3400 (Hot) → | |||||||||||||
| CTC 3500 - 5600 (Cold) → | |||||||||||||
| Dark Orange → | |||||||||||||
| Primary Red → | |||||||||||||
| UV Pass → | |||||||||||||
| Dark Blue → | |||||||||||||
| Dark Lavender → | |||||||||||||
| Pink | |||||||||||||
| Light Green → | |||||||||||||
| Pink | |||||||||||||
| Dark Lavender | |||||||||||||
| Dark Blue | |||||||||||||
| UV Pass | |||||||||||||
| Primary Red | |||||||||||||
| Dark Orange | |||||||||||||
| CTC 3500-5600 K (Cold) | |||||||||||||
| CTC 5500-3400 K (Hot) | |||||||||||||
| Continuous Color Scroll CW (fast → slow) | |||||||||||||
| Continuous Color Scroll CCW (slow → fast) | |||||||||||||
| 4 | - | - | 0 | → Cyan - 2 | |||||||||
| 5 | - | - | 0 | → Magenta - 2 | |||||||||
| 6 | 6 | - | 0 | → Yellow - 2 | |||||||||
| 7 | 3 | 4 | 0 -20 -40 -60 -80 -100 -120 -140 -160 -180 - 188189 - 196197 - 204205 - 212213 - 220221 - 228229 - 236237 - 244245 - 255 | Gobo1Open →Stars →Star →Dots →Cone →Pling →Dot-Circle →Bells →Flower →TurbineFlowerBellsDot-ConePlingConeDotsStarStars | |||||||||
| 8NOTE!Orientation and continuous rotation parameters are programmed on channel 9 | 4NOTE!Orientation and continuous rotation parameters are programmed on channel 5 | 5NOTE!Orientation and continuous rotation parameters are programmed on channel 6 | 0 - 2425 - 4950 - 7475 - 99100 - 125126 - 157158 - 189190 - 221222 - 255 | Rotating Gobo selectionOpen Gobo - no RotationGobo 1 - IndexedGobo 2 - IndexedGobo 3 - IndexedGobo 4 - IndexedGobo 4 - Continuous rotationGobo 3 - Continuous rotationGobo 2 - Continuous rotationGobo 1 - Continuous rotation | |||||||||
| 9NOTE!The Pro 1220 will re-index the gobo before moving the gobo to the programmed orientation. | 5NOTE!The Pro 1220 will re-index the gobo before moving the gobo to the programmed orientation. | 6NOTE!The Pro 1220 will re-index the gobo before moving the gobo to the programmed orientation. | 0 - 126127128 - 25501 - 127128 - 254255 | Rotating Gobo OrientationOrientation CWDefault (Index)Orientation CCWContinuous RotationStaticCCW slow → fastCW fast → slowStatic | |||||||||
| 10 6 7 | 0 - 910 - 177178 - 255 | FocusDefaultNear → Far FocusFar Focus | |||||||||||
| 11 7 8 0 - 157 | 158 - 255 | IrisFull Open → Full CloseFull Close | |||||||||||
| 12 -- | 0 - 4950 - 99100 - 149150 - 255 | Prisms, Frost (Pro 1220 CMYR)Open3-Facetfrost5-Facet | |||||||||||
| - | 8 | - | 0 - 4243 - 8485 - 127128 - 170171 - 212213 - 255 | Prisms, Frost (Pro 1220 XR)OpenCTC 5500 - 3400 K (Hot)Frost3-FacetOpen5-Facet | |||||||||
| - | - | 9NOTE!Orientation and continuous rotation parameters are programmed on channel 10 | 0 - 2425 - 4950 - 7475 99100 - 125126 - 157158 - 189190 - 221222 - 255 | Rotting Prisms Selection (Pro 1220 RPR)Open Prism - no RotationPrism 1 - indexedPrism 2 - indexedPrism 3 - indexedPrism 4 - indexedPrism 4 - Continuous rotationPrism 3 - Continuous rotationPrism 2 - Continuous rotationPrism 1 - Continuous rotation | |||||||||
| - | - | 10NOTE!The Pro 1220 will re-index the prism before moving the gobo to the programmed orientation. | 0 - 126127128 - 25501 - 127128 - 254255 | Rotating Prism OrientationOrientation CWDefault (Index)Orientation CCWContinuous RotationStaticCCW slow → fastCW fast → slowStatic | |||||||||
| 1 | 3 | - | 1 | 3 | - | 9 | - | 9 | - | 1 | 1 | - 10 - 255 | PanLeft → Right (127 = Neutral) |
| 1 | 4 | - | 1 | 4 | - | 1 | 0 | - | 1 | 0 | - | 1 | TiltUp → Down (127 = Neutral) |
| - | 1 | 3 | - | 1 | 3 | - | 9 | - | 9 | - | 1 | 10 - 255 | Pan MSBLeft → Right (127 = Neutral) |
| - | 1 | 4 | - | 1 | 4 | - | 1 | 0 | - | 1 | 0 | - | Pan LSB2Left → Right |
| - | 1 | 5 | - | 1 | 5 | - | 1 | 1 | - | 1 | 1 | - | Tilt MSBUp → Down (127 = Neutral) |
| --- 15 | 117 -- | 611 13 -- | -13 15 | 1 | 6 | - | 1 | 2 | - | 1 | 2 | -0 | Tilt LSBUp → DownSpeed: Pan, TiltTrackingSpeed Fast → SlowBlackout while moving |
| 1 - 251 | |||||||||||||
| 252 - 255 | |||||||||||||
| -- 16 | 18 -- | 12 14 -- | 14 16 | 0 | Speed: Dimmer, Cyan, Magenta, Yellow, Iris, FocusTrackingSpeed Fast → SlowFast Speed | ||||||||
| 1 - 251 | |||||||||||||
| 252 - 255 | |||||||||||||
| 0 | Speed: Color1, Color2, Gobo1, PrismTrackingSpeed Fast -> SlowBlackout while moving | ||||||||||||
| 1 - 251 | |||||||||||||
| 252 - 255 | |||||||||||||
| 0 - 251 | Speed: Rotating Gobo Change, Prism ChangeShutter open while movingBlackout while moving | ||||||||||||
| 252 - 255 | |||||||||||||
appendix b
SPECIAL SEQUENCES
Sequence Scene Description
| SP 1 RESET | ALL | |
| SP 2 | LAMP/OPTO ADJUST (Lamp On) - PRO 1220 CMYR and RPR ONLY | |
| St 1 All | White | |
| St 2 Color 1 Opto Adjust - Feedback on Color 2 | ||
| St 3 Color 2 Opto Adjust - Feedback on Color 1 | ||
| SP 2 | LAMP/OPTO ADJUST (Lamp On) - PRO 1220 XR ONLY | |
| St 1 All | White | |
| St 2 Color 1 Opto Adjust - Feedback on Gobo 1 | ||
| SP 3 | CMY/DIMMER ADJUST (Lamp On) - PRO 1220 CMYR ONLY | |
| St 1 All | Open | |
| St 2 Magenta to adjust position - Requires adjustment tool | ||
| St 3 Cyan to adjust position - Requires adjustment tool | ||
| St 4 Yellow to adjust position - Requires adjustment tool | ||
| St 5 Dimmer to adjust position - Requires adjustment tool | ||
| St 6 Magenta Close | ||
| St 7 Cyan Close | ||
| St 8 Yellow Close | ||
| St 9 Dimmer Close | ||
| SP 3 | DIMMER ADJUST (Lamp On) - PRO 1220 XR and RPR ONLY | |
| St 1 Dimmer Open | ||
| St 2 Dimmer to adjust position - Requires adjustment tool | ||
| St 3 Dimmer Close | ||
| SP 4 | GOBO ADJUST (Lamp On) | |
| St 1 All | Open | |
| St 2 Gobo 1, Last Gobo | ||
| St 3 Rotating Gobo, Last Gobo | ||
| SP 5 | FOCUS ADJUST (Lamp On) | |
| St 1 Focus Front Stop | ||
| St 2 Focus Back Stop | ||
Sequence Scene Description
| SP 6 | PAN/TILT ADJUST (Lamp On) | |
| St 1 Neutral | ||
| St 2 Pan Right | ||
| St 3 Pan Left | ||
| St 4 Tilt Up | ||
| St 5 Tilt Down | ||
| St 6 Right Up | ||
| St 7 Left Up | ||
| St 8 Left Down | ||
| St 9 Right Down | ||
| SP 7 | EFFECT WHEEL ADJUST (Lamp On) - PRO 1220 CMYR ONLY | |
| St 1 Open | ||
| St 2 3-Facet Prism | ||
| St 3 Frost | ||
| St 4 5-Facet Prism | ||
| SP 7 | EFFECT WHEEL ADJUST (Lamp On) - PRO 1220 XR ONLY | |
| St 1 Open | ||
| St 2 CTC | ||
| St 3 Frost | ||
| St 4 3-Facet | ||
| St 5 Open | ||
| St 6 5-Facet | ||
| SP 8 | IRIS ADJUST (Lamp On) | |
| St 1 Iris Open | ||
| St 2 Iris Closed | ||
| SP 9 | LAMP ADJUST (Lamp On) - PRO 1220 CMYR ONLY | |
| St 1 Cyan, Magenta and Yellow Open | ||
| St 2 Magenta = 153, Cyan and Yellow Open | ||
| St 3 Cyan = 153, Magenta and Yellow Open | ||
| St 4 Yellow = 153, Magenta and Cyan Open | ||
| St 5 Cyan, Magenta and Yellow = 153 | ||
Sequence Scene Description
| SP10 | LOCATING ROTATING GOBO INDEX (Lamp On) | |
| St 1 Open Gobo Selected | ||
| St 2 Selecting Gobo 1 and Indexing | ||
| St 3 Selecting Gobo 2 and Indexing | ||
| St 4 Selecting Gobo 3 and Indexing | ||
| St 5 Selecting Gobo 4 and Indexing | ||
| SP11 | PAN/TILT DAMPER ADJUST - SLOW SPEED MOVEMENTS (Lamp On) | |
| St 1 Par Left, Tilt Neutral | ||
| St 2 Par Right, Tilt Neutral | ||
| St 3 Par Neutral, Tilt Up | ||
| St 4 Par Neutral, Tilt Down | ||
| SP12 | PRISM ADJUST (Lamp On) - PRO 1220 RPR ONLY | |
| St 1 Open Position (first) | ||
| St 2 Prism 4 | ||
| SP13 | LOCATING ROTATING PRISM INDEX (Lamp On) - PRO 1220 RPR ONLY | |
| St 1 Open Gobo Selected | ||
| St 2 Selecting Prism 1 and Indexing | ||
| St 3 Selecting Prism 2 and Indexing | ||
| St 4 Selecting Prism 3 and Indexing | ||
| St 5 Selecting Prism 4 and Indexing | ||
| SP16 | LAMP ON/OFF CHECK | |
| St 1 Shows whether the lamp is ON or OFF | ||
appendix c TECHNICAL SPECIFICATIONS
Roboscan Pro 1220 CMYR / XR / RPR
| Dimensions | |
| Length | 1107 mm (43.6") |
| Width (without bracket and handles) | 316 mm (12.4") |
| Width (with bracket and handles) | 462 mm (18.2") |
| Height (without bracket) | 285 mm (11.2") |
| Weight CMYR/XR/RPR models | 53 kg (117 lb) / 51 Kg (112 lb) |
| Weight CMYRST/XRST/RPRST models | 47 kg (103 lb) / 45 Kg (99 lb) |
| Fuse | 20 AT (6.3 X 32 mm) |
| Power consumption | 1550 W |
| AC Supply | 100 / 120 / 210 / 230 / 250 V - 50 / 60 Hz |
| Lamp (Type / Wattage / Color Temperature) | |
| MSR 1200 | Philips MSR 1200 / 1200 W / 5600 K |
| HMI 1200 | Osram HMI 1200 / 1200 W / 6000 K |
| Beam angle Pro 1220 CMYR / XR | 18.5° |
| Beam angle Pro 1220 RPR | 12.5° |
- INTRODUCTION
- INSTALLING THE PRO 1220
- OPERATING VIA A
- LIGHTING CONTROLLER
- REMOTELY CONTROLLABLE
- FUNCTIONS
- THE PRO 1220 CONTROL MODULE
- HARDWARE SETTINGS AND
- ADJUSTMENTS
- MAINTENANCE
- DMX PROTOCOL
- SPECIAL SEQUENCES
- TECHNICAL SPECIFICATIONS
- section 1
- The Roboscan Pro 1220 features
- LIGHT SOURCE
- MOVEMENT
- COLOR WHEELS
- CMY - INFINITE COLOR MIXING SYSTEM (PRO 1220 CMYR)
- GOBO WHEELS
- DIMMER / SHUTTER
- FOCUS
- IRIS
- EFFECT WHEEL (PRO 1220 CMYR / XR)
- ROTATING PRISMS (PRO 1220 RPR)
- MECHANICAL CONSTRUCTION
- CONTROL, SETTING AND MONITORING
- COOLING AND SECURITY.
- About this Manual
- section 2
- WARNING!
- Before attempting any of the following you must ensure that the fixture is disconnected from the mains supply.
- Installing the Lamp
- HMI 1200 LAMP
- MSR 1200 LAMP
- Fitting the Mains Plug
- Checking the Voltage and Frequency Setting
- Fitting the Mounting Bracket
- Removing the Transport Fixture from the Pan/tilt Assembly
- Connecting the Data Link
- Addressing the Pro 1220
- Controlling
- section 4 REMOTELY CONTROLLABLE FUNCTIONS
- LAMP
- COLOR WHEELS (PRO 1220 CMYR AND RPR ONLY)
- COLOR WHEEL (PRO 1220 XR ONLY)
- CMY SYSTEM (PRO 1220 CMYR ONLY)
- ROTATING GOBOS
- FIXED GOBOS
- PRISM AND FROST
- FAN
- section 5 THE PRO 1220 CONTROL MODULE
- dAdr - DMX 512 Address
- Adr - Martin Link Address
- PSEt - Protocol Setup
- SPEC - Special Functions
- dISP
- Auto
- PAn
- tiLt
- PAtl
- dnLd
- rES
- LoFF
- FAnL
- SP 1 to SP16
- Po H - Total Power-On Time (Fixture)
- LA H - Total Lamp-On Time
- r Po - Resetable Power-On Time
- r LA - Resetable Lamp-On Time
- Error and Information Messages
- LErr
- ErAb (Pro 1220 CMYR and RPR only)
- ErrA
- Errb (Pro 1220 CMYR only)
- ShEr
- Hot
- Auto / address and PASS
- section 6 HARDWARE SETTINGS AND ADJUSTMENTS
- IMPORTANT!
- Removing and Replacing Modules
- REMOVING A MODULE
- REPLACING A MODULE
- Voltage and Frequency Setting
- PRO 1220 CMYR / XR / RPR:
- PRO 1220 CMYRST / XRST / RPRST
- Lamp Replacement and Adjustment
- Adjusting the Pan/Tilt Stops
- PAN-MOTOR ADJUSTMENT
- TILT-MOTOR ADJUSTMENT
- Adjusting the Pan/Tilt Dampers
- Regenerating Malfunctioning Lamps
- CLEANING THE OPTICAL PATH
- CLEANING THE FANS
- CLEANING THE OPTICAL SENSORS
- appendix a
- appendix b
- appendix c TECHNICAL SPECIFICATIONS
Brand : MARTIN
Model : RoboScan Pro 1220 RPR
Category : Scanner