
Kamina WU100 - Heating appliance HARVIA - Free user manual and instructions
Find the device manual for free Kamina WU100 HARVIA in PDF.


| Product Type | Wood-burning sauna heater |
| Brand | Harvia |
| Model | Kamina WU100 |
| Fuel | Wood logs |
| Heating Output | Approx. 15 kW |
| Heating Volume | 10–25 m³ |
| Dimensions (H x W x D) | 70 cm x 45 cm x 45 cm |
| Weight | Approx. 60 kg |
| Material | Steel with heat-resistant coating |
| Stone Capacity | Approx. 20 kg |
| Flue Outlet Diameter | 115 mm |
| Ignition | Manual |
| Functions | Heating, steam generation, adjustable air vents |
| Safety Features | Overheat protection, safety clearances required |
| Maintenance | Ash removal, chimney cleaning, stone inspection |
| Spare Parts Availability | Available from Harvia distributors |
| Country of Origin | Finland |
Frequently Asked Questions - Kamina WU100 HARVIA
User questions about Kamina WU100 HARVIA
0 question about this device. Answer the ones you know or ask your own.
Ask a new question about this device
Download the instructions for your Heating appliance in PDF format for free! Find your manual Kamina WU100 - HARVIA and take your electronic device back in hand. On this page are published all the documents necessary for the use of your device. Kamina WU100 by HARVIA.
USER MANUAL Kamina WU100 HARVIA
EN Instructions for installation and use

natural_image
Exterior view of a Harvia industrial stove with visible internal combustion chamber (no text or symbols on main body)Harvia 10
EN
Congratulations on a good choice of fireplace and thank you for your confidence in Harvia's products. Read these instructions carefully before using the fireplace and save them for future reference.
Iron stoves are long-lasting and reliable heat sources when used correctly. Harvia's iron stoves are designed to be safe and easy to use, while also looking good.
CONTENTS
- HARVIA IRON STOVE....4
1.1. Iron stove structure 4
1.2. Input of combustion air....4
- USING HARVIA IRON STOVES......4
2.1. Warnings 4
2.2.Fuel 4
2.3. Heating....4
2.4. Maintenance....4
- INSTALLING HARVIA IRON STOVES 5
3.1.Before Installation 5
3.2. Installation location 5
3.2.1. Safety Distances ....5
3.3. Smoke flue....6
3.3.1. Moving the flue connecting piece to the top or side 6
3.3.2. Connection to a masonry flue 6
- SPARE PARTS 8
| Harvia 10 WU100 | |
| Sauna room volyme (m3) 20–200 | |
| Required temperature class of chimney T450 | |
| Diameter of connection opening (mm) 115 | |
| Weight (kg) ca 85 | |
| Widht (mm) 360 | |
| Depth (mm) 570 | |
| Height (mm) 750 | |
| Fire chamber Cast iron | |
| Maximum lenght of firewood (cm) 30 | |
| Diameter of firewood (cm) 8–15 |
Table 1. Technical Data
| CE Harvia Oy, PL 12, 40951 Muurame, Finland14EN 13240:2001 | Harvia 10 iron stove WU100 | |
| Intended use Intermittent burning room heater | ||
| Fuel Wood | ||
| - safety distances to combustible materials | 500 mm500 mm | |
| Flue gas temperature* 240 °C | ||
| Heating output 6,7 kW | ||
| - carbon monoxide emission at 13 % O_2 | p (9137 mg/ m^3 ) | |
| - carbon monoxide emission (%) at 13 % O_2 | p (0,7 %) | |
| - total efficiency p (80 %) | ||
| - flue draught* 12 Pa | ||
| - refuelling loads 1,6 kg | ||
Table 2.
* Stove door closed
p Pass
1. HARVIA IRON STOVE
1.1. Iron stove structure
The air circulating between the heating chamber and the outer casing efficiently heats the room.
The sturdy and extremely tight cast iron doors are equipped with a vertical latching device.
The iron stoves have a frame of steel board and an outer casing of painted steel. The heating chamber is made of either cast iron protected by firebrick at the bottom.
The extended flame channel in the top part of the heating chamber contributes to the efficiency of the hot plates in the iron stoves and makes the stoves excellent for heating room air.
Only use replacement parts recommended by the manufacturer. Unauthorised modification of the iron stove is prohibited.
1.2. Input of combustion air
In the Harvia iron stoves the air is conducted through a channel into the front part of the chamber, which is designed to direct the air into the embers.
The amount of air needed for burning can be adjusted from a knob under the doors.
2. USING HARVIA IRON STOVES

Read the instructions carefully before using the iron stove.
For the fireplace to work correctly and draw air well, ensure that there is enough replacement air in the room, especially if mechanical ventilation is in use.
2.1. Warnings
- Burning too big fire in the stove leads to an excessive risk of fire and too high temperatures in fireplace structures. Overheating may change the shape of the heating chamber and the colour of the casing.
- Whenever a iron stove is heated, the steel casing becomes extremely hot. It is important to ensure that children do not come into contact with a hot furnace.
- No objects should be kept on top of stoves. Drying clothes on, above or near them is prohibited.
- Do not store wood or other inflammable material in the space below of the fire chamber.
- Never leave a fire burning unattended. Before closing the flue, make sure that there are no smouldering embers in the fireplace that might lead to a build-up of carbon monoxid.
2.2. Fuel
Harvia iron stoves can use wood as a fuel (with a length of 20–30 cm). The fuel must be dry.

The following may not be used as fuel: plastics, combustible liquids, and waste including solvent or plastic.
2.3. Heating
The heating of a new stove should be started carefully. Because the substances that evaporate from the painted surfaces may initially release an odour characteristic of paints, air the room well.
Keep small pieces of wood, along with kindling such as birch bark and newspaper, close at hand. Start off with only a small amount of firewood.
-
Place the wood pieces crosswise (in the middle of the heating chamber) and stick the kindling between the lowest pieces of wood.
-
Open the damper and close the control openings for combustion air.
-
Set fire to the kindling. Once the wood has caught fire, close the doors of the stove and open the regulating outlet for combustion air. The stove is not intended for use with the stove door open. The draught may be poor at first, because the flue is still cold, but it will improve as the flue warms up.
- Keep an eye on the fire and adjust the combustion air as needed.
- When the first batch has nearly burned down to embers, add more wood to the furnace, two to four pieces at a time. When adding wood, close the outlets for combustion air and open the chamber door carefully. Quick changes of air current in the chamber may cause smoke to seep into the room.

Be careful with the door handles of the heating chamber as they may become hot.
Place new wood horizontally on top of the embers – parallel with the side wall of the chamber – as far as possible from the glass doors.
-
After adding the wood, close the doors and open the regulating outlet for combustion air.
-
When the embers turn darker and ashes start forming on top, turn the embers around to ensure that they burn down.
-
The damper must not be closed until the embers have completely burned down and no more blue flames can be seen. Closing the damper too early poses a risk of carbon monoxide.
After the first rounds of heating, you should also start keeping an eye on the ash forming in the heating chamber. The embers may fall against the doors if there is too much ash in the chamber.
2.4. Maintenance Iron stove
- We recommend removing the ash before each time of use. Get a metal container, preferably standing model, to put the ash in. As the removed ash may include hot embers, do not keep the ash container close to combustible material.
EN
- The soot and deposit on the surfaces under the stove's hot plates should be removed frequently with, for example, a steel brush.
- Dishwashing detergent can be used for sooty glass doors. Use washing-up liquid to remove deeply ingrained soot. Rinse and dry the glass after cleaning.
- Paint and enamel surfaces can be lightly wiped with a damp cloth when the furnace has cooled off.
- If you notice flue gas leakage, check the sealing of the damper joints and furnace parts. If required, seal and tighten the joints.
Chimney
- The chimney and connection pipes should be swept at regular intervals and especially if the stove has not been used in a long time.
-
Due to incomplete burning of fuel and failure of sweeping the chimney, the soot build-up in the flue may ignite. Actions to be taken in case of a chimney fire:
-
Close the stove door and damper plate (if installed).
-
Contact local fire authority.
-
Do not try to extinguish fire using water.
-
After a sootfire, a chimney sweeper must check the stove and the flue before use.
3. INSTALLING HARVIA IRON STOVES
3.1. Before Installation
Before installing the iron stove make sure that all safety distance requirements are fulfilled.
There shall be no electrical devices, wires or inflammable materials within the established safety distances around the iron stove.
- All local regulations, including those referring to national and European standards need to be complied with when installing the appliance.
- The iron stove is not suitable for installation in a shared flue system.
- The local fire authorities in charge of approving the installations can provide more detailed information about fire safety regulations.
3.2. Installation location
The furnace should be placed as centrally as possible to achieve an even distribution of heat. Fire safety regulations must also be taken into consideration when planning the location.
The space required for installation consists of the space taken up by the stove itself as well as the safety distances and space needed for normal use and maintenance tasks. For the minimum safety distances, refer to 3.2.1. Your local fire authorities can provide more detailed information on fire safety regulations.
The iron stove shall be installed on a floor with an adequate load-bearing capacity. If the existing floor does not meet this prerequisite, suitable measures (e.g. load distributing plate) shall be taken to achieve it.
If the floor in front of the stove door is made of inflammable material, install floor protection made of nonflammable material (figure 1).
The combustion gases are removed through a Harvia Steel Chimney or a smoke flue made of bricks with a minimum size of 140 x 140 mm.
When using a Harvia Steel Chimney, the fireplace can be placed in the most practical location. For more detailed installation instructions, see the Instructions for installation of Harvia Steel Chimney.
Follow the manufacturer's instructions for safety distances and the installation of pre-manufactured flues.
3.2.1. Safety Distances
See figure 1.
- Walls made of inflammable material. The minimum safety distances to inflammable materials: on either side 500 mm and behind the iron stove 500 mm.

Figure 1. Safety distances (all dimensions in millimeters)
3.3. Smoke flue
The draught depends on the difference in density between the gas in the chimney and the outside air, as well as the height of the chimney. The hotter the gases in the chimney, the bigger the density difference between the outside air and the chimney gases.
Landscape and weather conditions also influence the draught of the smoke flue. If the building is located next to high trees or a hill, the chimney must also be high. It may be difficult to create a good draught during low pressure due to the small density difference.
If a stove is replaced with a new one, make sure that the smoke flue can be used for the new purpose.
If the furnace is altered to use a different fuel (e.g., an oil stove is converted into a furnace using solid fuel), contact a chimneysweep to determine the suitability and condition of the smoke flue.
Chimney fires, even extinguished ones, must always be reported to the regional fire brigade control.
3.3.1. Moving the flue connecting piece to the top or side
The smoke flue can be connected to the top, back or sides of Harvia's iron stoves (figure 2). The stoves supplied directly from the factory are equipped with a straight flue pipe and a connection in the back.
If required, exchange the flue connecting piece in the back of the furnace and the protective cover on the top or side of it with one another before starting work on the actual flue connection.
-
Detach the protective cover from the outer casing by cutting the clamps. This can be done with, for example, a hacksaw blade.
-
Remove the flue connecting piece located in the back opening and the screwed-on cover protecting the flue outlet.
- Join the flue connecting piece to the opening located on the top or side of iron stoves.
- Attach the protective cover to the opening in the back. Ensure that the flanges fit tightly in place and that the screws have been properly tightened.
3.3.2. Connection to a masonry flue
Make a hole for the flue connection in the wall. The hole should be slightly bigger than the flue connecting pipe. The pipe will later be sealed to the hole in the wall with, for example, fireproof mineral wool. A suitable gap around the pipe is ca. 1 cm.
- First connect the flue connecting pipe to the connecting piece on the rear of the furnace. Make sure that the connecting pipe is tightly in place and tighten, if needed, by hitting the pipe with a soft hammer. Also ensure the sealing of the connection.
- Move the iron stove to the flue outlet and push it towards the flue.
- Fill the gap around the pipe with mineral wool and push the iron stove into place. Leave a space of approximately 50 mm between the wall and the back of the furnace.
- Make sure that the flue connection is tightly sealed and add more fireproof mineral wool if necessary.
If the flue connection is not tight, the draught properties of the furnace will suffer and smoke may seep into the room.

Figure 2. Location of smoke outlet (all dimensions in millimeters)
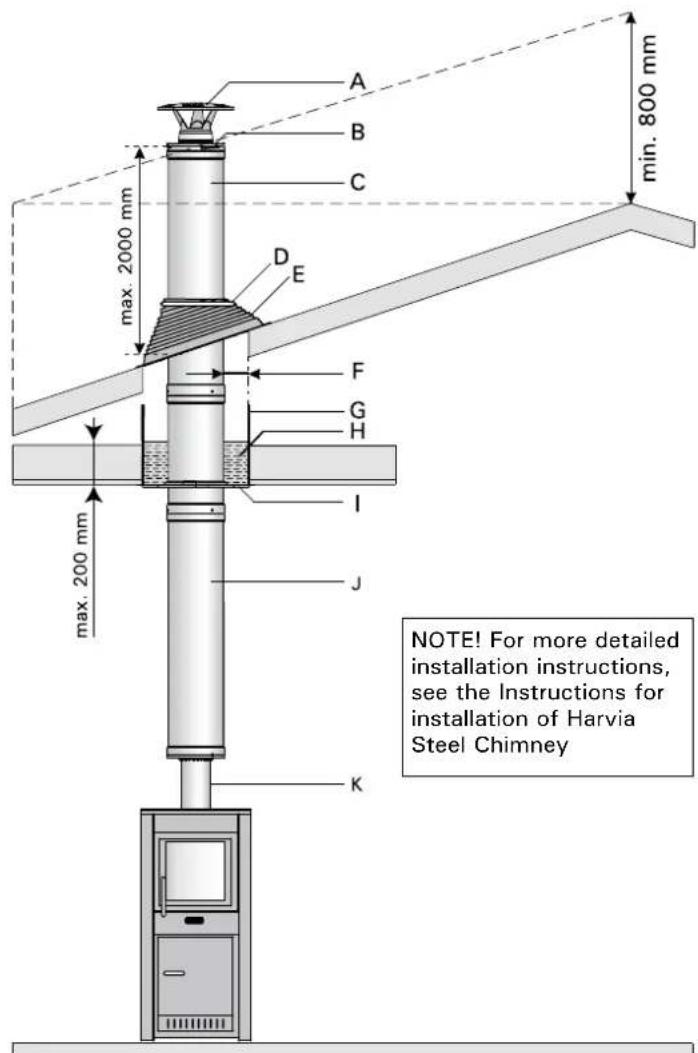
| A | Rain cap |
| B | Upper end |
| C | Steel Chimney extension 1 m |
| D | Clamp |
| E | Rain flange (rubber) |
| F | Minimum distance 100 mm |
| G | Lead-through protector |
| H | Lead-through insulation ZSH-200 or 100 mm fire resistance rated mineral wool (pack the wool so that it supports the chimney) |
| I | Lead-through flange |
| J | Steel Chimney 1,5 m |
| K | Smoke pipe 1 m, stainless steel (cut to the appropriate lenght) (katkaistaan sopivan mittaiseksi) |
Figure 3. Example installation of a steel chimney
4. SPARE PARTS
Spare parts can be purchased at Harvia retailers.
| 1 Glass for the stove door (171 mm x 171 mm) ZTS-37 | |
| 2 Seal to the door WX055 | |
| 3 Frame for hot plate (stainless steel) WX050 | |
| 4 Glass door for the stove WX051 | |
| 5 Handle for the stove door WX052 | |
| 6 Brick for lining ZTS-30 | |
| 7 Fire control plate of the firing chamber WX056 | |
| 8 Spray-paint WX036 | |
| 9 Fire chamber complete WX100 |

- EN
- CONTENTS
- HARVIA IRON STOVE
- Iron stove structure
- Input of combustion air
- USING HARVIA IRON STOVES
- Warnings
- Fuel
- Heating
- Maintenance Iron stove
- Chimney
- INSTALLING HARVIA IRON STOVES
- Before Installation
- Installation location
- Safety Distances
- Smoke flue
- Moving the flue connecting piece to the top or side
- Connection to a masonry flue
- SPARE PARTS
Brand : HARVIA
Model : Kamina WU100
Category : Heating appliance