
MobilePro 780 - Digital Personal Assistant NEC - Free user manual and instructions
Find the device manual for free MobilePro 780 NEC in PDF.


| Product Type | Digital Personal Assistant (PDA) |
| Brand | NEC |
| Model | MobilePro 780 |
| Operating System | Microsoft Windows CE 3.0 |
| Processor | 32-bit RISC NEC VR4121 @ 150 MHz |
| Memory RAM | 16 MB |
| Memory ROM | 32 MB Flash |
| Display | 3.5-inch color STN LCD touchscreen |
| Resolution | 240 x 320 pixels |
| Input | Touchscreen with stylus, handwriting recognition |
| Expansion Slot | CompactFlash Type I |
| Connectivity | Serial (RS-232), IrDA infrared |
| Power Source | 2 x AA alkaline batteries (or rechargeable NiMH) |
| Battery Life | Approximately 10–15 hours |
| Dimensions (W x H x D) | 4.5 x 3.0 x 0.6 in (114 x 76 x 15 mm) |
| Weight (with batteries) | 5.5 oz (156 g) |
| Special Features | Voice recorder, built-in speaker, microphone |
| Care and Cleaning | Use a soft, dry cloth. Avoid liquids. |
| Safety | Do not disassemble. Avoid extreme temperatures. |
| Spare Parts | Stylus, AA batteries, serial sync cable |
| Repairability | User-replaceable batteries and stylus; other repairs by technician |
| General Information | User manual available in PDF from notice-facile.com |
Frequently Asked Questions - MobilePro 780 NEC
User questions about MobilePro 780 NEC
0 question about this device. Answer the ones you know or ask your own.
Ask a new question about this device
Download the instructions for your Digital Personal Assistant in PDF format for free! Find your manual MobilePro 780 - NEC and take your electronic device back in hand. On this page are published all the documents necessary for the use of your device. MobilePro 780 by NEC.
USER MANUAL MobilePro 780 NEC
■ Welcome
■ Unpacking Your MobilePro
■ Getting to Know Your MobilePro
■ Installing and Charging the Battery
■ Connecting the AC Adapter
■ Taking a Quick Tour
■ Introducing the Software
■ Connecting to Your PC via Serial
■ Connecting to Your PC via Infrared
■ Synchronizing with Your Host PC
■ Getting Help
WELCOME
Congratulations on purchasing your NEC MobilePro 780 Professional PC Companion powered by the Microsoft® Windows CE operating system. The size and capabilities of this device let you keep your most important business and personal information up-to-date and close at hand. Microsoft ActiveSync™ increases the power of your device by letting you synchronize the information on your host PC with your device. Picture yourself in the following situations:
- You're on a business trip, getting important customer feedback to discuss with your colleagues back in the office. Using Calendar, Contacts, and Inbox, you schedule a meeting and send it to your colleagues while still on the road.
■ You are on the road taking customer orders. Using Pocket Access, you create records for each customer order. At night, you connect to your network and update the global database with your new orders. You also download updates to the product information database that you use when making sales.
■ During a few spare minutes in the airport, you check your email and send a note to your daughter wishing her luck at the gymnastics meet. (Requires access to an analog phone line or wireless modem card and subscription to an internet service provider or corporate network server.)
Before you start using your device, you will need to install batteries, turn it on, and adjust the screen contrast.
UNPACKING YOUR MOBILEPRO
Your NEC MobilePro ships with a number of accessories. When you unpack the NEC MobilePro, verify that you have all of the items listed below and that they are in good condition. If anything is missing or damaged, contact the vendor who sold you the unit.
Note: Do not attempt to use the unit without the batteries installed. Be sure to complete the sections, "Installing and Charging the Battery," "Connecting the AC Adapter," and "Taking a Quick Tour," later in this chapter.
■ NEC MobilePro 780 (a stylus ships in a holder in the MobilePro)
■ NEC MobilePro AC Adapter
■ NEC MobilePro VGA Cable
■ NEC MobilePro PC Connect Cable (serial cable)
■ NEC MobilePro RJ-11 (telephone cable)
■ One (1) rechargeable Lithium-Ion Battery pack (main battery)
■ Microsoft ActiveSync CD
■ NEC MobilePro Bonus Software CD ^1
■ NEC MobilePro 780 User's Guide (this document)
■ Introduction to Your MobilePro Power System sheet
■ NEC MobilePro Release Notes
GETTING TO KNOW YOUR MOBILEPRO
The NEC MobilePro 780 offers you a portable system designed for synchronization with your desktop or notebook computer. Standard features include a VR4121, 168-MHz, 32 MB RAM, an 8.1-inch H-VGA STN enhanced touch screen, a V.90 internal modem, a built-in microphone, internal speakers, and Type I/II PC card and Compact-Flash™ card support.
NEC MobilePro 780

natural_image
Laptop with NEC branding open, showing front and back views of the keyboard (no visible text or symbols on main body)With your NEC MobilePro you can edit, create, send, and receive documents including text, spreadsheets, presentations, and email, manage your schedule and contacts, access the internet with the internal modem, and synchronize data with your host PC.
Accessories
The NEC MobilePro 780 ships with the following accessories.
■ AC adapter
■ PC Connect (serial port) cable
■ RJ-11 Telephone cable
■ VGA Monitor cable
For a more comprehensive list of MobilePro accessories, refer to the MobilePro desktop. Tap Start, Help, and double tap the MobilePro Accessories link.
INSTALLING AND CHARGING THE BATTERY
Follow these steps to install and charge the main battery.
- Unpack the contents of the MobilePro carton and locate the unit and the Lithium-Ion battery pack.
Lithium-Ion battery pack

natural_image
3D model of a rectangular electronic component with labeled points A and B (no text or symbols beyond labels)A – Battery connectors – B – Lithium-Ion battery pack
-
Locate the release lock on the bottom of the system.
-
Slide the lock to the unlocked position in the direction of the arrow as indicated in the following figure.
-
Put the Lithium-Ion battery pack in the bay and slide the battery in the direction of the arrow, as indicated in the following figure.
Inserting the battery pack

natural_image
Diagram of a device casing with labeled parts A and B, showing internal components and directional arrows (no text or symbols beyond labels)A – Battery release lock B – Lithium-Ion battery pack
-
Firmly press the battery until it is secure and clicks (locks) into place.
-
Slide the lock back to the locked position.
Note: Be sure to slide the lock back to the locked position. The NEC MobilePro will not power on when the lock is in the unlocked position.
- Connect the AC adapter to begin charging the battery. Refer to the next section, "Connecting the AC Adapter," for connection information.
The color of the left status LED changes from amber to green when the battery is fully charged.

Note: Before using the system for the first time, w ten hours for both the main and the backup series to fully charge, even if the indicator on the t of the MobilePro lights green before the full ten rs are passed. You must repeat this full ten hour rge cycle, only if the backup battery becomes discharged.
To protect your data, do not use the system until the backup battery is charged. Recharge the battery whenever the battery charging LED lights amber.
CONNECTING THE AC ADAPTER
NEC recommends using the AC adapter if you
■ are recharging the main battery pack or the backup battery.
■ are using PC cards or Compact Flash™ cards.
■ are using the internal modem.
■ have your MobilePro H/PC on for long periods.

CAUTION
Follow these precautions whenever you use the AC adapter and the NEC MobilePro.
■ When using the AC adapter, make sure the AC outlet is near the NEC MobilePro and easily accessible.
- Keep the main battery installed when running on AC power.
■ When communicating or sending transmissions for a long time, use the AC adapter to conserve power.
Follow these steps to connect the AC adapter.
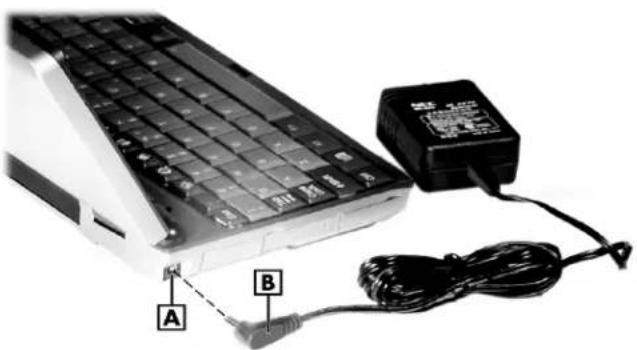
- Insert the plug on the AC adapter cable into the AC power port on the left side of the NEC MobilePro.
Connecting the AC Adapter
natural_image
Close-up of a computer keyboard with attached power adapter and cable, labeled A and B (no text or symbols on main subject)A - AC Power port B - AC adapter cable
-
Plug the AC adapter into a working AC outlet.
-
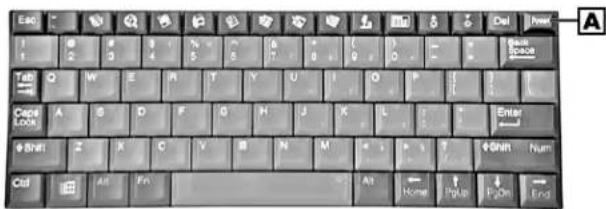
Power on the NEC MobilePro using the Power button at the top right section of the keyboard.
Using AC power saves battery life for when you are on the go, ensures that the backup battery maintains its charge, and helps prevent data loss.

CAUTION
If you power off, then quickly power on the NEC MobilePro, your system may erroneously report the presence of CompactFlash cards.
In addition, repeatedly powering off and quickly powering on, may cause data loss. NECC recommends that you wait ten seconds after powering off, before powering on the NEC MobilePro.
Continue working with the NEC MobilePro 780 as it charges and leave it connected to AC power after the light turns green.

Note: Before using the system for the first time, w ten hours for both the main and the backup series to fully charge, even if the indicator on the t of the MobilePro lights green before the full ten rs are passed.
TAKING A QUICK TOUR
This section takes you through the process of setting up your system for the first time.
- Open the display panel to start your NEC MobilePro 780 for the first time.
Press the Power button if the system does not start automatically. - Follow the on-screen instructions to calibrate the touch screen. If necessary, press Ctrl Alt = to recalibrate at any time.
- Be sure to enter your name, local city, and set the clock for your local time.
- Be sure to specify a country for modem use. For details, see the section in Chapter 4, “Adjusting MobilePro Settings.”
INTRODUCING THE SOFTWARE
Your NEC MobilePro 780 features the latest version of Microsoft Windows CE software along with additional applications on the accompanying CDs.
Your NEC MobilePro 780 software includes:
■ Microsoft ActiveSync™ CD (Install on your host PC for access and synchronization).
■ Microsoft Windows CE pre-loaded applications (in ROM).
■ Bonus Software CD (For U.S. and Canada distribution, only).
For more information about your MobilePro software, refer to Chapter 3, “Introducing Windows CE.”
CONNECTING TO YOUR PC VIA SERIAL
The MobilePro is designed to be a companion PC. Most users want to synchronize the MobilePro 780 with a host PC. The latest work done on either the MobilePro or the host PC automatically appears on both machines, once the synchronization process occurs.
The following section provides an overview of the synchronization process, using the serial port, followed by detailed instructions for each stage of the process.
Follow these procedures to configure your MobilePro for synchronization using the serial port.
■ Verify the accuracy of the PC Connection default settings on your MobilePro.
■ Ensure the availability of the serial port on your host PC.
■ Connect the PC Connect (serial) cable to your host PC and to your MobilePro.
■ Install Microsoft ActiveSync on your host PC.
■ Create a partnership between your host PC and your MobilePro.
■ Verify that the desired synchronization services are configured.
Verifying PC Connection Settings
Your MobilePro ships with PC Connection default settings. Follow these steps to verify the accuracy of the PC connection settings.
- Tap Start, Settings, Control Panel, Communications.
- Select the PC Connection tab.
-
Verify the following settings.
-
“Allow connection with desktop computer when device is attached” is checked.
■ “Connect using Serial Port @ 115K” displays. (Change this setting to 115K, if necessary. If synchronization is unsuccessful, revert to the default of 19200.)
Proceed to the next section to check the availability of the serial port on your host PC.
Ensuring the Availability of the Serial Port
The serial port on your host PC must be available for synchronization with your NEC MobilePro. Follow these steps to ensure the availability of the serial port.
- Access the setup utility on your host PC to verify that the port is enabled.
- Check the device manager on your host PC to identify potential conflicts for the serial port. In the Windows environment:
■ Go to Start, Settings, Control Panel.
■ Double click the System icon and select the Device Manager tab.
- Check the Ports listing to determine if any conflicts exist (another device is assigned to or is using the serial port). The port may be flagged with an exclamation point, for example, if any conflicts exist.
■ If another device is assigned to or is using the serial port, you must reassign the device to free up the serial port for MobilePro synchronization.
Proceed to the next section to connect the PC connect cable.
Connecting the PC Connect Cable
Before installing Microsoft ActiveSync, follow these instructions to connect the PC Connect (serial) cable that ships with your MobilePro to both your MobilePro and to your host PC.
- Locate and open the serial port cover on the back of your MobilePro.
- Align and attach the PC Connect cable to the serial port on the MobilePro. (If your cable is labeled, insert the cable with the word Up visible on the top. If your cable has an arrow near the connector, insert the cable with the arrow visible on top.)
Connecting the PC Connect cable

natural_image
Close-up of a black USB cable inserted into a device with a close-up of its connector (no visible text or symbols)- Connect the other end of the cable to the 9-pin serial port on your host PC. If your host PC has a 25-pin serial port, use an adapter (available in most computer stores).
Proceed to the next section to install Microsoft ActiveSync.
Note: Before connecting the PC Connect cable to the serial port on your desktop, be sure that the serial port is enabled in the desktop's BIOS setup and that no conflicts exist for the port. For details, see a previous section in this chapter, "Ensuring the Availability of the Serial Port."
CAUTION
Be sure to properly align the cable connectors and ports. Incorrect connection can damage the MobilePro and the computer.
Installing Microsoft ActiveSync
You must install Microsoft ActiveSync on your host PC to enable synchronization with your MobilePro. The Microsoft ActiveSync CD that ships with your MobilePro contains the ActiveSync software designed for synchronization with Microsoft Office components. The following procedure assumes Microsoft Outlook as the host PC synchronization component.
Network Requirements
If your host PC is connected to a network, configure one of the following before installing Microsoft ActiveSync:
■ Configure a WINS server on the host PC's network, or,
■ Configure the host PC's IP address on the MobilePro as follows:
- Tap Start, Settings, Control Panel, and double tap the network icon.
-
Highlight NE2000 Compatible Ethernet Driver and select the Properties button.
-
In the IP address tab, select (place a dot beside) "Obtain an IP address via DCHP."
- Select the Name Servers tab and enter the host PC's IP address in the "Primary WINS" field.
To identify the host PC's IP address, run an IP config utility. In Windows 98 and 95, run Win IP Config. In Windows NT, run IP Config. If you need assistance, see your network administrator.
Installing ActiveSync
Follow these steps to install Microsoft ActiveSync for synchronization with Microsoft Outlook. The installation sequence may vary depending upon the Microsoft components installed on your host PC.

Note: If your host PC uses the Windows NT rating system, you must install Windows NT working before installing Microsoft ActiveSync to or host PC.
- Insert the Microsoft ActiveSync CD in the CD-ROM reader of your host PC.
■ If auto insert is enabled on your host PC, the setup window appears.
■ If auto insert is not enabled, go to Start, Run, browse for the CD-ROM drive, and run the setup.exe file.
- Click Next to start the setup wizard.
The Selection Installation folder appears.
- Click Next to accept the default installation folder or modify the folder destination and click Next.
The Get Connected window appears.
- Read the instructions about connecting your device and click Next.
The host PC verifies the availability of a COM port and polls the MobilePro for synchronization settings. The New Partnership window appears.
Proceed to the next section to complete the installation.
Creating a Partnership
Once the host PC verifies the availability of a COM port and polls the MobilePro for synchronization settings, the New Partnership window appears.
-
Click Next to display the Select Synchronization Settings window.
-
Select the desired synchronization settings and click Next.
The Setup Complete window appears.
- Click Finish to complete the installation process.
Verifying Synchronization Settings
Look for the new Microsoft ActiveSync desktop icon on your host PC. Follow these steps to verify synchronization settings on the MobilePro.
-
Double click the ActiveSync icon.
-
Click Tools, Options and verify that the desired synchronization services are checked. Modify the selections as required.

Note: By default, synchronization of email sages is not checked. Be sure to select the kbox for this service if you want to synchronize all between your MobilePro to your host PC.
Once installed, Microsoft ActiveSync automatically synchronizes your MobilePro 780 with your host PC's Microsoft Outlook email, contacts, calendar, and task list each time you attach the PC Connect cable to the MobilePro 780 and the host PC.

Note: Whenever possible Microsoft ActiveC automatically translates files and email atments during synchronization. This allows you use the MobilePro to view and work with files created on your host PC with Microsoft Word, Excel, PowerPoint, among others.
However, as noted in the readme.doc file on the Microsoft ActiveSync CD, PowerPoint files created or modified on the MobilePro are not translated for viewing or modification on your host PC. This limitation does not apply to Pocket Word or Pocket Excel files.
CONNECTING TO YOUR PC VIA INFRARED
If your host PC is not equipped with a serial port or the serial port(s) is in use, use the infrared port to synchronize the NEC MobilePro with your host PC.
The following section provides an overview of the synchronization process, using the infrared port, followed by detailed instructions for each stage of the process.
Follow these procedures to configure your MobilePro for synchronization using the infrared port.
■ Modify the PC Connection default settings on your MobilePro.
■ Set the infrared connection speed.
■ Enable the infrared port on your host PC.
■ Install Microsoft ActiveSync on your host PC.
■ Create a partnership between your host PC and your MobilePro.
■ Verify that the desired synchronization services are configured.
Modifying PC Connection Settings
Your MobilePro ships with PC Connection default settings. Follow these steps to modify the PC connection settings.
- Tap Start, Settings, Control Panel, Communications.
- Select the PC Connection tab.
- Select the Change tab, use the dropdown box to change the setting to Infrared port, and click OK.
Proceed to the next section to set the infrared connection speed, if necessary.
Setting the Infrared Connection Speed
Your NEC MobilePro supports both SIR (115 Kbps) and FIR (4 Mbps) IR communications. Follow these steps to set the infrared connection speed.
- Tap Start, Settings, Control Panel, and double tap MobilePro Settings.
- Select the IrDA tab and select the appropriate infrared connection speed. The infrared connection speed on your NEC MobilePro must be compatible with the infrared connection speed on your host PC.
- Click OK and close the Control Panel.
Proceed to the next section to enable the infrared port on your host PC.
Enabling the Infrared Port
The infrared port on your host PC must be available for synchronization with your NEC MobilePro. Follow these steps to enable the infrared port.
-
Access the setup utility on your host PC to verify that the port is enabled. If required, select FIR support in Setup.
-
Set up infrared software components on your host PC. In the Windows environment:
■ Go to Start, Settings, Control Panel.
■ If infrared is disabled, select the options tab and place a check in the box "Enable infrared communications."
■ Place a check in the boxes, "Search and provide status for devices in range," and "Install software for Plug and Play devices within range."
■ Uncheck the box, "Limit connection speed to."
-
Click Apply and click OK.
-
Check the device manager on your host PC to identify potential conflicts for the infrared port.
■ Double click the System icon and select the Device Manager tab.
- Check the Ports listing to determine if any conflicts exist (another device is assigned to or is using the infrared port). The port may be flagged with an exclamation point, for example, if any conflicts exist.
■ If another device is assigned to or is using the infrared port, you must reassign the device to free up the infrared port for MobilePro synchronization.
- Reboot your host PC.
Once the system restarts, an infrared icon (gray vertical bar with a red bump) appears in the system taskbar. If there is an X to the right of the icon, infrared is not enabled. Repeat steps 1-4 to enable infrared.
Installing Microsoft ActiveSync
You must install Microsoft ActiveSync on your host PC to enable synchronization with your MobilePro. The Microsoft ActiveSync CD that ships with your MobilePro contains the ActiveSync software designed for synchronization with Microsoft Office components. The following procedure assumes Microsoft Outlook as the host PC synchronization component.
Network Requirements
If your host PC is connected to a network, configure one of the following before installing Microsoft ActiveSync:
■ Configure a WINS server on the host PC's network, or,
■ Configure the host PC's IP address on the MobilePro as follows:
- Tap Start, Settings, Control Panel, and double tap the network icon.
- Highlight NE2000 Compatible Ethernet Driver and select the Properties button.
- In the IP address tab, select (place a dot beside) "Obtain an IP address via DCHP."
- Select the Name Servers tab and enter the host PC's IP address in the "Primary WINS" field.
To identify the host PC's IP address, run an IP config utility. In Windows 98 and 95, run Win IP Config. In Windows NT, run IP Config. If you need assistance, see your network administrator.
Installing ActiveSync
Follow these steps to install Microsoft ActiveSync for synchronization with Microsoft Outlook. The installation sequence may vary depending upon the Microsoft components installed on your host PC.

Note: If your host PC uses the Windows NT rating system, you must install Windows NT working before installing Microsoft ActiveSync to or host PC.
- Insert the Microsoft ActiveSync CD in the CD-ROM reader of your host PC.
■ If auto insert is enabled on your host PC, the setup window appears.
■ If auto insert is not enabled, go to Start, Run, browse for the CD-ROM drive, and run the setup.exe file.
- Click Next to start the setup wizard.
The Selection Installation folder appears.
- Click Next to accept the default installation folder or modify the folder destination and click Next.
The Get Connected window appears.
-
Place the NEC MobilePro so that the infrared port is within range of the host PC infrared port and read the instructions about connecting your device. Click Next.
-
On the NEC MobilePro, tap Start, Programs, Communication, and PC Link.
The host PC verifies the availability of an infrared port and polls the MobilePro for synchronization settings. The New Partnership window appears.
Proceed to the next section to complete the installation.
Creating a Partnership
Once the host PC verifies the availability of an infrared port and polls the MobilePro for synchronization settings, the New Partnership window appears.
-
Click Next to display the Select Synchronization Settings window.
-
Select the desired synchronization settings and click Next.
The Setup Complete window appears.
- Click Finish to complete the installation process.
Verifying Synchronization Settings
Look for the new Microsoft ActiveSync desktop icon on your host PC. Follow these steps to verify synchronization settings on the MobilePro.
-
Double click the ActiveSync icon.
-
Click Tools, Options and verify that the desired synchronization services are checked. Modify the selections as required.
Once installed, Microsoft ActiveSync automatically synchronizes your MobilePro 780 with your host PC's Microsoft Outlook email, contacts, calendar, and task list each time you attach the PC Connect cable to the MobilePro 780 and the host PC.
Note: Whenever possible Microsoft ActiveSync automatically translates files and email attachments during synchronization. This allows you to use the MobilePro to view and work with files created on your host PC with Microsoft Word, Excel, and PowerPoint, among others.
However, as noted in the readme.doc file on the Microsoft ActiveSync CD, PowerPoint files created or modified on the MobilePro are not translated for viewing or modification on your host PC. This limitation does not apply to Pocket Word or Pocket Excel files.
SYNCHRONIZING WITH YOUR HOST PC
Once your MobilePro is configured for synchronization with your host PC, synchronization occurs when the ActiveSync components on the NEC MobilePro and on the host PC are activated. When synchronizing via the serial port, the process occurs automatically. When synchronizing via the infrared port, manual intervention is required. Refer to the next two sections for details about synchronizing with your host PC.
Synchronizing via the Serial Port
Once the MobilePro is configured for synchronization the synchronization process automatically occurs each time you connect the MobilePro to your host PC, via the serial port. In addition, you can manually initiate the synchronization process using Microsoft ActiveSync on your host PC. Simply open the ActiveSync window, click File, and click Synchronize.
Synchronizing via the Infrared Port
Once the MobilePro is configured for synchronization via infrared, the ActiveSync component on the MobilePro must be manually activated to initiate the synchronization process. Simply tap Start, Programs, Communication, ActiveSync to initiate synchronization via infrared.
Resynchronizing Your MobilePro
Once synchronized, you may need to re-establish communication between the MobilePro and your host PC if you soft reset the MobilePro or you warm boot your host PC. To re-establish communication between the MobilePro and your host PC, do one of the following:
■ Disconnect, then reconnect the PC Connect (serial) cable.
■ Power off, then power on the MobilePro unit.
Using Other Communication Devices
During synchronization via the serial port, the PC Connect (serial) cable must be connected to your host PC. However, you must disconnect the serial cable before using the internal modem, IR port or a network card in your MobilePro.
Connecting Remotely
In addition to using your MobilePro as a companion PC, when you travel you can connect by modem directly to an internet service provider or a network remote access server, to get email and to view web pages.
Refer to Chapter 5, “Setting Up a Remote Connection” for details.
GETTING HELP
The following table provides a comprehensive list of where you can get help on your MobilePro 780, the software, connections, accessories, and support.
Help Resources
| Item | Resource |
| MobilePro Operation | MobilePro User's Guide |
| Windows CE | Windows CE Main HelpHelp file included with Windows CE. Tap Start then Help on the MobilePro desktop taskbar.Microsoft Windows CE for the Handheld PC Homehttp://www.microsoft.com/windowsceMicrosoft Windows CE for the Handheld PC Frequently Asked Questionshttp://support.microsoft.com/support/windowsce/faq/default.aspMicrosoft Windows CE for the Handheld PC Newsgroupshttp://support.microsoft.com/support/news/Ngresults.asp?D=wceChris De Herrera's Windows CE Website Homehttp://www.cewindows.net |
| ActiveSync (formerly Windows CE Services) | ActiveSync HelpAfter installing ActiveSync on your host PC, click on Start/Programs/ActiveSync to open the ActiveSync window. Select Help from the menu bar and click on Microsoft ActiveSync Help. |
| Pocket Word, Excel, Access, PowerPoint, Internet Explorer, Inbox, Calendar, Contacts, Tasks | Microsoft Windows CE for the Handheld PC Highlightshttp://support.microsoft.com/support/default.asp?PR=wce&FR=0&SD=SO& |
| Connecting to Internet Service Providers | Chris De Herrera's Windows CE Website ISP Settingshttp://www.cewindows.net/wce/isp.htm |
Help Resources
| Item | Resource |
| Software and Hardware Resources | Microsoft Windows CE for the Handheld PC Resource Guidehttp://windowsce.resourceguide.net(For PC cards, Compact Flash cards, network adapters, wireless modems, software, and more.)Microsoft Windows CE for the Handheld PC Product Locatorhttp://windowsce.microsoft.com/reftool/search/s_h wsw.asp |
| MobilePro Accessories ^1 | NEC Computers Inc. Accessorieshttp://www.nec-computers.com/accessories_category.asp ^2 |
| MobilePro Technical Support, Warranty Service ^1 | NEC Computers Inc. MobilePro Supporthttp://www.neccomp.com (click on Service & Support)NEC Computers Inc.Support Telephone Numbers800-632-4525, fax: 801-981-3133 |
| MobilePro Homepage | NEC Computers Inc. MobilePro Homehttp://www.nec-comput-ers.com/store/product_line.asp?prod_line_no= 4^2 |
^1 For U.S. and Canada only. If you purchased this computer outside of the U.S. and Canada, please contact a local dealer in your country.
^2 World Wide Web address subject to change.
2
Introducing the NEC MobilePro
■ Identifying System Features
■ Opening the Display Panel
■ Using the Stylus
■ Using MobilePro's Power Sources
■ Caring for the MobilePro
IDENTIFYING SYSTEM FEATURES
The NEC MobilePro 780 is compact with features on every side. The next few sections provide figures and feature descriptions.
Around the Front of the System
The following sections describe front features beginning with the display panel.
Display Panel
Your NEC MobilePro 780 comes with an 8.1-inch display panel that you can adjust for a comfortable viewing position. See the section, “Making Display Panel Adjustments,” in Chapter 4 for information about adjusting the panel brightness.
Display panel

A – Display panel B – Display panel latch C – Stylus D – Scroll Dial
■ Display Panel (with built-in touch screen) — provides a touch screen that lets you activate functions by touching the screen with the stylus or your fingertip.
■ Display Panel Latch — secures the display panel when it is closed.
■ Stylus — a “pen” that serves as an input device for the touch screen. Remove the stylus from its holder to use it.
■ Scroll Dial — allows you to scroll up/down or PgUp/PgDn, depending upon your MobilePro Settings.
Keyboard Panel and Base Unit
The NEC MobilePro keyboard panel and base unit provide the following features which are described after the figure.
Keyboard panel and base unit
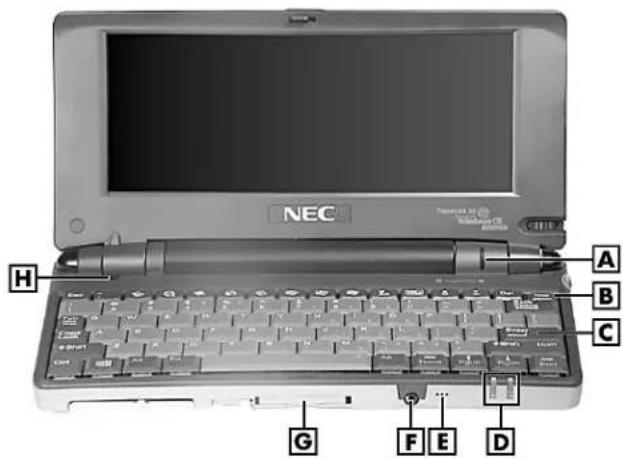
A-Scroll Dial B-Power Button C-Keyboard
D- Status LEDs E-Microphone
F – Earphone microphone jack G – CompactFlash card slot
H-Suspend switch
■ Scroll Dial – allows you to scroll up/down or
PgUp/PgDn, depending upon your MobilePro Settings.
■ Power Button — allows you to power on and off the unit when it is open.
■ Keyboard — lets you a enter data with your fingertips.
■ Status LEDs — keeps you informed of the system's power status and notifies you about scheduled appointments.
Status LEDs

A – Battery charging LED B – Notification LED
Battery charging LED
– lights amber when the battery is charging.
– lights green when the battery is fully charged.
☐ Notification LED — flashes amber as a reminder of appointments, pages, etc.
■ Microphone — lets you record your voice.
■ Earphone Microphone Jack — lets you connect the earphone microphone accessory to your NEC MobilePro.
■ CompactFlash Card Slot — lets you install one CompactFlash card.
■ Suspend Switch — Shuts off the backlight when the LCD panel is closed. Puts the MobilePro into a suspend state when the lid is closed (if enabled in MobilePro Settings).
Around the Back of the System
The back of the NEC MobilePro offers the following features which are described after the figure.
Features on the back of the system

natural_image
Diagram of a mechanical component with labeled parts A and B (no text or symbols beyond labels)A - IR port B - Main battery pack
■ Infrared (IrDA) Port — allows the MobilePro to communicate without cables with similarly equipped devices, including other MobilePros.
■ Main Battery Pack — provides battery power to the NEC MobilePro when away from an AC power source.
Around the Left Side of the System
The left side of your NEC MobilePro offers the following features which are described after the figure.
Left side features
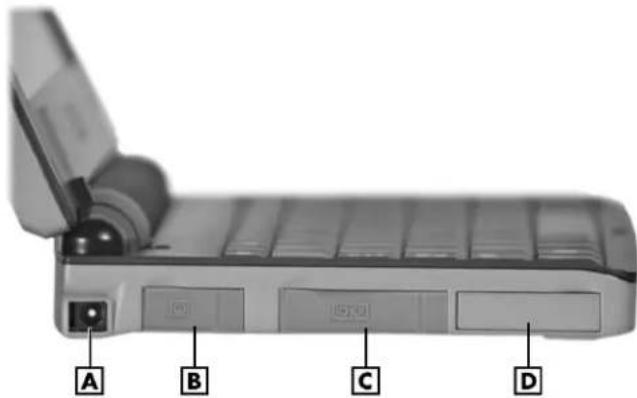
A - AC Power port B - VGA port C - Serial port D - Not Used
■ AC Power Port — lets you connect the AC adapter to run your unit on AC power.
■ VGA port — provides a connection point for the VGA cable.
■ Serial port — provides a connection point for the PC connect cable.
■ Not used in some models.
Around the Right Side of the System
The right side of your NEC MobilePro offers the following features which are described after the figure.
Right side features

natural_image
3D model of a mechanical device with labeled parts A, B, and C (no text or symbols on the object itself)A – PC card eject button B – PC card slot C – Modem port
■ PC card eject button — allows you to remove an installed PC card.
■ PC card slot — lets you install one Type I or Type II PC card.
■ Modem Port — provides connection access to the internal modem using the RJ-11 telephone cable.
Around the Bottom of the System
The bottom of the NEC MobilePro offers the following features which are described after the figure.
Features on the bottom of the system

A - Soft reset button B - ROM bay cover C - Speaker D - Battery release lock E - Lithium-Ion battery pack F - Battery release latch
■ Soft Reset Button — lets you do a “Soft Reset” to the NEC MobilePro in case of malfunctions. Your data is preserved if it has been saved in a file. Use your stylus to press the soft reset button.
■ ROM Bay Cover — protects the ROM bay and the installed ROM module.
■ Speaker — lets you listen to digital audio. You can program MobilePro audio to remind you of appointments, notify you of operation events, or play application-associated sounds.
■ Battery Release Lock — locks the battery in its bay.

Note: The NEC MobilePro will not power on the battery lock is in the unlocked position.
Lithium-Ion battery pack — provides the system's main battery power.
■ Battery Release Latch — allows you to release and remove the battery (when the lock is in the unlocked position).
OPENING THE DISPLAY PANEL
Open the display panel as follows.
- Slide the display panel latch to the right.
- Lift the display panel up and towards the back of the unit.

CAUTION
When the NEC MobilePro is not in use or when you are carrying it, keep the display panel closed. This helps prevent accidental damage to the touch screen or keyboard.
Dropping the MobilePro may cause display panel damage.
USING THE STYLUS
To use the stylus, follow these steps.
- Open the MobilePro display panel.
- Locate the stylus holder on the lower right of the display panel. To remove the stylus, slide it away from the unit.

CAUTION
Although you can use your fingertip to activate the touch screen, never use hard-pointed or sharp objects. These objects can damage the touch screen.
- Gently touch the pointed tip of the stylus to the screen to select an object. When you are done using the stylus, return it to its convenient holder on the MobilePro.
USING MOBILEPRO'S POWER SOURCES
The NEC MobilePro 780 can be powered using the AC adapter or the system's main battery, making it a truly portable system. The MobilePro also contains a built-in, backup battery that recharges whenever the unit is connected to an AC power source. Read the following sections for information about using the NEC MobilePro's power sources.
Determining Battery Status
You can determine battery status by using the power icon on the lower right-hand side of the taskbar or through the power icon in the control panel. The icon on the taskbar displays as an electrical plug when the battery is fully charged (battery charging LED lights green) or as a battery while charging (battery charging LED lights amber).
To display battery status, use one of the following methods.
■ Double tap the battery/plug icon on the taskbar, if present.
■ Go to Start, Settings, Control Panel, and double tap the power icon.
Recharging the Main Battery Pack
The main battery pack contains rechargeable Lithium-Ion cells. Recharge a battery pack when you see the following message displayed on your screen.
Main Batteries Very Low
To recharge a battery pack installed in the battery bay, connect the AC adapter. See “Connecting the AC Adapter” in Chapter 1.
The battery charging LED indicates the charging status of the main battery pack when the NEC MobilePro is connected to an AC power source. The LED status displays as follows:
■ Lights amber while charging.
■ Lights green when fully charged.
It takes approximately 4.5 hours to recharge a fully depleted battery pack regardless of the system's power state. However, if the main battery has been depleted for a prolonged period, you must also allow time for the backup battery to fully recharge (see the section, Recharging the Backup Battery").

Note: Through normal use, the capacity of a very pack gradually declines. Should you notice the battery does not stay charged as long as exited, it is probably necessary to replace the bat-with a new one. Please refer to the section ttery Replacement" in this chapter. Depending in use, a battery pack should recharge from full letion approximately 300 times during the life of battery.
Recharging the Backup Battery
The backup battery charges while the main battery is charging. It usually takes approximately 4.5 hours to recharge both the main and backup batteries together.
A full 10 hours charging time is required under either of these circumstances:
■ this is the first time you have used your MobilePro
■ the main battery has been in a depleted state for a prolonged period.
In these cases, allow ten hours for both the main and backup batteries to charge, even if the LED indicator on the front of the MobilePro lights green before the full 10 hours are passed.
To protect your data, do not use the system until the backup battery is charged.
To recharge the main and backup batteries, connect the AC adapter. See the section, “Connecting the AC Adapter” in Chapter 1.
MobilePro Power Management
When your MobilePro is connected to an AC power source and the main battery is removed from the system, be sure to replace the main battery before disconnecting the AC adapter to prevent possible data loss.

CAUTION
The MobilePro's internal data backup battery provides power to maintain the memory contents for a limited period of time when the main battery is removed and the unit is not connected to an AC power source. The backup battery does not provide sufficient power to operate the system.
Do not remove the main battery from the unit for an extended period of time unless the unit is connected to an AC power source. The backup battery is not user replaceable.
Battery Replacement
Note the following when replacing batteries:
■ If the main battery becomes weak, the MobilePro automatically turns off. Recharge or replace the main battery immediately if the power goes off.
■ MobilePro has a built-in backup battery that maintains your data for several hours whenever the main battery is depleted or removed. The backup battery is re-charged whenever the unit is connected to an AC power source.
If you fail to replace a depleted main battery for an extended period of time and the back-up battery is weak, the contents of the MobilePro memory and all user data may be lost.
Removing and Inserting the Battery Pack
Should you notice the life of a charged battery pack is short, replace it with a new one. Follow these instructions to replace a battery pack.
- Save your data, turn off unit power, and close the display panel. Disconnect any cables attached to the unit, such as the AC adapter cable.

Note: If you receive messages indicating that in the main battery and the backup battery are low, immediately connect the AC adapter to large both batteries.
-
Have a new Lithium-Ion battery pack available.
-
Remove the battery pack as follows.
-
Locate the battery lock and release latch on the bottom of the system.
■ Slide the lock to the unlocked position in the direction of the arrow as indicated in the following figure.
■ Slide the release latch in the direction of the arrow, as indicated in the following figure, and hold it.
■ Remove the battery from its bay.
Removing the battery pack

A – Battery release latch B – Battery release lock C – Lithium-Ion battery pack
- Insert a new battery pack as follows.
■ Put the new Lithium-Ion battery pack in the bay and slide the battery in the direction of the arrow, as indicated in the following figure.
Inserting the battery pack

natural_image
3D diagram of a device casing with labeled components A and B, showing internal structure and mounting points (no text or symbols beyond labels)A – Battery release lock B – Lithium-Ion battery pack
■ Firmly press the battery until it is securely in the bay and clicks (locks) into place.
■ Slide the lock back to the locked position.
Note: Be sure to slide the lock back to the locked position. The NEC MobilePro will not power on when the lock is in the unlocked position.
- Charge the battery. See "Recharging the Main Battery" and "Recharging the Backup Battery."
Battery Precautions
Read the following battery handling precautions to insure your safety.

WARNING
Adhere to these warnings when handling batteries. Failure to do so may result in personal injury.
■ There is a danger of explosion if the battery is incorrectly replaced. Replace only with the same type recommended by the manufacturer.
- Discard used batteries according to the manufacturer's instructions. Never dispose of batteries by burning them.
■ Dispose of used batteries promptly.
- Keep batteries away from children.
■ Do not subject batteries to impact.
■ Do not subject batteries to heat sources including direct sunlight, open fires, microwave ovens, and high-voltage containers.
■ Do not recharge battery unless they are specifically designed for recharging.
■ Do not disassemble batteries.
■ Do not solder or puncture batteries.

WARNING (cont'd)
- Do not use a battery that is damaged or deformed, has any rust on its casing, is discolored, overheats, or emits a foul odor.
CARING FOR THE MOBILEPRO
The NEC MobilePro is a durable, dependable unit built for extensive use and travel. Follow these guidelines to maintain the condition and performance of your MobilePro.

CAUTION
Immediately turn off and unplug the MobilePro under the following conditions.
■ The power cord is damaged or frayed.
■ Liquid spills on or into the unit.
■ Someone drops the unit or damages the casing.
Precautions
Follow these precautions when using your NEC MobilePro and AC adapter.
■ Always plug the AC adapter cord into an easily accessible outlet. It is important to be able to easily shut off power by unplugging the AC adapter if needed.
■ Avoid dropping or bumping the MobilePro or the AC adapter.
■ Do not stack heavy objects on the MobilePro or the AC adapter.
- When using the AC adapter, make sure the power source falls within the unit's compatible range of 100–240 volts AC. Never use the AC adapter if the voltage falls outside of this range. (Watch for this when traveling to other countries.)
■ Turn off the MobilePro power before attaching or removing devices.
■ Do not push any foreign objects into the MobilePro bays, connectors, and slots.
■ Avoid using the unit or AC adapter for extended periods in direct sunlight.
■ Do not use the unit in humid or dusty environments.
■ Turn off the MobilePro power before cleaning the system.
■ Avoid exposing the MobilePro or AC adapter to extreme changes in temperature or humidity. If it is unavoidable, allow your MobilePro to adjust to room temperature before use.
■ When cleaning the system, use a soft, clean, slightly damp, almost dry cloth. Avoid wiping the display surface with abrasive material, including rough fabric. Do not use a cleaning solution; this may damage the plastic.
■ If the AC adapter becomes extremely hot, unplug the adapter and let it cool. - Keep the AC adapter away from the IrDA port to ensure stable communication/transfer operations.
Storage Requirements
Store the NEC MobilePro and AC adapter in an environment that meets the following conditions.
- Maintain storage temperatures between 14°F and 140°F (-10°C and 60°C).

CAUTION
If the temperature of the NEC MobilePro suddenly rises or falls (for example, when you move the system from a cold place to a warm place) vapor condenses inside the system. Turning on the unit under this condition can damage the internal system components.
Before turning on the NEC MobilePro, wait until the unit's internal temperature equalizes with the new environment and any internal humidity evaporates.
- Keep the storage area free from vibration and magnetic fields.
- Keep the unit and its components away from organic solvents or corrosive gases.
■ Avoid leaving the unit and its components in direct sunlight or near heat sources.
Routine Cleaning
Clean or dust your system as follows.

CAUTION
Never use harsh solutions, household cleaners, or spray cleaners that contain caustic materials on the MobilePro.
These cleaners are usually high in alkalinity, which is measured in pH. Using these cleaners can cause the plastic surface to crack or discolor.
■ Display screen — Carefully wipe the LCD screen with a soft cloth or a screen wipe designed for that purpose. Special screen wipes are available through your local computer dealer.
■ Unit case — NEC recommends that you carefully wipe the case with a slightly damp, almost dry cloth.
3
Introducing Windows CE
■ Windows CE Operating System
■ Microsoft ActiveSync
■ Software Applications
■ Online Help
4
Using the NEC MobilePro
■ Powering On and Off
■ Making Display Panel Adjustments
■ Using the Keyboard
■ Adjusting MobilePro Settings
■ Using the Voice Recorder
■ Using PC Cards
■ Using CompactFlash Cards
■ Using the IR Port
■ Upgrading ROM
■ Resetting the MobilePro
5
Setting Up a Remote Connection
■ Preparing for Connection Setup
■ Connecting the Internal Modem
■ Connecting to an Internet Service Provider (ISP)
■ Connecting to a Remote Access Server
■ Sending and Receiving Email
■ Activating a Connection
A
Troubleshooting
Your NEC MobilePro is designed to provide many hours of service while you are at home or on the road.
For optimum performance, frequently back up and synchronize the MobilePro data with your notebook or desktop computer. Then if something happens, most of your data is still available. If you have problems, check the information in the following table for possible solutions.
Troubleshooting
| PROBLEM | RESOLUTION |
| The MobilePro has no power. | Check the main battery.If you are using an AC adapter, make sure the connections are correct and secure.Make sure the battery bay release lock is in the locked position.Check that the ROM bay cover is properly secure. |
| Nothing appears on the screen. | Try pressing the Power button again (the unit might have turned itself off if it was not used for a specified time).Adjust the contrast.Check the power connections. |
Troubleshooting (cont'd)
| PROBLEM | RESOLUTION |
B
Specifications
The following specifications are standard except where noted.
Display
8.1-inch, 640 x 240, 64K color, liquid crystal display (LCD), with backlight, touch screen
CPU
NEC V _R4121 , 168-MHz processor, optimized for Windows CE
User Data Entry Methods
■ 78-key QWERTY keyboard with stylus
■ 17.5 mm alpha key pitch
■ Touch screen (input via stylus)
■ Scroll (Jog) dial
Random Access Memory (RAM)
32 megabytes (MB); standard
Read-Only Memory (ROM)
24 megabytes MB; replaceable
Speaker
One built-in speaker
Battery Replacement
A lithium battery in some computers maintains system configuration information. In the event that the battery fails to maintain system configuration information, NECC recommends that you replace the battery. For battery replacement information, call your local NECC dealer or the NECC Customer Assistance Center.

WARNING
There is a danger of explosion if the battery is incorrectly replaced. Replace only with the same or equivalent type recommended by the manufacturer. Discard used batteries according to the manufacturer's instructions.

AVERTISSEMENT
The main battery is a Lithium-Ion battery.
The sub-battery is a Lithium/Vanadium battery.
Do not place used batteries in your regular trash.
The incineration, landfilling, or mixing of batteries with the municipal solid waste stream is prohibited by law in most areas.
Contact your local waste management officials for other information regarding the environmentally sound collection, recycling, and disposal of used batteries. If you purchased or are using this computer outside of the U.S. or Canada, contact a local NECC dealer in your country.
Infrared (IrDA) Communication
■ Baud rate — FIR 4 Mbps maximum
■ Distance — 2 to 20 inches
Serial Interface
Baud rate — 115.2 Kbps maximum
I/O Ports
■ Serial port (Direct Cable connection)
■ IrDA port
■ VGA port (output)
■ Earphone Microphone
■ Modem port
■ Power port (DC in)
Modem
■ Data — V. 90, 56 Kbps (AT command)
■ Fax — 14.4 Kbps (Fax control command Class I)

Note: Download speed is limited to 53 Kbps.
Upload speed is limited to 33.6 Kbps. Actual speeds may vary depending upon line conditions.
The built-in modem requires a compatible service provider.
PC Card Slot
One Type I or Type II PC card slot
Compact Flash Card Slot
One Type I or Type II Compact Flash card slot
Power
■ AC Adapter
Input Voltage — 100 to 240 volts AC, 50 or 60 Hz
☐ Output Voltage — 9.0 volts, 1,000mA max.
■ Main battery — one rechargeable Lithium-Ion (Li-Ion) battery pack (included).
■ Memory backup — approximately 7 days (with depleted main battery) at ambient temperature of 73^ F ( 23^ C).

Note: The period for safe memory backup can vary with ambient temperature and other factors. Always make sure that your MobilePro is powered off more you store it. Always recharge your MobilePro soon as possible after depleting the main battery.
Recharge Time
■ Use the AC adapter to recharge the MobilePro main battery and the backup battery.
■ Recharging time is approximately 4.5 hours when the system is on or off.
■ The backup battery usually recharges while the main battery is recharging.
■ Initial charging time for the main battery and the backup battery is approximately 10 hours with the system off.
■ The system must be charged for 10 hours if the main battery is depleted for a prolonged period.
Accessories (ship with the system)
■ AC adapter – S1424-21A Listed Direct Plug-In Power Unit
Input Voltage - 100 to 240V AC; 60Hz, 13W
☐ Output Voltage – 9V DC 1000 mA
■ Rechargeable Lithium-Ion Battery Pack
■ PC Connect (serial) Cable
■ RJ-11 Telephone Cable
■ VGA Cable
■ Stylus
Dimensions
■ 1.69 lb. (with battery)
■ 770 g (with battery)
Operating Environment
■ Temperature — 32° to 104°F (0° to 40°C)
■ Humidity — 35% to 85% (No condensation)
Storage Environment
■ Temperature — 14° to 140°F (-10° to 60°C)
■ Humidity — 35% to 85% (No condensation)
Available Options
■ AC Adapter (S1424-21A)
■ AA Battery Adapter (MC-BA10)
■ PC Connect (serial) Cable (S1424-12S)
■ VGA Cable(S1424-12V)
■ Stylus Pack (S1424-17A)
■ Compact Carrying Case (S1424-30A-D)
■ Standard Carrying Case (S1424-30A)
■ Deluxe Carrying Case (290-01500-000)
■ Li-Ion Battery Pack (MC-BA9)
■ Earphone Microphone (MC-EM1)
■ High-Speed Printer Cable (MC-RC3E)
■ 16 MB CompactFlash™ Storage Card (050-00054-000)
| Nothing appears on the screen. (cont'd) | Try recharging the main battery pack.Check that the ROM bay cover is properly secure. |
| A low battery message appears. | Recharge the main battery. |
| When using a PC card, such as a modem, the unit powers off. | Connect the AC adapter to the unit when using PC cards that require large amounts of energy. |
| The AC adapter doesn't work. | Make sure that the main battery is installed.Check that the AC adapter connections are secure.Verify that the AC outlet being used is working. Do this by plugging in another electric device, such as a lamp. |
| The keyboard doesn't respond. | Reset the unit.If you have installed handwriting recognition software, be sure that you have not set the “disable keyboard” parameter in that software. |
| The serial port doesn't work. | Check that the cable connections are secure. |
| The IrDA port doesn't work. | Check that nothing obstructs the path between the transmitting and receiving IR ports.Check the information in “Using the IR Port,” in the NEC MobilePro 780 User's Guide. |
Troubleshooting (cont'd)
| PROBLEM | RESOLUTION |
| The PC card cannot be accessed. | Make sure the card is inserted correctly and seated properly. |
| Connect the unit to AC power using the adapter. Some cards do not operate properly unless the AC adapter is connected. | |
| The touch screen does not respond. | Press Ctrl Alt = to calibrate the stylus input. Follow the on-screen instructions to complete the recalibration procedure. |
| Reset the unit. | |
| The soft reset button does not respond. | Remove the main battery. Reinstall the battery and make sure it is seated properly. Try resetting the unit again. |
| If the soft reset button on the bottom of the system does not respond, you may have to use the full reset button inside the battery bay. Refer to the section, “Resetting the MobilePro,” in Chapter 4 of the user’s guide. | |
| This second procedure may result in the loss of the memory contents including all stored data, settings, and files. | |
| Be sure to make regular backups. |
For further assistance, call NECC Support Services at 1-800-632-4525

Note: If you purchased this computer outside of U.S. and Canada, please contact the local NECC fee or their dealers for service and support.
PREPARING FOR CONNECTION SETUP
Before you set up a dial-up connection for an internet service provider (ISP) or remote access server (RAS), and the associated email properties, you need the following.
■ a modem (your NEC MobilePro is equipped with an internal data/fax modem).
■ an ISP or RAS account.
■ configuration information from your ISP or network administrator that may include some or all of the following:
☐ the dial-up telephone number
□ TCP/IP settings
□ port settings
☐ a user name and password, if required
You must create a new connection for each ISP or RAS account that you want to establish. Once you have created a connection for an ISP, RAS, etc., you can define an email account for each connection, if so desired. Follow the
instructions in the sections that follow “Connecting to an ISP,” “Connecting to a RAS,” and “Sending and Receiving Email” to create the desired connections.
CONNECTING THE INTERNAL MODEM
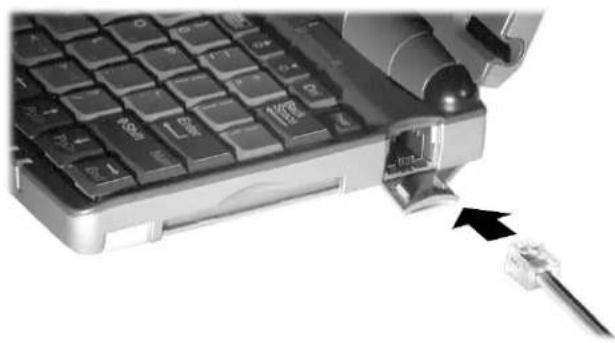
Follow these steps to connect an RJ-11 telephone cable to the internal modem.
-
Locate the modem cover on the right side of the NEC MobilePro and open it by pulling down the top of the cover.
-
Carefully plug the RJ-11 telephone cable into the modem connector.
Connecting the telephone cable
natural_image
Close-up of a computer keyboard with an attached USB port and cable connector (no visible text or symbols)WARNING
Do not connect the internal modem to a digital private branch exchange connector, or the digital side of an integrated digital network. Use only analog phone connections. Failure to do so may result in explosion or fire and will damage your modem.
During thunderstorms be sure to disconnect the modem phone cable from the NEC MobilePro. Failure to do so may result in explosion or fire.
- Connect the other RJ-11 connector into an active (analog) phone jack.
Now you are ready to create a connection for an ISP or RAS account!
CONNECTING TO AN INTERNET SERVICE PROVIDER
Once you have established an account with an ISP and gathered the necessary configuration information, you are ready to create a connection on your MobilePro for your ISP account.
Your Bonus Software CD may contain the application, Ruksun® ConnectForce™ that enables you to automate the ISP setup procedure described below and includes a database of phone numbers and communication settings for a number of popular ISPs.
Follow these steps to create a new connection for your ISP account.
- Tap Start, Programs, Communication, then select Remote Networking.
- Double tap the Make a New Connection icon.
- Enter a name for the new connection.
- Select Dial-Up Connection as the connection type and tap Next.
- Use the dropdown box to select Internal Modem on COM 4 and tap Configure.
- Select the required port settings and call options. Tap OK.
-
Tap TCP/IP Settings and configure the required General Settings and Name Servers. Tap OK.
-
Tap Next and enter the required dial-up telephone number. Tap Finish.
Once your ISP connection is established you can configure your MobilePro for sending and receiving email through your ISP. Follow the instructions in “Sending and Receiving Email” and “Activating a Connection,” later in this chapter, to send and receive email through your ISP.
For ISP settings, access:
http://www.cewindows.net/wce/isp.htm/. Although not an official NECC web site, this site contains important information about ISP settings.
CONNECTING TO A REMOTE ACCESS SERVER
Once you establish an account with your RAS and gather the necessary configuration information, you are ready to create a connection on your MobilePro for your RAS account.
Follow these steps to create a new connection for your RAS account.
- Tap Start, Programs, Communication, then select Remote Networking.
- Double tap the Make a New Connection icon.
- Enter a name for the new connection.
- Select Dial-Up Connection as the connection type and tap Next.
- Use the dropdown box to select Internal Modem on COM 4 and tap Configure.
- Select the required port settings and call options. Tap OK.
-
Tap TCP/IP Settings and configure the required General Settings and Name Servers. Tap OK.
-
Tap Next and enter the required dial-up telephone number. Tap Finish.
Once your RAS connection is established you can configure your MobilePro for sending and receiving email through your RAS. Follow the instructions in “Sending and Receiving Email” and “Activating a Connection,” later in this chapter, to send and receive email through your RAS.
SENDING AND RECEIVING EMAIL
Before configuring the necessary email service information you need some or all of the following settings.
■ POP3 Host.
■ Your user id.
■ Your password, if required.
■ SMTP host.
■ Your email address.
To send and receive email through your ISP or RAS account, you must configure the services properties through your Inbox. Follow these steps to configure the email services information.
- Double tap Inbox, tap Services, and tap Options.
- On the Services tab, tap Add.
- Select the desired service type and enter the service name.
- Tap OK.
- Enter the information provided by your ISP provider or network administrator.
The Mail Services Definition screen consists of Required information and Optional information. Fill in all information as provided by your ISP or network administrator.
■ Enter ISP information as follows:
□ POP3 Host — ISP POP3 Host name.
□ User ID — Your user id.
☐ Password — Your password, if required.
☐ SMTP Host — ISP SMTP Host name.
Return Address — Your email address. (If in a unix environment
■ Enter RAS (Exchange server) information as follows:
□ POP3 Host — Exchange server name.
□ User ID — Domain\your user id\exchange alias.
☐ Password — Your password, if required.
☐ SMTP Host — Exchange server name.
Return Address — Your email address. (If in a unix environment
Note: If you experience difficulty sending email, check your optional configuration settings. If you experience difficulty receiving email, check your required configuration settings.
ACTIVATING A CONNECTION
Once you have created a new connection for each desired service, you must activate the connection with that service to open communication and send or receive email.
Follow these steps to activate a connection.
- Double tap the Inbox icon.
- Tap Services and verify that the service you want to connect is selected.
The currently selected service displays in the drop-down menu and is designated with a dot. If necessary, modify your selection before connecting and tap OK. - Tap Services (again, if necessary) and tap Connect.
The connection dialog box displays and may prompt you to enter a password. Otherwise, the connection dialog box displays the connection progress and indicates when the connection is successful. - Enter your password, if required.
Once the connection is established, you are ready to send and receive email.
POWERING ON AND OFF
Power on the NEC MobilePro as follows.

CAUTION
If you power off, then quickly power on the NEC MobilePro, your system may erroneously report the presence of CompactFlash cards.
In addition, repeatedly powering off and quickly powering on, may cause data loss. NECC recommends that you wait ten seconds after powering off, before powering on the NEC MobilePro.
- Slide the display panel latch to the right. Lift the display panel up towards the rear of the unit.

CAUTION
Do not push the display panel beyond its pre-designed stop point as you open the panel.
- Locate and press the Power button. To power off the unit, press the Power button a second time.
Powering on and off
4-2 Using the NEC MobilePro

Note: The first time you install the main battery, MobilePro automatically powers on when you in the display panel.
The first time you power on the MobilePro, the screen contrast may need adjustment. Refer to the following section, "Making Display Panel Adjustments," for details.
If the MobilePro is not used for a specific length of time, it automatically shuts off. You can select how long the unit remains on through the Power selection in the Windows Control Panel. On the Windows CE desktop, go to Start, Settings, Control Panel. Double tap the Power icon and select the Power Off tab to designate a power off time.

Note: As a general operation rule, frequently k up and synchronize data between your Mo-Pro and your host PC.
Synchronization occurs each time you connect your MobilePro to your host PC, once initial synchronization is configured. For details, see the section in Chapter 1, "Connecting to Your PC."
For details about backing up and restoring data, see the section in Chapter 3, “Backup Up and Restoring Data.”
MAKING DISPLAY PANEL ADJUSTMENTS
You can adjust the brightness of the display panel in the NEC MobilePro using two function keys located at the top right of the keyboard. Increasing panel brightness can dramatically lower battery life.
Follow these steps to adjust the panel brightness.
- Open the display panel and power on the unit.
- Press the brightness up or brightness down keys as required.
Adjusting the brightness
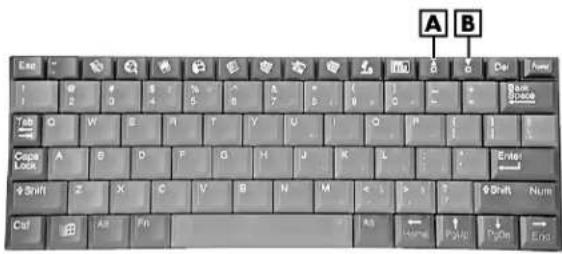
A – Brightness Up B – Brightness Down
Backlight
You can conserve battery life by configuring your NEC MobilePro to automatically turn off the display panel's backlight. Follow these steps to configure the backlight for automatic turn off.
Automatic Off
- Tap Start, Settings, Control Panel.
-
Double tap the Display icon and select the Backlight tab.
-
Tap the desired selections to place a check beside the selection. Use the dropdown boxes to select the desired time settings.
Backlight settings

Automatic On
In addition, you can configure the NEC MobilePro to turn on the backlight automatically. Follow these steps to configure the backlight for automatic turn on.
-
Tap the Advanced tab, shown in the previous figure, to access the advanced backlight properties.
-
Tap the desired selections to automatically turn on the backlight either while on battery power or when connected to an AC power source.
Advanced backlight settings


WARNING
Using auto on while on battery power substantially reduces battery life.
Enabling the Suspend Switch
You can configure your NEC MobilePro to power on or off by simply opening or closing the display cover. The suspend switch acts as a switch for both the power and the display panel.
Opening the NEC MobilePro powers on the unit. To power on the unit while it is open, use the Power button.
Closing the MobilePro powers off the unit and insures that the backlight is off as well.
Follow these steps to enable the Suspend Switch.
- Tap Start, Settings, then select Control Panel.
- Double tap the MobilePro Settings icon to launch the dialog box shown in the following figure.
Be sure to select the "LCD Suspend/Resume" tab.
Power off settings

- Select either "Enable suspend while on battery power" or "Enable suspend while on external power," or both, to enable the display linkage switch.
Note: Your NEC MobilePro will not automatically suspend while on battery power during synchronization, unless the battery charge is at a very low status. You may want to connect your MobilePro to an AC power source before synchronizing with your host PC.
USING THE KEYBOARD
The NEC MobilePro keyboard is equipped with many features including:
■ Application shortcut keys
■ Brightness up/down keys
■ Cursor control keys
■ Control keys
Feature keys are located as shown in the following figure. Key operations are described after the figure.
Keyboard

A – Applications shortcut keys B – Brightness up/down keys C – Cursor control keys D – Control keys E – Windows key
■ Application shortcut keys — Ten application shortcut keys allow you to launch applications directly from the keyboard. For details about each key, refer to the section that follows, "Using Application Shortcut Keys."
- Brightness up/down keys — Use the brightness up/down keys to adjust the NEC MobilePro’s panel brightness.
■ Cursor Control Keys — Cursor control keys let you position the cursor on the screen where you want. The cursor indicates where the next typed text is inserted.
■ Control Keys — Ctrl, Alt, Fn, and Shift are controls used in conjunction with other keys to change their functions. To use control keys, press and hold the Control key while pressing another key.
■ Windows Key — You can use the Windows key to display the Start menu.
Using Application Shortcut Keys
The NEC MobilePro provides application launch keys located in the top of the keyboard. Use these keys to launch applications directly from the keyboard. The key defaults are listed in the following table.
Default Application Shortcut Keys
| Icon | Application |
 | Inbox |
 | Microsoft Internet Pocket Explorer |
 | Calendar |
 | Contacts |
 | Tasks |
 | Microsoft Pocket Word |
 | Microsoft Pocket Excel |
 | Microsoft Pocket PowerPoint |
 | Voice Recorder |
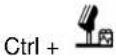 | Microsoft Pocket Access |
 | Calculator |
 | Brightness Up |
 | Brightness Down |
Default Function Keys
In addition to the application shortcut keys, your NEC MobilePro is equipped with default function keys as described in the following table.
Default Function Keys
| Key | Function |
| Fn + Space Backlight On/Off | |
| Fn + Shift Num Lock | |
| Fn + 4 Pound key | |
| Fn + 5 Euro | |
| Alt + < Contrast Up | |
| Alt + > Contrast Down | |
| Alt + Left Arrow Home | |
| Alt + Right Arrow End | |
| Alt + Up Arrow PgUp | |
| Alt + Down Arrow PgDn | |
ADJUSTING MOBILEPRO SETTINGS
Your NEC MobilePro is equipped with a MobilePro Settings applet. To access MobilePro Settings, simply tap Start, Settings, Control Panel, and double tap the MobilePro Settings icon to display the applet's window. For more details, simply tap the “?” to view the online help.
The MobilePro Settings applet allows you to configure a variety of properties on your NEC MobilePro and includes the following features.
■ External Monitor — Allows you to display the same image on both the display panel and an external monitor.
■ Color Palette — Lets you select a 256-color display or the default 64K color display.
■ LCD Suspend/Resume — Allows you to designate a suspend option for the display panel lid, when closed.
■ Keyboard Layout — Allows you to select for a U.S. or international keyboard.
■ IrDA — Allows you to select the speed for IR transfer.
■ Scroll Dial — Allows you to define the action of the Scroll Dial as Up/Down or PgUp/PgDn.
■ Built-in Modem — Allows you to specify a country for use of the built-in modem.

CAUTION
Select the appropriate country setting for your built-in modem to ensure compliance with the country's telephone lines. An incorrect country setting may damage your device or the telephone line.
The list of compliant country's outside the U.S. and Canada is subject to change. For the latest list of compliant countries outside the U.S. and Canada, refer to NECC's web site at
www.nec-computers.com.
Connecting the VGA Cable
The VGA cable lets you connect the MobilePro directly to a MultiSync monitor that has VGA output. Use an external monitor to enhance your MobilePro display.
Connect the cable as follows.
- Tap Start, Settings, Control Panel.
-
Double tap the MobilePro Settings icon and select the External Monitor tab.
-
Tap to place a check mark in the box "Display LCD on External Monitor," and tap OK.
-
Use the soft reset button to reset the MobilePro and implement the new setting. For instructions about resetting the MobilePro, refer to the section, "Resetting the MobilePro," in Chapter 4.
-
Power off the MobilePro.
-
Locate the VGA port cover on the left side of the MobilePro and open it.
-
Align and attach the connector on the MobilePro VGA cable to the VGA port on the left side of the MobilePro.
Connecting the VGA cable
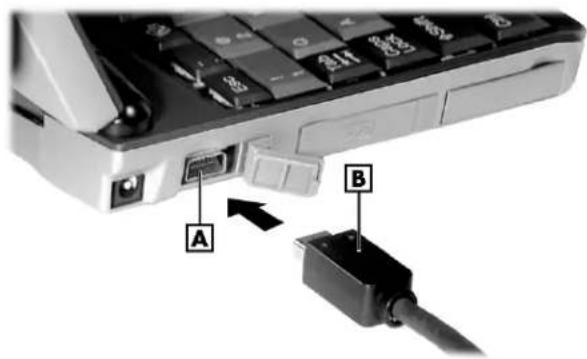
A - VGA port B - VGA cable
- Connect the other end of the VGA cable to the monitor cable connector.

CAUTION
Be sure to properly align the cable connectors and ports. Incorrect connection can damage the MobilePro H/PC and the monitor.
- Power on the MobilePro and the external monitor.

CAUTION
When the setting, "Display LCD on External Monitor," is selected, the MobilePro uses more power than normal. To conserve power, be sure to deselect this setting when not using an external monitor.
Screen Resolution
Your NEC MobilePro 780 provides a display panel with a 640x240 screen resolution. When you connect the VGA cable to an external monitor, and select “Display LCD on External Monitor,” in the MobilePro settings applet, the external monitor’s image is also set to 640x240. However, some applications like Pocket PowerPoint, allow you to increase the screen resolution on the external monitor to 800x600.
Follow these steps to increase the screen resolution on an external monitor when using Pocket PowerPoint.
- Connect the VGA cable as described in the preceding section, "Connecting the VGA Cable."
-
Launch Microsoft Pocket PowerPoint and open the file that you want to display.
-
Tap Tools, tap Set Up Show, use the dropdown box to set the entry to "External VGA," and close the window.
-
Tap View and tap View Show to display the PowerPoint presentation in 800x600 resolution.
Using the Scroll Dial
The Scroll Dial, located in the right-hand lid hinge, allows you to:
■ scroll screens using an Up/Down or PgUp/PgDn action, depending on your MobilePro Settings.
■ launch an application from the MobilePro desktop.
Locating the Scroll Dial

natural_image
Laptop with NEC branding open, showing front panel and keyboard (no visible text or symbols on main body)A – Scroll Dial
Use the Scroll Dial in the following ways:
■ Move the dial up or down to toggle the up or down options, then push in the dial to execute the up or down action.
■ Tap to highlight an application on the MobilePro desktop, then push in the dial to launch the application.
The NEC MobilePro features a voice recorder application that lets you record and play voice memos. Recording is dictation quality only and not intended for musical recording. Recording voice memos with the NEC MobilePro is easy.
Follow these steps to record with the Microsoft Voice Recorder.
- Tap Start, Programs, Accessories, then select Microsoft Voice Recorder.
- Hold your NEC MobilePro with the microphone facing you.
- Press the Record button (red dot) and speak into the microphone.
- When you are finished recording, press the Stop button (black square). A beep sounds when the recording stops.
To playback your recording, tap to highlight your selection and press the Play button (green triangle) or simply double tap your selection.
You may want to modify the recording format to improve the quality of playback. To modify the recording format, tap Tools, Recording Format and use the dropdown box to change the format to PCM and to modify the Attributes to a higher sampling rate.

Note: Recording works best if you position the phone about three inches away from your path while speaking.
Memory required for voice memo storage varies depending on user settings.
Menu
The Voice Recorder provides a variety of menu selections under the File, Control, and Tools selections. Refer to the online help provided with the voice recorder application for details about its use. Just tap the question mark icon in the upper right-hand corner of the screen to access the online help.
USING PC CARDS
Your NEC MobilePro comes with a PC card slot that supports one Type I or one Type II PC card. All PC cards are approximately the same size, have a standard 68-pin connector and vary only in thickness. PC cards add a variety of storage and communication functionality to your MobilePro.

CAUTION
Windows CE supports the hot swapping of PC cards. However, to avoid data loss, do not remove a PC card while in use.
When using a PC card in the MobilePro, we recommend that you also use AC power. The batteries alone may not provide enough power for some PC cards to operate properly.

Note: Use the AC adapter when using PC cards or the internal modem. Using the adapter can you avoid potential data loss caused by the energy consumption of some PC cards.
Inserting PC Cards
Follow these procedures to install a PC card.
- With the PC card facing up, insert the card into the PC card slot on the right side of the system.
Inserting a PC card
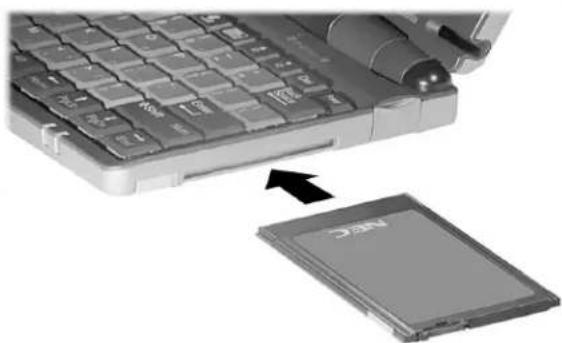
natural_image
Close-up of a computer keyboard and an ATM card, showing the internal components (no text or symbols visible)- Verify that the PC card is fitted securely into position.

CAUTION
Make sure you align the PC card correctly for insertion. Inserting a PC card incorrectly can damage the card and/or the NEC MobilePro.
Removing PC Cards
Follow these steps to remove a PC card from the NEC MobilePro.
- Locate the PC card eject button beside the PC card slot and press it to release the card from the slot.
- Once the card is released, pull it the rest of the way out of the slot.
USING COMPACTFLASH CARDS
Your NEC MobilePro comes with a CompactFlash card slot that supports one Type I or Type II CompactFlash card. A CompactFlash card provides a storage device for your MobilePro and when inserted, creates a Storage Card 2 folder. To view the contents of the folder, double tap the My Handheld PC icon on your MobilePro desktop, then double tap the Storage Card 2 folder.

CAUTION
Windows CE supports the hot swapping of PC cards. However, to avoid data loss, do not remove a PC card while in use.
When using a CompactFlash card in the MobilePro, also use AC power. The batteries alone may not provide enough power for some CompactFlash cards to operate properly.
Note: Use the AC adapter when using CompactFlash cards. Using the adapter can help you avoid potential data loss caused by the high-energy consumption of some CompactFlash cards.
Inserting CompactFlash Cards
Follow these steps to install a CompactFlash card.
- With the CompactFlash card facing up, insert it into the CompactFlash card slot.
Inserting a CompactFlash card
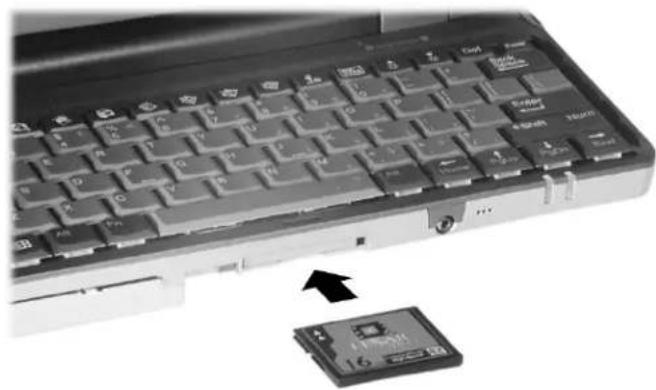
natural_image
Close-up of a laptop keyboard with an attached 16-inch RAM chip (no visible text or symbols)
Note: When you insert a CompactFlash card, a button pops out of the card bay. Pivot the button towards the left side of the unit until it fits into the recessed space next to the slot.
- Verify that the CompactFlash card is fitted securely into position.

CAUTION
Make sure you align the CompactFlash card correctly for insertion. Inserting a CompactFlash card incorrectly can damage the card and/or the MobilePro.
Removing CompactFlash Cards
Follow these steps to remove a CompactFlash card from the NEC MobilePro.

Note: Pivot the CompactFlash card button out of the recessed space before beginning the following procedure.
- Save your data if you are storing it on the inserted CompactFlash card.
- Press the button beside the CompactFlash card slot.
- When the card pops out slightly, pull it out of the slot.
USING THE IR PORT
With the NEC MobilePro, you can send and receive data to and from another similarly equipped device using the infrared (IrDA) communication port. In addition, you can use the IR port to synchronize data with your host PC, in place of using the PC Connect serial cable.
Before using the NEC MobilePro for IrDA communication, first configure/enable the IR port on your host system, then install Microsoft ActiveSync on your host system.

Note: If you configure/enable the IrDA port on or host system after installing Microsoft ActiveC, you must re-install Microsoft ActiveSync be-establishing IrDA communication between items.
Follow these steps to use the IR port to communicate with another MobilePro or your host PC.
- Remove the PC Connect (serial) cable from the MobilePro before attempting IrDA communication.
- Open the display panels on the two units that you want to use for communication.
- Position the units so that communication ports face each other. Position the units from 2 to 20 inches apart.
- Be sure that nothing obstructs the path between the communication ports on both units, and that the ports are aligned properly.
- Send your data by using the "Send To" selection in the Windows CE Pocket Explorer File menu.
Highlight the file you wish to transfer and choose “Infra-red Recipient” from the Send To selections. Your file is transferred to the other unit. The receiving unit uses the File/Receive command to receive the infrared transmission.
Note: If the units are too far apart or if something blocks the path between the two ports, data may not be sent or received correctly.
UPGRADING ROM
You can upgrade NEC MobilePro ROM by replacing the currently installed ROM module with an upgraded ROM module (when available).
Note: Be sure to synchronize your MobilePro data with your host PC and perform a backup of your MobilePro data before upgrading your ROM module. You may need to copy some files back to your MobilePro following this upgrade procedure.
Note: Before handling any internal components, discharge static electricity from yourself and your clothing by touching a nearby metal surface.
Follow these steps to upgrade your MobilePro ROM module.
-
Save your data to a host PC, power off the MobilePro, and close the display panel.
-
Disconnect any peripheral devices attached to the MobilePro, such as the AC adapter.
- Remove the battery pack. See the section in Chapter 2, "Removing and Inserting the Battery Pack," for details.
- Turn over the MobilePro and locate the screw that secures the ROM bay cover.
- Using a small screwdriver, remove the screw and the bay cover. (The MobilePro does not power on when the bay cover is removed.)
ROM bay cover

natural_image
Top-down view of a computer chassis showing front panel and rear panel (no text or symbols visible)A - ROM bay cover
- With the small screwdriver, remove the two screws on the ROM module.
- Gently lift up the ROM module to disconnect it from its connector and remove it from the bay.
-
Insert the upgraded ROM module into the bay, aligning the connector on the module with the one in the bay.
-
Gently press on the module just above the connectors until the connection is secure.
- Replace the two screws to secure the upgraded ROM module.
- Replace the bay cover and cover screw.
- Push the full reset button. For details about using the full reset button, refer to the section later in this chapter, "Using the Full Reset button."
- After one minute or more, install the battery pack.

Note: The MobilePro will not power on unless ROM bay cover is secure and the battery lock is the locked position.
RESETTING THE MOBILE PRO
Occasionally you may need to reset your NEC MobilePro. For instance, you may need to reset after restoring data from your host PC, after modifying the MobilePro's configuration, when you are unable to power on using the Power button, or when the operating system stops responding.
The NEC MobilePro is equipped with two reset buttons, designed for use depending upon specific conditions. The two reset buttons are:
- Soft Reset Button – The soft reset button allows you to restart the NEC MobilePro operating system while preserving any saved data. This method is similar to a “warm boot” on your host PC.
■ Full Reset Button – The full reset button restores your system to its original shipping configuration, erasing all information that you have entered.

Note: To ensure the safety of your information all times, you should perform regular backups of r MobilePro information to your host PC. For e information, see the "Backing Up and Restor-Data" section in Chapter 3.
Using the Soft Reset Button
Before using the soft reset button to reset the MobilePro, close any open files or applications, if possible. When you soft reset the MobilePro, you may lose open/unsaved files.
Use the soft reset button to reset the NEC MobilePro as follows.
- Open the display panel and remove the stylus from its holder.
- Power on the MobilePro.
- Turn over the MobilePro.
-
Locate the soft reset button on the bottom of the MobilePro.
-
Using the stylus, press the soft reset button. (You may need to press the button more than once.) This resets the unit.
Soft reset button
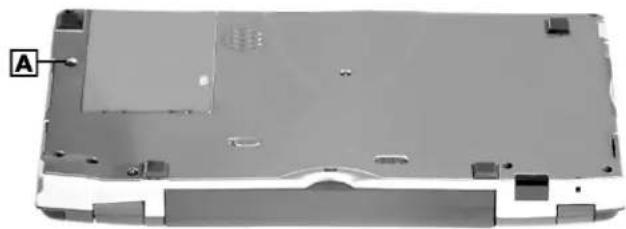
natural_image
Laptop back panel with visible mounting holes and a labeled component 'A' (no text or symbols on the main body)A - Soft reset button
Using the Full Reset Button
Use the full reset button only when your unit does not respond after doing all of the following.
■ Installing a charged battery.
■ Connecting the unit to an AC power source.
■ Verifying that the battery lock is in the locked position.
■ Using the soft reset button to reset the system.

CAUTION
Using the full reset button to reset your MobilePro returns your unit to its original shipping configuration. All data and applications are erased from RAM. All open/unsaved files are lost and all user specific data such as contacts, tasks, etc., are erased.
You can only restore data that has been backed up to your host PC. For more information, see the "Backing Up and Restoring Data" section in Chapter 3.
The full reset button is located inside of the main battery's bay. Follow these steps to remove the battery and use the full reset button to reset the NEC MobilePro.
-
Open the display panel and remove the stylus from its holder.
-
Remove the main battery as follows:
■ Locate the battery lock and release latch on the bottom of the system.
■ Slide the lock to the unlocked position in the direction of the arrow, as indicated in the following figure.
■ Slide the release latch in the direction of the arrow, as indicated in the following figure, and hold it.
■ Remove the battery from the bay.
Removing the battery pack

A – Battery release latch B – Battery release lock C – Battery pack
- Locate the full reset button inside of the battery bay, as indicated in the following figure.
Full reset button
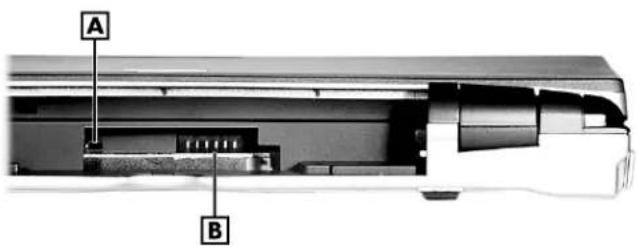
A – Full reset button B – Battery connectors
- Using the stylus, press the full reset button. This resets the unit and restores your system to its original shipping configuration.
You may be able to use a recent backup of your data to restore your system to a more recent configuration. Refer to Microsoft ActiveSync on your host PC or the section in Chapter 3, "Backing Up and Restoring Your Data" for details about backing up and restoring your MobilePro.
Windows CE is the smallest member of the Windows operating system family using the Windows 95 interface. What exactly does smallest mean? It means mobility and portability provided through a reduced code base. This code base is completely 32-bit; it is multithreaded, multitasking and runs on different processors such as the NEC V_R 4121 MIPS processor.
Your MobilePro does not have a hard disk drive. The operating system and preloaded applications are deployed on a Read-Only Memory (ROM) module; files that you work on are stored in Random Access Memory (RAM) on a RAM module.
The power of Windows CE is enhanced through its design to easily link with your desktop computer to synchronize your data. For more information about setting up your MobilePro for synchronization, see the section in Chapter 1, “Connecting to Your PC.”
Using Windows CE
Windows CE is similar to Windows 95. However, some actions are executed differently, as indicated in the following sections.
Tapping
Your NEC MobilePro comes with a stylus, a pen-like device that allows you to touch, tap, or double tap objects on the MobilePro touch screen. The touch, tap, and double tap act just like a point, click, and double click of a mouse.
To simulate the click of the right mouse button, hold down the Alt key while you tap or drag the object with the stylus.
Finally, never use a metal object in place of the stylus. Metal objects may scratch the surface of the touch screen.
Selecting Objects
You can select objects in Windows CE by tapping the object(s) with the stylus. To select multiple contiguous items, hold down the Shift key while tapping the first and last items. To select multiple non-contiguous items, hold down the Ctrl key while tapping each item.
To move the blinking cursor while editing text in a program, simply tap the screen at the desired (new) location.
Dragging and Dropping
Dragging and dropping works just like Windows 95. To drag an object, tap the object with the stylus and hold the stylus against the screen. Continue to hold as you slide the object across the screen. Lift the stylus from the screen when the object is in the desired location.
To copy an object, simply hold down the Ctrl key as you drag the object, as indicated in the previous section.
Windows CE Desktop
Windows CE gives you the newest features offered by Microsoft for your NEC MobilePro and is very similar to Windows 95.
Windows CE includes a desktop with built-in pocket applications, a taskbar for quick navigation, online networking functions, and more. Your Windows CE desktop provides the following icons.

■ My Handheld PC — Opens Windows CE Explorer to display all the data on your MobilePro, whether stored in RAM or on a storage card in the PC card or Compact Flash card slots. My Handheld PC is much like the My Computer icon on the Windows 95 desktop.
■ My Documents — Provides shortcuts to documents most recently worked on, as well as, access to Pocket PowerPoint and Pocket Access.
■ Recycle Bin — Gives you a trash container in which to put unwanted files.
- Internet Explorer — Provides web access once you are connected to the Internet via the MobilePro’s built-in modem and an internet service provider.
- Inbox — Allows you to send and receive email messages on your NEC MobilePro. Refer to Chapter 5, "Setting Up a Remote Connection," for details about configuring your Mobile Pro to send and receive email.
■ Calendar — Lets you schedule appointments, meetings, and other events and provides a variety of ways to display the stored information.
■ Contacts — Maintains a list of names, both business and personal, for easy access while at home or on the road.
■ Tasks — Provides a portable “to do” list for keeping track of all of your tasks.
■ Microsoft Pocket Word — Allows you to create and edit documents on your MobilePro.
■ Microsoft Pocket Excel — Allows you to view or draft spreadsheets.
■ Microsoft Pocket PowerPoint — Lets you quickly and easily deliver a professional online presentation.
■ Microsoft Pocket Access — Allows you to access and synchronize information from other data bases.
■ Microsoft Voice Recorder — Allows you to record voice memos.
■ NEC Where to Get Help — Provides a comprehensive list of help resources for your MobilePro, the software, connections, and more.
■ MobilePro Fax — Allows you to send and receive faxes.
■ bUseful Backup Plus — Allows you to backup and restore your MobilePro data.
■ bUseful Script — Allows you to automate tasks such as logging on to an ISP, retrieving email, and more.

Note: The bUseful Scripts provided in ROM are example, only. Before using the scripts, modify scripts to suit your own needs.
In addition, your NEC MobilePro includes additional utilities accessible through the Start, Programs menu.
■ ASL Connect Client for Windows CE — Provides automatic backup, restore, and synchronization features.
Citrix ICA Client — Provides a setup wizard to configure the Citrix ICA thin client for connectivity to the MetaFrame server component.
Pocket Applications
While Windows CE applications do not have all the features you may expect to see in applications on other Windows systems, these applications provide many powerful features adapted for the mobile environment.
Your MobilePro, with its larger keyboard, highly visible display, and longer battery life, allows you to obtain full advantage of the CE-based applications. Write complete, well-formatted reports, take detailed notes, and work on spreadsheet data as you travel.
Microsoft provides a complete suite of applications ready for you to use. These applications are available as a desktop icon or accessible through Start, Programs in the Accessories, Communication, or Games folders.
■ Calendar — Allows you to track your appointments and create meeting requests.
■ Contacts — Lets you store important information about your friends and colleagues.
■ Inbox — Allows you to send and receive email.
■ Tasks — Gives you a place to create a portable "to do" list.
■ Microsoft Pocket Access — Provides a database program for the mobile professional allowing you to update and query data while you are on the road.
■ Microsoft Pocket Excel — Provides spreadsheet and data base functions for budgeting and other data tasks.
■ Microsoft InkWriter ^® — Lets you create handwritten or typed notes and drawings.
■ Microsoft Pocket PowerPoint — Provides an easy, portable solution for desktop presentations.
■ Microsoft Voice Recorder — Provides an easy way to quickly capture thoughts, reminders, ideas, and phone numbers.
■ Microsoft Pocket Word — Provides many features of Microsoft Word including document formatting and spell-checking. Copy documents from your desktop for editing or draft documents on your MobilePro for later completion on your desktop.
■ ActiveSync — Lets you initiate synchronization with your host PC.
■ PC Link — Allows you to initiate a connection with your host PC.
■ Remote Networking — Allows you to configure remote access accounts for connecting to your ISP, your local area network, and more.
■ Terminal — Lets you view and download files from a bulletin board or to send and receive email.
■ World Clock — Allows you to set the time, date, and alarm for your home city and a city that you are visiting.
■ Solitaire — Provides entertainment while on the road.
For more information about each of the applications, just click the question mark or select the help button when using each application.
You can also use many other applications with Windows CE for faxing and data transfer. A number of these are on your Bonus Software CD. See the section later in this chapter, “Software Applications,” for more information.
Printing Features
Windows CE provides printing capability using Hewlett-Packard (HP) PCL Level 3 and compatible printing devices that support serial or infrared connection. Using the serial cable or infrared transfer you can print a variety of high-quality documents directly from MobilePro including:
■ Pocket Word and Pocket Excel files
■ Contacts and Task lists
■ A view of your schedule or agenda in Calendar
■ Inbox messages
Follow these steps to print documents using your MobilePro.
- Open the desired Pocket application.
- Tap File and tap Print.
The print dialog box appears. - Select the appropriate printer setting, "PCL_Laser" or "PCL_Inkjet."
- Select the appropriate port setting, IrDA, COM1 @ 57600, COM1 @ 9600, IrDA, LPT1, or Network.
- Select other printing attributes as required.
- Tap OK.
Note: See the Bonus Software CD for installation and use of a wider range of high-speed printer drivers.

Note: With the optional printer cable (RC3) connected to the serial port of your NEC lePro, you can print to a supported, high-speed lel printer. For information about MobilePro ssories, access the NECC web site at v.nec-computers.com
For additional details about using the IR port for printing and transferring data, refer to the section in Chapter 4, “Using the IR Port.”
Network Capabilities
Your MobilePro takes full advantage of the networking capability offered through Windows CE and the PC card port. The operating system supports Ethernet LAN and serial line interface protocol (SLIP) used with Cellular Digital Packet data (CDPD) so you can have cable- or wireless-based network communications using an Ethernet LAN PC card. In addition, you can use CompactFlash type II Ethernet cards on your NEC MobilePro.
Creating a Network (Ethernet) Connection
To create a network (Ethernet) connection, you must install and configure an Ethernet card. The drivers for the card may already exist on your device. NEC also has included drivers for the Proxim RangeLAN2.
- Insert the Ethernet card into your device and connect it to your network cable. You must have an NE2000-compatible Ethernet card, one of the wireless Ethernet cards described above, or have installed drivers supplied with the card.
You may see a message warning about battery power. If you have an A/C adapter, plug it into your device.
- In the Settings dialog box, enter the information for your server. Most networks use DHCP, so you should not have to change these settings. See your network administrator if you need assistance.
If the Settings dialog box does not appear, go to Start, Settings, Control Panel, and double tap Network. Select your Ethernet driver, select Properties, and configure the appropriate settings. - Tap OK, twice, select the Identification tab, and enter your name, password, and domain. Click OK, then close the Control Panel.
- Remove and reinsert the Ethernet card when prompted.
Once you have configured your Ethernet connection, use Internet Explorer on your MobilePro to surf the net or to send and receive email. For details about configuring email, see Chapter 5, "Setting Up a Remote Connection."
MICROSOFT ACTIVESYNC
The Windows CE operating system and your MobilePro provide a powerful, portable extension to your host PC. This PC-companion capability comes through the Microsoft ActiveSync software.
Microsoft ActiveSync provides the communication link between your MobilePro and host PC. The ActiveSync technology provides synchronization between files on your MobilePro and host PC keeping up-to-date copies of email and documents in both locations.
You can also backup and restore data and files and install new applications using Microsoft ActiveSync. For additional information about Microsoft ActiveSync, double click the ActiveSync desktop icon on your host PC that appears after installing ActiveSync.
Backing Up and Restoring Data
To prevent data loss, frequently back up your NEC MobilePro data. You can backup all data to your host PC in two convenient ways.
■ Use Microsoft ActiveSync on your host PC.
■ Use the bUseful Backup Plus application on your MobilePro desktop.
Using Microsoft ActiveSync
The Microsoft ActiveSync backup and restore feature creates a complete duplicate of all data stored on your NEC MobilePro. If you routinely connect to your host PC, this is the best method of data backup. The backup file is saved on the hard disk of your host PC.
When you restore data from a backup file created by Microsoft ActiveSync, all data on your NEC MobilePro is replaced by the data in the backup file. All data on your MobilePro is overwritten including files you created, settings that you changed or programs that you installed since the last backup.
To access the Microsoft ActiveSync backup feature, double click the ActiveSync icon on your host PC. Click Tools, then click Backup/Restore. Follow the on-screen instructions to complete the backup process. For more information about Microsoft ActiveSync backup and restore, see the online Help file.
Using bSQUARE ^® bUseful ^TM Backup Plus
bUseful Backup Plus provides a convenient way for you to back up or restore your MobilePro data while traveling or away from your host PC. Back up data to a PC card or CompactFlash card for secure storage.
Follow these steps to use bUseful Backup Plus to backup or restore files.
- Double tap the bUseful Backup Plus icon on your MobilePro desktop.
- Select the backup or restore option when the backup wizard appears and click Next.
- Select the type of backup or restore that you want and click Finish.
- Click Browse and enter the name of the file(s) that you wish to backup or restore.
- Click OK, twice, to initiate the backup or restore.
For more information about bUseful Backup Plus, see the online Help file.
SOFTWARE APPLICATIONS
A variety of software applications are provided on the Bonus Software CD that ships with your NEC MobilePro 780. These applications let you take full advantage of your MobilePro capabilities.
Using the Bonus Software CD
Use the Bonus Software CD to install your choice of the included software applications. Your NEC MobilePro does not include a CD-ROM drive. The Bonus Software CD is designed for use on your host PC. Before installing the software applications from the Bonus Software CD, first connect your MobilePro to your host PC. When you install an application to the host PC, the installation process automatically installs the application to your NEC MobilePro.

Note: Before using the Bonus Software CD to all additional applications, you must first install Microsoft ActiveSync on your host PC.
- Insert the Bonus Software CD to the CD-ROM drive in your host PC.
■ If auto insert is enabled on your host PC, the CD automatically plays and the introduction screen appears.
■ If auto insert is not enabled, tap Start, Run, browse for the CD-ROM drive, and run the setup file.
- Move your cursor over the application list at the left side of the screen to select an application for installation.
- Click the selected application title to initiate the installation program.
- Read the license agreement, that only appears the first time that you launch the Bonus Software CD, and click OK.
- Follow the on-screen instructions to install the software applications.
Note: When installing some applications from the NEC Bonus Software CD using a Windows NT host PC, the installation process may proceed slowly. The progress bar that appears on the screen during installation may seem to stop for a period of 30 to 90 seconds. Be patient! This is normal and the installation process will complete successfully.
Once installed on your NEC MobilePro, the software application is stored in RAM. Refer to each application's online help for details about how to use the application.

Note: Be sure to keep your main battery pack urged to maintain all applications stored in RAM. If for main battery pack loses its charge, applications need in RAM may be lost. Once lost, you must re-all the desired software applications.
ONLINE HELP
Your NEC MobilePro and Windows CE provide a variety of online help resources. In addition, Microsoft ActiveSync on your host PC provides its own online help file.
Follow these instructions to find your online help resources.
■ NEC Where to Get Help—Double tap the NEC Where to Get Help icon on your MobilePro desktop.
■ MobilePro Accessories — Tap Start, Help, and double tap the MobilePro Accessories link.
■ Windows CE Main Help — Tap Start, then Help on the Windows CE taskbar.
■ Application-specific Help — Just tap the question mark in the upper right-hand corner of the taskbar in each of the Pocket applications.
■ Microsoft ActiveSync Help — On your host PC, double click the ActiveSync desktop icon, click Help, and select the Microsoft ActiveSync Help Topics.
3
Introducing Windows CE
■ Windows CE Operating System
■ Microsoft ActiveSync
■ Software Applications
■ Online Help
Windows CE is the smallest member of the Windows operating system family using the Windows 95 interface. What exactly does smallest mean? It means mobility and portability provided through a reduced code base. This code base is completely 32-bit; it is multithreaded, multitasking and runs on different processors such as the NEC V_R 4121 MIPS processor.
Your MobilePro does not have a hard disk drive. The operating system and preloaded applications are deployed on a Read-Only Memory (ROM) module; files that you work on are stored in Random Access Memory (RAM) on a RAM module.
The power of Windows CE is enhanced through its design to easily link with your desktop computer to synchronize your data. For more information about setting up your MobilePro for synchronization, see the section in Chapter 1, “Connecting to Your PC.”
Using Windows CE
Windows CE is similar to Windows 95. However, some actions are executed differently, as indicated in the following sections.
Tapping
Your NEC MobilePro comes with a stylus, a pen-like device that allows you to touch, tap, or double tap objects on the MobilePro touch screen. The touch, tap, and double tap act just like a point, click, and double click of a mouse.
To simulate the click of the right mouse button, hold down the Alt key while you tap or drag the object with the stylus.
Finally, never use a metal object in place of the stylus. Metal objects may scratch the surface of the touch screen.
Selecting Objects
You can select objects in Windows CE by tapping the object(s) with the stylus. To select multiple contiguous items, hold down the Shift key while tapping the first and last items. To select multiple non-contiguous items, hold down the Ctrl key while tapping each item.
To move the blinking cursor while editing text in a program, simply tap the screen at the desired (new) location.
Dragging and Dropping
Dragging and dropping works just like Windows 95. To drag an object, tap the object with the stylus and hold the stylus against the screen. Continue to hold as you slide the object across the screen. Lift the stylus from the screen when the object is in the desired location.
To copy an object, simply hold down the Ctrl key as you drag the object, as indicated in the previous section.
Windows CE Desktop
Windows CE gives you the newest features offered by Microsoft for your NEC MobilePro and is very similar to Windows 95.
Windows CE includes a desktop with built-in pocket applications, a taskbar for quick navigation, online networking functions, and more. Your Windows CE desktop provides the following icons.

■ My Handheld PC — Opens Windows CE Explorer to display all the data on your MobilePro, whether stored in RAM or on a storage card in the PC card or Compact Flash card slots. My Handheld PC is much like the My Computer icon on the Windows 95 desktop.
■ My Documents — Provides shortcuts to documents most recently worked on, as well as, access to Pocket PowerPoint and Pocket Access.
■ Recycle Bin — Gives you a trash container in which to put unwanted files.
- Internet Explorer — Provides web access once you are connected to the Internet via the MobilePro’s built-in modem and an internet service provider.
- Inbox — Allows you to send and receive email messages on your NEC MobilePro. Refer to Chapter 5, "Setting Up a Remote Connection," for details about configuring your Mobile Pro to send and receive email.
■ Calendar — Lets you schedule appointments, meetings, and other events and provides a variety of ways to display the stored information.
■ Contacts — Maintains a list of names, both business and personal, for easy access while at home or on the road.
■ Tasks — Provides a portable “to do” list for keeping track of all of your tasks.
■ Microsoft Pocket Word — Allows you to create and edit documents on your MobilePro.
■ Microsoft Pocket Excel — Allows you to view or draft spreadsheets.
■ Microsoft Pocket PowerPoint — Lets you quickly and easily deliver a professional online presentation.
■ Microsoft Pocket Access — Allows you to access and synchronize information from other data bases.
■ Microsoft Voice Recorder — Allows you to record voice memos.
■ NEC Where to Get Help — Provides a comprehensive list of help resources for your MobilePro, the software, connections, and more.
■ MobilePro Fax — Allows you to send and receive faxes.
■ bUseful Backup Plus — Allows you to backup and restore your MobilePro data.
■ bUseful Script — Allows you to automate tasks such as logging on to an ISP, retrieving email, and more.

Note: The bUseful Scripts provided in ROM are example, only. Before using the scripts, modify scripts to suit your own needs.
In addition, your NEC MobilePro includes additional utilities accessible through the Start, Programs menu.
■ ASL Connect Client for Windows CE — Provides automatic backup, restore, and synchronization features.
Citrix ICA Client — Provides a setup wizard to configure the Citrix ICA thin client for connectivity to the MetaFrame server component.
Pocket Applications
While Windows CE applications do not have all the features you may expect to see in applications on other Windows systems, these applications provide many powerful features adapted for the mobile environment.
Your MobilePro, with its larger keyboard, highly visible display, and longer battery life, allows you to obtain full advantage of the CE-based applications. Write complete, well-formatted reports, take detailed notes, and work on spreadsheet data as you travel.
Microsoft provides a complete suite of applications ready for you to use. These applications are available as a desktop icon or accessible through Start, Programs in the Accessories, Communication, or Games folders.
■ Calendar — Allows you to track your appointments and create meeting requests.
■ Contacts — Lets you store important information about your friends and colleagues.
■ Inbox — Allows you to send and receive email.
■ Tasks — Gives you a place to create a portable "to do" list.
■ Microsoft Pocket Access — Provides a database program for the mobile professional allowing you to update and query data while you are on the road.
■ Microsoft Pocket Excel — Provides spreadsheet and data base functions for budgeting and other data tasks.
■ Microsoft InkWriter ^® — Lets you create handwritten or typed notes and drawings.
■ Microsoft Pocket PowerPoint — Provides an easy, portable solution for desktop presentations.
■ Microsoft Voice Recorder — Provides an easy way to quickly capture thoughts, reminders, ideas, and phone numbers.
■ Microsoft Pocket Word — Provides many features of Microsoft Word including document formatting and spell-checking. Copy documents from your desktop for editing or draft documents on your MobilePro for later completion on your desktop.
■ ActiveSync — Lets you initiate synchronization with your host PC.
■ PC Link — Allows you to initiate a connection with your host PC.
■ Remote Networking — Allows you to configure remote access accounts for connecting to your ISP, your local area network, and more.
■ Terminal — Lets you view and download files from a bulletin board or to send and receive email.
■ World Clock — Allows you to set the time, date, and alarm for your home city and a city that you are visiting.
■ Solitaire — Provides entertainment while on the road.
For more information about each of the applications, just click the question mark or select the help button when using each application.
You can also use many other applications with Windows CE for faxing and data transfer. A number of these are on your Bonus Software CD. See the section later in this chapter, “Software Applications,” for more information.
Printing Features
Windows CE provides printing capability using Hewlett-Packard (HP) PCL Level 3 and compatible printing devices that support serial or infrared connection. Using the serial cable or infrared transfer you can print a variety of high-quality documents directly from MobilePro including:
■ Pocket Word and Pocket Excel files
■ Contacts and Task lists
■ A view of your schedule or agenda in Calendar
■ Inbox messages
Follow these steps to print documents using your MobilePro.
- Open the desired Pocket application.
- Tap File and tap Print.
The print dialog box appears. - Select the appropriate printer setting, "PCL_Laser" or "PCL_Inkjet."
- Select the appropriate port setting, IrDA, COM1 @ 57600, COM1 @ 9600, IrDA, LPT1, or Network.
- Select other printing attributes as required.
- Tap OK.
Note: See the Bonus Software CD for installation and use of a wider range of high-speed printer drivers.

Note: With the optional printer cable (RC3) connected to the serial port of your NEC lePro, you can print to a supported, high-speed lel printer. For information about MobilePro ssories, access the NECC web site at v.nec-computers.com
For additional details about using the IR port for printing and transferring data, refer to the section in Chapter 4, “Using the IR Port.”
Network Capabilities
Your MobilePro takes full advantage of the networking capability offered through Windows CE and the PC card port. The operating system supports Ethernet LAN and serial line interface protocol (SLIP) used with Cellular Digital Packet data (CDPD) so you can have cable- or wireless-based network communications using an Ethernet LAN PC card. In addition, you can use CompactFlash type II Ethernet cards on your NEC MobilePro.
Creating a Network (Ethernet) Connection
To create a network (Ethernet) connection, you must install and configure an Ethernet card. The drivers for the card may already exist on your device. NEC also has included drivers for the Proxim RangeLAN2.
- Insert the Ethernet card into your device and connect it to your network cable. You must have an NE2000-compatible Ethernet card, one of the wireless Ethernet cards described above, or have installed drivers supplied with the card.
You may see a message warning about battery power. If you have an A/C adapter, plug it into your device.
- In the Settings dialog box, enter the information for your server. Most networks use DHCP, so you should not have to change these settings. See your network administrator if you need assistance.
If the Settings dialog box does not appear, go to Start, Settings, Control Panel, and double tap Network. Select your Ethernet driver, select Properties, and configure the appropriate settings. - Tap OK, twice, select the Identification tab, and enter your name, password, and domain. Click OK, then close the Control Panel.
- Remove and reinsert the Ethernet card when prompted.
Once you have configured your Ethernet connection, use Internet Explorer on your MobilePro to surf the net or to send and receive email. For details about configuring email, see Chapter 5, "Setting Up a Remote Connection."
MICROSOFT ACTIVESYNC
The Windows CE operating system and your MobilePro provide a powerful, portable extension to your host PC. This PC-companion capability comes through the Microsoft ActiveSync software.
Microsoft ActiveSync provides the communication link between your MobilePro and host PC. The ActiveSync technology provides synchronization between files on your MobilePro and host PC keeping up-to-date copies of email and documents in both locations.
You can also backup and restore data and files and install new applications using Microsoft ActiveSync. For additional information about Microsoft ActiveSync, double click the ActiveSync desktop icon on your host PC that appears after installing ActiveSync.
Backing Up and Restoring Data
To prevent data loss, frequently back up your NEC MobilePro data. You can backup all data to your host PC in two convenient ways.
■ Use Microsoft ActiveSync on your host PC.
■ Use the bUseful Backup Plus application on your MobilePro desktop.
Using Microsoft ActiveSync
The Microsoft ActiveSync backup and restore feature creates a complete duplicate of all data stored on your NEC MobilePro. If you routinely connect to your host PC, this is the best method of data backup. The backup file is saved on the hard disk of your host PC.
When you restore data from a backup file created by Microsoft ActiveSync, all data on your NEC MobilePro is replaced by the data in the backup file. All data on your MobilePro is overwritten including files you created, settings that you changed or programs that you installed since the last backup.
To access the Microsoft ActiveSync backup feature, double click the ActiveSync icon on your host PC. Click Tools, then click Backup/Restore. Follow the on-screen instructions to complete the backup process. For more information about Microsoft ActiveSync backup and restore, see the online Help file.
Using bSQUARE ^® bUseful ^TM Backup Plus
bUseful Backup Plus provides a convenient way for you to back up or restore your MobilePro data while traveling or away from your host PC. Back up data to a PC card or CompactFlash card for secure storage.
Follow these steps to use bUseful Backup Plus to backup or restore files.
- Double tap the bUseful Backup Plus icon on your MobilePro desktop.
- Select the backup or restore option when the backup wizard appears and click Next.
- Select the type of backup or restore that you want and click Finish.
- Click Browse and enter the name of the file(s) that you wish to backup or restore.
- Click OK, twice, to initiate the backup or restore.
For more information about bUseful Backup Plus, see the online Help file.
SOFTWARE APPLICATIONS
A variety of software applications are provided on the Bonus Software CD that ships with your NEC MobilePro 780. These applications let you take full advantage of your MobilePro capabilities.
Using the Bonus Software CD
Use the Bonus Software CD to install your choice of the included software applications. Your NEC MobilePro does not include a CD-ROM drive. The Bonus Software CD is designed for use on your host PC. Before installing the software applications from the Bonus Software CD, first connect your MobilePro to your host PC. When you install an application to the host PC, the installation process automatically installs the application to your NEC MobilePro.

Note: Before using the Bonus Software CD to all additional applications, you must first install Microsoft ActiveSync on your host PC.
- Insert the Bonus Software CD to the CD-ROM drive in your host PC.
■ If auto insert is enabled on your host PC, the CD automatically plays and the introduction screen appears.
■ If auto insert is not enabled, tap Start, Run, browse for the CD-ROM drive, and run the setup file.
- Move your cursor over the application list at the left side of the screen to select an application for installation.
- Click the selected application title to initiate the installation program.
- Read the license agreement, that only appears the first time that you launch the Bonus Software CD, and click OK.
- Follow the on-screen instructions to install the software applications.
Note: When installing some applications from the NEC Bonus Software CD using a Windows NT host PC, the installation process may proceed slowly. The progress bar that appears on the screen during installation may seem to stop for a period of 30 to 90 seconds. Be patient! This is normal and the installation process will complete successfully.
Once installed on your NEC MobilePro, the software application is stored in RAM. Refer to each application's online help for details about how to use the application.

Note: Be sure to keep your main battery pack urged to maintain all applications stored in RAM. If for main battery pack loses its charge, applications need in RAM may be lost. Once lost, you must re-all the desired software applications.
ONLINE HELP
Your NEC MobilePro and Windows CE provide a variety of online help resources. In addition, Microsoft ActiveSync on your host PC provides its own online help file.
Follow these instructions to find your online help resources.
■ NEC Where to Get Help—Double tap the NEC Where to Get Help icon on your MobilePro desktop.
■ MobilePro Accessories — Tap Start, Help, and double tap the MobilePro Accessories link.
■ Windows CE Main Help — Tap Start, then Help on the Windows CE taskbar.
■ Application-specific Help — Just tap the question mark in the upper right-hand corner of the taskbar in each of the Pocket applications.
■ Microsoft ActiveSync Help — On your host PC, double click the ActiveSync desktop icon, click Help, and select the Microsoft ActiveSync Help Topics.
4
Using the NEC MobilePro
■ Powering On and Off
■ Making Display Panel Adjustments
■ Using the Keyboard
■ Adjusting MobilePro Settings
■ Using the Voice Recorder
■ Using PC Cards
■ Using CompactFlash Cards
■ Using the IR Port
■ Upgrading ROM
■ Resetting the MobilePro
POWERING ON AND OFF
Power on the NEC MobilePro as follows.

CAUTION
If you power off, then quickly power on the NEC MobilePro, your system may erroneously report the presence of CompactFlash cards.
In addition, repeatedly powering off and quickly powering on, may cause data loss. NECC recommends that you wait ten seconds after powering off, before powering on the NEC MobilePro.
- Slide the display panel latch to the right. Lift the display panel up towards the rear of the unit.

CAUTION
Do not push the display panel beyond its pre-designed stop point as you open the panel.
- Locate and press the Power button. To power off the unit, press the Power button a second time.
Powering on and off

4-2 Using the NEC MobilePro

Note: The first time you install the main battery, MobilePro automatically powers on when you in the display panel.
The first time you power on the MobilePro, the screen contrast may need adjustment. Refer to the following section, "Making Display Panel Adjustments," for details.
If the MobilePro is not used for a specific length of time, it automatically shuts off. You can select how long the unit remains on through the Power selection in the Windows Control Panel. On the Windows CE desktop, go to Start, Settings, Control Panel. Double tap the Power icon and select the Power Off tab to designate a power off time.

Note: As a general operation rule, frequently k up and synchronize data between your Mo-Pro and your host PC.
Synchronization occurs each time you connect your MobilePro to your host PC, once initial synchronization is configured. For details, see the section in Chapter 1, "Connecting to Your PC."
For details about backing up and restoring data, see the section in Chapter 3, “Backup Up and Restoring Data.”
MAKING DISPLAY PANEL ADJUSTMENTS
You can adjust the brightness of the display panel in the NEC MobilePro using two function keys located at the top right of the keyboard. Increasing panel brightness can dramatically lower battery life.
Follow these steps to adjust the panel brightness.
- Open the display panel and power on the unit.
- Press the brightness up or brightness down keys as required.
Adjusting the brightness

A – Brightness Up B – Brightness Down
Backlight
You can conserve battery life by configuring your NEC MobilePro to automatically turn off the display panel's backlight. Follow these steps to configure the backlight for automatic turn off.
Automatic Off
- Tap Start, Settings, Control Panel.
-
Double tap the Display icon and select the Backlight tab.
-
Tap the desired selections to place a check beside the selection. Use the dropdown boxes to select the desired time settings.
Backlight settings

Automatic On
In addition, you can configure the NEC MobilePro to turn on the backlight automatically. Follow these steps to configure the backlight for automatic turn on.
-
Tap the Advanced tab, shown in the previous figure, to access the advanced backlight properties.
-
Tap the desired selections to automatically turn on the backlight either while on battery power or when connected to an AC power source.
Advanced backlight settings
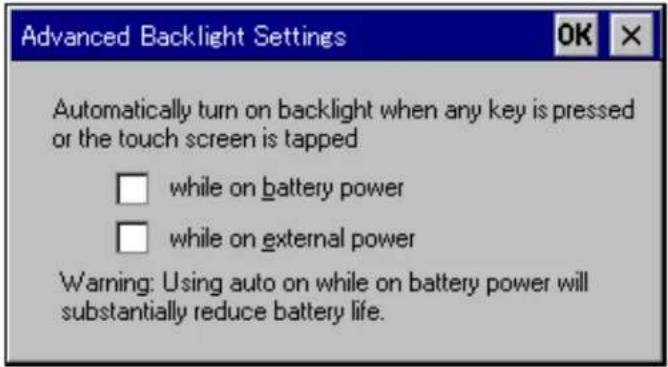

WARNING
Using auto on while on battery power substantially reduces battery life.
Enabling the Suspend Switch
You can configure your NEC MobilePro to power on or off by simply opening or closing the display cover. The suspend switch acts as a switch for both the power and the display panel.
Opening the NEC MobilePro powers on the unit. To power on the unit while it is open, use the Power button.
Closing the MobilePro powers off the unit and insures that the backlight is off as well.
Follow these steps to enable the Suspend Switch.
- Tap Start, Settings, then select Control Panel.
- Double tap the MobilePro Settings icon to launch the dialog box shown in the following figure.
Be sure to select the "LCD Suspend/Resume" tab.
Power off settings

- Select either "Enable suspend while on battery power" or "Enable suspend while on external power," or both, to enable the display linkage switch.
Note: Your NEC MobilePro will not automatically suspend while on battery power during synchronization, unless the battery charge is at a very low status. You may want to connect your MobilePro to an AC power source before synchronizing with your host PC.
USING THE KEYBOARD
The NEC MobilePro keyboard is equipped with many features including:
■ Application shortcut keys
■ Brightness up/down keys
■ Cursor control keys
■ Control keys
Feature keys are located as shown in the following figure. Key operations are described after the figure.
Keyboard
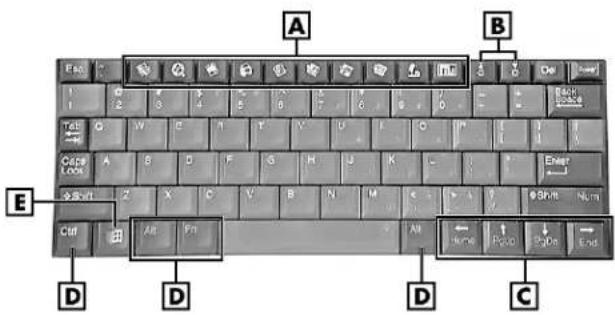
A - Applications shortcut keys B - Brightness up/down keys C - Cursor control keys D - Control keys E - Windows key
■ Application shortcut keys — Ten application shortcut keys allow you to launch applications directly from the keyboard. For details about each key, refer to the section that follows, "Using Application Shortcut Keys."
- Brightness up/down keys — Use the brightness up/down keys to adjust the NEC MobilePro’s panel brightness.
■ Cursor Control Keys — Cursor control keys let you position the cursor on the screen where you want. The cursor indicates where the next typed text is inserted.
■ Control Keys — Ctrl, Alt, Fn, and Shift are controls used in conjunction with other keys to change their functions. To use control keys, press and hold the Control key while pressing another key.
■ Windows Key — You can use the Windows key to display the Start menu.
Using Application Shortcut Keys
The NEC MobilePro provides application launch keys located in the top of the keyboard. Use these keys to launch applications directly from the keyboard. The key defaults are listed in the following table.
Default Application Shortcut Keys
| Icon | Application |
| Inbox |
| Microsoft Internet Pocket Explorer |
| Calendar |
| Contacts |
| Tasks |
| Microsoft Pocket Word |
| Microsoft Pocket Excel |
 | Microsoft Pocket PowerPoint |
| Voice Recorder |
| Microsoft Pocket Access |
| Calculator |
| Brightness Up |
| Brightness Down |
Default Function Keys
In addition to the application shortcut keys, your NEC MobilePro is equipped with default function keys as described in the following table.
Default Function Keys
| Key | Function |
| Fn + Space Backlight On/Off | |
| Fn + Shift Num Lock | |
| Fn + 4 Pound key | |
| Fn + 5 Euro | |
| Alt + < Contrast Up | |
| Alt + > Contrast Down | |
| Alt + Left Arrow Home | |
| Alt + Right Arrow End | |
| Alt + Up Arrow PgUp | |
| Alt + Down Arrow PgDn | |
ADJUSTING MOBILEPRO SETTINGS
Your NEC MobilePro is equipped with a MobilePro Settings applet. To access MobilePro Settings, simply tap Start, Settings, Control Panel, and double tap the MobilePro Settings icon to display the applet's window. For more details, simply tap the “?” to view the online help.
The MobilePro Settings applet allows you to configure a variety of properties on your NEC MobilePro and includes the following features.
■ External Monitor — Allows you to display the same image on both the display panel and an external monitor.
■ Color Palette — Lets you select a 256-color display or the default 64K color display.
■ LCD Suspend/Resume — Allows you to designate a suspend option for the display panel lid, when closed.
■ Keyboard Layout — Allows you to select for a U.S. or international keyboard.
■ IrDA — Allows you to select the speed for IR transfer.
■ Scroll Dial — Allows you to define the action of the Scroll Dial as Up/Down or PgUp/PgDn.
■ Built-in Modem — Allows you to specify a country for use of the built-in modem.

CAUTION
Select the appropriate country setting for your built-in modem to ensure compliance with the country's telephone lines. An incorrect country setting may damage your device or the telephone line.
The list of compliant country's outside the U.S. and Canada is subject to change. For the latest list of compliant countries outside the U.S. and Canada, refer to NECC's web site at
www.nec-computers.com.
Connecting the VGA Cable
The VGA cable lets you connect the MobilePro directly to a MultiSync monitor that has VGA output. Use an external monitor to enhance your MobilePro display.
Connect the cable as follows.
- Tap Start, Settings, Control Panel.
-
Double tap the MobilePro Settings icon and select the External Monitor tab.
-
Tap to place a check mark in the box "Display LCD on External Monitor," and tap OK.
-
Use the soft reset button to reset the MobilePro and implement the new setting. For instructions about resetting the MobilePro, refer to the section, "Resetting the MobilePro," in Chapter 4.
-
Power off the MobilePro.
-
Locate the VGA port cover on the left side of the MobilePro and open it.
-
Align and attach the connector on the MobilePro VGA cable to the VGA port on the left side of the MobilePro.
Connecting the VGA cable

A - VGA port B - VGA cable
- Connect the other end of the VGA cable to the monitor cable connector.

CAUTION
Be sure to properly align the cable connectors and ports. Incorrect connection can damage the MobilePro H/PC and the monitor.
- Power on the MobilePro and the external monitor.

CAUTION
When the setting, "Display LCD on External Monitor," is selected, the MobilePro uses more power than normal. To conserve power, be sure to deselect this setting when not using an external monitor.
Screen Resolution
Your NEC MobilePro 780 provides a display panel with a 640x240 screen resolution. When you connect the VGA cable to an external monitor, and select “Display LCD on External Monitor,” in the MobilePro settings applet, the external monitor’s image is also set to 640x240. However, some applications like Pocket PowerPoint, allow you to increase the screen resolution on the external monitor to 800x600.
Follow these steps to increase the screen resolution on an external monitor when using Pocket PowerPoint.
- Connect the VGA cable as described in the preceding section, "Connecting the VGA Cable."
-
Launch Microsoft Pocket PowerPoint and open the file that you want to display.
-
Tap Tools, tap Set Up Show, use the dropdown box to set the entry to "External VGA," and close the window.
-
Tap View and tap View Show to display the PowerPoint presentation in 800x600 resolution.
Using the Scroll Dial
The Scroll Dial, located in the right-hand lid hinge, allows you to:
■ scroll screens using an Up/Down or PgUp/PgDn action, depending on your MobilePro Settings.
■ launch an application from the MobilePro desktop.
Locating the Scroll Dial

natural_image
Laptop with NEC branding open, showing front panel and keyboard (no visible text or symbols on main body)A – Scroll Dial
Use the Scroll Dial in the following ways:
■ Move the dial up or down to toggle the up or down options, then push in the dial to execute the up or down action.
■ Tap to highlight an application on the MobilePro desktop, then push in the dial to launch the application.
The NEC MobilePro features a voice recorder application that lets you record and play voice memos. Recording is dictation quality only and not intended for musical recording. Recording voice memos with the NEC MobilePro is easy.
Follow these steps to record with the Microsoft Voice Recorder.
- Tap Start, Programs, Accessories, then select Microsoft Voice Recorder.
- Hold your NEC MobilePro with the microphone facing you.
- Press the Record button (red dot) and speak into the microphone.
- When you are finished recording, press the Stop button (black square). A beep sounds when the recording stops.
To playback your recording, tap to highlight your selection and press the Play button (green triangle) or simply double tap your selection.
You may want to modify the recording format to improve the quality of playback. To modify the recording format, tap Tools, Recording Format and use the dropdown box to change the format to PCM and to modify the Attributes to a higher sampling rate.

Note: Recording works best if you position the phone about three inches away from your path while speaking.
Memory required for voice memo storage varies depending on user settings.
Menu
The Voice Recorder provides a variety of menu selections under the File, Control, and Tools selections. Refer to the online help provided with the voice recorder application for details about its use. Just tap the question mark icon in the upper right-hand corner of the screen to access the online help.
USING PC CARDS
Your NEC MobilePro comes with a PC card slot that supports one Type I or one Type II PC card. All PC cards are approximately the same size, have a standard 68-pin connector and vary only in thickness. PC cards add a variety of storage and communication functionality to your MobilePro.

CAUTION
Windows CE supports the hot swapping of PC cards. However, to avoid data loss, do not remove a PC card while in use.
When using a PC card in the MobilePro, we recommend that you also use AC power. The batteries alone may not provide enough power for some PC cards to operate properly.
Note: Use the AC adapter when using PC cards or the internal modem. Using the adapter can help you avoid potential data loss caused by the high-energy consumption of some PC cards.
Inserting PC Cards
Follow these procedures to install a PC card.
- With the PC card facing up, insert the card into the PC card slot on the right side of the system.
Inserting a PC card
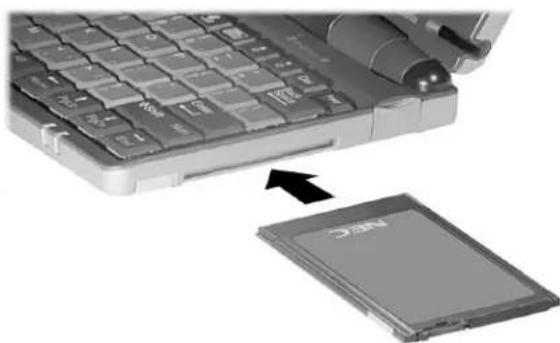
natural_image
Close-up of a computer keyboard and an open drive module (no visible text or symbols)- Verify that the PC card is fitted securely into position.

CAUTION
Make sure you align the PC card correctly for insertion. Inserting a PC card incorrectly can damage the card and/or the NEC MobilePro.
Removing PC Cards
Follow these steps to remove a PC card from the NEC MobilePro.
- Locate the PC card eject button beside the PC card slot and press it to release the card from the slot.
- Once the card is released, pull it the rest of the way out of the slot.
USING COMPACTFLASH CARDS
Your NEC MobilePro comes with a CompactFlash card slot that supports one Type I or Type II CompactFlash card. A CompactFlash card provides a storage device for your MobilePro and when inserted, creates a Storage Card 2 folder. To view the contents of the folder, double tap the My Handheld PC icon on your MobilePro desktop, then double tap the Storage Card 2 folder.

CAUTION
Windows CE supports the hot swapping of PC cards. However, to avoid data loss, do not remove a PC card while in use.
When using a CompactFlash card in the MobilePro, also use AC power. The batteries alone may not provide enough power for some CompactFlash cards to operate properly.
Note: Use the AC adapter when using CompactFlash cards. Using the adapter can help you avoid potential data loss caused by the high-energy consumption of some CompactFlash cards.
Inserting CompactFlash Cards
Follow these steps to install a CompactFlash card.
- With the CompactFlash card facing up, insert it into the CompactFlash card slot.
Inserting a CompactFlash card

natural_image
Close-up of a laptop keyboard with an attached 16-inch RAM chip, showing no text or symbols on the keys or background.
Note: When you insert a CompactFlash card, a button pops out of the card bay. Pivot the button towards the left side of the unit until it fits into the recessed space next to the slot.
- Verify that the CompactFlash card is fitted securely into position.

CAUTION
Make sure you align the CompactFlash card correctly for insertion. Inserting a CompactFlash card incorrectly can damage the card and/or the MobilePro.
Removing CompactFlash Cards
Follow these steps to remove a CompactFlash card from the NEC MobilePro.

Note: Pivot the CompactFlash card button out of the recessed space before beginning the following procedure.
- Save your data if you are storing it on the inserted CompactFlash card.
- Press the button beside the CompactFlash card slot.
- When the card pops out slightly, pull it out of the slot.
USING THE IR PORT
With the NEC MobilePro, you can send and receive data to and from another similarly equipped device using the infrared (IrDA) communication port. In addition, you can use the IR port to synchronize data with your host PC, in place of using the PC Connect serial cable.
Before using the NEC MobilePro for IrDA communication, first configure/enable the IR port on your host system, then install Microsoft ActiveSync on your host system.

Note: If you configure/enable the IrDA port on or host system after installing Microsoft ActiveC, you must re-install Microsoft ActiveSync be-establishing IrDA communication between items.
Follow these steps to use the IR port to communicate with another MobilePro or your host PC.
- Remove the PC Connect (serial) cable from the MobilePro before attempting IrDA communication.
- Open the display panels on the two units that you want to use for communication.
- Position the units so that communication ports face each other. Position the units from 2 to 20 inches apart.
- Be sure that nothing obstructs the path between the communication ports on both units, and that the ports are aligned properly.
- Send your data by using the "Send To" selection in the Windows CE Pocket Explorer File menu.
Highlight the file you wish to transfer and choose “Infra-red Recipient” from the Send To selections. Your file is transferred to the other unit. The receiving unit uses the File/Receive command to receive the infrared transmission.
Note: If the units are too far apart or if something blocks the path between the two ports, data may not be sent or received correctly.
UPGRADING ROM
You can upgrade NEC MobilePro ROM by replacing the currently installed ROM module with an upgraded ROM module (when available).
Note: Be sure to synchronize your MobilePro data with your host PC and perform a backup of your MobilePro data before upgrading your ROM module. You may need to copy some files back to your MobilePro following this upgrade procedure.
Note: Before handling any internal components, discharge static electricity from yourself and your clothing by touching a nearby metal surface.
Follow these steps to upgrade your MobilePro ROM module.
-
Save your data to a host PC, power off the MobilePro, and close the display panel.
-
Disconnect any peripheral devices attached to the MobilePro, such as the AC adapter.
- Remove the battery pack. See the section in Chapter 2, "Removing and Inserting the Battery Pack," for details.
- Turn over the MobilePro and locate the screw that secures the ROM bay cover.
- Using a small screwdriver, remove the screw and the bay cover. (The MobilePro does not power on when the bay cover is removed.)
ROM bay cover
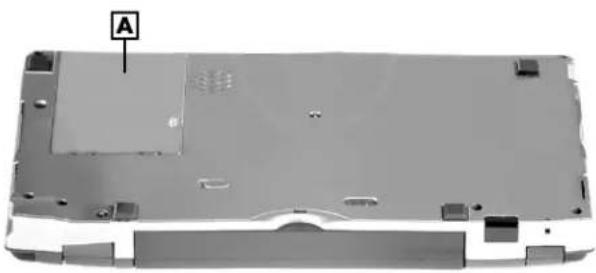
natural_image
Top-down view of a computer chassis showing front panel and internal components (no text or symbols visible)A - ROM bay cover
- With the small screwdriver, remove the two screws on the ROM module.
- Gently lift up the ROM module to disconnect it from its connector and remove it from the bay.
-
Insert the upgraded ROM module into the bay, aligning the connector on the module with the one in the bay.
-
Gently press on the module just above the connectors until the connection is secure.
- Replace the two screws to secure the upgraded ROM module.
- Replace the bay cover and cover screw.
- Push the full reset button. For details about using the full reset button, refer to the section later in this chapter, "Using the Full Reset button."
- After one minute or more, install the battery pack.

Note: The MobilePro will not power on unless ROM bay cover is secure and the battery lock is the locked position.
RESETTING THE MOBILE PRO
Occasionally you may need to reset your NEC MobilePro. For instance, you may need to reset after restoring data from your host PC, after modifying the MobilePro's configuration, when you are unable to power on using the Power button, or when the operating system stops responding.
The NEC MobilePro is equipped with two reset buttons, designed for use depending upon specific conditions. The two reset buttons are:
- Soft Reset Button – The soft reset button allows you to restart the NEC MobilePro operating system while preserving any saved data. This method is similar to a “warm boot” on your host PC.
■ Full Reset Button – The full reset button restores your system to its original shipping configuration, erasing all information that you have entered.

Note: To ensure the safety of your information all times, you should perform regular backups of r MobilePro information to your host PC. For e information, see the "Backing Up and Restor-Data" section in Chapter 3.
Using the Soft Reset Button
Before using the soft reset button to reset the MobilePro, close any open files or applications, if possible. When you soft reset the MobilePro, you may lose open/unsaved files.
Use the soft reset button to reset the NEC MobilePro as follows.
- Open the display panel and remove the stylus from its holder.
- Power on the MobilePro.
- Turn over the MobilePro.
-
Locate the soft reset button on the bottom of the MobilePro.
-
Using the stylus, press the soft reset button. (You may need to press the button more than once.) This resets the unit.
Soft reset button
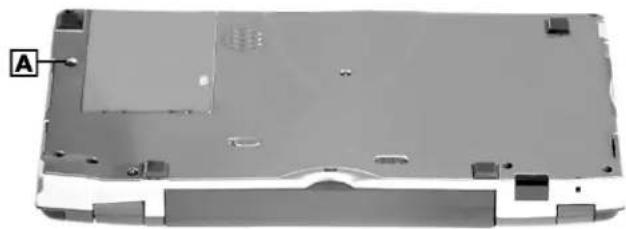
natural_image
Laptop back panel with visible mounting holes and a labeled component 'A' (no text or symbols on the main body)A - Soft reset button
Using the Full Reset Button
Use the full reset button only when your unit does not respond after doing all of the following.
■ Installing a charged battery.
■ Connecting the unit to an AC power source.
■ Verifying that the battery lock is in the locked position.
■ Using the soft reset button to reset the system.

CAUTION
Using the full reset button to reset your MobilePro returns your unit to its original shipping configuration. All data and applications are erased from RAM. All open/unsaved files are lost and all user specific data such as contacts, tasks, etc., are erased.
You can only restore data that has been backed up to your host PC. For more information, see the "Backing Up and Restoring Data" section in Chapter 3.
The full reset button is located inside of the main battery's bay. Follow these steps to remove the battery and use the full reset button to reset the NEC MobilePro.
-
Open the display panel and remove the stylus from its holder.
-
Remove the main battery as follows:
■ Locate the battery lock and release latch on the bottom of the system.
■ Slide the lock to the unlocked position in the direction of the arrow, as indicated in the following figure.
■ Slide the release latch in the direction of the arrow, as indicated in the following figure, and hold it.
■ Remove the battery from the bay.
Removing the battery pack

A – Battery release latch B – Battery release lock C – Battery pack
- Locate the full reset button inside of the battery bay, as indicated in the following figure.
Full reset button

A – Full reset button B – Battery connectors
- Using the stylus, press the full reset button. This resets the unit and restores your system to its original shipping configuration.
You may be able to use a recent backup of your data to restore your system to a more recent configuration. Refer to Microsoft ActiveSync on your host PC or the section in Chapter 3, "Backing Up and Restoring Your Data" for details about backing up and restoring your MobilePro.
5
Setting Up a Remote Connection
■ Preparing for Connection Setup
■ Connecting the Internal Modem
■ Connecting to an Internet Service Provider (ISP)
■ Connecting to a Remote Access Server
■ Sending and Receiving Email
■ Activating a Connection
PREPARING FOR CONNECTION SETUP
Before you set up a dial-up connection for an internet service provider (ISP) or remote access server (RAS), and the associated email properties, you need the following.
■ a modem (your NEC MobilePro is equipped with an internal data/fax modem).
■ an ISP or RAS account.
- configuration information from your ISP or network administrator that may include some or all of the following:
☐ the dial-up telephone number
□ TCP/IP settings
□ port settings
☐ a user name and password, if required
You must create a new connection for each ISP or RAS account that you want to establish. Once you have created a connection for an ISP, RAS, etc., you can define an email account for each connection, if so desired. Follow the
instructions in the sections that follow “Connecting to an ISP,” “Connecting to a RAS,” and “Sending and Receiving Email” to create the desired connections.
CONNECTING THE INTERNAL MODEM
Follow these steps to connect an RJ-11 telephone cable to the internal modem.
-
Locate the modem cover on the right side of the NEC MobilePro and open it by pulling down the top of the cover.
-
Carefully plug the RJ-11 telephone cable into the modem connector.
Connecting the telephone cable

natural_image
Close-up of a computer keyboard with an attached USB port and cable connector (no visible text or symbols)WARNING
Do not connect the internal modem to a digital private branch exchange connector, or the digital side of an integrated digital network. Use only analog phone connections. Failure to do so may result in explosion or fire and will damage your modem.
During thunderstorms be sure to disconnect the modem phone cable from the NEC MobilePro. Failure to do so may result in explosion or fire.
- Connect the other RJ-11 connector into an active (analog) phone jack.
Now you are ready to create a connection for an ISP or RAS account!
CONNECTING TO AN INTERNET SERVICE PROVIDER
Once you have established an account with an ISP and gathered the necessary configuration information, you are ready to create a connection on your MobilePro for your ISP account.
Your Bonus Software CD may contain the application, Ruksun® ConnectForce™ that enables you to automate the ISP setup procedure described below and includes a database of phone numbers and communication settings for a number of popular ISPs.
Follow these steps to create a new connection for your ISP account.
- Tap Start, Programs, Communication, then select Remote Networking.
- Double tap the Make a New Connection icon.
- Enter a name for the new connection.
- Select Dial-Up Connection as the connection type and tap Next.
- Use the dropdown box to select Internal Modem on COM 4 and tap Configure.
- Select the required port settings and call options. Tap OK.
-
Tap TCP/IP Settings and configure the required General Settings and Name Servers. Tap OK.
-
Tap Next and enter the required dial-up telephone number. Tap Finish.
Once your ISP connection is established you can configure your MobilePro for sending and receiving email through your ISP. Follow the instructions in “Sending and Receiving Email” and “Activating a Connection,” later in this chapter, to send and receive email through your ISP.
For ISP settings, access:
http://www.cewindows.net/wce/isp.htm/. Although not an official NECC web site, this site contains important information about ISP settings.
CONNECTING TO A REMOTE ACCESS SERVER
Once you establish an account with your RAS and gather the necessary configuration information, you are ready to create a connection on your MobilePro for your RAS account.
Follow these steps to create a new connection for your RAS account.
- Tap Start, Programs, Communication, then select Remote Networking.
- Double tap the Make a New Connection icon.
- Enter a name for the new connection.
- Select Dial-Up Connection as the connection type and tap Next.
- Use the dropdown box to select Internal Modem on COM 4 and tap Configure.
- Select the required port settings and call options. Tap OK.
-
Tap TCP/IP Settings and configure the required General Settings and Name Servers. Tap OK.
-
Tap Next and enter the required dial-up telephone number. Tap Finish.
Once your RAS connection is established you can configure your MobilePro for sending and receiving email through your RAS. Follow the instructions in “Sending and Receiving Email” and “Activating a Connection,” later in this chapter, to send and receive email through your RAS.
SENDING AND RECEIVING EMAIL
Before configuring the necessary email service information you need some or all of the following settings.
■ POP3 Host.
■ Your user id.
■ Your password, if required.
■ SMTP host.
■ Your email address.
To send and receive email through your ISP or RAS account, you must configure the services properties through your Inbox. Follow these steps to configure the email services information.
- Double tap Inbox, tap Services, and tap Options.
- On the Services tab, tap Add.
- Select the desired service type and enter the service name.
- Tap OK.
- Enter the information provided by your ISP provider or network administrator.
The Mail Services Definition screen consists of Required information and Optional information. Fill in all information as provided by your ISP or network administrator.
■ Enter ISP information as follows:
□ POP3 Host — ISP POP3 Host name.
□ User ID — Your user id.
☐ Password — Your password, if required.
☐ SMTP Host — ISP SMTP Host name.
Return Address — Your email address. (If in a unix environment
■ Enter RAS (Exchange server) information as follows:
□ POP3 Host — Exchange server name.
□ User ID — Domain\your user id\exchange alias.
☐ Password — Your password, if required.
☐ SMTP Host — Exchange server name.
Return Address — Your email address. (If in a unix environment
Note: If you experience difficulty sending email, check your optional configuration settings. If you experience difficulty receiving email, check your required configuration settings.
ACTIVATING A CONNECTION
Once you have created a new connection for each desired service, you must activate the connection with that service to open communication and send or receive email.
Follow these steps to activate a connection.
- Double tap the Inbox icon.
- Tap Services and verify that the service you want to connect is selected.
The currently selected service displays in the drop-down menu and is designated with a dot. If necessary, modify your selection before connecting and tap OK. - Tap Services (again, if necessary) and tap Connect.
The connection dialog box displays and may prompt you to enter a password. Otherwise, the connection dialog box displays the connection progress and indicates when the connection is successful. - Enter your password, if required.
Once the connection is established, you are ready to send and receive email.
A
Troubleshooting
Your NEC MobilePro is designed to provide many hours of service while you are at home or on the road.
For optimum performance, frequently back up and synchronize the MobilePro data with your notebook or desktop computer. Then if something happens, most of your data is still available. If you have problems, check the information in the following table for possible solutions.
Troubleshooting
| PROBLEM | RESOLUTION |
| The MobilePro has no power. | Check the main battery.If you are using an AC adapter, make sure the connections are correct and secure.Make sure the battery bay release lock is in the locked position.Check that the ROM bay cover is properly secure. |
| Nothing appears on the screen. | Try pressing the Power button again (the unit might have turned itself off if it was not used for a specified time).Adjust the contrast.Check the power connections. |
Troubleshooting (cont'd)
| PROBLEM | RESOLUTION |
| Nothing appears on the screen. (cont'd) | Try recharging the main battery pack.Check that the ROM bay cover is properly secure. |
| A low battery message appears. | Recharge the main battery. |
| When using a PC card, such as a modem, the unit powers off. | Connect the AC adapter to the unit when using PC cards that require large amounts of energy. |
| The AC adapter doesn't work. | Make sure that the main battery is installed.Check that the AC adapter connections are secure.Verify that the AC outlet being used is working. Do this by plugging in another electric device, such as a lamp. |
| The keyboard doesn't respond. | Reset the unit.If you have installed handwriting recognition software, be sure that you have not set the “disable keyboard” parameter in that software. |
| The serial port doesn't work. | Check that the cable connections are secure. |
| The IrDA port doesn't work. | Check that nothing obstructs the path between the transmitting and receiving IR ports.Check the information in “Using the IR Port,” in the NEC MobilePro 780 User's Guide. |
Troubleshooting (cont'd)
| PROBLEM | RESOLUTION |
| The PC card cannot be accessed. | Make sure the card is inserted correctly and seated properly. |
| Connect the unit to AC power using the adapter. Some cards do not operate properly unless the AC adapter is connected. | |
| The touch screen does not respond. | Press Ctrl Alt = to calibrate the stylus input. Follow the on-screen instructions to complete the recalibration procedure. |
| Reset the unit. | |
| The soft reset button does not respond. | Remove the main battery. Reinstall the battery and make sure it is seated properly. Try resetting the unit again. |
| If the soft reset button on the bottom of the system does not respond, you may have to use the full reset button inside the battery bay. Refer to the section, “Resetting the MobilePro,” in Chapter 4 of the user’s guide. | |
| This second procedure may result in the loss of the memory contents including all stored data, settings, and files. | |
| Be sure to make regular backups. |
For further assistance, call NECC Support Services at 1-800-632-4525

Note: If you purchased this computer outside of U.S. and Canada, please contact the local NECC fee or their dealers for service and support.
B
Specifications
The following specifications are standard except where noted.
Display
8.1-inch, 640 x 240, 64K color, liquid crystal display (LCD), with backlight, touch screen
CPU
NEC V _R 4121, 168-MHz processor, optimized for Windows CE
User Data Entry Methods
■ 78-key QWERTY keyboard with stylus
■ 17.5 mm alpha key pitch
■ Touch screen (input via stylus)
■ Scroll (Jog) dial
Random Access Memory (RAM)
32 megabytes (MB); standard
Read-Only Memory (ROM)
24 megabytes MB; replaceable
Speaker
One built-in speaker
Infrared (IrDA) Communication
■ Baud rate — FIR 4 Mbps maximum
■ Distance — 2 to 20 inches
Serial Interface
Baud rate — 115.2 Kbps maximum
I/O Ports
■ Serial port (Direct Cable connection)
■ IrDA port
■ VGA port (output)
■ Earphone Microphone
■ Modem port
■ Power port (DC in)
Modem
■ Data — V. 90, 56 Kbps (AT command)
■ Fax — 14.4 Kbps (Fax control command Class I)

Note: Download speed is limited to 53 Kbps.
Upload speed is limited to 33.6 Kbps. Actual speeds may vary depending upon line conditions.
The built-in modem requires a compatible service provider.
PC Card Slot
One Type I or Type II PC card slot
Compact Flash Card Slot
One Type I or Type II Compact Flash card slot
Power
■ AC Adapter
Input Voltage — 100 to 240 volts AC, 50 or 60 Hz
☐ Output Voltage — 9.0 volts, 1,000mA max.
■ Main battery — one rechargeable Lithium-Ion (Li-Ion) battery pack (included).
■ Memory backup — approximately 7 days (with depleted main battery) at ambient temperature of 73^ F ( 23^ C).

Note: The period for safe memory backup can vary with ambient temperature and other factors. Always make sure that your MobilePro is powered off more you store it. Always recharge your MobilePro soon as possible after depleting the main battery.
Recharge Time
■ Use the AC adapter to recharge the MobilePro main battery and the backup battery.
■ Recharging time is approximately 4.5 hours when the system is on or off.
■ The backup battery usually recharges while the main battery is recharging.
■ Initial charging time for the main battery and the backup battery is approximately 10 hours with the system off.
■ The system must be charged for 10 hours if the main battery is depleted for a prolonged period.
Accessories (ship with the system)
■ AC adapter – S1424-21A Listed Direct Plug-In Power Unit
Input Voltage - 100 to 240V AC; 60Hz, 13W
☐ Output Voltage – 9V DC 1000 mA
■ Rechargeable Lithium-Ion Battery Pack
■ PC Connect (serial) Cable
■ RJ-11 Telephone Cable
■ VGA Cable
■ Stylus
Dimensions
■ 1.69 lb. (with battery)
■ 770 g (with battery)
Operating Environment
■ Temperature — 32° to 104°F (0° to 40°C)
■ Humidity — 35% to 85% (No condensation)
Storage Environment
■ Temperature — 14° to 140°F (-10° to 60°C)
■ Humidity — 35% to 85% (No condensation)
Available Options
■ AC Adapter (S1424-21A)
■ AA Battery Adapter (MC-BA10)
■ PC Connect (serial) Cable (S1424-12S)
■ VGA Cable(S1424-12V)
■ Stylus Pack (S1424-17A)
■ Compact Carrying Case (S1424-30A-D)
■ Standard Carrying Case (S1424-30A)
■ Deluxe Carrying Case (290-01500-000)
■ Li-Ion Battery Pack (MC-BA9)
■ Earphone Microphone (MC-EM1)
■ High-Speed Printer Cable (MC-RC3E)
■ 16 MB CompactFlash™ Storage Card (050-00054-000)
Battery Replacement
A lithium battery in some computers maintains system configuration information. In the event that the battery fails to maintain system configuration information, NECC recommends that you replace the battery. For battery replacement information, call your local NECC dealer or the NECC Customer Assistance Center.

WARNING
There is a danger of explosion if the battery is incorrectly replaced. Replace only with the same or equivalent type recommended by the manufacturer. Discard used batteries according to the manufacturer's instructions.

AVERTISSEMENT
The main battery is a Lithium-Ion battery.
The sub-battery is a Lithium/Vanadium battery.
Do not place used batteries in your regular trash.
The incineration, landfilling, or mixing of batteries with the municipal solid waste stream is prohibited by law in most areas.
Contact your local waste management officials for other information regarding the environmentally sound collection, recycling, and disposal of used batteries. If you purchased or are using this computer outside of the U.S. or Canada, contact a local NECC dealer in your country.
NEC Computers Inc.
DECLARATION OF CONFORMITY
We, the Responsible Party
NEC Computers Inc.
8350 Fruitridge Road
Sacramento, CA 95826
declare that the product
NEC MobilePro 780
is in conformity with part 15 of the FCC Rules. Operation of this product is subject to the following two conditions: (1) this device may not cause harmful interference, and (2) this device must accept any interference received, including interference that may cause undesired operation.
Product Type: HandHeld PC
Equipment Classification: Class B peripheral
(For United States Use Only)
Federal Communications Commission Radio Frequency Interference Statement

WARNING
Changes or modifications to this unit not expressly approved by the party responsible for compliance could void the user's authority to operate the equipment.

Note: This equipment has been tested and found to comply with the risks for a Class B digital device, pursuant to Part 15 of the FCC Rules. Use limits are designed to provide reasonable protection against harmful interference in a residential installation. This equipment generates, uses can radiate radio frequency energy and, if not installed and used in accordance with the instructions, may cause harmful interference to radio communications.
However, there is no guarantee that interference will not occur in a particular installation. If this equipment does cause harmful interference to radio or television reception, which can be determined by turning the equipment off and on, the user is encouraged to try to correct the interference by one or more of the following measures.
■ Reorient or relocate the receiving antenna.
■ Increase the separation between the equipment and receiver.
■ Connect the equipment to an outlet on a circuit different from the one to which the receiver is connected.
Use shielded and properly grounded I/O cables and power cable to ensure compliance of this unit to the specified limits of the rules.
FCC PART 68
This equipment complies with Part 68 of FCC rules. On the bottom of this equipment is a label that contains, among other information, the FCC registration number and ringer equivalence number (REN) for this equipment. If requested, this information must be provided to the telephone company.
All applicable registration jack USCOs, any facility interface codes and service order codes associated with the service the equipment must be connected.
The REN is used to determine the quantity of devices that may be connected to the telephone line. Excessive RENs on the telephone line may result in the devices not ringing in response to an incoming call. In most, but not all areas, the sum of the RENs should not exceed five (5). To be certain of the number of devices that may be connected to the line, as determined by the total RENs contact the telephone company to determine the maximum REN for the calling area.
If the MobilePro causes harm to the telephone network, the telephone company will notify you in advance that temporary termination of service may be required. But if advance notice isn't possible, the telephone company will notify the customer as soon as possible. Also, you will be advised of your right to file a complaint with the FCC if you believe it is necessary.
The telephone company may make changes in its facilities, equipment, operations, or procedures that could affect the operation of the equipment. If this happens, the telephone company will advise you in advance to make the necessary modifications to maintain uninterrupted service.
If you have trouble with the MobilePro, please contact NECC Support Services at 1-800-632-4525 for repair and warranty information. If the trouble is impacting the telephone network, the telephone company may request you remove the equipment from the network until the problem is resolved.
The equipment cannot be used with public coin telephones provided by the telephone company. Connection to Party Line Service is subject to state tariffs. (Contact the state public utility commission, public service commission or corporation commission for information.)
The Telephone Consumer Protection Act of 1991 makes it unlawful for any person to use a computer or other electric device to send any message via a telephone fax machine unless such message clearly contains in a margin at the top or bottom of each transmitted page or on the first page of the transmission, the date and time it is sent and an identification of the business or other entity, or other individual sending the message and the telephone number of the sending machine or such business, other entity, or individual. In order to program this information into your MobilePro refer to the MobilePro FAX help files on the MobilePro desktop. If you are using a different communication software program, refer to its manual.

Note: The Industry Canada label identifies certified equipment.
This certification means that the equipment meets telecommunications network protective, operational and safety requirements as prescribed in the appropriate Terminal Equipment Technical Requirements document. The Department does not guarantee the equipment will operate to the user's satisfaction.
Before installing this equipment, users should ensure that it is permissible to be connected to the facilities of the local telecommunications company. The equipment must also be installed using an acceptable method of connection. The customer should be aware that compliance with the above conditions may not prevent degradation of service in some situations.
Repairs to certified equipment should be coordinated by a representative designated by the supplier. Any repairs or alterations made by the user to this equipment, or equipment malfunctions, may give the telecommunications company cause to request the user to disconnect the equipment.
Users should ensure for their own protection that the electrical ground connections of the power utility, telephone lines and internal metallic water pipe system, if present, are connected together. This precaution may be particularly important in rural areas.

CAUTION
Users should not attempt to make such connections themselves, but should contact the appropriate electric inspection authority, or electrician, as appropriate.

Note: The Ringer Equivalence Number (REN) assigned to each terminal device provides an indication of the maximum number of terminals owed to be connected to a telephone interface. The termination on an interface may consist of any combination of devices subject only to the requirement that the sum of the Ringer Equivalence Number of all the services does not exceed 5."
(For Canadian Use Only)
This Class B digital apparatus meets all requirements of the Canadian Interference-Causing Equipment Regulations.
Changes or modifications not expressly approved by the party responsible for compliance could void the user's authority to operate the equipment.
Properly shielded and grounded cables and connectors must be used for connection to host computer and/or peripherals in order to meet FCC emission limits.
AC adapter with ferrite core must be used for RF interference suppression.
Index
A
AC adapter, 1-7
connecting, 1-7
AC power port, 2-6
Activating a connection, 5-8
Application shortcut keys, 4-8, 4-9
Available options, B-5
B
Backing up data, 3-11
Battery
charging, 1-5
determining status, 2-10
inserting, 2-14
installing, 1-5
precautions, 2-17
recharging, 2-11
removing, 2-14
replacing, 2-13
Battery release latch, 2-9
Bonus Software CD, 3-12
using, 3-12
using with Windows NT, 3-13
Brightness keys, 4-9
C
Cables, 1-5
Cleaning your MobilePro, 2-20
CompactFlash cards
inserting, 4-21
removing, 4-22
Configuring a remote access
server, 5-5
Connecting
AC adapter, 1-7
activate a connection, 5-8
internet service provider (ISP), 5-4
modem, 5-3
PC Connect cable, 1-13
preparation, 5-2
remote access server (RAS), 5-5
via infrared port, 1-17
via serial port, 1-11
Control keys, 4-9
Creating a partnership, 1-22
via serial port, 1-16
Cursor control keys, 4-9
D
Data transmission, 4-23
Display panel, 2-2, 2-9
adjustments, 4-4
backlight, 4-5
latch, 2-3
suspend switch, 4-6
E
Earphone microphone, 2-4
F
Features
AC power port, 2-6
battery release latch, 2-9
display panel, 2-2
display panel latch, 2-3
earphone microphone, 2-4
infrared port, 2-5
keyboard, 2-4
main battery, 2-5
microphone, 2-4
modem port, 2-7
PC card slot, 2-7
Power button, 2-4
ROM bay cover, 2-8
scroll dial, 2-3
serial port, 2-6
soft reset button, 2-8
speaker, 2-8
status LEDs, 2-4
stylus, 2-3
suspend switch, 2-5
VGA port, 2-6
Finding the stylus, 2-10
Full reset button, 4-26
using, 4-28
G
Getting help, 1-25
Getting started, 1-10
I
Infrared port, 2-5
enabling, 1-19
host PC, 1-19
NEC MobilePro, 1-18
Inserting
CompactFlash cards, 4-21
PC cards, 4-18
Installing
Microsoft ActiveSync, 1-14, 1-20
K
Keyboard, 2-4
application shortcut keys, 4-8
brightness keys, 4-9
control keys, 4-9
cursor control keys, 4-9
using, 4-8
Windows key, 4-9
M
Main battery
battery pack, 2-5
Microphone, 2-4
Microsoft ActiveSync, 3-10 using, 3-11
MobilePro care, 2-18
MobilePro settings adjusting, 4-11
Modem
connecting, 5-3
port, 2-7
Monitor
connecting to, 4-13
0
Online help, 3-14
Opening the display panel, 2-9
P
PC card slot, 2-7
PC cards
inserting, 4-18
removing, 4-20
PC Connection settings
infrared connection, 1-18
serial connection, 1-11
Pocket applications, 3-6
Power button, 2-4
Precautions, 2-18
Printing, 3-8
Problem Solving, A-1
R
Removing
CompactFlash cards, 4-22
PC cards, 4-20
stylus, 2-10
Replacing batteries, 2-13
Reset button, 2-8
full reset, 4-26
soft reset, 4-26
Resetting MobilePro, 4-26
Restoring data, 3-11
Resynchronizing your MobilePro, 1-24
ROM module
bay cover, 2-8
upgrading, 4-24
S
Screen resolution, 4-15
Scroll dial, 2-3
Sending and receiving email, 5-6
Serial port, 2-6
host PC, 1-12
Setting up a remote connection, 1-24
Shortcut keys, 4-9
Soft reset button, 4-26
using, 4-27
Software
applications, 3-12
introducing, 1-10
Speaker, 2-8
Specifications
accessories (shipped with system), B-4
CompactFlash card slot, B-2
CPU, B-1
dimensions, B-4
display panel, B-1
I/O ports, B-2
IrDA port, B-2
keyboard, B-1
modem, B-2
operating environment, B-4
PC card slot, B-2
RAM, B-1
ROM, B-1
serial interface, B-2
speaker, B-1
storage environment, B-4
weight, B-4
Status LEDs, 2-4
Storage requirements, 2-19
Stylus, 2-3, 2-10
Suspend switch, 2-5
Synchronizing your MobilePro
after rebooting the host PC, 1-24
after resetting, 1-24
System features
back, 2-5
bottom, 2-8
front, 2-2
keyboard panel and base unit, 2-3
left, 2-6
right, 2-7
T
Taking care of the MobilePro, 2-18
Transmitting data, 4-23
Troubleshooting, A-1
U
Unpacking your MobilePro, 1-3
Upgrading ROM module, 4-24
Using
IR port, 4-23
MobilePro power sources, 2-10
scroll dial, 4-16
Windows CE, 3-2
V
Verifying synchronization settings, 1-16, 1-22
VGA port, 2-6, 4-13
Voice memos, 4-17
Voice recording, 4-17
W
Windows CE
applications, 3-6
backing up data, 3-11
desktop, 3-3
networking capabilities, 3-9
operating system, 3-2
overview, 3-2
printing, 3-8
restoring data, 3-11
Windows key, 4-9
PROPRIETARY NOTICE AND LIABILITY DISCLAIMER
The information disclosed in this document, including all designs and related materials, is the valuable property of NEC Computers Inc. (hereinafter "NECC") and/or its licensors. NECC and/or its licensors, as appropriate, reserve all patent, copyright and other proprietary rights to this document, including all design, manufacturing, reproduction, use, and sales rights thereto, except to the extent said rights are expressly granted to others.
The NECC product(s) discussed in this document are warranted in accordance with the terms of the Warranty Statement accompanying each product. However, actual performance of each such product is dependent upon factors such as system configuration, customer data, and operator control. Since implementation by customers of each product may vary, the suitability of specific product configurations and applications must be determined by the customer and is not warranted by NECC.
To allow for design and specification improvements, the information in this document is subject to change at any time, without notice. Reproduction of this document or portions thereof without prior written approval of NECC is prohibited.
NEC and MobilePro are registered trademarks or trademarks of NEC Corporation and/or one or more of its subsidiaries. All are used under license by NEC Corporation and/or one or more of its subsidiaries.
Microsoft, MS, MSN, PowerPoint, ActiveX, ActiveSync, Outlook, InkWriter, Windows, Windows NT, Visual Basic, Visual C++, and the Windows logo are either registered trademarks or trademarks of Microsoft Corporation in the United States and/or other countries. Microsoft products are licensed to OEMs by Microsoft Licensing, Inc., a wholly owned subsidiary of Microsoft Corporation.
All other product, brand, or trade names used in this publication are the property of their respective owners.
First Printing — January 2000
Copyright 2000
NEC Computers Inc.
8350 Fruitridge Road
Sacramento, CA 95826
All Rights Reserved
Using this Guide
The NEC MobilePro™ 780 User's Guide gives you the information you need to maximize the use of your NEC MobilePro 780 Handheld Personal Computer (H/PC). Read this guide to familiarize yourself with the MobilePro and its features. For specific information, see the following:
■ Chapter 1, Getting Started, provides all the information you need to get your MobilePro 780 working and synchronized with your desktop or notebook computer.
■ Chapter 2, Introducing the NEC MobilePro, introduces you to your MobilePro features, battery recharging, and general unit care.
■ Chapter 3, Introducing Windows CE, provides an overview of Microsoft® Windows® CE and Windows CE applications.
■ Chapter 4, Using the NEC MobilePro, shows you how to power on and off, make display panel adjustments, install PC and CompactFlash cards, and more.
■ Chapter 5, Setting Up a Remote Connection, describes how to configure service connections for an internet service provider, a remote access service, and how to configure email for each new service connection.
■ Appendix A, Troubleshooting, walks you through some common problems and possible solutions.
■ Appendix B, Specifications, details the hardware specifications for your MobilePro.
TEXT CONVENTIONS
To make this guide as easy to use as possible, text is set up as follows.
■ Warnings, cautions, and notes have the following format:

WARNING
Warnings alert you to situations that could result in serious personal injury or loss of life.

CAUTION
Cautions indicate situations that can damage the system hardware or software.

Note: Notes give particularly important informa-about whatever is being described.
■ Names of keys are printed as they appear on the keyboard, for example, Ctrl, Alt, or Enter.
■ Text that you must type or keys that you must press are presented in bold type. For example, type dir and press Enter.
Contents
Using This Guide...... vii
1 Getting Started
Welcome 1-2
Unpacking Your MobilePro.... 1-3
Getting to Know Your MobilePro 1-4
Accessories 1-5
Installing and Charging the Battery.... 1-5
Connecting the AC Adapter.... 1-7
Taking a Quick Tour.... 1-10
Introducing the Software.... 1-10
Connecting to Your PC via Serial.... 1-11
Verifying PC Connection Settings 1-11
Ensuring the Availability of the Serial Port 1-12
Connecting the PC Connect Cable 1-13
Installing Microsoft ActiveSync.... 1-14
Network Requirements.... 1-14
Installing ActiveSync 1-15
Creating a Partnership 1-16
Verifying Synchronization Settings.... 1-16
Connecting to Your PC via Infrared.... 1-17
Modifying PC Connection Settings.... 1-18
Setting the Infrared Connection Speed.... 1-18
Enabling the Infrared Port 1-19
Installing Microsoft ActiveSync.... 1-20
Network Requirements.... 1-20
Installing ActiveSync 1-21
Creating a Partnership 1-22
Verifying Synchronization Settings.... 1-22
Synchronizing with Your Host PC 1-23
Synchronizing via the Serial Port.... 1-23
Synchronizing via the Infrared Port.... 1-24
Resynchronizing Your MobilePro.... 1-24
Contents iii
Using Other Communication Devices ....1-24
Connecting Remotely....1-24
Getting Help....1-25
2 Introducing the NEC MobilePro
Identifying System Features....2-2
Around the Front of the System....2-2
Display Panel....2-2
Keyboard Panel and Base Unit....2-3
Around the Back of the System 2-5
Around the Left Side of the System....2-6
Around the Right Side of the System....2-7
Around the Bottom of the System....2-8
Opening the Display Panel....2-9
Using the Stylus 2-10
Using MobilePro's Power Sources 2-10
Determining Battery Status....2-10
Recharging the Main Battery Pack 2-11
Recharging the Backup Battery 2-12
MobilePro Power Management 2-13
Battery Replacement....2-13
Removing and Inserting the Battery Pack 2-14
Battery Precautions....2-17
Caring for the MobilePro 2-18
Precautions....2-18
Storage Requirements....2-19
Routine Cleaning 2-20
3 Introducing Windows CE
Windows CE Operating System....3-2
Using Windows CE....3-2
Tapping....3-2
Selecting Objects 3-3
Dragging and Dropping 3-3
Windows CE Desktop....3-3
Pocket Applications....3-6
Printing Features....3-8
Network Capabilities 3-9
Creating a Network (Ethernet) Connection.... 3-9
Microsoft ActiveSync.... 3-10
Backing Up and Restoring Data.... 3-11
Using Microsoft ActiveSync.... 3-11
Using bSQUARE® bUseful™ Backup Plus.... 3-11
Software Applications.... 3-12
Using the Bonus Software CD.... 3-12
Online Help.... 3-14
4 Using the NEC MobilePro
Powering On and Off 4-2
Making Display Panel Adjustments.... 4-4
Backlight....4-5
Automatic Off.... 4-5
Automatic On 4-5
Enabling the Suspend Switch.... 4-6
Using the Keyboard 4-8
Using Application Shortcut Keys.... 4-9
Default Function Keys.... 4-11
Adjusting MobilePro Settings.... 4-11
Connecting the VGA Cable.... 4-13
Screen Resolution.... 4-15
Using the Scroll Dial 4-16
Using the Voice Recorder.... 4-17
Menu 4-18
Using PC Cards....4-18
Inserting PC Cards.... 4-19
Removing PC Cards 4-20
Using CompactFlash Cards.... 4-20
Inserting CompactFlash Cards.... 4-21
Removing CompactFlash Cards 4-22
Using the IR Port 4-23
Upgrading ROM 4-24
Resetting the Mobile Pro 4-26
Using the Soft Reset Button 4-27
Using the Full Reset Button 4-28
5 Setting Up a Remote Connection
Contents v
Preparing for Connection Setup....5-2
Connecting the Internal Modem....5-3
Connecting to an Internet Service Provider 5-4
Connecting to a Remote Access Server 5-5
Sending and Receiving Email 5-6
Activating a Connection....5-8
A Troubleshooting A-1
B Specifications B-1
Index
- WELCOME
- UNPACKING YOUR MOBILEPRO
- GETTING TO KNOW YOUR MOBILEPRO
- Accessories
- INSTALLING AND CHARGING THE BATTERY
- CONNECTING THE AC ADAPTER
- CAUTION
- TAKING A QUICK TOUR
- INTRODUCING THE SOFTWARE
- CONNECTING TO YOUR PC VIA SERIAL
- Verifying PC Connection Settings
- Ensuring the Availability of the Serial Port
- Connecting the PC Connect Cable
- Installing Microsoft ActiveSync
- Network Requirements
- Installing ActiveSync
- Creating a Partnership
- Verifying Synchronization Settings
- CONNECTING TO YOUR PC VIA INFRARED
- Modifying PC Connection Settings
- Setting the Infrared Connection Speed
- Enabling the Infrared Port
- SYNCHRONIZING WITH YOUR HOST PC
- Synchronizing via the Serial Port
- Synchronizing via the Infrared Port
- Resynchronizing Your MobilePro
- Using Other Communication Devices
- Connecting Remotely
- GETTING HELP
- 2
- Introducing the NEC MobilePro
- IDENTIFYING SYSTEM FEATURES
- Around the Front of the System
- Display Panel
- Keyboard Panel and Base Unit
- Around the Back of the System
- Around the Left Side of the System
- Around the Right Side of the System
- Around the Bottom of the System
- OPENING THE DISPLAY PANEL
- USING THE STYLUS
- USING MOBILEPRO'S POWER SOURCES
- Determining Battery Status
- Recharging the Main Battery Pack
- Main Batteries Very Low
- Recharging the Backup Battery
- MobilePro Power Management
- Battery Replacement
- Removing and Inserting the Battery Pack
- Battery Precautions
- WARNING
- WARNING (cont'd)
- CARING FOR THE MOBILEPRO
- Precautions
- Storage Requirements
- Routine Cleaning
- 3
- Introducing Windows CE
- 4
- Using the NEC MobilePro
- 5
- Setting Up a Remote Connection
- A
- Troubleshooting
- B
- Specifications
- Display
- CPU
- User Data Entry Methods
- Random Access Memory (RAM)
- Read-Only Memory (ROM)
- Speaker
- AVERTISSEMENT
- Infrared (IrDA) Communication
- Serial Interface
- I/O Ports
- Modem
- PC Card Slot
- Compact Flash Card Slot
- Power
- Recharge Time
- Accessories (ship with the system)
- Dimensions
- Operating Environment
- Storage Environment
- Available Options
- For further assistance, call NECC Support Services at 1-800-632-4525
- PREPARING FOR CONNECTION SETUP
- CONNECTING THE INTERNAL MODEM
- CONNECTING TO AN INTERNET SERVICE PROVIDER
- CONNECTING TO A REMOTE ACCESS SERVER
- SENDING AND RECEIVING EMAIL
- ACTIVATING A CONNECTION
- POWERING ON AND OFF
- MAKING DISPLAY PANEL ADJUSTMENTS
- Backlight
- Automatic Off
- Backlight settings
- Automatic On
- Enabling the Suspend Switch
- USING THE KEYBOARD
- Using Application Shortcut Keys
- Default Function Keys
- ADJUSTING MOBILEPRO SETTINGS
- Connecting the VGA Cable
- Screen Resolution
- Using the Scroll Dial
- Menu
- USING PC CARDS
- Inserting PC Cards
- Removing PC Cards
- USING COMPACTFLASH CARDS
- Inserting CompactFlash Cards
- Removing CompactFlash Cards
- USING THE IR PORT
- UPGRADING ROM
- RESETTING THE MOBILE PRO
- Using the Soft Reset Button
- Using the Full Reset Button
- Using Windows CE
- Tapping
- Selecting Objects
- Dragging and Dropping
- Windows CE Desktop
- Pocket Applications
- Printing Features
- Network Capabilities
- Creating a Network (Ethernet) Connection
- MICROSOFT ACTIVESYNC
- Backing Up and Restoring Data
- Using Microsoft ActiveSync
- Using bSQUARE ® bUseful TM Backup Plus
- SOFTWARE APPLICATIONS
- Using the Bonus Software CD
- ONLINE HELP
- NEC Computers Inc.
- DECLARATION OF CONFORMITY
- NEC MobilePro 780
- (For United States Use Only)
- Federal Communications Commission Radio Frequency Interference Statement
- FCC PART 68
- Index
- C
- D
- E
- F
- G
- I
- Inserting
- Installing
- K
- M
- 0
- P
- R
- S
- T
- U
- V
- W
- PROPRIETARY NOTICE AND LIABILITY DISCLAIMER
- Using this Guide
- TEXT CONVENTIONS
- Contents
- Getting Started
- Introducing the NEC MobilePro
- Introducing Windows CE
- Using the NEC MobilePro
- Setting Up a Remote Connection
Brand : NEC
Model : MobilePro 780
Category : Digital Personal Assistant