
Design Advanced Professional 41007 - Blender Gastroback - Free user manual and instructions
Find the device manual for free Design Advanced Professional 41007 Gastroback in PDF.


| Product Type | High-Performance Blender |
| Brand | Gastroback |
| Model | Design Advanced Professional 41007 |
| Power Consumption | 1500 W |
| Capacity | 2.0 L |
| Dimensions (H x W x D) | 40 x 20 x 20 cm |
| Weight | 5.5 kg |
| Jug Material | BPA-Free Tritan Plastic |
| Blade Material | Stainless Steel |
| Speed Settings | Variable 10 Steps + Pulse |
| Functions | Smoothie, Ice Crush, Puree, Soup, Grind |
| Safety Features | Overload Protection, Lid Lock, Non-Slip Base |
| Dishwasher Safe Parts | Jug, Lid, Measuring Cup |
| Cord Length | 1.2 m |
| Warranty | 2 Years |
| Repairability Index | 8.5/10 |
| Spare Parts Availability | Jug, Blade Assembly, Lid, Seal Ring |
| Certifications | CE, RoHS |
| Color | Stainless Steel / Black |
| Included Accessories | User Manual, Recipe Book, Tamper |
Frequently Asked Questions - Design Advanced Professional 41007 Gastroback
User questions about Design Advanced Professional 41007 Gastroback
0 question about this device. Answer the ones you know or ask your own.
Ask a new question about this device
Download the instructions for your Blender in PDF format for free! Find your manual Design Advanced Professional 41007 - Gastroback and take your electronic device back in hand. On this page are published all the documents necessary for the use of your device. Design Advanced Professional 41007 by Gastroback.
USER MANUAL Design Advanced Professional 41007 Gastroback
natural_image
Exterior view of a modern stainless steel blender with clear glass body and red liquid inside (no visible text or symbols)natural_image
Hand holding a fresh green leaf next to a glass container filled with green juice, no text or symbols visible.IHREN »DESIGN MIXER ADVANCED PROFESSIONAL« KENNEN LERNEN
AMessbecher—
natural_image
Glass of layered dessert with colorful toppings (no text or symbols visible)
natural_image
Glass of green beverage with a side dish featuring orange and white fruit (no text or symbols visible)
natural_image
Glass of orange-colored beverage with a slice of mango visible inside (no text or symbols)
natural_image
Glass of red beverage with a slice of watermelon garnish (no text or symbols)BEDIENUNGSELEMENTE
L ON | OFF-Taste —
natural_image
Two identical mechanical components with labeled X and Y axes (no text or symbols on the parts themselves)T Pause-Taste ( ) -
natural_image
Close-up of a smooth, transparent blender with liquid and red caliper (no text or symbols visible)Eastman Tritan™ Copolyester
Operating Instructions
DESIGN MIXER ADVANCED PROFESSIONAL
natural_image
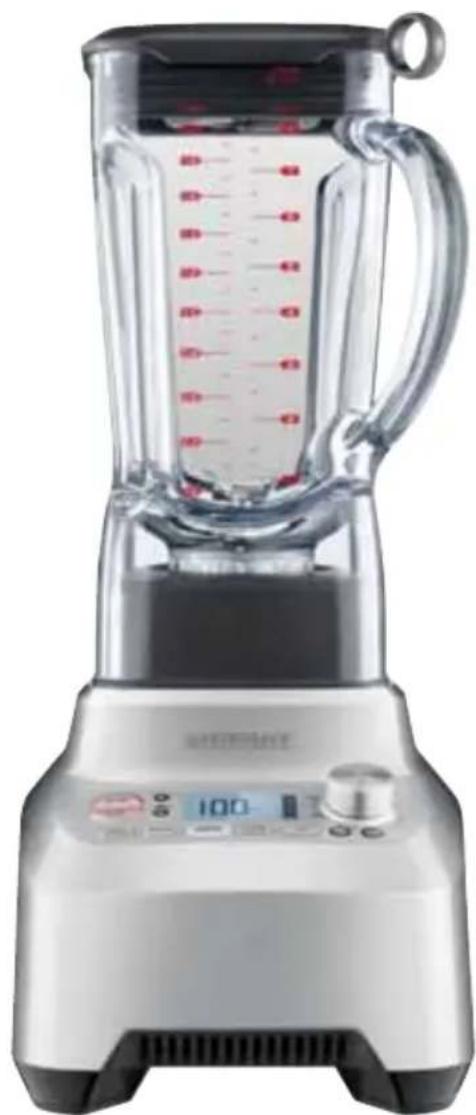
Exterior view of a modern stainless steel blender with clear glass body and red liquid inside (no visible text or symbols)Art.-No. 41007 »Design Mixer Advanced Professional«
Read all provided instructions before first use! Model and attachments are subject to change! For household use only!
TABLE OF CONTENTS
Knowing your »Design Mixer Advanced Professional« 36
Important safeguards....39
General Safety Instruction....39
Important Safeguards for all Electrical Appliances....42
High Temperatures – Risk of Burns....43
Moving Parts – Risk of Injuries ...... 44
Technical Specifications....45
Properties of your new »Design Mixer Advanced Professional« ....45
Programs of the »Design Mixer Advanced Professional« ....46
Tips for Best Results 48
Before first Use 49
Preparing the Appliance for Operation....50
Operation 51
Blending Chart....52
Operating The »Design Mixer Advanced Professional« ....53
Solving Problems ....56
Care and Cleaning 57
Cleaning the Appliance ....57
Storage....59
Notes for Disposal 60
Information and Service....60
Warranty 61
DEAR CUSTOMER!
Congratulations! A series of new possibilities comes with your new Gastroback »Design Mixer Advanced Professional«.
Due to its special ProKinetix™ design, the »Design Mixer Advanced Professional« is placed in the top class of mixers. The jug, knives and the extraordinary high revolution speed produces an especially creamy consistency of your food. And what's more, the powerful motor copes easily with hard pieces like nuts, almonds and even ice.
The »Design Mixer Advanced Professional« is intended for cutting and grating of fruits and vegetables, for mincing meat and chopping herbs, for beating cream and egg white, and for grinding, mixing, and emulsifying, thus preparing the ingredients for your dishes, salads, desserts, and drinks.
These instructions for use will inform you about the various functions and features, which make it easy to take pleasure in your new »Design Mixer Advanced Professional«.
We hope that you will enjoy your new »Design Mixer Advanced Professional«.
Your Gastroback GmbH

KNOWING YOUR
DESING MIXER ADVANCED PROFESSIONAL
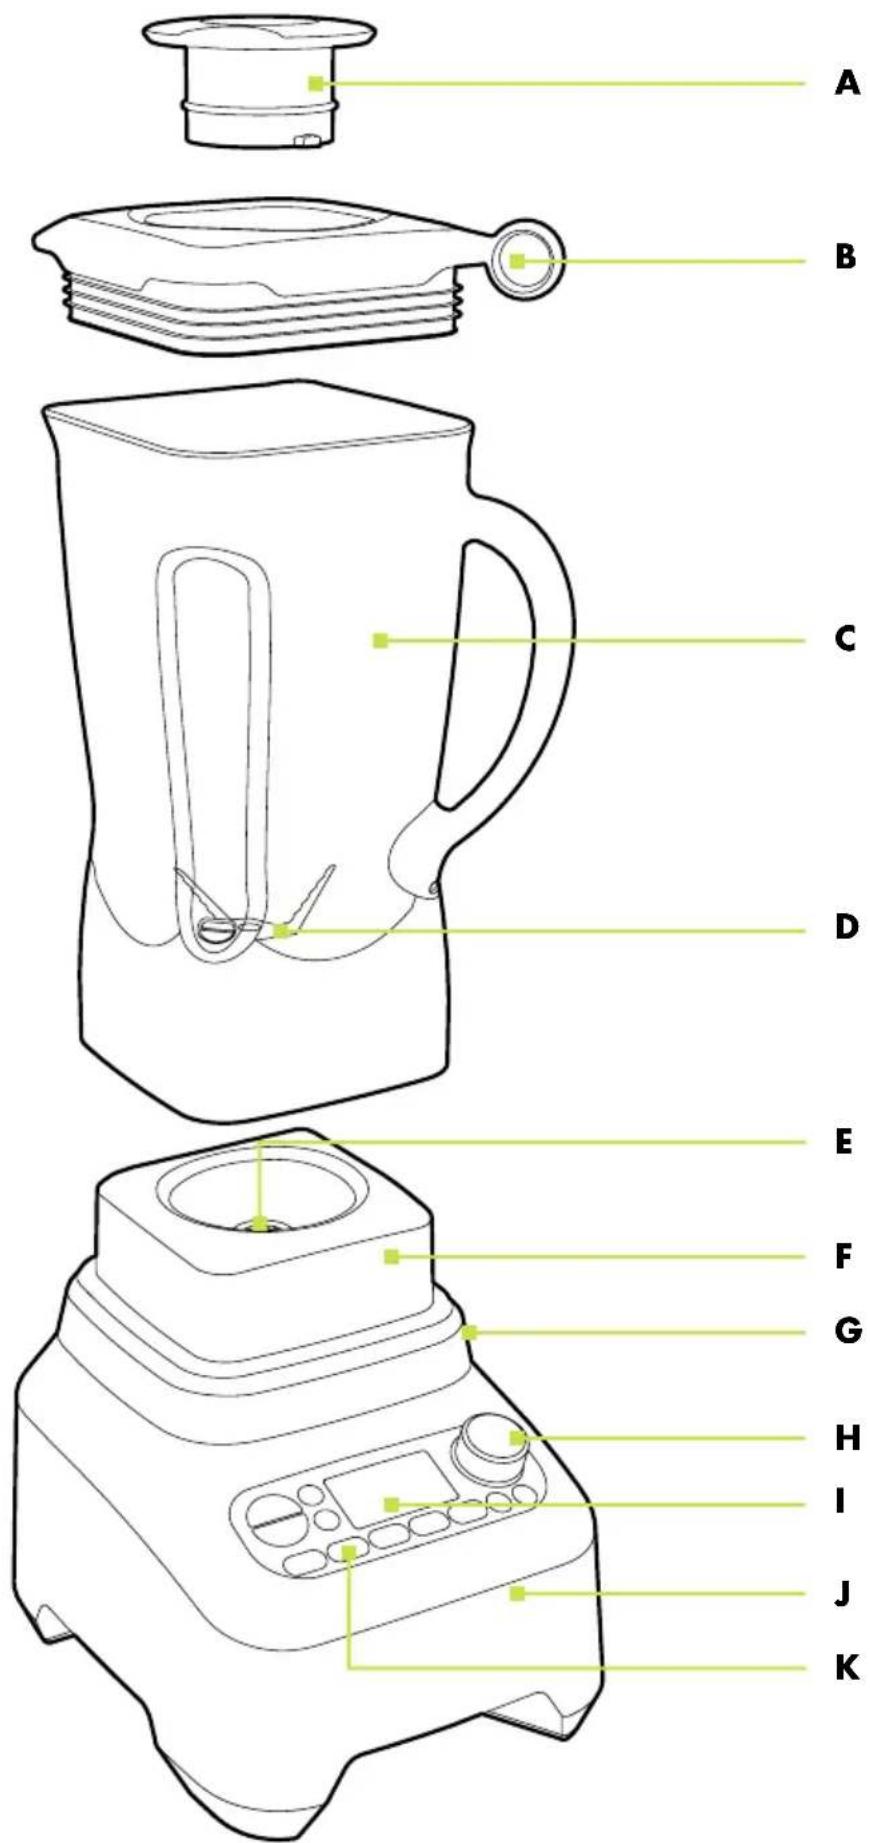
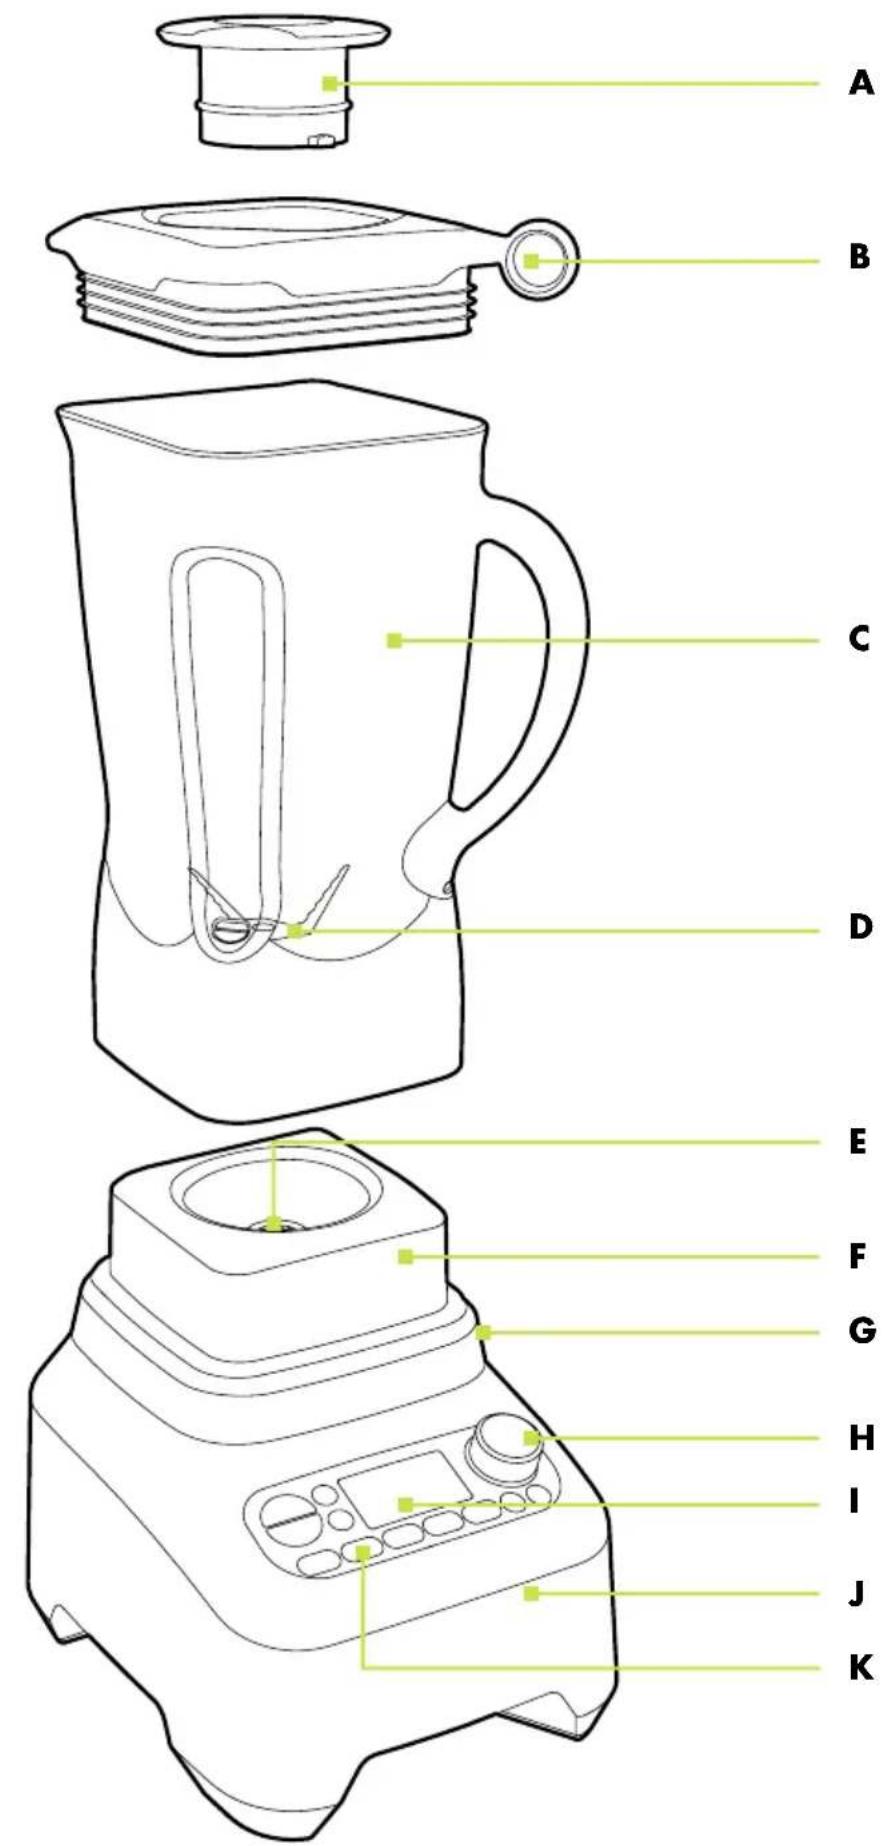
A Inner measuring cup —
remove for adding ingredients while blending, for measuring small amounts.
B High performance lid -
with steam vents and removable measuring cup keeps tight and leak free even during high velocity tasks, prevents splatter and overflow.
C, D ProKinetix™ extra-ordinary, heavy duty blade and jug system – bietet herausragende Vorteile
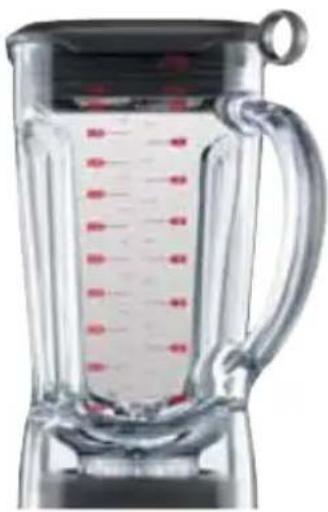
— C: 2.0 Litre BPA-free Tritan™ jug — impact resistant, shatter proof and dishwasher-safe.
— D: Cutting blades—combining 3 powerful stainless steel knives contoured to the base of the jug for maximum cutting power and best processing results, enable liquid-free processing, create the special ProKinetix™ motion, thus eliminating food traps.
E Heavy duty metal coupling —
for durable and long lasting performance under demanding conditions.
F Heavy duty 2200 W motor -
provides high velocity power, and high torque for processing even heavy loads, enables 12 speed settings from super slow stir up to high speed milling.
G Overload protection —
thermal fuse for motor protection. Automatically resets after cooling down.
natural_image
Glass of layered dessert with colorful toppings (no text or symbols visible)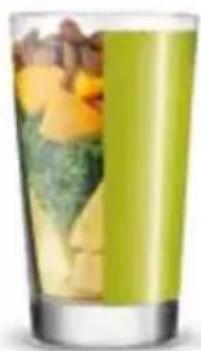
natural_image
Glass of green beverage with visible toppings (no text or symbols)H Speed dial –
controlling the provided wide speed range in 12 steps for precise processing: mixing delicate foods with a slow stirring motion up to grinding hard foods (nuts, grains, etc.) using highest milling speed.
I LCD screen -
provides information on the current settings: counts up for speed dial settings, counts down for predefined programs and timer settings, shows the speed setting in a bar at the right side.
J Robust Power Base –
durable die-cast metal, non-slip rubber legs provide a firm stand.
K 5 buttons for pre-set programs -
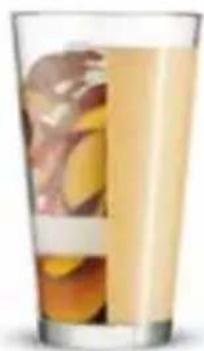
optimised settings for several tasks: crushing ice, mixing smoothies, or green smoothies, preparing frozen desserts, and blending, or pureeing and even heating soups.
Power cord (not shown) —
carefully pull it completely out for operation, conveniently designed plug: the thickened ledge eases removal from the wall outlet, for storage, you may push the power cord back into the power base.
Safety interlock (not shown) -
switches the appliance completely off, when the jug is not properly in place.
natural_image
Glass of light-colored beverage with a slice of orange fruit in the background (no text or symbols visible)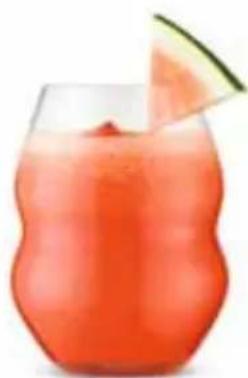
natural_image
Glass of red beverage with a slice of watermelon garnish (no text or symbols)OPERATING ELEMENTS
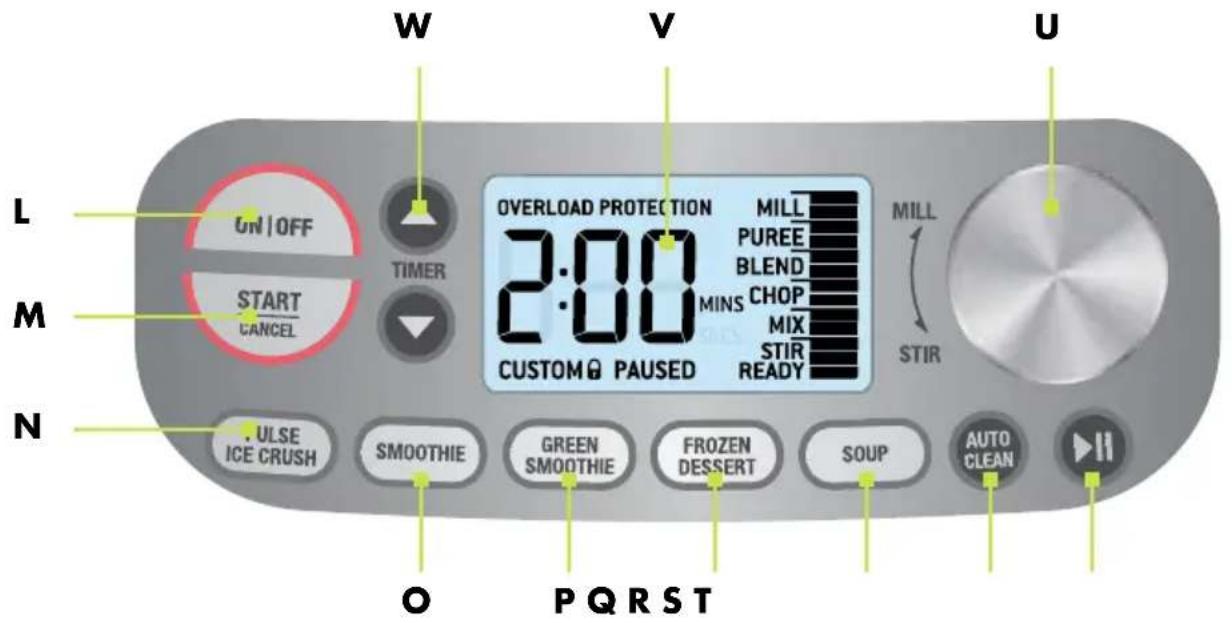
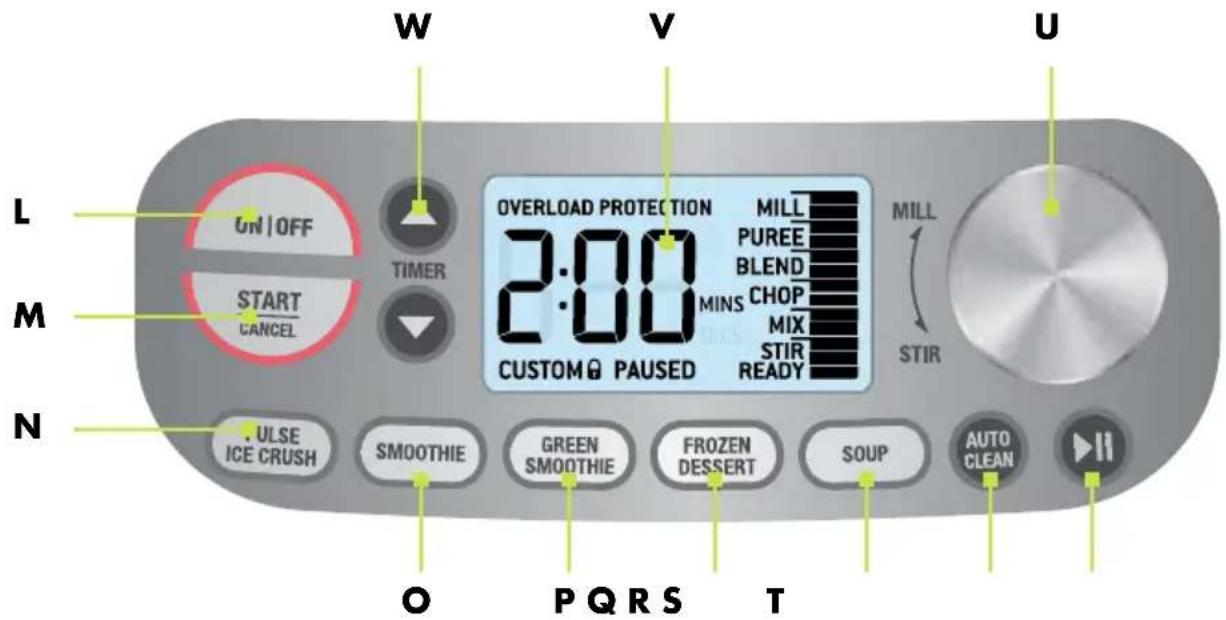
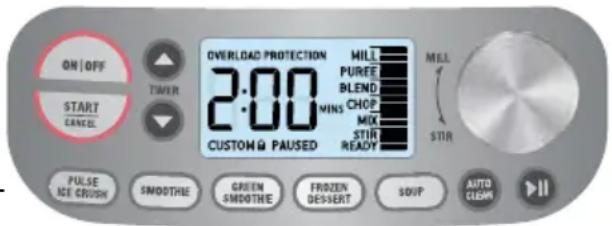
L ON | OFF button -
switches the appliance ON or OFF, flashes with the appliance switched ON.
M START | CANCEL button -
starts the motor using the recent setting, or cancels the current operation.
N Pulse | Ice Crush – programme
O Smoothie – programme
P Green Smoothie – programme
Q Frozen Dessert – programme
R Soup – programme
S AUTO CLEAN button ( AUTO CLEAN ) -
enables easy cleaning of the cutting blades and the bottom of the jug
natural_image
Two identical mechanical components with labeled X and Y axes (no text or symbols on the parts themselves)T Pause button ( ▶) -
pauses and holds the speed and timer settings for up to 2 minutes. Press this button again to reassume operation.
U Speed dial –
controlling the provided wide speed range in 12 steps for precise processing: mixing delicate foods with a slow stirring motion up to grinding hard foods (nuts, grains, etc.) using highest milling speed.
V LCD screen -
provides information on the current settings: counts up for speed dial settings, counts down for predefined programs and timer settings, shows the speed setting in a bar at the right side.
W Timer buttons -
sets the selected processing time higher ( ▲) or lower ( ▼).
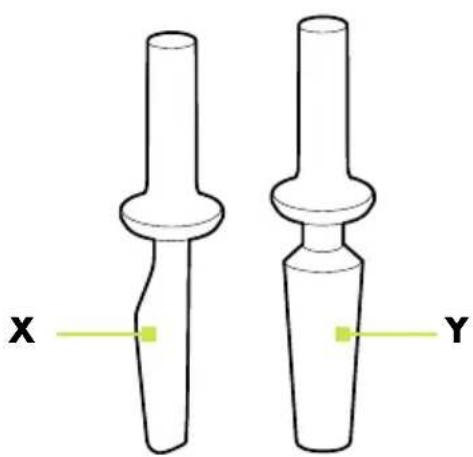
X Scraper -
to push food down from the walls of the jug, and for easily removing ingredients after operation.
Y Frozen dessert pusher —
for pushing thick foods directly back onto the cutting blades.
natural_image
Close-up of a smooth, transparent blender with liquid and red caliper (no text or symbols visible)Eastman Tritan™ Copolyester
The jug of this appliance is made with Eastman Tritan™ copolyester, which is a tough, BPA-free* polymer used to make housewares products that can withstand extreme use and repeated dishwasher cleaning. Products made from Tritan™ are impact resistant and shatter resistant and stay clear and durable even after hundreds of cycles in the dishwasher.
(* BPA / Bisphenol-A is a harmful chemical, given off in very little amounts by some plastic materials, usually used for food.)
IMPORTANT SAFEGUARDS
Carefully read all instructions before operating this appliance and save for further reference. Do not attempt to use this appliance for any other than the intended use, described in these instructions. Any other use, especially misuse, can cause severe injuries or damage by electric shock, moving parts, heat, or fire.
These instructions are an essential part of the appliance. Do not pass the appliance without this booklet to third parties.
Any operation, repair and technical maintenance of the appliance or any part of it other than described in these instructions may only be performed at an authorised service centre. Please contact your vendor.
GENERAL SAFETY INSTRUCTIONS
- The appliance is intended for household use only and NOT suited for commercial usage. Do not attempt to use this appliance in any other way or for any other purpose than the intended use, described in these instructions. Any other use is regarded as unintended use or misuse, and can cause severe injuries or damage. There is no warranty claim of the purchaser if any injuries or damages are caused by unintended use.
- Check the entire appliance regularly for proper operation—especially the power cord (e.g. check for distortion, discolouration, cracks, leaks, corroded pins of the power plug). Do not operate the appliance, when the appliance or any part of it is likely to be damaged, to avoid risk of fire, electric shock, or any other injuries to persons and/or damage. The appliance or its parts are likely to be damaged, if the appliance has been subject to inadmissible strain (e.g. overheating, mechanical or electric shock), or if there are any damages (e.g. lid or seal of the lid is broken, cracks in the jug), excessively frayed or melted parts, or distortions, or if the appli-
ance is not working properly. If one of these cases occurs during operation, immediately unplug the appliance. Get in contact with an authorized service centre for examination and/or repair.
- Operate the appliance on a well accessible, stable, level, dry, and suitable large table or counter that is resistant against water, fat, and heat. Do not place any delicate objects near the appliance during operation, to avoid damage.
• Always keep the appliance and the table or counter clean and dry, and wipe off spilled liquids immediately. The exterior of the jug bottom, and especially the drive shaft jutting out must always be clean and dry when mounting the jug on the power base, to avoid damage to the drive shaft coupling, and avoid risk of overheating, fire and electric shock. Always remove the jug from the power base, before taking food out of the jug. Do not place any clothes or tissue or other foreign objects under or on the appliance during operation, to avoid risk of fire, electric shock and overheating. Do not place the appliance or any hot parts (cooking utensils, jug) over a power cord or on any surfaces sensitive to heat, fat, or moisture, or near the edge of the table or counter, or on wet or inclined surfaces. - The appliance could move considerably during operation. During keep the appliance in an appropriate distance of at least 30 cm on each side to the edge of the working space and furniture, walls, boards, curtains, other appliances, and any delicate objects to avoid damage due to heat and splashes. Leave at least 50 cm of free space above and 50 cm in front of the appliance. Do not operate the appliance under over hanging boards or drop lights or near inflammable objects (e.g. curtains).
- Exclusively use the appliance for domestic use and for processing food that is fit for consumption. Immediately switch off (ON | OFF button) and unplug the appliance, if there is any kind of malfunction or problem (e.g. the motor gets stuck, liquid running out, the LCD screen shows »OVERLOAD PROTECTION«). Do not needlessly operate the appliance continuously. With the jug loaded with large amounts and/or very hard ingredients, do not operate for more than 3 minutes continuously. After this period of operation make a break of some minutes. Always switch off (pressing the ON | OFF button, then unplug) when not in use.
- This appliance is not intended for use by persons (including children) with reduced physical, sensory or mental capabilities, or lack of experience and knowledge, unless they have been given supervision or instruction by a person responsible for their safety, so they are able to understand the use and possible hazards during operation of the appliance. Even cleaning and user maintenance shall not be made by children without supervision. Children must always be supervised to ensure that they do not play with the appliance or any parts of the appliance or the packaging. Always keep the appliance where it is dry, frost-free, and clean, and where young children cannot reach it. Do not leave the appliance or any part of it unattended, when in reach of young children.
- Do not place the appliance or any part of it in a range, or on or near hot surfaces (e.g. burner, heater or oven). Do not use the appliance or any parts or accessories of the appliance with any other device or for any other purpose. Before operation, always ensure that the appliance is assembled and connected completely and correctly according to the instructions in this booklet.
- Do not switch on the appliance without any food or liquid in the jug. Do not handle the appliance or any part of it with violence. The ventilation slits in the power base must be always unobstructed.
- Do not hold your hands or any foreign objects (e.g. clothes, cooking utensils) in the jug, with the appliance connected to the power supply. Flashing light on the control panel indicates ready to operate and means for you: Strictly avoid any contact with the cutting blades or other moving parts (drive shaft coupling). Do not operate the appliance without the jug mounted correctly on the power base. Always switch the motor off before removing the jug from the power base, reaching inside the jug or removing the lid. Only use the provided pusher for feeding food back onto the cutting blades. Do not use any hard, sharp or edged objects (e.g. knives, forks, metal scraper) with the appliance.
- Close the lid securely with the measuring cup properly in place before operation to avoid that the foods will escape, spray or overflow. Do not open the lid during operation. When processing hot food, during operation and shortly thereafter, hot steam could escape from under the lid even with the lid securely closed. Do not hold any parts of your body or any delicate objects over the appliance during operation.
- Do not overfill the jug. Do not fill in more than 2 L (maxim Otherwise, foods and liquids could run and splash out from under the lid and cause hazards due to overheating, fire and electric shock. Always wipe off spilled liquids immediately. If liquids run out or are spilled on the power base, immediately unplug the appliance. However, for operation always at least fill the jug to the lowest filling level mark (0.2 L) to avoid overheating.
- When processing hot food: Use caution when taking hot food fro to avoid scalds. During operation and shortly thereafter, hot steam could escape from the lid. Additionally, jug and lid could get hot. Only touch these parts by the handles.
- During operation do not move or tilt the appliance or remove the lid. Otherwise, food and liquids could splash or overflow, leading to hazard of overheating and electric shock or damage to the appliance.
- Do not leave the appliance unattended, when it is connected to the power supply. Always switch off (press ON | OFF button) then unplug the appliance, and wait until the motor comes to a standstill, and leave the appliance cool down, before moving, or cleaning the appliance, or assembling or disassembling any parts, or when the appliance is not in use. Always hold the power base at both sides near
the bottom for moving the appliance. Do not hold the appliance at the lid, jug or power cord for moving the appliance. Do not place any hard and/or heavy objects on or in the appliance or any part of it.
- Do not use any abrasive cleaners, cleaning pads (e.g. metal scouring pads), or any corrosive chemicals (e.g. bleach) for cleaning.
- Do not place the power base or the power cord in an automatic dishwasher.
- Do not leave any food dry on the appliance. Always clean the appliance after each use to prevent an accumulation of baked-on foods (see: >Care and Cleaning<). Always keep the appliance and its parts, where it is clean.
Please note: Milling hard ingredients like spices, nuts, sugar, coffee, grains, and others will cause scratching and clouding to the inner surfaces of the jug. This is a cosmetic result from milling these kinds of ingredients, and does not affect the performance of the appliance.
IMPORTANT SAFEGUARDS FOR ALL ELECTRICAL APPLIANCES
The appliance is driven electrically. Place the appliance near a suitable wall power socket to connect the appliance directly to a protected mains power supply with protective conductor (earth/ground) connected properly. Ensure that the voltage rating of your mains power supply corresponds to the voltage requirements of the appliance (230 V, 50 Hz, AC, rated for at least 16 A). The power outlet socket must be installed separately from other power outlet sockets to avoid interference with other appliances.
The installation of a residual current operated circuit breaker (r.c.c.b.) with a maximum rated residual operating current of 30 mA in the supplying electrical circuit is strongly recommended. If in doubt, contact your electrician for further information.
In various foreign countries, the specifications for power supplies are subject to incompatible norms. Therefore it is possible that power supplies in foreign countries do not meet the requirements for safe operation of the appliance. Thus, before operating the appliance abroad, ensure that safe operation is possible.
- Do not use any desk top multi socket outlet, external switching device, or remote control systems, or extension cord. Utilization of external switching devices (such as a timer or circuits that can regularly switch the appliance on and off), will lead to possible hazard of the appliance starting by itself due to inadvertent resetting of the overload protector of the motor.
- Always handle power cords with care. The pins of the power smooth and clean. Always completely unwind the power cord before use. Do not place the appliance on a power cord. Power cords may never be knotted, twisted, pulled, strained or squeezed. Do not let the plug or power cord hang over the edge
of the table or counter. The power cord may not touch hot surfaces or sharp edges. Ensure that no one will pull the appliance by the power cord. Take care not to entangle in the power cord. Always grasp the plug to disconnect the power cord. Do not touch the appliance or power plug with wet hands when the appliance is connected to the power supply.
- Do not allow any liquids to run into the ventilation slots at the rear of the power base, the operating elements or the drive shaft coupling within the power base. Do not pour or spill any liquids on the power base or power cord, or let any liquids run down the exterior of the jug with the jug on the power base. Do not drip or spill any liquids on the power base or power cord. Do not place the jug on the power base, when the exterior of the jug is wet or not clean to avoid risk of overheating, electric shock, or fire. Do not immerse the appliance or power cord in water or other liquids. Do not place the appliance on wet surfaces. When liquids overflowed or are spilled on the power base or power cord, immediately unplug the appliance. Thereafter, clean the appliance and let it dry for at least 1 day. See: Care and Cleaning
- Immediately switch the appliance off (press ON | OFF button) and unplug if the LCD screen shows »OVERLOAD PROTECTION«. Leave the appliance cool down for several minutes before switching it on again.
HIGH TEMPERATURES - RISK OF BURNS
Your new »Design Mixer Advanced Professional« is designed for heating up food, using the SOUP program. Additionally, you can process hot food. Doing so, adhere to the following precautions to avoid scalds and damage.
- Due to the contact with hot food, steam and condensate, the jug, lid, and measuring cup can get hot during operation and thereafter.
- Do not process boiling hot liquids to avoid boiling over. Allow temperature to drop before putting into the jug for operation. Always be careful if hot liquid is poured into the jug, as it could eject out of the jug due to sudden steaming.
- When processing hot liquids, always ensure that the measuring cap is in place. This will protect you from splashing of hot liquids and excessive amounts of steam during operation.
- Do not put the jug in extremes of heat or cold, for example placing an ice-cold jug into hot water, or vice versa. Otherwise, the jug could burst.
- Even with the lid properly closed, steam could escape from the lid during operation and shortly thereafter. This holds especially for the ventilation slits in the lid. Condensate could accumulate under the lid and measuring cup and drip, when pouring out the contents of the jug, or when opening the lid. Beware of hot steam and condensate when opening the lid shortly after operation.
- Do not process any high-proof alcoholic drinks within the appliance to avoid risk of explosion and fire. The appliance is not suited for flambéing.
MOVING PARTS - RISKS OF INJURIES
The appliance is intended for cutting, chopping and mixing food. Thus, moving/cutting parts of the appliance can cause severe injuries, when used contrary to these instructions.
• Always switch off the motor before opening the lid and/or assembling or disassembling the jug to avoid injuries due to moving parts (drive shaft coupling in the power base and cutting blades in the jug).
- Do not insert your hands, hair, clothes or any other objects (e.g. cooking utensils) into the jug with the appliance connected to the power supply and operating elements on the control panel are illuminated. Only the provided scraper and pusher may be used with the lid in place (through the opening in the lid).
- Do not leave the appliance unattended when connected to the power supply.
- The cutting blades in the jug are very sharp. Handle with care to avoid severe injuries! Thus, always be careful when emptying the jug and during cleaning.
• Always switch off (indicator in the ON | OFF button goes out) the appliance via the ON | OFF button, when the motor suddenly stops agitating due to overheating or braking of a safety interlock.
- Do not try to deactivate the safety interlocks. If the appliance will not work, even when handled correctly, then switch off the appliance (pressing ON | OFF button) and unplug. Wait for some minutes before attempting to operate the appliance again. See also: Solving Problems.
- During operation, the appliance could vigorously vibrate, thus moving around on the table or counter. Ensure to leave sufficient distance to any other objects. Do not place the appliance near the edge of the table or counter. If the appliance moves to the edge of the table/counter, immediately switch off (press ON | OFF button). Do not attempt to move the appliance, with the motor operating to avoid injuries and damage.
TECHNICAL SPECIFICATIONS
| Model: Art. No.: 41007 | »Design Mixer Advanced Professional« |
| Power supply: 230-240 V AC, | 50/60 Hz |
| Maximum power consumption: | 2,200 W |
| Length of power cord: approx. | 110 cm |
| Weight: approx. 5.44 kg | |
| Dimensions: approx. 200 x 242 x 456 mm (W x D x H) | |
| Capacity: 2.0 Litres | |
| Maximum Amount of Food: Depending on the food type: up to 2.00 kg | |
| Temperature: max. 95 °C | |
| Revolutions: 1,500 - 32,000 per minute | |
| Certification: |  |
These specifications may change without notice.
PROPERTIES OF YOUR NEW
»DESIGN MIXER ADVANCED PROFESSIONAL«
Important: Your new »Design Mixer Advanced Professional« is driven electrically, and is intended for mixing and/or grinding edible foods. The appliance is not suited for grinding other materials.
Your new »Design Mixer Advanced Professional« comes with a lot of outstanding properties:
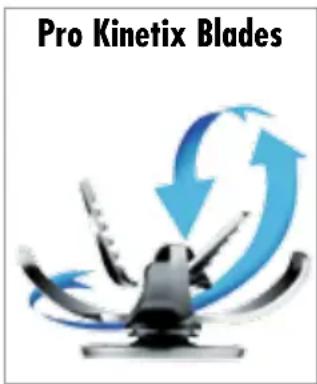
- One jug and one cutting blade for all ingredients – no matter, if wet or dry: Due to the super-high power and the ProKinetix™ system of contoured cutting blades and jug the »Design Mixer Advanced Professional« is designed to pulverise and fold all ingredients to an 80% finer consistency. What's more, the circulation within the jug generated by the ProKinetix™ system directs most foods automatically back to the blades demanding only a minimum of intervention. Thus, the »Design Mixer Advanced Professional« processes almost all types of food evenly and quickly.
- The countdown timer makes it easy to select the best processing time. Thus, you get best results for all types of food.
- 5 pre-defined programs offer more simplicity for selecting the best speed and processing time:
- Pulse | Ice Crush
- Smoothie
- Green Smoothie: this particular program produces specially creamy green
smoothies. In contrast to this, due to the various consistency of different types of vegetables and herbs, conventional mixers provide typically only poor results, when processing the variety of ingredients for green smoothies.
- Frozen Dessert
-
Soup
-
AUTO CLEAN function for easy cleaning—there is no need to laboriously remove residues of food from the cutting blades. Additionally, jug, lid, and cutting blades are dishwasher-safe.
- The control panel with a large illuminated LCD screen and illuminated buttons is designed for easy operation.
- 2 Litre Tritan™ jug (extremely stable / BPA free) Tritan™ is impact resistant and shatter proof. This material even withstands repeated dishwasher cleaning.
- The heavy die-cast metal power base ensures a stable stand, even with large amounts processed.
- Fields of application: Green smoothies, smoothies, ice cocktails, ice coffee, nut butter, hummous (vegetable paste), sauces, dips, spice mixtures, soups, sherbets, and creams.
Safety Concept
WARNING: For your protection and convenience, your new »Design Mixer Advanced Professional« is equipped with some safety features. Do not attempt to damage or by-pass the safety interlocks! Do not attempt to operate the appliance using others than the designated parts (e.g. jug, lid, measuring cup, and accessories).
⚠ WARNING: Do not operate the appliance with the power base, jug, lid and seal of the lid damaged. The seal at the rim of the lid prevents liquids from overflowing, and thus, guarantees safe operation of the appliance. Before operation, always ensure that the jug is undamaged and completely watertight. The exterior of the jug bottom, and especially the drive shaft jutting out must always be clean and dry when mounting the jug on the power base, to avoid damage to the drive shaft coupling, and avoid risk of overheating, fire and electric shock.
Do not operate the appliance with the lid open.
Overload Protector
The appliance is equipped with an overload protector fuse. Expect the overload protector responding, if you use the appliance for more than 6 minutes of continuous operation. In this case, the motor will stop automatically. Switch off the appliance (pressing the ON | OFF button) and unplug. Then wait for some minutes before bringing the appliance into operation again. See also: >Solving Problems<
Safety switch
The appliance may not be operated without the provided jug. Thus, a safety switch completely disables the appliance, if the jug has been removed from the power base, or when the jug is not assembled correctly.
PROGRAMS OF THE DESIGN MIXER ADVENCED PROFESSIONAL
You select the desired program by pressing the assigned program button on the control panel (see: »Knowing Your »Design Mixer Advanced Professional««). The corresponding program number is shown on the LCD screen. The processing time depends on the selected program. The »Design Mixer Advanced Professional« offers 5 pre-defined programs for processing your food and 3 auxiliary functions.
| Programs for Processing Food | ||
| Program Button | Duration Function | |
| PULSEICE CRUSH | 60 seconds For crushing ice.Has an intelligent sensor to stop the motor when ice is done. This cycle is also ideal for processing other foods that need sudden bursts of power. | |
| SMOOTHIE 60 seconds Optimised to combine and aerate frozen and liquid ingredients together.The program uses a unique technique, that blends the denser ingredients at lower speed, then increases in speed as ingredients thicken. This will happen several times during operation. The program also circulates the ingredients for maximum aeration and a creamy texture. | ||
| GREENSMOOTHIE | 70 seconds Optimised to break down whole hard ingredients like fruits, leafy greens and seeds, and allows them to blend together with other soft and liquid ingredients. | |
| FROZEN DESSERT | 60 seconds To break down and combine frozen ingredients quickly. Use the pusher for best results. | |
| SOUP 7 minutes Blend and heat ingredients to make soups. This pre-set program has a slow start to combine ingredients before running at high speed, and ends with a couple of stirs to release any steam bubbles that may have formed in the soup. | ||
| Auxiliary Functions | ||
| AUTO CLEAN Removes most of the ingredients off the jugs walls and cutting blades. Add 500 ml warm soapy water, and press the AUTO CLEAN button. For harder to clean, sticky or thick ingredients, add 12 teaspoon of dish liquid detergent for extra cleaning power. For best results, run the clean cycle immediately after use. | ||
| Pause ( ) | Pauses and holds a program for up to 2 minutes. Press the pause button again to continue. Pause is also activated, if the jug is removed from base during use. Replace the jug, and press the pause button to resume. | |
IMPORTANT: If the appliance is running and you press a different program button, it will switch to that program without stopping.
TIPS FOR BEST RESULTS
IMPORTANT: Do not remove the lid from the jug during operation to avoid food splashing and overflowing. Only take the measuring cup out of the central opening of the lid to add further ingredients.
With the ingredients splashing up to the measuring cup during operation, always interrupt processing, for adding further ingredients. For this, press the pause button (▶). You can interrupt processing for up to 2 minutes without losing any settings. Simply restart operation by pressing the pause button (◀) again.
Do not use metal utensils, as they may damage the cutting blades or jug.
When the appliance has been running for 6 minutes in manual mode, it will automatically turn off. This is a safety feature to protect the motor. See: Solving Problems
- If the volume within the jug is below the maximum line with the motor agitating, the inner measuring cap can be removed from the lid and further ingredients can be poured through the opening in the lid during operation.
- Run the »Design Mixer Advanced Professional« only for the required time duration – do not over blend ingredients.
• Use the PULSE | ICE CRUSH button, if your food is too thick or coarse to mix up. - If the volume within the jug is below the maximum filling mark while the motor is agitating, scraper and frozen dessert pusher can be used during operation. For this, remove the measuring cup from the lid. Always ensure that the lid stays firmly in place.
- Do not exceed the maximum filling mark when adding foods and liquids into the jug.
- Ingredients could stick to the sides of the jug. In this case, use the provided scraper to scrape your food from the sides of the jug, and push it down back onto the 48
cutting blades. For this, keep the lid in place and only remove the measuring cup. Thereafter replace the measuring cup.
- If any moisture or liquid appears on or under the power base during operation, IMMEDIATELY turn the appliance off, and unplug from the power supply. Immediately remove the jug, and wipe the power base dry with a dry cloth or paper towel. Do not use the appliance again without having cleared up, whether the jug is leaking and, if so, having replaced the jug.
- To interrupt processing at any time, press the pause button ( ). To completely CANCEL operation, press the START | CANCEL button.
- A speed or function can be selected at any time, even while the motor is running. Select the new speed or program, and the appliance will change operation immediately.
- The maximum amount of ice cubes that the appliance can proc (approx. 1 standard ice tray).
- Thicker mixtures puree more efficiently if you fill in not more than 0.5 to 1 Litre.
BEFORE FIRST USE
⚠ WARNING: Do not let young children play with the appliance, or any part of it, or the packaging! The cutting blades are very sharp. Ensure not to get injured. The length of the power cord is about 1.10 m. Do not attempt to pull out the power cord any further than this. Always grasp the appliance at both sides at the bottom of the power base to move the appliance. Do not grasp the appliance at the power cord or jug for moving it.
- Unpack the appliance and all accessories carefully, considering the hints on the cardboard box. Keep all the packing material until all the parts of the »Design Mixer Advanced Professional« have been found and the appliance has been assembled. To move the appliance, always grasp it at both sides at the bottom of the power base.
Tip: It is good advice to keep the packing material in a safe place in case you wish to repack the product for storage or shipping.
- The accessories will be found in a hollow of one of the polystyrene blocks.
- Probably, the power cord is inserted in the back of the power base. Carefully, pull out the power cord without using violence. The power cord is about 1.10 m in length. Do not attempt to pull out the power cord any further than this.
- Check that no parts are missing. Check the »Design Mixer Advanced Professional« for any damage (e.g. damaged seals and sealing surface, broken, or scratched plastic parts). If there is any damage, do not operate the appliance
and contact an authorized service centre. See: Knowing Your »Design Mixer Advanced Professional«
- Carefully remove all shipping materials and promotional materials, but Do not remove the model label. Especially ensure that there are no foreign objects (e.g. packaging material) in the jug and drive shaft coupling of the power base.
⚠ WARNING - RISK OF ELECTRIC SHOCK
Always switch off (press ON | OFF button), and unplug the appliance, and wait for the motor to come to a complete standstill. Than leave the appliance cool down, before cleaning. Do not immerse the power base, or power cord in water or other liquids or spill any liquids on/in the power base or power cord. Do not place the power base or power cord in an automatic dishwasher.
- Before first use and after a longer period of storage, wash the jug with warm soapy water, rinse with clear tap water and dry the exterior thoroughly. See: Care and Cleaning
PREPARING THE APPLIANCE FOR OPERATION
IMPORTANT: Only place the appliance on a stable, dry, level, and clean surface. Be aware that, due to the agitation of the motor, the appliance could move around on the table during operation. Thus do not place the appliance on inclined surfaces or near the edge of the table, where it can fall over and/or fall down. Do not place any clothes or tissue or other foreign objects on or under the appliance during operation, to avoid risk of fire, overheating, or electric shock. Do not block the ventilation slots of the power base. During operation, the operating elements (see: »Knowing Your »Design Mixer Advanced Professional«) must be accessible all the time.
Ensure to keep the appliance in an appropriate distance of at least 30 cm on each side to any other objects or walls and 50 cm to the edge of the working space. During operation leave at least 50 cm of free space above the appliance for unhindered access.
⚠ WARNING: Do not place the »Design Mixer Advanced Professional« over any type of heat-producing appliance, or any other heat source to avoid injuries and damage. For operation, always pull the power cord completely out of the power base to avoid risk of overheating and fire.
- Place the appliance on a working space that meets the requirements mentioned above.
- Place the jug on the power base. The jug must stand stable and may not wobble. Insert the lid on top of the jug. Press the lid carefully down until it closes firmly. Place the measuring cup upside down into the central opening of the lid. The measuring cup must lie in line with the lid. Turn the measuring cup clockwise to lock it within the lid.
OPERATION
⚠ WARNING: The appliance is intended for cutting and mixing food. For this, the appliance is equipped with sharp knives and other electrically driven moving parts. Do not operate the appliance before assembling the appliance completely and correctly. (See: >Operating the Design Mixer.) Always mount the jug correctly and stable on the power base before operation. Do not allow any parts of your body (e.g. hands, hair) or any foreign objects (e.g. cooking utensils, clothes) to get in the jug or drive shaft coupling in the power base, with the appliance connected to the power supply, to avoid risks of injuries and damage. Only use the provided pusher for pushing food down in the feed tube.
Always switch off the ON | OFF button (indicator goes out), then unplug the appliance, before assembling or disassembling any parts. Always turn the »Design Mixer Advanced Professional« off and unplug before reaching inside the jug. Before operation, always ensure that you have assembled the appliance completely and correctly according to the instructions in this booklet, and that there are no foreign objects in the jug. Carefully remove hard, inedible parts of your foods (e.g. bones, stalks, wooden shells) completely, before processing.
Do not place clothes, tissues or any other foreign objects on or under the appliance during operation. Do not place the appliance over a power cord. Do not use any hard or sharp-edged objects (e.g. forks, knives), to avoid damage to the appliance. Do not use violence!
Do not process boiling hot liquids. Allow temperature to drop before putting into the jug for blending to avoid injuries and damage due to sudden eruptive boiling, excessive steam evaporation, splashing, and overflow.
If liquids come out from under the lid, run down the exterior of the appliance and/or accumulate under the power base, immediately switch off (pressing the ON | OFF button), and unplug the appliance to avoid injuries and damage by electric shock. Always wipe off spilled liquids immediately. Do not overfill the jug. Always observe the maximum amount of 2.0 Litres. If liquids accumulate again under the appliance, possibly the jug is leaking. Do not operate the appliance with leaking jug. Contact your authorized service centre.
Do not use the appliance, if the jug is leaking or damaged in any way to avoid hazard of overheating, fire, and electric shock. Replace the jug, if the jug is damaged in any way, before using the appliance again.
If the motor is straining under a heavy load, do not operate continuously for more than 10 seconds. Allow the motor to rest for 1 minute between uses on heavy loads.
Tip: None of the recipes in these instructions are considered a heavy load
BLENDING CHART
Use the following blending chart as a guide
| Food Type Preparation & Usage Quantity Speed setting Duration | ||||
| Grains & seeds Mill into flour. | Use in bread, pizza dough, cakes, muffins, and flour batters. | 250 – 500 g,11⁄4 – 21⁄2 cups | MILL 30 – 60 | seconds |
| Dried legumes & corne.g. soy beans, chickpeas popping corn | Mill into flour.Use in combination with plain or self-raising flour for breads, cakes, muffins, pancakes. | 250 – 500 g,11⁄4 – 21⁄2 cups | MILL 90 seconds | |
| Spices To make ground spices. | Use whole spices except for cinnamon quills that need to be broken half. Store in airtight glass containers. | 55 – 115 g,1⁄2 – 1 cup,8 – 16 cinnamon sticks | MILL 90 seconds | |
| Raw nuts To make nut meal. | Use in cakes, biscuits, and muffins. | 150 g – 300 g,1 – 2 cups | MILL 20 – 30 | seconds |
| Toasted nuts To make nut butters and spreads. 300 g – 450 g, | 2 – 3 cups | MILL, use scraper 1 minute | ||
| White sugar Mill, to make pure icing sugar or powdered sugar. | 200 g,2 cups | MILL 15 seconds | ||
| Raw vegetables Peel and cut into 2 cm cubes. Finely chopped.Use for stuffing, filling, bolognese, stews, and casseroles. | 200 g CHOP 5 – 10 | seconds | ||
| Biscuits / cookies | Break biscuits/cookies in half. Blend to form crumbs.Use for cheesecake crusts. | 250 g PULSE | ICE CRUSH 6 – 10 | pulses | |
| Bread crumbs | Remove crusts. Cut bread into 2 1⁄2 cm cubes.Use in crumb coatings, stuffings or in meatballs and meat patties. | 120 g(up to 3 slices) | CHOP 20 – 30 | seconds |
| Mayonnaise Mix the egg yolk, mustard, and vinegar or lemon juice. Add oil slowly through the lid. Use for dressing. | Up to 4 egg yolks and 2 cups of oil. | MIX | 90 seconds | |
| Hard cheeses (like Parmesan and Pecorino) | Cut into 3 cm cubes.Use in creamy sauces, pasta dishes. | 130 g CHOP 15 – 20 | seconds | |
| Cream | Whip cream to firm peaks. Add sugar or vanilla before blending, if desired. | 300 – 600 ml | MILL 10 seconds | |
OPERATING THE »DESIGN MIXER ADVANCED PROFESSIONAL«
⚠ WARNING: Operate the appliance on a well accessible, stable, level, dry, and suitable large table or counter that is resistant against water, fat, and heat. Do not place any delicate objects near the appliance during operation, to avoid damage.
Do not operate the appliance with the jug empty, to avoid damage to the appliance.
The appliance could move considerably during operation. Keep the appliance in an appropriate distance of at least 30 cm on each side to the edge of the working space and furniture, walls, boards, curtains, other appliances, and any delicate objects to avoid damage due to heat and splashes. Leave at least 50 cm of free space above and 50 cm in front of the appliance to prevent the appliance from falling down.
Do not operate the appliance while the jug is empty, to avoid damage to the motor.
- Place the appliance on a suitable table or counter near an appropriate wall power outlet.
- Carefully pull the power cord completely out of the power base and insert the plug into the power outlet.
- Fill the ingredients into the jug and place the lid on the jug. Slightly press the lid down until the rim of the lid settles on the rim of the jug.
- Place the jug onto the power base.
- Press the ON | OFF button to switch on. The LCD screen is illuminated and shows the current operating time >0 secs<. The ON | OFF button flashes in red. At the lower right corner of the LCD screen >READY< is shown. The appliance is now ready for use (READY mode).
Tip: The appliance switches off the LCD screen automatically, when being idle for more than 2 minutes. However, the ON | OFF button still flashes red. After 5 minutes, the appliance switches off completely.
⚠ WARNING: The motor starts IMMEDIATELY, when pressing a program button or turning the speed dial. Do not insert any parts of your body (fingers, hair) or foreign objects (e.g. cooking utensils, clothes) into the jug with the jug placed on the power base, and the ON | off button is flashing, and the LCD screen is illuminated!
How to Use a Pre-Defined Program
- Simply press the desired program button. The appliance starts working immediately. The LCD screen shows the still remaining processing time. As soon as the program elapsed, the appliance automatically switches back to the defaults (READY mode).
Manual Selection of Speed
There are 12 speed settings from STIR through to MILL. STIR mixes more delicate foods with a slow stirring motion and light pausing to fold ingredients together. MILL is the fastest setting, and is ideal for milling nuts, grains and seeds. When turning the speed dial, the appliance starts always with the slowest speed. See: Blending Chart
- If you wish to operate the appliance for a certain time duration, press the timer buttons (and □) until the desired time is shown on the LCD screen.
- Turn the speed dial to the desired speed setting, shown at the right hand of the LCD screen. The appliance starts working IMMEDIATELY, as soon as you turn the speed dial. The selected speed is shown on the LCD screen in a bar display, labelled with the assigned levels.
With no time duration selected, the LCD screen shows the already elapsed time in a count-up. If you do not stop processing manually, by pressing the START | CANCEL button, the appliance will operate for 6 minutes. Thereafter the motor stops automatically switching back to READY mode.
However, you can stop operation at any time, using the START | CANCEL button to switch to READY mode manually.
With a time duration selected, the processing time is shown on the LCD screen in a count-down. The motor stops automatically as soon as the selected processing time elapsed, and the appliance goes back to READY mode.
Manually Stopping Operation
You can cancel or interrupt any running function at any time, no matter whether you started a pre-defined program or manual settings.
- If you wish to cancel any running operation completely, press the START | CAN-CEL button.
The appliance cancels the currently running function immediately and switches back to the defaults (READY mode). - If you wish to interrupt operation (e.g. for filling in further ingredients), press the pause button (9). The motor stops and any running function is interrupted. Now, you may remove the jug from the power base.
Note: The appliances hold the current settings for up to 2 minutes. Thereafter, it cancels any functions completely.
- For carrying on operation, place the jug back onto the power base with the lid correctly in place, and press the pause button (") again.
The appliance continues working immediately.
- If you wish to cancel the current process completely, press the START | CANCEL button.
Repeat Function
To allow a quick repeat of the recently started manually selected process, the last speed setting is held for 2 minutes in memory. For example, this function is useful, when processing large amounts in separate portions. However, the repeat function is only available for manual speed settings, because the pre-defined programs can already be started by simply pressing a button.
To start the repeat function:
- Turn the speed dial to start the manual operation. Cancel operation manually by pressing the START | CANCEL button, or wait until the timer switches back to READY mode. Regardless whether you have used the timer, or have stopped operation by pressing the START | CANCEL button, the selected speed is still shown on the LCD screen. However, any timer settings are lost.
- Press the START | CANCEL button to re-start operation using the same speed.
- If you wish to delete the speed setting from memory, hold the START | CANCEL button pressed for 2 seconds, or simply wait for 2 minutes.
IMPORTANT: The repeat function runs for 3 minutes at the maximum, unless you stop operation by pressing the START | CANCEL button. The recent timer setting is ignored.
After Processing
- Press the ON | OFF button to switch off the appliance, and unplug.
- Remove the jug from the power base. Remove the lid from the jug, and empty the jug.
- Clean the appliance and all used parts according to the instructions in chapter >Care and Cleaning<.
SOLVING PROBLEMS
If any problems occur during operation, you will find solutions in this section.
| Problem Possible Reason The Solution | ||
| The appliance does not respond. The cutting blades do not move. | The appliance is not live. Please check: | — Is the appliance connected to the power supply? — Is the power outlet live? Check by connecting a lamp. |
| The jug is not correctly mounted on the power base. | Check, whether the jug and lid are securely in place. | |
| Is the ON | OFF button illuminated? When the appliance has been idle for more than 5 minutes, the appli-ance switches off automatically. | Switch ON the appliance using the ON | OFF button. | |
| Food is unevenly chopped. Too much food is in the jug. Try a smaller amount, and work in batches, if necessary. | ||
| Food is chopped too finely or is watery. | The ingredients are over-processed. Food sticks to the cutting blades and jug. | Verringern Sie die Bearbeitungszeit. Verwenden Sie die Funktion PULSE | ICE CRUSH, um die Bearbeitungszeit besser steuern zu können. |
| The mixture may be too thick. Try adding more liquid and/or using a slower speed. | ||
| >OVERLOAD PROTECTION< flashes on the LCD screen and the appliance does not respond. | This appliance has a motor protection feature to protect against overheating.. | Turn the appliance off by pressing the ON | OFF button on the control panel, then unplug. Wait a few minutes then re-plug and switch on again. If >OVERLOAD PROTECTION< is still flashing: Repeat and leave the appliance separated from the power supply for at least 20 to 30 minutes.Once >OVERLOAD PROTECTION< has disappeared from the LCD screen the appliance is ready to be used again. We recommend blending in smaller batches, and/or cutting ingredients into smaller pieces. |
| Liquid is running down on the power base or accumulating below the power base. | The lid is not closed properly. Close the lid. The rim of the lid must lie on the rim of the jug without any gap. Clean the appliance and leave it dry for 1 day. | |
| There is too much food or liquid in the jug. | Take some of the food out of the jug. Try working in smaller portions. Clean the appliance and leave it dry for 1 day. | |
| The jug is leaking. Immediately switch off and unplug the appliance, then take the jug away from the power base. Clean the power base, and leave it dry naturally for at least 1 day. Contact an authorized service centre for examination and repair. | ||
CARE AND CLEANING
⚠ WARNING: Always ensure that the appliance is out of reach of young children. The cutting blades in the jug are very sharp. Handle with care to avoid injuries.
Always switch off the appliance (press ON | OFF button), then unplug the appliance, before moving or cleaning the appliance. Do not attempt to move the appliance during operation.
Ensure to protect the power base and power cord against splashing water and moisture. Do not immerse the power base, or power cord in water or any other liquid, to avoid hazards due to electric shock and damage. Do not spill or drip any liquids on or in the power base and power cord to avoid risk of fire and electric shock. This holds especially for the ventilation slits at the rear of the power base and the drive shaft coupling in the centre of the power base. Do not clean the power base or power cord in an automatic dishwasher!
Do not scratch or cut on the surfaces of the appliance or the seal of the lid or use any violence. Do not use any abrasive cleaners, cleaning pads (e.g. metal scouring pads), or any corrosive chemicals (e.g. bleach) for cleaning the appliance or any parts of it, to avoid damage to the surfaces. Do not immerse the power base or power cord in water or any other liquid. Do not spill or drip any liquids on the power base, or on the power cord to avoid risk of fire and electric shock.
Always keep the appliance clean. When food splatters or spilled liquids adhere to the outer surfaces, wipe with a damp cloth. Mild detergent may be used. Thereafter, thoroughly dry all parts.
CLEANING THE APPLIANCE
Jug, Lid, and Measuring Cup
In order to keep your »Design Mixer Advanced Professional« clean, you should prevent food from drying on the surfaces. This holds especially for the cutting blades, jug and lid, because these parts will get directly in contact with food. Thus, follow the steps below as soon as possible after use.
Tip: Please note that milling hard ingredients (e.g. spices, nuts, sugar, coffee, and grains) will cause scratching and clouding to the inside surfaces of the jug. This is a cosmetic problem, and does not affect the performance of the appliance.
- Rinse most of the coarse reminders off the jug, lid, and measuring cup with tap water.
IMPORTANT: Ensure that the drive shaft of the jug is always clean and dry before placing the jug onto the power base, to avoid moisture and residues of food getting into the drive shaft coupling.
- Thoroughly wipe the drive shaft at the bottom of the jug dry and clean, then
place the jug back onto the power base.
- Pour 500 ml of warm water into the jug and press the AUTO CLEAN button. If thick or sticky ingredients require extra cleaning power add a few drops of dish liquid detergent.
⚠ WARNING – RISK OF INJURIES: The cutting blades in the jug are extremely sharp. Do not insert your hands or any foreign objects (e.g. brushes, clothes) in the jug, with the jug still standing on the power base. Even during cleaning, do not touch the cutting blades with your fingers to avoid injuries.
- After the AUTO CLEAN program finished, take the jug from the power base and rinse the jug, lid and measuring cup again and/or wash these parts separately in warm soapy water with a soft cloth or bottle brush.
Dishwasher Use
CAUTION: Do not place the power base or power cord in an automatic dishwasher.
All removable parts (jug, lid, measuring cup, and accessories) of your »Design Mixer Advanced Professional« are tolerant to dishwasher use.
However, if using the dishwasher, place the lid and measuring cup on the top shelf only. The jug can be placed on the bottom shelf. If your dishwasher features temperature control, do not select more than 65^ C ( 150^ F).
Power Base and Power Cord
- Moisture a clean cloth or soft sponge with a little warm dishwater and carefully wipe the exterior of the power base and power cord.
- Thoroughly dry the power base and all parts, and let dry naturally for about half an hour out of reach of young children.
If liquids dripped on the power base, then let the appliance dry for at least 1 day.
Removing Stubborn Food Stains and Odours
Strong smelling foods (e.g. garlic, onions, or fish) and some fruits, spices, and vegetables (e.g. blackberries, capsicum, carrots) may leave an odour or stains on the jug and lid.
- To remove odours and stains, soak jug and lid for 5 minutes in warm soapy water.
- Then wash with a mild detergent and warm water. Thereafter rinse well and dry thoroughly.
- Store the jug with the lid open.
STORAGE
⚠ WARNING: Young children must be supervised that they do not play with the appliance or any part of it. When the appliance is not in use, always switch off (press ON | OFF button). Thereafter, unplug the appliance. Always leave the appliance cool down, before cleaning or storing the appliance. Do not leave the appliance unattended while connected to the power supply to avoid risk of electric shock or fire.
- Switch off the appliance (press ON | OFF button) and wait until all parts cooled down. Unplug the appliance.
- Always clean the appliance and all its parts before storing to avoid accumulation of dried-on food. (See: >Care and Cleaning.)
- You may push the power cord back into the corresponding opening of the power base.
IMPORTANT: Ensure to store the appliance where it is clean, dry and safe from frost, direct sunlight and inadmissible strain (mechanical or electric shock, heat, moisture) and where it is out of reach of young children. Do not place any hard or heavy objects on or in the appliance or any part of it.
-
For storage, grasp the power base on both sides at the bottom and place it in upright position on a level, clean and stable surface, where it cannot fall.
-
It is good advice to store the jug on its correct place on the power base. Alternatively, you may place it beside the power base. To avoid accumulation of odours in the jug, leave the lid open.
IMPORTANT: Do not use any parts or accessories of the appliance for any other purpose than operating the appliance. It is good advice to store the parts and accessories of the appliance with the appliance.
NOTES FOR DISPOSAL
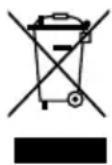
Dispose of the appliance and packaging must be effected in accordance with the corresponding local regulations and requirements for electrical appliances and packaging. Please contact your local disposal company.
Do not dispose of electrical appliances as unsorted municipal waste, use separate collection facilities. Contact your local government for information regarding the collection systems available. If electrical appliances are disposed of in landfills, dumps, or refuse incineration, hazardous substances can leak into the groundwater or can be emitted into air, thus getting into the food chain, and damaging your health and well-being as well as poisoning flora and fauna. When replacing old appliances with new once, the vendor is legally obligated to take back your old appliance for disposal at least for free of charge.
INFORMATION UND SERVICE
Please check www.gastroback.de for further information. For technical support, please contact Gastroback Customer Care Center by phone: +49 (0)4165/22 25-0 or e-mail info@gastroback.de.
Please refer to our home page for a copy of these operating instructions in pdf format.
WARRANTY
We guarantee that all our products are free of defects at the time of purchase. Any demonstrable manufacturing or material defects will be to the exclusion of any further claim and within 2 years after purchasing the appliance free of charge repaired or substituted. There is no Warranty claim of the purchaser if the damage or defect of the appliance is caused by inappropriate treatment, over loading or installation mistakes. The Warranty claim expires if there is any technical interference of a third party without a written agreement. The purchaser has to present the sales slip in assertion-of-claim and has to bear all charges of costs and risk of the transport.
Note:
Customers from Germany and Austria: For repair and service, please send Gastroback products to the following address: Gastroback GmbH, Gewerbestr. 20, D-21279 Hollenstedt, Germany.
Customers from other countries: Please contact your dealer.
Please agree that we cannot bear the charge of receipt. Submission of appliances: Please ensure packing the appliance ready for shipment without accessories. Add the sales slip and a short fault description. The processing time after receipt of the defective appliance will be approx. 2 weeks; we will inform you automatically. After the warranty period, please send defective appliances to the given address. You will get a free quotation and, thereafter, can decide, whether we shall repair the appliance to the costs possibly accrued, send back the defective appliance for free of charge, or dispose of the appliance for free of charge.
The appliance is intended for household use only and NOT suited for commercial usage. Do not attempt to use this appliance in any other way or for any other purpose than the intended use, described in these instructions. Any other use is regarded as unintended use or misuse, and can cause severe injuries or damage. There is no warranty claim of the purchaser if any injuries or damages are caused by unintended use.
GASTROBACK GmbH
- IHREN »DESIGN MIXER ADVANCED PROFESSIONAL« KENNEN LERNEN
- AMessbecher—
- L ON | OFF-Taste —
- T Pause-Taste ( ) -
- Eastman Tritan™ Copolyester
- Operating Instructions
- DESIGN MIXER ADVANCED PROFESSIONAL
- TABLE OF CONTENTS
- DEAR CUSTOMER!
- KNOWING YOUR
- DESING MIXER ADVANCED PROFESSIONAL
- L ON | OFF button -
- M START | CANCEL button -
- N Pulse | Ice Crush – programme
- O Smoothie – programme
- P Green Smoothie – programme
- Q Frozen Dessert – programme
- R Soup – programme
- S AUTO CLEAN button ( AUTO CLEAN ) -
- T Pause button ( ▶) -
- U Speed dial –
- V LCD screen -
- W Timer buttons -
- X Scraper -
- Y Frozen dessert pusher —
- IMPORTANT SAFEGUARDS
- GENERAL SAFETY INSTRUCTIONS
- IMPORTANT SAFEGUARDS FOR ALL ELECTRICAL APPLIANCES
- HIGH TEMPERATURES - RISK OF BURNS
- MOVING PARTS - RISKS OF INJURIES
- TECHNICAL SPECIFICATIONS
- PROPERTIES OF YOUR NEW
- »DESIGN MIXER ADVANCED PROFESSIONAL«
- Safety Concept
- Overload Protector
- Safety switch
- PROGRAMS OF THE DESIGN MIXER ADVENCED PROFESSIONAL
- TIPS FOR BEST RESULTS
- BEFORE FIRST USE
- ⚠ WARNING - RISK OF ELECTRIC SHOCK
- PREPARING THE APPLIANCE FOR OPERATION
- OPERATION
- BLENDING CHART
- OPERATING THE »DESIGN MIXER ADVANCED PROFESSIONAL«
- How to Use a Pre-Defined Program
- Manual Selection of Speed
- Manually Stopping Operation
- Repeat Function
- To start the repeat function:
- After Processing
- SOLVING PROBLEMS
- CARE AND CLEANING
- CLEANING THE APPLIANCE
- Jug, Lid, and Measuring Cup
- Dishwasher Use
- Power Base and Power Cord
- Removing Stubborn Food Stains and Odours
- STORAGE
- NOTES FOR DISPOSAL
- INFORMATION UND SERVICE
- WARRANTY
- Note:
- GASTROBACK GmbH
Brand : Gastroback
Model : Design Advanced Professional 41007
Category : Blender