
SV 104 B - Wine cellar Scandomestic - Free user manual and instructions
Find the device manual for free SV 104 B Scandomestic in PDF.


| Product Type | Wine Cellar |
| Brand | Scandomestic |
| Model | SV 104 B |
| Color | Black |
| Temperature Range | 5°C to 18°C |
| Number of Zones | 2 (Upper & Lower) |
| Temperature Control | Independent digital control for each zone |
| Display | LED display with set and actual temperature |
| Interior Light | LED, auto-off after 10 min (optional continuous mode) |
| Door Lock | Yes, with key |
| Shelves | Adjustable with bottle notch |
| Reversible Door | Yes, left-hand hinge kit included |
| Refrigerant | R600a (flammable) |
| Light Energy Class | G (LED) |
| Installation Type | Built-in (fully recessed) |
| Climate Class | SN, N, ST, T (+10°C to +43°C) |
| Humidity Control | Included humidity box |
| Spare Parts Availability | Minimum 7 years |
Frequently Asked Questions - SV 104 B Scandomestic
User questions about SV 104 B Scandomestic
0 question about this device. Answer the ones you know or ask your own.
Ask a new question about this device
Download the instructions for your Wine cellar in PDF format for free! Find your manual SV 104 B - Scandomestic and take your electronic device back in hand. On this page are published all the documents necessary for the use of your device. SV 104 B by Scandomestic.
USER MANUAL SV 104 B Scandomestic
SV 10 series
SV 80 series
SV 90 series
SV 100 series
SV 110 series
SV 120 series
SV 130 series
Brugermanual
User manual
Bedienungsanleitung
scandomestic
Kære kunde!
SKABSLEDNINGEN B∅R HVERKEN SLUTTES TIL NETTET VIA STIKSKINNER ELLER MED FORLÆNGERLEDNING.
VIGTIGE SIKKERHEDSREGLER
Model SV 110-serie
Model SV 80-serie/SV 90-serie
natural_image
Technical line drawing of a mechanical assembly with no visible text or symbolsBemærk



- To prevent damaging the door gasket, make sure to have the door all the way opened when pulling shelves out of the rail compartment.
- The appliance must be positioned so that the plug is accessible. Release the electric cord. Move your cabinet to its final location. Do not move your Cabinet while loaded with wine. You might distort the body. The wine cellar should be installed in a suitable place in order to avoid Touching the compressor with the hand.
- The appliance must be positioned so that the plug is accessible. Release the electric
- This appliance can be used by children aged from 8 years and above and persons with reduced physical, sensor and mental capabilities or lack of experience and knowledge if they have been given supervision or instruction concerning use of the appliance in a safe way and understand the hazards involved. Children shall not play with the appliance. Cleaning and user maintenance shall not be made by children without supervision.
- If the supply cord is damaged, it must be replaced by manufacturer of its Service agent or a similarly qualified person in order to avoid a hazard.

PLEASE DON'T TRY TO PLUG INTO OR EXTENSION THE CABLE IN ANY CASE.
SAFETY INSTRUCTIONS
- To reduce the risk of fire, electrical shock, or injury when using your appliance, follow these basic precautions:
- Read all instructions before using the Wine cooler.
• DANGER or WARNING: Risk of child entrapment. - Child entrapment and suffocation are not problems of the past. Junked or abandoned appliances are still dangerous even if they will “just sit in the garage a few days”.
- Before you throw away your old Wine cooler: Take off the door. Leave the shelves in place so that children may not easily climb inside.
- Never allow children to operate, play with, or crawl inside the appliance.
- Never clean appliance parts with flammable fluids. The fumes can create a fire hazard or explosion.
- Do not store or use gasoline or any other flammable vapors and liquids in the vicinity of this or any other appliance. The fumes can create a fire hazard or explosion. Do not store explosive substances such as aerosol cans with a flammable propellant in this appliance.
- WARNING: keep ventilation openings, in the appliance enclosure or in the built-in structure, clear of obstruction;
- Do not use mechanical devices or other means to accelerate the defrosting process, other than those Recommended by the manufacturer;
- WARNING: To avoid a hazard due to instability of the appliance, it must be fixed in accordance with the instructions.
- WARNING: Do not damage the refrigerant circuit;
- WARNING: Do not use electrical appliances inside the food
storage compartments of the appliance, unless they are the type recommended by the manufacturer.
- The refrigerant of these appliances are R600a, Flammable and explosive articles should not be put in or near the cabinet, to avoid the fire or explode caused.
Save these instructions for later use.
INSTALLATION INSTRUCTIONS
Before Using Your Wine cooler
- Remove the exterior and interior packing.
- Before connecting the Wine cooler to the power source, let it stand upright for approximately 2 hours. This will reduce the possibility of a malfunction in the cooling system from handling during transportation.
- Clean the interior surface with lukewarm water using a soft cloth.
- This appliance is intended to be used in household and similar applications such as:
- staff kitchen areas in shops, offices and other working environments;
farmhouses and by clients in hotels, motels and other residential type environments;
bed and breakfast type environments;
catering and similar non-retail applications. - When disposing your appliance, please choose an authorized disposal site.
Installation of Your Wine Cooler
- This appliance is designed to be for built-in (fully recessed) (Refer to sticker location the back of this appliance).
• This appliance is intended to be used exclusively for the storage
of wine.
- Place your Wine cooler on a floor that is strong enough to support it when it is fully loaded. To level your Wine cooler, adjust the front leveling leg at the bottom of the Wine cooler.
- This appliance is using flammability refrigerant. So never damage the cooling pipe work during the transportation.
- Locate the Wine cooler away from direct sunlight and sources of heat (stove, heater, radiator, etc.). Direct sunlight may affect the acrylic coating and heat sources may increase electrical consumption. Extreme cold ambient temperatures may also cause the unit not to perform properly.
- Avoid locating the unit in moist areas.
- Plug the Wine cooler into an exclusive, properly installed-grounded wall outlet. Do not under any circumstances cut or remove the third (ground) prong from the power cord. Any questions concerning power and/or grounding should be directed toward a certified electrician or an authorized Products service center.
- Door handles, door hinges, trays, and baskets for a minimum period of seven years and door gaskets for a minimum period of 10 year, after placing the last unit of the model on the market.
- Thermostats, temperature sensors, printed circuit boards and light sources are available for a minimum period of seven years after placing the last unit of the model on the market.
Attention
- The device is intended exclusively for the storage of wine.
• Store wine in sealed bottles;
- Do not overload the cabinet;
- Do not open the door unless necessary;
- Do not cover shelves with aluminum foil or any other shelf material which may prevent air circulation;
- Should the Wine cooler be stored without use for long periods it is suggested, after a careful cleaning, to leave the door ajar to allow air to circulate inside the cabinet in order to avoid possible formations of condensation, mold or odors.
Ambient Room Temperature Limits
This appliance is designed to operate in ambient temperatures specified by its temperature class marked on the rating plate.
| Class | Symbol | Amb. Temp. range (°C) |
| Extended Temperate | SN | + 10 to + 32°C |
| Temperate | N | + 16 to + 32°C |
| Subtropical | ST | + 16 to + 38°C |
| Tropical | T | + 16 to + 43°C |
Internal LED lights
In order to reduce energy consumption, this wine cabinet will automatically switch off the LED lights after 10 minutes.
If you want the LED light to remain on continuously, this is possible. Please press and hold the "LIGHT" button for 5 seconds, the display will show "LP". After 4 seconds the display will revert back to normal, and the light will remain on until manually switched off. If you want to revert back and conserve energy (recommended), please press and hold the "LIGHT" button for 5 second, the display will show "LF", after 4 seconds the display will revert back to normal, and the light will automatically switch off after 10 minutes.
OPERATING YOUR
WINE COOLER
For SV 10-series, SV 80-series and SV 90-series
The controls of your wine Cooler
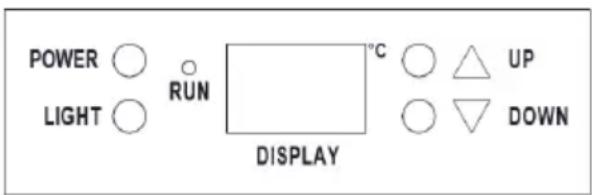
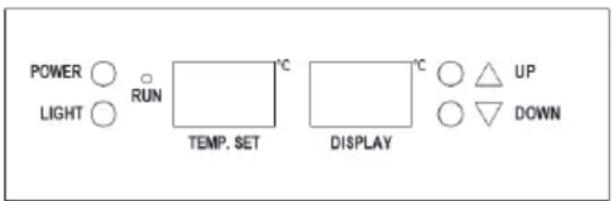
- "RUN" - Indicator light illuminates to signify the cooling mode is currently in operation.
- "LIGHT": control the inner light turn on/off.
- "POWER": control this appliance turn on/off (press and hold this button for approximately 3 seconds).
- "DISPLAY": shows the temperature of the internal cabinet.
- “UP” : Used to raise(warm) the temperature in 1°C.
- "DOWN": Used to lower(cool) the temperature in 1°C.
Temperature Controls Model SV 80-series
- If the power is suddenly lost, the set temperature will be saved by the unit. Once the power is back on, the unit will be at the same set temperature.
- Set the desired cooling temperature by pressing the buttons adjacent to the "UP/DOWN" indicators. Each depression of the buttons will scroll through the available temperature setting in increments of 1 degree.
- The temperature setting can be adjusted from 5°C -18°C
- To view the actual temperature at any time press and hold the temperature adjustment button (up or down) for approximately 5 seconds, the actual temperature will temporarily flash in the LED display for 5 seconds. After this it will revert to the set temperature.
Flashing LED = Cabinet temperature
Steady LED = Set temperature.
Temperature Controls
Model SV 90-series
- Each cooling compartment of the wine cooler/beverage cooler (Left & Right) is independently controlled.
• To set the temperature: - If the power is suddenly lost, the set temperature will be saved by the unit. Once the power is back on, the unit will be at the same set temperature.
- Set the desired cooling temperature by pressing the buttons adjacent to the "UP/DOWN" program. Each depression of the buttons will scroll through the available temperature settings (for each compartment) in increments of 1 degree. The temperature selected will flash in the LED display for approximately 5 seconds, then revert back to display the setting temperature of the cabinet.
- Both compartments: The temperature setting can be adjusted from 5°C \~18°C.
To view the actual temperature, (anytime) press and hold the corresponding button for approximately 5 seconds, the actual temperature will temporarily" flash" in the LED display for 5 seconds.
For SV 85-series,100-series, SV 120-series
The controls of your wine Cooler

SV 110-series

- "RUN": Indicator light illuminates to signify the cooling mode is currently in operation.
- "Light": control the inner light turn on/off.
- "Power": control this appliance turn on/off.
- "Set Upper": set the temperature of the upper chamber.
- "Set Lower": set the temperature of the lower chamber.
- "Up chamber": shows the temperature of the up chamber.
- "Lower chamber": shows the temperature of the lower chamber.
- "TEMP SET": shows the setting temperature.
- "Display": Shows the actual temperature.
Setting the Temperature Control
- Each cooling compartment of the wine cooler (upper & lower) is independently controlled.
- If the power is suddenly lost, the set temperature will be saved by the unit. Once the power is back on, the unit will be at the same set temperature.
- Temperature alarm: If the inner temperature is higher than 23irc C, the “HI” is shown in the display panel, and the buzzer alarm after one hour continuously. It informs that the inner temperature is too high, please check the reason. If the inner temperature is lower than 0irc C, “LO” is shown on the temperature display panel and the temperature alarm will sound continuously after fifteen minutes.
- Set the desired cooling temperature by pressing the buttons adjacent to the “set upper/set lower” program. Each depression of the buttons will scroll through the available temperature settings (for each compartment) in increments of 1 degree.
- The temperature selected will flash in the LED display for ap-proximately 5 seconds, then revert to display the setting temperature of the cabinet.
- Both compartment: The temperature setting can be adjusted from 5°C to 18°C.
- To view the actual temperature. (any-time) press and hold the corresponding button for approximately 5 seconds, the actual temperature will temporarily "flash" in the LED display for 5 seconds.
For SV 130-series
The controls of your Wine cooler (the upper zone and middle zone)

- "RUN": Indicator light illuminates to signify the cooling mode is currently in operation.
- "Light": control the inner light turn on/off.
- "Power": control this appliance turn on/off.
- "Set Upper": set the temperature of the upper chamber.
- "Set Middle": set the temperature of the middle chamber.
- "Up Chamber": shows the temperature of the up chamber.
- "Middle Chamber": shows the temperature of the middle chamber.
Setting the Temperature Control
Each cooling compartment of the wine cooler (upper & lower) is independently controlled. To set the temperature:
- If the power is suddenly lost, the set temperature will be saved by the unit. Once the power is back on, the unit will be at the same set temperature.
- Set the desired cooling temperature by pressing the buttons adjacent to the "Set Upper/Set Middle" program. Each depression of the buttons will scroll through the available temperature settings (for each compartment) in increments of 1 degree. The temperature selected will flash in the LED display for approximately 5 seconds, then revert back to display the setting temperature of the cabinet.
• Upper compartment: The temperature setting can be adjusted
• from 5°C to 18°C.
- Middle compartment: The temperature setting can be adjusted from 5°C to 10°C.
- To view the actual temperature (any-time) press and hold the corresponding button, the actual temperature will temporarily "flash" in the LED display for 5 seconds.
The controls of your Wine cooler (the Lower zone)

- "Up": Used to raise(warm) the temperature in 1°C.
- "Down": Used to lower(cool) the temperature in 1°C.
- "Display": shows the temperature of the lower compartment.
Setting the Temperature Control
- If the power is suddenly lost, the set temperature will be saved by the unit. Once the power is back on, the unit will be at the same set temperature.
- Set the desired cooling temperature by pressing the buttons adjacent to the "UP/DOWN" program. Each depression of the buttons will scroll through the available temperature settings in increments of 1 degree. The temperature selected will flash in the LED display for approximately 5 seconds, then revert back to display the setting temperature of the cabinet.
- The temperature setting can be adjusted from 10°C to 18°C.
Shelves
- To prevent damaging the door gasket, make sure to have the door all the way opened when pulling shelves out of the rail compartment.
- For easy access to the storage content, you must pull the shelves approximately 1/3 out of the rail compartment, however this unit was designed with a notch on each side of the shelf tracks to prevent bottles from falling.

For SV 80-series/ SV 90-series
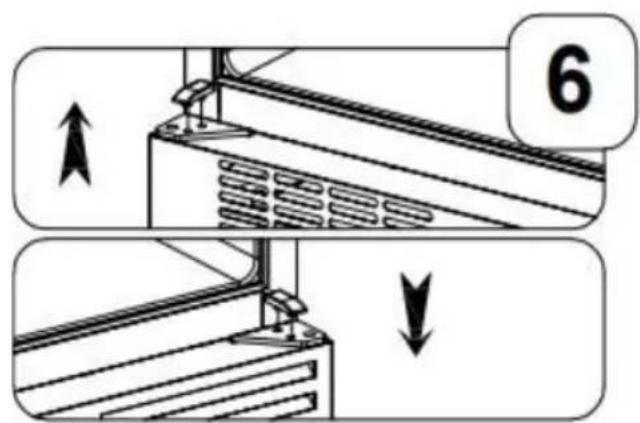
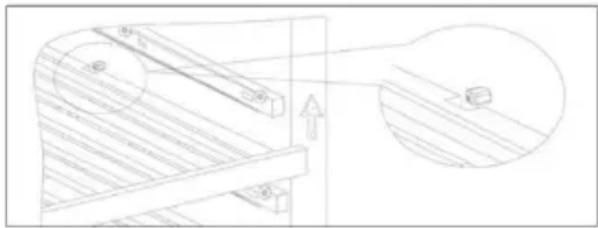
- When removing any of these shelves out of the rail compartment, To fit or remove the shelf, tilt the shelf as per the diagram and simply pull out, or push in the shelf until it sits on the support brackets securely.
For SV 10-series, SV 100-series/SV110-series/ SV 120- series/SV 130-series
- Put the shelf gap (left and right) under the square plastic block, uptilt the shelf, then pull the shelf from the Wine Cooler.
natural_image
Technical line drawing of a mechanical assembly with no visible text or symbolsNote
- If the unit is unplugged, power lost, or turned off, you must wait 3 to 5 minutes before restarting the unit. If you attempt to restart before this time delay, the Wine Cooler will not start.
- When you use the wine cooler for the first time or restart the wine cooler after having been shut off for a long time, there could be a few degrees variance between the temperature you select and the one indicated on the LED readout. This is normal and it is due to the length of the activation time. Once the wine cooler is running for a few hours everything will be back to normal.
Door Lock
(For SV 100-series/SV 110-series/SV 120-series/SV 130-series)
Your unit is provided with a lock and key combination.
The keys are located inside the plastic bag that contains the User's Guide. Insert the key into the lock and turn it counterclockwise to unlock the door. To lock the door, do the reverse operation making sure metal pin is engaged completely. Remove the key and place it in a secure place for safekeeping.
How to change the door opening
This appliance has reversible doors but is delivered with a right hinged door. The left-hand hinge kit comes with the unit (in the box), should you wish to reverse the hinge on your unit.
For model SV-10 series, SV 80-series and SV 90-series
-
Lower hinge (Right)
-
Screws
-
Door axis
-
Door
-
Top hinge (Right)
-
Hinge Screws
-
Top hinge (Left)
-
Decorative nail
-
Lower hinge (Left)
-
Door limit device
-
Screw
-
Plug
-
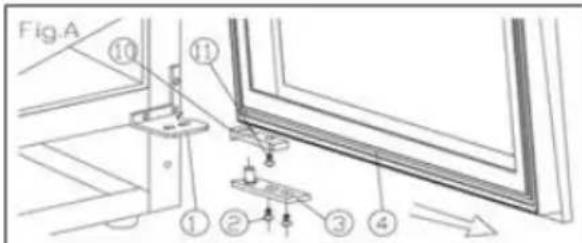
When open the door 90 degree, take out 2 screws (2) from lower door axis (3), remove the door (4), then pull out the door and door axis (Fig. A).
-
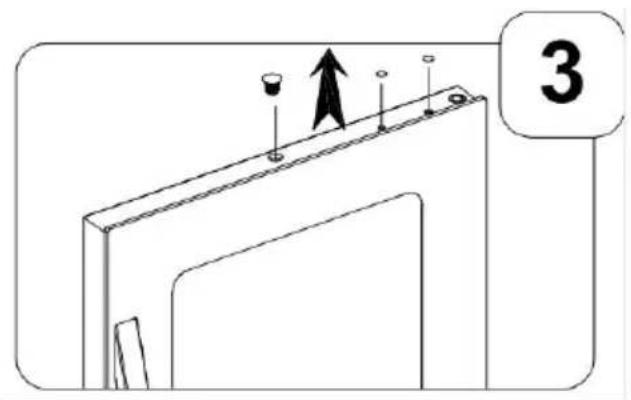
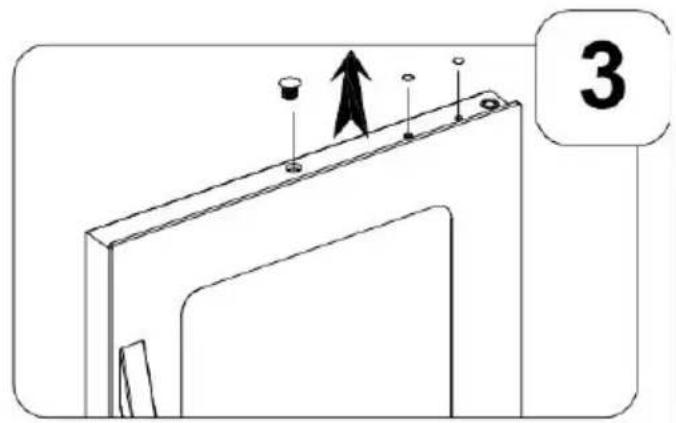
Put the door (4) safety and take out the plug (12) from top of door frame, unscrew 1 screw (11) at bottom and remove the Door limit device (10), then install the Door limit device (10) at top of door frame, please use spare plug (12) to block the hole at top of door frame. (Fig. A/B)
-
Take out 3 hinge screws (6) from top hinge (right) (5) and remove it. (Fig. C)
-
Remove decorative nail (8) from left top of cabinet and install spare top hinge (Left) (7) at left top of cabinet with 3 screws. (Fig. D)
-
According above procedure, install
spare lower hinge (left) (9). (Fig. E)
- Remove the door hinge from right side and install on the left side.
- Block the hole at right top of cabinet with spare decorative nail (8).


For model SV 100-series, SV 110-series, SV 120-series and SV 130-series (with stainless steel door)
- Screws
- Top hinge (right)
- Lock hole decorative cover
- Decorative nail
- Screws
- Door axis(right)
- Door bracket
- Lower hinge (left)
- Lower hinge (right)
- Top hinge (left)
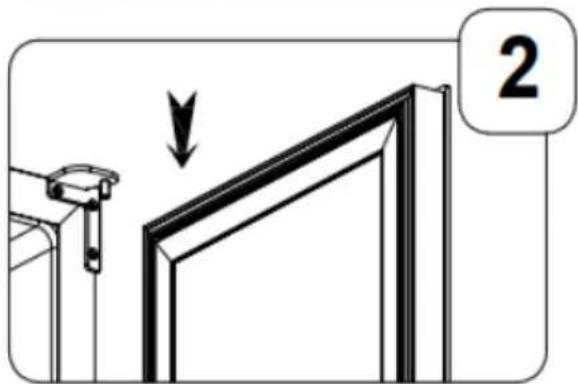
- Take out 4 screws (1) from top hinge (right) (2) and remove the top hinge (right), then put out the door. (Fig.A)
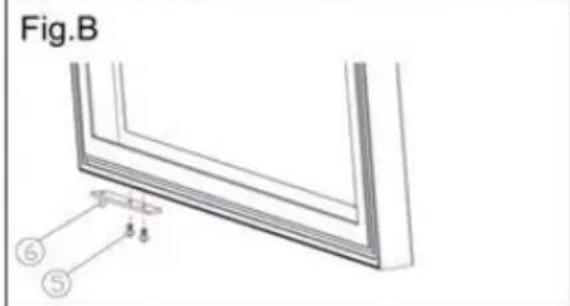
- Put the door safety and take out the lock hole decorative cover(3) and decorative nail (4) from top of door frame, unscrew 2 screws (5) at bottom and remove the door axis(right) (6), then install the lock hole decorative cover (3) and decorative nail (4) at bottom, please install the spare left door axis at top of door frame. (Fig.B)
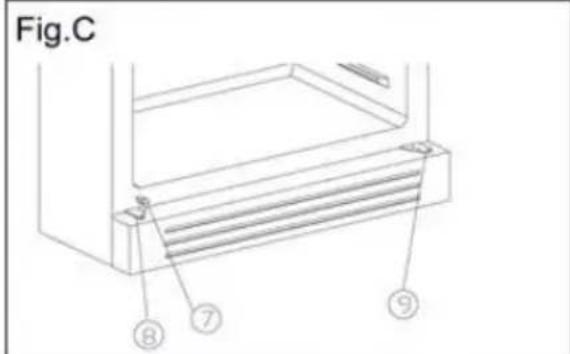
- Remove the door bracket (7) from lower hinge (left)(8) and install it at lower hinge (right)(9). (Fig.C)
- The door revolves 180 degrees, put door axis to aim at lower hinge (left) and install the door onto lower hinge (left), then close the door carefully.
- Fix spare top hinge (left) (10) onto left top of cabinet with 4 screws (1), then adjust door. (Fig.D)
Note: This is a job for two persons.


For model SV 100-series, SV 110-series, SV 120-series (with full glass door)
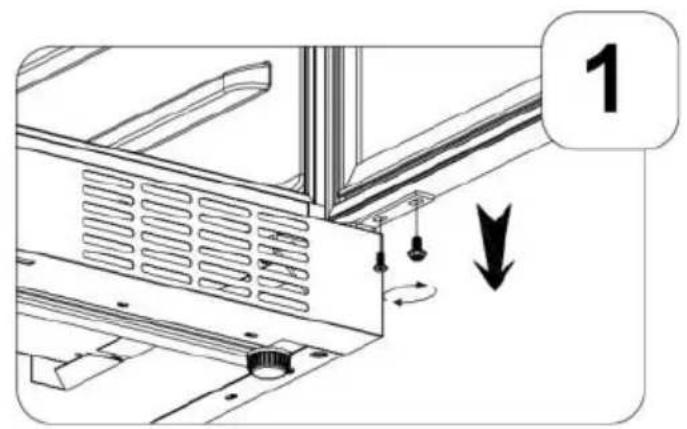
- Open the door and remove the two screws under the right bottom corner of the door that are used to hold the right lower hinge to the door. Be careful to hold the door with hands from dropping after removing the screws.
- Put down to remove the door and place it on a padded surface to prevent scratching it.
- Remove the pasters on the top of the door.
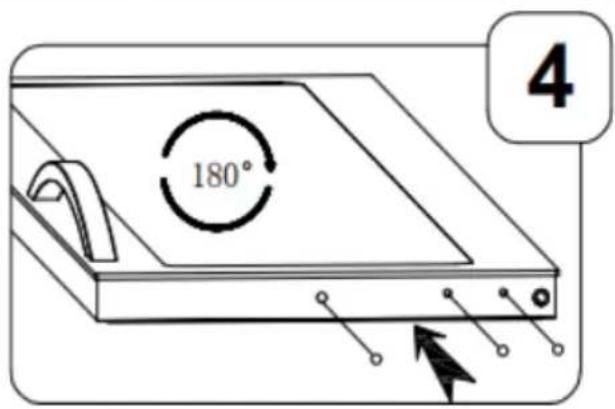
- The door revolves 180 degrees. Install the two pasters from the accessories package to the top right of the door.
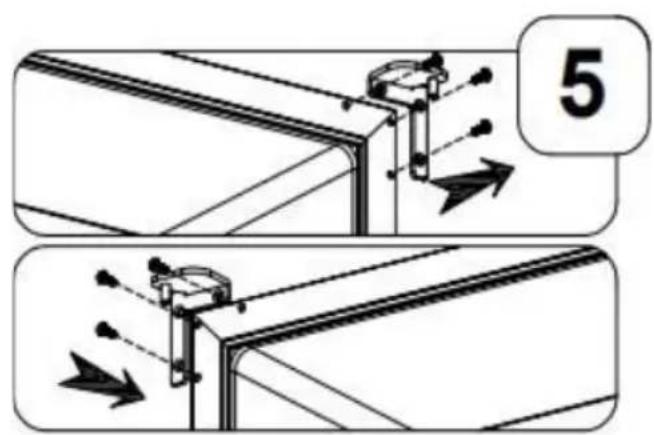
- Remove the door shaft from the right upper hinge. Install the new left door shaft that from the plastic bag includes the instruction manual and tighten it on the left upper hinge.
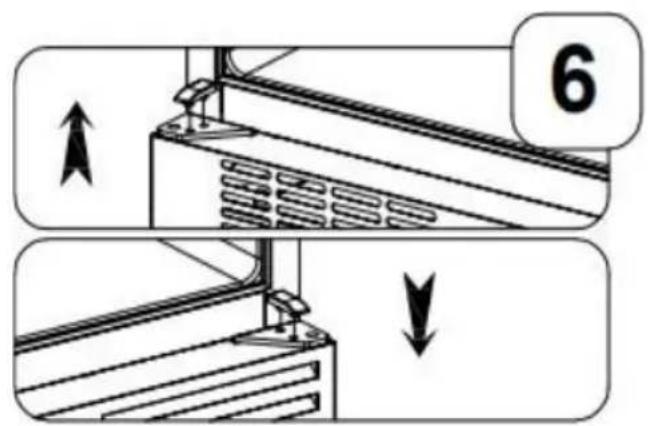
- Take out the door body support block at the right lower hinge, and then install it to the left lower hinge.
- Remove the right lower hinge supporter with the adjusting washer. Install the left lower hinge supporter from the plastic bag that includes the instruction manual. Make sure to put the adjusting washers at the designated position.
- Locate the door to the designated position making sure that the door shaft enters the door hole at the left upper corner of the door. Install the two screws that are used to connect the left lower hinge with the door and tighten them before the door is leveled. Then remove the handle from the left side and install it on the right side of the door.



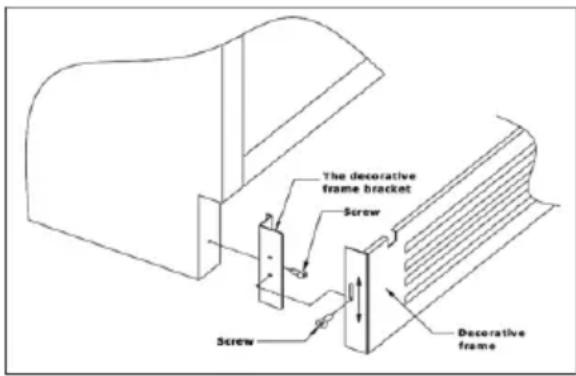
Install the decorative frame (SV 80-series)
Take out the decorative frame and the brackets from the accessories box. Fix the brackets to the cabinet with the screws provided and fix both sides of the decorative frame to the brackets with the 2 supplied screws as shown in below diagram.
Humidity box
This product comes with a plastic box for the humidity. If the ambient humidity inside the cabinet is too dry, you can use the box and water to raise the humidity.
In countries with warm weather like Spain or south France, this box may be useful.
CARE AND
MAINTENANCE
Cleaning Your Wine Cooler
- Turn off the power, unplug the appliance, and remove all items including shelves and rack.
- Wash the inside surfaces with a warm water and baking soda solution. The solution should be about 2 tablespoons of baking soda to a quart of water.
- Wash the shelves with a mild detergent solution.
- Wring excess water out of the sponge or cloth when cleaning area of the controls, or any electrical parts.
- Wash the outside cabinet with warm water and mild liquid detergent. Rinse well and wipe dry with a clean soft cloth.
Power Failure
- Most power failures are corrected within a few hours and should not affect the temperature of your appliance if you minimize the number of times the door is opened. If the power is going to be off for a longer period of time, you need to take the proper steps to protect your contents.
Vacation Time
- Short vacations: Leave the Wine Cooler operating during vacations of less than three weeks.
- Long vacations: If the appliance will not be used for several months, remove all items and turn off the appliance. Clean and dry the interior thoroughly. To prevent odor and mold growth, leave the door open slightly: blocking it open if necessary.
Moving Your Wine Cooler
- Remove all items.
- Securely tape down all loose items (shelves) inside your appliance.
- Turn the adjustable leg up to the base to avoid damage.
- Tape the door shut.
- Be sure the appliance stays secure in the upright position during transportation. Also protect outside of appliance with a blanket, or similar item.
Energy Saving Tips
- The Wine Cooler should be located in the coolest area of the room, away from heat producing appliances, and out of the direct sunlight.
PROBLEMS WITH YOUR WINE
COOLER?
You can solve many common Wine Cooler problems easily, saving you the cost of a possible service call. Try the suggestions below to see if you can solve the problem before calling the servicer.
TROUBLESHOOTING GUIDE
Wine Cooler does not operate.
Not plugged in.
The appliance is turned off.
The circuit breaker tripped or a blown fuse.
Wine Cooler is not cold enough.
Check the temperature control setting.
External environment may require a higher setting.
The door is opened too often.
The door is not closed completely.
The door gasket does not seal properly.
Turns on and off frequently.
The room temperature is hotter than normal.
A large amount of contents has been added to the wine cooler.
The door is opened too often.
The door is not closed completely.
The temperature control is not set correctly.
The door gasket does not seal properly.
The light does not work.
Not plugged in.
The circuit breaker tripped or a blown fuse.
The bulb has burned out.
The light button is "OFF".
Vibrations
Check to assure that the Wine Cooler is level.
The Wine Cooler seems to make too much noise.
The rattling noise may come from the flow of the refrigerant, which is normal.
As each cycle ends, you may hear gurgling sounds caused by the flow of refrigerant in your Wine Cooler.
Contraction and expansion of the inside walls may cause pop-ping and crackling noises.
The Wine Cooler is not level.
The door will not close properly.
The Wine Cooler is not level.
The door was reversed and not properly installed.
The gasket is dirty.
The shelves are out of position.
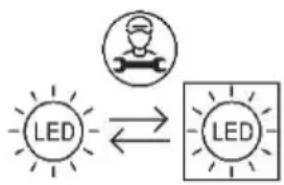
Light source energy class
- Lamp type: LED light. Energy efficiency level: G
• Light source in this product is replaceable only by a professional
flowchart
graph LR
    A["LED"] <--> B["LED"]
CE declaration of conformity
CE This appliance has been manufactured to the strictest standards and complies with all applicable legislations,
Low Voltage Directive (LVD) and Electromagnetic Compatibility (EMC).
UKCA declaration of conformity
UK CA This appliance has been manufactured to the strictest standards and complies with all applicable legislation.
Disposal of Old Appliance
Dispose of your appliance packaging properly.
Refrigeration equipment must be properly disposed of in a way which protects the environment. This applies to your old appliance and to your new unit once it has reached the end of its service life.
WARNING
Please ensure that old, worn appliances are rendered unusable before disposal by removing the plug, cutting the network cable, and removing or destroying any snap fastenings or bolts. You will thus prevent children from locking themselves in the
appliance during play (risk of suffocation) or endangering their lives in any other way.
Disposal instructions:
- The appliance must not be disposed of in the dustbin or with normal household rubbish.
- The coolant circuit, particularly the heat exchanger at the back/ bottom of the unit, must not be damaged.
- The symbol on the product or its packaging indicates that this product is not to be handled as normal household waste but is to be taken to a recycling collection point for electrical and electronic goods.
By correctly disposing of this product, you are contributing to the protection of the environment and to the health of your fellow human beings. Improper disposal endangers health and the environment. Further information about the recycling of the product may be obtained from your town hall, refuse collection department or the store where you purchased the product.
SV 110-serie

Für SV 80-serie / SV 90-serie
natural_image
Technical line drawing of a mechanical assembly with hatched components and an inset view showing a gear mechanism (no text or symbols)Hinweis




flowchart
graph TD
    A["Step 5: Mounting"] --> B["Step 6: Directional Adjustment"]
    B --> C["Step 7: Forward Rotation"]
    C --> D["Step 8: Directional Adjustment"]
    D --> E["Step 9: Directional Adjustment"]
    E --> F["Step 10: Directional Adjustment"]
Access to professional repair, such as internet webpages, addresses, contact details.
Model no: SV 19 B
Aftersales service station list:
| Address | Scandomestic A/S | QR code | 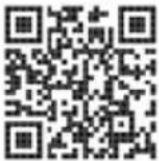 |
| Contact Number | 7242 5571 | ||
| Website | www.scandomestic.dk | ||
| Relevant information for ordering spare parts, directly or through other channels provided by the manufacturer, importer or authorised representative; | Scandomestic A/S | ||
| The minimum period during which spare parts, necessary for the repair of the appliance, are available; (years) | 7 | ||
| defined in Regulation EU 2019/2016 by means of a weblink that links to the model information as stored in the product database or a link to the product database and information on how to find the model identifier on the product.) | www.scandomestic.dk | ||
Note: The address or contact phone number of the service site is subject to change without prior notice. Please confirm whether the service station is a directly affiliated one of our company when requiring services.
DE
Access to professional repair, such as internet webpages, addresses, contact details.
Model no: SV 81 B
Aftersales service station list:
| Address | Scandomestic A/S | QR code |  |
| Contact Number | 7242 5571 | ||
| Website | www.scandomestic.dk | ||
| Relevant information for ordering spare parts, directly or through other channels provided by the manufacturer, importer or authorised representative; | Scandomestic A/S | ||
| The minimum period during which spare parts, necessary for the repair of the appliance, are available; (years) | 7 | ||
| defined in Regulation EU 2019/2016 by means of a weblink that links to the model information as stored in the product database or a link to the product database and information on how to find the model identifier on the product.) | www.scandomestic.dk | ||
Note: The address or contact phone number of the service site is subject to change without prior notice. Please confirm whether the service station is a directly affiliated one of our company when requiring services.
DE
Access to professional repair, such as internet webpages, addresses, contact details.
Model no: SV 81 X
Aftersales service station list:
| Address | Scandomestic A/S | QR code |  |
| Contact Number | 7242 5571 | ||
| Website | www.scandomestic.dk | ||
| Relevant information for ordering spare parts, directly or through other channels provided by the manufacturer, importer or authorised representative; | Scandomestic A/S | ||
| The minimum period during which spare parts, necessary for the repair of the appliance, are available; (years) | 7 | ||
| defined in Regulation EU 2019/2016 by means of a weblink that links to the model information as stored in the product database or a link to the product database and information on how to find the model identifier on the product.) | www.scandomestic.dk | ||
Note: The address or contact phone number of the service site is subject to change without prior notice. Please confirm whether the service station is a directly affiliated one of our company when requiring services.
DE
Access to professional repair, such as internet webpages, addresses, contact details.
Model no: SV 85 B
Aftersales service station list:
| Address | Scandomestic A/S | QR code |  |
| Contact Number | 7242 5571 | ||
| Website | www.scandomestic.dk | ||
| Relevant information for ordering spare parts, directly or through other channels provided by the manufacturer, importer or authorised representative; | Scandomestic A/S | ||
| The minimum period during which spare parts, necessary for the repair of the appliance, are available; (years) | 7 | ||
| defined in Regulation EU 2019/2016 by means of a weblink that links to the model information as stored in the product database or a link to the product database and information on how to find the model identifier on the product.) | www.scandomestic.dk | ||
Note: The address or contact phone number of the service site is subject to change without prior notice. Please confirm whether the service station is a directly affiliated one of our company when requiring services.
DE
Access to professional repair, such as internet webpages, addresses, contact details.
Model no: SV 91 X
Aftersales service station list:
| Address | Scandomestic A/S | QR code |  |
| Contact Number | 7242 5571 | ||
| Website | www.scandomestic.dk | ||
| Relevant information for ordering spare parts, directly or through other channels provided by the manufacturer, importer or authorised representative; | Scandomestic A/S | ||
| The minimum period during which spare parts, necessary for the repair of the appliance, are available; (years) | 7 | ||
| defined in Regulation EU 2019/2016 by means of a weblink that links to the model information as stored in the product database or a link to the product database and information on how to find the model identifier on the product.) | www.scandomestic.dk | ||
Note: The address or contact phone number of the service site is subject to change without prior notice. Please confirm whether the service station is a directly affiliated one of our company when requiring services.
DE
Access to professional repair, such as internet webpages, addresses, contact details.
Model no: SV 104 B
Aftersales service station list:
| Address | Scandomestic A/S | QR code |  |
| Contact Number | 7242 5571 | ||
| Website | www.scandomestic.dk | ||
| Relevant information for ordering spare parts, directly or through other channels provided by the manufacturer, importer or authorised representative; | Scandomestic A/S | ||
| The minimum period during which spare parts, necessary for the repair of the appliance, are available; (years) | 7 | ||
| defined in Regulation EU 2019/2016 by means of a weblink that links to the model information as stored in the product database or a link to the product database and information on how to find the model identifier on the product.) | www.scandomestic.dk | ||
Note: The address or contact phone number of the service site is subject to change without prior notice. Please confirm whether the service station is a directly affiliated one of our company when requiring services.
DE
Access to professional repair, such as internet webpages, addresses, contact details.
Model no: SV 104 X
Aftersales service station list:
| Address | Scandomestic A/S | QR code | 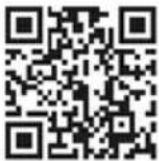 |
| Contact Number | 7242 5571 | ||
| Website | www.scandomestic.dk | ||
| Relevant information for ordering spare parts, directly or through other channels provided by the manufacturer, importer or authorised representative; | Scandomestic A/S | ||
| The minimum period during which spare parts, necessary for the repair of the appliance, are available; (years) | 7 | ||
| defined in Regulation EU 2019/2016 by means of a weblink that links to the model information as stored in the product database or a link to the product database and information on how to find the model identifier on the product.) | www.scandomestic.dk | ||
Note: The address or contact phone number of the service site is subject to change without prior notice. Please confirm whether the service station is a directly affiliated one of our company when requiring services.
DE
Access to professional repair, such as internet webpages, addresses, contact details.
Model no: SV 111 B
Aftersales service station list:
| Address | Scandomestic A/S | QR code |  |
| Contact Number | 7242 5571 | ||
| Website | www.scandomestic.dk | ||
| Relevant information for ordering spare parts, directly or through other channels provided by the manufacturer, importer or authorised representative; | Scandomestic A/S | ||
| The minimum period during which spare parts, necessary for the repair of the appliance, are available; (years) | 7 | ||
| defined in Regulation EU 2019/2016 by means of a weblink that links to the model information as stored in the product database or a link to the product database and information on how to find the model identifier on the product.) | www.scandomestic.dk | ||
Note: The address or contact phone number of the service site is subject to change without prior notice. Please confirm whether the service station is a directly affiliated one of our company when requiring services.
DE
Access to professional repair, such as internet webpages, addresses, contact details.
Model no: SV 124 B
Aftersales service station list:
| Address | Scandomestic A/S | QR code |  |
| Contact Number | 7242 5571 | ||
| Website | www.scandomestic.dk | ||
| Relevant information for ordering spare parts, directly or through other channels provided by the manufacturer, importer or authorised representative; | Scandomestic A/S | ||
| The minimum period during which spare parts, necessary for the repair of the appliance, are available; (years) | 7 | ||
| defined in Regulation EU 2019/2016 by means of a weblink that links to the model information as stored in the product database or a link to the product database and information on how to find the model identifier on the product.) | www.scandomestic.dk | ||
Note: The address or contact phone number of the service site is subject to change without prior notice. Please confirm whether the service station is a directly affiliated one of our company when requiring services.
DE
Access to professional repair, such as internet webpages, addresses, contact details.
Model no: SV 124 X
Aftersales service station list:
| Address | Scandomestic A/S | QR code |  |
| Contact Number | 7242 5571 | ||
| Website | www.scandomestic.dk | ||
| Relevant information for ordering spare parts, directly or through other channels provided by the manufacturer, importer or authorised representative; | Scandomestic A/S | ||
| The minimum period during which spare parts, necessary for the repair of the appliance, are available; (years) | 7 | ||
| defined in Regulation EU 2019/2016 by means of a weblink that links to the model information as stored in the product database or a link to the product database and information on how to find the model identifier on the product.) | www.scandomestic.dk | ||
Note: The address or contact phone number of the service site is subject to change without prior notice. Please confirm whether the service station is a directly affiliated one of our company when requiring services.
DE


- Kære kunde!
- VIGTIGE SIKKERHEDSREGLER
- Model SV 80-serie/SV 90-serie
- Bemærk
- SAFETY INSTRUCTIONS
- INSTALLATION INSTRUCTIONS
- Installation of Your Wine Cooler
- Attention
- Ambient Room Temperature Limits
- Internal LED lights
- OPERATING YOUR
- WINE COOLER
- Temperature Controls Model SV 80-series
- Temperature Controls
- Model SV 90-series
- For SV 85-series,100-series, SV 120-series
- Setting the Temperature Control
- For SV 130-series
- The controls of your Wine cooler (the Lower zone)
- Shelves
- For SV 80-series/ SV 90-series
- For SV 10-series, SV 100-series/SV110-series/ SV 120- series/SV 130-series
- Note
- Door Lock
- (For SV 100-series/SV 110-series/SV 120-series/SV 130-series)
- How to change the door opening
- For model SV-10 series, SV 80-series and SV 90-series
- For model SV 100-series, SV 110-series, SV 120-series and SV 130-series (with stainless steel door)
- For model SV 100-series, SV 110-series, SV 120-series (with full glass door)
- Install the decorative frame (SV 80-series)
- Humidity box
- CARE AND
- MAINTENANCE
- Cleaning Your Wine Cooler
- Power Failure
- Vacation Time
- Moving Your Wine Cooler
- Energy Saving Tips
- PROBLEMS WITH YOUR WINE
- COOLER?
- TROUBLESHOOTING GUIDE
- Wine Cooler does not operate.
- Wine Cooler is not cold enough.
- Turns on and off frequently.
- The light does not work.
- Vibrations
- The Wine Cooler seems to make too much noise.
- The door will not close properly.
- Light source energy class
- CE declaration of conformity
- UKCA declaration of conformity
- Disposal of Old Appliance
- Dispose of your appliance packaging properly.
- WARNING
- Disposal instructions:
- SV 110-serie
- Für SV 80-serie / SV 90-serie
- Hinweis
- DE
Brand : Scandomestic
Model : SV 104 B
Category : Wine cellar