
1DRPZ - Wall socket Karlik - Free user manual and instructions
Find the device manual for free 1DRPZ Karlik in PDF.


| Product Type | Wall Socket |
| Brand | Karlik |
| Model | 1DRPZ |
| Number of Sockets | 1 |
| Rated Voltage | 230 V AC |
| Rated Current | 16 A |
| Frequency | 50/60 Hz |
| Material | Flame-retardant polycarbonate |
| Dimensions (H x W x D) | 86 x 86 x 35 mm |
| Weight | 100 g |
| Mounting Type | Flush mount (in-wall) |
| Safety Features | Child safety shutters, flame retardant |
| Color | White |
| IP Rating | IP20 (indoor use) |
| Operating Temperature | -10°C to 40°C |
| Standards Compliance | CE, RoHS |
| Terminal Type | Screw terminal |
| Maximum Wire Size | 2.5 mm² |
| Cleaning Instructions | Wipe with a dry cloth; do not use water or solvents |
| Repairability | Replaceable modules; spare parts available |
| Warranty | 2 years |
Frequently Asked Questions - 1DRPZ Karlik
User questions about 1DRPZ Karlik
0 question about this device. Answer the ones you know or ask your own.
Ask a new question about this device
Download the instructions for your Wall socket in PDF format for free! Find your manual 1DRPZ - Karlik and take your electronic device back in hand. On this page are published all the documents necessary for the use of your device. 1DRPZ by Karlik.
USER MANUAL 1DRPZ Karlik
ASSEMBLY MANUAL OF RTV AND RTV-SAT OUTLET SOCKETS
- Prepare end of the antenna cable for installation, i.e. strip the wire of the coaxial cable by cutting at the same height the external insulation, over-wrap and the centre of the cable. (picture no. 1)
- Unscrew the clamping bolt in the antenna outlet socket (picture no. 2).
- Insert the antenna cable so as blade of the socket enters between the over-wrap and the external insulation. Check if the wires of the cable are inserted into the input clamp in a correct way (picture no. 4).
- Tighten the clamping bolt in the antenna outlet socket (picture no. 5).
- For pass-through sockets - procedure for socket output is the same as for socket input.
- Insert the socket into the φ 60mm installation box and according to the type of box assembly the socket with either the spikes or the fastening screws.
- Place the frame with the cap on the main body of the outlet socket..
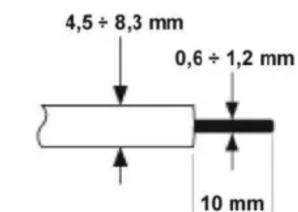
PICTURE NO.1

PICTURE NO.2

PICTURE NO.3

PICTURE NO.4

PICTURE NO.5
NOTE!
Assembly shall be held by a suitably qualified person with deactivated voltage and shall meet the national safety standards.


Brand : Karlik
Model : 1DRPZ
Category : Wall socket