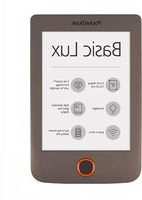
Basic Lux - E-reader POCKETBOOK - Free user manual and instructions
Find the device manual for free Basic Lux POCKETBOOK in PDF.


| Product Type | E-reader |
| Brand | PocketBook |
| Model | Basic Lux |
| Display | 6” E-Ink Carta, 1024×758, 212 dpi, black & white, frontlight |
| CPU | 1 GHz |
| RAM | 256 MB |
| Storage | 8 GB (actual available may vary) |
| Memory Slot | MicroSD up to 32 GB |
| Battery | Li-Ion Polymer, 1300 mAh |
| Dimensions | 174.4 × 114.6 × 8.3 mm |
| Weight | 170 g |
| Connectivity | Wi-Fi (b/g/n), Micro-USB |
| Supported Book Formats | PDF, PDF (DRM), EPUB, EPUB (DRM), DJVU, FB2, FB2.ZIP, DOC, DOCX, RTF, PRC, TXT, CHM, HTM, HTML, MOBI, ACSM |
| Supported Image Formats | JPEG, BMP, PNG, TIFF |
| Operating System | Linux |
| Controls | Physical buttons: Up, Down, Left, Right, OK, Forward, Backward, Power |
| Frontlight | Yes, adjustable |
| Languages | Multiple interface languages, up to 3 keyboard layouts |
| Battery Charging | Via USB (PC or charger, optional), first charge 8-12 hours |
| Battery Life | Varies with usage, settings, and connectivity |
Frequently Asked Questions - Basic Lux POCKETBOOK
User questions about Basic Lux POCKETBOOK
0 question about this device. Answer the ones you know or ask your own.
Ask a new question about this device
Download the instructions for your E-reader in PDF format for free! Find your manual Basic Lux - POCKETBOOK and take your electronic device back in hand. On this page are published all the documents necessary for the use of your device. Basic Lux by POCKETBOOK.
USER MANUAL Basic Lux POCKETBOOK
SAFETY PRECAUTIONS 6
APPEARANCE 11
TECHNICAL CHARACTERISTICS ...... 12
GETTING STARTED 13
Charging Battery 13
Device management 15
Main menu overview 16
Navigation 17
Working with On-Screen Keyboard 18
Recent Events 20
Loading Files 20
Frontlight 24
Inserting Micro SD Card 25
Applications
Calculator 26
Chess 26
Dictionary 26
Klondike 27
Gallery 27
Snake
Interactive Apps 30
Dropbox PocketBook 30
Send-to-PocketBook 33
READING BOOKS 37
Turning Pages 41
Following References 41
Changing Font Size 41
Reading Menu 42
Contents 42
Go to Page 43
Search 44
Bookmarks 44
Settings 45
Dictionary 48
Rotate 48
Notes 48
Closing a Book 49
SETTINGS 50
Accounts and Synchronization 51
Personalize 54
Languages 55
Date/Time 56
Saving power 56
Maintenance 57
Software 59
About Device 60
FIRMWARE UPDATE....61
Table of Contents 5
TROUBLESHOOTING 64
CUSTOMER SUPPORT ......66
COMPLIANCE WITH INTERNATIONAL STANDARDS ......67
Safety Precautions
Before start working with the Device, please, read this section carefully. Following these instructions will help you ensure your safety and extend service life of the Device.
Storage, Carriage and Usage Conditions
Device operating temperature range is 0^ to 40^ , so don't expose the Device to excessively high or low temperatures. Never leave cables near heat sources. Heated cables or their insulation may become deformed or damaged, which could lead to fire or electric shock.
Try to avoid next impacts:

Maintenance
Do not leave the Device for a long time in poorly ventilated environment, e.g. in a car or in closed tight boxes/packaging.
☒ Neither drop nor try to bend the Device.
√ Protect the screen from objects that may scratch or damage it. To ensure adequate protection of the screen, we recommend storing the Device in a protective and/or hard cover.
√ Keep away from children.
☒ Do not disassemble or modify the book reader.
Do not use the Device with a damaged battery or charger (broken case, poor contact, broken feed cable). If the battery is damaged (cracked case, leakage of electrolyte, off-shape etc.) it should be replaced by the authorized personnel. Usage of home-made
or modified batteries may cause an explosion and/or damage the Device.
Do not use organic or inorganic solvents (e.g. benzoyl etc.) to clean the screen/case.
Use a soft cloth to remove dust from the Device's surface. Apply a few drops of distilled water to remove dirt.
Up to five faulty pixels are acceptable in the screen and do not constitute a warrantable defect of the screen.
If the device has not been used for a long time, the battery charge indicator may not work when the charger is connected. In this case, connect the charger, let the device charge for 1 hour, then disconnect and reconnect the charging device or USB cable. The device can then be used as normal.
By the end of product guarantee term, please contact the nearest authorized service facility for examination on the subject of security is maintained.
For detailed information about service centres in your region please visit the official website of PocketBook International: http://www.pocketbook-int.com.
RF Safety
The Device receives and transmits radio frequencies and may interfere with radio communications and other electronic equipment. If you use personal medical Devices (e.g. a pacemaker or hearing aid) please contact your doctor or the manufacturer to learn whether or not such medical devices are protected against external RF signals.
Do not use wireless communication in places where it is prohibited, e.g. onboard a plane and in hospitals — this may affect airborne avionics or medical equipment.
Utilization
natural_image
Symbol of a trash bin crossed with no text or numbers, representing waste sorting or disposal (no text present)Incorrect disposal of this Device may have adverse impacts on the environment and public health. To prevent such consequences follow the device-specific disposal requirements. Recycling of these materials helps preserve natural resources. For more information regarding recycling issues please contact local municipal authorities, your domestic waste collection service, store where you purchased the Device, or the authorized service centre.
Disposal of electric and electronic components (the Directive is applicable to the EU and other European countries where separate waste disposal systems exist). In other countries dispose batteries accordingly to local laws.
Do not destroy the battery by burning it to avoid the danger of explosion
Appearance
- Backward – in reading mode turns page backward; in navigation mode – goes to the previous menu or page of the list;
- Left;
- Down;
- OK – short press opens an element (e.g. book or menu item), continuous one – opens item's context menu (if available);
- Up;
- Right;
- Forward – turns page forward;
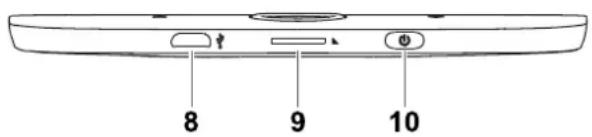
- Micro-USB port – for connecting to c omputer or charger (charger may be optional);
- MicroSD card slot – for external memory card (Micro SD card may be optional);
- On/Off (power) button – turns the Device on/off.
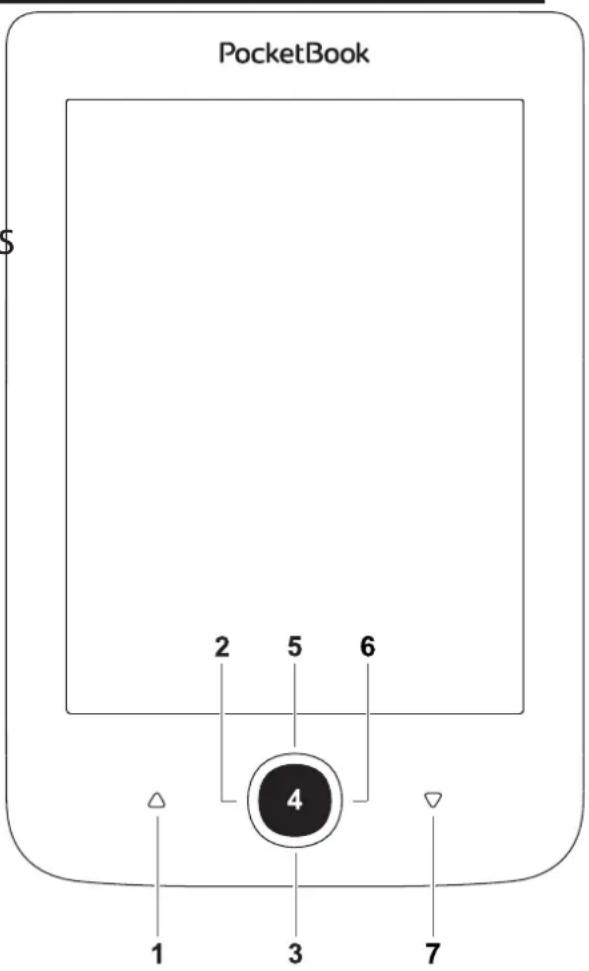
NOTE You can configure key mapping to your own in Settings > Personalize > Key mapping. Navigation and page turning buttons mapping depends on screen orientation.
Technical Characteristics
| Display | 6” E-Ink CartaTM 1024×758, 212 dpi, B&W |
| CPU | 1 GHz |
| Frontlight | Yes |
| RAM | 256 MB |
| Storage | 8 GB * |
| Operating system | Linux® |
| CPU | 1 GHz |
| Communications | Micro-USBWi-Fi(b/g/n) |
| Memory slot | MicroSD (up to 32 GB) |
| Battery | Li-Ion Polymer, 1300 mAh ** |
| Book formats | PDF, PDF (DRM), EPUB, EPUB (DRM),DJVU, FB2, FB2.ZIP, DOC, DOCX, RTF, PRC,TXT, CHM, HTM, HTML, MOBI, ACSM |
| Image formats | JPEG, BMP, PNG, TIFF |
| Dimensions | 174,4 × 114,6 × 8,3 mm |
| Weight | 170 g |
* The actual available internal storage size may vary depending on the software configuration of your device.
** Battery life and values mentioned above might vary depending on usage mode, connectivity and settings.
Getting Started
In this chapter you will learn how to prepare the Device to work and about its main control features.
CHARGING BATTERY
To extend battery lifetime, it's recommended to charge the Device for the first time from 8 to 12 hours.
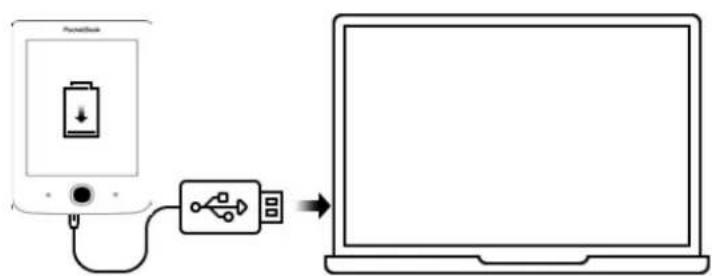
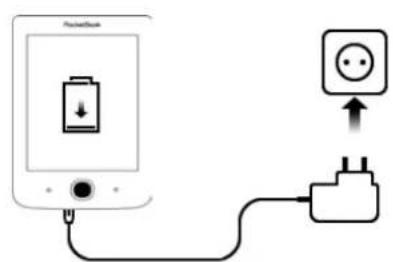
You can charge the battery from (1) PC using USB-cable or from (2) the power line using a charger (optional).
flowchart
graph LR
    A["Device with battery symbol"] --> B["USB icon"]
    B --> C["Laptop screen"]
①
②
To charge the battery for the first time, do the following:
- Connect the Device to a computer or charger with USB-cable. The device will turn on as soon as charging starts.
- When the battery is fully charged, you can disconnect the cable from the Device which is ready for usage.
If the Device is on when you connect the cable to PC, a dialog window asking to select action – PC link or Charge – will appear. Charging starts only if the appropriate mode was selected.
DEVICE MANAGEMENT
| Turn on | Press On/Off button. When the Device is ready to operate, Main menu or last opened book will appear, depending on settings. |
| Turn off | Press and hold On/Off button for about two seconds until the Device goes off. |
| Lock | You can lock your Device in three ways:1. Press On/Off button.2. You can set automatic key lock or power off: go to Settings > Saving Power > Power off after or Auto screen lock, and set the idle time before power off or locking Device. |
| Unlock | Press On/Off button. |
| Restart | In case if your Device ‘freezes’ (don’t respond to keys presses, you must give the device time (up to 30 seconds) to process commands. If it does not help, you can restart it by pressing On/Off button for 10 seconds. |
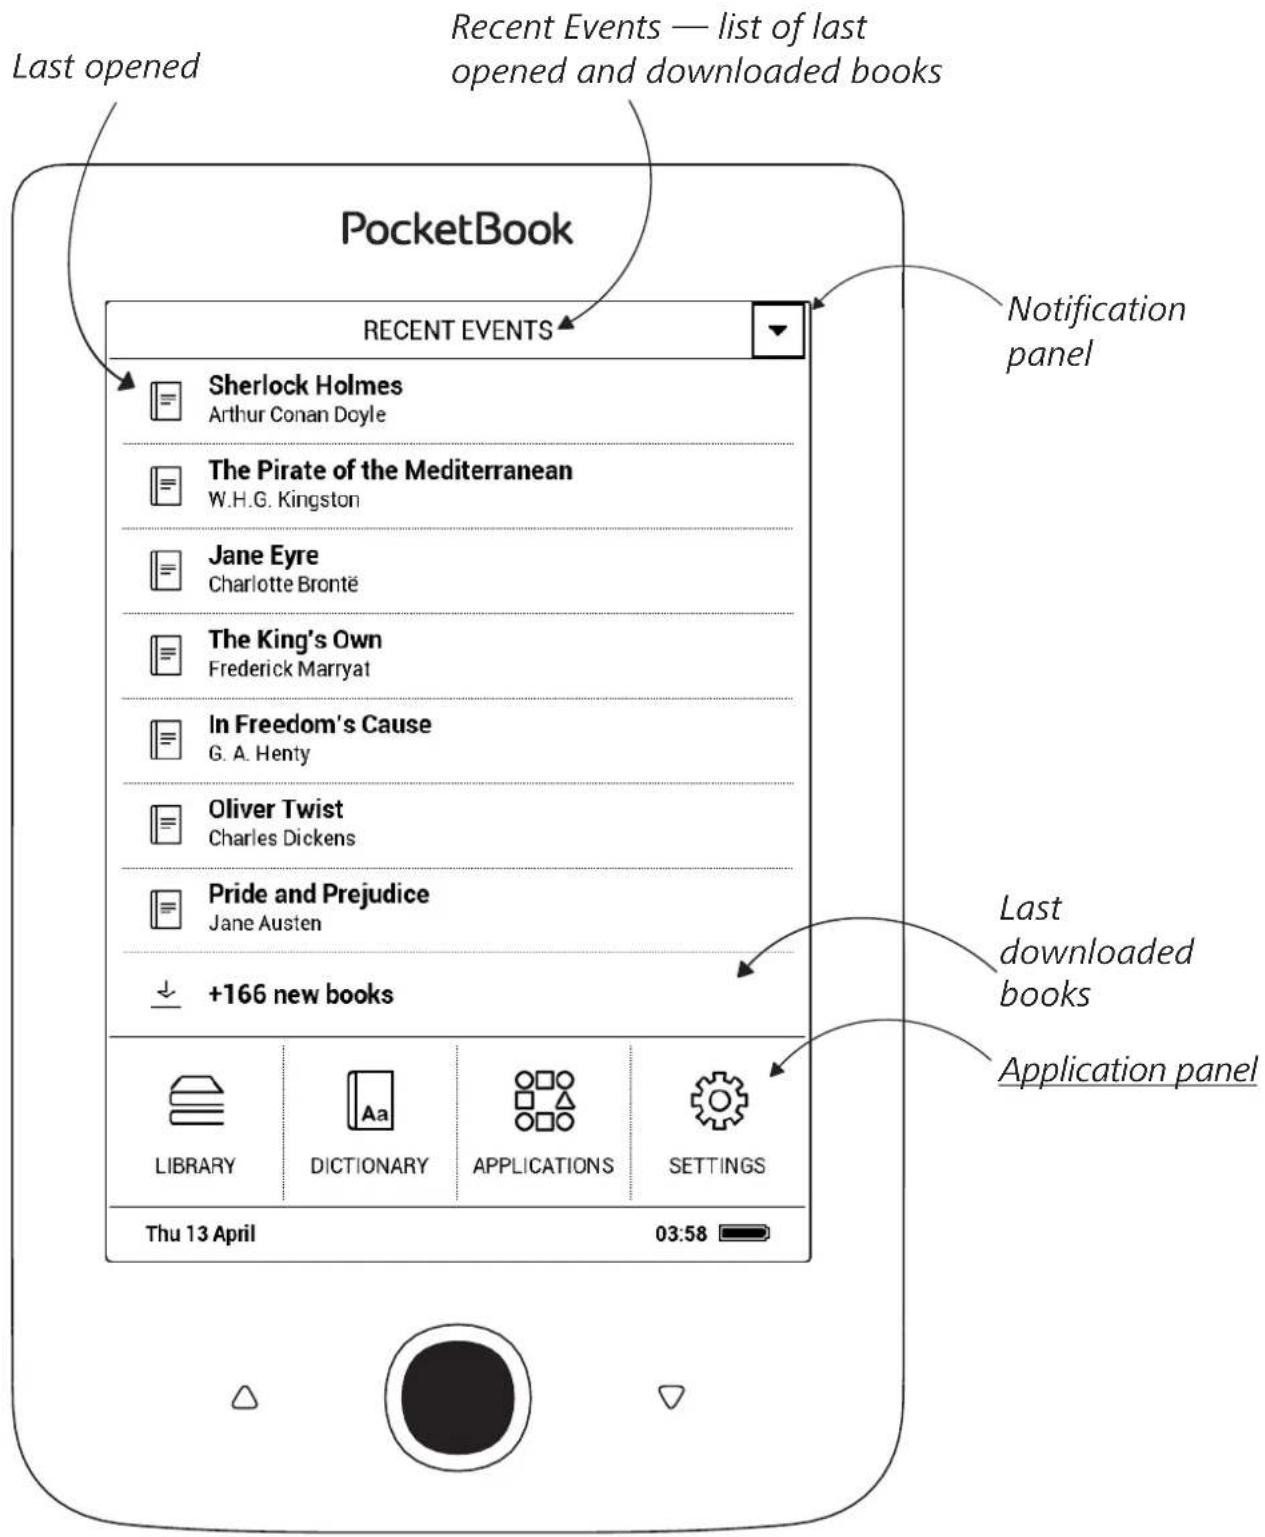
MAIN MENU OVERVIEW
NAVIGATION
Use navigation buttons Up, Down, Left, Right to select required item (e.g. book or menu item).
ATTENTION! If you change screen orientation, navigation and page turning keys mapping will be also changed accordingly to the side you've changed orientation to.
Press OK button shortly to open selected item. Continuous OK press opens context menu of item, folder or application (if available). If a menu item contains several level, you can go over them by Left/Right buttons.
Page turning buttons Backward/Forward are used to turn list pages. Continuous Backward/Forward keys press turns 10 pages at once in lists and books. Short and continuous Backward button press returns to the previous menu
(or list's page), closes an application, a context menu and the Library (If you are on the first page).
Also you can configure key mapping to your own in Settings > Personalize > Key mapping section.
WORKING WITH ON-SCREEN KEYBOARD
The on-screen keyboard appears when it is necessary to enter some text info, for example, search query.
To navigate through the keyboard use the navigation keys and OK button. To speed up keyboard operations all symbols are divided into 5 zones. The first navigation key press transfers cursor to the middle of the selected zone, and then you can select the required symbol in this zone. Press OK button to type the selected symbol.
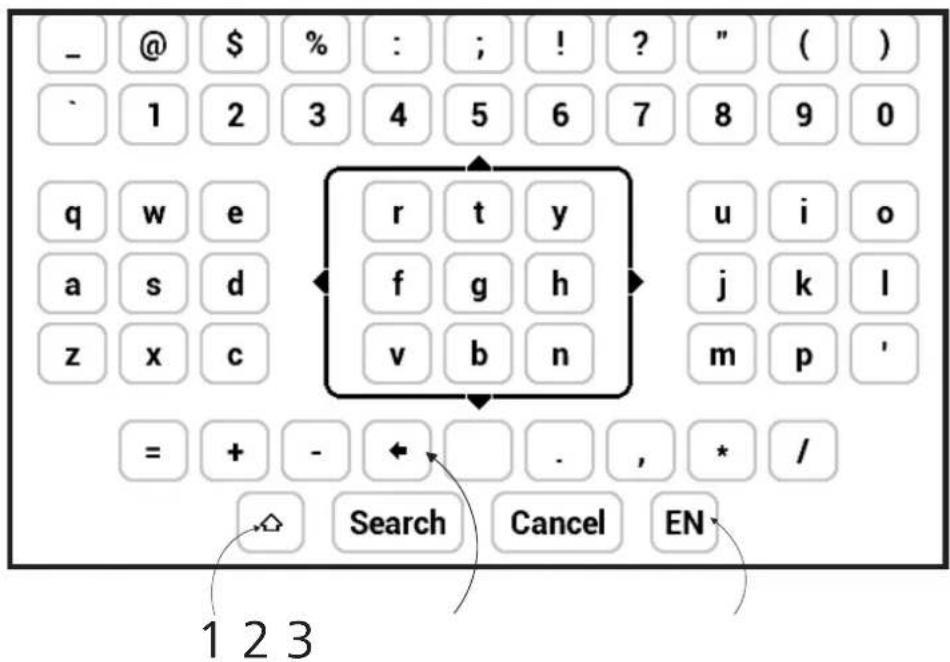
- Change text case
- Erase last entered symbol
- Change input language. To add the language (up to 3 layouts) to the onscreen keyboard layout go to Settings > Languages > Keyboard Layouts.
As you type a password (e.g. Wi-Fi credentials) 📷 icon will appear on a text field. Select icon and press OK to see typed symbols.
RECENT EVENTS
This section displays last actions on the Device, namely last opened and recently loaded books.
After you press OK on recently opened book title, it will be opened on a page you've finished reading before.
After pressing OK on a message about recently added books, Library will be opened displaying added books. Books will be grouped by creation date.
LOADING FILES
Connect the Device to the PC using microUSB cable.
NOTE The Device should be kept on while transferring files.
You will be prompted to select USB mode: PC Link or Charge either. Select PC Link. Operating system of computer will
detect Device's storage as removable disk (if SD card installed – as two ones). Now you can copy files to the Device or SD card using Explorer or other file manager.
ATTENTION! After copying files safely remove the Device before disconnect the cable!
Downloading protected e-books (Adobe DRM)
Registration at www.adobe.com is required to use e-books in protected format (Sign in > Create an Adobe Account).
Download via \*.acsm
- Visit www.adobe.com via your browser;
NOTE: the current version of your browser on the Device does not support Flash Player
-
Open Menu > Products > All products;
-
Follow the link Digital Editions in the alphabetical index of products.
- Open Visit the sample eBook library at the bottom of the page to enter the library;
- Choose a book and click Download item.
- A download window will appear on the screen. The file name should contain the name of the book and the file extension .acsm. Click Save.
- After the file is saved on your PC, a link as URLLink.acsm will appear.
NOTE: The same sequence of actions allows downloading a link to a protected book from any online bookstore.
Do the following to open a protected (DRM) book on the Device:
- Copy the file of the link to a book (*.acsm) to your Device.
-
Find and open the file on your Device.
-
Follow the on-screen instructions to activate your Device. To do this, use the on-screen keyboard to enter the login and password of your account on www.adobe.com into the Device Activation form. Then you will be able to download the book.
- Download the book. After the download is complete, a full version of the book will be available for reading in the Digital Edition folder.
The downloaded book is protected (DRM) and cannot be opened by a non-registered user.
Download books via PC
- Open the Adobe Digital Editions application.
NOTE: When connecting your Device to PC for the first time, Adobe Digital Editions prompts you to activate the new device. Use your registration data at www.adobe.com for this. If the Device is not activated, it will be impossible to copy a book from PC to device using Adobe Digital Editions.
- Select the Go to library view icon.
- Click All items.
- Choose a book and copy it to your Device.
FRONTLIGHT
Tj adjust the frontlight level, please use the Left/Right button and move a Slider in the notification bar.

flowchart
graph LR
    A["MIN"] --> B["●"]
    B --> C["●"]
    C --> D["●"]
    D --> E["MAX"]
INSERTING MICRO SD CARD
The Device already has 8 GB of internal storage, but you can extend it by using micro SD card (up to 32 GB). Insert it to the slot, like it is shown on a figure, and slightly push until card will be fixed.
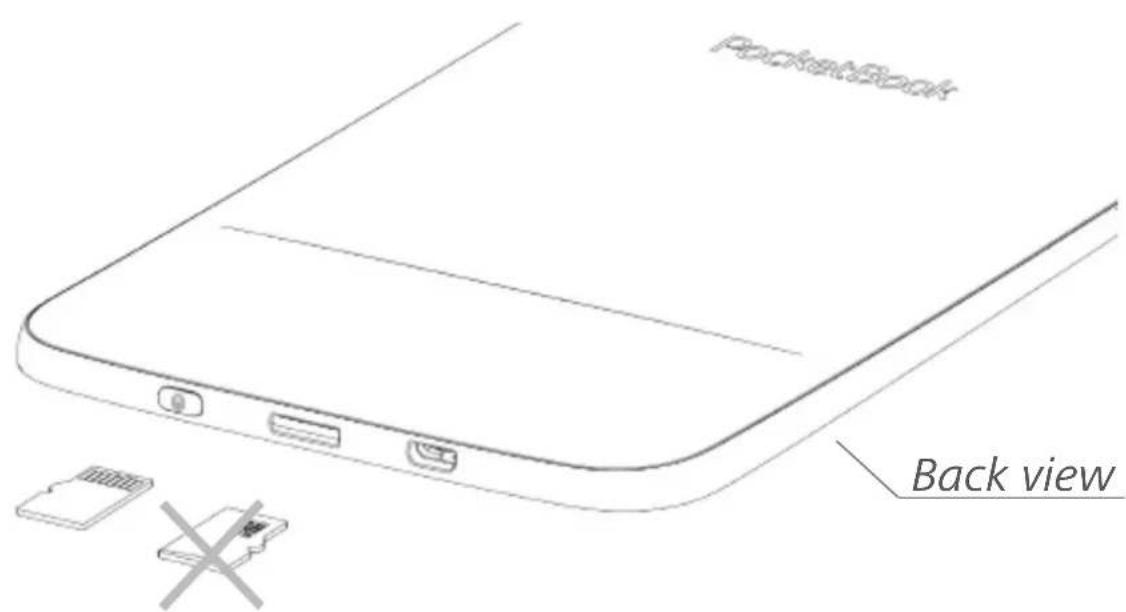
To eject the card, slightly press on its edge until it will be unfixed, and pull it to get.
ATTENTION! If your SD card get stuck, do not try to eject it by yourself and immediately call Customer Support.

APPLICATIONS
This section contains games and additional software.

Calculator
Engineering calculator supports a wide range of mathematical operations, such as different numeric systems, trigonometric, logarithm, power and logical operations.

Chess
You can play versus your friend or the Device. If you are playing against the Device, you can select 10 difficulty levels. Use the navigation keys to move cursor over the gaming board and OK to pick and put a piece.

Dictionary
After your start this application, the on-screen keyboard will appear. Type the word you'd like to find, and application will find its entry in the dictionary. To change
dictionaries, press Forward button twice, select the dictionary you need from the list and press OK.
After you close the on-screen keyboard (by pressing its keys OK or Cancel), you will be able to view dictionary page-by-page. To turn pages, use Left/Right keys. To bring up the on-screen keyboard again, press OK. To exit dictionary, press Backward button.

Klondike
Classic solitaire.

Gallery
This section opens in the mode of photo view (all photos must be downloaded to the Photo folder). You can look through images in JPG, BMP, PNG and TIFF formats.

Snake
The game. Use navigation keys to move the snake and collect bugs. Beware of the walls and other snake!

Sudoku
Popular Japanese puzzle.
Navigation: Use the navigation keys to move around the grid and bottom panel. Click OK button to enter. Backward/Forward buttons toggle between the grid and the panel and vice versa.
Controls: To enter a number into a cell of the grid, you can choose firstly a number or a cell, in which you want to enter a number or a label.
Cell first:
- Set a frame on the chosen cell and press OK button.
-
Press Backward or Forward to move to the bottom panel to choose correspondingly a number (left) or labels (right) for the specified cell. Press OK to enter;
-
The chosen number will be entered into the selected cell.
Number first:
- Press OK on the cell with "givens" (digits known in the beginning of the game) and on numbers of the bottom panel.
- The chosen number will be highlighted on the bottom panel, showing that it is active.
- Press OK on the cell of the grid to enter the highlighted number in a cell.
NOTE: A digit on the bottom panel is highlighted until another one is chosen.
Bottom panel:
→ — Step Back (Cancel previous action);
← — Step forward (active after "step back");
— Clear cell.
Hints:
■ — a hint by highlighting instances of the chosen numeral.
♂ — hiding labels, which are not correct for a cell no more
Q — a hint about possible labels for a cell.

Library
Library is e-books file manager, which allows to group, sort, change appearance of the section and perform search. Read more about this app at Library.
INTERACTIVE APPS

Dropbox PocketBook
DropBox application allows to download files, added to Dropbox from any computer or any Device with installed Dropbox app or from the Dropbox website, to your Device. And you do not need to install anything to your Pocket-Book, it is enough to authorize in the service.
How to start using
- Register in the Dropbox service (www.dropbox.com);
- Input your Dropbox account data (email address and password) on your PocketBook Device in the section Settings > Accounts and Synchronization > Dropbox > Login to authorize Dropbox. (The Wi-Fi connection should be on, otherwise you will be asked to turn it on);
- After successful authorization, the Dropbox PocketBook sync folder will be created in the Library of the Device. The Application > Dropbox PocketBook directory will show up in your Dropbox account, and after synchronization it will be available from other devices with Dropbox.
NOTE The application on your device will have access only to files in the Application > Dropbox PocketBook folder on the server
How to synchronize
Automatically:
- Files, added to the directory Application > Dropbox PocketBook on the server and to the sync folder on
your Device, will be automatically synchronized when the internet connection is on.
- All synchronized files will be downloaded to the sync folder in the Library (by default, Dropbox PocketBook is the sync folder, but you can change it in Settings > Accounts and Synchronization > Dropbox > Sync folder).
Manually:
- To synchronize all content in sync folders, in Settings choose 'Accounts and Synchronization > Dropbox > Synchronize files now', or in the Library choose 'Synchronize files now' in the context menu of the sync folder.

Send-to-PocketBook
The application allows to send files to the email address of your Device. Sent books will be automatically downloaded to your Device, if the Wi-Fi is turned on.
How to start using
-
Register for the Send-to-PocketBook service, for this purpose do the following:
-
Launch application:
• from the Applications > Send-to-PocketBook section;
• or from Settings > Accounts and Synchronization > Send-to-PocketBook.
NOTE: The Wi-Fi connection should be on, otherwise you will be asked to turn it on.
- In the opened wizard enter your contact email address and password.
- The email with the activation link will be sent to the specified address. Follow this link to receive the email address of your Device (for example, username@pbsync.com).
NOTE: The contact email address is used only for the authorization of the application, and the service address of the Device username@pbsync.com is used for sending books to it, if you want them to be downloaded to your Device.
- After activation update the registration wizard on the Device. After that all applications features will be available for you, and the download folder for received books will be created in the library — Send to PocketBook.
How to get files
Automatically:
-
Files, sent to the service email address of your Device, will be automatically downloaded to the download folder in the Device Library, when the internet connection is on. Download folder is available after authorization from the locations:
-
Applications > Send-to-PocketBook;
-
Settings > Accounts and synchronizations > Send-
to-PocketBook > Go to folder of the context menu of the Download folder;
• Library > Send-to-PocketBook. -
By default, 'Send-to-PocketBook' is the download folder, but you can change it at registration or in the Settings > Accounts and synchronization > Send-to-Pocket-Book > Download folder section.
Manually:
To update the content of the download folder, in Settings choose Accounts and synchronization > Send-to-Pocket-Book > Receive files now or in Library choose Receive files now in the context menu of the download folder.
Received files will be also available in the download folder in the Library of the Device.
The list of trusted senders
Documents can be downloaded on the Device, if they are sent from the address, contained in the 'white list' (a list of the trusted senders).
The address, specified at registration, is contained in the list by default.
If the mail is sent to your Device from the unknown address, you will receive the letter with a proposal to add a sender to the 'white list'. After your confirmation you will receive files from the added address to your Device. Thus, spam won't get on the Device.
Reading Books
In this chapter you will learn how to read e-books and con- figure reader software for the most comfortable reading.
The Device supports next book formats: PDF, PDF (DRM), EPUB, EPUB (DRM), DJVU, FB2, FB2.ZIP, DOC, DOCX, RTF, PRC, TXT, CHM, HTM, HTML, MOBI, ACSM.
To open a book, press OK on its title in Last events or Library section. If you opened a book before, it will be opened at the page you've finished reading.

LIBRARY
Library is e-books file manager. To open a book, press OK while its title is selected. Library menu allows to filter, group, sort, change appearance of the section and perform search.
1. Grouping criteria
Depending on selected criterion books are grouping by:
- All Books;
- Authors;
- Genres;
- Collections;
- Favorites;
- Folders;
- Formats;
- Series.
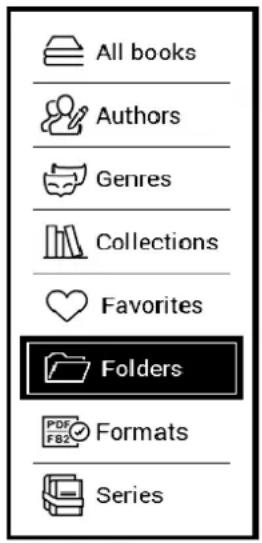
The results of grouping can be displayed as ascending (A-Z) or descending (Z-A) .
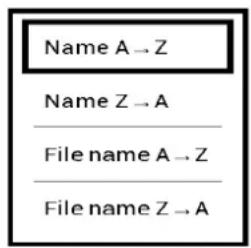
2. Sorting criteria
- By opening date;
- By addition date;
- By title;
- By author.
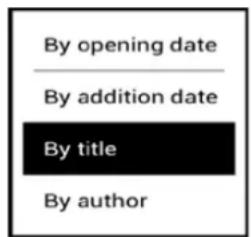
3. Books list views
Simple – in this mode the cover icon of the book is displayed.
Detailed – in this mode there's added author, titlele, thumbnails, information about file format and size, read percentage.
Context menu
Context menu, evoked by continuous pressing OK, allows performing the following operations:
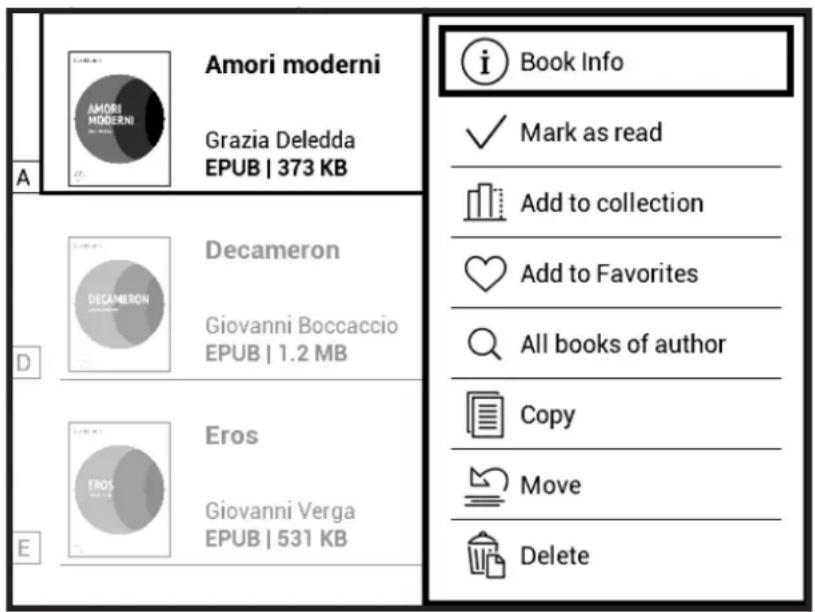
• Book Info - brief information about book;
- Mark as read;
- Add to collection;
- Add to Favorites;
• All books of author; - Copy;
- Move;
- Delete.
TURNING PAGES
Use Backward/Forward or Left/Right keys to turn pages. Continuous Backward/Forward keys press turns 10 pages at once.
FOLLOWING REFERENCES
If a page contains cross-references or footnotes, you can enter links mode on continuous OK button press (otherwise you'll get a message informing that a page contains no links to follow). A cursor will appear, and you will be able to select a link using keys and press OK to follow.
CHANGING FONT SIZE
In text format books (ePub, FB2 etc., excluding PDF and DjVu) you can change font size with Up/Down keys.
READING MENU
To access reader application menu press OK button.
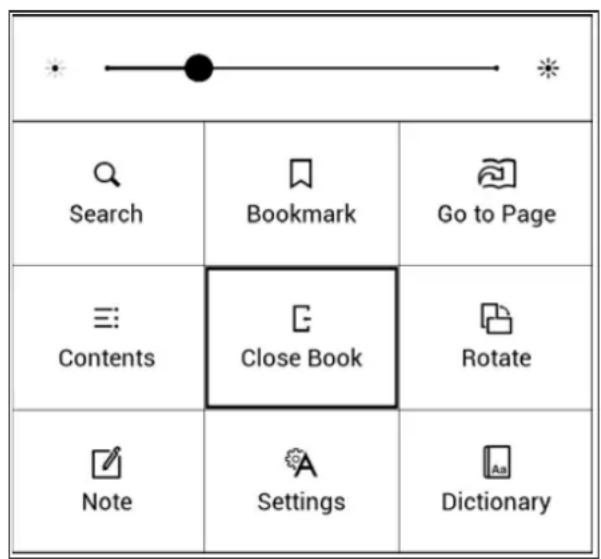
三: Contents
Opens structured content of the book if present, otherwise you'll get message about missing table of contents. Active contents display table of contents, bookmarks and notes you've made during reading. If table of contents has more than one level, higher level entry will be marked with '+'
sign. Expanded item is displayed with a sign '-'. Buttons Left/Right collapse/expand selected subsection branch.
Use navigation keys to move across the table, OK button opens selected book chapter, continuous press of OK button opens the context menu.
Using this menu you can open contents entry, edit or delete notes (text or graphic either) and bookmarks, expands/collapses selected subsection branch. Under Settings section of the context menu you can configure which elements to display:
- Contents;
- Bookmarks;
- Notes.

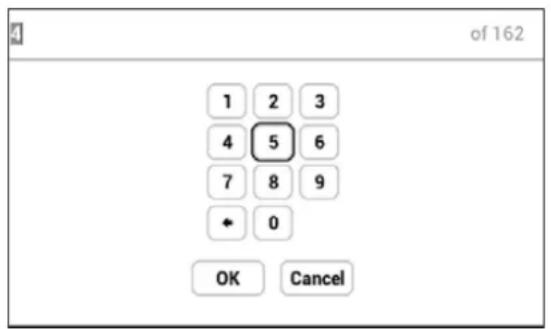
Go to Page
If you want to open the exact page press Go to page, after typing a page number exactly from on-screen keyboard press OK. If you will exit the menu by pressing Backward, you will stay on a page you was before.

Search
Search mode works only in books containing text layer. To search text through the book enter it using the on-screen keyboard. Found text would be highlighted, and you can switch between found instances using Left/Right navigation keys. To exit search mode press Backward/Forward.
NOTE: Search mode is not available for DJVU books.

Bookmarks
Adds current page to bookmarks. After adding a page to bookmarks in a right top corner a bookmark will appear.
All the bookmarks will be displayed in contents. To delete bookmark, select the correspondent menu item again.

Settings
In this section you can find out how to configure your reading settings for different book formats. You can also learn about all the available options and features in this menu.
EPUB, FB2, etc.
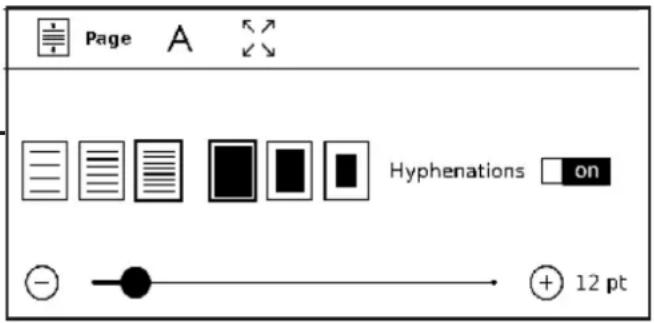
To configure EPUB, TXT, FB2, DOC and other text format books, open the Reading menu and select Settings.
Page tab - you can choose line spacing, font size, margins width and also enable or disable hyphenation.
Font tab - use this tab to select font style.
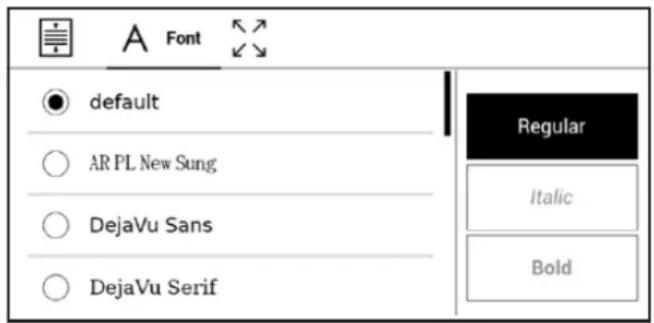
Screen tab - you can enable or disable page numbering and on/off Status bar.
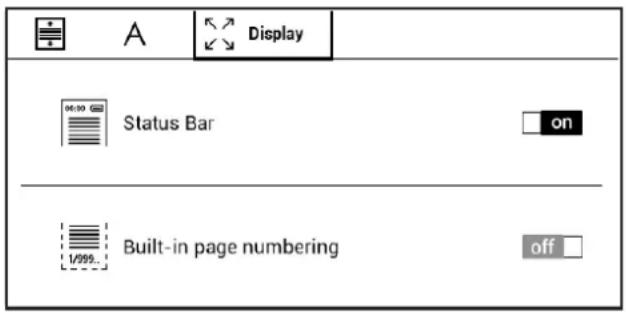
Built-in page numbering displays the number of pages in the book's original layout. One page can cover one or several screens, depending on reading settings.
If the function is disabled, the numbering will display the number of screens. It may take a while to calculate the number of screens when you first open the book, or after the reading settings have been changed. The number of screens won't be calculated again whenever the book is opened after this.
PDF and DjVu
PDF and DjVu books has Settings. Select viewing mode using Left/Right keys. Following modes are available:
- Margins cropping – allows to decrease margins width or height. Define a border, you want to crop by a joystick and press OK. Move arrow buttons by a joystick to set margins width and height. After selecting cropping area choose Accept. Then define cropping settings: whole document, odd pages, even pages or current page only. Confirm your choice by clicking Accept.
- Fit width – scaling page to the screen width
• The whole page – one page scaling - Columns – for reading books with columns. To navigate the page use navigation buttons. A page will be turned after bottom edge of the sheet reached
- Reflow – in this mode text is formatted to display completely on a page. You can change font size with Up and Down keys. Some images and tables may not display in this mode. Reflow mode is supported for PDF books only. Some tables and pictures cannot be displayed in the Reflow mode.

Dictionary
Single-word translation. By default cursor highlights the word to translate and dictionary looks for translation automatically. OK button press switches to a toolbar.
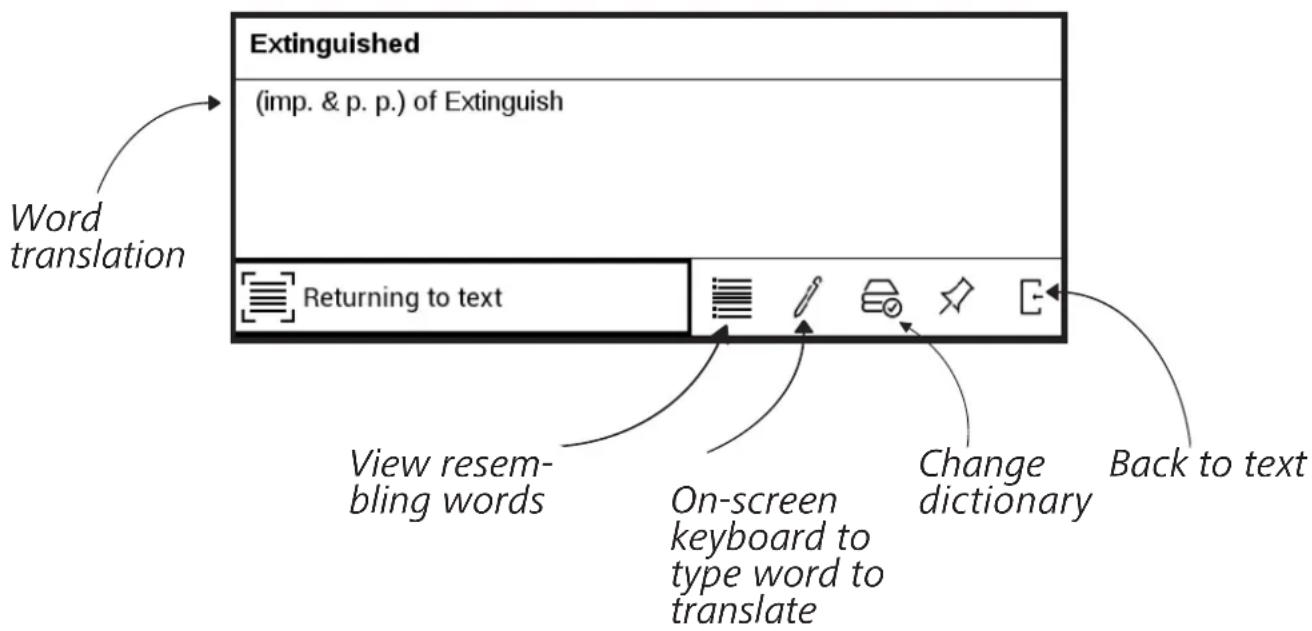
flowchart
graph TD
    A["Word translation"] --> B["Extinguished"]
    B --> C["(imp. & p. p.) of Extinguish"]
    B --> D["Returning to text"]
    D --> E["View resembling words"]
    D --> F["On-screen keyboard to type word to translate"]
    D --> G["Change dictionary"]
    D --> H["Back to text"]

Rotate
Fixes the screen orientation: select the suitable one with navigation keys.

Notes
You can enter notes mode by pressing Down button continuously or by pressing the corresponding menu option.
On the top of the display separate area will appear. Use the buttons Up, Down to choose the place where your note will begin and press OK to set up the top margin of the note. Use navigation buttons to highlight a text fragment and press OK to set the bottom margin of the note.
You can look through the notes by choosing Notes section in the main menu. By pressing OK button on the note, you can switch to the initial page, where it was created.

CLOSING A BOOK
To close a book, select the corresponding reading menu item.
Settings
In this chapter you will learn how configure the interface and software features of the Device for the most comfortable usage. Select Settings at Main menu panel to configure the Device. All changes will be applied after exiting the section.

WI-FI
In this section you can set parameters needed for network connection.
Network access — on or off. After network access activation, the following settings appear:
- Connection to hidden networks — read more in the Connecting to the Internet section of this manual.
• Available Networks — a list of available networks. Choose one of them and you’ll see parameters of this connection: Network name (SSID), signal strength, security, IP-address, network mask, main gateway, DNS.
NOTE If Scanning is displayed instead of Available Networks, it means that Device is searching for available networks.

ACCOUNTS AND SYNCHRONIZATION
Adobe DRM
To authorize, input your Login (e-mail address) and Pass-word. When you are authorized, your login and Exit from Adobe DRM item are displayed. After exit all protected DRM documents will be unavailable.
Send-to-PocketBook — the following options are available:
- PocketBook account: your account email.
- Login/Log out: if you are not authorized in the application, input your contact email address and password, to authorize. If you are authorized, the email, to
which you can send books, is displayed. You can logout Send-to-PocketBook.
- Receive files now: The content of the Download folder will be updated. Before update, please, check if your Device is connected to the Internet.
- Receive files automatically: On or Off. Files, sent to the Device address username@pbsync.com, will be automatically updated in the download folder, if Wi-Fi connection is on. You can turn off automatic receiving files to optimize the Device productivity.
- Download folder: location of received files. The Send-to-PocketBook folder is set by default. You can choose any other folder or create a new one in the internal Device storage or on the external SD-card.
- About service — more detailed about service.
Dropbox — In this section the following options are available:
- Login/Log out: if you are not authorized in the application, input your Dropbox account data to authorize. If you are authorized, then you can logout Dropbox.
- Synchronize Now: Files in the Sync folder and Pocketbook device directory will be synced. Before syncing files, please check if your Device is connected to the Internet and is linked to the proper Dropbox account
- Autosync: Turn On or Off auto synchronization. The service is turned on automatically at the authorization, so Dropbox will automatically sync files, if Wi-Fi connection is on. You can turn off autosync to optimize the Device productivity.
- Sync Folder: location of synced files. You can also move files to Sync folder, if you want to sync them with Dropbox Pocketbook directory on the server. The Dropbox PocketBook folder on the Device is set by default. You can choose another folder or create a new one in the internal Device storage or on the external SD-card.
- About Service — more detailed about service.

PERSONALIZE
Power-off Logo — the image will be displayed when the Device is off. You can set a cover of the last opened book by setting book cover.
NOTE You can also set your own picture as a logo from the Gallery application. Read about it in the Gallery section.
Complete Page Refresh. Select the amount of page turned before the screen will be updated completely. Always item provides the best quality, but consumes the most power. Less frequency may cause some artifacts from previous pages on a screen.
Open at Startup last opened book or main menu.
LED Indication – you can turn on or turn off LED indicator.
Key Mapping. In this section you can remap hardware keys. To change key action, select it from the list and select action from the list.
User Profiles - can be configured on bith internal storage and microSD card; number of profiles is not limited. Each profile stores individual books' status, last opened books, bookmarks, notes, favorites and pre-configured network connections.
To add new profile, open the corresponding item. You will be suggested to set destination (local memory or SD card) and to enter the name from on-screen keyboard. After this current above-mentioned parameters will be stored at this profile.
To activate profile open the one you need. In profile context menu you can change avatar, rename or delete profile.

LANGUAGES
Language. Select the Device's interface language.
Keyboard Layouts. Under this section you can add up to 3 keyboard layouts.
Available Dictionaries. Under this section you can un-check dictionaries you don't want to be displayed in the list during the translation or in Dictionary application.

DATE/TIME
In this section you will be able to set date, time, time zone and clock format. You can also Synchronize Time or set Auto Time Sync to use the network time/date.

SAVING POWER
Here you can see battery level and set parameters, which help to save battery charge:
- Battery Percentage;
- Lock device after — set time of idleness, after which the Device is locked: off, 5 min, 10 min.
• Power off after — set time of idleness, after which the Device power off: off, 10, 20, 30 or 60 minutes.

MAINTENANCE
USB Mode — set how the Device handles USB connection by default: PC link, Charge or Ask when connected.
Backup & Recovery
- Restore Configuration – select the configuration file to restore from a list;
- Backup Configuration to SD – this action will create a backup folder on an external microSD-card and will save there system settings. You will be suggested to enter the file name from on-screen keyboard;
Privacy
- Protect Configurations by Password — in this section you can protect your setting by password. Select Set Password section and type the password from on-screen keyboard. Now each time you try to enter Settings section, you will be asked to enter the password. You can remove or change password by selecting the corresponding item. To proceed, you will be asked to enter the password once more.
- Diagnostic and Usage — software provides data to PocketBook about some actions, performed by a user on the Device for the further improvement of the Device and services to users. The serial number and any other information for identifying a user isn’t saved. You can disable this option of statistics gathering in the Diagnostic and Usage section.
Format Internal Memory – this action will erase all data, except system files.
CAUTION! If you need to erase all data on the Device, use this feature only, don't try to format the Device internal memory via PC.
Format SD card – this action will erase all data from the external microSD card.
Factory Reset – the Device state will be reset to factory default settings, erasing user settings. Other data (e.g. books, photos) won’t be lost;
Demo mode - switching demo mode for the Device. To activate demonstration mode check On in the Demo mode item.

SOFTWARE
Software Version - the current version of firmware is displayed;
Software Update – the Device will search for updates in the following order: microSD card (if installed), internal storage and Internet.
Auto Update – turn on/off automatic check for updates.
Third-Party Apps — license and information about third-party applications, used on the Device.

ABOUT DEVICE
The following information about Device will be displayed:
Device Model (model, serial number, hardware platform); Memory (operative memory, total and available internal memory and microSD-card);
License - license and information about applications, used on the Device.
Firmware Update
WARNING! Firmware Update is a responsible operation, during which management software of the Device will be changed. In case of improper execution control program may be damaged and will require treatment in the service centre. Please perform the upgrade procedure in accordance with the instructions below.
There are two ways to update the firmware.
Automatic Update
To start automatic software update select Settings > Software > Software Update. The Device will begin to check available update sources in the following order:
• MicroSD card (if installed);
- internal memory;
- Internet.
If default Internet connection is not set, the Device will ask to connect to one of available wireless networks.
Also you can activate the automatic updates check (Settings > Software > Auto Update). In this case, the Device will use Wi-Fi connection only.
NOTE: You can check your Firmware version in Settings > Software > Firmware Version
Manual Update
- Open site www.pocketbook-int.com on your PC. Select your country.
- Click the Support button on top menu. Select hardware model of your Device
- Download the Firmware to your PC
- Unpack the content of the archive, file SWUPDATE. BIN, and copy it to the root folder of MicroSD-Card or internal Device storage
- Switch off the Device by pressing button On/Off.
- Switch on the Device by pressing On/Off. Hold both Backward and Forward buttons until the message Firmware update... is displayed on the screen.
NOTE If the firmware file is located on the SD card, it will have a higher priority in comparison with the file stored in the Device's root folder during the update process.
Troubleshooting
| Error Message Reason Correction Method | ||
| No upgrade image found | File SWUPDATE.BIN cannot be found on the microSD card. Make sure the file is in the root folder of the card. | Try to format your Micro SD card (make a backup copies of all its content prior to formatting) and copy the file to the root of the empty card. If this error persists, use another card. |
| Upgrade image is corrupted or Image is empty | SWUPDATE.BIN file is damaged or there is no space available on the microSD card. | Delete some files from your card and copy SWUPDATE. BIN file on it one more time. Repeat the download from www.pocketbook-int.com. If this error repeats, use other card. |
| File read error MicroSD card error | Try to use another MicroSD card | |
| Error. A different firmware version is installed on the device | A firmware file of an older version is stored in the device internal memory. | Delete the old version of the firmware file from the Device's internal memory root folder |
Troubleshooting
| Malfunction Possible Reason Solution | ||
| Device does not turn on or turns on but only the logo is loaded | Battery is low Charge the battery | |
| A book does not open — the message Book is probably damaged or protected appears, or nothing happens at all | The book is damaged | If the book was downloaded from the online store try to reload it again. If the file opens on your PC, but does not open on the Device, save the book in another format (TXT, DOC, PDF). |
| Html book opens but is displayed incorrectly. For example, there are empty pages, some part of the text is missing etc. | HTML-files contain non-text elements (frames, JAVA-scripts, flash-elements) | Save the page in TXT format |
| Book opens but various symbols, question marks etc. are displayed instead of letters | Incorrect encoding | Switch to reading mode, select Settings and change encoding |
| No response when you press any key | Sometimes (e.g., when downloading damaged or too large books) the Device may freeze | Close the frozen application by pressing ▲ keys simultaneously for 1–2 sec. |
| After connection to PC disks are not displayed in Explorer | Your Device is in the battery charging mode. | Check USB mode in Settings Main Menu item. Set Connection to PC or Ask at Connection |
| No signal in connection cable | Check USB cable condition and its proper connection to connector. Try to connect the USB-cable to another port | |
| Malfunciton Possible Reason Solution | ||
| Bookmarks, settings and current position in file cannot be saved | File system damaged | Connect the device to a PC and check disks. To proceed, open My Computer, right-click on the selected disk and select Properties > Service > Check Disk |
| Internal memory is full | Delete books, images and/or music files that you do not need | |
| Battery discharges too fast | Disabled automatic turning off | Settings > Date/Time in Main Menu. Select automatic turn off time in Auto Turn Off in... item |
Customer Support
For detailed information about service centers in your country please use contacts below:

www.pocketbook-int.com/support/
help@pocketbook-int.com
Compliance with International Standards
Product name: PocketBook Basic Lux
Model name: PB615W
Firmware: 5.17
The EUT should be supplied by USB port from complied Limited Power Source of personal computer or notebook.
The EUT should be supplied by Adapter from complied Limited Power Source.
Rated output voltage: DC 5V 1A.
This equipment is marked with the symbol and can be used throughout the European community. This indicates compliance with the R&TTE Directive 1999/5/EC. France – 2.4GHz for Metropolitan France. In all Metropolitan departments, wireless LAN frequencies can be used under the following conditions, either for public or private use:
- Indoor use: maximum power (EIRP*) of 100 mW for the entire 2400-2483.5 MHz frequency band
• Outdoor use: maximum power (EIRP*) of 100 mW for the 2400-2454 MHz band and with maximum power (EIRP*) of 10 mW for the 2454-2483 MHz band.
IMPORTANT: Changes or modifications to this product not authorized could void the EMC and wireless compliance and negate your authority to operate the product. This product has demonstrated EMC compliance under conditions that included the use of compliant peripheral devices and shielded cables between system components. It is important that you use compliant peripheral devices and shielded cables between system components to reduce the possibility of causing interference to radios, televisions, and other electronic devices.
Certification information (SAR)
The device meets guidelines for exposure to radio waves. Your device is a radio transmitter and receiver. It is designed not to exceed the limits for exposure to radio waves recommended by international guidelines. These guidelines were developed by the independent scientific organization ICNIRP and include safety margins designed to assure the protection of all persons,
regardless of age and health. The exposure guidelines for devices employ a unit of measurement known as the Specific Absorption Rate or SAR. The SAR limit stated in the ICNIRP guidelines is 2.0 watts/kilogram (W/kg) averaged over 10 grams of tissue. Tests for SAR are conducted using standard operating positions with the device transmitting at its highest certified power level in all tested frequency bands. The actual SAR level of an operating device can be below the maximum value because the device is designed to use only the power required to reach the network. This equipment complies with the European Council Recommendation of 12 July 1999 on the Limitation of Exposure of the General Public to Electromagnetic Fields [1999/519/EC].
Pocketbook International SA
Crocicchio Cortogna, 6, 6900, Lugano, Switzerland
Tel. 0 800 187 3003
Made in China

Includes ADOBE® READER® MOBILE
Contains Reader® Mobile technology
by Adobe Systems Incorporated

- SAFETY PRECAUTIONS 6
- APPEARANCE 11
- TECHNICAL CHARACTERISTICS ...... 12
- GETTING STARTED 13
- Applications
- READING BOOKS 37
- SETTINGS 50
- FIRMWARE UPDATE....61
- Table of Contents 5
- Safety Precautions
- Storage, Carriage and Usage Conditions
- Maintenance
- RF Safety
- Utilization
- Appearance
- Technical Characteristics
- Getting Started
- CHARGING BATTERY
- NAVIGATION
- WORKING WITH ON-SCREEN KEYBOARD
- RECENT EVENTS
- LOADING FILES
- Downloading protected e-books (Adobe DRM)
- Download via \*.acsm
- Download books via PC
- FRONTLIGHT
- INSERTING MICRO SD CARD
- Calculator
- Chess
- Dictionary
- Klondike
- Gallery
- Snake
- Sudoku
- Cell first:
- Number first:
- Bottom panel:
- Hints:
- Library
- INTERACTIVE APPS
- Dropbox PocketBook
- How to start using
- How to synchronize
- Automatically:
- Manually:
- Send-to-PocketBook
- How to get files
- The list of trusted senders
- Reading Books
- Grouping criteria
- Sorting criteria
- Books list views
- Context menu
- TURNING PAGES
- FOLLOWING REFERENCES
- CHANGING FONT SIZE
- READING MENU
- 三: Contents
- Go to Page
- Search
- Bookmarks
- Settings
- EPUB, FB2, etc.
- PDF and DjVu
- Rotate
- Notes
- CLOSING A BOOK
- WI-FI
- ACCOUNTS AND SYNCHRONIZATION
- Adobe DRM
- PERSONALIZE
- LANGUAGES
- DATE/TIME
- SAVING POWER
- Backup & Recovery
- Privacy
- SOFTWARE
- ABOUT DEVICE
- Firmware Update
- Automatic Update
- Manual Update
- Troubleshooting
- Customer Support
- Compliance with International Standards
- Rated output voltage: DC 5V 1A.
- Certification information (SAR)
Brand : POCKETBOOK
Model : Basic Lux
Category : E-reader