
610d - Telephone AASTRA - Free user manual and instructions
Find the device manual for free 610d AASTRA in PDF.


| Product Type | DECT Cordless Phone |
| Display | Backlit LCD with 5 lines |
| Dimensions (Handset) | Approx. 160 x 50 x 30 mm |
| Weight (Handset) | Approx. 130 g |
| Power Supply | Two 1.2V AAA NiMH rechargeable batteries; base powered via AC adapter (230V/50Hz) |
| Standby Time | Up to 200 hours |
| Talk Time | Up to 10 hours |
| Range (Indoor) | Up to 50 m |
| Range (Outdoor) | Up to 300 m |
| Phonebook Capacity | Up to 100 entries |
| Caller ID | Yes, with call log |
| Call Waiting | Yes |
| Redial | Last 10 numbers |
| Hands-Free (Speakerphone) | Yes |
| Ringer Types | 10 melodies and 5 volume levels |
| Keypad Lock | Automatic and manual |
| Safety Compliance | CE, RoHS, low SAR |
| Cleaning Instructions | Wipe with a soft, dry cloth; do not use liquids or abrasives |
| Spare Parts Available | Replacement batteries (AAA NiMH) and charging base |
| Repairability | User-replaceable battery; other repairs by authorized service |
Frequently Asked Questions - 610d AASTRA
User questions about 610d AASTRA
0 question about this device. Answer the ones you know or ask your own.
Ask a new question about this device
Download the instructions for your Telephone in PDF format for free! Find your manual 610d - AASTRA and take your electronic device back in hand. On this page are published all the documents necessary for the use of your device. 610d by AASTRA.
USER MANUAL 610d AASTRA
natural_image
Man in business attire sitting at a desk with a laptop, looking at her phone (no visible text or symbols)Aastra610d,620d,630d
AASTRA
DECT Telephones User Guide
Communications systems
Aastra 800
OpenCom X320
OpenCom 130/131/150
OpenCom 510


Welcome to Aastra
Thank you for choosing this Aastra product. Our product meets the strictest requirements with regard to quality and design.
The following operating instructions will assist you in using your Aastra 610d, 620d, 630d and answer most of the questions that may arise.
If you require further technical support or information about other Astra products, please refer to our website at http://www.aastra.de or http://www.aastra.com. It provides additional notes and tips on the product.
We hope you enjoy using your Astra 610d, 620d, 630d.
Aastra 800 and OpenCom 100
This user guide applies to the Aastra 800 and OpenCom 100 communications systems. The OpenCom 100 product family comprises the OpenCom 130, OpenCom 131, OpenCom 150, OpenCom 510 and OpenCom X320 communications systems.
If individual features differ on the systems, a reference is made in this user guide.
Contents
General Information....7
Appropriate Use....8
Safety Information 9
Communications Regulation Information....10
FCC Notices (U.S. Only) 10
Health and Safety Information 11
Industry Canada (Canada only)....11
Overview and Basic Information 12
Authorisation is Required....12
Further Documentation .... 12
DECT and GAP 12
Installation 14
Scope of Delivery 14
Inserting Standard Battery 14
Inserting the Power Battery....15
Mounting / Removing a Bracket or Swivel Clip 15
Lanyard Fastener 16
Headset Socket/Bluetooth ^® 16
Aastra 630d : Removing the Cover ..... 17
USB and External Charging Port 17
Aastra 630d – USB Port: Removing the Cover ..... 17
Setting Up and Connecting the Charger 18
Power Supply / Power Supply Unit 19
microSD Card 19
Important Battery Information 20
Precautionary Regulations during Usage 21
Commissioning 22
Charging and Usage Times....22
Battery Charge Display 23
Charge Warning....23
Mobile Unit Subscription (Checking In) 24
Registration 26
Checking In 26
Functions 27
Operational Controls on the Mobile Unit....27
Display Elements and Symbols....28
The Display 28
Display Elements 28
Line of Softkeys and Idle Display 29
The LED 30
Illumination....31
Key Functions ...... 31
Locking Your Telephone Interface by the System Administrator ..... 37
Menu Navigation....38
Using Menus ....38
Example: Language Setting 39
The Editors 39
Basic Functions 41
Device Functions 41
Switching Mobile Unit Off/On....41
Keylock / Phone Lock....42
Telephone Lock 43
Speaker/Handsfree Use....43
Adjusting Volume During a Call 43
Switch Ringer On/Off 44
Switch Off Ringer When Called....44
Vibra Call (Aastra 620d/630d Only) 44
Signalling Wake-up Time or an Appointment....44
Muting Mobile Unit....45
Illumination/Display Dimming 45
Display: Change Brightness/Contrast....45
Automatic Hide / Message Windows 46
Event Window and Info Menu....46
Date/Time....46
Bluetooth® Headset Operation (Aastra 620d/630d) 46
Subscribing / Renaming / Unsubscribing Bluetooth Headset ..... 47
Telephoning via the Bluetooth Headset....47
Special Key (Hotkey) / VIP List (Aastra 620d/630d)....48
VIP List (Aastra 610d) 49
Profiles....49
Adjusting to Environment....49
Special Functions 50
Emergency Call Key (SOS)....50
The Alarm Sensor (Aastra 630d only) 51
Connections....54
Internal and External Call Numbers 54
External Seizure and Entry of Call Numbers....54
Multiple Trunk Keys 55
Multiple Connections....55
DTMF Postdial/VF Signalling 56
Charge Display (Charges) 56
Transmission of Call Numbers....56
Blocked/Unblocked Call Numbers....57
Keypad Dialling 57
Least Cost Routing (LCR)....58
Calls in the Call-Waiting Queue 58
Calls with Booking Numbers....59
Forwarding Calls 60
Menu Before and During a Call....61
Telephoning....63
External/Internal Calling....63
Dialling Directly 63
Pre-dialling....63
Making a Call from the Redial List 64
Making Calls from the Caller List 65
Call Waiting with an Internal Subscriber 66
Using Routes to Make Calls 67
Menu when Dialling....67
Menu when Pre-dialling 69
Menu during Conversation 70
Menu if Subscriber Busy 71
Menu when Calling....72
Ending a Call 73
Accepting Calls....73
Calls During a Conversation....74
Incoming Call Menu 75
Call Waiting Menu....76
Enquiry, Toggling, Transfer and Conference 77
Enquiry/Toggling....77
Transferring an Internal/External Call to an Internal Subscriber 78
Transferring an External Call to an External Subscriber 79
Enquiry Call Menu....79
Menu when Subscriber on Hold....81
Three-Party-Conference 82
Menu during Conference 83
Special Calls/Conversations 84
Voicebox Queries....84
Parked Calls 85
Announcements (with and without Intercom) 86
Callback....88
Baby Call....88
Confirming Appointment/Alarm Clock 89
Accepting an Appointment Call 89
Doorbell, Door Opener 90
Entrance Intercom Calls....91
Phone Book 92
System Phone Book 92
Calling from the Communications System Phone Book 92
Speed-Dialling (System Phone Book) 94
Add Phone Numbers from Lists to Communications System Phone Book....94
Personal Phone Book 96
Calling from the Personal Phone Book. 96
Adding Entry to Personal Phone Book....97
Editing Personal Phone Book Entries 98
Speed Dialling (Personal Phone Book)....99
Aastra 600 PC Tool / Phone Book (Aastra 620d, 630d) ..... 99
The Device Menu....100
Information on Display Symbols in the Device Menu ....100
Overview: Device Menu....101
"Info" Menu....103
"Active features" Menu....106
"Directories" Menu....106
"Un Park" Menu Entry....107
"Pickup" Menu Entry....107
"Take" Menu Entry 107
"Time/Alarms" Menu....108
"Audio" Menu....109
"System" Menu....112
"System menu" / Total Menu 113
System menu: "Calls" 115
System menu: "Call forwarding"......118
System menu: "Messages"....120
System menu: "Protection" 123
System menu: "Connections"....124
System menu: "Phone book"......127
System menu: "Applications" 128
System menu "Central settings"......128
"Settings" Menu 129
"Security" Menu 133
"Profiles" Menu 135
"Door opener" Menu Entry 136
Key Programming....137
Programmable Keys....137
Programmable Functions 138
Appendix 142
Care and Maintenance ....142
Environmental Properties and Disposal....142
Notes on Disposal 142
Declaration of Conformity 143
Limited Warranty....144
Exclusions....144
Warranty Repair Services 145
After Warranty Service....145
Accessories....145
Technical Data 147
Menu Tree....149
Index....154
General Information
The DECT telephone Aastra 6x0d is a cordless system telephone for operation on the Aastra 800 / OpenCom 100 communications system. You can also operate your DECT telephone on other communications systems and thus use it at different locations. Operation on communications systems by other manufacturers is still possible when they comply with the GAP standard.
There are three DECT telephone models available:

Aastra 610d
- 2 side buttons (+/-)
- 3 softkeys (2 of them programmable)
- grayscale display
- caller list for up to 50 entries
- redial list for 50 entries
– private phone book / personal directory for 200 entries - socket for headset
- IP 50 ingress protection

Aastra 620d
- 1 hotkey / 3 side buttons (programmable)
- 3 softkeys (2 of them programmable)
- 2 programmable navigation keys
-colour display - caller list for up to 50 entries
- redial list for 50 entries
– private phone book / personal directory for 200 entries - headset connection via cable or Bluetooth
- mini USB connection
- IP 50 ingress protection

Aastra 630d
- 1 hotkey / 3 side buttons (programmable)
- 3 softkeys (2 of them programmable)
- 2 programmable navigation keys
- colour display
- 1 emergency key (SOS)
– caller list for up to 50 entries - redial list for 50 entries
– private phone book / personal directory for 200 entries
– sensor for mandown, no movement, escape alarm - headset connection via cable or Bluetooth
- mini USB connection
- IP 65 ingress protection (dust and jet-water protected)
Appropriate Use
This product can be operated on a DECT-GAP-compatible communications system in all EU member countries. The telephone complies with radio-specific European-harmonised DECT standards.
The CE mark on the product confirms conformity with the technical regulations regarding user safety and electromagnetic compatibility, valid as of the issue date of the corresponding Declaration of Conformity according to European Directive 99/5/EC. The Declaration of Conformity can be viewed on the Astra internet homepage.
This device remains approved for use in North America (USA and Canada). Please refer to the safety information under Communications Regulation Information starting on page 10.
Safety Information
Please be sure to note the following when setting up, connecting and operating the telephone:
- Place the charger on an anti-slip mat.
- Position the connecting cable where it will not cause an accident!
- The charger may only be set up and operated within a closed building.
- Please refer to page 20 for important information on battery use.
-
Do not lay down the mobile unit or set up the charger
-
near heat sources,
- in direct sunlight,
- near other electrical devices generating strong, magnetic fields.
- Protect your telephone from moisture, dust, aggressive fluids and vapours.
- Connect only approved accessories.
- Use the included power supply only (ID No.: 23-001061-00).
- Use the standard batteries ID No. 23-001059-00 or ID No. 23-001080-00 resp. the power batteries ID No. 23-001060-00 or ID No. 23-001081-00 only.
- Do not use any power supply that is visibly damaged (ruptures, cracks of the housing).
- Switch off the mobile unit before you remove the batteries.
- Research has demonstrated that in certain cases medical devices can be affected by portable telephones (DECT) that are switched on. This is why when within medical institutions you should be sure to comply with the regulations of the respective institution when using portable telephones.
WARNING! Never
- open the charger or the mobile device (aside from the battery compartment lid)!
- touch the plug contacts with sharp, metal objects!
-
carry the charger by the connecting cable!
-
Only use a slightly damp or an anti-static cloth to clean your telephone. Never use a dry cloth. Never use cleansing agents.
- Do not use your telephone in areas at risk of explosion.
- Do not use Astra 610d and 620d in damp rooms (e.g. bath).
- Do not hold the telephone in the hands-free mode next to your ear as the volume can be very high.
- Set up and keep mobile device and accessories outside the reach of children.
- This product's earcap region (at the front) and the loudspeaker region (at the rear) is slightly magnetic and may pick up metallic objects, such as staples or pins. Please check both regions for metallic objects before use.
Note for persons wearing hearing aids
Persons wearing hearing aids should keep in mind that when using the mobile device at sufficient volume, the resulting radio signal interference produces an unpleasant humming noise.
Communications Regulation Information
FCC Notices (U.S. Only)
This device complies with part 15 of the FCC Rules. Operation is subject to the following two conditions:
(1) This device may not cause harmful interference, and (2) this device must accept any interference received, including interference that may cause undesired operation.
Modifications not expressly approved by this company could void the user's authority to operate the equipment.
NOTE: This equipment has been tested and found to comply with the limits for a Class B digital device, pursuant to Part 15 of the FCC Rules. These limits are designed to provide reasonable protection against harmful interference in a residential installation. This equipment generates, uses and can radiate radio frequency energy and, if not installed and used in accordance with the instructions, may cause harmful interference to radio communications. However, there is no guarantee that interference will not occur in a particular installation. If this equipment does cause harmful interference to radio or television reception, which can be determined by turning the equipment off and on, the user is encouraged to try to correct the interference by one or more of the following measures:
- Reorient or relocate the receiving antenna.
- Increase the separation between the equipment and receiver.
- Connect the equipment into an outlet on a circuit different from that to which the receiver is connected.
- Consult the dealer or an experienced radio/TV technician for help.
Health and Safety Information
Exposure to Radio Frequency (RF) Signals:
The wireless phone is a radio transmitter and receiver. It is designed and manufactured not to exceed the emission limits for exposure to radio frequency (RF) energy set by the Federal Communications Commission (FCC) of the U.S. Government. These limits are part of comprehensive guidelines and establish permitted levels of RF energy for the general population. The guidelines are based on the safety standards previously set by both U.S. and international standards bodies. These standards include a substantial safety margin designed to assure the safety of all persons, regardless of age and health.
This device and its antenna must not be co-located or operating in conjunction with any other antenna or transmitter.
This EUT has been shown to be capable of compliance for localized specific absorption rate (SAR) for uncontrolled environment/general population exposure limits specified in ANSI/IEEE Std. C95.1-1992 and had been tested in accordance with the measurement procedures specified in FCC/OET Bulletin 65 Supplement C (2001) and IEEE 1528-2003.
Industry Canada (Canada only)
Operation of this device is subject to the following two conditions: (1) this device may not cause interference, and (2) this device must accept any interference, including interference that may cause undesired operation of the device.
Privacy of communications may not be ensured when using this telephone.
Exposure to Radio Frequency (RF) Signals:
The wireless phone is a radio transmitter and receiver. It is designed and manufactured not to exceed the emission limits for exposure to radio frequency (RF) energy set by the Federal Communications Commission (FCC) of the U.S. Government. These limits are part of comprehensive guidelines and establish permitted levels of RF energy for the general population. These guidelines are based on the safety standards
previously set by international standard bodies. These standards include a substantial safety margin designed to assure the safety of all persons, regardless of age and health.
This device and its antenna must not be co-located or operating in conjunction with any other antenna or transmitter.
This device has been shown to be capable of compliance for localized specific absorption rate (SAR) for uncontrolled environment / general public exposure limits specific in ANSI/IEEE C95.1-1992 and had been tested in accordance with the measurement procedures specified in IEEE 1528-2003.
Overview and Basic Information
Authorisation is Required
Most of the features mentioned in this manual can only be used when you have the corresponding user authorisation. Your system administrator configures authorisations when configuring the communications system.
Contact the system administrator when you have questions on specific features or are not able to use a feature satisfactorily.
Further Documentation
Please use the other included documentation on parts of your communications system. This documentation is on the OpenCom 100 product CD (on the USB stick that comes with an Astra 800).
DECT and GAP
A digital radio connection is established between the mobile unit and the base station (Radio Fixed Part, RFP) in accordance with the DECT standard (DECT = Digital Enhanced Cordless Telecommunications). The digital channel ensures the best voice quality without static or background noise. The Generic Access Profile (GAP) is used for signalling between the communications system and the mobile unit.
The Generic Access Profile (GAP) and the DECT standard define procedures according to which digital cordless telephones can establish connections. The GAP standard applies independent of manufacturer, meaning that communications systems and mobile units of various manufacturers can be combined. The basic functions (telephoning, accepting calls) are always available in these combinations; other functions
(e.g. displaying the call number on the display, displaying connection charges) which your Astra 800 / OpenCom 100 communications system provides along with your mobile unit, may not be available with other manufacturers' communications systems. Please consult the corresponding manufacturer's user guide or contact your system administrator.
Information on transmission quality
- Due to digital transmission within the frequency range used – even within range depending on the structural environment – dead spots can result. In this case, transmission quality can be lessened by increased and brief transmission gaps. A slight movement outside the dead spot will re-establish the usual transmission quality. When a caller goes out of range, the connection is disconnected.
- In order to avoid radio-related interference with other electronic devices, we recommend as great a distance as possible (minimum of 1 m) between the charger or mobile unit and other devices (e.g. radios, loudspeakers, etc).
- As is the case with any cordless telephone, the mobile unit uses radio signals which do not guarantee a connection under all circumstances. This is why you should never completely rely on cordless telephones for essential communication (e.g. for medical emergencies).
Installation
Scope of Delivery
This package includes:
• a mobile unit (Aastra 610d, Aastra 620d or Aastra 630d)
- a charger
• one power supply (ID No.: 23-001061-00)
- a standard battery
- a belt clip
- short user guide
Inserting Standard Battery
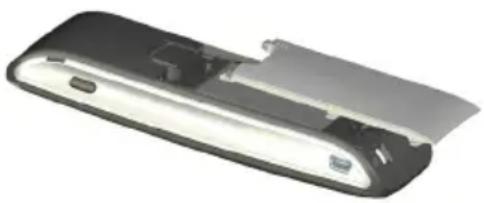
Slide the battery compartment lid down until the catch releases, then lift it. Insert the battery with the contacts pointing down. Place the battery compartment lid on the unit and slide it upwards until it clicks into place.
Aastra 630d
Loosen the two screws on the rear side of the mobile unit with a suitable tool and remove the lid. Insert the battery with the contacts pointing downwards, close the battery compartment with the lid (insert lower down, press upwards) and screw it shut again. Do not damage the rubber seal when putting it back together.
natural_image
3D rendering of a device casing with internal components and mounting points (no text or symbols visible)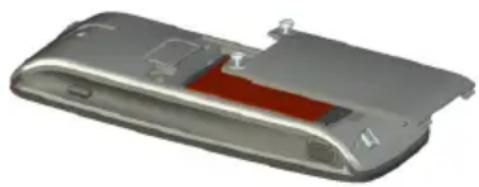
natural_image
3D rendering of a silver mobile phone casing with a red internal component (no text or symbols visible)Inserting the Power Battery
You can order a battery with greater charge capacity (power battery) as an accessory (see page 145) for Aastra 620d and Aastra 630d. It is thicker which means you need a different battery compartment lid which protrudes ca. 6 mm on the rear side of the device.
Mount the new battery compartment lid as described above. You should first remove any bracket if mounted on the Aastra 620d and Aastra 630d.

natural_image
Exterior view of a modern office building (no signage)Mounting / Removing a Bracket or Swivel Clip
The bracket that comes with the product is placed on the two openings at the upper end of the mobile unit and snapped into place by pressing on it. To remove the bracket, press in the little recesses of the edge of the bracket and pull the bracket apart somewhat.
A swivel clip can also be provided as an accessory for the Astra 610d and
Aastra 620d. The bracket is also placed on the two openings at the upper end of the mobile unit and snapped into place by pressing on it. Then the clip is pushed on the protruding button. Press the upper button to release the moveable part of the clip.

natural_image
3D rendered image of a sleek, metallic electronic device with a handle and control knob (no text or symbols visible)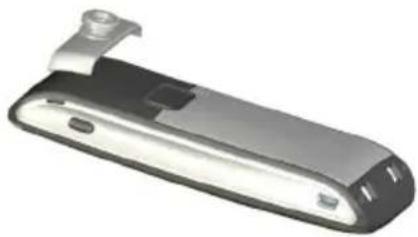
natural_image
Exterior view of a modern office building (no signage)Lanyard Fastener
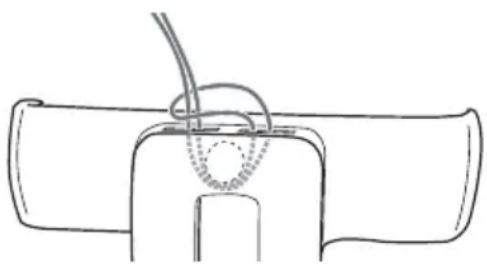
Aastra 610d, Aastra 620d: There are two openings on the upper part of the bracket. The lower end of the lanyard can be fed through them (please mount with the bracket removed). Lanyards are available as accessories (see page 145).
Aastra 630d: Lanyard fastener and lanyard are available as accessories. The screwed on belt clip must be replaced by the lanyard fastener.
natural_image
Simple line drawing of a mechanical or electrical component with a loop and base, no text or symbols present.
natural_image
Line drawing of a first aid kit with a cross symbol (no text or labels)Headset Socket/Bluetooth®
All mobile units have a 2.5 mm jack socket on the bottom for connecting a headset. Use recommended headsets only (see Accessories starting on page 145).
The Astra 620d/630d mobile units have a Bluetooth interface (2.0) for operating corresponding headsets. The Bluetooth interface can be used for transmitting audio data only with a headset.
Safety precaution
Headsets (earphones and headphones) can produce tones which are very loud and high. When you are exposed to such tones, this can lead to hearing damage. Before using a headset, please adjust the volume to the lowest possible level. You can make these settings for cable-connected headsets in the >> > Audio > Volume Settings > Corded Headset menu (see page 109). Adjust the setting directly on the device with Bluetooth headsets (please consult the device user guide). When telephoning with the headset, adjust the volume – if necessary – slowly.
Aastra 630d : Removing the Cover
The opening of the headset socket is closed with an undetachable cover. If a headset is not used, please be sure to close the opening to be sure the device can be operated in accordance with its protection class.
Remove the cover by tugging it out of the housing on the upper edge.
Never tug it out on the lower edge!
USB and External Charging Port
Aastra 620d, Aastra 630d: There is a mini USB port (2.0) on the lower right side. It has two functions:
- As an interface for connecting to the PC e.g. to load data to/from the device. When the mobile unit is connected to a PC it is charged simultaneously. The charging process is slower, however, than when the mobile unit is charged in the charger.
- As a connection socket for a USB charger (see Accessories starting on page 145), e.g. to charge the mobile unit even when it is in a leather pouch. This charging process is also slower than when charging in the charger.
Use a shielded "USB 2.0 A to USB mini B" type USB cable only.
Aastra 630d – USB Port: Removing the Cover
The opening of the USB port is closed with an undetachable cover. If a USB cable is not used, please be sure to close the opening to be sure the device can be operated in accordance with its protection class. Remove the cover by tugging it out of the housing on the upper edge.
Never tug it out on the lower edge!
Setting Up and Connecting the Charger
Aastra 610d, Aastra 620d: The mobile units can be operated without changing the charger.
Aastra 630d: When operating the mobile unit, you have to remove the two lateral guides in the charger. These are easy to lift up on the inner edge using a fingernail or a paper clip.

natural_image
Close-up of a black electronic device with a magnified inset showing internal components (no text or symbols visible)
natural_image
Top-down view of a black car head with two circular inset views showing front and side views (no text or symbols)You can also remove the guides by pressing a suitable screwdriver in the longish holes on the bottom of the charger.
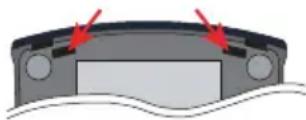
Connect the power supply unit with the charger and place the connecting cable through the cable guide. If necessary, change the connector of the power supply (see Power Supply / Power Supply Unit on page 19).
Where to set it up
Your telephone is made for normal usage conditions. Today's furniture is coated with a sheer myriad of lacquers and plastics and treated with various lacquer care products. It is possible that some of these materials contain components which can attack and deteriorate the plastic feet of the charging station. The device feet altered by these foreign substances may leave undesirable marks on furniture surfaces.
For understandable reasons, the manufacturer cannot assume liability for these types of damage. This is why you should use an anti-slip mat under your charging station – particularly with furniture that is new or has been freshened up with lacquer care products.
Note
Please make sure you do not set up the charging station in the space where doors or windows open: Damage Risk!
Power Supply / Power Supply Unit
The power supply unit is suitable for 100V to 240V alternating current (50-60 Hz). It comes with 4 interchangeable adapters so it can be used practically anywhere worldwide. As needed, put the connector on the power supply used in your country. Mounting varies slightly as there are two variants of the power supply connector:
Variant 1: Position the switch on the power supply at OPEN and slide the connector in place upwards and off. Stick the desired new connector into the power supply and lock it by positioning the switch at LOCK.
Variant 2: Remove the connector if one is there by pressing OPEN. Then place the desired new connector into the power supply slightly diagonally with the TOP designation showing upwards. Press it down until it clicks into place.
When you wish to disconnect the charger from the power supply, pull the power supply unit plug out of the mains socket. If there is a power outage, all memory data (programme and user data) are saved on the mobile unit without alteration.
microSD Card
Aastra 620d, 630d (as of device software 4.0)
Under the mobile unit battery there is a recess for inserting an optional microSD card. This special microSD card stores the login data of the mobile unit to your communications system, the most important local device data and the private phone book. This guarantees that if the device has a defect – by removal of the card – operation with a replacement device can be continued immediately and without having to log in anew.
Commercial microSD cards cannot be used.
Please consult the guide provided with the card and the more detailed descriptions on the website http://www.aastra.de or http://www.aastra.com.
Important Battery Information
Devices are operated using a Li-ion battery (standard and power battery).
Be sure to read the following precautionary regulations before using the battery for the first time. Retain these precautionary regulations and all operating instructions close at hand for later reference.
Dispose of batteries as described on page 142.
Not observing any of the following precautionary battery operation regulations is hazardous and can lead to overheating, inflammation and explosion.
- CAUTION: Explosion hazard when battery replaced improperly.
- Never use the battery for providing power to other devices. It is exclusively for supplying power to the mobile units.
- Never use or leave the battery near open flames.
- Never put the battery in a microwave oven, throw it into a fire or expose it to extreme heat in any other way.
- Never carry or store the battery together with electroconductive articles (neck-laces, pencil leads, etc.)
- Never take apart the battery or modify it in any way or subject it to powerful blows.
- Never immerse the battery in freshwater or saltwater.
- Never use or leave the battery in direct sunlight, or in a car parked in direct sunlight or anywhere else with high temperatures.
- If you ever notice any fluid leakage, an unusual smell, accumulation of heat, discolouring, deformation or any other abnormal condition while using, charging or storing the battery, remove it immediately from the mobile unit and keep it away from open flames.
- Battery fluid can damage your eyes. If you ever get battery fluid in your eyes, immediately rinse them with clean tap water and contact a doctor.
- If the battery is to be used by children, make sure that a responsible adult instructs them regarding relevant precautionary regulations and make sure the children use the battery properly.
- If battery fluid accidentally gets on your clothing or skin, immediately rinse the spot with clean tap water. Extended contact with battery fluid can lead to skin inflammation.
Precautionary Regulations during Usage
- The battery is only intended for usage with this mobile unit.
- Only use the charger that comes with the product for charging.
- A new battery is not charged. Before using it the first time, you thus have to charge it.
- Using a battery in a cold environment can reduce the expected operating time of a fully charged battery. Charge the battery in a place where the temperature is within the 10°C to 35°C range. Charging the battery outside this temperature range can mean the time required for charging is longer or result in failure to charge.
- If the operating time of a battery is very limited after being fully charged, this indicates the life span of the battery has expired. Replace the battery with a new one.
- Never wipe off the battery with thinner, benzine, alcohol or other volatile agents or chemically treated cloths. Otherwise, this could cause deformation of the battery or malfunctioning.
- When you have to ship your mobile unit with an installed Li-ion battery or ship the Li-ion battery separately, please observe the legal stipulations and directives regarding sending hazardous materials with the post.
Commissioning
Load the battery before using the mobile unit for the first time because of its low capacity on delivery. Place the switched on or switched off mobile unit into the charger. If the mobile unit is switched off (e.g. after inserting the battery for the first time), the mobile unit will be charged while beeing switched off. The LED flashes alternately green / red to indicate this state. When you switch on the mobile unit (see page 41), the current charging status is displayed (see page 24).
Maximum battery performance is achieved only after three to five charge and discharge cycles. Place the mobile unit regularly into the charger to charge the battery optimally.
Charging and Usage Times
Charge time in the charger (uncharged battery):
2.5 hours to full capacity (standard battery), 5 hours (power battery).
Charge time using USB charger:
5 hours to full capacity (standard battery), 10 hours (power battery).
Talk time:
Standard battery – up to 15 hours (at full charge) for North America. Standard battery – up to 12 hours (at full charge) for other countries. Power battery – up to 30 hours (at full charge) for North America. Power battery – up to 24 hours (at full charge) for other countries.
Stand-by time:
Standard battery – up to 105 hours (at full charge) for North America. Standard battery – up to 110 hours (at full charge) for other countries. Power battery – up to 190 hours (at full charge) for North America. Power battery – up to 200 hours (at full charge) for other countries.
Note
Poor radio connections (large distance from system radio station) reduce the standby and talk time of the mobile unit. High speaker or ringer signal volume, frequently activated key and display lighting as well as activated vibration alarm and Bluetooth operation are also features decisive in reducing stand-by and talk times.
Battery Charge Display
The charging status of the battery is shown on the display. The following means:

61 - 100 % charged

31 - 60 % charged

11 - 30 % charged

6 - 10 % charged

0 - 5 % charged

battery is charged
- When the mobile unit is placed on the charger with a completely discharged battery there is no status display until a certain charge has been reached. This process can take a few minutes and is not a defect.
- Even when the mobile unit is switched off the battery discharges slowly.
- While charging the LED appears orange; green when the battery is fully charged (can be deactivated in the > Settings > Illumination > LED indications > Life indication menu (see page 130).
Charge Warning
When the battery capacity is nearly exhausted, you will see a warning on the display and hear short "beep" signals as an acoustic warning (can be deactivated in the >>
Audio > Attention tones > Battery warning menu (see page 111).
If you are making a call at the time, you have 5 minutes to complete the call before the mobile unit shuts itself off.
Mobile Unit Subscription (Checking In)
Your mobile unit can be operated on a maximum of 10 different communications systems. To do so, it has to be subscribed to each system, i.e. checked in.
The check-in procedure is usually done when commissioning the device. This is usually done by your system administrator for you when operated on the Astra 800 / OpenCom 100 communications system.
Checking in is done via the following steps:
- Switch on the mobile unit. To do so, press the button.
When commissioning, the Language menu appears. Use the △ and ▼ navigation keys to select the desired display language. Confirm with the softkey.
- When commissioning the first time, Subscription appears on the display.
If you do not wish to immediately start checking in, after a few seconds No system appears on the mobile unit on the idle display. In this case, press the softkey and call the System > New system menu.
A new DECT configuration entry must be configured on the Aastra 800 / OpenCom 100 communications system to check in the mobile unit. When the mobile unit is to be checked in onto the communications system using the so-called Secured procedure the IPEI (International Portable Equipment Identity) of the mobile unit is required for this configuration entry (located in the >> System > Show IPEI menu).
- You have to enter the Authentication Code first to log into a new system. The access code is valid for all further steps during the login, i.e. up until the login was successful or cancelled.
Enter the (maximum) 8-digit code which was entered into the Configurator of the communications system. If no authentication code was entered into the Configurator, no code entry is necessary. Press the Next softkey.
Note
When you prefix authentication code entry with the star key, the mobile unit will be checked in as a GAP device. The header of the access code input mask changes to GAP/CATiq.
Tip:
The length and quality of the authentication code used depends on your security requirements. Please keep in mind that the memory required for the authentication code increases 4 bits per additional digit.
-
After entering the access code the New system is displayed. Continue with the following menu items:
-
Subscription: If there are no other communications systems within radio range and you have activated simplified registration on the communications system, you can start logging in via this menu item without entering a PARK.
- Enter PARK: begins the login process in the secured procedure. Enter the communications system PARK. Then press the Next softkey.
- Show IPEI: displays the IPEI of the mobile unit.
- Protocol: changes the protocol for the login process. Select Astra DECT (standard) or GAP/CAP/E2. Confirm with the 📋 softkey. Press the E3c softkey to exit the selection.
The mobile unit begins subscription and displays Subscription: Please wait. This procedure should be completed very quickly. If not, the entries may not be correct or the radio connection is inadequate. In this case, cancel the procedure using the Esc softkey and repeat the registration with corrected entries. After completion of checking in, the mobile unit is ready for operation.
The following applies to other manufacturers' communications systems:
Register your mobile unit with the communications system as described in the manufacturer manual.
Note for the System Administrator
If you are operating a DECT network on an Astra 800 communications system, please read the more detailed information as well in the "Installing and Commissioning" guide and in the online help on the topics DECT networks and DECT areas. This is where you will find details on configuring DECT base stations and on checking in DECT terminals in DECT areas.
Registration
Anytime the mobile unit is checked in/registered with a communications system, this registration is saved on the device. A registration entry includes a system name.
When you have checked onto the system with your mobile unit, the system name appears on the display. You can change the registration entry data as needed. To do so, call the >> > System > Subscriptions menu. Select the desired registration entry and change the data (please refer to page 112).
Checking In
After the mobile unit has been registered on one or more communications systems, you can make calls. If you have activated the Auto Search feature (see page 112), the mobile unit (when idle) will automatically select the closest available system and check in there. If you do not wish to use the Auto Search feature, you can execute an exclusive search for a desired system based on the saved registration entries.
Functions
Operational Controls on the Mobile Unit
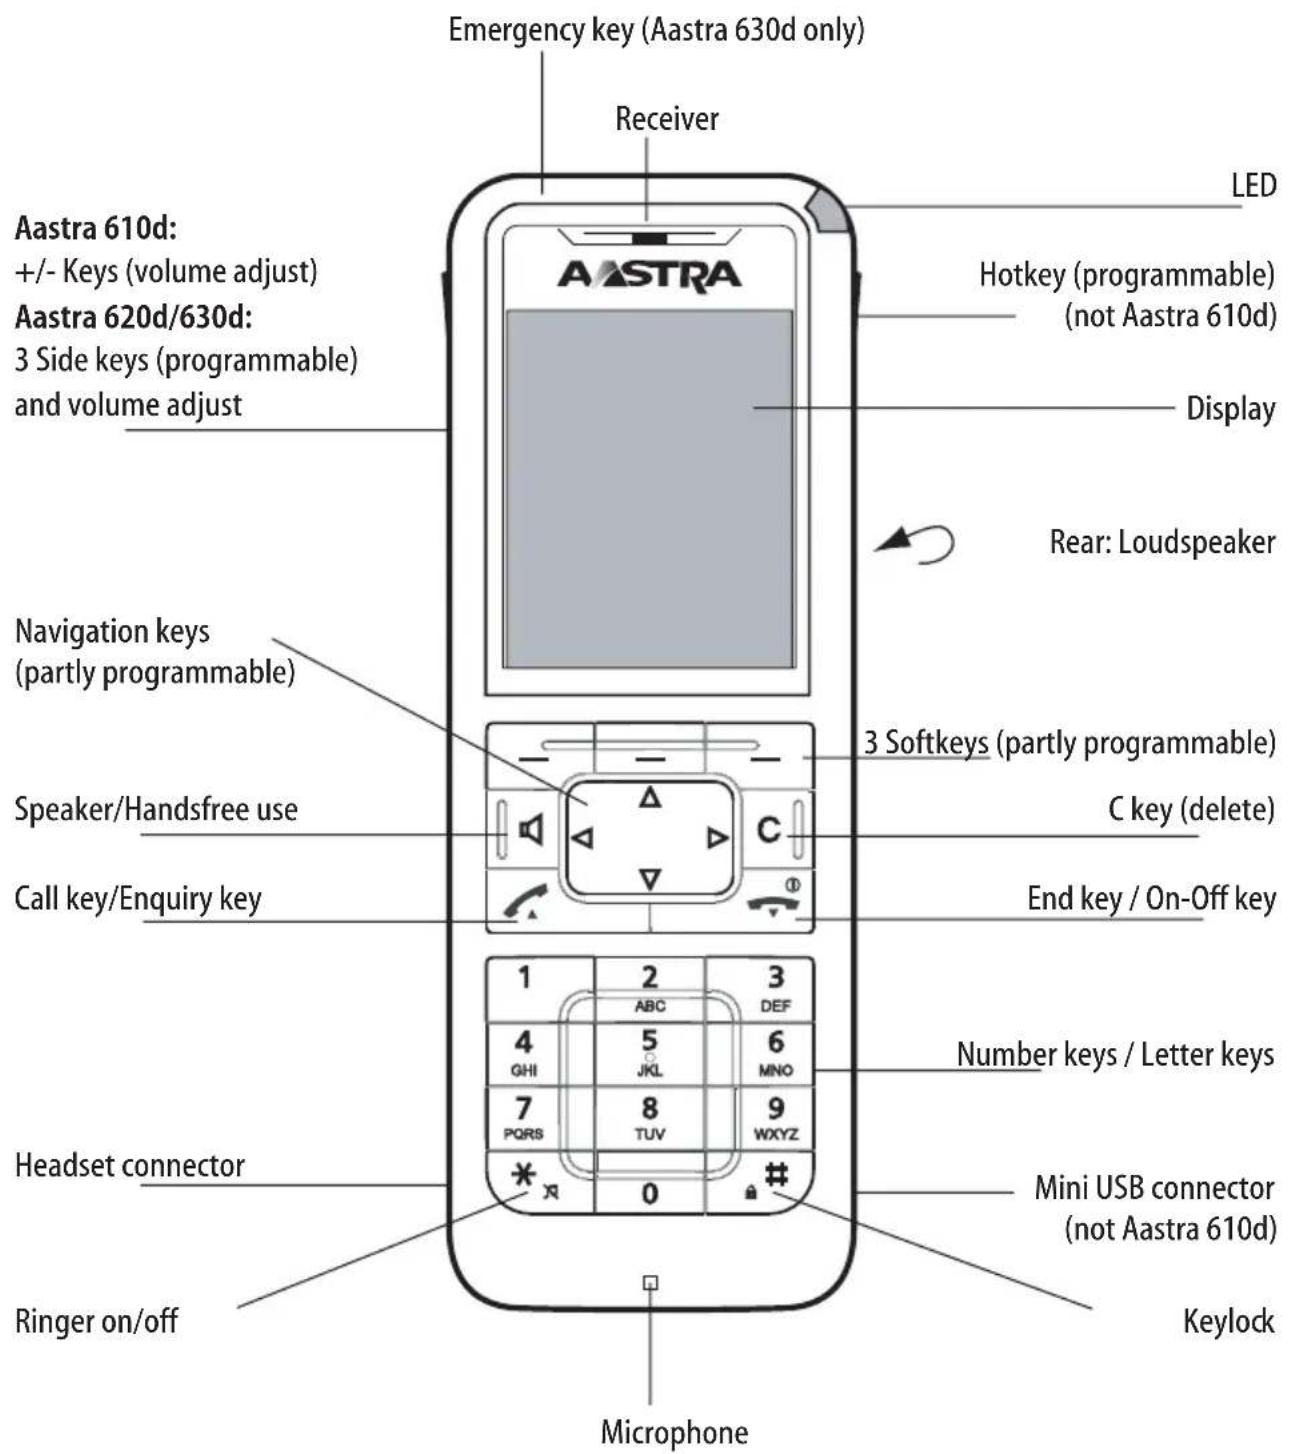
Key assignment (default)
Display Elements and Symbols
The Display
The display shows you information regarding the current connection state or menu lists and texts. When idle you see
- the system name with the internal call number,
- your programmed user name,
• the current time and date, - a set alarm and/or appointment,
- any activated features if applicable,
- the activated profile,
- symbols for programmed functions.

The time is only displayed when transmitted from the system or set by you.
Use the navigation keys to scroll up and down through pick-lists (e.g. phone book) and the menu for the features. A selectable entry is highlighted.
Display Elements
Symbols in the upper line of the display:
| radio connection quality | |
| microphone switched off | |
| battery charging status | |
| battery is charged | |
| loudspeaker switched on | |
| headset active | |
| Bluetooth headset operational | |
| Bluetooth connection active | |
| voicebox message (if available) |
| you have received new short messages | |
| you have short messages which have been read | |
| ringer switched off | |
| call key pressed | |
| call forwarding “immediately” is activated | |
| call protection active | |
| alarm sensor active (Aastra 630d only) |
Line of Softkeys and Idle Display
The three keys below the display are called softkeys. The functions assigned to the keys are shown in the lowest line of the display. The key function automatically changes depending on the respective operation state of the mobile unit.
The following symbols appear in the softkey line in the default condition of the mobile unit.


Enables selection from the redial list.
Navigation menu. This is for calling a pick-list of frequently used features. These are:
- phone book of the Astra 800 / OpenCom 100 communications system (central phone book / system directory)
- phone book of the mobile unit (personal phone book / private directory)
- info lists (caller list, voicebox (if available), redial)
- profiles
The navigation keys are also assigned with these functions.

- short key press: You open the device menu of the mobile unit (see page 100).
- long key press: You open the system menu / main menu of the communications system (see page 113).
Note
Please keep in mind that the functions of the left and middle softkeys and the left/right navigation keys are programmable and can thus be re-assigned later on.
The LED
The light diodes located on the upper corner (tri-colour / red-orange-green) signal specific events which can be system defaults which you cannot alter or also may be switched on or off by you (see also page 130). Please refer to the following table for more information.
Colour Status Description can be switched
on/off
| green flashes rapidly incoming call yes | ||||
| flashes slowly stand-by display / within range / not in the charger | yes | |||
| illuminated | handsfree | activated | yes | |
| illuminated battery fully charged (when on the charger) | yes | |||
| red flashes rapidly sensor alarm (Aastra 630d only) no | ||||
| flashes rapidly outside system range | yes | |||
| flashes rapidly alarm call / notification | no | |||
| flashes slowly new entries in the info area (e.g. caller list) | yes | |||
| flashes slowly time functions | yes | |||
| orange | flashes slowly | stand-by display / within range / not in the charger / battery capacity under 60% charged | ||
| illuminated | battery | charging | yes | |
| Colour | Status | Description | can be switched on/off |
| green / red | alternating mobile unit is switched off while beeing charged in the charger | no | |
Illumination
The display and the keyboard are illuminated. You can individually define the illumination duration yourself in the ▶▶> Settings > Illumination menu (see page 130).
Key Functions
The following table provides you with an overview of the various default key functions. The keys provide access to various functions depending on the device state and key press length (short or long).
| Key | Duration (key press) | ... | State | Description |
| right softkey short stand-by calls the device menu | ||||
| menus, lists calls the respective options menu or save | ||||
| call options menu during call | ||||
| long stand-by calls the system menu / main menu | ||||
| left softkey short stand-by redial (default) or calls pro-grammed function | ||||
| menus, lists confirm ( Ok) | ||||
| call | activates the call-dependent function (e.g. enquiry, reject) | |||
| long | stand-by programming the key function | |||
| Key | Duration (key press) | ... State | Description | |
middle softkey  | short stand-by displays the “Navigation menu”: list of functions which can also be accessed using the navigation keys (default), or calls the programmed function menus, lists, editor cancel (Esc) | |||
| long stand-by programming the key function | ||||
up navigation key  | short stand-by calls the central phone book menus, lists scrolls upwards editor one line | |||
down navigation key  | short stand-by, call calls the personal phone book menus, lists scrolls downwards editor one line | |||
left navigation key  | short stand-by, call calls the info list (default) or calls the programmed function menus back one menu level. usually replaces the Esc softkey (back) editor moves cursor back one digit | |||
| long stand-by programming the key function call decreases volume (save via [IMAGE]) editor moves cursor to beginning of line | ||||
| Key | Duration (key press) | ... | State | Description |
| right navigation key | short stand-by, call calls the profile setting (default) or calls the programmed function menus to the next menu level. usually replaces the Ok / Change softkey editor moves cursor forward one digit | |||
| long stand-by programming the key function call increases volume (save via) editor moves cursor to end of line | ||||
| handsfree | short | stand-by | making a handsfree call | |
| call | switches off | speaker/hands | ||
| lists | makes entry | handsfree call to : | ||
| C key short | incoming call | switches off the ringer (only for current call) – if supported by system | ||
| menus | back one menu level. usually replaces the Esc softkey (back) | |||
| lists | deletes the corresponding entry | |||
| editor | deletes the character left of the cursor | |||
| long lists | deletes the entire list (except phone book) | |||
| menus back to stand-by state | ||||
| editor | deletes all characters | |||
| Key | Duration (key press) | ... State | Description | ||
receiver key (lifting up), green | short | stand-by | making | a | call |
| incoming call accept call | |||||
| call | signal | key | |||
| lists makes call to selected entry | |||||
| long stand-by calls the redial listlists adopts pre-dialling entry (for local list access only, see page 131) | |||||
end key, red short stand-by special options menu | |||||
| mobile unit off Switching on mobile unit | |||||
| number keys0 ... 9 | short | stand-by | pre-dialling numeric entry | ||
| editor characters according to table(see page 39) | |||||
| number 1 | long stand-by calls voicebox (if available) | ||||
| number keys2 ... 9 | long stand-by dials the corresponding speeddialling destination (if speed dialling is programmed) | ||||
| Key | Duration (key press) | ... State | Description | |
| * key | short | stand-by | pre-dialling | |
| editor switches upper/lower case when entering text | ||||
| long stand-by switches ringer on/off (permanently) | ||||
| # key short stand-by pre-dialling # entry | ||||
| hotkey (not 610d) | short stand-by calls the programmed function (default: VIP list) | |||
| long stand-by programming with the desired function | ||||
| SOS key (630d only) | long stand-by, call makes an emergency call (call or notification, depending on the programming and on the communications system) | |||
| upper sidekey (620d, 630d only) | short stand-by, call calls the programmed function or during call – if the key is not programmed – increases volume | |||
| long stand-by programming with the desired function | ||||
| call increases volume – if key is programmed (save via) | ||||
| sidekey +(610d only) | short call | increases volume (for current call only/save with Ok) | ||
| Key | Duration (key press) | ... State | Description |
| middle sidekey (620d, 630d only) | short stand-by, call calls the programmed function | ||
| long stand-by programming with the desired function | |||
| call increases volume – if key is pro-grammed (save via) | |||
| lower sidekey (620d, 630d only) | short stand-by, call calls the programmed function or during call – if the key is not programmed – decreases vol-ume | ||
| long stand-by programming with the desired function | |||
| call decreases volume – if key is programmed (save via) | |||
| sidekey ⊙ (610d only) | short call decreases volume (for current call only/save with ∅k) | ||
Locking Your Telephone Interface by the System Administrator
The system administrator can lock your telephone interface via a setting for your user group. All keys of your telephone no longer function aside from a few exceptions (e.g. the receiver key and the number keys).
- You can still make calls with your telephone but no system functions can be configured.
- The redial function, the communications system telephone books, the Info menu and the state-dependent menus cannot be activated. (The state-dependent menus are described in the Telephoning starting on page 63 chapter). The personal phone book of the mobile unit is, however, available because the lock only affects communications systems functions.
- If the system administrator has authorised you to do so, you can set the time group of the communications system (please refer to the chapter entitled System menu “Central settings” starting on page 128). If your user group authorisation changes according to the time group, then it is possible that your telephone’s interface lock will be cancelled due to a change in time group.
Please contact your system administrator if you have questions regarding your authorisations.
Menu Navigation
Using Menus
Scrolling
Use the △ navigation keys to scroll through menu entries. When you press the △ key with the first menu entry selected, you go to the last menu entry. When you press the ▽ key with the last menu entry selected, you go to the first menu entry.
Menus hide automatically
Menus hide automatically under the following conditions:
- Any open menu closes automatically after 60 seconds if you do not make any further entries. Exception: Playing back a voicebox message which is longer than 1 minute. Unsaved changes are lost.
- In the call state when you make entries that require calling up a new call-dependent menu, e.g., when looking for a call number in the phone book during an enquiry call.
- When switching to a sub-menu or up a menu level.
- Any saved menu entries remain saved when you exit the menu.
- When you have opened the device menu (see page 100) and you get an incoming call, you can accept it and the menu remains in the background (see also Automatic Hide / Message Windows starting on page 46). When you have opened the system menu / main menu of the Astra 800 / OpenCom 100 communications system and get an incoming call (see page 113), the caller will hear a busy signal and the call is entered onto your caller list.
Example: Language Setting
- Open the menu – depending on the configuration of your mobile unit, this is done via
- the >>softkey or
- short key press of the 📄 end key and select the Menu menu entry from the list.
- Use the △ / ▽ navigation keys to select the Settings entry from the list and press the ∅k softkey or the navigation key.
- Use the △ / ▽ navigation keys to select the Display entry from the list and press the Ok softkey or the navigation key.
- Use the △ / ▽ navigation keys to select the Language entry from the list and press the Ok softkey or the navigation key.
- Use the /△navigation keys to select a language offered on the list and press the 📄 softkey (save).
- To exit the menu press the Esc softkey multiple times, the navigation key, the C key, or press the end key shortly.
The Adding Entry to Personal Phone Book on page 97 chapter has another detailed navigation example.
The Editors
Entering names/call numbers
Various editors enable you to enter new call numbers and names or edit older entries (e.g. Phone book). Entering letters of the alphabet is done with the following library of characters:
Key Upper-case letter Lower-case letter
| 1 ?! 1 - + * / = & () % ¿i ?! 1 - + * / = & () % ¿i | |
| 2 A B C 2 Ä Å À Á Á Æ Ç | a b c 2 ä å à á á æ ç |
| 3 D E F 3 È É Ê Ė | d e f 3 è é ê ë |
| Key | Upper-case letter | Lower-case letter |
| 4 G H I 4 l l l i g h i 4 i i i i | ||
| 5 | J K L 5 j k l 5 | |
| 6 M N O 6 Ñ Ó Ó Ó Ó ∅ m n o 6 ñ õ ò ó õ õ ∅ | ||
| 7 P Q R S 7 B p q r s 7 B | ||
| 8 T U V 8 Ü Ù Ú Û t u v 8 ü ù ú û | ||
| 9 W X Y Z 9 w | ||
| 0 space , . 0 :; _ " / ^ ~ space , . 0 :; _ " / ^ ~ | ||
| * short key press: switching be- tween entering numbers or text and upper/lower case long key press: entry of * | short key press: switching between entering numbers or text and upper/ lower case long key press: entry of * | |
| # @ € £ ¥ § < > | [ ] | # @ € £ ¥ § < > { | } [ \ ] | |
- In input lines for entering text, the numeric keyboard automatically switches to entry of letters.
- When entering text, use the ◀ / ▶ navigation keys to move text input position to the beginning or end of the entry. Entries are always made at the cursor position. Input position moves automatically when you enter a new character.
- When entering text, the first letter is automatically upper case and then automatically switched to lower case. After you enter a space, the next letter is upper case. You can also press the star key to switch back and forth between upper and lower case.
- When entering text you can switch to numeric input by pressing the number key longer.
- When entering numbers (call numbers) you may have to enter the "R" character (for enquiry calls). Press the hash key multiple times to select "R".
- A short press of the C key deletes single numbers/characters (left of the cursor position), a long key press to delete the entire entry.
- The Esc softkey cancels the input procedure.
Basic Functions
Device Functions
Switching Mobile Unit Off/On
You can switch off your mobile unit to make your battery charge last longer. If your mobile unit is switched off, no ringer or info tones are emitted (for example, for an appointment call).
Switching on mobile unit
Switch on by pressing and holding the end-call key until the display lights up once again.
This can take up to 10 seconds.
The display now looks like this (e.g.):
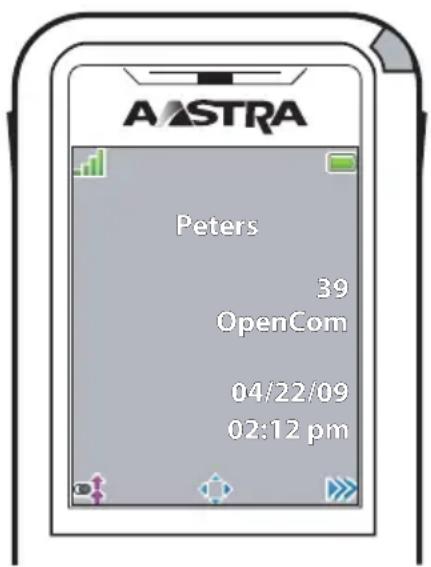
The communications system is called "OpenCom" and the (internal) call number of the mobile unit is "39". This information refers to the mobile unit of the communications system. You can change this information in the >>> > System > Subscriptions menu (see page 112). The mobile unit is named "Peters". You can change this information in the >>> > Settings > User name menu (see page 129).
The current date and time settings are usually provided by the system when checking in.
Note
When no subscription appears on the display the mobile unit has to be checked in; please refer to Mobile Unit Subscription (Checking In) starting on page 24.
Switching off mobile unit
Longer key press of the end-call key
or ...
Short key press of the 📋 end-call key, select Switch off and press the OK softkey. After a confirmation message, the mobile unit is switched off.
Note
If a switched of mobile unit is placed in the charger, it stays switched off while being charged. The LED flashes alternately red / green to indicate the charging process. For technical reasons the mobile unit is switched on when it was placed in the charger and removed from it before the LED begins to flash red / green.
Keylock / Phone Lock
Activating keylock
When idle, press the hash key longer.
The keylock is activated and the 🔍 symbol appears on the display.
When you receive a call, the keylock is deactivated for the duration of the call.
Use the receiver key to accept the call.
Deactivating keylock
Press the softkey with the symbol and then the hash key within 3 seconds.
Cancel phone lock
If you have locked your telephone to prevent unauthorised use (see page 133), you can cancel the lock by pressing the softkey and entering your device PIN.
Telephone Lock
If you wish to permit another person to temporarily use your telephone, you can activate the telephone lock for the mobile unit via the >>> > System Menu >
Protection menu (see page 123). Dependent on the system configuration, when the telephone lock is activated, the functionality range is restricted on the mobile unit, incl. possibly restricted dialling rights.
Speaker/Handsfree Use
Press the loudspeaker key before or during a call to allow multiple persons to participate in the call. Repeat the process to switch it off. When the loudspeaker function is activated, the symbol appears on the display.
To obtain the best speaker/handsfree quality, make sure neither the speaker nor the microphone are covered up. When placing the mobile unit into the charging station during a call, the speaker/handsfree is automatically activated.
Note
Do not hold the telephone in the handsfree mode next to your ear as the volume can be very high.
Adjusting Volume During a Call
During a call you have seven levels to adjust the volume of the receiver/headset or the loudspeaker (during speaker/handsfree, see page 43).
Aastra 610d
Press the /+ sidekeys to increase or reduce volume for the current call.
Alternatively, you can use the (quieter) und (louder) navigation keys by pressing and holding them to begin with. To make a volume adjustment, push them in quick succession.
Press the upper or lower sidekeys to increase or reduce volume for the current call. If the keys have been programmed with functions, press and hold them to begin with. To make a volume adjustment, push them in quick succession.
Alternatively, you can use the (quieter) und (louder) navigation keys by pressing and holding them to begin with. To make a volume adjustment, push them in quick succession.
Note
When you make a setting and press the OK softkey, the new value is saved (i.e. saved as a menu entry, please refer to "Audio" Menu starting on page 109).
Switch Ringer On/Off
If you wish to be sure you are not disturbed (e.g. during a meeting) you can switch off the ringer. Incoming calls are then signalled silently by vibration instead of the audio signal (if activated, see page 111 – not available on the Astra 610d).
Switch off
When idle, press the star key longer – the symbol appears on the display.
Switch on
When idle, press the star key longer once again – and the symbol appears on the display.
Switch Off Ringer When Called
If you wish to switch off the ringer for a current incoming call, press the key or the softkey. As long as the caller has not hung up yet, you can still accept the call.
Vibra Call (Aastra 620d/630d Only)
You can activate/deactivate the vibration alarms in the >> > Audio > Ringer settings > Device > Vibra call menu (see page 111).
Signalling Wake-up Time or an Appointment
When there is a wake-up call or appointment call (see page 89) the ringing tone is activated for 1 minute and the display shows an event text, if saved. You can completely terminate the call using the Stop softkey. If you press the Snooze softkey, the ringing tone is interrupted for 5 minutes and then switched on again. You can also press the 📄 end key or the ⓒ C-key instead of the Snooze softkey.
Muting Mobile Unit
If you do not want the caller to hear, e.g. what you are discussing with someone else in the room, you can temporarily mute your mobile unit.
Muting
Press the softkey. The symbol appears in the upper line of the display. The caller on the telephone can no longer hear you.
Cancel muting
When you wish to talk to the caller again, press the softkey once again. The caller on the telephone can hear you again.
Illumination/Display Dimming
Keypad and display are illuminated. Illumination is switched on anytime a key is pressed or a call made and remains switched on for a configurable time. To prevent a complete deactivation of display illumination after this time, you can activate the dim function. Illumination remains switched on but at lower intensity. This setting reduces battery operating times. You can make changes in the ▶▶> Settings >
Illumination > Display dimming / Keypad / Display menu (see page 130).
Switching on display illumination
If display illumination is completely switched off, you can switch it on with one of the three softkeys below the display without executing the function assigned to those keys.
Display: Change Brightness/Contrast
Aastra 610d
Adjust the display brightness to suit your prevailing environment. Change the contrast in the ▶▶> Settings > Display > Contrast menu (see page 130).
Adjust the display brightness to suit your prevailing environment. Change the brightness in the ▶▶> Settings > Display > Brightness menu (see page 130).
Automatic Hide / Message Windows
If you have an open a menu or input mask and there is an incoming call, the information regarding the call appears on the display (name/call number of the caller, etc). After ending the call, you return to where you had been before the call. When you have opened the system menu / main menu of the Astra 800 / OpenCom 100 communications system and get an incoming call (see page 113), the caller will hear a busy signal and the call is entered onto your caller list.
Messages appear for some settings in the Device menu and lengthier texts are automatically scrolled forward. You can also scroll manually by pressing the △ keys.
Event Window and Info Menu
When the mobile unit is idle, an event window appears on the display if, e.g. there are new entries in the caller list, the voicebox (if configured) or in the message list. If there are multiple entries, the New infos header appears.
Open the Info menu to retrieve the entries. When idle, press the navigation key and select a menu entry. You can also open the Info menu by pressing the softkey or the softkey.
Date/Time
When idle, the display shows the current date and the current time of the Aastra 800 / OpenCom 100. After commissioning or after changing the battery it may take a moment until all current data is transmitted from the Aastra 800 / OpenCom 100 communications system.
Bluetooth® Headset Operation (Aastra 620d/630d)
The Bluetooth® brand name as well as the Bluetooth® logo are the property of Bluetooth SIG, Inc. and any usage of this trademark by Astra is licenced. Other trademarks and brand names are the property of the respective owner.
The Bluetooth function of the mobile units permit checking in two Bluetooth headsets, one of which can be selected for operation.
A Bluetooth headset which is checked in and reachable ( symbol) has priority over any headset that may be simultaneously connected by cable (symbol).
When using a headset (Bluetooth or cable connected) and the handsfree key is pressed on the mobile unit, the call is definitely continued via the loudspeaker of the mobile unit.
If the mobile unit and the Bluetooth headset become disconnected during a call, a message appears on the display. You can decide whether you wish to continue the call with a cable-connected headset or on the mobile unit itself or whether to end the call.
Subscribing / Renaming / Unsubscribing Bluetooth Headset
Checking in
To do so, switch the headset into the "Pairing mode". Please refer to the user guide of the headset to do so.
- Switch the function on (On) in the ▶ > Settings > Bluetooth > BT Status menu.
- Open the ▶▶> Settings > Bluetooth > Subscribe headset menu and then press the New softkey.
- The name of the headset found appears on the display. Confirm the display with Ok and enter the headset PIN.
Now the headset is checked in and the symbol appears in the upper line of the display.
You determine the respectively active headset in the >>> > Settings > Bluetooth > Select headset menu.
Renaming
Select the menu entry >>> > Settings > Bluetooth > Subscribe headset > [Headset name] >> Edit.
Checking out
Select the menu entry >>> > Settings > Bluetooth > Subscribe headset > [Headset name] >> Delete.
Telephoning via the Bluetooth Headset
Accepting a call
Press the corresponding "call key" on the headset or the receiver key on the mobile unit. The symbol appears.
End call
Press the corresponding "end-call key" on the headset or the end-call key on the mobile unit.
Outgoing call
Enter the call number on the mobile unit and press the corresponding "call key" on the headset or the call key on the mobile unit.
Handsfree operation
When you press the 📄 handsfree key to accept a call or during a call, Bluetooth operation is interrupted and the loudspeaker / microphone of the mobile unit is switched on.
Transferring call to headset
During a connection via the mobile unit: press the "call key" on the headset.
Transferring call to mobile unit
During a connection via the headset: press >> and select Transfer BT to Handset.
Special Key (Hotkey) / VIP List (Aastra 620d/630d)
The special key (hotkey) on the upper right side of the Aastra 620d and Aastra 630d mobile units is prepared as the VIP directory / VIP list as the default for saving up to six especially fast-access telephone numbers (the key can be re-programmed, please refer to the chapter entitled Key Programming starting on page 137).
Programming call numbers
To programme your preferred call numbers, press the hotkey briefly and then the new softkey. Enter the name and call number. Define additional call numbers under the >> > New entry option.
Dialling a call number
To dial this call number, press the hotkey briefly, select the desired entry and press the call key; the call is made.
Calls from call numbers on the VIP list are signalled by the VIP call. This setting is made in the ▶▶▶ > Audio > Ringer settings > Melodies menu (see page 110).
Note
The VIP list can also be programmed with call numbers in the Directories menu (see page 107).
VIP List (Aastra 610d)
The Aastra 610d programmable keys can also be assigned with a VIP directory. To do so, programme one of these keys as described on page 137 and then save the name and call number as described in the previous section (or in the Directories menu).
Profiles
Profiles are a group of mobile unit settings which are respectively assigned to a specific situation or application. So you can, e.g. switch from the Normal operation mode (e.g. in an office) to the Loud operation mode when you move into a different environment (e.g. workshop). Switching profiles adjusts various features to the environment, e.g. ring tone volume, vibra call, voice quality, LED signalling etc.
Your mobile unit has 5 profiles. These are pre-defined but can be changed at anytime. Change the default settings as needed in accordance with your requirements (see page 135).
Note
When you change features contained by the profile with the profile activated via the usual menu access (e.g. via the >> > Audio > Volume settings > Ringer menu), these settings are taken on by the respective profile.
Adjusting to Environment
Your mobile unit has 2 functions for adjusting the device to a loud environment:
When you activate the function via the ▶▶▶ > Audio > Ringer settings > Volume menu, the volume of the ring tone is automatically increased when the environment is loud.
Please note that in this case the ring tone volume should not be set to Increasing.
When you activate this feature via >>> > Audio > Loud environment, the mobile unit will attempt to improve voice quality in a loud environment. This applies to connections via the mobile unit itself as well as on a corded headset (not to Bluetooth headsets nor to handsfree mode).
Special Functions
Emergency Call Key (SOS)
All devices offer the option of saving an SOS emergency call function to one of the programmable keys (see page 137). After a short key press of the programmed key (emergency call key), an SOS emergency call number is dialled. Whether the call can be made while idle or also in the call state depends on the device, the type of programmed key and the system where the mobile unit is currently checked in.
If you have programmed the SOS emergency call function to the left or middle softkey, the emergency call key is only available when idle. If you program the emergency call function to one of the other keys (left or right navigation key or side keys / hotkey on the Aastra 620d, 630d), then the emergency call key can also be used when in the connection state (depending on the system).
On the Aastra 610d / Aastra 620d the mobile unit is always switched into the handsfree operation when the emergency call number is dialled. On the Aastra 630d you can configure whether the call is made in the handsfree or receiver operation (see the Handsfree at alarm menu entry under Alarm Sensor on page 133).
The Astra 630d mobile unit has a separate SOS key on the top edge. You can configure what the key does in the menu >> > Security > SOS call > SOS key or in the menu >> > Settings > Key programming > [and pressing the SOS key]. The following can be configured: SOS call (then the SOS emergency call number is dialled directly) or SOS call: with confirmation (the SOS emergency call number is dialled only after a confirmation prompt). After pressing and holding the key, the SOS emergency call number is always dialled immediately.
You can enter the SOS emergency call number in the menu >>> > Security > SOS call > SOS number. If the SOS emergency call number is predefined by the system, this menu entry does not appear.
OpenCom 100 / Aastra 800 systems only: Always save the SOS emergency call number with the prefixed R-key function (enquiry/hold). Then an emergency call can also be made during a call (depending on mobile unit – see above). Press the hash
key 3 times to enter the R key function.
Other systems: The "Hold" function may be generated using other codes on other systems. The respective system documentation provides information on suitable programming.
Note
the emergency call key / SOS key on the Astra 630d even when the keylock and phone lock are activated, as well as when the telephone lock are activated. Under certain circumstances it may not be possible to use the emergency call key/SOS key when activating system features via menu (e.g. System menu). You should thus avoid making menu settings during safety-relevant usage of the mobile unit.
The Alarm Sensor (Aastra 630d only)
The Astra 630d mobile unit has an alarm sensor that continuously determines the tilt angle or motion of the device. This can lead to various types of alarms which automatically trigger an alarm call. You have to have an alarm call number or the SOS emergency call number programmed (see previous section) and the alarm sensor function is activated. The following alarms are supported:
- Mandown alarm
- No movement alarm
- Escape alarm
All three alarm types can be activated simultaneously. The alarm call number is the same for all types of alarm. If there is no alarm call number saved, the SOS emergency call number saved to the emergency call key / SOS key is used.
The first type of alarm detected is activated. The symbol appears in the first display line when the sensor alarms are activated. One way you can determine which alarm is active is in the Active Features menu (see page 106).
Please note that to ensure dependable functioning, the device should be worn (belt clip, lanyard) as exposed as possible (not in your pocket).
Mandown
Usually the mobile unit is worn vertically, e.g. with the belt clip directly fastened to the person's body. The position measurement is conducted continuously and checks to ensure the device is still upright. If the device is 45^ from being in the vertical, an alarm is triggered after a defined time interval, as there may be an emergency.
No movement
This alarm is triggered when the mobile unit is motionless for a definable time interval (no device movement or movement of the person wearing the device). Sensor sensitivity can be configured in three levels. It is recommended to test the sensitivity of the no movement alarm with the person being monitored in order to guarantee reliable operation.
When loading the device in the charger or via the USB port, the no movement alarm is deactivated.
Escape
The escape alarm is triggered when the sensor detects intense movements of the mobile unit during a configurable time interval. As with the no movement alarm, the sensor sensitivity can be set at three levels. It is recommended to test the sensitivity of the escape alarm with the person being monitored in order to guarantee reliable operation.
Setting alarm times
The settings are in the >>> > Security > Alarm Sensor menu (see page 133). Alarm times are comprised as follows:
Delay: This is the time that starts after the triggering event (mandown, no movement, escape). If the triggering event is interrupted for at least 2 seconds during this time, the delay restarts.
The delay can be configured separately for each alarm type.
Pre alarm: This is the time where – if activated – an alarm tone is signalled on the mobile unit before the alarm call number is dialled. To switch off the alarm tone (and thus deactivate the alarm), you have to press the Esc softkey. During pre-alarm, a display shows how much time remains until the alarm call number is dialled.
If the triggering event is interrupted for at least 4 seconds (2 seconds for the no movement alarm) during this time, the delay restarts.
The escape alarm can only be cancelled via the Esc softkey.
Setting the time for the pre-alarm is done for all alarm types together.

flowchart
graph LR
    A["Event\nMandown, No movement, Escape detected"] --> B["Delay Pre alarm"]
    B --> C["with/without alarm tone on the mobile unit"]
    C --> D["Dialling of the alarm call number"]
Other alarm parameter settings
Alarm number: If the SOS emergency call number is predefined by the system, this menu entry does not appear.
OpenCom 100 / Aastra 800 systems only: Always save the SOS emergency call number with the prefixed R-key function (enquiry/hold). Then an emergency call can also be made during a call (depending on mobile unit – see above). Press the hash key 3 times to enter the R key function.
Other systems: The "Hold" function may be generated using other codes on other systems. The respective system documentation provides information on suitable programming.
If there is no alarm number saved, the SOS emergency call number – if there is one – is called alternatively.
Alarm auto answer: If the function is activated, any call is automatically accepted during Pre call. If the function is deactivated and there is an incoming call during pre-alarm, or a call already being made, the alarm call number is dialled after pre-alarm.
No matter what the setting, calls from the alarm call number or the SOS emergency call number are automatically accepted and pre-alarm ended.
Alarm tone: Pre-alarm can take place with/without an alarm tone on the mobile unit. When the alarm tone is activated, it is signalled with increasing volume.
Repeat alarm: This is the time interval after which another pre-alarm including subsequent dialling of the alarm call number is executed (e.g. because calling the alarm call number was cancelled by the system).
Handsfree in alarm: You can configure whether an alarm call is done in handsfree or receiver operation. This setting also applies to the emergency call via the SOS emergency call key.
Several alarm types simultaneously activated
Do not activate the three alarm sensor types simultaneously when short delay and repeat times are set and the pre-alarm is switched off. This may block the menu access (to deactivate an alarm type) in case of a simultaneous alarm call. Place the mobile unit in the charger and keep it placed there. Make your configurations then.
Connections
Internal and External Call Numbers
Internal and external call numbers for reaching you are assigned during configuration of the Aastra 800 / OpenCom 100 communications system.
External Seizure and Entry of Call Numbers
If you hear the external dialling tone after pressing the call key, your telephone is set to spontaneous external line seizure. If you hear the internal dialling tone after pressing the call key, your telephone is set to manual external line seizure. The external line seizure applicable for you is configured by your system administrator upon user group configuration.
If your telephone is set to manual external line seizure, an internal line is seized initially. You can dial an internal call number immediately. You have to use the external line prefix to dial external call numbers (default: "0"). The system administrator defines this code for all users in the Aastra 800 / OpenCom 100 and informs you of the applicable value.
If your telephone is set to spontaneous external line seizure, an external line is seized initially. You can dial an external call number immediately. To reach internal users – before entering the internal call number – press the ☐ * * star key twice.
If you dial a call number for an enquiry or when you programme call number destinations, you have to enter these call numbers in accordance with the external line seizure applicable to you.
Example
You wish to programme call forwarding.
- You enter an external call number directly with spontaneous line seizure; with manual line seizure, enter the prefix code for the external line (default: "0"). Exception: The destination of "Divert MSN" is always entered without a prefix code.
- Enter an internal call number directly with manual line seizure; with spontaneous line seizure, press the starkey twice beforehand.
Multiple Trunk Keys
Multiple trunk keys can be configured on your telephone (three max. on the Aastra 800 / OpenCom 100 communications system) Each of these keys has its own internal call number – independent of system configuration – which can also be assigned to its own external call number. Ask your system administrator about the configuration applicable to you.
When you have multiple trunk keys configured on your telephone, you can dial a call number directly via one of these keys, please refer to the Pre-dialling starting on page 63 chapter. The first trunk key is designated the preference key if you do not make a selection.
When making a call from the redial list or from the caller lists, the respective trunk key is automatically seized from which the original call was made.
Tip
Use the programmable keys for fast and convenient access to your device's trunk keys. Assign the Line x function to one or multiple keys. The trunk key is then permanently assigned to the programmed key. You can also programme a key with the Select Line function. You can then select the respective trunk key desired via this programmed key. Please refer to the Key Programming starting on page 137 chapter for further information.
Multiple Connections
Your device can handle two connections simultaneously, i.e. you can speak with two callers at the same time, and switch back and forth between these connections (toggle) or conduct a three-party conference. Any further callers will hear a busy signal.
When the system administrator has configured a call queue, any further calls are given a place in the queue (please refer to the Calls in the Call-Waiting Queue starting on page 58 section).
DTMF Postdial/VF Signalling
Depending on the system configuration, your telephone is automatically set to VF signalling during a call. Use VF signalling, e.g. to query a voice message or voicebox. Please contact your system administrator if you have questions regarding this function.
Charge Display (Charges)
If your network operator transmits charge information – even for external calls you dial yourself – you will see the charge amount for the call during and after the call.
Note
If there are no charges for the call, no charges are displayed.
Transmission of Call Numbers
There are various ISDN services which either allow or prevent transmission of call numbers between users.
"CLIP" feature
CLIP is an abbreviation which stands for "Calling Line Identification Presentation". The call number of the caller is displayed (if transmitted). If the call number has also been entered into the directory of the Aastra 800 / OpenCom 100, the name is displayed.
"CLIP no screening" feature
“CLIP no screening” offers transmission of an arbitrary call number for outgoing connections instead of transmitting the actual call number of the caller. This means that instead of your call number being displayed, e.g. a service call number is displayed to the user you called. The “CLIP no screening” feature must be ordered from the network operator and authorised for use by the system administrator during system configuration. When you receive an external call where the caller is displaying a different call number than the one actually technically being transmitted, a “?” appears next to the call number on the display. If the call number indicated on the display is saved to a phone book entry, the name is displayed as usual along with a question mark.
Note
Display of the question mark "?" is the system default. The system administrator can switch off this default setting in the web configurator with the Mark unchecked phone number with ? option (Telephony: Settings menu).
"CNIP" feature
CNIP is an abbreviation which stands for "Calling Name Identification Presentation". In addition to the call number of a caller, the name provided by the caller is transmitted and displayed. This requires that the network operator transmits this information with the connection. If the call number of the caller is also entered into the Astra 800 / OpenCom 100 directory, this – local – entry is given priority on the display.
"CLIR" feature
CLIP is an abbreviation which stands for "Calling Line Identification Restriction". Before dialling a call number, you can determine from case to case whether the transmission of your call number is to be suppressed to the person you are calling, please refer to the Pre-dialling on page 63 chapter).
Blocked/Unblocked Call Numbers
Your telephone can be blocked for all or for certain external call numbers. Emergency call numbers (110/112 in Germany) can be placed on a special list – no matter what your external authorisation – and can thus be dialled at any time. Ask your system administrator about it.
Keypad Dialling
Some European network operators require the keypad protocol in order to be able to set features. Depending on the system configuration, your telephone is automatically set to keypad dialling during a call. If not – before dialling – you have to switch your device and enter the codes stipulated by the network operator. These are then directly forwarded to the exchange and evaluated there. You usually receive an announcement in response. Please contact your system administrator if you have questions regarding this function.

Now your telephone has been switched to the keypad protocol. Now you can enter the keypad codes.
Note
This setting is deleted once again when the call is completed!
Least Cost Routing (LCR)
For every outgoing external connection, the communications system automatically makes a connection – via LCR – to a network operator defined by the system administrator. If you do not use this preferred connection and for a single call would like to select a network operator yourself (call by call), switch LCR off before making the call (please refer to the "LCR off" menu entry in the Menu when Pre-dialling starting on page 69 section).
Note
The baby call and external call forwarding are not automatically conducted via preferred connections. This is where you can prefix the codes of the desired network operator when entering the call number, when you wish to use a different network operator than the standard one.
Calls in the Call-Waiting Queue
The system administrator can additionally configure and activate a Call-waiting queue for your telephone in the Astra 800 / OpenCom 100. While you are making a call, new calls are registered in this queue, the caller first hears an announcement (if your system administrator has configured an announcement) and then the ring tone. The number of calls that can be registered in your queue is defined by the system administrator, e.g. 5 calls. Once this number is reached, any additional callers hear a busy signal. The calls in the queue are transferred in accordance with their priority (baby calls, door calls, VIP calls, other internal and external calls), calls with the same priority are transferred in the order made.
Calls that are in the queue for too long a time are removed. The caller then hears a busy signal also. The time interval until an external call is cleared from the queue is defined by the network operator. This is usually 2 minutes in Germany and in other European countries usually 3 minutes.
Your telephone can have a call-waiting queue even if it belongs to a subscriber group. A call-waiting queue simultaneously affects call forwarding.
Note
If call-waiting protection is activated on your telephone, every time a new call comes in you will hear the call-waiting tone and see on your display whether the call is external or internal. If call-waiting protection is activated and you end the call, the next waiting call will be signalled.
For more information please refer to the "Call Queue" chapter in the "OpenCom 100 Mounting and Commissioning" or "Aastra 800 Installing and Commissioning" user guide.
Calls with Booking Numbers
By means of a booking number you can record the call data of a connection to an external subscriber and save them in the Astra 800 / OpenCom 100 for further evaluation. Booking numbers are useful, e.g. for calculating costs per client (fees and times) in an office. Incoming calls can also be associated with a booking number.
Notes on booking numbers
- The system administrator defines the length of the entered booking number during system configuration.
- Entering a booking number during a call is possible only if the system administrator has activated this function for your user group.
- For external connections established by you it is relevant how system administrator has configured the route you are using for the connection. One thing the system administrator defines during configuration is whether a booking number is entered via the menu during a call. He/she can, however, also specify that booking numbers must be entered via code procedure. In that case the booking number must be entered before the call is initiated and the connection is established. It is entered after the routing code and before the actual destination call number.
- Calls made with booking numbers can be evaluated with the OpenCount / Astra Count Web application of the Astra 800 / OpenCom 100 communications system.
Forwarding Calls
Types of forwarding
You can forward internal or external calls intended for yourself to another internal call number or – provided that you have the necessary user group authorisation – to another external call number. Calls can be forwarded either immediately, after a specified period of time or if the terminal is busy. You can configure more than one call forwarding mode at the same time (Immediately, After delay or Busy). You can, e.g. configure call forwarding Immediately for external calls to one call number, and call forwarding After delay for internal calls to a different call number. During configuration, the system administrator defines an interval in seconds for After delay call forwarding. You can replace this default with your own individual value when programming After delay call forwarding. If more than one forwarding mode has been activated, Immediately call forwarding is always given priority.
Call forwarding to a voicebox
If OpenVoice / Astra Voice, the integrated voicemail system, is installed on the communications system, you can also forward your calls to the call number of your voicebox.
Selective Call Forwarding
Furthermore, the system administrator can programme call forwarding where the call number of the caller is evaluated ("SCF: Selective Call Forwarding"). Potentially this could be the reason why specific calls do not reach you. Please contact your system administrator if you have questions regarding this function.
Least Cost Routing
Least Cost Routing (LCR) can be evaluated with call forwarding to external numbers – provided your system administrator has configured LCR and its application in the Aastra 800 / OpenCom 100 correspondingly. Ask your administrator for the configuration applicable to you.
Hunt group call numbers
During system configuration, the system administrator can configure call forwarding destinations for hunt group call numbers. These destinations are called when all users of a hunt group are busy and/or when a call is not accepted by any member of the hunt group within a certain time interval. You cannot view or change this call forwarding on your device.
In addition, the system administrator can determine whether you can forward incoming calls to the hunt group call number or not. If the system administrator does
not permit call forwarding for your hunt group call number, any call forwarding that you have programmed on your device is not carried out upon a hunt group call.
Call forwarding chains
The system administrator can configure the system such that multiple call forwarding instances can be linked one to another to form a chain. A simple example: user A forwards to user B, who then forwards to user C. A call for user A is then directly signalled to user C.
A setting in your user group regulates which call number appears on your device when a call which has been forwarded multiple times is signalled on your device: you will see either the call number of the last user who programmed the last call forwarding in the chain, or the call number of the first user in the chain. The number displayed is also saved to the caller list for missed calls on your device.
The system prevents call forwarding chains from forming a loop, e.g. when the call forwarding destination refers back to the call forwarding source. When the system detects a call forwarding loop, no further call forwarding is carried out. This can mean that – despite call forwarding being programmed – calls are nonetheless signalled on your device.
A loop is also detected during call deflection. If you receive a call via a call forwarding chain and wish to deflect it to a destination call number which is already in the call forwarding chain, a negative acknowledgement tone is heard and the call signalling on your device will continue.
Contact your system administrator if call forwarding is not functioning as expected on your device. The system administrator is able to analyse call forwarding chains and eliminate any possible conflicts.
Menu Before and During a Call
When the handset is in the idle or call state, state-dependent menus are displayed when you press the softkey. Frequently used features of the Astra 800 /
OpenCom 100 communications system are displayed, which you can then activate in this situation.
Examples
-
Another telephone in your pick-up group rings and you want to accept the call. Press the >> softkey briefly, select Pick-up and confirm your choice with Ok. You will be connected with the caller.
-
Or a subscriber is busy and you want to be called back. When you hear the busy signal, press the >>> softkey briefly and confirm Callback with Ok.
The state-dependent menus are individually described at the end of the following chapters.
Tip
For fast and convenient access to the state-dependent menus you can programme one of the programmable keys with the 🎨 System Menu function (please refer to the chapter entitled Key Programming starting on page 137).
Telephoning
Safety precaution
Do not hold the telephone in the hands-free mode next to your ear as the volume can be very high.
External/Internal Calling
Dialling Directly

Press the call key.

Dial the internal or external call number (if necessary with the prefixed code for external line seizure, please refer to the chapter entitled External Seizure and Entry of Call Numbers on page 54).
Pre-dialling

Enter entire call number and then press the call key.
If there are several trunk keys configured on your telephone you can assign them specifically (please refer to page 55):

Enter the internal or external call number.

Press softkey briefly. The Options menu opens.
Ok Press softkey to confirm the selected Select line menu entry.

Use the navigation keys to select the desired trunk key and confirm with the ∅k softkey.
Correcting pre-dialling entry:

Press C key briefly to delete single digits.

Press C key longer to delete the entire call number.
Making a Call from the Redial List
The call numbers you last dialled are saved in the redial list (the last entry is first on the list). If the call number is also entered into the communications system phone book, the name appears as well.

When idle, press the ⚪ softkey or press the call key – long key press. The call numbers most recently dialled appear.
△ / Select an entry via the navigation keys.

Press the call key to dial the selected call number.
If your internal call number (e.g. "30") is configured on multiple terminals, you can view and edit the redial list for the call number 30 on each of these terminals. If you delete, e.g. the redial list on a terminal, it is then deleted on the other terminals as well.
If there are multiple trunk keys configured on your telephone (please refer to the chapter entitled Multiple Trunk Keys on page 55), when you redial, the trunk key is automatically seized with which you originally dialled the call number.
Additional options:
After you have selected an entry from the redial list, you can instead of dialling – execute other operations as well. The operations available to you depend on the List access setting (please refer to page 131).
Local Redial List

Press softkey. Information on this entry appears.

Press softkey. The redial list menu opens and you can edit the entry/list, please refer to page 104.
Redial List via Communications System
Ok Press softkey. The redial list menu opens.
△ / ∅se the navigation keys to edit the entry/list, please refer to page 104.
Note
You can access the info menu / redial list using the navigation menu (see page 29) or via the menu access when the mobile unit is idle.
Making Calls from the Caller List
Your mobile unit saves the call numbers to the caller list of the users that either did not reach you (missed calls) or callers that you most recently spoke with (accepted calls). This requires that the call number was transmitted during the call, please refer to the chapter entitled Transmission of Call Numbers starting on page 56. A missed call is deleted from the list when a caller reaches you on a subsequent call. If a caller is saved in your phone book, the name is displayed. If a caller has called multiple times, that caller's calls are listed as one entry. If a caller suppresses display of his/her call number, the call is also saved on the caller list. Multiple calls from an unknown call number are listed as one entry.
When idle, press the navigation key to open the info menu.
△ / ▽ andSelect the Caller List menu entry and confirm with the Ok softkey. Ok
△ / Select an entry via the navigation keys.

Press the call key to dial the selected call number.
If there are multiple trunk keys configured on your telephone (please refer to the chapter entitled Multiple Trunk Keys on page 55), when you receive a call from the caller list, the trunk key is automatically seized with which you originally received the call number.
When accessing the caller list locally the display shows:
When you have configured the local caller list (please refer to the List access setting, page 131), the following symbols indicate the respective type of call:

| filtered call | |
| call-waiting not answered | |
| forwarded call | |
| SOS | SOS call |
| automatically accepted call | |
| VIP call |
Additional options:
After you have selected an entry from the caller list, you can instead of dialling – execute other operations as well. The operations available to you depend on the List access setting (please refer to page 131).
Local caller list

Press softkey. Information on this entry appears.

Press softkey. The caller list menu opens and you can edit the entry/list, please refer to page 103.
Caller list via communications system
Ok Press softkey. The caller list menu opens.
△ / ∅se the navigation keys to edit the entry/list, please refer to page 103.
Note
You can access the info menu / caller list using the navigation menu (see page 29) or via the menu access when the mobile unit is idle.
Call Waiting with an Internal Subscriber
When you call an internal subscriber whose number is busy, your call will appear on their display and signalled with the call waiting tone. You hear the ringing tone yourself. The system administrator can determine that a special ringing tone is used for call-waiting calls. Based on this special ringing tone, you can decide whether you wish to end the connection or not.
If the subscriber called has activated call-waiting protection (see page 124) you will hear the busy signal. You can penetrate a subscriber's call-waiting protection via a VIP call (see page 72).
Using Routes to Make Calls
The Astra 800 / OpenCom 100 establishes calls to a desired subscriber either automatically or via specific routes. Your system administrator configures these routes in the Astra 800 / OpenCom 100 and specifies how each route is seized. In order to manually seize a specific route for a desired call, dial the routing code before dialling the (internal or external) call number. By making specific calls via routes, you can e.g. contact subscribers in the branches of a large company network. It is also possible to use a manually-entered routing code to record your call-charge data for external private and business calls separately.

enter routing code, dial call number
for enquiry:

enter routing code, dial call number
Your system administrator can provide you information on current routes and your codes.
Menu when Dialling
Note
Menu items marked with an * are only displayed if the system administrator has given corresponding user authorisation.
You have pressed the call key and wish to dial a call number. During a call, press the >> softkey briefly and then select ...
Take: You wish to take a current call from one terminal over to your DECT telephone and continue the call on the DECT telephone. To do so, your DECT telephone and the other terminal must have the same internal call number.
Pick-up:* You pick up the call intended for another telephone in your pick-up group.
Pick-up select:* You pick up a call for any other internal subscriber. Enter the call number of the other telephone. If the other telephone is already in the call state (e.g. an answering machine is making an announcement), you pick up the call. The subscriber for whom you picked up the call must belong to a user group for which “Call removal” authorisation is activated, otherwise “Pick-up select” is not possible.
Note: If the called subscriber is a member of a user group for which pick-up protection is active, "Pick-up" and "Pick-up select" are not possible.
VIP call:* Your next internal call is executed as a VIP call. Enter the call number of the subscriber to whom you wish to transfer under Dest:. Even when the internal subscriber called (with system terminal only) has activated call waiting protection, call protection or call forwarding, your call is signalled acoustically.
Announcement:* After entering the call number, you can initiate an announcement to another system terminal (or to a group of system terminals).
Intercom:* After entering the device ID, you can initiate an announcement to a single system terminal. The microphone of the terminal called will be switched on and the person you are calling can immediately answer your announcement. The "Intercom" function cannot be used for announcements to a group of terminals.
LCR off:* You switch off LCR (Least Cost Routing) for the next call.
Un Park: Consecutively "unparks" one or more connections which you have previously parked, for instance to make enquiries or to forward calls.
Personal directory: You can search for and dial a call number in the personal phone book, please refer to page 96.
Central directory: You can search for and dial a call number in the central phone book, please refer to page 92.
Redial: Displays entries in the redial list. You can select and dial an entry, please refer to page 64.
Caller list: Displays entries in the caller list. You can select and dial an entry, please refer to page 65. This menu entry is only available if you have configured local list access (see page 131).
Add ...: You can insert a call number into the personal phone book or the VIP list.
Door opener:* You activate the door opener.
Menu when Pre-dialling
Note
Menu items marked with an * are only displayed if the system administrator has given corresponding user authorisation.
You have entered a call number into pre-dialling (please refer to page 63). Press the >> softkey briefly and then dial ...
Select Line:* When there are multiple trunk keys configured on your telephone (please refer to page 55), select the trunk you with which you wish to make the call and then press the OK softkey.
Suppress number:* You determine whether (On option) or not (Off option) your call number is suppressed to the person you call for the following call.
Pick-up select:* You pick up a call for any other internal subscriber. Enter the call number of the other telephone. If the other telephone is already in the call state (e.g. an answering machine is making an announcement), you pick up the call. The subscriber for whom you picked up the call must belong to a user group for which “Call removal” authorisation is activated, otherwise “Pick-up select” is not possible.
Note: If the called subscriber is a member of a user group for which pick-up protection is active, "Pick-up select" is not possible.
VIP call:* Your next internal call is executed as a VIP call. Enter the call number of the subscriber to whom you wish to transfer under Dest:. Even when the internal subscriber called (with system terminal only) has activated call waiting protection, call protection or call forwarding, your call is signalled acoustically.
Announcement:* After entering the call number, you can initiate an announcement to another system terminal (or to a group of system terminals).
Intercom:* After entering the device ID, you can initiate an announcement to a single system terminal. The microphone of the terminal called will be switched on and the person you are calling can immediately answer your announcement. The "Intercom" function cannot be used for announcements to a group of terminals.
Add ...: You can insert the entered call number into the personal phone book or the VIP list.
LCR off:* You switch off LCR (Least Cost Routing) for the next call.
Menu during Conversation
Note
Menu items marked with an * are only displayed if the system administrator has given corresponding user authorisation.
You are making a call. Press the >> softkey briefly and then dial ...
Intercept:* The call numbers of “malicious callers” can be saved in your network operator’s exchange (if this service is enabled). The function is also possible if the caller has already hung up!
Disconnect: The connection is disconnected. The current call is ended and you can dial once again.
Take: You wish to take a current call from one terminal over to your DECT telephone and continue the call on the DECT telephone. To do so, your DECT telephone and the other terminal must have the same internal call number. Your first call is put on hold.
Pick-up:* You pick up the call intended for another telephone in your pick-up group. Your first call is put on hold. "Pick-up" is not available if there are two connections running already.
Pick-up select:* You pick up a call for any other internal subscriber. Enter the call number of the other telephone. If the other telephone is already in the call state (e.g. an answering machine is making an announcement), you pick up the call. "Pick-up select" is not available if there are two connections running already. The subscriber for whom you picked up the call must belong to a user group for which "Call removal" authorisation is activated, otherwise "Pick-up select" is not possible.
Note: If the called subscriber is a member of a user group for which pick-up protection is active, "Pick-up" and "Pick-up select" are not possible.
Booking number:* You can assign a booking number to the current call (to an external subscriber). Enter the booking number (8 digits max.) under No. and confirm with the ∅k softkey. Please refer to the Calls with Booking Numbers starting on page 59 chapter for further information.
Park call: * You can "park" the caller for a certain time. Please refer to the Parked Calls starting on page 85 chapter for further information.
Personal directory: You can search for a call number in the personal phone book, please refer to page 96.
Redial: Displays entries in the redial list. You can search a call number in the redial list. This menu entry is only available if you have configured local list access (see page 131).
Caller list: Displays entries in the caller list. You can search a call number in the caller list. This menu entry is only available if you have configured local list access (see page 131).
Add ...: The call number of the person you are speaking with is added to the personal phone book, the central phone book or the VIP list.
Door opener:* You activate the door opener.
Menu if Subscriber Busy
Note
Menu items marked with an * are only displayed if the system administrator has given corresponding user authorisation.
You have dialled a call number and the subscriber is busy. Press the softkey briefly and then dial ...
Callback: You leave your callback request with a busy subscriber (please refer to the Callback starting on page 88 section also).
Disconnect: You disconnect the connection and can then dial once again.
Pick-up select:* You pick up a call for any other telephone. Enter the call number of the other telephone. If the other telephone is already in the call state (e.g. an answering machine is making an announcement), you pick up the call. The subscriber for whom you picked up the call must belong to a user group for which “Call removal” authorisation is activated, otherwise “Pick-up select” is not possible.
Note: If the called subscriber is a member of a user group for which pick-up protection is active, "Pick-up select" is not possible.
VIP call:* Even when the internal subscriber called (with system terminal only) has activated call waiting protection, call protection or call forwarding, your call is signalled acoustically.
Personal directory: You can search for a call number in the personal phone book, please refer to page 96.
Redial: Displays entries in the redial list. You can search a call number in the redial list. This menu entry is only available if you have configured local list access (see page 131).
Caller list: Displays entries in the caller list. You can search a call number in the caller list. This menu entry is only available if you have configured local list access (see page 131).
Add ...: The call number of the subscriber called is added to the personal phone book or the VIP list.
Door opener:* You activate the door opener.
Menu when Calling
You have dialled a number. Your call is signalled to the subscriber called. The subscriber called has not yet accepted the call. Press the >>> softkey briefly and then dial ...
Disconnect: You disconnect the connection and can then dial once again.
Personal directory: You can search for a call number in the personal phone book, please refer to page 96.
Redial: Displays entries in the redial list. You can search a call number in the redial list. This menu entry is only available if you have configured local list access (see page 131).
Caller list: Displays entries in the caller list. You can search a call number in the caller list. This menu entry is only available if you have configured local list access (see page 131).
Add ...: The call number of the subscriber called is added to the personal phone book or the VIP list.
Door opener: You activate the door opener (this menu entry is available to you with the appropriate user authorisation).
Ending a Call

Calls are ended by pressing the end key briefly.
If the subscriber you are speaking to ends the call, the busy signal for your telephone is switched off after a few seconds and you can be reached again. This also applies when you are connected via headset. The time interval until the busy signal is switched off is configured by the system administrator. All other connections are ended after 20 seconds when the receiver is not replaced.
Accepting Calls
When there is an incoming call, an event window with information on the call appears on the display and the display illumination is switched on.

Press the call key.
... or
When "Auto answer" is activated (see page 131) – remove the mobile unit from the charging station.
optional:

The ring tone and/or vibration alarm are switched off, you can, however, still accept the call.
... or
Reject / Press softkey (alternatively: end key) The call is rejected. The caller

hears the busy signal.
... or

Press softkey briefly and select one of the menu entries offered, please refer to Incoming Call Menu starting on page 75.
Normal call
When you are called, the caller's call number is displayed (if transmitted). If this call number is also recorded in your phone book, you will see the person's name instead.
External calls from unknown call number
When you receive an external call where the caller is displaying a different call number than the one actually technically being transmitted (CLIP no screening), a “?” appears next to the call number on the display. If the call number indicated on the display is saved to a phone book entry, the name is displayed as usual along with a question mark. Note: Display of the “?” can be deactivated by the system administrator.
Call for a virtual call number (Tele Secretary)
Call numbers not assigned to any telephone or user (virtual call numbers) can be configured on the Astra 800 / OpenCom 100. The system administrator can divert a virtual call number to another internal call number, e.g. the call number of your telephone. This kind of diverted call is signalled on your telephone just like a normal call.
VIP calls
VIP calls from authorised users are signalled to you even when call protection, call waiting protection are activated or call forwarding is programmed. You hear the melody (please refer to the "Melody" section on page 110 also) and see the entry VIP call along with the caller's call number on the display. Accept the call just like a normal call.
Multiple trunk keys
If your telephone has multiple trunk keys configured on it (please refer to page 55), the display shows which call number the call is for, e.g. For:20.
Calls During a Conversation
While you are making a call, any incoming calls are signalled acoustically as well as visually on the display ("Call Waiting"). Call waiting protection must be deactivated for this to happen (see page 124).

You are making a call, hear the call waiting tone and see the text Call waiting as well as the name or call number of the subscriber waiting on the display.

Press the end key to end the current call. The call waiting call is now signalled to you just like a normal call.
... or

Press softkey briefly to accept the call waiting call. Your first call is placed on hold. You are speaking with the call waiting caller. For further information, please refer to the Enquiry, Toggling, Transfer and Conference starting on page 77 chapter.
... or

Press softkey briefly and select one of the menu entries offered, please refer to Call Waiting Menu starting on page 76.
Incoming Call Menu
You receive an incoming call, the telephone is in the idle state. Press the softkey briefly and then dial ...
Accept: You accept the call.
Reject: Reject the call by pressing the Ok softkey. The caller hears the busy signal.
Ringer off: Switch call signalling (ringer and/or vibration alarm) off temporarily. You can still accept the call.
Deflect call: You do not accept the call yourself, rather deflect it to another subscriber. Enter the call number of this subscriber under Dest: and then the Ok softkey. You can only use the "Deflect call" function if your user group has the authorisation to deflect internal and/or external destinations.
Note: If you receive a call via a call forwarding chain and wish to deflect it to a destination call number which is already in the call forwarding chain, a negative acknowledgement tone is heard and the call signalling on your device will continue.
Add ...: The call number of the subscriber calling is added to the personal phone book or the VIP list.
Door opener: You activate the door opener (this menu entry is available to you with the appropriate user authorisation).
Call Waiting Menu
Note
Menu items marked with an * are only displayed if the system administrator has given corresponding user authorisation.
You are making a call and receive a call. Press the >>> softkey briefly and then dial ...
Accept: Accept the call by pressing the ∅k softkey. The connection to the original subscriber is held in enquiry. You can now toggle back and forth between the two callers (please refer to the chapter entitled Enquiry, Toggling, Transfer and Conference starting on page 77).
Reject: Reject the call-waiting call by pressing the Ok softkey. The caller hears the busy signal.
Deflect call:* You do not accept the call yourself, rather deflect it to another subscriber. Enter the call number of this subscriber under Dest: and then the Ok softkey. You can only use the "Deflect call" function if your user group has the authorisation to deflect internal and/or external destinations.
Note: If you receive a call via a call forwarding chain and wish to deflect it to a destination call number which is already in the call forwarding chain, a negative acknowledgement tone is heard and the call signalling on your device will continue.
Disconnect: You disconnect the current call and accept the call-waiting call.
Park call:* You park the first call. Press the end key to enable your telephone to accept calls. The call-waiting call will then be signalled like a normal call. Press the call key and you are connected with the call-waiting subscriber. After you have finished this call you can “unpark” the parked call by briefly pressing the >> softkey and selecting the Un park menu entry. Please refer to the Parked Calls starting on page 85 chapter for further information.
Personal directory: You can search for a call number in the personal phone book, please refer to page 96.
Redial: Displays entries in the redial list. You can search a call number in the redial list. This menu entry is only available if you have configured local list access (see page 131).
Caller list: Displays entries in the caller list. You can search a call number in the caller list. This menu entry is only available if you have configured local list access (see page 131).
Add ...: The call number of the person you are speaking with is added to the personal phone book, the central phone book or the VIP list.
Door opener:* You activate the door opener.
Enquiry, Toggling, Transfer and Conference
Enquiry/Toggling
During a call you can consult another subscriber.
j
You are making a call.
Initiate enquiry:
R
Press softkey briefly. Your first call is placed on hold.
[Non-Text]
Enter internal or external call number. Note the type of line seizure (see page 54).
j
You are speaking with the subscriber called.
For toggling (switching back and forth between callers):
R
Press softkey.
Ending toggling/enquiry:
[Non-Text]
Press softkey briefly.
△ / Use the navigation keys to select the
Disconnect menu entry and
confirm with the Ok softkey. The current call is ended.
R
Press softkey briefly. You are speaking with the waiting subscriber once again.
Transferring an Internal/External Call to an Internal Subscriber
You have dialled an internal enquiry call (see page 77).
The subscriber called via enquiry answers:

Announce the call transfer.

Press softkey briefly.
The subscriber called via enquiry does not answer or is busy:

Press softkey briefly. The other subscriber is called.
If the called subscriber accepts the call, he/she will be connected to the waiting call. If the call is not accepted within a certain time interval (the communications system is 45 seconds by default, the system administrator can change this value), you get an automatic recall. You are re-connected to the original subscriber when you press the call key again.
If the system administrator has configured the Music on hold upon transfer on calling feature in the Configurator, the caller on hold hears "Music on Hold" while his/her call is signalled to the other internal subscriber. This setting also determines whether, when calling back, the caller hears "Music on Hold" or a ringing tone or busy signal.
Use the following procedure to disconnect an enquiry connection (e.g. when the subscriber called is busy):

Press softkey briefly.
△ / ∅se the navigation keys to select the confirm with the ∅k softkey.
Disconnect menu entry and

Enter another call number to transfer the call.
... or

Press R key briefly. You are speaking with the waiting subscriber once again.
Transferring an External Call to an External Subscriber
External calls can only be transferred to an external subscriber via the enquiry call menu (see page 79).

Press softkey briefly.
△ / Use the navigation keys to select the confirm with the OK softkey.
Connect menu entry and
Depending on your communications system's settings, the external calls will be switched together on your communications system or on the exchange of your network operator.
Note
When you call an external party and then transfer this person to another external party, you will bear the costs for the call between the two external callers. You have no way of influencing how long the transferred call will last. The connection is established via the Astra 800 / OpenCom 100 and occupies two call channels (ISDN user channels).
Enquiry Call Menu
Note
Menu items marked with an * are only displayed if the system administrator has given corresponding user authorisation.
You have put a call on hold and are making an enquiry call. Press the softkey briefly and then dial ...
Diversion: You put your current caller on hold (called via enquiry) and then call another (third) subscriber with whom you wish to connect your current (second) caller. Enter the call number of the subscriber to whom you wish to transfer under Dest: and then press the ☐ softkey. Announce the call and press the endkey. The call has now been transferred. After transfer, you are reconnected with the (first) caller you originally put on hold.
3 party:* You initiate a 3-party conference, see page 82.
Connect:* You connect the subscriber on hold with the current caller you are speaking with.
Toggle: You toggle between the current subscriber and the subscriber you last spoke with.
Disconnect: You disconnect the current connection. You can now either enter a new call number for another enquiry; Or press the R softkey briefly and you will be re-connected with the subscriber on hold.
Booking number:* You can assign a booking number to the current call (to an external subscriber). Enter the booking number (8 digits max.) under No. and confirm with the OK softkey. Please refer to the Calls with Booking Numbers starting on page 59 chapter for further information.
Park call: * You can "park" the current caller. Please refer to the Parked Calls starting on page 85 chapter for further information.
Personal directory: You can search for a call number in the personal phone book, please refer to page 96.
Redial: Displays entries in the redial list. You can search a call number in the redial list. This menu entry is only available if you have configured local list access (see page 131).
Caller list: Displays entries in the caller list. You can search a call number in the caller list. This menu entry is only available if you have configured local list access (see page 131).
Add ...: The call number of the person you are speaking with is added to the personal phone book, the central phone book or the VIP list.
Door opener:* You activate the door opener.
Menu when Subscriber on Hold
Note
Menu items marked with an * are only displayed if the system administrator has given corresponding user authorisation.
You have placed a call on hold. Press the >> softkey briefly and then dial ...
VIP call:* Your next internal call is executed as a VIP call. Enter the call number of the subscriber to whom you wish to transfer under Dest:. Even when the internal subscriber called (with system terminal only) has activated call waiting protection, call protection or call forwarding, your call is signalled acoustically.
Announcement:* After entering the call number, you can initiate an announcement to another system terminal (or to a group of system terminals).
Intercom:* After entering the device ID, you can initiate an announcement to a single system terminal. The microphone of the terminal called will be switched on and the person you are calling can immediately answer your announcement. The "Intercom" function cannot be used for announcements to a group of terminals.
LCR off:* You switch off LCR (Least Cost Routing) for the next call.
Personal directory: You can search for and dial a call number in the personal phone book, please refer to page 96.
Central directory: You can search for and dial a call number in the central phone book, please refer to page 92.
Redial: Displays entries in the redial list. You can select and dial an entry, please refer to page 64.
Caller list: Displays entries in the caller list. You can select and dial an entry, please refer to page 65.
Add ...: You can insert a call number into the personal phone book or the VIP list.
Door opener:* You activate the door opener.
Three-Party-Conference
If your user group has the corresponding authorisation configured, you can conduct a telephone conference (maximum of 3 subscribers). Conference participants can be internal or external callers. Three-party conferences cannot be connected.
Initiate and end conference
Initiate conference:

short Establish enquiry connection (see page 77).

When the subscriber answers, announce the conference.

Press softkey briefly.
△ / ▽ Use the navigation keys to select the
3 Party menu entry and confirm
with the Ok softkey. The conference is initiated.
Ending conference:

Press softkey briefly.
... or

Press softkey briefly.
△ / ▽ use the navigation keys to select the
confirm with the OK softkey.
3 Party End menu entry and
Continuing call with conference participants individually
During a conference, you can speak to conference participants separately.

Press softkey briefly.
△ / ∅ use the navigation keys to select the
Toggle menu entry and confirm
with the Ok softkey. Both connections are held and you can toggle
between the subscribers using the softkey.
Menu during Conference
Note
Menu items marked with an * are only displayed if the system administrator has given corresponding user authorisation.
You are now in a three-way conference. Press the >> softkey briefly and then dial ...
3 Party End: You end the conference.
Connect:* You switch yourself out of the conference. The other subscribers remain connected.
Toggle: You cancel the conference. You are speaking with one of the subscribers, the other is on hold. Use the softkey to toggle back and forth between subscribers to speak with them alternately.
Booking number:* When you call an external subscriber and have included the person in the conference, you can assign a booking number to the call data of this connection. Enter the booking number (8 digits max.) under No. and confirm with the Ok softkey. Please refer to the Calls with Booking Numbers starting on page 59 chapter for further information.
Personal directory: You can search for a call number in the personal phone book, please refer to page 96.
Redial: Displays entries in the redial list. You can search a call number in the redial list. This menu entry is only available if you have configured local list access (see page 131).
Caller list: Displays entries in the caller list. You can search a call number in the caller list. This menu entry is only available if you have configured local list access (see page 131).
Add ...: You can insert a call number into the personal phone book, the central phone book or the VIP list.
Door opener:* You activate the door opener.
Special Calls/Conversations
Voicebox Queries
OpenVoice / Aastra Voice answering machine is the integrated voicebox system for the Aastra 800 / OpenCom 100 communications system. If the system administrator has configured a voicebox for you, callers can leave messages for you, even when you cannot be reached at times.
On your mobile unit, received voicebox messages are saved in the info menu and on the caller lists of the main menu. The symbol appears on the display when new voicebox messages await you. To query new messages:
1
Long key press of number key 1.
... or
[Non-Text]
Press softkey briefly and select the Voicebox entry in the Info menu and confirm with the Ok softkey.
A list of voicebox messages received appears.
△ / ∅ use the navigation keys to select one of the entries displayed (confirm with the Ok softkey). You can now listen to the message and edit it (please refer to the "Voicebox mess." section as of page 116).
Additional options:
- It is possible to programme call forwarding to the voicebox (in the Call forwarding menu, please refer to page 118).
- You can also query your voicebox messages by directly calling the (call number of your) voicebox. You can also use the Call voicebox menu entry in the Applications menu (see page 128). Voicebox operation is voice controlled. Please refer to the user guide of the OpenVoice / Astra Voice voicebox programme for detailed information.
Parked Calls
While calling, you can “park” (one or more) callers for some time and meanwhile conduct other telephone calls or also hang up and carry out other operations. Parked calls are recorded on a list. You can remove calls from the list in any order such that a call is specifically “unparked” once again. The caller hears music on hold – if music on hold has been configured – until the call is “unparked”. If the caller is not “unparked” after some time, a callback is automatically made to your mobile unit as soon as your device is free again. The caller is then automatically “unparked”. If you are, however, still on another call, the caller hears the busy signal and is thus “unparked”. The authorisation for parking connections and the time interval until which callback takes place, is configured by the system administrator upon system configuration.
Park call

You are making a call.

Press softkey.
△ / Use the navigation keys to select the
Park call menu entry and
confirm with the ∅k softkey. The system offers the next available parking spot (0-9, * or #). Confirm with the ∅k softkey.

Press the end key.
Unpark call

Press softkey when idle.
△ / Use the navigation keys to select the
Unpark menu entry and confirm
with the ∅k softkey. Select the parked call desired from the list offered.
Confirm with the ∅k softkey.

You will be connected with the parked caller.
Announcements (with and without Intercom)
Announcements can be set up on single or multiple system terminals. The "Announcement" function is available in two versions.
- Announcement with intercom: The microphone of the system terminal called will be switched on (handsfree operation) and the person you are calling can immediately answer your announcement. An announcement with intercom can only be conducted to a single system terminal (not a group of terminals).
- Announcement without intercom: The called subscriber hears a special information tone followed by your announcement. You can also make an announcement to a group of system terminals (e.g. to a hunt group number on which calls are signalled simultaneously). All subscribers called hear the announcement at the same time in this case. The person initiating the announcement hears a signal tone on his/her telephone when the (announcement) connection has been established to all called subscribers. If one of these subscribers replies to the announcement, the announcement call to the other system terminals is terminated.
The system administrator has to extend the corresponding authorisation for your user group for you to be able to use the function. If a subscriber being called has activated announcement protection or intercom protection, announcements to that subscriber's call number will not be carried out.
Making an announcement without intercom

Pre-dialling: Enter the call number (of a single terminal or of a group of terminals).

Press softkey briefly.
△ / ∅ use the navigation keys to select the
Announcement menu entry.
Ok
Press softkey to confirm. State your announcement.
Making an announcement with intercom

Pre-dialling: Enter the device-ID of the terminal. Your system administrator can provide you with the device ID.

Press softkey briefly.
△ / Use the navigation keys to select the
Intercom menu entry.
Ok
Press softkey to confirm. State your announcement.
Responding to an announcement (announcement without intercom)
If you receive an announcement yourself, you will hear a special information tone.
Announcement and the caller's name appears on the display.

Press the call key to answer the announcement.
alternatively:
Reject / Press softkey (alternatively: end key) to reject announcement. The announcement initiator then hears the busy signal.
alternatively:

Press softkey briefly and use the / navigation keys to select:
Accept to answer the announcement,
Reject to reject the announcement.
Responding to an announcement (announcement without intercom)
Your telephone switches to the handsfree mode when it receives the announcement. You can speak with the caller immediately.
Note
When you have activated announcement protection (see page 123) and/or intercom protection (see page 124) on your mobile device, announcements to your call number will not be carried out.
Callback
If you call another subscriber of your Astra 800 / OpenCom 100 communications system and the line is busy, you can initiate automatic callback. Your user group must have authorisation for this feature to be able to use it.
Initiate callback

Press softkey briefly.
△ / ∅se the navigation keys to select the confirm with the ∅k softkey.
Callback menu entry and
Answering a callback
A callback is carried out when the other subscriber is free.
When your telephone rings:

Press call key.
The other subscriber is now called.
Baby Call
The "Baby call" function dials a previously programmed internal or external call number a specific time interval after pressing the 📄 call key (please refer to page 124). The default time interval on the communications system is 5 seconds. The system administrator can change this value. If you begin dialling a call number within the specified time interval, the baby call is cancelled.
Carrying out a baby call

Press call key.
Note
You can also programme an emergency call number on your mobile unit. In contrast to the baby call, an emergency call is executed immediately (please refer to page 50 also).
Confirming Appointment/Alarm Clock
Your mobile unit allows you to set and activate up to three appointments and up to three wake times (please refer to page 108).
The time of an appointment or the alarm clock are signalled to you with the configured ringer and the red flashing LED for ca. 45 seconds. The corresponding text appears on the display. Confirm signalling with Esc.
Accepting an Appointment Call
When your mobile unit is checked in to the Aastra 800 / OpenCom 100 communications system, you can save two additional appointments on your mobile unit (please refer to page 121). When the appointment time occurs, your mobile unit rings for a period of one minute with volume increasing. The appointment number appears on the display. An appointment can be repeated once or repeatedly.
Accepting an appointment call

Press call key. The reason for the programmed appointment appears.
Ok
Press softkey to confirm the appointment call.
If you are on a call at the time of the appointment call, you will hear a special tone and the display indicates the appointment number. After you finish the call, a short message informs you that the appointment expired.
Doorbell, Door Opener
A doorbell appears on the display (Door call). If there is an entry in the phone book for the call number, the doorbell name appears.
Opening door while idle

Press call key.
... or

Press softkey briefly.
△ / ∅ use the navigation keys to select the confirm with the ℃ softkey.
Door opener menu entry and
Opening door during call

If the doorbell signal is triggered during a call, you hear the call-waiting tone.

Press softkey briefly.
△ / ∅se the navigation keys to select the confirm with the ∅k softkey.
Door opener menu entry and
Note
The Door opener menu entry is not dependent on an entrance intercom call. The door opener function controls a relay contact in your system which can also be connected to other devices. For more information, consult your system administrator.
Entrance Intercom Calls
Calling the entrance intercom
If your OpenCom 100 communications system is connected to an entrance intercom (doorstation 6-wire), you can speak with a visitor at the entrance intercom with the following code procedure.

For enquiry:

If you are operating an entrance intercom (doorstation 2-wire, e. g. of the "DoorLine" type), use the following code procedure:

For enquiry:

Calling door when idle
Press the call key. You speak with the visitor.
Door call during call
If the doorbell signal is triggered during a call, you hear the call-waiting tone. Proceed as described under Opening door during call starting on page 90.
Door call forwarding
You can forward calls signalled from the doorbell to another (internal or external) call number (a so-called "pharmacy line"). This is done via the Call forwarding menu (see page 119).
Call duration
All door calls are automatically terminated after a specific time interval has expired (default is 60 seconds). This ensures that forwarded door calls do not unintentionally lead to continuous calls (e.g. to a voicebox). Your system administrator can configure the time interval in the Aastra 800 / OpenCom 100 from 30 to 300 seconds and will be able to tell you the current value.
Phone Book
System Phone Book
Up to 2,000 entries can be saved in the phone book of your Astra 800 /
OpenCom 100 communications system. This number includes the centrally administered phone book (available to all users), the personal entries of all subscribers, and – provided you are using the multicompany variant of the Astra 800 / OpenCom 100 – the entries in the companies' phone books. An entry in the company phone book can be used by all employees in your company.
The number of entries you can save in your personal phone book is determined by your system administrator when configuring the Astra 800 / OpenCom 100. Your personal entries are automatically sorted into the comprehensive register, but can only be viewed on your telephone by you yourself. However, the system administrator or a person with the corresponding authorisation can completely delete your phone book.
Authorisations
To be able to edit the central phone book and the company phone books, you have to have the corresponding authorisations from the system administrator.
The Astra 800 / OpenCom 100 phone books can also be edited from the system Web console, provided you have the authorisation to do so.
Contact your system administrator for information on your authorisations.
Calling from the Communications System Phone Book
Search the Phone book menu for entries saved to the communications systems phone books.
The entries in the phone books of the communication system can be saved within the system itself or in an external address directory (LDAP server, configured by the system administrator). A combination of these storage locations is also possible. The storage locations of phone book entries do affect phone book searching (see following description).
When idle, press the navigation key.
If you now press the OK softkey, the complete list of phone book entries stored on the communications system is displayed. The list is sorted alphabetically and you can page to the desired entry.
Alternatively: In the Name: field enter the first letter(s) of the name you are searching for (see The Editors on page 39).
Ok Press softkey.
The list of phone book entries found is displayed. All suitable search results are displayed, no matter where they are stored.
△ / Select an entry via the navigation keys.
Ok Press softkey.
If there is more than one call number under this name (e.g. an office number and a private number), the list contains correspondingly designated entries (Office, Mobile and Private).
△ / Select the call number desired with the navigation keys.
Press call key – the call number is dialled.
... optional When there are multiple trunk keys configured on your telephone (please refer to page 55), use the △ navigation keys to select the desired trunk key and then press the call key.
... or
Ok Press softkey.
A selection menu appears where you can dial this call number (Dial menu entry) or view information on this phone book entry (Info menu entry).
Speed-Dialling (System Phone Book)
All central phone book entries can also be dialled via two-digit or 3-digit speed-dialling numbers once they have been configured. The 2-digit speed-dialling numbers are in the range 00...99, the 3-digit are in the range 000...999. Ask your system administrator how many digits are valid.
Dialling a speed-dialling destination


(SD no.)
Alternatively:


(SD no.) #
Add Phone Numbers from Lists to Communications System Phone Book
You can add phone numbers saved in your caller list or your redial list to a phone book. These lists must be in the communications system to do so. This is handled in the ▶> Settings > List access menu (see page 131).
While you have the caller list or the redial list open, press the OK softkey and select the Phone book menu entry.
New entry: You add the call number to a phone book (see page 94).
Add: You add the call number to an existing phone book entry (see page 95).
Adding call number as new phone book entry
Δ / ∇
Select New entry menu entry in the Phone book menu, confirm with the Ok softkey.
Δ
Select desired phone book: with Ok softkey.
Personal, Company or Central, confirm
Δ
Determine call number: softkey.
Office, Mobile or Private, confirm with Ok

Enter Name: and First name: (see The Editors starting on page 39), confirm with OK softkey respectively.

Confirm or change call number displayed, e.g. No. office, confirm via Ok softkey.
You can assign a speed-dialling number to the call numbers of the entry in the central phone book. You automatically have the next available speed-dialling number (Abbrev. no.) offered to you. If you wish to assign them, press the ∅k softkey. If not, delete the speed-dialling number with the C-key (enter another unused speed-dialling number if needed) and then press ∅k.
△ / ▼ display your own call number, confirm with Ok softkey:
Transmit number: When calling (from the phone book) your call number is displayed to the subscriber called.
Suppress number: Your call number is suppressed.

As necessary – just like in the two previous steps – enter additional call numbers (No. mobile and No. Private), confirm with Ok softkey respectively.
△ / ∅ialling default number ( Default office, Default mobile or Default private), confirm with OK softkey. The phone book entry is saved.
The default call number is dialled automatically if no other call number is selected before establishing a connection.
Adding call number to a phone book entry
You can add the entry to your personal phone book. If your system administrator has authorised you (or the user group you are part of) accordingly, you can also edit the central phone book and your company's phone book.
△ / ▽ Select Add menu entry in the Phone book menu, confirm with the Ok softkey.
△ / Select desired phone book: Personal, Company or Central, confirm with ∅k softkey.
Enter letter/name you are searching for (see The Editors starting on page 39).
Ok Press softkey.
You see the phone book list beginning with the characters entered. If you do not enter any characters and press OK, the list will begin with the first entry.
△ / ∅se arrow keys to select the name desired, confirm with
Ok softkey.
△ / Select the kind of call number to save the list entry under: Mobile or Private, confirm with Ok softkey.
Office,
Note
If you wish to edit phone book entries (e.g. to change names and call numbers), use the "Phone book" menu (see System menu: "Phone book" starting on page 127).
Personal Phone Book
In addition to the phone book of your Astra 800 / OpenCom 100 communications system, your mobile unit also has a local (personal) book. This phone book enables you to save up to 200 additional, personal entries with 3 call numbers respectively.
Calling from the Personal Phone Book
When idle, press the navigation key.

Enter the first letter(s) of the name you are searching for (see The Editors on page 39).
... or
△ / Select an entry via the navigation keys.
Access the various call numbers associated with the name using the softkey.

Press the call key to dial the selected call number.
Note
You can access the personal phone book using the navigation menu (see page 29) or via the softkey when the mobile unit is idle.
Adding Entry to Personal Phone Book
-
Open the phone book – depending on the configuration of your mobile unit, this is done via
-
the navigation key, ▼
- the softkey >> and select the entry Phone book / Ok or and Personal directory / Ok or ▶
-
one of the function keys to which you have assigned phone book access.
-
If the phone book is empty, press the New softkey.
If there are entries already in it, press the >> softkey, select New entry and confirm via Ok or ▶
-
You see an overview of possible entries. Select Name and confirm via Ok or ▶
-
Select the characters of a key by pressing it repeatedly and quickly, enabling you to see the characters assigned to that key. Input position moves automatically forward if you make no entry for a short time or when you enter a new character. Correct entries by moving the cursor behind the number/letter to be deleted with the ◀ / ▶ navigation keys and then press the key. This is where you can now enter new characters.
Every word is automatically begun with upper-case letters. Press the key multiple times to select upper or lower case (displays A or a) or upper-case letters only at the beginning of words (displays Aa).
Confirm your entries with the ∅k softkey.
-
Now select the next line ▼ (e.g. Private) and confirm via Ok or ▶
-
Enter the private call number for the entry and press Ok.
-
Now select the next line ▼ (e.g. Business) and confirm via Ok or ▶
-
Enter the business call number for the entry and pressOk.
-
Using this method, enter the mobile call number, the e-mail address and the fax number if necessary.
-
If you would like to assign a number key for speed dialling this entry, select Quick call and confirm via Ok or ▶From the list, select a key (2...9) and confirm via Ok or ▶Exit the list via Esc or .You can delete or overwrite existing list entries.
- You can assign a particular melody to an entry for signalling a call from this call number. Select Melody and confirm via OK or ▶Select a melody from the list. Press OK or ▶to save your selection.
- Press the 📋 softkey to save the entire phone book entry.
Note
If there is only one destination number saved for a phone book entry with a speed dialling option (personal, office, mobile, e-mail or fax), it is possible to directly call this destination at a later point by pressing and holding the corresponding speed dial key 2...9 (see page 99).
Editing Personal Phone Book Entries

When idle, press the navigation key.

Enter the first letter(s) of the name you are searching for (see The Editors on page 39).
... or
△ / Select an entry via the navigation keys.

Press softkey. The local phone book menu appears (see following section).
Local phone book menu
Edit: The entry can be changed.
New entry: You create a new entry.
Add to ...: The call number dialled next is added to the VIP list.
Delete: The entry is deleted.
Memory: Shows the number of entries already saved.
Speed Dialling (Personal Phone Book)
When entering call numbers into the personal phone book, individual entries can be assigned to the keys 2...9 as speed dialling keys. Select the entry as follows:
When idle, hold and press one of the keys 2...9.
If there are multiple destination numbers saved to the phone book entry, you will see the list within the entry where you can use the navigation keys to select one of the numbers.
If the phone book only has one destination (personal, office, mobile, e-mail or fax) and the Auto.Speed Dial menu item is activated (see page 132), this entry is directly dialled.
Aastra 600 PC Tool / Phone Book (Aastra 620d, 630d)
Use the Aastra 600 PC Tool to manage the contact data (Personal Phone Book) of the Aastra 620d and Aastra 630d via the USB interface. Existing data can be transferred from the device to the PC, be edited, saved and re-loaded onto the device. The PC Tool (for PCs with the Windows XP, Windows Vista, Windows 7 operating system – not for 64 bit versions) can be downloaded from the Aastra website.
The Device Menu
This chapter presents all essential features available on the mobile unit and the Aastra 800 / OpenCom 100 communications system. Because the communications system also supports the operation of cord-connected and other cordless telephones, some menu entries are named differently, although they serve the same purpose. The following descriptions offer more information.
Some menu entries are only shown on your telephone when you belong to a user group authorised to use the corresponding feature. Contact the system administrator when you have questions on specific features or are not able to use a feature satisfactorily.
Alongside the Device menu, there are state-dependent menus that you, e.g. can access during a call, to use features available in that device state. For more information, please refer to the chapter entitled Telephoning starting on page 63.
To call the Device menu do the following:
- Press >> briefly when idle.
- When idle, press the 📄 end key and select Menu.
Information on Display Symbols in the Device Menu

Save When you adjust settings in a menu, you have to open the respective settings window with the Ok softkey . Your entry is then saved with the softkey.

Information You can access additional information on the entries via the softkey.

Options Use the softkey to open other sub-menus (e.g. Delete, Edit).
Esc
Use Esc (Escape) should key to cancel entries and/or go a step back in a menu.
Ok
Use Ok softkey to chefirm a selected function or entry.

Call When you press the softkey an entry is either dialled directly or goes into pre-dialling.
Overview: Device Menu
Info
Contains access information to call list, redial list, voicebox (if supported), received messages and announcements, the most recent call charges and active features. Fast access is also available on the navigation key or via the softkey (default).
Menu description: see page 103
Active features
This menu offers fast access to some important settings, such as, e.g.
Bluetooth, Profiles, Alarm clock and Appointment as well as Mandown, No movement alarm and Escape alarm on the Astra 630d.
Menu description: see page 106
Directories
Offers access to the system phone book and to the personal phone book. Fast access is also available on the navigation key and or via the softkey (default).
Menu description: see page 106
Un park
This menu entry is only available when your mobile unit is checked into the Aastra 800 / OpenCom 100 communications system. Use this to unpark a parked call.
Menu description: see page 107
Pickup
This menu entry is only available when your mobile unit is checked into the Aastra 800 / OpenCom 100 communications system. Use this to accept calls for other telephones in your pickup group
Menu description: see page 107
Take
This menu entry is only available when your mobile unit is checked into the Aastra 800 / OpenCom 100 communications system. You can take over a call from another terminal on your mobile unit.
Menu description: see page 107
Time/Alarms
This is the menu where you set date and time, programme appointments, wake-up times or a timer and define formats for displaying date and time.
Menu description: page 108
Audio
This menu is where you make the settings regarding volume, ringer and info tones.
Menu description: page 109
System
This menu is where you can define the active communications system for your mobile unit, manage subscriptions to various systems as well as view the IPEI-number and information on hardware and software status.
Menu description: page 112
System menu
This entry is only available on the menu when your mobile unit is checked into the Aastra 800 / OpenCom 100 communications system. Use this menu entry to open the main menu of the Aastra 800 / OpenCom 100 communications system and have access to the system features.
Menu description: page 113
Settings
This is where you find device settings such as keylock, key programming, user name, display settings, illumination, Bluetooth, etc.
Menu description: page 129
Security
This menu can be accessed via the PIN (Personal Identification Number). The default is "0000" (4 digits of 0 (zero)). You can lock the mobile unit here, change the PIN, programme an emergency call number, enter alarm sensor settings (Aastra 630d only) as well as reset the mobile unit entirely or partially to factory settings.
Menu description: page 133
Profiles
This menu is for creating and managing user profiles. There are five editable default profiles.
Menu description: page 135
Door opener
This menu entry is only available when your mobile unit is checked into the Aastra 800 / OpenCom 100 communications system. This is for operating the door opener.
"Info" Menu
Caller list: Displays entries in the caller list. If there is a phone book entry for one of the call numbers displayed, the corresponding name is displayed. The entries in this menu are dependent on the List access setting (please refer to page 131).
Note: Calls are also entered on the caller lists of the menu System menu, see page 115).
Local caller list: Up to 50 entries can be saved to the local caller list. Entries are limited to 30 on the Aastra 610d. The following options are available in the local caller list:
Dial number ...: Call number is dialled; you call the caller back. If there are multiple trunk keys configured on your telephone (please refer to the chapter entitled Multiple Trunk Keys on page 55), upon callback, the trunk key is automatically seized with which you originally received the call.
Predial: Call number is added to pre-dialling.
Add to ...: Call number can be added to the phone book or the VIP list.
Details ...: Entry information is displayed.
Delete: The entry is deleted after an enquiry.
Delete all: The list is deleted after a confirmation prompt.
Communications system caller list: Up to 50 entries can be saved to the communications system caller list. Press the ☐ softkey. The following options are now available in the communications system caller list:
Dial: Call number is dialled; you call the caller back. If there are multiple trunk keys configured on your telephone (please refer to the chapter entitled Multiple Trunk Keys on page 55), upon callback, the trunk key is automatically seized with which you originally received the call.
Delete: The entry is deleted after an enquiry.
Phone book: Call number can be added to the phone book of the communications system, see page 94.
Info: Entry information is displayed.
Delete all: The list is deleted after a confirmation prompt.
You usually have the following possibilities for editing the call lists of the communications system:
Briefly press C key: deletes the selected entry
Press and hold C key: deletes the list
Paging messages: If your Astra 800 / OpenCom 100 communications system is equipped with a corresponding application, paging messages can be sent on your telephone. These messages are displayed here. Please contact your system administrator for more information.
Voice box: Displays new messages in the voicebox of your communications system (if available), please refer to the menu System menu: "Calls" starting on page 115.
Text Messages: Displays new short messages, please refer to the menu System menu: "Messages" starting on page 120.
e-mail: Displays new e-mails, please refer to the menu System menu: "Messages" starting on page 120.
Jobs: If your Astra 800 / OpenCom 100 communications system is equipped with a corresponding application, paging messages can be sent on your telephone, which require a returning answer to the application. These messages are displayed here. Please contact your system administrator for more information.
Fax: Displays new faxes, please refer to System menu: "Messages" starting on page 120.
Redial list: Displays entries in the redial list. If there is a phone book entry for one of the call numbers displayed, the corresponding name is displayed. The entries in this menu are dependent on the List access setting (please refer to page 131).
Local Redial List: The last 30 call numbers dialled are saved on the local redial list. Entries are limited to 20 on the Aastra 610d. The following options >>... are available in the local redial list:
Dial number ...: Call number is dialled. If there are multiple trunk keys configured on your telephone (please refer to the chapter entitled Multiple Trunk Keys on page 55), upon redial, the trunk key with which you originally dialled the call number is automatically seized.
Predial: Call number is added to pre-dialling.
Add to ...: Call number can be added to the phone book or the VIP list.
Details ...: Entry information is displayed.
Delete: The entry is deleted after an enquiry.
Delete all: The list is deleted after a confirmation prompt.
Redial List via Communications System: The last 50 call numbers dialled are saved on the communications system redial list. Press the Ük softkey. The following options are now available in the communications system redial list:
Dial: Call number is dialled. If there are multiple trunk keys configured on your telephone (please refer to the chapter entitled Multiple Trunk Keys on page 55), upon redial, the trunk key with which you originally dialled the call number is automatically seized.
Delete: The entry is deleted after an enquiry.
Phone book: Call number can be added to the phone book of the communications system, see page 94.
Info: Entry information is displayed.
Delete all: The list is deleted after a confirmation prompt.
You usually have the following possibilities for editing the re-dial list of the communications system:
Briefly press C key: deletes the selected entry
Press and hold C key: deletes the list
Costs: You see the charges for the last call and the sum total for your device. If there are multiple trunk keys configured on your telephone, you can view the individual charges for each of these keys. To do so, select the desired key (e.g. L1: [internal call number]) and then press the ⚠k softkey.
Active features: Displays active features which restrict reachability. The same features are also in the menu called System menu. You can deactivate features here.
Call protect.: Call protection is activated; see page 123
Call forwarding: Call forwarding is activated; see page 118
Time control: Time control is configured on the system and can be activated from the telephone; see page 129
"Active features" Menu
The Active features menu offers fast access to certain selected menu entries.
Bluetooth (available on the Aastra 620d/630d): Switches Bluetooth feature on/off and configures it, see page 46.
Mandown / No movement alarm / Escape alarm (available on the Astra 630d): Switches alarm sensor on/off and configures it, see page 51.
Profiles: Switch quickly from one profile to another, see page 135.
Alarm clock: Switches alarm clocks 1...3 on/off and configures it (see page 108). Use the and navigation keys to select the respective alarm clock.
Appointment: Switches appointments 1...3 on/off and configures it (see page 108). Use the and navigation keys to select the respective appointment.
"Directories" Menu
This menu provides access to the personal phone book on your mobile unit, to the communications system phone book and to the VIP-list.
Please refer to chapter Phone Book starting on page 92 for additional details on dialling from phone books and creating new entries.
Central directory: You can dial a call number saved in the system phone book (see page 92).
Personal directory: You can edit the entries in your personal phone book. Select an entry from the list.
Edit: The entry can be changed.
New entry: You create a new entry.
Add to ...: The call number dialled next is added to the VIP list.
Delete: The entry is deleted.
Memory: Shows the number of entries already saved.
Note: Please refer to pages page 96 and page 97 for more information on dialling from your personal phone book and creating a new entry.
VIP list: Create the first VIP list entry as follows:
Press the New softkey to define a name and call number.
Select an entry from an existing list:

Edit: The entry can be changed.
Delete: The entry is deleted.
New entry: You create a new entry.
"Un Park" Menu Entry
This menu entry is only available when your mobile unit is checked into the Aastra 800 / OpenCom 100 communications system, see "System" Menu starting on page 112.
Un Park: Consecutively "unparks" one or more connections which you have previously parked, for instance to make enquiries or to forward calls (see also Parked Calls starting on page 85).
"Pickup" Menu Entry
This menu entry is only available when your mobile unit is checked into the Aastra 800 / OpenCom 100 communications system, see "System" Menu starting on page 112.
Pickup: You pick up the call intended for another telephone in your pick-up group.
Note: If the called subscriber belongs to a user group with Pickup protection activated, you cannot pick up calls for that person's call number.
"Take" Menu Entry
This menu is only available when your mobile unit is checked into the Astra 800 / OpenCom 100 communications system, see "System" Menu starting on page 112.
Take: You wish to take a current call from one terminal over to your DECT telephone and continue the call on the DECT telephone. To do so, your DECT telephone and the other terminal must have the same internal call number.
"Time/Alarms" Menu
Use the and navigation keys to adjust input position for all menu settings and the and keys to change the values.
Date/Time
Time: displays the time currently configured on the mobile unit Edit: Changes time setting.
Date: displays the time currently configured on the mobile unit Edit: Changes date setting.
Note: If time and date are transmitted by the communications system, you cannot make this setting.
Appointment: Displays appointment list. You can enter and activate up to 3 appointments. Select an entry from the list and press the OK softkey.
Status: Switching the appointment On or switching it Off. Edit: Switching appointment on or off.
Time: Displays time set for the appointment. Edit: Changes time setting.
Date: Displays date set for the appointment. Edit: Changes date setting
Text Displays text entered for the appointment. Edit: Change/re-enter the text (32 characters max.).
Note: If the ringer is switched off (see page 111), there is no acoustical signal for the appointment set. Appointments can also be programmed in the System menu (see page 121).
An appointment call which is already being signalled can be interrupted for 5 minutes at a time, as described on page 44 with Snooze. When opening an appointment which has been paused, Stop (to switch off) and Snooze (to continue interrupting the signal) appear.
Alarm clock: Displays the list of alarm clocks. You can enter and activate up to 3 appointments.
Status: Switching the alarm clock On or switching it Off. Edit: You have the choice between Once (at the next possible time), Daily (recurring daily) and Off.
Time: Displays time set for the alarm clock.
Edit: Changes time setting.
Text: Displays text entered for the alarm clock.
Edit: Change/re-enter the text (32 characters max.).
Note: If the ringer is switched off (see page 111), there is no acoustical signal for the alarm clock set.
A wake-up call which is already being signalled can be interrupted for 5 minutes at a time, as described on page 44 with Snooze. When opening an alarm which has been paused, Stop (to switch off) and Snooze (to continue interrupting the signal) appear.
Timer: options for setting a timer which counts backwards (max. 23 hours / 59 minutes). The respectively remaining time until signalling (beeps increasing in volume) is shown on the display. The ring tone of the timer cannot be configured.
Format settings: For configuring date and time display format.
Time format: Changes the time format (24h or 12h am/pm)
Date format: Changes the date format.
DD.MM.YY for, e.g. 10.04.09
DD.MM.YY for, e.g. 04/10/09
DD.MM.YY for, e.g. 09-04-10
DD.MM.YY for, e.g. 09-04-10
"Audio" Menu
Volume settings: For changing the following settings, use the ◁ and navigation keys or enter a number (1 ... 7).
Earpiece: Displays the currently set earpiece volume.
Handsfree: Displays the currently set volume for handsfree mode.
Corded headset: Displays the currently set headset volume (not applicable to Bluetooth headset).
Ringer: Displays the currently set earpiece volume.
Ringer settings: Ringer settings.
Melodies: Different call types can be signalled using different melodies. Select one of the following entries. To change the currently selected melody, press the Edit softkey. You can listen to the melody before saving via the softkey. There are 44 polyphonic MIDI ring melodies, 8 normal ringing tones and 7 alarm sounds available.
Internal: Select melody for internal calls.
If there are multiple trunk keys configured on your telephone, you can configure a melody for each trunk key. Select the desired key, e.g. L1: [internal call number], and then press the Ok softkey. Under Internal select the melody for internal calls to this trunk key.
External: Select melody for external calls.
If there are multiple trunk keys configured on your telephone, you can configure a melody for each trunk key. Select the desired key, e.g. L1: [internal call number], and then press the 0k softkey. Under External select the melody for external calls to this trunk key.
Unknown number: Selects the melody for incoming calls without transferred call number.
If there are multiple trunk keys configured on your telephone, you can configure a melody for each trunk key. Select the desired key, e.g. L1: [internal call number], and then press the ∅k softkey. Select the melody for calls without transferred call number to this trunk key.
Text Message: Selects the melody upon reception of new short messages.
VIP call: Selects the melody for incoming VIP calls (call numbers on your VIP list, see page 48).
SOS call: Selects the melody for incoming emergency calls.
Alarm clock: Selects the melody for the alarm clock.
Appointment: Selects the melody for the appointment.
Type: This setting is where you determine how selected melodies are signalled.
Repeat: The melody is played repeatedly as long as the call is signalled.
Single: The melody is played only once.
Device: You can select the combination of signal generators with which the call will be signalled. Press the Edit softkey to switch a signal generator on/off.
Ringer: Signalling via loudspeaker.
Vibra call (not on the Astra 610d): Signalled via vibrator.
Headset: Signalled on the headset if this is connected to the mobile unit.
Note: If you switch off all signal generators, a call is only signalled optically on the display.
Volume: Displays the currently set ringer volume. For changing the volume, use the ◀ and ▶ navigation keys or enter a number (1 ... 7) (Increasing or level 1...7).
Noise detection: When this feature is switched on, ringer volume is automatically increased when ambient noises are loud. If you wish to use this feature, you should not set the ringer setting volume at Increasing.
Attention tones: Select whether the respective attention tones are switched on or off.
Key click: Acoustic confirmation of key press.
Confirm tones: Confirms successful/failed settings.
End of menu: Info tone when the end of a list/menu is reached.
Battery warning: Info tone when the battery has only low capacity remaining. There are just a few minutes remaining before the connection is disconnected.
Coverage warning: Info tones when the radio connection threatens to break off.
Alarm tone (Aastra 630d only): alarm tone which sounds during the pre-alarm (triggered by alarm sensor). This setting is also in the Alarm sensor menu (see page 133).
Loud environment: If this setting is activated, the mobile unit attempts to improve voice transmission in a loud environment (does not apply when operating a Bluetooth headset or in handsfree mode).
"System" Menu
New system: Enter the authentication code and the PARK code optionally. For more information on this and on protocol configuration, consult your system administrator.
Subscription:
Auto search: The mobile unit automatically checks in to the currently available system with the strongest signal. The mobile unit can only check in to the relevant system if it has previously been subscribed to that system. Please contact your system administrator if necessary.
[System 1...10]: List of systems where the mobile unit is already subscribed. The selected system is highlighted. Select an entry via the navigation keys. The mobile unit attempts to establish a connection with 📋
Press to query and set additional options. These usually do not have to be changed. The following settings should be made by the system administrator.
Use System name and Phone number to change /enter the system name and the call number. This is only possible if the system is not providing any information or if the mobile unit is subscribed via the GAP protocol.
External call is for setting which code is used to designate external calls (e.g. 0). Internal call is for setting how many digits an internal call number has.
Both settings are for the device being able to differentiate between internal and external calls.
Character set shows the character set used by the editor.
Protocol is for setting the transfer protocol.
Details displays additional device data.
Use Delete to delete the subscription for the corresponding system.
Stop searching: this designates the mobile unit as absent on the system. This function is helpful on some systems if the system does not detect that the device is switched off and then e.g. activate call forwarding in this case.
Show IPEI: The international mobile unit code is displayed (IPEI = International Portable Equipment Identity). This may be necessary to designate your mobile unit on the communications system.
Version info: Information on the hardware and software status of the mobile unit is displayed.
"System menu" / Total Menu
This entry is only available on the menu when your mobile unit is checked into the Aastra 800 / OpenCom 100 communications system. Use this menu entry to open the main menu of the Aastra 800 / OpenCom 100 communications system and have access to the system features.
This menu is only available when your mobile unit is checked into the Astra 800 / OpenCom 100 communications system, see "System" Menu starting on page 112.
The menu System menu comprises the following menu groups under the menu header Main menu:
Calls
This is where the most important call-related features are grouped together. Menu description: see page 115
Call forwarding
This menu group provides all types of call forwarding which you can programme on your telephone. Please note the explanations in the Forwarding Calls starting on page 60 chapter also. Menu description: see page 118
Messages
This menu group offers information on e-mails and short messages which you have sent or received. Furthermore, you can programme appointment calls and activate prepared notification texts. Menu description: see page 120
Protection
Among other things, you can activate the call protection or the telephone lock, and change the user PIN in this menu group. Menu description: see page 123
Connections
This menu group provides you with all the features that can affect a call. Depending on the particular state, these features are also displayed in the menus that you can access during a call. Menu description: see page 124
Phone book
You can edit the phone books of the communications system in this menu group. Menu description: see page 127
Applications
This menu group contains all functions offered by your system telephone in conjunction with additional programme packages of your communications system. If your system administrator has set up, e.g. a voicebox with the OpenVoice / Astra Voice additional programme for you, this is where you can access and configure your voicebox. Menu description: see page 128
Central settings (central settings)
This is where you can configure central settings for the communications system. This is an optional menu item, it is only available if your system administrator has configured the appropriate authorisation for your user group. Menu description: see page 128
A number of the menu entries in the System menu / Main menu are also available in other menus. For example, received e-mails are available under Main menu >Messages and also available via the Info menu. Features which affect your telephone's reachability (e.g. call protection activated) are located at Main menu >Protection as well as in the Info menu under Active features.
To call the System menu /Main menu, do the following:
- Press >> longer when idle.
- Press >>> longer when idle. Select System menu.
Using code number procedures
Many features in the System menu can also be configured by entering code numbers. Code numbers are entered via the and keys respectively and in combination with a specific series of numbers (00 keys).
Code number input is especially intended for analogue terminals on your system. Code numbers can also be used on your mobile unit. They are described in the short user guide "Code-number Procedures" (this is supplied with the system). A current online overview is available anytime in the Codes entry in the System Info menu of the Astra 800 / OpenCom 100 communications system Web console.
System menu: "Calls"
Call lists: Displays the lists of missed and accepted calls.
Missed calls: You see the call numbers of the callers who most recently tried to reach you. The name is displayed instead of the call number if the caller is in the system phone book.
This list also applies to calls transferred or forwarded to you from other internal subscribers.
• The symbol indicates forwarded calls.
- A call when busy is indicated by the symbol.
- When you receive an external call where the caller is displaying a different call number than the one actually technically being transmitted, a “?” appears next to the call number on the display. Note: Display of the “?” can be deactivated by the system administrator.
- If the call number indicated on the display is saved to a phone book entry, the name is displayed as usual along with a question mark.
- Door calls are shown either with the call number, or with the name of the doorbell – depending on the type of door intercom in use.
- If a caller suppresses display of his/her call number via CLIR, the call is also saved on the caller list. Multiple calls from an unknown call number are listed as one entry. The system administrator can, however, during system configuration, determine that any calls with unknown call numbers will not be included on your call list.
The authorisations of your user group determine which calls are recorded on your caller list. Your system administrator can specify that internal calls, external calls, calls when busy, and calls from the door be included in your call list.
Select an entry. You can call the caller back directly by pressing the call key. Alternatively, press the OK softkey and then select one of the following options:
Dial: You call the caller back. If there are multiple trunk keys configured on your telephone (please refer to the chapter entitled Multiple Trunk Keys on page 55), upon callback, the trunk key is automatically seized with which you originally received the call.
Delete: The entry is deleted after an enquiry. (an entry is automatically deleted when you call the caller back).
Phone book: You add the call number of the caller to one of the phone books (please refer to Add Phone Numbers from Lists to Communications System Phone Book starting on page 94).
Info: This displays information about the caller: call number or name, time of the last call and the number of calls.
Delete all: The list is deleted after a confirmation prompt.
Note: If your internal call number (e.g. "30") is configured on multiple terminals, you can view and edit the calls for the call number 30 on each of these terminals. If you delete the call list from one terminal, it will be deleted from all others as well.
Accepted calls: You see the call numbers or the names of the callers with whom you last spoke. You can edit this list in the same way as the missed calls list (see page 115).
Voicebox mess. (voicebox messages): Displays the list of messages received. Each message is identified by the caller's phone number or (if saved in the phone book) by the caller's name. Messages that have not yet been played back are marked with a "+" ; messages that have been played back are marked by a "-" . The most recently received messages are at the top of the list.
Play: Listen to the message. You can also use the number keys to control message playback: 4 (rewind), 5 (pause) and 6 (fast forward).
Dial: You call the caller back. If there are multiple trunk keys configured on your telephone (please refer to the chapter entitled Multiple Trunk Keys on page 55), upon callback, the trunk key is automatically seized with which you received the voicebox message.
Delete: The entry is deleted after an enquiry.
Phone book: You add the call number of the caller to one of the phone books (please refer to Add Phone Numbers from Lists to Communications System Phone Book starting on page 94).
Forward: You can forward the message to another voicebox with comment or without comment. Enter the call number of the other voicebox under To;; use the ✝ star key to end a spoken comment.
Mark as new: If the message is addressed to another person and you accidentally have listened to it, you can use this option to reset the message to "new" status.
Info: To view the call number or name of the caller, as well as the duration, date and time of the message.
Delete all: You delete all messages stored in your voicebox (after a confirmation prompt).
Note: Alternatively, you can also use the Applications menu for querying voicebox messages, see page 128 menu.
Charges: You see the charges for the last call and the sum total for your device. If there are multiple trunk keys configured on your telephone, you can view the individual charges for each of these keys. To do so, select the desired key (e.g. L1: [internal call number]) and then press the ⚠k softkey.
Remote charges: You can view the charges of other Astra 800 / OpenCom 100 communications system users. To do so, your user group has to have "Costs" authorisation from your system administrator.
Number: Enter the internal call number of the other telephone.
Phone book: You can also select a call number from the phone book.
Hunt group: If your telephone belongs to one or more hunt group(s), you can use this menu entry to switch hunt group signalling for your telephone on or off. When there are multiple trunk keys configured on your telephone and assigned to hunt group call numbers, you can switch the hunt group signalling for each of these keys on or off. To do so, select the desired key (e.g. L1: [internal call number]) and then press the OK softkey.
HG no: [internal call number]: The pick-list of hunt group call numbers appears. Activated hunt group calls have a "+" prefixing the hunt group call number; deactivated ones have a "-"
On/Off: switching hunt group calls on or off
All: switching all hunt group calls On/Off for your telephone or for the trunk key selected
Note: If you are the last reachable member of the hunt group and you log out then any further callers will hear a busy signal. Depending on the system configuration, additional callers can also be forwarded to the exchange.
Device busy: if there are multiple trunk keys configured on your telephone, you can set that your device is busy as soon as one of the trunk keys is busy. Any subsequent callers hear a busy signal.
on/off: switching the function on or off. A "+" indicates the function is switched on.
System menu: "Call forwarding"
Call diversion: Programming call diversions for your own telephone. If there are multiple trunk keys configured on your telephone, you can programme call diversions for each of these keys. To do so, select the desired key (e.g. L1: [internal call number]) and then press the 0k softkey.
Immediately / After delay / Busy: Select the desired forwarding type.
Dest.: Enter the call number you wish to forward to (for entering the call number, please refer to the chapter entitled External Seizure and Entry of Call Numbers starting on page 54).
Time: When programming call forwarding after time, enter the time in seconds after which a call is to be forwarded (10 sec ... 120 sec). If you do not enter a value, the default time interval provided by the system administrator at system configuration is used (default: 20 seconds).
Internal calls / External calls / Int./ext. calls (internal & external calls): Select which calls are to be forwarded.
On/Off: Switching call forwarding on or off. Active call forwarding is indicated by a "+" sign. This is followed by the call forwarding destination.
Note: All calls for the call numbers of your device are forwarded. If a number is in use on more than one telephone, then calls made to any of the other telephones will be forwarded as well.
Divert MSN (MSN call forwarding): Use the "Divert MSN" (MSN = Multiple Subscriber Number) to forward incoming external calls per MSN to external destinations. Several MSNs can be grouped together (this is configured by the system administrator) and forwarded to a common destination number. A list of the configured MSNs and MSN groups is displayed.
Immediately / After delay / Busy: Select the desired forwarding type.
Dest.: Enter the external call number to be forwarded to. For the "Divert MSN" type of call forwarding, the (external) destination number is always entered without the area code.
On/Off: Switching call forwarding on or off. Active call forwarding is indicated by a “+” sign. This is followed by the call forwarding destination. A “?” preceding the entry, (e.g. ? MSN Group 1), means that call forwarding is active for only some MSNs or that there are different call forwarding types activated for this group.
Note: If "Divert MSN" is executed in the exchange (= external call forwarding; configured by the system administrator), it can take a few seconds after configuration for call forwarding to be activated in the exchange.
Divert door (door call forwarding): This is where you can programme "Divert call immediately" for door calls. If several doorbells are configured on the communications system, first select the doorbell whose calls are to be diverted. The number of doorbells available and with which names they are listed in the menu, depends on the type of entrance intercom. Consult your system administrator if you have questions concerning the configuration of the doorbells.
Dest.: Enter the call number you wish to forward to (for entering the call number, please refer to the chapter entitled External Seizure and Entry of Call Numbers starting on page 54).
On/Off: Switching call forwarding on or off. Active call forwarding is indicated by a "+" sign. This is followed by the call forwarding destination.
Remote divert (call diversion for): You can also configure call forwarding for other Aastra 800 / OpenCom 100 users. Programming call forwarding for a virtual call number is also possible (please refer to Call for a virtual call number (Tele Secretary) on page 74 also). In order to do so, "Call forwarding for other user"
authorisation is required, otherwise this menu item will not be displayed. Also, you can configure call forwarding only for those users whose terminal has not been blocked for this type of access (these users themselves have authorisation to "Prevent call forwarding by other user").
Number: Enter the internal phone number you wish to forward.
or ...
Phone book: You can find and select the desired call number in the communications system phone book (see page 92).
The next steps are identical with programming call forwarding (see page 118).
Follow me: This type of call forwarding diverts calls from another terminal (source) to your telephone. The PIN of the source terminal is required for this function. If the "follow me" function is active, all call numbers of the other device are forwarded immediately to your telephone.
Source: Enter the internal call number from which calls are to be forwarded.
PIN: Enter the user PIN of the source.
On/Off: Switching call forwarding on or off. You can switch "Follow me" call forwarding off again on your own telephone or on the other terminal via the Off option. You can also switch off "Divert call immediately" on the other terminal.
System menu: "Messages"
Short messages: You can exchange short messages with other communications system users with a system terminal.
Received mail (main in-box): A list of senders of received messages is displayed.
Show: Short message text is displayed. Use the key to view date/time received and the sender.
Delete: The message is deleted after a confirmation prompt.
Forward: You can edit the message and then forward it to another user. Edit the message. Press the OK softkey to forward it. Enter the internal call number of the user to whom you would like to forward the message. You can also select a call number from the
communications system phone book. Confirm input/selection of the call number with the ⚠k softkey.
Delete all: All received messages are deleted after a confirmation prompt.
Outgoing mail (mail out-box): Short messages sent by you are displayed. In the same way as described in the above section, you can display, forward or delete these messages.
New message: You can send a message to another user. Enter the text (max. 160 characters) and then press the ☐k softkey. Enter the internal call number of the user to whom you would like to send the message. You can also select a call number from the phone book. Confirm input/selection of the call number with the ☐k softkey.
Note: Short messages can also be sent to system terminals from the OpenCTI 50 / Aastra CTI 800 Web application. Please refer to the Aastra 800 / OpenCom 100 communications system online help for information.
E-Mail: A list of senders of received messages is displayed.
Show: The subject text of the e-mail is displayed. Use the key to view date/time received and the sender.
Delete: The e-mail message is deleted after a confirmation prompt.
Delete all: All received e-mail messages are deleted after a confirmation prompt.
Note: The actual e-mails are not deleted. You can access and edit these at your desktop PC with your e-mail programme.
Appointments: You see the status of both appointments which can be programmed in the menu System menu: "+" = appointment activated, "-" = appointment deactivated or not programmed.
Time: Displays time set for the appointment.
Ok : Enters/changes time setting.
Reason: Displays text entered for the appointment.
Ok : Enter/change the text (31 characters max.)
Repeat
Single: Appointment is signalled when the set time comes around.
Date: Appointment is signalled once at the time set on the date entered. Enter the date. The date format is set in the Time/Alarms menu (see page 109).
Mo - Fr: Appointment is signalled weekdays at the time set.
Sa - Su: Appointment is signalled on the weekend at the time set.
Every day: Appointment is signalled daily.
On/Off: Switching appointment on or off.
Note: If the ringer is switched off (see page 111), there is no acoustical signal for the appointment set. Appointments can also be programmed in the Time/Alarms menu (see page 108).
Presence: You can inform other communications system users regarding your presence status, e.g. you are currently not in the office. The text appears on the display of the caller of an internal call provided that the caller's telephone is a system terminal.
There are pre-defined message texts available for this. Use the ▲ and ▽ navigation keys to select the desired text. If no message is to be displayed, select the text Available.
Text List positions available for your own message text
Ok: Enter/change the text (23 characters max.)
Note: The settings of the Presence menu entry are saved on the communications system and remain after a re-start as well.
Messages can also be entered via the OpenCTI 50 / Aastra CTI 800 Web application. Please refer to the Aastra 800 / OpenCom 100 communications system online help for information.
Received fax: This menu entry is displayed on the OpenCom X320 communications system if the system administrator has configured the fax function. You see the sender list of received faxes.
Delete: The fax is deleted after a confirmation prompt.
Info: Fax information is displayed. Use the key to view date/time received and the sender and file size of the fax.
Delete all: All received faxes are deleted after a confirmation prompt.
Note: A fax is saved as an image file on the communications system. Use the OpenCTI 50 / Aastra CTI 800 Web application to view and save the fax. Please refer to the Aastra 800 / OpenCom 100 communications system online help for information.
System menu: "Protection"
Call protect.: Switching signalling of calls on/off for all call numbers of your device (exception: VIP calls continue to be signalled). When call protection is activated, a caller hears either a ringing tone or a busy signal (the system administrator configures this when configuring user groups). If there are multiple trunk keys configured on your telephone, you can switch call protection on/off for each of these keys. To do so, select the desired key (e.g. L1: [internal call number]) and then press the OK softkey.
Int./ext. calls (internal & external calls): You can activate call protection either for internal calls only, for external calls only, or for all calls.
On/Off: Switching call signalling on or off.
Note: Call protection is only in effect on the terminal where it was activated. If the internal call number of the terminal is available multiple times (i.e. on other terminals as well), call protection is not automatically activated on them.
Announc. prot (announcement protection): Switching the announcement protection On or switching it Off. When announcement protection is activated, no announcements can be made to your telephone (please refer to page 86 also). If there are multiple trunk keys configured on your telephone, you can switch announcement protection on/off for each of these keys. To do so, select the desired key (e.g. L1: [internal call number]) and then press the OK softkey.
Telephone lock: If you wish to temporarily allow another person to use your telephone, you can activate the telephone lock. Then your telephone is given the authorisations for the "Guests" user group. This user group is configured by the system administrator and prevents unauthorised persons from accessing, reading or making changes in the System menu and its menu entries and lists on your mobile unit. Dialling rights may also be restricted. A programmed emergency call key or the SOS key can still be used on the Astra 630d. Please contact your system administrator for information on the altered range of functions when the telephone lock is on. Telephone lock access is user-PIN
protected (default "0000"). After entering the PIN, activate / deactivate the function with the On or Off option.
Baby call: Switches baby call on/off (please refer to page 88 also).
Dest.: Enter the destination call number for a baby call.
On/Off: Switching baby call on or off.
Change PIN: Enter the current user PIN (6-digits max.) and then the new PIN twice. You require this PIN for accessing the telephone lock (see page 123). If you have misplaced your PIN, please contact your system administrator.
Availability: All active features (call protection, call forwarding, call waiting protection) which affect your reachability are deleted.
Call wait Prot: While you are making a call, and are thus busy, authorised internal subscribers can use call waiting to notify you that they are calling you also. If you would like to prevent this, activate call waiting protection (On); the caller hears a busy signal.
If there are multiple trunk keys configured on your telephone, you can switch call waiting protection on/off for each of these keys. To do so, select the desired key (e.g. L1: [internal call number]) and then press the ∅k softkey.
Note: Call waiting protection is only in effect on the terminal where it was activated. If the internal call number of the terminal is available multiple times (i.e. on other terminals as well), call protection is not automatically activated on them.
Intercom prot. (Intercom protection): Switches the intercom protection On or Off. When intercom protection is activated, no intercom announcements can be made to your telephone (please refer to page 86 also).
System menu: "Connections"
The following features are executed if the current connection state of your telephone permits. These features are also available in the state-dependent menus.
Call pick-up
Pick-up: You pick up the call intended for another telephone in your pick-up group.
If the called subscriber belongs to a user group with pickup protection activated, you cannot pick up calls for that person's call number.
Pick-up select. (Pickup selective): After entering the call number, you pick up the call for any other telephone.
If the called subscriber belongs to a user group with pickup protection activated, you cannot pick up calls for that person's call number.
Note: If the other telephone is already in the call state (e.g. an answering machine is making an announcement), you can pick up the call with "Pickup select.". The subscriber for whom you picked up the call must belong to a user group for which "Call removal" authorisation is activated, otherwise "Pick-up select" is not possible.
Take: You wish to take a current call from one terminal over to your DECT telephone and continue the call on the DECT telephone. To do so, your DECT telephone and the other terminal must have the same internal call number.
Dial
Announcement: You direct an announcement to other system terminals (please refer to page 86). Enter the call number of the subscriber to whom you wish to transfer under Dest:. Announcements can also be directed to call numbers where multiple subscribers can be reached (e.g. a hunt group call number).
Note: If a called subscriber has announcement protection on (see page 123), this feature is not executed.
Intercom: This function is for directing an announcement to a single system terminal and the microphone is switched on the system terminal called (please refer to page 86). The subscriber called can answer you immediately without having to press a key. Enter the device ID of the terminal in Device-ID:. For information on the device IDs available, contact your system administrator.
Note: If a called subscriber has call waiting protection on (see page 124), this feature is not executed.
VIP call: Your next internal call is executed as a VIP call. Enter the call number under To:. Even when the internal subscriber called (with system terminal only) has activated call waiting protection, call protection or call forwarding, your call is now signalled acoustically.
Door opener: You activate the door opener.
Phone book: You open the Astra 800 / OpenCom 100 phone book and can call one of the subscribers listed there (please refer to the chapter entitled Calling from the Communications System Phone Book on page 92).
Switch auth. (Switch authorisation): You switch another terminal into a user group defined by the system administrator. When the user group is changed, this involves different authorisations, e.g. the authorisation for international dialling. This switch only applies to the next call conducted on this terminal. Please consult your system administrator regarding changed authorisations when switching user groups.
Number: Enter the internal call number of the terminal whose authorisation you wish to switch. Use On/Off to activate/deactivate the switch.
Phone book: You can find and select the desired call number in the communications system phone book (see page 92). Use On/Off to activate/deactivate the switch.
Note: If the terminal to be switched is making a call, the authorisation switch takes place when the call is finished. If the next call is not begun within 60 seconds, the authorisation switch expires automatically. At the end of the call, you receive – if configured this way – a brief message on your telephone regarding call duration and relevant charges incurred. Charges are only displayed if a call costs something.
PIN dialling: For the next call, you switch your telephone into one of the user groups defined by the system administrator. Switching the user group means different authorisations (e.g. international dialling authorisation) and other features are possibly available (e.g. for charging and recording connection data of private calls). Please contact your system administrator for information on system configuration and the designated application area for PIN dialling.
First you enter your internal call number under Number and then your user PIN under PIN. Then you can dial the desired call number.
Note: PIN dialling can be done from any terminal which belongs to a user group with this authorisation activated. The call numbers dialled using PIN dialling are not saved in any redial list, neither on the terminal used, nor on one's own terminal.
Lists: When there are multiple call numbers (trunk keys) configured for your telephone, you can define which number(s) are to be recorded in the caller lists (missed calls and accepted calls) and the redial list. Select the desired call number. Use On/Off to activate/deactivate the lists for this call number.
System menu: "Phone book"
You can edit communications system phone books in this menu (please refer to the chapter entitled System Phone Book starting on page 92). Your user group authorisations determine which phone books you can edit.
New entry: Creating a new phone book entry.
Personal / Company / Central: Select the desired phone book.
Name / First name: Enter last name and first name.
No. office / No. mobile / No. private: Enter the corresponding call number.
Abbrev. no. (available in the central phone book only): You can assign a speed-dialling number to each entry call number. You automatically have the next available speed-dialling number (Abbrev. no.) offered to you. If you wish to assign them, press the OK softkey. If not, delete the speed-dialling number with the C key (enter another unused speed-dialling number if needed) and then press OK.
Transmit number / Suppress number: For each call number in a telephone book entry, you can specify whether your own call number should be automatically suppressed whenever you dial these numbers (from the telephone book).
Note: If you do not activate the "Suppress number" function for a call number saved in the telephone book, you can suppress the display of your call number from call to call – i.e. before you dial the destination call number.
Default office / Default mobile / Default private: Select the default number. The default call number is dialled automatically if no other call number of the phone book entry is selected before establishing a connection.
Edit: Change an existing phone book entry
Personal / Company / Central: Select the desired phone book.
Name: Enter the first letter/s of the name. Then select the desired entry from the list displayed.
Delete: The entry is deleted.
Edit: Overwrite and/or add to the current entry information. The procedure is identical to the one described in the "New entry" section on page 127.
System menu: "Applications"
This menu is only shown if the system administrator has set up additional programme packages for your communications system and you have the user authorisation to use these programmes.
Voice box: This menu is only shown if the system administrator has installed the additional programme package OpenVoice / Astra Voice and configured a voicebox for you.
Voicebox mess. (voicebox messages): You see the list of received voicebox messages and can listen to them and edit them (please refer to "Voicebox messages" starting on page 116).
Call voicebox: You call your voicebox. The next steps are voice-controlled.
Please refer to the user guide of the OpenVoice / Astra Voice voicebox programme for detailed information.
Server menu: Your communications system can also be extended via third-party programmes. It is possible to use individual functions of these programmes with your system terminal. The menu entry Server menu will be offered to you in this case. Contact your system administrator if you have questions.
System menu "Central settings"
In the menu Central settings you can define rules and settings for the time management of your system. The Time control menu entry is available if the user group of your telephone has been granted "Time Control" authorisation by the system administrator. The Date / Time menu entry is available if the user group of your telephone has been granted "Configurator - Expert" authorisation by the system administrator. If you do not have any of these authorisations the Central settings menu will not be displayed.
Time control: In the Astra 800 / OpenCom 100 communications system several time groups can be configured. Depending on the activated time group, incoming calls are signalled on different terminals.
Automatic: Activates automatic time control. The configured time groups then switch automatically according to the timetable configured by the system administrator. This setting remains active until one of the existing time groups is set manually.
Time group: The system administrator can configure up to 10 time groups. The time groups are either numbered (default setting) or they have been given a name by the system administrator. You can manually select a specific time group; the automatic time control is then deactivated.
Note: Any "MSN" call diversion always remains in effect – regardless of the currently active time group.
Date / Time: The date and time are taken over from the exchange on the first external outgoing call. If this information is not transmitted by your network operator, you can set the date and time here yourself.
"Settings" Menu
Key lock: Press the ☐k softkey to activate the key lock (please refer to page 42).
Key programming: You can programme the softkeys (except Esc), the side keys and the hotkey (not the Aastra 610d). After calling the Key programming feature, press the key you wish to programme. A pick-list of programmable functions appears. This list is the same displayed when a programmable key is pressed longer when idle. See page 137 for a description of how to proceed.
Aastra 630d: This is where you set the SOS key function. After calling up the menu press the SOS key and select ...
SOS call: with confirmation: After a short key press on the SOS key in an emergency a prompt is displayed. This prompt avoids to initiate the SOS call by mistake. After a long key press the SOS number is dialled directly.
SOS call: After a key press on the SOS key in an emergency the SOS number is dialled directly.
User name: This is where you can enter a name for your mobile unit, shown on the display when idle.
Display
Language: Select a display language from the list.
Font settings: (Aastra 620d/630d only) You can select a small, medium or large font for the display.
Color schemes: (Aastra 620d/630d only) You have a range of 5 different background colours to choose from for the menus.
Brightness: (Aastra 620d/630d only) Change display brightness to adjust to current ambient lighting conditions using the and navigation keys or by entering a number (1 ... 8).
Contrast: (Aastra 610d only) Change display contrast to adjust to current lighting conditions using the and navigation keys or by entering a number (1 ... 8).
Illumination
Display dimming: This setting is for keeping the display illumination always on, or dimmed for a definable time (1 min ... 48 min), also for when the device is idle or on the charger. This setting reduces battery operating times. This is why you should only select the On setting (permanent) if you regularly charge the mobile unit after usage.
Display: This is for setting how long full display illumination (e.g. after each key press) remains on (10 ... 240 sec).
Keyboard: This is where you set how long keyboard illumination remains on after each key press (Off, 1 ... 240 sec).
Charger: This is where you set how long display illumination remains on when the device is placed on the charger (Off, 1 ... 240 sec).
Conversation: To save battery power, you can define how the display is illuminated during a call connection (Light off, Light on, Light dimmed).
LED indications: You can switch LED display on/off as desired (see also page 30).
Life indication: LED slowly flashing green or orange.
Incoming call: LED quickly flashing green or orange with incoming calls.
Out of range: Red LED flashing quickly when you leave the radio range of the system.
Charge indication: LED lights up orange when the battery is charging, changing to green when charging complete.
Info: Slowly flashing red LED, e.g. when there is a new entry on the caller list.
Handsfree: Green LED lights up when the loudspeaker is on.
Appointment: Slowly flashing red LED when appointment signalled.
Alarm clock: Slowly flashing red LED when wake-up time signalled.
List access: the caller list and / or the re-dial list are usually managed on your mobile unit (setting: Local). If a list is also stored on the communications system (setting: PBX), you can select which list you wish to display. When Automatic is selected, the device always shows the PBX list (if available) of the communications system. If this list is not available, Local is automatically selected. Selecting the PBX list (or Automatic / PBX) is a good idea if your mobile unit is operated parallel with the corded telephone. This means that both devices have access to the same list and changes are shown on both devices.
Device options
Silent charging: The mobile unit does not signal any calls as long as it is on the charger. As soon as you remove it, calls are signalled again. The calls are recorded on the caller list. Silent charging does not apply to charging via the USB port (available on the Aastra 620d/630d).
Auto. key lock: When this function is active, the keypad lock is automatically switched on if you do not use the device for more than 60 seconds.
Charger answer (charger): If this function is active, the mobile unit automatically accepts a call when it is taken from the charger.
Auto answer (call): This function has the mobile unit automatically accept a call. You only activate this feature if your work procedures necessitate it, as it could enable a caller to listen in without your noticing. To be on the safe side, the automatic call acceptance is introduced with 3 notification tones and a quickly blinking green LED signals the connection. The function is useful for being immediately informed of important things (e.g. when on call). In addition, when operating the mobile unit, this function can be used more easily with a headset. Press change to
switch on or off.
The following options can be configured:
Time: you can set the length of time after which a call is automatically accepted: Off, 0 ... 20 seconds.
Please note: if your device supports the text messages and / or paging features, do not enter a value any less than 3 seconds.
Handsfree: the call can be accepted in the handsfree mode (loudspeaker is activated). Using the setting In charger only or
Always differentiates whether or not handsfree is switched on only when the mobile unit is in the charger or whether it is also switched on when, e.g. it is being carried.
Microphone: the call can be accepted automatically with or without the microphone switched on. The microphone can, however, be switched on with the softkey after taking the call.
LED indications: this is for switching the LED display on or off during a connection.
Attention tone: the notification tone at the begin of the automatic call acceptance can switched on or off with this.
Auto quick hook: if this feature is activated, this destination is immediately dialled by pressing and holding a speed dial key (see page 99). The prerequisite is that the associated phone book entry only contains one destination (personal, office, mobile, e-mail or fax). Otherwise the list of the entries is provided in pre-dialling.
Voice box no.: This is where you save your voicebox call number. Press the number 1 long and the call number is dialled. If the call number of the voicebox is managed by the telephone system this setting is not available.
Bluetooth (available on the Astra 620d/630d)
BT Status: Shows whether Bluetooth is switched on or not. Press the Edit softkey to switch on or off.
Select headset: Select the headset you wish to use from the list of subscribed headsets.
Subscribe headset: Press the New softkey to subscribe a new headset for use on your mobile unit. Carry out the steps necessary for the headset (see headset user guide). The mobile unit searches for Bluetooth devices
within range for ca. 30 sec. Select an entry, press the ☐k softkey and enter the headset PIN. "Pairing" is started.
If you wish to change the name or delete a Bluetooth headset, select ...
Edit: Changes the headset name.
Delete: The subscription data for the corresponding headset is deleted after a confirmation prompt.
"Security" Menu
You have to enter the device PIN to open the Security menu. The default is "0000" (4 digits of 0 (zero)).
Phone lock: The telephone is locked. Now only incoming calls can be accepted. A programmed emergency call key or the SOS key can still be used on the Astra 630d. To remove the telephone lock, see page 42.
Change PIN: Change the device PIN for the Security menu. Enter the new PIN and then re-enter the new PIN once more.
SOS call
SOS number: Enter the call number for an emergency call. This SOS emergency call number is dialled when the SOS key is pressed (Aastra 630d), when a programmed emergency call key is pressed or via the Alarm sensor (Aastra 630d, if no Alarm number is programmed). If the SOS emergency call number is predefined by the system, this menu entry does not appear.
SOS key: you can define what the SOS key does (Aastra 630d). Either the emergency call number is dialled immediately (SOS call) or just after being pressed again (SOS call: with confirmation).
Alarm sensor: (Aastra 630d only) Please read the description of the alarm sensor on page 51 before making configurations.
Alarm number: If the SOS emergency call number is predefined by the system, this menu entry does not appear.
Enter the alarm call number to be dialled when there is a sensor alarm.
OpenCom 100 / Aastra 800 systems only: You can prefix the call number with the R key function (enquiry) by pressing the hash key 3
times. Then an alarm call can also be made during a call (depending on mobile unit).
Other systems: The "Hold" function may be generated using other codes on other systems. The respective system documentation provides information on suitable programming.
Alarm auto answer: You can configure whether a call from any call number is automatically answered during a prealarm. No matter what the setting, calls from the alarm call number or the SOS emergency call number are automatically accepted and prealarm ended.
Alarm tone: Prealarm can take place with/without an alarm tone on the mobile unit. When the alarm tone is activated, it is signalled with increasing volume.
Handsfree in alarm: You can configure whether an alarm call is done in handsfree or receiver operation. This setting also applies to the emergency call via the SOS/emergency call key.
Pre alarm: You can set the time interval to go by until the emergency call number is dialled. During this time, there is a ring tone (alarm tone) signalled at increasing volume (unless deactivated). During the prealarm, the alarm can still be cancelled (Off, 10 sec ... 60 sec).
Repeat alarm: This is the time interval after which another prealarm including subsequent dialling of the alarm call number is executed, e.g. because calling the alarm call number was cancelled (Off, 5 sec ... 240 sec).
Mandown
Status: Shows whether mandown alarm is switched on or not. Press the Edit softkey to switch on or off.
Delay: You can define the time how long the device is allowed to be out of the vertical position without triggering a prealarm (1 sec ... 60 sec).
No movement alarm
Status: Shows whether no movement alarm is switched on or not. Press the Edit softkey to switch on or off.
Delay: You can define the time how long the device is allowed to be motionless without triggering a prealarm (10 sec ... 60 sec).
Sensibility: Set sensitivity (Low, Medium, High). This enables you to adapt the sensor to various movements (e.g. manner of walking) of the supervisory personnel. Please deactivate vibra call if you wish to use the no movement alarm, see page 111.
Escape alarm
Status: Shows whether escape alarm is switched on or not. Press the Edit softkey to switch on or off.
Delay: You can define the time how long the device is allowed to be moved quickly without triggering an alarm (1 sec ... 60 sec).
Sensibility: Set sensitivity (Low, Medium, High). This enables you to adapt the sensor to various movements (e.g. manner of running) of the supervisory personnel. Please deactivate vibra call if you wish to use the escape alarm, see page 111.
Reset to default: You can reset various areas of your settings back to factory settings.
Personal directory: The entries in your personal phone book are deleted after a confirmation prompt.
VIP-list: the VIP list (see page 48) is deleted.
All lists: All lists (caller list, redial list) are deleted after a confirmation prompt.
User settings: All user settings (e.g. display language, display settings) are returned to factory setting after a confirmation prompt.
All: The mobile unit is reset to factory settings after a confirmation prompt. Device registration on the system and the PIN are not affected.
"Profiles" Menu
As default, there are 4 pre-defined profiles included for the settings characteristic to "Purpose". There is a fifth profile for other settings. You can change all profiles and re-name them as desired. The activated profile is displayed when idle behind the symbol.
Select
No profile: No profile is used under this setting. The settings you select apply.
Normal: The parameters for "normal" usage are configured in this profile.
Headset: Headset operation parameters are pre-defined in this profile.
Meeting: Parameters for using the mobile unit during a call are pre-defined in this profile.
Loud: This profile has parameters for usage in an especially loud environment.
Settings: Select one of the profiles to make changes.
Profile name: Change the profile name if necessary.
Ringer volume: Set your preferred ringer volume (Increasing, levels 1...7).
Ringer device: Select where and with what you wish ring tones to be made (loudspeaker, headset, vibrator).
Ringer type: Select whether a ring tone sounds once or repeatedly.
Key click: Switch key click on or off.
Noise detection: Switch automatic noise detection for a louder ringer on or off.
Loud environment: Switch this function on to have voice quality adjusted in a loud environment.
Silent charging: Switch the Silent charging function on or off (see also page 131).
Incoming call: Switch LED display for an incoming call on or off.
"Door opener" Menu Entry
This menu entry is only available when your mobile unit is checked into the Aastra 800 / OpenCom 100 communications system, see "System" Menu starting on page 112.
Door opener: You activate the door opener.
Key Programming
Your mobile unit enables you to assign frequently used functions to specific keys.
Programmable Keys
Aastra 610d
The left and middle softkeys below the display and the left and right navigation keys can be programmed. The left and right programmed navigation key of the mobile unit can also be used during a connection.
The left and middle softkeys below the display can be programmed. These programmed keys can only be used when idle.
The three side keys (left) and the hotkey (right) and the left and right navigation keys can also be programmed as usual. These programmed keys can be used during calls and when the mobile unit is idle.
After programming, the display shows the programmed function (not for the hotkey, however). A short key press is sufficient to call the function.
Note
Please keep in mind that some functions are only displayed during a call. When you, e.g. access the caller list, you can scroll through it and edit it, however, you cannot dial a call from the list.
Programmable Functions
Press the respective key longer or use the >>> > Settings > Key programming menu (see page 129).
If you press the softkey while programming keys, the standard factory setting value of the key is displayed. You can confirm them via OK.
The following selection is offered:
No function The key is available.

VIP list A call number list (6 entries max.) is assigned to the key.
The VIP-List is assigned to the hotkey as the default setting. You have to programme the key first before you can assign call numbers to the VIP-List. After calling it the first time, enter the corresponding call number and name so the list becomes available to you.

Alarm clock Initial programming of alarm clock settings is done.

Appointment Initial programming of appointment settings is done.

Profile The selection of profiles is presented.

Info The info menu (caller list, redial, ...) can be programmed.

New Info If new messages or, e.g. new calls have arrived in the call list, the list entries are directly retrieved with the programmed key.

Caller list Here is the caller list.

Redial list Here is the redial list.

Voice box Here is the list of voicebox messages.

Paging messages If your Astra 800 / OpenCom 100 communications system is equipped with a corresponding application, here is where you can programme access to paging announcements.

Acknowledge message The key is for acknowledging received messages (paging).

Text messages Assigns the key access to new short messages.

Jobs Assigns the key to the task list (if available on your system).

e-Mail Accessing new e-mail messages is assigned to the key.

Fax Accessing new fax messages is assigned to the key.

Menu The key is assigned device menu access.

System menu The key is assigned access to the system menu / main menu of the Astra 800 / OpenCom 100 communications system.

Server menu Accessing the server menu is assigned to the key.

Personal directory Here is the personal phone book (saved on the phone).

Central directory Here is the Astra 800 / OpenCom 100 communications system phone book.

Navigation Assigns the key alternative access to functions which are assigned to the navigation keys.

SOS-call: with confirmation
Assigns the key as SOS emergency call key. After a confirmation prompt the emergency call number is dialled which is saved in the >> >Security >SOS call >SOS number menu (see page 133).

SOS call Assigns the key as SOS emergency call key.
The emergency call number which is saved in the ▶▶▶ > Security > SOS call > SOS number menu is dialled directly (without confirmation prompt).
Aastra 620d / 630d: If the SOS emergency call key is to be available during a call also, please do not assign this function to one of the middle or left softkeys (see page 50).

Take Assigns the key the
page 125).
Take function (see

Un park Assigns the key the
page 85).
Un park function (see

Pickup Assigns the key the
page 124).
Pickup function (see

Pickup select Assigns the key the
(see page 125).
Pickup select function

VIP call Assigns the key the
page 125).
VIP call function (see

Announcement Assigns the key the
function (see page 125).
Announcement

Intercom Assigns the key the
page 125).
Intercom function (see

Door opener x Assigns the key the
There are multiple door openers available depending on the system configuration.
Select line Assigns the key access to the trunk keys of your telephone (please refer to page 55 also).
Line x Assigns the key access to a selected trunk key of your telephone.
Active features Assigns the key access to the Active features menu entry of the system menu / main menu (see page 105).
Bluetooth Assigns the access to the Bluetooth menu to the key (Aastra 620d / 630d only).
Volume Programs the access to volume control to a key (the programmed key is not labelled with a symbol / icon).
Alternative access to default functions
If you have re-programmed default functions, you have other options for accessing these functions.
Redial list ... long key press of call key
Navigation ... by pressing the , , , keys △ ▽ ▶ ▶
Appendix
Care and Maintenance
Your telephone is a product that meets the highest standards of design and manufacture. It should therefore be treated with care. Follow the advice below, and you will be able to enjoy using this product for a long time.
Please follow all the Safety Precautions starting on page 9. These precautions apply to the mobile unit, the charging station, the batteries (the entire telephone), as well as the accessories.
To clean the telephone, first remove the charger adapter plug from the mains socket. Wipe the equipment with an anti-static cloth or a soft, damp leather cloth, then with a dry cloth.
Note
Never spray your telephone with cleaning fluid or solvents. Clean the contacts of the mobile unit and charging station with a lint-free cloth.
Environmental Properties and Disposal
(Valid for the European Union)
The product was manufactured in line with the legal specifications and 2002 manufacturing directive and is recycling and environmentally compatible. It was developed with low energy usage, long service life span and user-friendliness in mind, using a limited amount of environmentally compatible materials and components. Help to extend the lifetime of your devices by following the safety precautions, information on battery lifetime and the care and maintenance precautions.
Notes on Disposal
In order to avoid any possible consequences resulting from the disposal of electrical and electronic equipment containing substances damaging to the environment and human health, the European Parliament and Council directives
• 2002/96/EC on "waste electrical and electronic equipment" (WEEE) and
- 2002/95/EC on the “restriction of the use of certain hazardous substances in electrical and electronic equipment” (RoHS)
have been transferred into national law in all EU member states.
The primary aim of the legislation is the prevention of waste electrical and electronic equipment, and also the recycling, material recovery and any other form of recovery of such waste in order to reduce the quantities of waste to be disposed of and the amount of hazardous substances from electrical and electronic equipment becoming waste.
The product that you have purchased was developed in line with current, state of the art technology in an environmentally friendly manner and with a view to recycling, thus complying with requirements of European directives.

The product is labelled with the symbol shown. If you wish to dispose of this product, this symbol obliges you to do so separately from unsorted domestic waste. For this reason suitable facilities have been set up for the return of waste electrical and electronic equipment. Waste equipment can be handed in at these return centres free of charge. To find out where these return centres are located, please consult the information provided by the department of your local authority responsible for waste disposal.
Attention!
Electrical equipment does not belong in household waste.
Deposit it free of charge at a return centre.
Declaration of Conformity
(Valid for the European Union)
CE mark
This device complies with the requirements set down in the EU directive:
EU directive 99/5/EC on radio equipment and telecommunications terminal equipment and the mutual recognition of their conformity. The conformity with the above-mentioned directive is confirmed by the CE mark on the device.
Limited Warranty
(Valid for sale in USA, Canada)
Aastra warrants this product against defects and malfunctions during a one (1) year period from the date of original purchase. If there is a defect or malfunction, Aastra shall, at its option, and as the exclusive remedy, either repair or replace the telephone set at no charge, if returned within the warranty period. If replacement parts are used in making repairs, these parts may be refurbished, or may contain refurbished materials. If it is necessary to replace the telephone set, it may be replaced with a refurbished telephone of the same design and colour.
If it should become necessary to repair or replace a defective or malfunctioning telephone set under this warranty, the provisions of this warranty shall apply to the repaired or replaced telephone set until the expiration of ninety (90) days from the date of pick up, or the date of shipment to you, of the repaired or replacement set, or until the end of the original warranty period, whichever is later. Proof of the original purchase date is to be provided with all telephone sets returned for warranty repairs.
Exclusions
Aastra does not warrant its telephone sets to be compatible with the equipment of any particular telephone company. This warranty does not extend to damage to products resulting from improper installation or operation, alteration, accident, neglect, abuse, misuse, fire or natural causes such as storms or floods, after the telephone is in your possession.
Aastra shall not be liable for any incidental or consequential damages, including, but not limited to, loss, damage or expense directly or indirectly arising from the customers use of or inability to use this telephone, either separately or in combination with other equipment. This paragraph, however, shall not apply to consequential damages for injury to the person in the case of telephones used or bought for use primarily for personal, family or household purposes.
This warranty sets forth the entire liability and obligations of Aastra with respect to breach of warranty, and the warranties set forth or limited herein are the sole warranties and are in lieu of all other warranties, expressed or implied, including warranties or fitness for particular purpose and merchantability.
Warranty Repair Services
Should the set fail during the warranty period;
In North America, please call 1-800-574-1611 for further information.
Outside North America, contact your sales representative for return instructions.
You will be responsible for shipping charges, if any. When you return this telephone for warranty service, you must present proof of purchase.
After Warranty Service
Aastra offers ongoing repair and support for this product. This service provides repair or replacement of your Aastra product, at Aastra's option, for a fixed charge. You are responsible for all shipping charges. For further information and shipping instructions;
In North America, contact our service information number: 1-800-574-1611.
Outside North America, contact your sales representative.
NOTE: Repairs to this product may be made only by the manufacturer and its authorized agents, or by others who are legally authorized. This restriction applies during and after the warranty period. Unauthorized repair will void the warranty.
Accessories
The following accessories are available from your dealer:
Accessories
Aastra 610d, 620d, 630d / charger with international adapter plug
Charger rack Aastra 610d, 620d, 630d with 8 charger cradles
Aastra 610d / mobile unit
Aastra 620d / mobile unit
Aastra 620d / mobile unit
Aastra 620d, 630d / power battery pack
Aastra 620d / power battery compartment cover
Aastra 630d / power battery compartment cover
Aastra 610d, 620d / rotary belt clip
Lanyard Aastra 610d, 620d, 630d with fastener for Aastra 630d
Aastra 610d, 620d / leather pouch
Aastra 630d / leather pouch
Headsets
Visit our Internet site to view a list of cord-connected headsets and Bluetooth headsets available for purchase at a shop near you. These are headsets recommended by Aastra which comply with the safety requirements of EN60950-1, section 6.2. This does not represent an assessment of the acoustic or functional quality of the headsets by the individual manufacturers.
USB charger
If you wish to charge your Aastra 620d, 630d mobile units via a USB charger, please use a USB power adapter available for purchase with the following specifications:
Socket type: Mini USB connector
Type: Switching power supply 100 V to 240 V / 50 – 60 Hz
Power output: ca. 5 W
Output voltage: 5 V / DC
Be sure to use a AC adapter plug with official certification from the relevant agencies.
Should you require a USB cable, it may be purchased in a store. Use a shielded "USB 2.0 A to USB mini B" type USB cable only. A certified cable is also available from Aastra (not available in all countries).
microSD card (for Aastra 620d, 630d)
The optional microSD card can store the login data of the mobile unit to your communications system, the most important local device data and the private phone book. This guarantees that if the device has a defect – by removal of the card – operation with a replacement device can be continued immediately and without having to log in anew.
Commercial microSD cards cannot be used.
Technical Data
valid for... USA, Canada All other countries
| Standard: | DECT | /GAP | DECT |
Number of channels: 60 duplex channels 120 duplex channels
| Frequencies: 1920 MHz to 1930 MHz(UPCS) | 1880 MHz to 1900 MHz |
| Duplexing: Time-division multiplex, 10 ms frame length | Time-division multiplex, 10 ms frame length |
Channel spacing: 1728 kHz 1728 kHz
| Bit rate: | 1152 kbps | 1152 kBit/s |
| Modulation: | GFSK | GFSK |
| Speech coding: | 32 kbps | 32 kBit/s |
| Transmission power: | 5 mW (average output per active channel) | 10 mW (average output per active channel) |
| Range: | up to 980 ft outdoors,160 ft indoors | up to 300 m outdoors, up to50 m indoors |
| BluetoothQD ID: | B014700 | B014700 |
| Charger power supply: | AC 110 – 240 V / 50 / 60 Hz AC 110 – 240 V / 50 / 60 Hz |
| Mobile unit / standard battery operating time: | Standby time / talk time up to 95 hours / 15 hours | Standby time / talk time up to 100 hours / 12 hours |
| Mobile unit / power battery operating time: | Standby time / talk time up to 190 hours / 30 hours | Standby time / talk time up to 200 hours / 24 hours |
| Standard battery: | Li-Ion battery, 3.7 V /850 (880) mAh /3.15 (3.3) Wh | Li-Ion battery, 3.7 V /850 (880) mAh / 3.15 (3.3) Wh |
Charge time for empty 2.5 hours 2.5 hours standard batteries:
| Permissible ambient temperatures for mobile unit operation: | 41°F to 104°F | 5°C to 40°C |
Permissible storage temperature: 23^ F to 113^ F -5°C to 45^ C
| Charger dimensions: Length / Width / Height | Length / Width / Height |
| 2.99 x 2.95 x 0.94 in | 76 x 75 x 24 mm |
| Mobile unit dimensions: | Length / Width / Height | Length / Width / Height |
| Aastra 610d, 620d: | 5.31 x 1.93 x 0.89 in | 135 x 49 x 22.5 mm |
| Aastra 630d: | 5.31 x 1.93 x 0.89 in | 135 x 53 x 22.5 mm |
Charger weight: 1.41 oz 40 g
| Mobile unit weight: Aastra 610d, 620d(with battery): 4.23 ozAastra 630d(with battery): 4.41 oz | Aastra 610d, 620d(with battery): 120 gAastra 630d(with battery): 125 g |
Length of power supply 5 ft 1.5 m cable:
Menu Tree
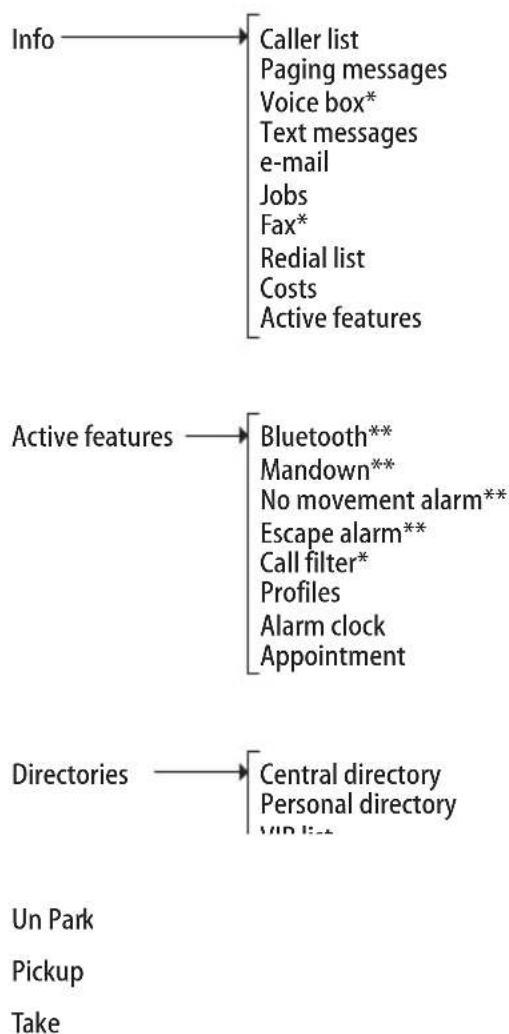
flowchart
graph TD
    A["Info"] --> B["Caller list"]
    A --> C["Paging messages"]
    A --> D["Voice box*"]
    A --> E["Text messages"]
    A --> F["e-mail"]
    A --> G["Jobs"]
    A --> H["Fax*"]
    A --> I["Redial list"]
    A --> J["Costs"]
    A --> K["Active features"]

    L["Active features"] --> M["Bluetooth**"]
    L --> N["Mandown**"]
    L --> O["No movement alarm**"]
    L --> P["Escape alarm**"]
    L --> Q["Call filter*"]
    L --> R["Profiles"]
    L --> S["Alarm clock"]
    L --> T["Appointment"]

    U["Directories"] --> V["Central directory"]
    U --> W["Personal directory"]
    U --> X["VIP list"]

    Y["Un Park"] --> Z
    AA["Pickup"] --> AB
    AC["Take"] --> AD

flowchart
graph TD
    A["Time/Alarms Time"] --> B["Date/Time Appointment Alarm clock Timer Format settings"]
    B --> C["Date"]
    B --> D["Appointment 1, 2, 3"]
    D --> E["Status Time Date Text"]
    B --> F["Alarm clock 1, 2, 3"]
    F --> G["Status Time Text"]
    B --> H["Time format Date format"]
    H --> I["24h, 12h am/pm"]
    H --> J["dd.mm.yy mm/dd/yy yy-mm-dd dd-mmm-yyyy"]
    K["Audio Earpiece"] --> L["Volume settings Ringer settings Attention tones Loud environment"]
    L --> M["Handsfree Corded headset Ringer"]
    L --> N["Melodies Type Device Volume Noise detection"]
    N --> O["Internal External Unknown number Text message VIP call SOS call Alarm clock Appointment"]
    N --> P["Key click Confirm tones End of menu Battery warning Coverage warning Alarm tone"]
    N --> Q["Repeat Once"]
    N --> R["Ringer Vibra call** Headset"]
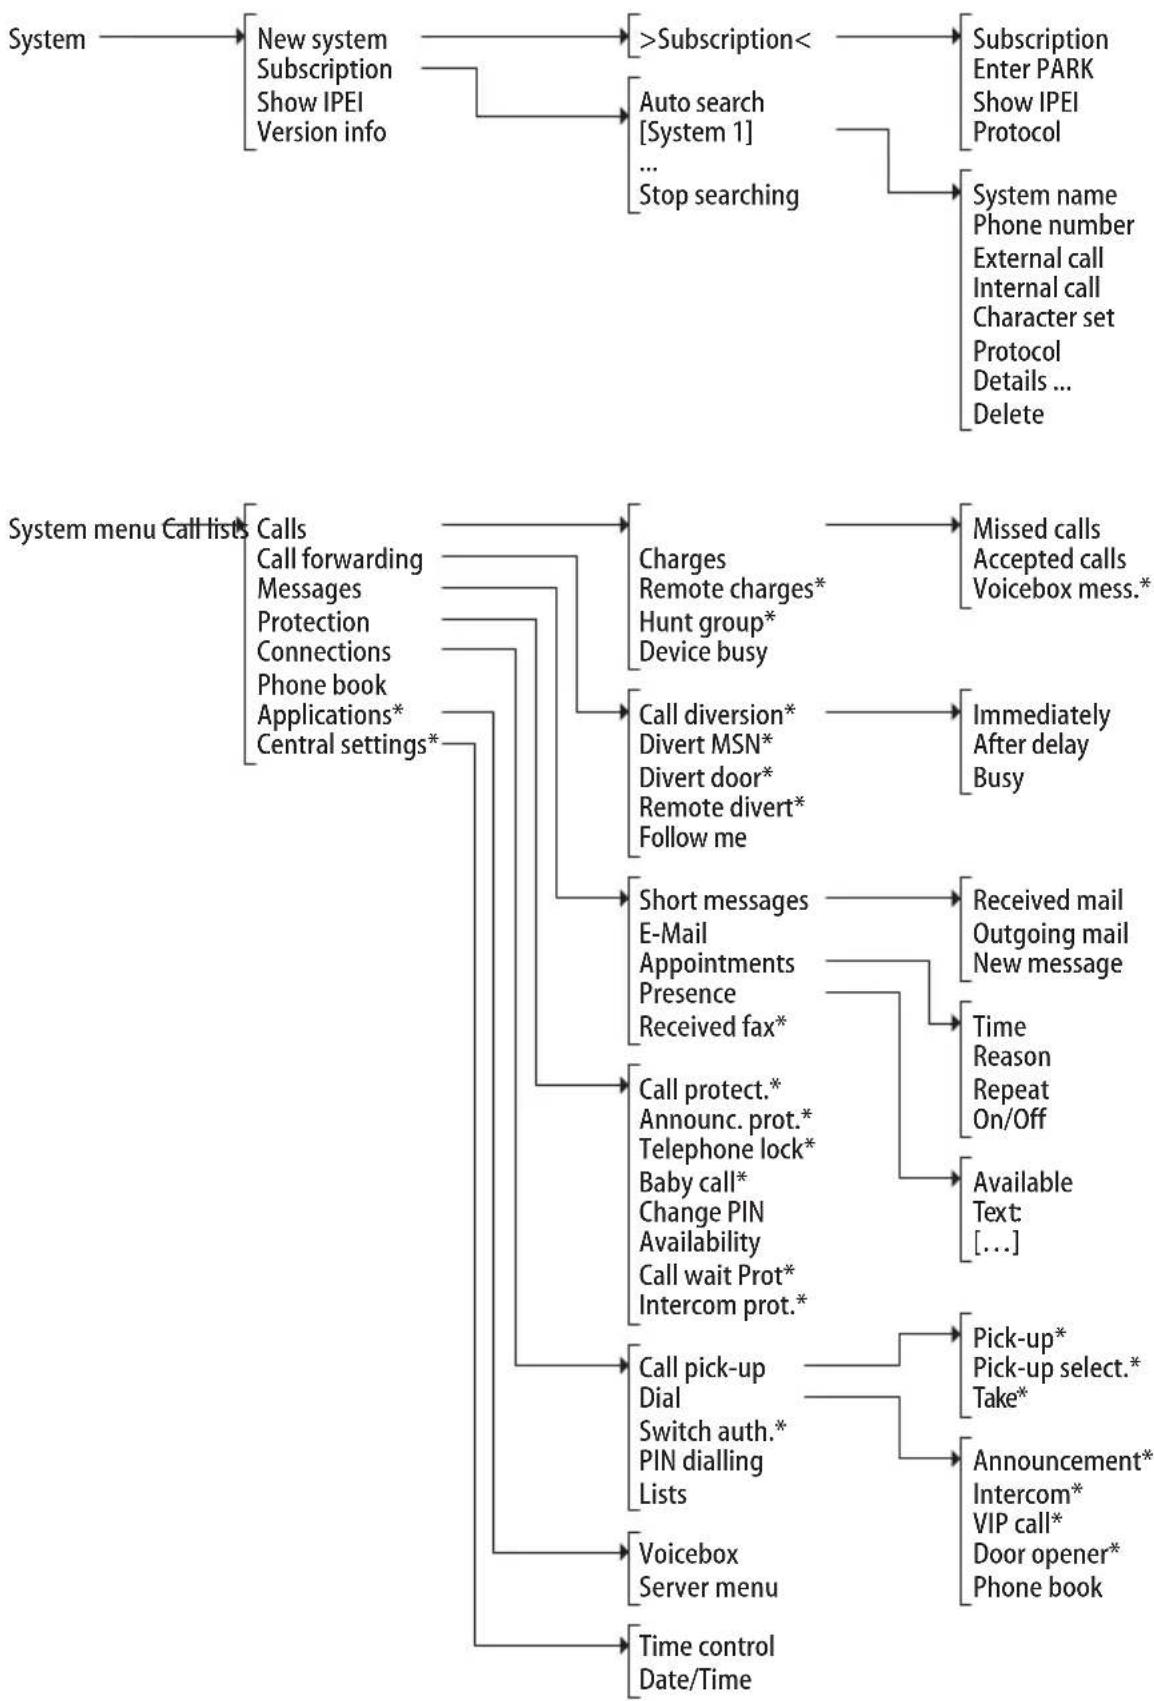
flowchart
graph TD
    A["System"] --> B["New system Subscription Show IPEI Version info"]
    B --> C[">Subscription"]
    C --> D["Subscription Enter PARK Show IPEI Protocol"]
    C --> E["Auto search [System 1"] ... Stop searching]
    E --> F["System name Phone number External call Internal call Character set Protocol Details ... Delete"]
    G["System menu Call lists"] --> H["Calls Call forwarding Messages Protection Connections Phone book Applications* Central settings*"]
    H --> I["Charges Remote charges* Hunt group* Device busy"]
    I --> J["Missed calls Accepted calls Voicebox mess.*"]
    H --> K["Call diversion* Divert MSN* Divert door* Remote divert* Follow me"]
    K --> L["Immediately After delay Busy"]
    H --> M["Short messages E-Mail Appointments Presence Received fax*"]
    M --> N["Received mail Outgoing mail New message"]
    M --> O["Time Reason Repeat On/Off"]
    M --> P["Available Text [..."]]
    H --> Q["Call protect.* Announc. prot.* Telephone lock* Baby call* Change PIN Availability Call wait Prot* Intercom prot.*"]
    Q --> R["Pick-up* Pick-up select.* Take*"]
    Q --> S["Announcement* Intercom* VIP call* Door opener* Phone book"]
    H --> T["Call pick-up Dial Switch auth.* PIN dialling Lists"]
    T --> U["Voicebox Server menu"]
    H --> V["Time control Date/Time"]
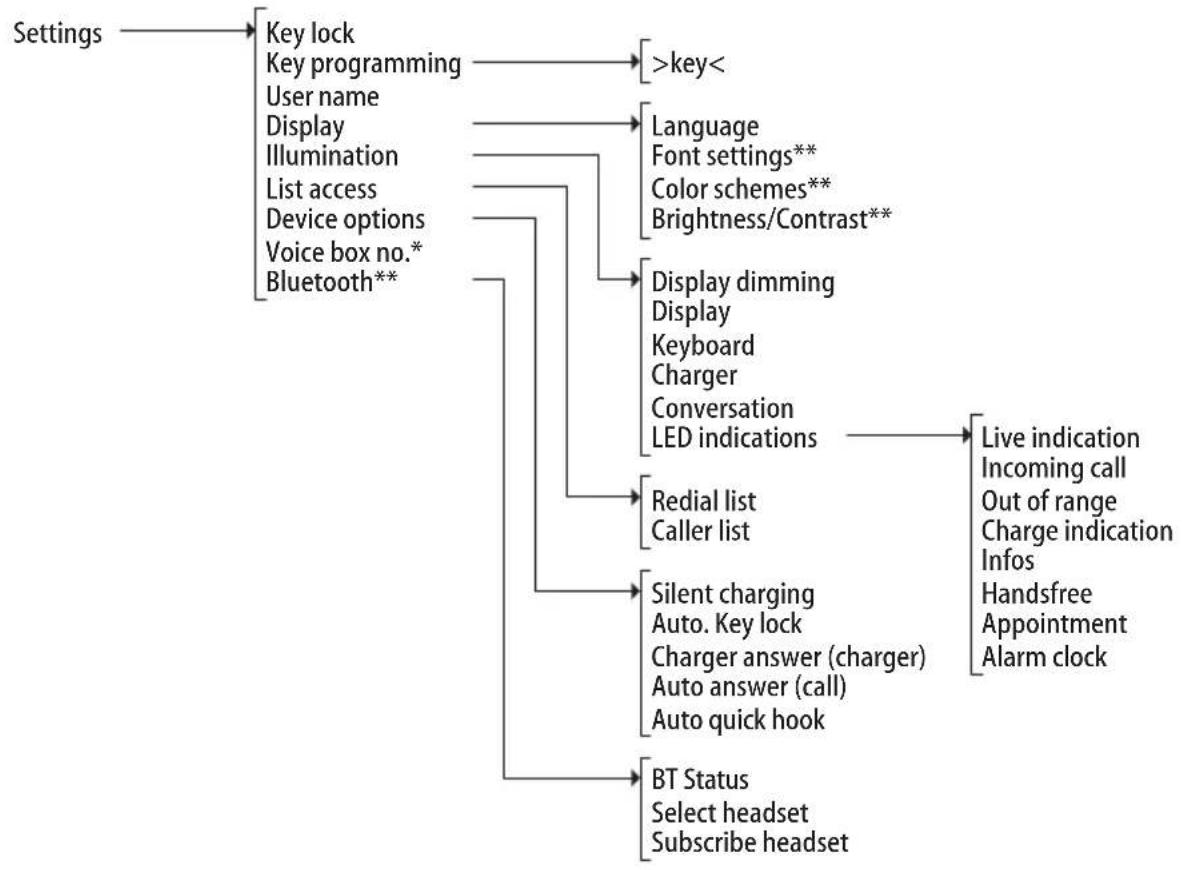
flowchart
graph TD
    A["Settings"] --> B["Key lock"]
    A --> C["Key programming"]
    A --> D["User name"]
    A --> E["Display"]
    A --> F["Illumination"]
    A --> G["List access"]
    A --> H["Device options"]
    A --> I["Voice box no.*"]
    A --> J["Bluetooth**"]
    B --> K[">key<"]
    C --> L["Language"]
    C --> M["Font settings**"]
    C --> N["Color schemes**"]
    C --> O["Brightness/Contrast**"]
    D --> P["Display dimming"]
    D --> Q["Display"]
    D --> R["Keyboard"]
    D --> S["Charger"]
    D --> T["Conversation"]
    D --> U["LED indications"]
    P --> V["Redial list"]
    P --> W["Caller list"]
    P --> X["Silent charging"]
    X --> Y["Auto. Key lock"]
    X --> Z["Charger answer (charger)"]
    X --> AA["Auto answer (call)"]
    X --> AB["Auto quick hook"]
    V --> AC["Live indication"]
    V --> AD["Incoming call"]
    V --> AE["Out of range"]
    V --> AF["Charge indication"]
    V --> AG["Infos"]
    V --> AH["Handsfree"]
    V --> AI["Appointment"]
    V --> AJ["Alarm clock"]
    P --> AK["BT Status"]
    AK --> AL["Select headset"]
    AK --> AM["Subscribe headset"]
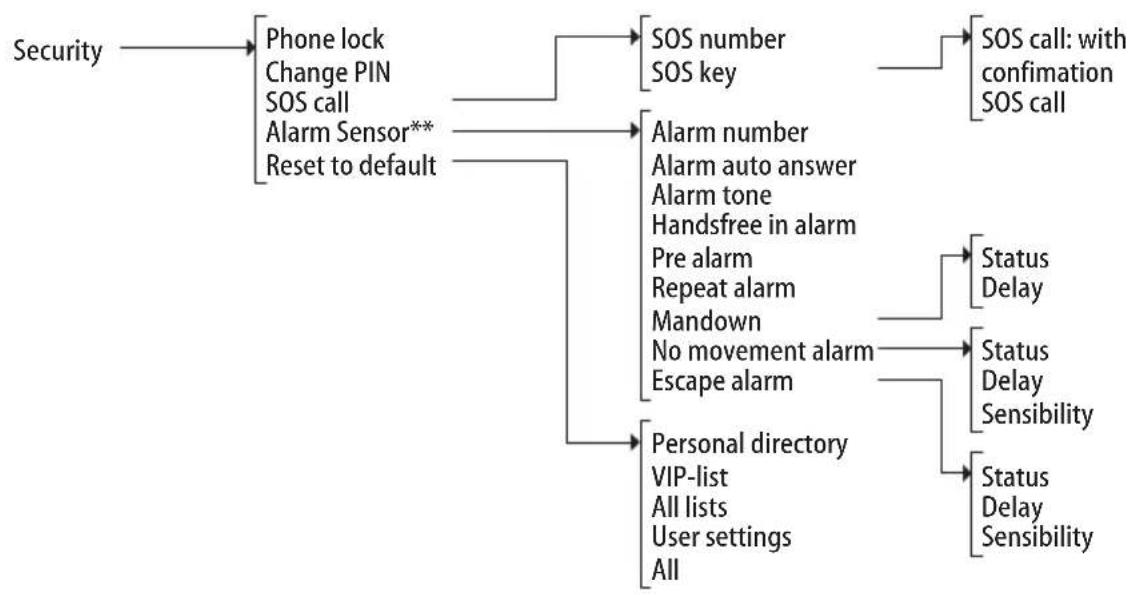
flowchart
graph TD
    A["Security"] --> B["Phone lock\nChange PIN\nSOS call\nAlarm Sensor**\nReset to default"]
    B --> C["SOS number\nSOS key"]
    C --> D["SOS call: with confimation\nSOS call"]
    B --> E["Alarm number\nAlarm auto answer\nAlarm tone\nHandsfree in alarm\nPre alarm\nRepeat alarm\nMandown\nNo movement alarm\nEscape alarm"]
    B --> F["Personal directory\nVIP-list\nAll lists\nUser settings\nAll"]
    E --> G["Status Delay"]
    E --> H["Status Delay Sensibility"]
    F --> I["Status Delay Sensibility"]

flowchart
graph TD
    A["Profiles No profile"] --> B["Select Settings"]
    B --> C["Normal Headset Meeting Loud Profile 05"]
    B --> D[">Profile selection"]
    C --> E["Profile name Ringer volume Ringer device Ringer type Key click Noise detection Loud environment Silent charging LED incoming call"]
    D --> E
Door opener*
*) offered when the communications system allows / supports this
**) offered only for certain terminal types
Index
Symbols
"Active features" menu 106
"Audio" menu 109
"Directories" menu 106
"Info" menu 103
"Profiles" menu 135
"Security" menu 133
"Settings" menu 129
"System menu" menu 113
"System" menu 112
"Time/Alarms" menu 108
A
Accessories 145
Active features (Info menu) 105
Alarm clock
confirm 89
setting and activating 108
Alarm clock (Active features menu) 106
Alarm number 53
Alarm sensor (Security menu) 133
Alarm tone 53, 111, 134
Announcement 68, 69, 81, 86, 125
Announcement protection 123
Appointment 106
confirm 89
setting and activating 108
Appointment call 89
Appointments 121
Appropriate Use 8
Attention tones 111
Auto answer
alarm 53
Auto answer (call) 131
Auto quick hook 132
Auto. key lock 131
Availability 124
B
Baby call 88, 124
Battery
information 20
warning 23
warning tone 111
Blocked/unblocked call numbers 57
Bluetooth 106, 132
Booking number 59, 70, 80, 83
Bracket 15
Brightness 45, 130
C
Call
accept 75, 76
deflect 75, 76, 79
end 73
park 71, 76, 80, 85
reject 75, 76
transfer to external subscriber 79
transfer to internal subscriber 78
unpark 68
Call diversion
for your own telephone 118
Call forwarding
call number entry 54
Divert MSN 54
Divert door 119
Follow me 120
for other users 119
MSN 119
to voicebox 60
Call numbers
blocked/unblocked 57
internal/external 54
Call protection 123
Callback 71, 88
Caller list 103
Accepted calls 116
calling from 65
Missed calls 115
Voicebox messages 116
Calling 63
from caller lists 65
from the personal phone book 96
from the system phone book 92
Calls
call-waiting call (state-dependent menu) 76
incoming (state-dependent menu) 75
outgoing (state-dependent menu) 72
pick-up 124
Call-waiting protection 124
Call-waiting queue 58
CE mark 143
Central directory 106
Change device PIN 133
Change user PIN 124
Charge time 22
Charger 18
Charger answer (charger) 131
Charges 56, 117 for... 117
Charging port 17
Checking in (mobile unit) 24, 26
CLIP 56
CLIP no screening 56, 74
CLIR 57
CNIP 57
Code number procedure 114
Color schemes 130
Company phone books 92
Conference 77, 82
end 82, 83
initiate 82
state-dependent menu 83
Confirmation tones 111
Connect 80, 83
Connections
Call pick-up 124
Dial 125
lists 127
PIN dialling 126
Switch authorisation 126
Contrast 45, 130
Conversation (state-dependent menu) 70
Costs 105
Coverage warning 111
D
Date 46
set 108, 129
Dead spots 13
Declaration of conformity 143
DECT 12
Delay (alarm) 52
Device busy 118
Device options 131
Dial (state-dependent menu) 67
Dialling directly 63
Disconnect 76, 80
call 70, 71, 72
Display
"Settings" menu 130
Brightness 45
Contrast 45
Illumination 45
Language 39
Display dimming 130
Display Elements 28
Disposal 142
Door call forwarding 91
Door opener 68, 71, 72, 75, 77, 80, 81, 83, 90, 125, 136
Doorbell 90, 91
Doorbell forwarding 91
DTMF 56
E
Editors 39
E-mail 104, 121
End of menu 111
Enquiry 77
Enquiry call (state-dependent menu) 79
Entering names/call numbers 39
Entrance intercom 91
Entrance intercom calls 91
Environmental properties 142
Escape alarm 52, 106
External seizure 54
F
Factory settings 135
Fax 104, 122
Features 57
Follow me 120
Font settings 130
Format settings 109
G
GAP 12
H
Handsfree 43
in alarm 53
Headset
select 132
signalling 111
socket 16, 46
subscribe 47, 132
volume 43
Hearing aids 10
Hotkey 48
Hunt group 117
|
Idle display 29
Illumination 130
Info
Call forwarding 105
Call protection 105
Time control 105
Info (menu) 46
Intercept 70
Intercom 68, 69, 81, 86, 125
Intercom protection 124
IPEI 24, 113
J
Jobs (Info menu) 104
K
Key assignment 27
Key click 111
Key functions 31
Key lock 42, 129
Key programming 129
Keypad dialling 57
Keypad protocol 57
L
Language 39
Lanyard fastener 16
Least Cost Routing (LCR) 58
switch off 68, 70, 81
LED
display on/off 130
overview 30
List access 131
Loud environment 111, 136
M
Main menu 113
Making a call 63
Mandown 106
Mandown alarm 51
Menu
before and during a call 61
hide automatically 38
Phone book 92
Menu (state-dependent)
busy subscriber 71
conference 83
conversation 70
dialing 67
during the call 72
enquiry call 79
for call-waiting call 76
for incoming call 75
pre-dialling 69
subscriber on hold 81
Menu tree 149
microSD card 19
Mobile unit
muting 45
switching on/switching off 41
Mute 45
N
New system 112
No movement alarm 52, 106
P
Paging messages (Info menu) 104
Park 71, 76, 80, 85
Personal directory 106
Personal phone book 92, 96
Phone book 126
add entry 95
menu 92
New entry 94
of the communications system 92
personal 106
Phone lock 42, 133
Pick-up 124
selective 125
Pickup 67, 70, 107
selective 68, 69, 70, 71
PIN 124, 133
PIN dialling 126
Postdial (DTMF) 56
Power battery 15
Power supply 19
Power supply unit 19
Pre-alarm 52
Precautionary regulations 21
Pre-dialling 63
Pre-dialling (state-dependent menu) 69
Presence 122
Profile 106
Select 135
set 136
Q
Queue 58
R
Recall 78
Receiver volume 43
Redial 64
Redial list 104
Registration 26
Repeat alarm 53
Reset to default, mobile unit 135
Ringer
Device 111
switch off when called 44, 73, 75
switch on/off 44
Type 110
Ringer settings 109
S
Safety information 9
Scope of delivery 14
Seize line 54
Server menu 128
Silent charging 131
Softkeys 29
SOS 50
SOS call 133
SOS emergency call number 133
Speaker 43
Special key 48
Speed Dialling (personal phone book) 99
Speed-dialling 132
Speed-dialling (system phone book) 94
Standard battery 14
Stand-by time 22
Subscriber busy (state-dependent menu) 71
Subscriber on hold (state-dependent menu) 81
Subscription (system menu) 112
Switch authorisation 126
Swivel clip 15
System menu
"Applications" 128
"Call forwarding" 118
"Calls" 115
"Central settings" 128
"Connections" 124
"Messages" 120
"Phone book" 127
"Protection" 123
System phone book Edit 127
New entry 127
T
Take 67, 70, 107, 125
Talk time 22
Technical data 147
Tele secretary 74
Telephone lock 43, 123
Text messages (Info menu) 104
Three-party conference 55, 79
Time
display when idle 46
set 108, 129
Time control 129
Timer 109
Toggle 55, 77, 80, 83
Transfer 77
to external subscriber 79
to internal subscriber 78
Transmission of call numbers 56
Trunk keys 55
call signalling 74
Select line 63, 69
U
Un park 68, 107
USB Port 17
User name 129
V
Version info 113
VF signalling 56, 57
Vibration call 44
Vibrator 111
VIP call 74, 125
initiate 68, 69, 72, 81
VIP list 49, 107
Virtual call number 74
Voice box 104, 128
call number 132
query 84
Voicemail system 60
Volume
adjust during call 43
adjustment 136
for ringer signalling 111
loudspeaker 43
Ringer 136
Volume settings 109
Notes

natural_image
Man in business attire talking on phone while seated indoors with a laptop nearby (no visible text or symbols)Copyright 2011 www.aastra.com
All rights reserved
As of 01.10.2011
Subject to changes
C€
AASTRA

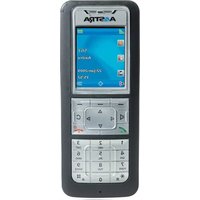
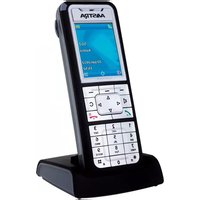
- DECT Telephones User Guide
- Welcome to Aastra
- Aastra 800 and OpenCom 100
- Contents
- General Information....7
- Installation 14
- Commissioning 22
- Functions 27
- Menu Navigation....38
- Basic Functions 41
- Telephoning....63
- Phone Book 92
- The Device Menu....100
- Key Programming....137
- Appendix 142
- Index....154
- General Information
- Aastra 610d
- Aastra 620d
- Aastra 630d
- Appropriate Use
- Safety Information
- WARNING! Never
- Note for persons wearing hearing aids
- Communications Regulation Information
- FCC Notices (U.S. Only)
- Health and Safety Information
- Industry Canada (Canada only)
- Overview and Basic Information
- Authorisation is Required
- Further Documentation
- DECT and GAP
- Information on transmission quality
- Installation
- Scope of Delivery
- Inserting Standard Battery
- Inserting the Power Battery
- Mounting / Removing a Bracket or Swivel Clip
- Lanyard Fastener
- Headset Socket/Bluetooth®
- Safety precaution
- Aastra 630d : Removing the Cover
- USB and External Charging Port
- Aastra 630d – USB Port: Removing the Cover
- Setting Up and Connecting the Charger
- Where to set it up
- Note
- Power Supply / Power Supply Unit
- microSD Card
- Aastra 620d, 630d (as of device software 4.0)
- Important Battery Information
- Precautionary Regulations during Usage
- Commissioning
- Charging and Usage Times
- Charge time in the charger (uncharged battery):
- Charge time using USB charger:
- Talk time:
- Stand-by time:
- Battery Charge Display
- Charge Warning
- Mobile Unit Subscription (Checking In)
- Tip:
- The following applies to other manufacturers' communications systems:
- Note for the System Administrator
- Registration
- Checking In
- Functions
- Display Elements and Symbols
- The Display
- Display Elements
- Line of Softkeys and Idle Display
- The LED
- Illumination
- Key Functions
- Locking Your Telephone Interface by the System Administrator
- Menu Navigation
- Using Menus
- Scrolling
- Menus hide automatically
- Example: Language Setting
- The Editors
- Entering names/call numbers
- Basic Functions
- Device Functions
- Switching Mobile Unit Off/On
- Switching on mobile unit
- Switching off mobile unit
- Keylock / Phone Lock
- Activating keylock
- Deactivating keylock
- Cancel phone lock
- Telephone Lock
- Speaker/Handsfree Use
- Adjusting Volume During a Call
- Switch Ringer On/Off
- Switch off
- Switch on
- Switch Off Ringer When Called
- Vibra Call (Aastra 620d/630d Only)
- Signalling Wake-up Time or an Appointment
- Muting Mobile Unit
- Muting
- Cancel muting
- Illumination/Display Dimming
- Switching on display illumination
- Display: Change Brightness/Contrast
- Automatic Hide / Message Windows
- Event Window and Info Menu
- Date/Time
- Bluetooth® Headset Operation (Aastra 620d/630d)
- Subscribing / Renaming / Unsubscribing Bluetooth Headset
- Renaming
- Checking out
- Telephoning via the Bluetooth Headset
- Accepting a call
- End call
- Outgoing call
- Handsfree operation
- Transferring call to headset
- Transferring call to mobile unit
- Special Key (Hotkey) / VIP List (Aastra 620d/630d)
- Programming call numbers
- Dialling a call number
- VIP List (Aastra 610d)
- Profiles
- Adjusting to Environment
- Special Functions
- Emergency Call Key (SOS)
- The Alarm Sensor (Aastra 630d only)
- Mandown
- No movement
- Escape
- Setting alarm times
- Other alarm parameter settings
- Several alarm types simultaneously activated
- Connections
- Internal and External Call Numbers
- External Seizure and Entry of Call Numbers
- Example
- Multiple Trunk Keys
- Tip
- Multiple Connections
- DTMF Postdial/VF Signalling
- Charge Display (Charges)
- Transmission of Call Numbers
- "CLIP" feature
- "CLIP no screening" feature
- "CNIP" feature
- "CLIR" feature
- Blocked/Unblocked Call Numbers
- Keypad Dialling
- Least Cost Routing (LCR)
- Calls in the Call-Waiting Queue
- Calls with Booking Numbers
- Notes on booking numbers
- Forwarding Calls
- Types of forwarding
- Call forwarding to a voicebox
- Selective Call Forwarding
- Least Cost Routing
- Hunt group call numbers
- Call forwarding chains
- Menu Before and During a Call
- Examples
- Telephoning
- External/Internal Calling
- Dialling Directly
- Pre-dialling
- Correcting pre-dialling entry:
- Making a Call from the Redial List
- Additional options:
- Local Redial List
- Redial List via Communications System
- Making Calls from the Caller List
- When accessing the caller list locally the display shows:
- Local caller list
- Caller list via communications system
- Call Waiting with an Internal Subscriber
- Using Routes to Make Calls
- Menu when Dialling
- Menu when Pre-dialling
- Menu during Conversation
- Menu if Subscriber Busy
- Menu when Calling
- Ending a Call
- Accepting Calls
- Normal call
- External calls from unknown call number
- Call for a virtual call number (Tele Secretary)
- VIP calls
- Calls During a Conversation
- Incoming Call Menu
- Call Waiting Menu
- Enquiry, Toggling, Transfer and Conference
- Enquiry/Toggling
- Transferring an Internal/External Call to an Internal Subscriber
- Transferring an External Call to an External Subscriber
- Enquiry Call Menu
- Menu when Subscriber on Hold
- Three-Party-Conference
- Initiate and end conference
- Continuing call with conference participants individually
- Menu during Conference
- Special Calls/Conversations
- Voicebox Queries
- Parked Calls
- Park call
- Unpark call
- Announcements (with and without Intercom)
- Making an announcement without intercom
- Making an announcement with intercom
- Responding to an announcement (announcement without intercom)
- Callback
- Initiate callback
- Answering a callback
- Baby Call
- Carrying out a baby call
- Confirming Appointment/Alarm Clock
- Accepting an Appointment Call
- Doorbell, Door Opener
- Opening door while idle
- Opening door during call
- Entrance Intercom Calls
- Calling the entrance intercom
- Calling door when idle
- Door call during call
- Door call forwarding
- Call duration
- Phone Book
- System Phone Book
- Authorisations
- Calling from the Communications System Phone Book
- Speed-Dialling (System Phone Book)
- Dialling a speed-dialling destination
- Add Phone Numbers from Lists to Communications System Phone Book
- Adding call number as new phone book entry
- Adding call number to a phone book entry
- Personal Phone Book
- Calling from the Personal Phone Book
- Adding Entry to Personal Phone Book
- Editing Personal Phone Book Entries
- Local phone book menu
- Speed Dialling (Personal Phone Book)
- Aastra 600 PC Tool / Phone Book (Aastra 620d, 630d)
- The Device Menu
- Information on Display Symbols in the Device Menu
- Overview: Device Menu
- Info
- Active features
- Directories
- Un park
- Pickup
- Take
- Time/Alarms
- Audio
- System
- System menu
- Settings
- Security
- Door opener
- "Info" Menu
- "Active features" Menu
- "Directories" Menu
- "Un Park" Menu Entry
- "Pickup" Menu Entry
- "Take" Menu Entry
- "Time/Alarms" Menu
- "Audio" Menu
- "System" Menu
- Subscription:
- "System menu" / Total Menu
- Calls
- Call forwarding
- Messages
- Protection
- Applications
- Central settings (central settings)
- Using code number procedures
- System menu: "Calls"
- System menu: "Call forwarding"
- System menu: "Messages"
- Repeat
- System menu: "Protection"
- System menu: "Connections"
- Call pick-up
- Dial
- System menu: "Phone book"
- System menu: "Applications"
- System menu "Central settings"
- "Settings" Menu
- Display
- Device options
- "Security" Menu
- SOS call
- No movement alarm
- Escape alarm
- "Profiles" Menu
- Select
- "Door opener" Menu Entry
- Key Programming
- Programmable Keys
- Programmable Functions
- Alternative access to default functions
- Appendix
- Care and Maintenance
- Environmental Properties and Disposal
- (Valid for the European Union)
- Notes on Disposal
- Attention!
- Declaration of Conformity
- CE mark
- Limited Warranty
- (Valid for sale in USA, Canada)
- Exclusions
- Warranty Repair Services
- After Warranty Service
- Accessories
- Headsets
- USB charger
- microSD card (for Aastra 620d, 630d)
- Technical Data
- Menu Tree
- Index
- Symbols
- A
- B
- C
- D
- E
- F
- G
- H
- |
- J
- K
- L
- M
- N
- P
- Q
- R
- S
- T
- U
- V
- Notes
Brand : AASTRA
Model : 610d
Category : Telephone