
RC8055AH2M - Tumble dryer LG - Free user manual and instructions
Find the device manual for free RC8055AH2M LG in PDF.


| Product Type | Tumble Dryer |
| Model | RC8055AH2M |
| Brand | LG |
| Drying Capacity | 8 kg |
| Energy Class | A++ |
| Annual Energy Consumption | 234 kWh |
| Noise Level | 65 dB(A) |
| Drum Volume | 118 L |
| Dimensions (W x D x H) | 600 x 600 x 850 mm |
| Weight | 50 kg |
| Power Supply | 230 V, 50 Hz |
| Power Consumption | 850 W |
| Condenser Type | Heat Pump |
| Programs | Cotton, Synthetic, Delicates, Mix, Quick 30, Duvet, Towel, Sports, Hygiene, Wool, Silent |
| Sensor Dry System | Intelligent Sensor Dry |
| Anti-Crease Function | Yes, up to 120 min |
| Filter Cleaning Indicator | Yes |
| Condenser Cleaning Indicator | Yes |
| Child Lock | Yes |
| Smart Diagnosis | Yes |
| Wi-Fi Connectivity | ThinQ Smart App |
Frequently Asked Questions - RC8055AH2M LG
User questions about RC8055AH2M LG
0 question about this device. Answer the ones you know or ask your own.
Ask a new question about this device
Download the instructions for your Tumble dryer in PDF format for free! Find your manual RC8055AH2M - LG and take your electronic device back in hand. On this page are published all the documents necessary for the use of your device. RC8055AH2M by LG.
USER MANUAL RC8055AH2M LG
natural_image
Symbol of a trash bin crossed with a diagonal line, no text or numbers presentnatural_image
Line drawing of a front-loading washing machine with labeled buttons (no text or symbols beyond labels)
natural_image
Line drawing of a front-loading washing machine with labeled buttons (no text or symbols beyond labels)natural_image
Technical diagram showing three views of a mechanical component with no visible text or symbolsnatural_image
Diagram showing a washing machine with a close-up view of its internal components (no text or symbols present)natural_image
Two-step diagram showing a hand pressing down on a mechanical component, with arrows indicating motion (no text or symbols)natural_image
Line drawing of two hands holding a flat object, no text or symbols presentVAROVÁNÍ
• Nepijte kondenzovanou vodu.
POZNÁMKA
natural_image
Diagram of a circular mechanical component with two curved arrows indicating rotational or bidirectional motion (no text or symbols)natural_image
Diagram of a mechanical component with rotating parts and motion lines, no visible text or symbolsnatural_image
Diagram of a car interior with visible seating and steering wheel (no text or labels)natural_image
Technical line drawing of a car interior with visible structural elements and fan components (no text or labels)5 Zavřete dvířka.
natural_image
Diagram of a car wheel with an arrow indicating direction, showing internal components (no text or symbols)natural_image
Illustration of a hand pressing down on a car door handle with an arrow indicating force (no text or symbols)natural_image
Technical line drawing of a curved mechanical component with internal curved arrows indicating motion (no text or symbols)natural_image
Diagram of a mechanical assembly with curved arrows indicating rotation or force direction (no text or symbols)natural_image
Two identical illustrations of a faucet with water flowing from a grid-patterned base, no text or symbols present.natural_image
Illustration of a hand placing a component into a car wheel (no text or symbols)POZNÁMKA
natural_image
Line drawing of a hand inserting a component into a washing machine (no text or symbols)natural_image
Line drawing of two hands using a tool to lift or stand (no text or symbols)natural_image
Line drawing of a hand using a vacuum cleaner to clean or install a washing machine (no text or symbols present)POZNÁMKA
natural_image
Technical line drawing of a washing machine with a close-up inset showing the component detail (no text or symbols)UPOZORNĚNÍ
DÔLEŽITÉ BEZPEČNOSTNÉ POKYNY....3
Zneškodnenie starého spotrebiča 10
INŠTALÁCIA....11
DÔLEŽITÉ BEZPEČNOSTNÉ POKYNY

VAROVANIE
natural_image
Line drawing of a front-loading washing machine with labeled buttons (no text or symbols beyond labels)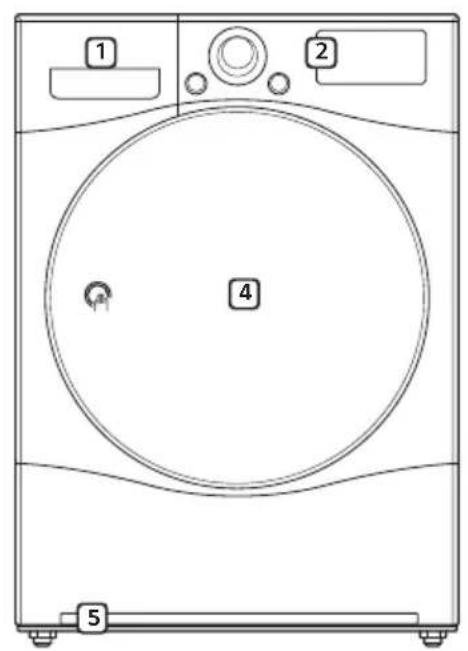
natural_image
Line drawing of a front-loading washing machine with labeled buttons (no text or symbols beyond labels)① Nádoba na vodu
② Ovládací panel
③ Sklenené dvierka
4 Nepriehladné dvierka
5 Vetracia mriežka
| Model RC7055*HM / RC7055*H*M RC8055*HM / RC8055*H*M | ||
| Napájanie 230 V~ 50 Hz | ||
| Vel'kost' 600 mm (Š) X 640 mm (H) X 850 mm (V) | ||
| Hmotnost' výrobku 53 - 56 kg | ||
| Povolená teplota 5 - 35 °C | ||
| Max. kapacita 7 kg | 8 kg | |
natural_image
Technical diagram showing three views of a mechanical component with no visible text or symbolsnatural_image
Illustration of a washing machine with a close-up inset showing hand positioning (no text or symbols)2 Oddel'te hadicu nádoby na vodu od súpravy.
natural_image
Diagram showing a washing machine with a close-up view of its internal components (no text or symbols present)natural_image
Illustration of a washing machine with a close-up view showing hand positioning and detail (no text or symbols)natural_image
Two-step diagram showing a hand pressing down on a mechanical component, with arrows indicating motion (no text or symbols)natural_image
Line drawing of a hand holding a tool or device with fingers, no text or symbols presentVAROVANIE
- Destilovanú vodu nepite.
POZNÁMKA
natural_image
Diagram of a circular mechanical component with two curved arrows indicating rotational or bidirectional motion (no text or symbols)5 Stlačte tlačidlo Spustit'/pozastavit'.

natural_image
Diagram of a mechanical component with curved arrows indicating motion or force direction (no text or symbols)natural_image
Diagram of a car interior with curved pathways and a horizontal ladder (no text or symbols)natural_image
Technical line drawing of a car interior with solar panels and ventilation ducts (no text or symbols)5 Zatvorte dvierka.
natural_image
Diagram of a mechanical component with an arrow indicating direction (no text or symbols)natural_image
Illustration of a hand inserting a component into a car door (no text or symbols)natural_image
Technical line drawing of a curved mechanical component with internal curved arrows indicating motion (no text or symbols)natural_image
Diagram of a mechanical assembly with curved arrows indicating rotation or force direction (no text or symbols)natural_image
Illustration of two identical water purifiers with faucet heads and liquid dripping (no text or symbols)natural_image
Illustration of a hand placing a component into a car wheel (no text or symbols)POZNÁMKA
natural_image
Illustration of a hand inserting a component into a washing machine (no text or symbols)natural_image
Line drawing of two hands holding a tool, no text or symbols presentnatural_image
Line drawing of a hand using a vacuum cleaner to lift a washing machine (no text or symbols)POZNÁMKA
natural_image
Technical line drawing of a washing machine with a close-up inset showing hand positioning (no text or symbols)UPOZORNENIE
Before beginning installation, read these instructions carefully. This will simplify installation and ensure that the product is installed correctly and safely. Leave these instructions near the product after installation for future reference.
RC7055*HM / RC7055*H*M
This manual may contain images or content different from the model you purchased.
This manual is subject to revision by the manufacturer.
SAFETY INSTRUCTIONS ....3
IMPORTANT SAFETY INSTRUCTIONS....3
Disposal of Your Old Appliance 10
INSTALLATION ....11
Specifications 11
Accessories 11
Installation Place Requirements 12
Stacking Installation Instructions 13
OPERATION ....16
Using the Appliance....16
Sorting Laundry 17
Control Panel....18
Programme Table 20
Option Programme 22
Rack Dry (Optional) 24
SMART FUNCTIONS....25
Using the Smart Diagnosis™ Function....25
MAINTENANCE....26
Cleaning the Lint Filter....26
Emptying the Water Container.... 27
Cleaning the Cool Air Inlet Grill....27
Wiping the Moisture Sensor 27
TROUBLESHOOTING 28
Diagnosing Problems 28
Error Codes 32
WARRANTY....33
OPERATING DATA 34
The following safety guidelines are intended to prevent unforeseen risks or damage from unsafe or incorrect operation of the appliance.
The guidelines are separated into ‘WARNING’ and ‘CAUTION’ as described below.

This symbol is displayed to indicate matters and operations that can cause risk. Read the part with this symbol carefully and follow the instructions in order to avoid risk.

WARNING
This indicates that the failure to follow the instructions can cause serious injury or death.

CAUTION
This indicates that the failure to follow the instructions can cause the minor injury or damage to the product.
IMPORTANT SAFETY INSTRUCTIONS

WARNING
To reduce the risk of fire, electric shock, or injury to persons when using your product, basic safety precautions should be followed, including the following:
Children in the Household
This appliance is not intended for use by persons (including children) with reduced physical, sensory or mental capabilities, or lack of experience and knowledge, unless they have been given supervision or instruction concerning use of the appliance by a person responsible for their safety. Children should be supervised to ensure that they do not play with the appliance.
For use in Europe:
This appliance can be used by children aged from 8 years and above and persons with reduced physical, sensory or mental capabilities or lack of experience and knowledge if they have been given supervision or instruction concerning use of the appliance in a safe way and understand the hazards involved. Children shall not play with the appliance. Cleaning and user maintenance shall not be made by children without supervision.
Children of less than 3 years should be kept away unless continuously supervised.
Installation
- Make sure the appliance is properly installed, grounded, and adjusted by qualified service personnel according to the installation instructions.
- Never attempt to operate the appliance if it is damaged, malfunctioning, partially disassembled, or has missing or broken parts, including a damaged cord or plug.
- This appliance should only be transported by two or more people holding the appliance securely.
- Do not install the appliance in a damp and dusty place. Do not install or store the appliance in any outdoor area, or any area that is subject to weathering conditions such as direct sunlight, wind, or rain or temperatures below freezing.
- Tighten the drain hose to avoid separation.
- If the power cord is damaged or the hole of the socket outlet is loose, do not use the power cord and contact an authorized service centre.
- Do not plug multiple socket outlets, an extension power cable or adapter with this appliance.
- This appliance must not be installed behind a lockable door, a sliding door or a door with a hinge on the opposite side to that of the appliance, in such a way that a full opening of the appliance door is restricted.
- This appliance must be grounded. In the event of malfunction or breakdown, grounding will reduce the risk of electric shock by providing a path of least resistance for electric current.
- This appliance is equipped with a power cord having an equipment-grounding conductor and a grounding power plug. The power plug must be plugged into an appropriate socket outlet that is installed and grounded in accordance with all local codes and ordinances.
- Improper connection of the equipment-grounding conductor can result in risk of electric shock. Check with a qualified electrician or service personnel if you are in doubt as to whether the appliance is properly grounded.
- Do not modify the power plug provided with the appliance. If it does not fit the outlet, have a proper outlet installed by a qualified electrician.
Operation
- Do not attempt to separate any panels or disassemble the appliance. Do not apply any sharp objects to the control panel in order to operate the appliance.
-
Do not repair or replace any part of the appliance. All repairs and servicing must be performed by qualified service personnel unless specifically recommended in this Owner's Manual. Use only authorized factory parts.
-
Keep the area underneath and around the appliance free of combustible materials such as lint, paper, rags, chemicals, etc.
- Do not put animals, such as pets into the appliance.
- Do not leave the appliance door open. Children may hang on the door or crawl inside the appliance, causing damage or injury.
- Never reach into the appliance while it is operating. Wait until the drum has completely stopped.
- Do not put in, wash or dry articles that have been cleaned in, washed in, soaked in, or spotted with combustible or explosive substances (such as waxes, wax removers, oil, paint, gasoline, degreasers, drycleaning solvents, kerosene, petrol, spot removers, turpentine, vegetable oil, cooking oil, acetone, alcohol, etc.). Improper use can cause fire or explosion.
- In case of flood, disconnect the power plug and contact the LG Electronics customer information centre.
- Do not push down the door excessively, when the appliance door is open.
- Use new hose or hose-set supplied with the appliance. Reusing old hoses can cause a water leak and subsequent property damage.
- Do not touch the door during a high temperature programme.
-
Do not use flammable gas and combustible substances (benzene, gasoline, thinner, petroleum, alcohol, etc.) near the appliance.
-
If the drain hose or inlet hose is frozen during winter, use it only after thawing.
- Keep all washing detergents, softener and bleach away from children.
- Do not touch the power plug or the appliance controls with wet hands.
- Do not bend the power cable excessively or place a heavy object on it.
Maintenance
- Securely plug the power plug in the socket outlet after completely removing any moisture and dust.
- Disconnect the appliance from the power supply before cleaning the appliance. Setting the controls to the OFF or stand by position does not disconnect this appliance from the power supply.
- Do not spray water inside or outside the appliance to clean it.
- Never unplug the appliance by pulling on the power cable. Always grip the power plug firmly and pull straight out from the socket outlet.
Technical Safety for Using the Dryer
- Do not dry unwashed items in the appliance.
- Fabric softeners, or similar products, should be used as specified by the fabric softener instructions.
- Remove all objects from pockets such as lighters and matches.
- Never stop the appliance before the end of the drying cycle unless all items are quickly removed and spread out so that the heat is dissipated.
- The appliance is not to be used if industrial chemicals have been used for cleaning.
- Items such as foam rubber (latex foam), shower caps, waterproof textiles, rubber backed articles and clothes or pillows fitted with foam rubber pads should not be dried in the appliance.
- Do not drink the condensed water. Failure to do so may result in food-borne illnesses.
- The lint trap has to be cleaned frequently.
- Lint must not to be allowed to accumulate around the appliance.
- Do not spray dry cleaning detergent directly onto the appliance or use the appliance to dry clothes left with dry cleaning detergent.
-
Do not dry clothes stained with oil substances. Oil substances (including edible oils) stained on clothes cannot be completely removed even after washing with water.
-
The appliance must not be supplied through an external switching device, such as a timer, or connected to a circuit that is regularly switched on and off by a utility.
- Remove clothes from the product immediately when drying is complete or the power is turned off during the drying process. Leaving clothes that has been dried in the appliance unattended could result in fire. Clothes removed from the appliance after drying could result in fire. Remove clothes immediately after drying, and then hang or lay the clothes flat to cool.
Disposal
- Before discarding an old appliance, unplug it. Cut off the cable directly behind the appliance to prevent misuse.
- Dispose of all packaging materials (such as plastic bags and styrofoam) away from children. The packaging materials can cause suffocation.
- Remove the door before disposing of or discarding this appliance to avoid the danger of children or small animals getting trapped inside.
Disposal of Your Old Appliance

- This crossed-out wheeled bin symbol indicates that waste electrical and electronic products (WEEE) should be disposed of separately from the municipal waste stream.
- Old electrical products can contain hazardous substances so correct disposal of your old appliance will help prevent potential negative consequences for the environment and human health. Your old appliance may contain reusable parts that could be used to repair other products, and other valuable materials that can be recycled to conserve limited resources.
- You can take your appliance either to the shop where you purchased the product, or contact your local government waste office for details of your nearest authorised WEEE collection point. For the most up to date information for your country please see www.lg.com/global/recycling.
This dryer contains fluorinated greenhouse gases. R134a (GWP: 1430): 0.390 kg / 0.558 t CO2-eq. Hermetically sealed.
Specifications

natural_image
Line drawing of a washing machine with labeled parts (no text or symbols beyond labels)
natural_image
Line drawing of a washing machine with labeled buttons (no text or symbols beyond labels)① Water container
② Control panel
③ Glass door
4 Opaque door
5 Air ventilation grill
| Model RC7055*HM / RC7055*H*M RC8055*HM / RC8055*H*M | |
| Power supply 230 V~ 50 Hz | |
| Size 600 mm (W) X 640 mm (D) X 850 mm(H) | |
| Product weight 53 - 56 kg | |
| Allowable temperature 5 - 35 °C | |
| Max. capacity 7 kg 8 kg | |
- Appearance and specifications may vary without notice to improve the quality of the appliance.
Accessories
Please contact the LG Electronics Customer Information Centre for purchase.

Condensing Drain Hose and Hose Holder

Dry Rack Stacking Kit

Installation Place Requirements
Location
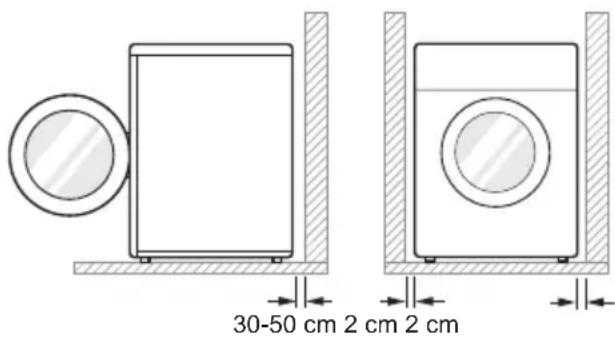
Level floor : Allowable slope under the entire appliance is 1°.
Power outlet : Must be within 1.5 meters of either side of the location of the appliance.
- Do not overload the outlet with more than one appliance.
Additional Clearance : For the wall, 30 – 50 cm: rear /2 cm: right & left side
- Do not place or store laundry products on top of the appliance at any time.
• These products may damage the finish or controls.
NOTE
- For better drying performance, please keep the rear of the appliance away from wall.
- Do not install the appliance where there is a risk of frost or dust.
- The appliance may not be able to operate properly or may be damaged by freezing of condensed water in the pump and drain hose.
- Do not install the appliance next to a high-temperature appliance like refrigerator, oven or stove etc, which can cause poor drying performance and programme duration, and adversely affect the proper functioning of the compressor. The appliance performs best at a room temperature of 23 °C.
Positioning
• Install the appliance on a flat hard floor.
- Make sure that air circulation around the appliance is not impeded by carpets, rugs, etc.
- Never try to correct any unevenness in the floor with pieces of wood, cardboard or similar materials under the appliance.
- Do not install the appliance in rooms where freezing temperatures may occur. Frozen hoses may burst under pressure. The reliability of the electronic control unit may be impaired at temperatures below freezing point.
- If the appliance is delivered in winter and temperatures are below freezing, place the appliance at room temperature for a few hours before putting it into operation.
- Please ensure that when the appliance is installed, it is easily accessible for an engineer in the event of a breakdown.
- With the appliance installed, adjust all four feet using a transit bolt spanner to ensure the appliance is stable, and a clearance of approximately 20 mm is left between the top of the appliance and the underside of any work-top.
Ventilation Requirement
• Alcove or under counter
- Ensure air flow of 3.17min through the appliance
- Closet
- Closet door must have 2 (louvered) openings, each having a minimum area of 387~cm^2 , located 8cm from bottom and top of door.

WARNING
- Avoid installing the appliance around a heat source. The rear side of the appliance must be well ventilated. Failure to follow these instructions may result in problems.
- The appliance should not be installed next to a refrigeration appliance.
- The appliance is not designed for maritime use or for use in mobile installations such as caravans, aircraft etc.
Electrical Connection
- Do not use an extension cord or double adapter.
• Always unplug the appliance after use. - Connect the appliance to an earthed socket in accordance with current wiring regulations.
- The appliance must be positioned so that the plug is easily accessible.
Stacking Installation Instructions
Your dryer can be placed on top of an LG washing machine and securely fixed with a stacking kit. This installation must be conducted by qualified service personnel to ensure it has been installed correctly.
The qualified service personnel will ensure you have the correct stacking kit for your model of washing machine and will ensure it is firmly fixed. For these reasons, expert fitting is essential.
Stacking Kit
In order to stack this dryer an LG stacking kit is required.

This dryer may only be stacked on top of an LG washing machine. Do not attempt to stack this dryer on any other washing machine, as damage, injury or property damage could result.
| Shape and assembly direction | Washing Machine Top plate size | |
| 550 mm 600 | mm | |
 |  | |
Installation Procedure
1 Place the LG dryer on the LG washing machine.
2 Remove the two screws from the bottom of the rear cover on each side as illustrated below.

natural_image
Three-panel diagram showing mechanical components with dashed alignment lines, no visible text or symbols3 Align the stacking kit holes and the rear cover holes.
• 3-1) 600 mm


4 Fasten the two screws that were removed earlier from the dryer to the stacking kit.
5 Use the four screws in the accessory box (16 mm) to assemble the washing machine rear cover and stacking kit.
6 The procedure for the opposite side will be the same.
WARNING
- Incorrect installation can cause serious accidents.
- The weight of the appliance and the height of installation make the stacking procedure too risky for one person. This procedure should be performed by two or more qualified service personnel.
- The appliance is not suitable for a built-in installation. Please do not install as a built-in appliance.
- Do not operate if the appliance is not properly stacked.
Condensed Water Drain-out
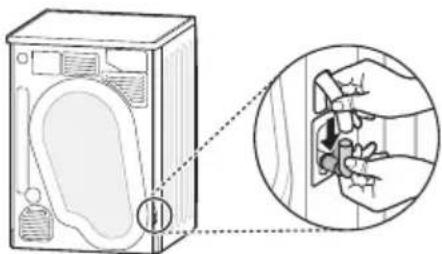
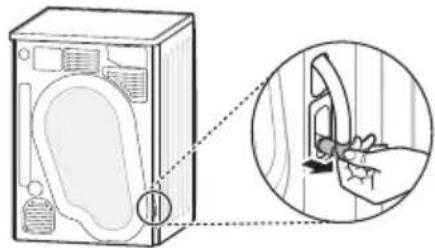
Normally, condensed water is pumped up to the water container where water is collected until manually emptied. Water can also be drained out directly to a mains drain, especially when the dryer is stacked on top of a washing machine. With a connecting kit for the mains drain hose, simply change the water path and re-route to the drainage facility as below:
1 Take the connecting kit out.
natural_image
Diagram showing a hand holding a baby near a doorbell, with an inset close-up of the hand adjusting the seat (no text or symbols present)2 Separate the water container hose from the kit.

natural_image
Diagram showing a washing machine with a close-up view of its internal components (no text or symbols present)3 Connect the drain hose to the kit.

natural_image
Illustration of a baby washing machine with a magnified inset showing hand cleaning the product (no text or symbols)Leveling the appliance
Leveling the appliance prevents unnecessary noise and vibration. Place the appliance on a solid, level floor.
If the appliance is not properly level, adjust the front leveling feet as necessary.
Turn them clockwise to raise and counterclockwise to lower until the appliance no longer wobbles, both front-to-back and side-to-side and corner-to-corner.

Diagonal Check
- When pushing down the edges of the top plate diagonally, the appliance should not move up and down at all (Check both directions). If the appliance rocks when pushing the top plate diagonally, adjust the feet again.
Using the Appliance
Before the first cycle, set the appliance to dry for five minutes to warm up the drum. Open the door between loads the first few times you use the appliance to allow any odours from the interior of the appliance to disperse.
1 Ensure the lint filter and water container are clean.
- The lint filter is inside the door rim. It needs to be cleaned before each drying cycle.
- Open the door and ensure the lint filter is clean. If it is not, please clean the lint filter.

natural_image
Two-step diagram showing a hand pressing down on a mechanical component, with arrows indicating motion (no text or symbols)- Also check if the water container needs to be emptied for optimum drying results.

natural_image
Line drawing of a hand holding a metal object with a clip, no text or symbols presentWARNING
- Do not drink the condensed water.
NOTE
- In some instances, LED window may display (Empty water symbol) and the appliance may stop because the water container is full.
2 Place laundry into the drum after sorting.
- The clothes should be sorted by fabric type and dryness level and all the strings and belts of clothes should be well tied and fixed before being put into the drum. Push the laundry to the back to keep it away from the door seal. Otherwise, the door seal and clothes may be damaged. Close the door.
CAUTION
- Be careful not to trap laundry between the door and rubber seal.
3 Turn the power on.
- Press the Power button. The indicator icon above the button will become illuminated, indicating that the appliance is all set to run.

4 Select the drying programme you want.
- You can choose a programme by turning the programme selector knob until the required programme is indicated.
- If you press the Start/Pause button without choosing a programme, the appliance will proceed with the Cotton programme. Please refer to the programme table for the detailed information.

natural_image
Diagram of a circular mechanical component with two curved arrows indicating rotational motion (no text or symbols)5 Press the Start/Pause button.
6 After the cycle has finished, open the door and remove the laundry.
7 Turn off the appliance.
- Press the Power button.

CAUTION
- Be careful! The drum inside may still be hot.
- The appliance must not be used for purposes other than those for which it was designed.
NOTE
- The final part of a tumble dryer cycle occurs without heat (cool down cycle) to ensure that laundry is left at a temperature that ensures the laundry will not be damaged.
- A high atmospheric temperature and a small room may both increase drying time as well as energy consumption.
Sorting Laundry
Clothes have their own wash care labels, so drying according to the wash care label is recommended.
Not only that, the laundry must be sorted according to size and type of fabric.
For the best drying performance and most efficient energy usage, do not overload the appliance.
Woollens
- Dry woollens on the Wool programme. Be sure to follow fabric care label symbols first. Wool may not be completely dried from the cycle, so do not repeat drying. Pull woollens to their original shape and dry them flat.
Woven and Loopknit Materials
- Some woven and loopknit materials may shrink, depending on quality.
Permanent Press and Synthetics
- Do not overload the appliance. Take out permanent press items as soon as the appliance stops to reduce creases.
Baby Clothes and Night Gowns
• Always check fabric care labels.
Rubber and Plastics
- Do not dry any items made from or containing rubber or plastics such as:
– Aprons, Bibs and Chair Covers
– Curtains and Table Clothes
- Bathmats
Fiberglass
- Do not dry fiberglass items in the appliance. Glass particles left in the appliance may be subsequently picked up by your clothes in later cycles.
| Icon Description | |
| Dry | |
| Tumble dry | |
| Permanent Press / Crease resistant | |
| Gentle / Delicate | |
| Do not tumble dry | |
| Do not dry | |
| High heating | |
| Medium heating | |
| Low heating | |
| No Heating / Air | |
| Line dry / Hang to dry | |
| Drip dry | |
| Dry flat | |
| In the shade | |
Control Panel
RC7055*HM / RC7055*H*M

1 Power Button
- Press the Power button to turn power on and off.
- Press the Power button to cancel the Time Delay function.
2 Programme Selector
- Programmes are available according to the laundry type.
- The lamp will light up to indicate the selected programme.
3 Start/Pause Button
- This Start/Pause button is used to start or pause a dry cycle.
- When in Pause, the power is turned off automatically after four minutes.
4 Additional Programme Buttons
- Use these buttons to select the desired options for the selected programme.
Display
: This icon indicates that the lint filter should be cleaned or is clogged.
- Cleaning notice: When you press the Power button, the icon will become displayed.
- Clogging notice: This icon will become displayed with a buzzer sound whilst the appliance is in operation.
: This icon indicates that the water container needs to be emptied or is full.
- Emptying notice: When you press the Power button, this icon will become displayed.
- Full water notice: The icon will become displayed and a buzzer will sound while the appliance is in operation.
: This icon indicates the lint filter insertion status. If the lint filter is not inserted, the appliance will not operate and the icon will become displayed.
Programme Table
Drying Programme
| Sensor Dry Programmes | |||||
| Programme | Laundry Type Detail Drying | Level | Capacity | ||
| 7 kg 8 kg | |||||
| Cotton | Towels, dressing gowns and bed linen | For thick and quilted fabrics | Extra 7 kg | 8 kg | |
| Terry towels, tea towels, towels and bed linen | For thick and quilted fabrics that do not need to be ironed | Very 7 kg | 8 kg | ||
| Bath towels, tea towels, underwear and cotton socks | For fabrics that do not need to be ironed | Cupboard | 7 kg 8 kg | ||
| Sheets, pillowcase and towels | For fabrics that do not need to be ironed | Light 7 kg | 8 kg | ||
| Bed linen, table linen, towels, T-shirts, polo shirts and work clothes | For fabrics that need to be ironed | Iron 7 kg | 8 kg | ||
| Mixed Fabric | Bed linen, table linen, tracksuits, anoraks and blankets | For thick and quilted fabrics that do not need to be ironed | Very 3.5 kg | 4 kg | |
| Shirts and blouses | For fabrics that do not need to be ironed | Cupboard | 3.5 kg 4 kg | ||
| Trousers, dressers, skirts and blouses | For fabrics that need to be ironed | Iron | 3.5 kg 4 kg | ||
| Easy Care | Shirts, T-shirts, trousers, under-wear and socks | For polyamide, acrylic, and polyester that do not need to be ironed | Cupboard | 3.5 kg 4 kg | |
| Shirts, T-shirts, under-wear, anoraks and socks | For polyamide, acrylic, polyester that do need to be ironed | Iron | 3.5 kg 4 kg | ||
| Bulky Item | Bed clothes, sheets | For bulky items | - | 2 kg | 2 kg |
| Jeans | Jeans and colour fading garments. | For jeans which do not need to be ironed | - | 3 kg 3 kg | |
| Skin Care | T-shirts, pillowcase, and towels | For cotton fabrics which do not need to be ironed | - | 4.5 kg | 4.5 kg |
| Refresh | Shirts and blouses | Odour removal of fabric (For fabrics in need of odour removal) | - | 1.5 kg | 1.5 kg |
| Sports Wear | Soccer kit and training wear | For polyester material | - | 2 kg 2 kg | |
| Quick Dry | Linen and towels (excluding delicate fabrics) sports wear, bulky Item cycle. | For small loads of suitable fabrics with short drying times | -3 kg | 3 kg | |
| Delicate | Silk, fine fabrics and lingerie | For fabrics that are heat-sensitive, such as synthetic fabrics | -1.5 kg | 1.5 kg | |
| Wool Wool For wool fabrics - 1 kg 1 kg | |||||
| Timed Drying Programmes | |||||
| Programme | Laundry Type Detail Drying | Level | Capacity | ||
| 7 kg 8 kg | |||||
| Rack Dry | Silk, wool, delicate lingerie | Refreshes clothes without tumble drying | --- | ||
| Gentle Air | Silk, wool, delicate lingerie | Refreshes clothes without tumble drying | --- | ||
| Cool Air | All fabrics that need refreshing | Tumbles without heat - - | |||
| Warm Air | Bath towels, bath robes, dishclothes and acrylic quilted fabrics | Small Items & damp clothing, Everyday items suitable for heat drying | --- | ||

CAUTION
- If the load is less than 1 kg, please use the Warm Air programme in Timed Drying programmes. Wool items should be dried using the Wool programme and heat-sensitive fabrics including silk, underwear and lingerie should be dried using the Delicate programme. Please comply with the recommended laundry load when you select your desired programme. Otherwise, your clothes may be damaged.
NOTE
- Tested in accordance with EN61121 and Directive 932/2012
- Set programme at Cotton Cupboard Normal (Full & Half Load) for test in accordance in conformity with EN61121 and Directive 932/2012
- Standard Cotton programme : Cotton □ + Cupboard + Normal Option (Default) (This is the most efficient programme in terms of the test conditions proposed by EN61121 and Directive 932/2012)
- This is suitable to dry normal wet cotton laundry. This is the most efficient programme in terms of energy consumption for drying wet cotton laundry.
- The test results depend on room temperature, type and amount of load, water hardness and water inlet temperature.
- If the appliance is installed as built under, it may cause performance degradation.
- If the laundry is not spun at a high speed during washing, energy consumption and drying time will increase.
Option Programme
Time Delay
You can use the Time Delay option to delay the finishing time of the drying cycle. Maximum Time Delay is 19 hours. Minimum Time Delay is 3 hours.
1 Turn the appliance on.
2 Select a programme.
3 Press the Time Delay button.
4 Set time delay hour(s) by pressing the ▲ button.
5 Press the Start/Pause button.
Anti Crease (4:3)
The Anti Crease option prevents creases that are formed when the laundry is not unloaded promptly at the end of the drying cycle. When Anti Crease is selected, the appliance repeatedly runs and pauses, giving you two hours to unload the laundry. If the door is opened during the Anti Crease option, the option is cancelled.
Favorite
The Favorite option allows you to store a customized dry programme for future use.
1 Turn the appliance on.
2 Select a programme.
3 Select the option or additional programme. (Anti Crease, Spin Speed etc.)
4 Press and hold the Favorite option button for three seconds.
The Favorite option is now stored for future use. To reuse the stored programme, select the Favorite option and press the Start/Pause button.
Drum Light
Whilst the appliance is running it is possible to see inside the drum if you select the Drum Light function.
• Light on : Door is opened.
- Light off: Door is closed. The light is turned off automatically.
Spin Speed
This additional program is able to control drying time, allowing you to select high or normal.
• The default option is Normal.
Option
Hand Iron
This function keeps the garments more moist than the standard Iron dry level.
1 Turn the appliance on.
2 Select a programme.
3 Press the Dry level button and select Iron.
4 Press the Option button and select Hand Iron.
5 Press the Start/Pause button.
Hand Iron is available to programmes specified in the table below.
| Programme Dry Level | |
| Cotton | IronMixed Fabric |
| Easy Care | |
Damp Dry Beep
With this option, the appliance will beep when the load is ready for ironing.
This allows you to remove faster-drying lightweight items or items that you would like to iron or hang while still slightly damp.
1 Turn the appliance on.
2 Select a programme.
3 Press the Dry level button and select a level.
4 Press the Option button and select Damp Dry Beep.
5 Press the Start/Pause button.
6 When the laundry is ready for ironing, the buzzer will sound for approximately one minute.
7 Press the Start/Pause button and open the door.
8 Take out laundry which you wish to iron. (Leave the other laundry in the appliance.)
9 Close the door and press the Start/Pause button.
Damp Dry Beep is available to programmes specified in the table below.
| Programme Dry Level | |
| Cotton | Extra/Very Cupboard/Light |
| Mixed Fabric Very/Cupboard | |
| Easy Care Cupboard | |
Child Lock

Use this option to disable the controls. This feature can prevent children from changing cycles or operating the appliance.
Locking the Control Panel
1 Press and hold the Child Lock button for three seconds.
2 A beeper will sound, and CL will appear on the display.
When the Child Lock is set, all buttons are locked except the Power button.
NOTE
- Turning off the power or completing all cycles will not reset the child lock function. You must deactivate child lock before you can access any other functions.
Unlocking the Control Panel
Press and hold the Child Lock button for three seconds.
- A beeper will sound and the remaining time for the current programme will reappear on the display.
Buzzer
This option enables you to adjust the volume of the beeper sound.
Rack Dry (Optional)
The dryer rack is placed inside the appliance, as in the picture below. Remove and discard packing material before use.
The Rack Dry is designed for use with laundry that must be dried flat, without tumbling, including sweaters and delicate fabrics.
1 Open the door.
2 Insert the hook to the drum centre.

natural_image
Diagram of a mechanical component with rotating parts and a highlighted section (no text or symbols)3 Place the dryer rack on the structure above the lint filter and press it to complete assembly.
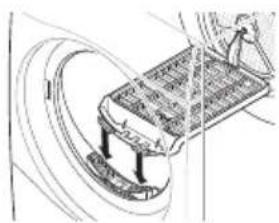
natural_image
Technical line drawing of a mechanical component with curved arrows indicating motion (no text or symbols)4 Place wet items on top of the rack. Allow space around items for air to circulate.
- The rack does not move, but the drum will rotate.
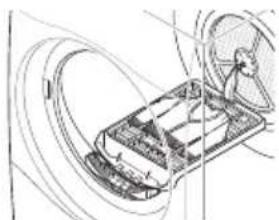
natural_image
Technical line drawing of a car interior with fan and wheel (no text or symbols)5 Close the door.
6 Turn power on and select Rack Dry.
7 Press the Start/Pause button.
NOTE
- Check the lint filter and remove any lint accumulated from items dried on the rack.
Using the Smart Diagnosis™ Function
Use this function if you need an accurate diagnosis by an LG Electronics customer information centre when the appliance malfunctions or fails.
Smart Diagnosis ^™ can not be activated unless the appliance is connected to power. If the appliance is unable to turn on, then troubleshooting must be done without using Smart Diagnosis ^™ .
1 Press the Power button to turn on the washing machine. Do not press any other buttons or turn the programme selector knob.
2 When instructed to do so by the call centre, place the mouthpiece of your phone close to the Power button.
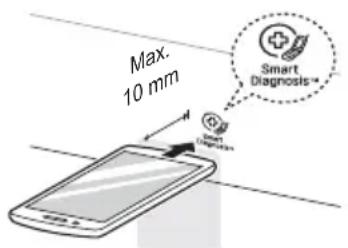
3 Press and hold the ▲(More) button for three seconds, while holding the mouthpiece of your phone close to the Smart Diagnosis™ icon and Power button.
4 Keep the phone in place until the tone transmission has finished. Time remaining for data transfer is displayed.
- For best results, do not move the phone while the tones are being transmitted.
- If the call centre agent is not able to get an accurate recording of the data, you may be asked to try again.

5 Once the countdown is over and the tones have stopped, resume your conversation with the call centre agent, who will then be able to assist you using the information transmitted for analysis.
NOTE
- The Smart Diagnosis™ function depends on the local call quality.
- The communication performance will improve and you can receive better service if you use the home phone.
- If the Smart Diagnosis™ data transfer is poor due to poor call quality, you may not receive the best Smart Diagnosis™ service.

WARNING
- Remove the power plug when you clean the appliance. Not removing the plug may result in electric shock.
Cleaning the Lint Filter
Clean the lint filter before each drying cycle. It should also be cleaned if the icon becomes illuminated and the buzzer sounds while the appliance is in operation.
Cleaning the lint filter will reduce drying time and energy consumption.
1 Open the door.
2 Remove the first lint filter.

natural_image
Diagram of a car interior showing a hand pressing down on the wheel, with an arrow indicating direction (no text or symbols present)3 Remove the second lint filter.

natural_image
Illustration of a hand placing a component into a car seat (no text or symbols)4 Open both lint filters and remove all the lint.
- Open the first lint filter.

natural_image
Technical line drawing of a curved structural component with internal curved arrows indicating motion (no text or symbols)- Open the second lint filter.
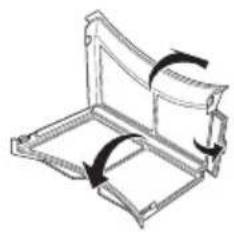
natural_image
Technical line drawing of a mechanical assembly with curved arrows indicating motion (no text or symbols)5 Rinse away the lint under warm, running water.

natural_image
Illustration of two identical faucet fixtures with water spraying from each other (no text or symbols)6 Dry the lint filters completely, close them and reinsert both lint filters.


natural_image
Line drawing of a hand placing a component into a car wheel (no text or symbols)NOTE
- Remove moisture from the mesh. Otherwise, the lint filter may be clogged due to water film and the appliance may not operate.
- If the lint filter is not in the appliance, you can not operate the appliance.
Emptying the Water Container
Condensed water is collected in the water container.
Empty the water container after every use. Not doing so will affect the drying performance.
If the water container is full, the 🔒 icon glows and the buzzer sounds while the appliance is operating. If this should occur, the water container needs to be emptied within the next hour.
1 Pull out the water container.

natural_image
Illustration of a hand inserting a card into a washing machine (no text or symbols)2 Empty the water container in the sink.
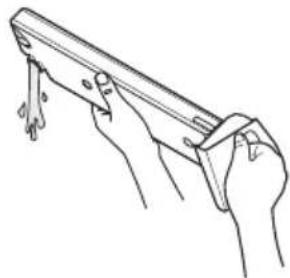
natural_image
Line drawing of two hands holding a tool, no text or symbols present3 Push it back into the appliance.
4 Press the Start/Pause button.
Cleaning the Cool Air Inlet Grill
Vacuum the Cool Air Inlet grill 3 – 4 times a year to make sure there is no build up of lint or dirt that may cause improper air flow.

natural_image
Line drawing of a hand using a vacuum cleaner to clean a washing machine (no text or symbols present)NOTE
- Warm air is exhausted through the ventilation grill.
- Adequate ventilation should be provided to avoid the back flow of gases into the room from units burning other fuels, such as open fires.
Wiping the Moisture Sensor
This device senses the moisture level of the laundry during operation, which means it must be cleaned regularly to remove any build up of lime scale on the surface of the sensor.
Wipe the sensors inside the drum.
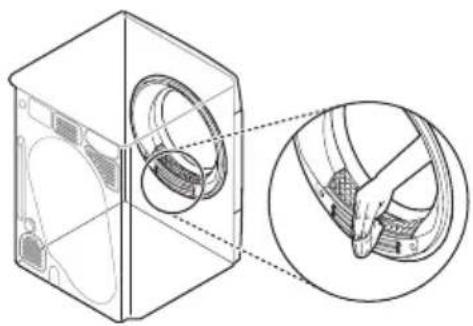
natural_image
Technical line drawing of a washing machine with a magnified inset showing the internal components (no text or symbols)CAUTION
- Do not wipe the moisture sensor with abrasive materials. Always clean the sensor with a rough sponge.
The appliance is equipped with an automatic error-monitoring system to detect and diagnose problems at an early stage. If the appliance does not function properly or does not function at all, check the following before you call for service:
Diagnosing Problems
| Symptoms Reason Solution | ||
| Appliance will not turn on. | Power cord is not properly plugged in. | Make sure that the plug is securely plugged into a grounded outlet matching the appliance's rating plate. |
| House fuse is blown, circuit breaker has tripped, or power outage has occurred. | Reset circuit breaker or replace fuse. Do not increase fuse capacity. If the problem is a circuit overload, have it corrected by a qualified electrician. | |
| Appliance does not heat. | House fuse is blown, circuit breaker has tripped, or power outage has occurred. | Reset circuit breaker or replace fuse. Do not increase fuse capacity. If the problem is a circuit overload, have it corrected by a qualified electrician. |
| Clothes take too long to dry. | Load is not properly sorted. | Separate heavy items from lightweight items. Larger and heavier items take longer to dry. Light items in a load with heavy items can fool the sensor because the light items dry faster. |
| Large load of heavy fabrics. | Heavy fabrics take longer to dry because they tend to retain more moisture. To help reduce and maintain more consistent drying times for large and heavy fabrics, separate these items into smaller loads of a consistent size. | |
| Appliance controls are not set properly. | Use the appropriate control settings for the type of load you are drying. Some loads may require an adjustment of the dry level setting for proper drying. | |
| Lint filter needs to be cleaned. | Remove the lint from the lint filter before every cycle. With the lint removed, hold the lint filter up to a light to see if it is dirty or clogged. With some loads that produce high amounts of lint, such as new bath towels, it may be necessary to pause the cycle and clean the filter during the cycle. | |
Symptoms Reason Solution
| House fuse is blown, circuit breaker has tripped, or power outage has occurred. | Reset circuit breaker or replace fuse.Do not increase fuse capacity. If the problem is a circuit overload, have it corrected by a qualified electrician. | |
| Appliance is overloaded. | Divide extra large loads into smaller loads for better drying performance and efficiency. | |
| Clothes take too long to dry. | If you are drying a very small load, add a few extra items to ensure proper tumbling action. If the load is very small and you are using Sensor Dry programmes, the electronic control cannot properly sense the dryness of the load and may shut off too soon.Use Timed Drying programmes or add some extra wet clothes to the load. | |
| Appliance is underloaded. | ||
| Drying time is not consistent. | Heat settings, load size, or dampness of clothing is not consistent. | The drying time for a load will vary depending on the type of heat used (electric), the size of the load, the type of fabrics, the wetness of the clothes, and lint filter. Even an unbalanced load in the appliance can cause poor spinning, resulting in wetter clothes which will take longer to dry. |
| Fabric softener is used incorrectly. | When washing laundry that is to be dried in the appliance, use the correct amount of fabric softener as recommended by the manufacturer of the fabric softener. | |
| Greasy or dirty spots are left on clothes. | Clean and dirty clothes are being dried together. | Use the appliance to dry only clean items. Soil from dirty clothes can transfer to the clean clothes in the same or later loads. |
| Clothes were not properly cleaned or rinsed before being placed in the appliance. | Stains on dried clothes could be stains that were not removed during the washing process. Make sure that clothes are being completely cleaned or rinsed according to the instructions for your washing machine and detergent. Some difficult soils may require pre-treating prior to washing. | |
| Symptoms Reason Solution | ||
| Clothes are wrinkled. | Clothes have dried too long (overdried). | Over drying a load of laundry can lead to wrinkled clothes. Try a shorter drying time. |
| Clothes have been left in the appliance for too long after cycle ends. | Use the Anti crease option. | |
| Clothes are shrinking. | Garment care instructions are not being followed. | To avoid shrinking your clothes, always consult and follow fabric care instructions. Some fabrics will naturally shrink when washed. Other fabrics can be washed but will shrink when dried in the appliance. Use a low or no heat setting. |
| Lint is left on clothes. | Lint filter has not been cleaned properly. | Remove the lint from the lint filter before every cycle. With the lint removed, hold the lint filter up to a light to see if it is dirty or clogged. If it looks dirty, follow the cleaning instructions. With some loads that produce high amounts of lint, it may be necessary to clean the lint filter during the cycle. |
| Laundry has not been sorted properly. | Some fabrics are lint producers (i.e., a fuzzy white cotton towel) and should be dried separately from clothes that are lint trappers (i.e., a pair of black linen pants). | |
| Appliance is overloaded. | Divide extra large loads into smaller loads for drying. | |
| Tissue, paper, etc., has been left in pockets. | Check pockets thoroughly before drying clothes. | |
| Excess static in clothes after drying. | Clothes have dried for too long (overdried). | Overdrying a load of laundry can cause a buildup of static electricity. Adjust settings and use a shorter drying time, or use Sensor Dry programmes. |
| Drying synthetics, permanent press, or synthetic blends. | These fabrics are naturally more prone to static buildup. Try using fabric softener, or use shorter Timed Drying time settings. | |
| Water leaks. | The water container hose or the drain hose is not connected correctly. | Connect the water container hose or the drain hose correctly. |
| The door is closed while laundry or foreign substance is caught in the door. | Check if laundry or foreign substance is caught in the door before using the appliance. If water leaks continuously, contact the LG Electronics Customer Information Centre. | |
| Clothes have damp spots after a Sensor Dry programme. | Very large load or very small load. Single large item such as a blanket or comforter. | If items are too tightly packed or too sparse the sensor may have trouble reading the dryness level of the load. Use a Timed Drying programme for very small loads.Large, bulky items such as blankets or comforters can sometimes wrap themselves into a tight ball of fabric. The outside layers will dry and register on the sensors, while the inner core remains damp. When drying a single bulky item, it may help to pause the cycle once or twice and rearrange the item to unwrap and expose any damp areas.To dry a few remaining damp items from a very large load or a few damp spots on a large item after a Sensor Dry programme has completed, empty the lint trap, then set a Timed Drying programme to finish drying the item(s). |
Error Codes
| Symptoms Reason Solution | ||
| Error code: tE1 through tE7 | Temperature sensor failure. | Turn off the appliance and call for service. |
| dE | The door has been opened while the appliance is in operation or the appliance is being operated without the door being closed properly. | Close the door completely.If dE is not released, call for service. |
| tE1 | Temperature Sensor has malfunctioned. | Unplug the power plug and call for service. |
| tE2 | ||
| tE3 | ||
| tE4 | ||
| tE5 | ||
| F1 | The temperature inside the drum has risen suddenly. | Unplug the power plug and call for service. |
| LE1 | The motor has stopped suddenly. | Check if the amount of laundry exceeds the maximum load.Unplug the power plug and call for service. |
| LE2 | The compressor has stopped suddenly. | Unplug the power plug and call for service. |
| AE | ||
| OE | The drain pump motor has malfunctioned. | Unplug the power plug and call for service. |
| The surrounding temperature for installation is below zero. | The recommended surrounding temperature for installation is 5 - 35 °C. | |
THIS LIMITED WARRANTY DOES NOT COVER:
- Service trips to deliver, pick up, or install or repair the product; instruction to the customer on operation of the product; repair or replacement of fuses or correction of wiring or plumbing, or correction of unauthorized repairs/installation.
- Failure of the product to perform during power failures and interruptions or inadequate electrical service.
- Damage caused by leaky or broken water pipes, frozen water pipes, restricted drain lines, inadequate or interrupted water supply or inadequate supply of air.
- Damage resulting from operating the Product in a corrosive atmosphere or contrary to the instructions outlined in the Product's owner's manual.
- Damage to the Product caused by accidents, pests and vermin, lightning, wind, fire, floods, or acts of God.
- Damage or failure caused by unauthorized modification or alteration, or if it is used for other than the intended purpose, or any water leakage where the product was not properly installed.
- Damage or failure caused by incorrect electrical current, voltage, or plumbing codes, commercial or industrial use, or use of accessories, components, or consumable cleaning products that are not approved by LG.
- Damage caused by transportation and handling, including scratches, dents, chips, and/or other damage to the finish of your product, unless such damage results from defects in materials or workmanship.
- Damage or missing items to any display, open box, discounted, or refurbished Product.
- Products with original serial numbers that have been removed, altered, or cannot be readily determined. Model and Serial numbers, along with original retail sales receipt, are required for warranty validation.
- Increases in utility costs and additional utility expenses.
- Repairs when your Product is used in other than normal and usual household use or contrary to the instructions outlined in the Product's owner's manual.
- Costs associated with removal of your Product from your home for repairs.
- The removal and reinstallation of the Product if it is installed in an inaccessible location or is not installed in accordance with published installation instructions, including LG's owner's and installation manuals.
- Damage resulting from misuse, abuse, improper installation, repair, or maintenance. Improper repair includes use of parts not approved or specified by LG.
- Noise or vibration that is considered normal, for example, water drain sound, spin sound or warning beeps.
| Filter is clogged.- Not heating, long dry time | 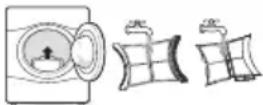 | Clean the lint filter. |
| Improperly connected power cord or electrical outlet issue.- No power- Not heating | Reconnect power cord, replace house fuse or reset breaker. If outlet is issue, electrician may be required. | |
| Product fiche_commission Delegated Regulation(EU) No 392/2012 | ||
| Supplier's name or trade mark LG Electronics | ||
| Supplier's model identifier | RC7055*HMRC7055*H*M | RC8055*HMRC8055*H*M |
| Rated capacity in kg of cotton laundry for the standard cotton programme at full load | 7 kg 8 kg | |
| Dryer type | Condenser Household Tumble Dryer | |
| Energy efficiency class A++ A++ | ||
| Energy consumption "X" kWh per year, based on 160 drying cycles of the standard cotton programme at full and partial load, and the consumption of the low-power modes. Actual energy consumption per cycle will depend on how the appliance is used | 205 kWh/year | 230 kWh/year |
| Automatic tumble drier Yes | ||
| Awarded an "EU Ecolabel" under Regulation (EC) No 66/2010 No | ||
| Energy consumption of the standard cotton programme at full load (Edry) | 1.75 kWh 1.91 kWh | |
| Energy consumption of the standard cotton programme at partial load (Edry1/2) | 0.90 kWh 1.04 kWh | |
| Power consumption of the off-mode for the standard cotton programme at full load (Po) | 0.4 W 0.4 W | |
| Power consumption of the left-on mode for the standard cotton programme at full load (PI) | 0.4 W 0.4 W | |
| Duration of the left-on mode (TI) 10 min 10 min | ||
| The 'Cotton □+ Cupboard + Normal' used at full and partial load is the standard drying programme to which the information in the label and the fiche relates, that this programme is suitable for drying normal wet cotton laundry and that it is the most efficient programme in terms of energy consumption for cotton. | ||
| The weighted programme time (T t) of the 'standard cotton programme at full and partial load' | 116 min 140 min | |
| The programme time of the 'standard cotton programme at full load' (T dry) | 155 min | 179 min |
| The programme time of the 'standard cotton programme at partial load' (T dry1/2) | 87 min | 111 min |
| Condensation efficiency class 'X' on a scale from G (least efficient) to A (most efficient) | A | A |
| Average condensation efficiency C dry of the standard cotton programme at full load | 92 % | 93 % |
| Average condensation efficiency C dry1/2 of the standard cotton programme at partial load | 92 % | 92 % |
| The weighted condensation efficiency (Ct) for the 'standard cotton programme at full and partial load' | 92 % | 93 % |
| The sound power level | 65 dB(A) | 65 dB(A) |
| Free Standing | ||
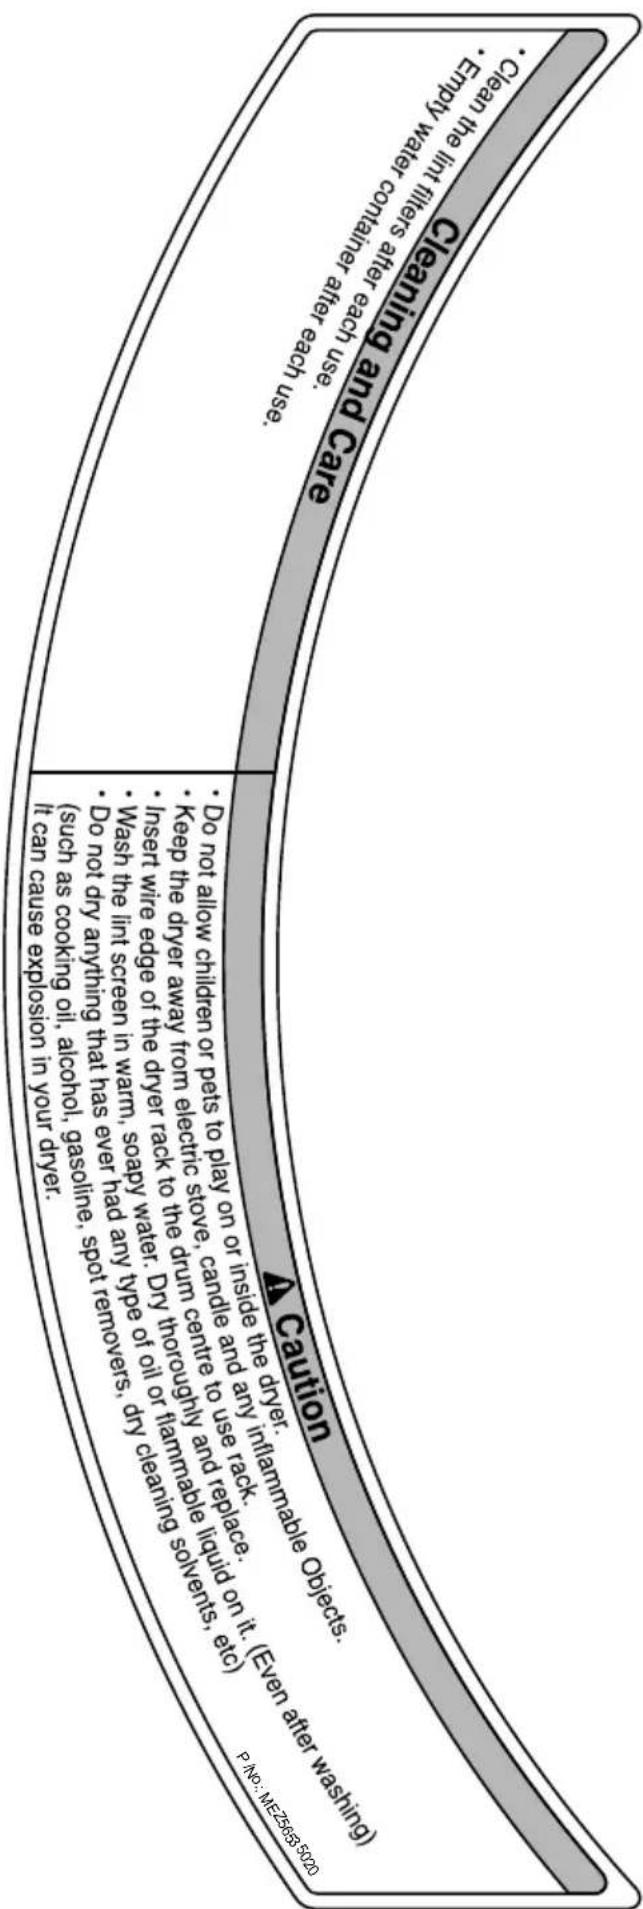
flowchart
graph TD
    A["A Caution"] --> B["• Empty the lift filters after each use."]
    B --> C["• Clean the lift filters after each use."]
    C --> D["• Empty water filters after each use."]
    D --> E["• Cleaning and Care"]
    E --> F["• Open the lift filter after each use."]
    F --> G["• Keep the dryer away from electric stove, can be centre to use a rack. • Insert wire edge of the dryer rack to the drum thoroughly and liquid on it. • Wash the tint screen in warm, scrapy water dry thoroughly and any type of oil or flammable solvents, etc. • Do not dry anything that has ever had any type of oil or furnamable solvents, etc. • Do not dry cooling oil, alcohol, gasoline, spot removers, dry cleaning (such as cooking oil, alcohol, gasoline, spot removers, etc.) can cause explosion in your dryer. It can cause explosion in your dryer."]
    E --> G
Memo
Memo

LG
Life's Good
- VAROVÁNÍ
- POZNÁMKA
- UPOZORNĚNÍ
- INŠTALÁCIA....11
- DÔLEŽITÉ BEZPEČNOSTNÉ POKYNY
- VAROVANIE
- UPOZORNENIE
- SAFETY INSTRUCTIONS ....3
- INSTALLATION ....11
- OPERATION ....16
- SMART FUNCTIONS....25
- MAINTENANCE....26
- TROUBLESHOOTING 28
- WARRANTY....33
- OPERATING DATA 34
- WARNING
- CAUTION
- IMPORTANT SAFETY INSTRUCTIONS
- Children in the Household
- For use in Europe:
- Installation
- Operation
- Maintenance
- Technical Safety for Using the Dryer
- Disposal
- Disposal of Your Old Appliance
- Specifications
- Accessories
- Installation Place Requirements
- Location
- NOTE
- Positioning
- Ventilation Requirement
- Electrical Connection
- Stacking Installation Instructions
- Stacking Kit
- Installation Procedure
- Condensed Water Drain-out
- Leveling the appliance
- Diagonal Check
- Using the Appliance
- Sorting Laundry
- Woollens
- Woven and Loopknit Materials
- Permanent Press and Synthetics
- Baby Clothes and Night Gowns
- Rubber and Plastics
- Fiberglass
- Control Panel
- Power Button
- Programme Selector
- Start/Pause Button
- Additional Programme Buttons
- Display
- Programme Table
- Drying Programme
- Option Programme
- Time Delay
- Anti Crease (4:3)
- Favorite
- Drum Light
- Spin Speed
- Option
- Hand Iron
- Damp Dry Beep
- Child Lock
- Locking the Control Panel
- Unlocking the Control Panel
- Buzzer
- Rack Dry (Optional)
- Using the Smart Diagnosis™ Function
- Cleaning the Lint Filter
- Emptying the Water Container
- Cleaning the Cool Air Inlet Grill
- Wiping the Moisture Sensor
- THIS LIMITED WARRANTY DOES NOT COVER:
- Memo
- LG
Brand : LG
Model : RC8055AH2M
Category : Tumble dryer