
PHT2-10 - Television Ferguson - Free user manual and instructions
Find the device manual for free PHT2-10 Ferguson in PDF.


| Product Type | LED Television |
| Screen Size | 22 inches (estimated) |
| Resolution | 1366 x 768 (HD Ready) |
| Refresh Rate | 60 Hz |
| Power Supply | 100-240V, 50/60 Hz |
| Power Consumption | 30W (typical), <0.5W standby |
| Dimensions (with stand) | 510 x 320 x 150 mm |
| Weight (with stand) | 3.2 kg |
| Inputs | HDMI x2, USB x1, AV (composite), VGA, Headphone jack |
| Outputs | Digital audio (optical) |
| Remote Control | Included (batteries not included) |
| Wall Mountable | Yes, VESA 100x100 mm |
| Tuner | DVB-T/T2/C (depending on region) |
| Sound | 2 x 6W speakers, Dolby Audio support |
| Operating System | None (basic non-smart TV) |
| Energy Class | E (EU scale) |
| Cleaning Instructions | Use soft dry cloth; do not use liquid cleaners |
| Safety Note | Do not block ventilation; keep away from moisture |
| Spare Parts Availability | Remote control and power cord available via authorized service |
Frequently Asked Questions - PHT2-10 Ferguson
User questions about PHT2-10 Ferguson
0 question about this device. Answer the ones you know or ask your own.
Ask a new question about this device
Download the instructions for your Television in PDF format for free! Find your manual PHT2-10 - Ferguson and take your electronic device back in hand. On this page are published all the documents necessary for the use of your device. PHT2-10 by Ferguson.
USER MANUAL PHT2-10 Ferguson
natural_image
Front view of a rectangular electronic device with 'FERGUSON' branding and control buttons at the bottom (no readable text or symbols on screen)PHT2 -10
User Manual
Important Safety Instructions
1) Read these instructions.
2) Keep these instructions.
3) Heed all warnings.
4) Follow all instructions
5) Do not use this apparatus near water.
6) Clean only with dry cloth.
7) Do not block any ventilation openings, install in accordance with the instructions.
8) Do not install near any heat sources such as radiations, heat
registers, stoves, or other apparatus
(including amplifiers) that produce heat.
9) Do not defeat the safety purpose of the polarized plug. If the
provided plug does not fit into your
outlet, consult an electrician for replacement of the obsolete outlet.
10) Protected the power cord from being walked on or pinched
particularly at plugs, convenience
receptacles, and the point where they exit from the apparatus.
11) Only use attachments/accessories specified by the
manufacturer
12) Unplug this apparatus during lighting storms or when unused for long periods of time.
13) Refer all servicing to qualified service personnel. Servicing is required when the apparatus
has been damaged in any way, such as power-supply cord or plug is damaged, liquid has been
spilled or objects have fallen into the apparatus, the apparatus has
been exposed to rain or
moisture, does not operate normally, or has been dropped.
14) Mains plug is used as the disconnect device, the disconnect device shall remain readily operable.
15) The ventilation should not be impeded by covering the
ventilation openings with items, such as
newspapers, table-cloth, curtains, etc.
16) No naked flame sources, such as lighted candles, should be placed on the apparatus.
17) Attention should be drawn to the environmental aspects of battery disposal.
18) The use of apparatus in moderate climate
19) The apparatus shall not be exposed to dripping or splashing and that no objects filled with
liquids, such as vases, shall be placed on the apparatus.
WARNING: To reduce the risk of fire or electric shock, do not expose this apparatus to rain or moisture.
WARNING: The batteries shall not be exposed to excessive heat such as sunshine, fire or the like.
CAUTION: Danger of explosion if battery is incorrectly replaced.
Replace only with the same or equivalent type.


The symbol indicates that dangerous voltages constituting a risk of electric shock are present within this unit.

The symbol indicates that there are important operating and maintenance instructions in the literature accompanying this unit.

This symbol indicates that this product incorporates double insulation between hazardous mains voltage and user accessible parts. When servicing use only identical replacement parts.

This marking indicates that this product should not be disposed with other household wastes throughout the EU. To prevent possible harm to the environment or human health from uncontrolled waste disposal, recycle it responsibly to promote the sustainable reuse of material resources. To return your used device, please use the return and collection systems or contact the retailer where the product was purchased. They can take this product for environmental safe recycling.

This device has been manufactured in accordance with Directive 2004/108 /WE.
Identification of Controls
-
Main Unit

4 -
SOURCE
- SETUP
- OK
- UP
- DOWN
- LEFT/VOL-
- RIGHT/VOL+
- AV OUT
- AV IN
- HEADPHONE
11.ON/OFF
12.DC IN 9-12V - ANT.
- HDMI
15.USB
Identification of Controls
Remote control unit
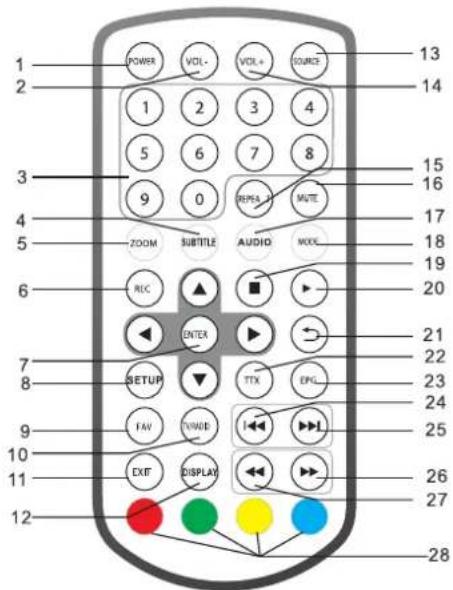
-
POWER
On/off the power supply
2.VOL-
Adjust VOLUME.
3.0-9 NUMBERB UTTON
Selects numbered items in a menu. -
SUBTITLE
Press SUBTITLE repeatedly during playback to viwe a different subtitle languages, if available.
5.ZOOM
JPEG: Use ZOOM to enlarge or shrink the picture.
Each press of the ZOOM button change the TV screen
6.REC
Record digital service.
- ENTER
Confirm and Enter
- SETUP
Main Menu/Return
9.FAV
Open Favorite Programs List Menu
10.TV/RADIAO
Switch between TV and Radio source
- EXIT
12.DISPLAY
Display the information of the current signal
13.SOURCE
DVB/AVIN
14.VOL+
Adjust VOLUME.
15.REPEAT
Repeat Play mp3 and video
Identification of Controls
Remote control unit
16.MUTE
Mute the sound
- AUDIO
Press AUDIO repeatedly during playback to hear a different audio language or audio track, if available.
18.MODE
Mode menu setting
19.STOP
20.PLAY/PAUSE
21.RETURN
22.TTX
23.EPG
Show EPG information
- ◀◀ BUTTON
Previous option.
- ▶▶| BUTTON
Next option.
- ▶▶B UTTON
Fast forward
- ◀ BUTTON
Fast backward
- RED/GREEN
Some specific function
MODE MENU SETTING
PICTURE

Brightness
Set the brightness of the screen.
Contrast
Set the Contrast of the screen
Color
Set the colours of the screen.
ENGLISH
Set the OSD Language
RESET
Reset to default setting
STANDBY
This function makes it possible to automatically put the device into
standby mode 3 or 4 hours.
3 H (3 hours): The device will automatically go into standby mode after
3 hours have passed from the time that any button was pressed.
4 H (4 hours): The device will automatically go into standby mode after
4 hours have passed from the time that any button was pressed.
OFF (Off): The automatic standby function will be deactivated.
First Time Installation

After all connections have been made properly, switch on TV and make sure the receiver is connected to the Main Power. Press Power button to switch receiver on. If you are using the receiver for the first time or restored to Factory Default, the Main Menu will appear on your TV screen.
(1) Select [OSD Language] and press RIGHT/LEFT key to select an language.
(2) Select [Country] and press RIGHT/LEFT key to select your country of residence.
(3) Select [Channel Search] and press RIGHT or OK key to begin Automatic channel search.
(4) Once channel tuning is complete, you are now ready to watch TV.
BasicOperation
ProgramManageSettings
To access the Menu, press the SETUP button and select [Program]. The Menu provides options to adjust the Program Manage Settings. Select an option and press OK or RIGHT to adjust that setting. Press the EXIT button to exit the Menu.

Program Edit
To edit your program preferences (lock, skip, favourite, move or delete), you will need to enter the Program Edit Menu. This Menu requires a password to access. Enter the default password '000000'.
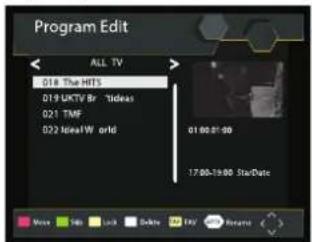
First Time Installation
SetFavouriteProgram/s
You can create a shortlist of favourite programs that you can easily access. Set Favourite TV or Radio program:
-
Select the preferred program then press the PAVOURITE button. A heart-shaped symbol will appear and the program is marked as a favourite.
-
Repeat the previous step to select more Favourite programs.
-
To confirm and exit the Menu, press the EXIT key.
Disable Favourite TV or Radio Program:
Press the FA V buton on the Remote Control with the heart-shaped symbol.
View Favourite Programs:
-
Press the Fav button and the Favourite Menu will appear.
-
Press UP/DOWN to select your Favourite Programs
-
Press OK to select your favourite program.
DeleteaT VorRadioProgram/s
-
Select the Program and then press the BLUE button A message will appear. Press OK to delete the program.
-
Repeat the previous step to select more programs to delete.
SkipTVorRadioProgram/s
-
Select the program you would like to skip and press the GREEN button A skip symbol is displayed. The program is marked as a skip.
-
Repeat the previous step to select more programs.
-
To confirm and exit themenu, press E XIT key.
Disable as kip TV or Radio Program:
Press the GREEN button on the skip program with the skip symbol.
Move a TV or Radio Program/s
-
S elect the preferred program then press the RED button. A move symbol will appear.
-
Press UP/DOWN to move the program.
-
PressOKtoconfirm.
-
Repeat the above steps to move more channels.
LockProgram/s
You can lock selected programs for restricted view.
Locka TVorRadio Program:
-
Select the preferred program then press the YELLOW button. A lock-shaped symbol is displayed. The program is now marked as locked.
-
Repeat the previous step to select more programs.
-
To confirm and exit the menu, press the EXIT button.
-
Press the YELLOW button to disable the locked program.
-
To view the locked program, you will be required to enter either the default.
EPG (Electronic program guide)
The EPG is an on-screen TV guide that shows scheduled programs seven days in advance for every tuned channel. Press the EPG button on the Remote Control to access guide.
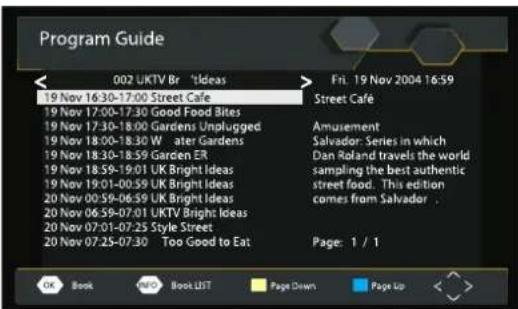
You can use the UP/DOWN key to select the preferred program. If there is more than one page of information, use the BLUE button for page up and the YELLOW button for page down.
Sort
Sort your channels from the following options:
[LCN]-Sort the channels in ascending order.
[Name]-Sort the channels in alphabetical order.
[Service | D] - Sort the channels a cording to the station.
LCN(Logical channel number)
Set LCN on or of f.
Video Setting
To access the Menu, press SETUP then select [Picture]. The Menu provides options to adjust the video settings. Press UP/DOWN to select an option and press RIGHT/LEFT to adjust that setting. Press EXIT to exit the menu.
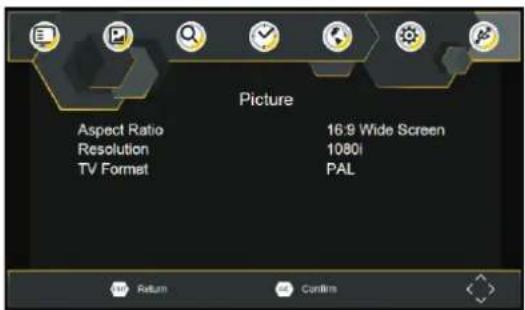
AspectRatio
You must set the display format to either 4:3 PanS can, 4:3 LetterBox, 4:3 Full, 16:9 Wide Screen, 16:9 PillarBox or Auto to get the maximum display when watching TV.
Resolution
If the video does not appear correctly, change the setting. This setting
is to match the most common setting for HDMI.
[480i] for NTSCsystem TV.
[480P]: for NTSC system TV.
[576i] for PAL system TV.
[576P]: for PAL system TV.
[720P]: for NTSCorPAL system TV.
[10801]: for NTSCorPAL system TV.
[1080P]: for NTSCorPAL system TV.
TVformat
If the video does not appear correctly, you need to change the
settings. This should match the most common setting for TVs in your country.
[NTSC]: for NTSC system TV.
[PAL]: for PAL system TV.
ChannelSearch
To access the menu, press S ETUP and select [Search Channel]. The Menu provides options to adjust the Search Channel settings. Select an option and press RIGHT/LEFT to adjust the settings. Press E XIT to exit the Menu.
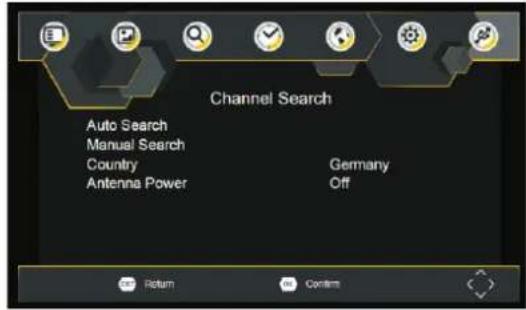
Auto Search
Search and install all channels automatically. This option overwrites all preset channels.
- Select [Auto Search] and press OK or RIGHT to start channel search.
- To cancel channel search, press EXIT.

Manual Search
Install new channels manually. This option adds new channels without changing the current channels list.
1. Select [Manual Search] then press OK or RIGHT. The channel search screen will appear.
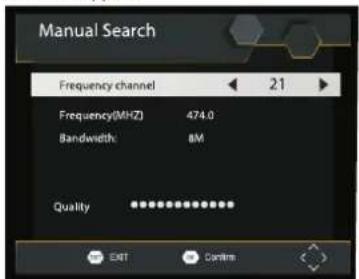
- Press the RIGHT/LEFT key to select the channel frequency.
- Press OK to start searching channels.
If a channel is found, it is saved and added to the channels list. If channels can't be found, then exit the menu.
Country
Select your country of residence.
Time Setting
To access the Menu, press MENU then select [Time]. The Menu provides options to adjust the time settings. Press UP /DOWN to select an option and press RIGHT /LEFT to adjust the settings. Press EXIT to exit the menu.
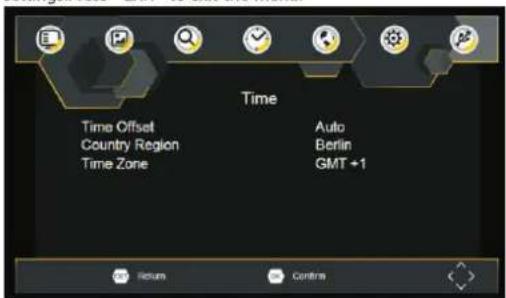
Time offset
Select auto or manual for GMT offset adjustments.
Country Region
Country Region is set automatically when you set the country at channel search menu.
Time Zone
Select the Time Zone Offset when [Time Offset] is set to Manual.
Option
To access the Menu, press SETUP and select [Option]. The menu provides options to adjust the OSD Language, Subtitle Language and Audio Language. Select an option and press RIGHT/LEFT to adjust the setting. Press EXIT to exit The Menu.

OSD Language
Select an OSD language.
Audio Language
Select the preferred audio language for watching TV channels. If the language is not available, the default program language will be used.
Subtitle Language
Select the preferred subtitle language.
Digital Audio
Set the desired audio format at the HDMI slot: PCM, Raw HDIM On, Raw HDMI Of f, Off (if available).
System Setting
To access the Menu, press SETUP and select [System]. The menu. Provides options to adjust the system settings. Press the UP/DOWN key to select an option and press RIGHT/LEFT to adjust the setting. Press EXIT to exit the Menu.
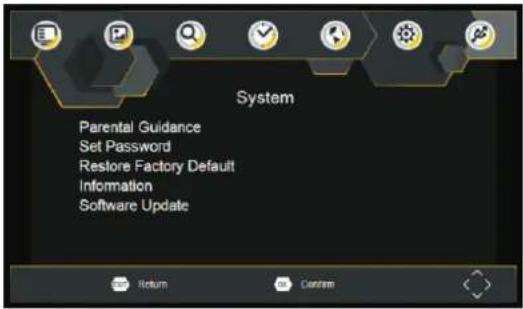
Parental Guidance
You can restrict access to channels that are unsuitable for children. To restrict/lock the channel you will need to enter either the default password '000000' or your own password.
Set Password
Set or change the password for Locked programs. Enter your old Password or the default password '000000'. You will then be asked to enter your new password. To confirm re-enter your new password. Once it is confirmed, press EXIT to exit the Menu.
Reset your Set Top Box to the Default Factory Settings. In Main Menu select [Restore Factory Default] and press OK or RIGHT to select. Enter your password or the default password '000000' and press OK to confirm. This option will delete all preset channels and settings.
Information
View model, hardware and software information.
Software update
Software update
USB
To access the Menu, press the SETUP button and select USB.
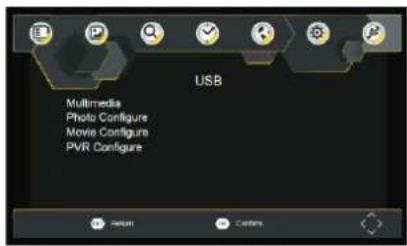
Multi-Media
Switch to USB mode and plug in USB to view files.
Photo Configure
Set the parameters for viewing photographs.
Movie C onfigure
Set the parameters for displaying movies subtitles.
PVRC onfigure
Set the parameters for record device.
Technical Specifications
| Item | Sub Item | Parameter |
| Tuner | Input Frequency | 170~230 MHz470~860 MHz |
| RF Input level | -25~79dBm @4QAM-19~71 dBm @256QAM | |
| IF Bandwidth | 7MHz and 8MHz | |
| Modulation | QPSK, 16 QAM, 64 QAM, 256 QAM | |
| Video | Decoder Format | MPEG 4 AVC /H.264 HP @ L4HEVC/H.265 HT@L4MPEG 2 MP @ ML HL |
| Output Port | CVBS,HDMI | |
| Audio | Decoder Format | MPEG -1 (layer 1&2 &3) |
| Audio output | Stereo | |
| Power | Voltage | DC 9V (1.5 A) |
| Working Power | ≤15W |
Troubleshooting
| Problem | Potential Reasons | What to do |
| No picture | Power isn't connected | Connect the power |
| The power switch is not on | Switch on the power | |
| Screen shows “No Signal” | DVB -T cable not connected | Plug in the DVB -T cable |
| Incorrect setting | Reset setting | |
| No sound from speaker | No or incorrect connection with audio cable | Connect the audio cable correctly |
| Sound on mute | Turn off mute function | |
| Incorrect sound track | Try another sound track | |
| Only sound, no image on the screen | No or incorrect connection with AV cable | Make sure cables are connected correctly |
| The program is a radio program | Presskeyto shift into TV mode | |
| Remote Control is not responding | The battery is exhausted | Change battery |
| Remote Control is not facing or close enough to the Set Top Box | Adjust the position of the Remote Control and move closer to the unit | |
| The image stopped suddenly or mosaic | The signal is too weak | Strengthen the signal |

- PHT2 -10
- Important Safety Instructions
- Identification of Controls
- Remote control unit
- MODE MENU SETTING
- PICTURE
- First Time Installation
- BasicOperation
- ProgramManageSettings
- Program Edit
- EPG (Electronic program guide)
- Sort
- LCN(Logical channel number)
- Video Setting
- ChannelSearch
- Auto Search
- Manual Search
- Country
- Time Setting
- Time offset
- Country Region
- Time Zone
- Option
- System Setting
- USB
- Multi-Media
Brand : Ferguson
Model : PHT2-10
Category : Television