
POB 819 - Oven Philco - Free user manual and instructions
Find the device manual for free POB 819 Philco in PDF.


| Product Type | Built-in Electric Oven |
| Brand | Philco |
| Model | POB 819 |
| Energy Source | Electric |
| Oven Capacity | 70 liters |
| Dimensions (H x W x D) | 59.5 cm x 59.5 cm x 56.8 cm |
| Weight | Approximately 32 kg |
| Power Supply | 220-240 V, 50/60 Hz |
| Power Consumption | 3200 W (max) |
| Functions | Convection, Grill, Conventional, Defrost, Pizza, etc. |
| Temperature Range | 50°C to 250°C |
| Control Type | Knobs and digital timer |
| Cleaning | Enamel interior, easy to clean with damp cloth |
| Safety Features | Thermal cut-off, cool-touch door, child lock |
| Spare Parts | Available through authorized service centers |
| Repairability | Repairable by qualified technicians; spare parts list in manual |
Frequently Asked Questions - POB 819 Philco
User questions about POB 819 Philco
0 question about this device. Answer the ones you know or ask your own.
Ask a new question about this device
Download the instructions for your Oven in PDF format for free! Find your manual POB 819 - Philco and take your electronic device back in hand. On this page are published all the documents necessary for the use of your device. POB 819 by Philco.
USER MANUAL POB 819 Philco
Famous for Quality the World Over
Dear customer,
Thank you for buying a PHILCO brand product. So that your appliance serves you well, please read all the instructions in this user's manual.
CONTENTS
PART 1: IMPORTANT SAFETY INSTRUCTIONS....2
PART 2: DESCRIPTION OF THE APPLIANCE .... 4
PART 3: INSTALLATION .... 5
Placement 5
Electrical connection....7
PART 4: OPERATION ....8
Defrost function....9
Static cooking (top and bottom heating element turned on)....9
Combination of the fan and both heating elements 10
Grill 10
Combination of the grill and the top heating element....10
Combination of the grill and the fan....11
Combination of the turbo fan and the bottom heating element....11
Energy saving tips....11
Oven accessories 12
PART 5: USING THE TOUCHSCREEN .... 13
Basic controls....13
Setting the time....14
Setting the minute alarm 14
Setting the start time for cooking food....14
Setting the end time for cooking 14
Setting the digital sound timer 14
BOOST function 15
Lock function 15
PART 6: CLEANING AND MAINTENANCE....17
Cleaning the inside areas of the oven....17
Changing a light bulb....17
PART 7: BEFORE YOU CALL THE SERVICE CENTRE .... 18
PART 8: TECHNICAL SPECIFICATIONS....19
PART 1: IMPORTANT SAFETY INSTRUCTIONS
Recommendation:
Carefully read these instructions before installing and operating this oven. Write down the serial number found on the rating label of the oven in the space below. It is essential that you store this user's manual in a safe place so that you can use it in the future. If you intend to sell the appliance, give it to another owner, or if you move, always make sure that the user's manual is attached to the appliance, so that the new owner can learn about the operation of the appliance and the relevant warnings.
SERIAL NUMBER:
• This appliance is designed for domestic use as a built-in appliance.
- Remove all packaging materials and advertising labels. Dispose of packaging materials and advertising labels in accordance with local codes.
- Do not allow children to play with the packaging material. There exists a risk of suffocation.
- After unpacking the appliance and removing packaging / advertising materials, check that the appliance has not been damaged in any way. In the event of damage, please contact an authorised service centre.
- The appliance MUST be installed and put into operation by an authorised service technician according to the manufacturer's instructions contained in this manual.
- Installation performed by an unqualified person may cause incorrect operation, damage to the appliance, create a fire hazard or cause injury to persons.
- Neither the manufacturer nor the vendor take responsibility for damages caused by an incorrect or unprofessional installation, connection or operation. Tampering with the appliance by an unqualified person will void the customer's right to a warranty repair.
- Do not turn on the oven until it is correctly and properly assembled.
- Ensure that the power cord is not tangled or wedged underneath the oven or another appliance.
- Do not subject the power cord to excessive pressure or temperatures.
- If the power cord is damaged it must be replaced by a service technician or another qualified electrician. Under no circumstances should you replace the power cord yourself. There is a risk of injury by electric shock.
• If will not be using the oven, ensure that all controls are turned off.
- Warning: Before replacing lights ensure that all controls are turned off, the power cord is disconnected from the power socket, or if appropriate the circuit breaker of the oven's circuit is turned off.
- Before cleaning, maintenance or moving the oven ensure that all controls are turned off, the power cord is disconnected from the power socket, or if appropriate, the circuit breaker of the oven's circuit is disengaged.
• Certain parts may heat up during long term use. Do not touch such parts. Wait until they cool down.
- Do not touch the heating element inside the oven.
• Warning: Prevent children from touching the appliance while it is in operation and warm.
- Do not store or use any flammable / volatile substances near the appliance.
- If you will use another electrical appliance near the oven, ensure that the power cord of such an appliance is outside the heat emission range of the oven.
- During installation ensure that sufficient air circulation is provided for. Follow the instructions contained in the respective installation part of the user's manual.
- This user's manual is produced for several models at the same time. For this reason, certain parts / illustrations may differ from the version of the appliance that you purchased. When reading the user's manual adhere to all warnings and instructions.
- This appliance must not be used by persons (including children) with physical or mental impairments or by inexperienced persons, unless properly trained or schooled in the safe use of the appliance, or unless they have been properly supervised by a qualified person who will be responsible for their safety.
• Children must be supervised to ensure that they do not play with the appliance.
- If you need to have the appliance repaired, please contact an authorised service centre and ensure and demand that only original spare parts or parts recommended by the manufacturer are used.
- Before plugging into an electrical power socket, make sure the voltage stated on the model label corresponds to the voltage in your socket. If you are not sure about the voltage in your power socket, please contact your power company.
• Always connect the appliance to a grounded power socket.
- On models containing a timer, ensure that you have correctly set the time after first turning it on or following a power outage. Heat and humidity will be produced in the installation location of the appliance. Ensure that the room in which the appliance is installed (kitchen) is properly ventilated.
- After first turning on the appliance, you may notice a slight odour coming from inside the oven. This is the burning in of insulation materials and the heat spiral. This is normal. We recommend that you first turn on the empty oven at maximum power for 45 minutes. At the same time ensure that the room where the appliance is installed is sufficiently ventilated.
- If the oven is turned on, the interior is heated up, particularly the heating element. Do not touch any of hot parts. After turning off the oven, wait until the heating element and the interior of the oven cool down.
- Do not place any flammable, volatile or combustible substances into the oven. Do not place any pressurised containers, of items from paper, plastic or fabric into the oven unless intended otherwise.
• Some external parts of the oven may heat up during operation. Prevent children from touching them.
• Do not stand or sit on the door when it is open. Do not allow children to play on the door while it is open.
- The information contained in the printed documentation that comes with the appliance is obtained under laboratory conditions conforming to respective directives. These values may differ from those achieved through regular use and in the environment where the appliance is used.
- Warning: The surface temperature may exceed 95°C. To prevent injury, please follow the installation instructions.
- For cleaning do not use coarse cleaning agents, steel wool or sponges with steel wool. You could scratch the surface, thereby lowering the lifetime of the appliance.
• Do not use steam cleaners to clean the appliance.
- After finishing cooking, the fan will continue to run and will cool down the interior of the oven until it is sufficiently cool.
- The appliance was manufactured in accordance with relevant safety measures for electrical appliances. The installation, maintenance and repairs must be performed at an authorised service centre. Otherwise the appliance could be damaged, a fire or injury to persons could occur, etc.
- Use the appliance functions, temperature setting and the time (if available) according to the instructions in this user's manual. Otherwise the appliance could be damaged, a fire or injury to persons could occur, etc
• Do not place any heavy items on the open door. This could damage or break out the door.
- If you will not be using the appliance for an extended period of time, turn it off and disconnect the power cord from the power outlet.
• Do not expose the appliance to direct sunlight, rain, snow, dust or extreme temperatures.
- Do not use this appliance with an external timer or a similar device, which could be used to turn on the appliance.
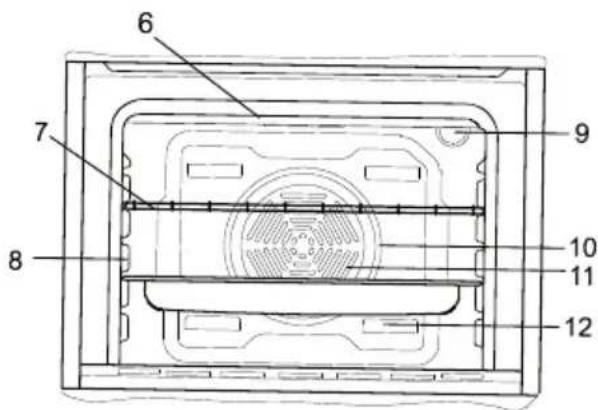
PART 2: DESCRIPTION OF THE APPLIANCE


- Control panel
- Handle
- Oven door
- Steel plate
- Bottom heating element (under the steel plate)
- Top heating element (under the steel plate)
- Rack
- Rail
- Oven light
- Turbo heating element (under the steel plate)
- Fan (under the steel plate)
- Air outlets
NOTE:
The pictures are purely for illustration and may change due to continuous product development without prior notice.
PART 3: INSTALLATION
The appliance is made from the highest quality materials and components. Its modern, functional and practical features will meet all your needs. Prior to installation and use, please carefully read this user's manual and make sure you understand all the instructions. Rules necessary for the correct use and maintenance of the appliance are provided below. It is necessary that the technician installing this appliance reads these instructions.
After unpacking this appliance, check that it is not damaged. In the event of damage, please contact an authorised service centre. Under no circumstances should you use a damaged appliance or an appliance with a damaged power cord.
Remove all packaging materials and advertising labels from the appliance. Dispose of these according to valid local codes. Prevent children from playing with the packaging material. There exists a risk of suffocation.
PLEASE CONTACT AN AUTHORISED SERVICE TECHNICIAN FOR THE INSTALLATION OF THE OVEN.
Installation location
Please adhere to the following instructions!
When selecting the installation location, ensure that in the vicinity of the oven there are no flammable, volatile or combustible substances and materials, such as curtains, oil, clothing, etc. These present a fire hazard.
Furniture around the appliance must be resistant against temperatures greater than 50°C.
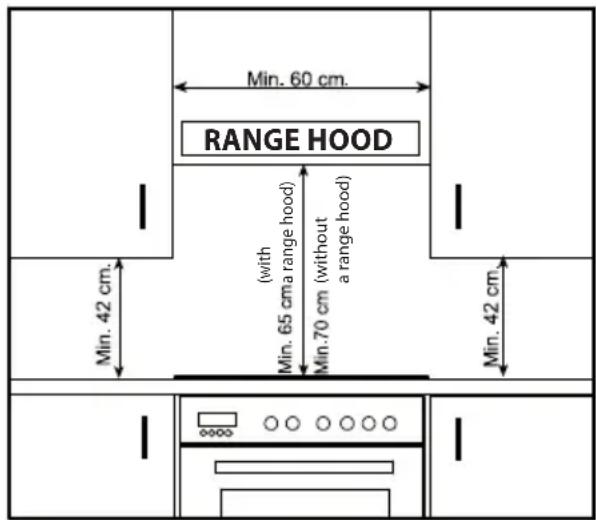
The illustration below shows the requirements for the minimum distances from top shelves, range hoods, etc. The minimum distance from a range hood must be 65 cm. If there is no range hood installed above the appliance then the distance should not be less than 70 cm.
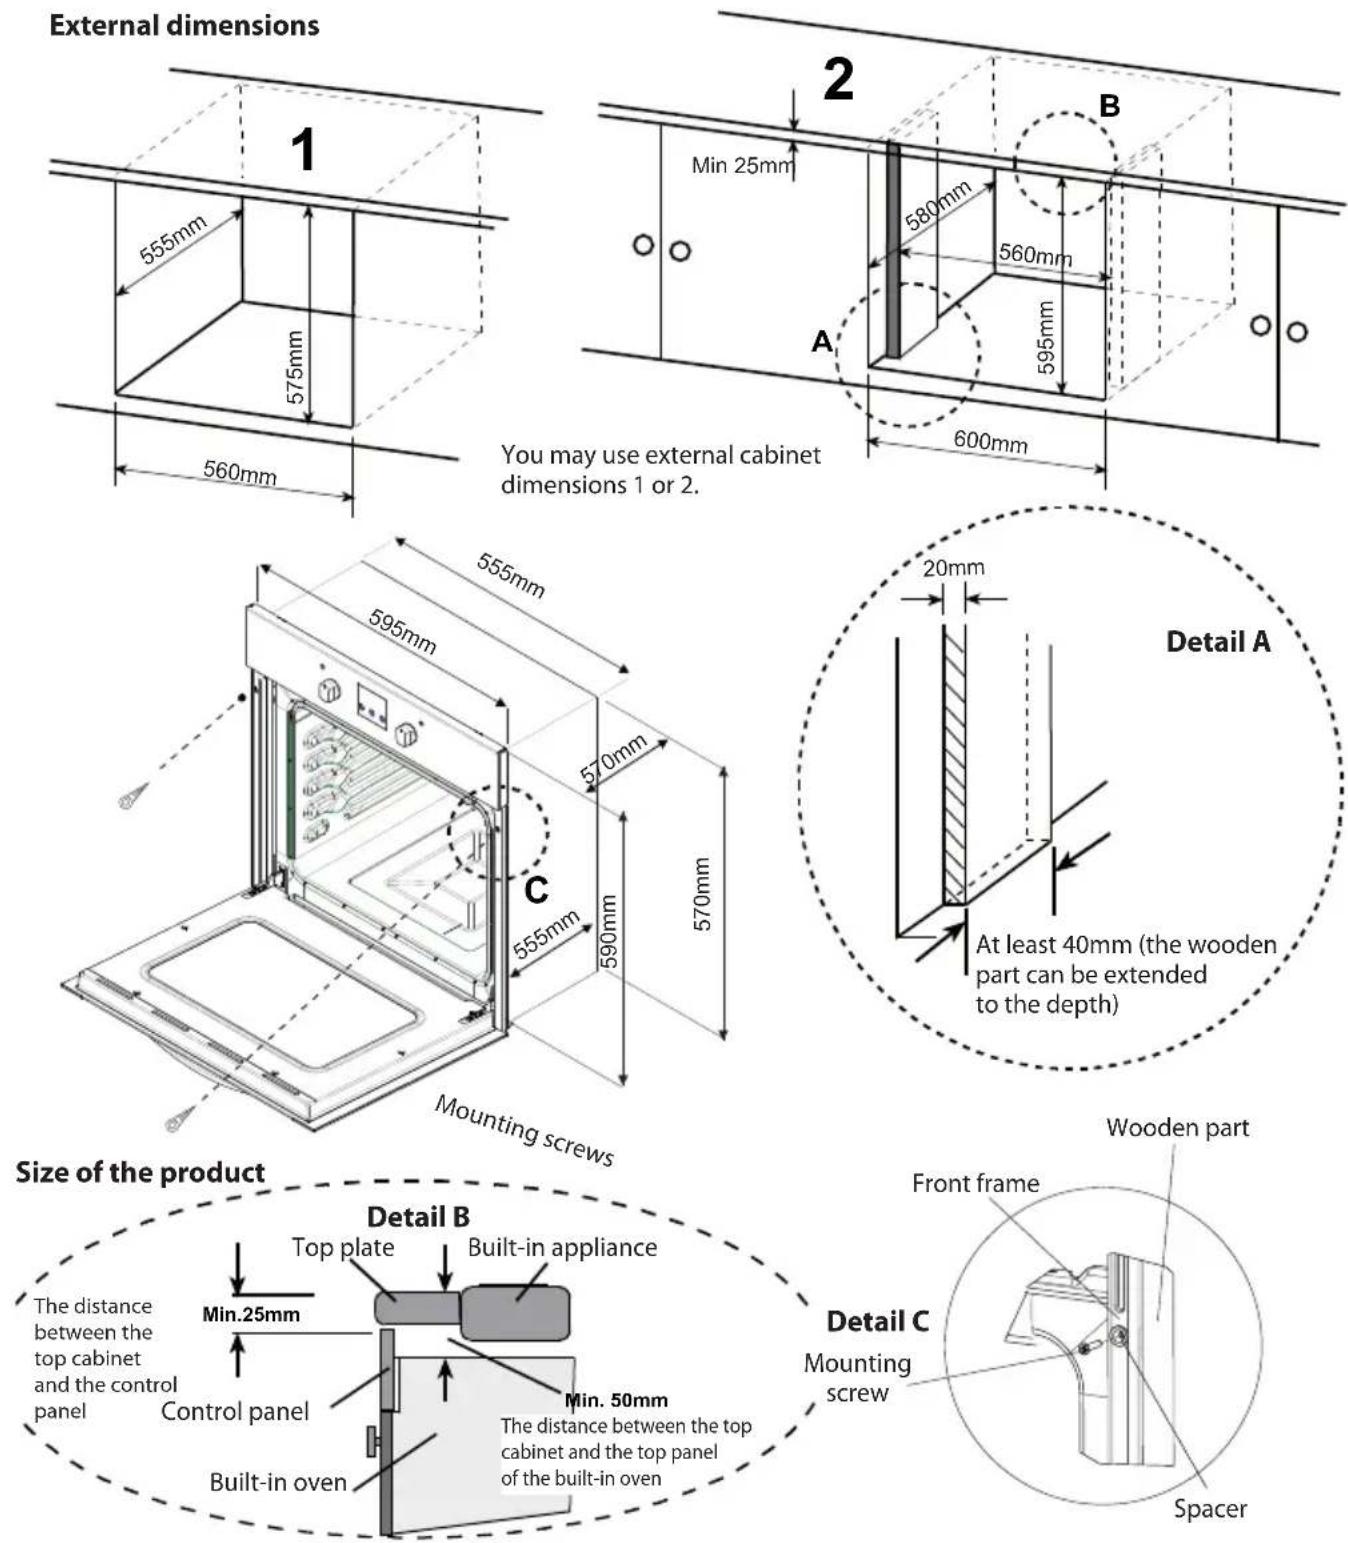
You may use external cabinet dimensions 1 or 2.
Slide the oven into the cabinet with the rear end entering first. Open the door and into the hole in the frame insert 2 screws. As soon as the frame of the appliance touches the surface of the cabinet, tighten the screws. The dimensions and material of the cabinet into which you will be installing the oven must be made from materials that are resistant to high temperatures. For correct installation safely secure the electrical contacts and the insulation parts. The insulation parts must be secured in such a way that they cannot be moved with or without the use of tools. Do not install the appliance in the direct vicinity of a refrigerator or freezer. Otherwise, it may negatively affect the operation of these appliances.
Electrical connection
Adhere to the instructions below!
- The power cord must only be connected to a grounded socket. The wiring connection is shown in the illustration below. If there is no grounded socket with the corresponding parameters available, contact your electrician or an authorised service.
- The power plug serves as a disconnection device and so the power socket or circuit breaker to which the appliance is connected must remain easily accessible. Never use an extension cord.
• Prevent the power cord from touching hot surfaces, being tangled or subject to excessive pressure. - If the power cord is damaged do not use the appliance. Contact an authorised service centre. The power cord may only be replaced by an authorised technician or another professionally qualified person.
- The electrical wiring connection must be performed by an authorised technician. The power cord type is H05VV-F.
- An incorrect wiring connection may damage the appliance. Such damage is not covered by the warranty conditions.
- Only connect the power cord to a grounded power socket 220 – 240 V\~.
Neither the manufacturer nor the vendor take responsibility for damages caused by an incorrect or unprofessional installation, connection or operation. Tampering with the appliance by an unqualified person will void the customer's right to a warranty repair.

PART 4: OPERATION
The oven light is on.

Light, red warning indicator light and fan are on. The defrost function is activated.

The temperature dial, warning indicator lights, fan and turbo fan are on.
The temperature dial, warning indicator lights, the bottom and top heating elements are on.

The temperature dial, warning indicator lights, the fan, the bottom and top heating elements are on.

The temperature dial, warning indicator lights, the fan, the turbo fan and the bottom and top heating elements are on.
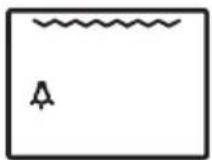
The temperature dial, warning indicator lights and the grill heating element are on.
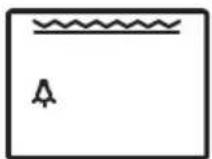
The temperature dial, warning indicator lights, the top heating element and the grill heating element are on.

The temperature dial, warning indicator lights, the fan, the top heating element and the grill heating element are on.
The availability of the individual functions may differ depending on the model.

Defrost function

natural_image
Diagram of a food delivery cabinet with two food items inside (no text or labels)Insert the food you wish to defrost into the oven on to the rack and select the third rail from the bottom. Under the rack place a backing tray, into which the water created during defrosting will drip.
Use the turn dial to select the defrost function.
This function neither cooks nor bakes, it only helps to defrost food in the shortest possible time.
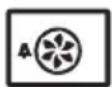
Turbo fan function
The turbo fan function serves to evenly distribute heat inside the oven. All food on all the racks will be baked evenly.
Set the temperature dial to the desired temperature. Use the turn dial to select the turbo fan function. After preheating for 10 minutes, place the food inside the oven in appropriate baking cookware. This function is suitable for cooking several types of food at once.
If you wish to bake two different types of food on two racks at the same time, select the lower of the two temperatures suitable for the given food type – see table below.
Cooking food on two racks at the same time requires an extended cooking time compared to cooking on only a single rack. Nevertheless, the both meals do not need to finish cooking at the same time. For this reason, regularly check both meals.
After finishing cooking, turn off the oven by turning the function selection dial and the temperature dial to zero and cancel the timer (if available). Take the cooked food out of the oven and place it on a cutting board or a metal rack and allow it to cool down. Leave the door open to allow the oven to cool down.
After finishing cooking the oven is still hot. Do not come too close to the oven. Make sure that children do not come near the oven. If the centre of the oven reached a temperature of 70^ C, the display will show "hot" (hot).
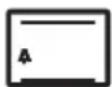
Static cooking (top and bottom heating element turned on)
This cooking method, which is also called the traditional method, ensures an even distribution of heat generated from the top and bottom heating elements. Food is evenly baked from the top and bottom.
Set the temperature dial to the appropriate temperature – see table below, or according to the recipe for the food you are cooking.
Use the function selection dial to select an appropriate function.
We recommend to leave the oven to preheat for about 10 minutes.
Place the food into cookware suitable for oven use and then place this into the preheated oven.
This function is suitable for cooking cakes, sponge cakes, baking foods au Gratin, lasagne and pizzas.
After finishing cooking, turn off the oven by turning the function selection dial and the temperature dial to zero and cancel the timer (if available). Take the cooked food out of the oven and place it on a cutting board or a metal rack and allow it to cool down. Leave the door open to allow the oven to cool down.
After finishing cooking the oven is still hot. Do not come too close to the oven. Make sure that children do not come near the oven. If the centre of the oven reached a temperature of 70^ C, the display will show "hot" (hot).

Combination of the fan and both heating elements
The fan and its blades distribute the hot air from the bottom and top heating element throughout the entire interior of the oven.
Set the temperature dial to the appropriate temperature – see table below, or according to the recipe for the food you are cooking.
Use the function selection dial to select an appropriate function.
We recommend to leave the oven to preheat for about 10 minutes.
Place the food into cookware suitable for oven use and then place this into the preheated oven.
The food will be baked through evenly.
This function is suitable for meals cooked au Gratin.
After finishing cooking, turn off the oven by turning the function selection dial and the temperature dial to zero and cancel the timer (if available). Take the cooked food out of the oven and place it on a cutting board or a metal rack and allow it to cool down. Leave the door open to allow the oven to cool down.
After finishing cooking the oven is still hot. Do not come too close to the oven. Make sure that children do not come near the oven. If the centre of the oven reached a temperature of 70^ C, the display will show "hot" (hot).

Grill
The grill heating element is located in the top part of the oven. We recommend that food that is to be grilled is placed on a rack located on the second rail from the top. Under the rack place a baking tray, into which fat and juices from the grilled food can drip.
It is necessary that the oven door remains closed while grilling. The temperature should reach 200^ C.
Set the temperature dial to the appropriate temperature – see table below, or according to the recipe for the food you are cooking.
Use the function selection dial to select an appropriate function.
We recommend to leave the oven to preheat for about 5 minutes.
Place the food into cookware suitable for oven use and then place this into the preheated oven.
After finishing cooking, turn off the oven by turning the function selection dial and the temperature dial to zero and cancel the timer (if available). Take the cooked food out of the oven and place it on a cutting board or a metal rack and allow it to cool down. Leave the door open to allow the oven to cool down.
After finishing cooking the oven is still hot. Do not come too close to the oven. Make sure that children do not come near the oven. If the centre of the oven reached a temperature of 70^ C, the display will show "hot" (hot).

Combination of the grill and the top heating element
The grill heating element is located in the top part of the oven. We recommend that food that is to be grilled is placed on a rack located on the second rail from the top. Under the rack place a baking tray, into which fat and juices from the grilled food can drip.
While grilling it is necessary to keep the door closed and the temperature should reach 200°C.
Set the temperature dial to the appropriate temperature – see table below, or according to the recipe for the food you are cooking.
Use the function selection dial to select an appropriate function.
We recommend to leave the oven to preheat for about 5 minutes.
Place the food into cookware suitable for oven use and then place this into the preheated oven.
After finishing cooking, turn off the oven by turning the function selection dial and the temperature dial to zero and cancel the timer (if available). Take the cooked food out of the oven and place it on a cutting board or a metal rack and allow it to cool down. Leave the door open to allow the oven to cool down.
After finishing cooking the oven is still hot. Do not come too close to the oven. Make sure that children do not come near the oven. If the centre of the oven reached a temperature of 70^ C, the display will show "hot" (hot).

Combination of the grill and the fan
The grill heating element is located in the top part of the oven. We recommend that food that is to be grilled is placed on a rack located on the second rail from the top. Under the rack place a baking tray, into which fat and juices from the grilled food can drip.
While grilling it is necessary to keep the door closed and the temperature should reach 200^ C.
Set the temperature dial to the appropriate temperature – see table below, or according to the recipe for the food you are cooking.
Use the function selection dial to select an appropriate function.
We recommend to leave the oven to preheat for about 5 minutes.
Place the food into cookware suitable for oven use and then place this into the preheated oven.
After finishing cooking, turn off the oven by turning the function selection dial and the temperature dial to zero and cancel the timer (if available). Take the cooked food out of the oven and place it on a cutting board or a metal rack and allow it to cool down. Leave the door open to allow the oven to cool down.
After finishing cooking the oven is still hot. Do not come too close to the oven. Make sure that children do not come near the oven. If the centre of the oven reached a temperature of 70^ C, the display will show "hot" (hot).

Combination of the turbo fan and the bottom heating element
The combination of the turbo fan and the bottom heating element is suitable for cooking pizzas or salty pastries, etc. While the turbo fan provides an even distribution of hot air inside the oven, the bottom heating element ensures baking from underneath.
Set the temperature dial to the appropriate temperature – see table below, or according to the recipe for the food you are cooking.
Use the function selection dial to select an appropriate function.
We recommend to leave the oven to preheat for about 10 minutes.
Place the food into cookware suitable for oven use and then place this into the preheated oven.
After finishing cooking, turn off the oven by turning the function selection dial and the temperature dial to zero and cancel the timer (if available). Take the cooked food out of the oven and place it on a cutting board or a metal rack and allow it to cool down. Leave the door open to allow the oven to cool down.
After finishing cooking the oven is still hot. Do not come too close to the oven. Make sure that children do not come near the oven. If the centre of the oven reached a temperature of 70^ C, the display will show "hot" (hot).
Energy saving tips
• To shorten the cooking time reduce the amount of liquids and fat used.
- Only open the oven door when necessary.
Oven accessories
- We recommend the use of cookware suitable for oven use, such as glass baking dishes, cake moulds, oven racks. The suitability of the cookware for oven use is indicated on the packaging of such cookware and is determined by its manufacturer. Carefully read the instructions of the manufacturer of the given cookware.
- If you will be using smaller baking cookware, we recommend placing it in the middle of the baking tray included as an accessory to the oven. This will prevent the accidental tipping over of the cookware.
- If the food you wish to prepare does not fully cover the oven rack, if you have taken the food out of the freezer or if you are using a baking tray as a drip tray for catching juices and fats from food that is being cooked, you may find that the rack deforms slightly due to the high temperature generated during the cooking process. This is a normal event caused by the transmission of heat.
- Do not place glass trays or cookware in cold places immediately after removing them from the oven. Do not place them on cold or wet underlays. After finishing cooking, either open the oven door and allow the food to finish cooking or remove the cookware from the oven and place it on a wooden cutting board or on a wiping cloth. Otherwise the glass cookware could be damaged or it may break.
- If you will be using the grill function, we recommended that you use the grill rack supplied as an accessory with the oven (if the oven is equipped with the grill function). In this way you will avoid staining and soiling the interior of the oven by dripping juices or fat.
- If you will use a large wide grill, place a baking tray under the rack on which you will grill the food. For easier cleaning add some water into this baking tray.
• For grilling, use rail 2.

Wide grill: for grilling or for the placement of baking cookware other than the baking tray.
Flat baking tray: for baking thin cakes, sponge cakes, etc.
Deep baking tray: for baking meat.
PART 5: USING THE TOUCHSCREEN

The control panel will turn off after 5 minutes of inactivity.
The oven is equipped with a touchscreen that is used to control all functions of the oven.
Always ensure that you have only touched the field for a given function. Otherwise, the function you require will not be performed.
The cooling fan will start automatically to keep the surface of the oven cold. After turning off the over, the cooling fan will run for some time in order to cool down the inside area of the oven.
Basic controls
Press and hold the ⏻ sensor for approx. 2 seconds. This mode is called the "on mode". In this mode you can select a suitable cooking function, set the temperature, select the BOOST function, set the start and end cooking time, minute alarm, time, etc.
In the on mode press the "P" sensor. Each time it is pressed the function will change as follows:
Light → Defrosting → Turbo fan → Top and bottom heating element → Combination of both heating elements and the fan → Pizza → Grill (with / without rotisserie) → Double grill (with / without rotisserie) → Double grill with fan (with / without rotisserie)
NOTE:
The number of functions may differ depending on the model.
Depending on the selected function the display will show the respective accessories.
After selecting a given function the display will show the pre-set temperature, which you can change with the up and down buttons, which are located near C. The temperature can be set from 50°C to 275°C.
Setting the clock
When the oven is turned on for the first time or after a power outage it is necessary to set the time.
- Press and hold the ⏻ sensor to turn on the oven.
- Press MODE and a clock symbol will appear in the left part of the screen.
- Use the up / down buttons near "MODE" to set the time.
- To save the time, press MODE once more.
If the automatic time mode function is turned off, press the – and + buttons at the same time to enter the time mode. Use the – and + buttons to set the time.
Correctly set time has an effect on the timer function.
Setting the minute alarm
Press MODE in the middle. The minute alarm symbol will appear on the display. At the same time "00:00" will start to flashing. Use the up / down buttons near "MODE" to set the required time. After completing the settings, the minute alarm symbol will light up. Then the minute alarm will be set.
As soon as the preset time elapses, a sound will be made and a minute alarm symbol and "00:00" will start flashing. Press any button to stop the sound and the minute alarm symbol will disappear from the display.
Setting the food cooking time
This function makes it possible to start the oven at a preset time.
Place the food you wish to cook inside the oven.
Select an appropriate cooking function. The temperature will be set automatically.
Repeatedly press MODE until the food cooking time symbol appears.
Use the up / down buttons near MODE to set the required cooking time.
After completing setup the clock and the food cooking time symbol will appear on the display.
After the given time elapses, a sound will be made and the food cooking time symbol will start flashing.
Setting the end time for cooking
This function is used for cooking after a set time.
Place the food you wish to cook inside the oven.
Select an appropriate cooking function. The temperature will be set automatically.
1) Repeatedly press MODE until the end of food cooking time symbol appears. Use the up / down buttons near MODE to set the required cooking time. After completing setup the clock and the food cooking time symbol will appear on the display.
2) Repeatedly press MODE until end of cooking symbol appears. As soon as the end of cooking symbol appears, the clock will start to flash to set additional cooking time. Use the up / down buttons near MODE to set the end of cooking time. After completing setup the clock and the end of cooking symbol will appear on the display.
The oven will start at the set time and will countdown the cooking time until the set cooking time has elapsed. After the end of cooking time is reached, a sound is made and the end of cooking symbol will start flashing. Press any button to end the sound and the food cooking time symbol will disappear.
Setting the digital sound timer
Press and hold the sensor under "MODE" for about 2 seconds, a sound will be made. A different sound is made every it is pressed. If you do not select a different sound, the last selected one will be saved to memory.
BOOST function
The BOOST function will reduce the pre-heating time. If you select the turbo fan, the combination of the top and bottom heating element, combination of both heating elements with the fan or the Pizza function, the BOOST sensor will light up. Before you start cooking, press the BOOST sensor. The BOOST function will reduce the pre-heating time by 45 – 50%.
Lock function
The lock function prevents buttons from being pressed accidentally.
Press and hold the lock sensor for 2 seconds. The lock function will be activated and the lock symbol will appear on the display.
In the lock mode only the ⏻ sensor will work. If you turn off the oven using the ⏻ button, the lock function will be activated when the oven is turned on again.
To cancel the lock function press and hold the lock sensor for 2 seconds.
If while the oven is running you do not press any button for a period of 3 hours, the oven will turn itself off automatically.
| Food | Turbo | Bottom and top heating element | Bottom and top heating element and fan Grill | |||||||||
| Temper-ature | Rail Cooking time | Temper-ature | Rail Cooking time | Temper-ature | Rail Cooking time | Temper-ature | Rail Cooking time | |||||
| Lasagne 17 | 70-190 1-2-3 | 35 - 45 17 | 0-190 1-2 3 | 5 - 45 170-1 | 90 1-2 25-35 | |||||||
| Cake 150-1 | 70 1-2-3 30 | -40 170-1 | 90 1-2 30 - | 40 150-170 | 1-2-3 25 - | 35 | ||||||
| Biscuits | 150-170 1 | -2-3 25 - 35 | 170-190 1 | -2 30 - 40 1 | 50-170 1-2-3 | 25 - 35 | ||||||
| Grilled minced meat | 200 | 4 | 10 - 15 | |||||||||
| Watery foods | 175 - 200 | 2 | 40 - 50 | 175 - 200 | 2 | 40 - 50 | 175 - 200 | 2 | 40 - 50 | |||
| Chicken | 200 | 1 - 2 | 45 - 60 | 200 | 1 - 2 | 45 - 60 | 200 | * | 50 - 60 | |||
| Meat slices | 200 | 3 - 4 15 | -25 | |||||||||
| Beef steak | 200 | 4 | 15 - 25 | |||||||||
| Cake 2 baking trays | 160 - 180 | 1 - 4 30 | -40 | |||||||||
| Lasagne 2 baking trays | 170 - 190 | 1 - 4 35 | -45 | |||||||||
| * Cooking using metal grilling skewers | ||||||||||||
PART 6: CLEANING AND MAINTENANCE
Before cleaning or standard maintenance make sure that the function selection dial, the temperature dial and the timer (if available) are in the zero position, the oven is turned off and the power cord is pulled out of the power socket, or where applicable the circuit breaker to which the appliance is connected is disengaged.
Do not use cleaning agents which could damage the enamel or varnish surface of the oven.
Only use cleaning agents intended for the cleaning and maintenance of your oven.
For cleaning do not use coarse cleaning agents, steel wool or sponges with steel wool. Do not use petrol, benzene, solvents or any other similar substances. This could damage the oven, particularly the enamel or varnish surface, and negatively affect the performance and operation of the oven.
Do not use steam cleaners for the cleaning or maintenance of the oven.
Cleaning the inside areas of the oven
Check that the oven is turned off.
Cleaning will be easier if the oven is a little warm.
Using a clean soft wiping cloth lightly dipped in warm water with a small amount of dishwashing detergent wipe the inside area of the oven. Then wipe using a wiping cloth dipped in clean water and wipe dry.
To increase the lifetime of the oven, we recommend that it is cleaned regularly.
Changing a light bulb
The light should be replaced by an authorised technician or another qualified person.
Check that the oven is turned off and cold.
Remove the front light cover, screw out the light bulb and replace it with a light bulb of the same type. It must be resistant against temperatures up to 300^ C, type E14, max. 25 W.
Return the cover to its place and check that the light works.
PART 7: BEFORE YOU CALL THE SERVICE CENTRE
| Problem Solution | |
| The oven does not work. The oven is not connected to a power socket, or the circuit breaker is disengaged.A power outage occurred.The timer is not set (only for models with a timer). | |
| The oven is not heating. The temperature dial is not set. | |
| The light is not lit. The light is broken. | |
| Uneven baking Check that the heating element is heating correctly,and contact an authorised service centre. | |
If the problem you have with your oven is not included in the table, please contact an authorised service centre.
Transport
We recommend that you keep the original packaging for at least for the duration of the warranty period for transport purposes. Follow the instructions on the packaging.
Secure all moving parts of the oven using paper and adhesive tape. We recommend to transport baking trays and racks separately or to wrap them and transport them placed on the oven.
If the original packaging is not available, pack the appliance into a suitable cardboard box.
PART 8: TECHNICAL SPECIFICATIONS
| Model POB 819 | |
| Power source 230 V ~ 50Hz | |
| Power input 3200 W | |
| Power consumption 0.89 kWh | |
| Volume 56 l | |
| Power consumption when off 0.9 Wh |
NOTE:
All the here mentioned data is subject to change.
INSTRUCTIONS AND INFORMATION REGARDING THE DISPOSAL OF USED PACKAGING MATERIALS
Dispose of packaging material at a public waste disposal site.
DISPOSAL OF USED ELECTRICAL AND ELECTRONIC APPLIANCES

The meaning of the symbol on the product, its accessory or packaging indicates that this product shall not be treated as household waste. Please, dispose of this product at your applicable collection point for the recycling of electrical & electronic equipment waste. Alternatively in some states of the European Union or other European states you may return your products to your local retailer when buying an equivalent new product. The correct disposal of this product will help save valuable natural resources and help in preventing the potential negative impact on the environment and human health, which could be caused as a result of improper liquidation of waste. Please ask your local authorities or the nearest waste collection centre for further details. The improper disposal of this type of waste may fall subject to national regulations for fi nes.
For business entities in the European Union
If you wish to dispose of an electrical or electronic device, request the necessary information from your seller or supplier.
Disposal in other countries outside the European Union
If you wish to dispose of this product, request the necessary information about the correct disposal method from local government departments or from your seller.

This product meets all the basic EU regulation requirements that relate to it.
Changes to the text, design and technical specifications may occur without prior notice and we reserve the right to make these changes.
TROUBA
NÁVOD K OBSLUZE
PHILCO

Famous for Quality the World Over
Vážený zákazníku
natural_image
Diagram of a food delivery cabinet with two scoops and a tray, showing interior layout (no text or labels)ČÁST 5: POUŽITÍ DOTYKOVÉHO DISPLEJE

ČÁST 7: PŘEDTÍM NEŽ ZAVOLÁTE DO SERVISU
Famous for Quality the World Over
Vážený zákazník

natural_image
Diagram of a food delivery cabinet with two food items inside (no text or labels)

- CONTENTS
- PART 1: IMPORTANT SAFETY INSTRUCTIONS
- Recommendation:
- SERIAL NUMBER:
- PART 2: DESCRIPTION OF THE APPLIANCE
- NOTE:
- PART 3: INSTALLATION
- Installation location
- Electrical connection
- Adhere to the instructions below!
- PART 4: OPERATION
- Defrost function
- Turbo fan function
- Static cooking (top and bottom heating element turned on)
- Combination of the fan and both heating elements
- Grill
- Combination of the grill and the top heating element
- Combination of the grill and the fan
- Combination of the turbo fan and the bottom heating element
- Energy saving tips
- Oven accessories
- PART 5: USING THE TOUCHSCREEN
- Basic controls
- Setting the clock
- Setting the minute alarm
- Setting the food cooking time
- Setting the end time for cooking
- Setting the digital sound timer
- BOOST function
- Lock function
- PART 6: CLEANING AND MAINTENANCE
- Cleaning the inside areas of the oven
- Changing a light bulb
- PART 7: BEFORE YOU CALL THE SERVICE CENTRE
- Transport
- PART 8: TECHNICAL SPECIFICATIONS
- INSTRUCTIONS AND INFORMATION REGARDING THE DISPOSAL OF USED PACKAGING MATERIALS
- DISPOSAL OF USED ELECTRICAL AND ELECTRONIC APPLIANCES
- For business entities in the European Union
- Disposal in other countries outside the European Union
- TROUBA
- NÁVOD K OBSLUZE
- PHILCO
- ČÁST 5: POUŽITÍ DOTYKOVÉHO DISPLEJE
- ČÁST 7: PŘEDTÍM NEŽ ZAVOLÁTE DO SERVISU
- Vážený zákazník
Brand : Philco
Model : POB 819
Category : Oven