
AP-12CR1SEJS - Air conditioner HISENSE - Free user manual and instructions
Find the device manual for free AP-12CR1SEJS HISENSE in PDF.


| Product Type | Air Conditioner |
| Brand | Hisense |
| Model | AP-12CR1SEJS |
| Unit Type | Portable Air Conditioner |
| Cooling Capacity (BTU/h) | 12,000 |
| Coverage Area (sq. ft.) | Up to 450 |
| EER | 12.0 |
| Voltage | 115 V |
| Power Consumption (Cooling) | 1,100 W |
| Refrigerant | R32 |
| Dimensions (W x H x D) | 19.5 x 29.5 x 17.3 in |
| Weight | 65 lbs |
| Noise Level (High/Low) | 56 / 52 dB |
| Airflow (CFM) | 300 |
| Remote Control | Yes |
| Timer | 24-hour programmable |
| Sleep Mode | Yes |
| Filter Type | Washable mesh filter |
| Drainage | Self-evaporative |
| Safety Features | Auto shut-off, overload protection |
| Maintenance | Clean filter every 2 weeks |
| Repairability | Spare parts available (filter, remote, etc.) |
Frequently Asked Questions - AP-12CR1SEJS HISENSE
User questions about AP-12CR1SEJS HISENSE
0 question about this device. Answer the ones you know or ask your own.
Ask a new question about this device
Download the instructions for your Air conditioner in PDF format for free! Find your manual AP-12CR1SEJS - HISENSE and take your electronic device back in hand. On this page are published all the documents necessary for the use of your device. AP-12CR1SEJS by HISENSE.
USER MANUAL AP-12CR1SEJS HISENSE
USE AND INSTALLATION INSTRUCTIONS
For questions about features, operation/performance, parts or service, call: 1-877-465-3566
Thank you very much for purchasing this Air Conditioner. Please read these use and installation instructionscarefully before installing and using this appliance,and keep this manual for future reference.
AIR CONDITIONER SAFETY....3
INSTALLATION REQUIREMENTS....3
Tools and Parts....3
Location Requirements....4
Electrical Requirements....4
INSTALLATION INSTRUCTIONS....5
Unpack the Air Conditioner....5
Window Vent Panel And Extensions....6
Install Portable Air Conditioner....7
Installation In Vertical Sliding Windows....8
Installation In Horizontal Sliding Windows....9
PORTABLE AIR CONDITIONER USE. 10
Starting Your Portable Air Conditioner 10
Using the Remote Control 11
Normal Sounds....15
PORTABLE AIR CONDITIONER CARE....16
Draining the Air Conditioner....16
Cleaning the Outside....16
Cleaning the Air Filter....16
Storing After Use....16
TROUBLESHOOTING....17
WARRANTY 19
ÍNDICE DE CONTENIDOS
State California Proposition 65 Warnings:
WARNING: This product contains one or more chemicals known to the State of California to cause cancer.
WARNING: This product contains one or more chemicals known to the State of California to cause birth defects or other reproductiver harm.

The figures in this manual are based on the external view of a standard model.
They may differ from that of the air conditioner you have selected.
1 Cool air outlet
2 Signal receptor
3 Remote control
4 Transport handle
5 Control panel
6 Air outlet hose
7 Evaporator air intake
8 Secondary drain port
9 Power supply
10 Primary drain port
11 Condenser air intake
AIR CONDITIONER SAFETY
Your safety and the safety of others is very important.
We have provided many important safety messages in this manual and on your appliance. Always read and obey all safety messages.

This is the safety alert symbol.
This symbol alerts you to potential hazards that can kill or hurt you and others.
All safety messages will follow the safety alert symbol and either the word "DANGER" or "WARNING".
These words mean:
DANGER
WARNING
You can be killed or seriously injured if you don't immediately follow instructions.
You can be injured if you don't follow instructions.
All safety messages will tell you what the potential hazard is and tell you how to reduce the chance of injury.
IMPORTANT SAFETY INSTRUCTIONS
WARNING: To reduce the risk of fire, electrical shock or injury when using your air conditioner, follow these basic precautions:
■ Plug into a grounded 3 prong outlet.
■ Do not remove ground prong.
■ Do not use an adapter.
■ Do not use an extension cord.
■ Unplug air conditioner before servicing.
■ Use two or more people to move and install air conditioner.
SAVE THESE INSTRUCTIONS
DISPOSING OF THE UNIT
■ Please recycle or dispose of the packaging material for product in an environmentally responsible manner.
■ Never store or ship the air conditioner upside down or sideways to avoid damage to the compressor.
■ The appliance is not intended for use by young children or infirm persons without supervision. Young children should be supervised to ensure that they do not play with the appliance.
■ All air conditioners contain refrigerants, which under federal law must be removed prior to product disposal. If old products with refrigerants are being disposed of, check with your local disposal company for local requirements.
■ Do not dispose of batteries in fire. Batteries may explore or leak.
INSTALLATION REQUIREMENTS
Tools and Parts
Gather the required tools and parts before starting installation. Read and follow the instructions provided with any tools listed here.
Tools needed
Phillips screwdriver
■ Scissors
Pencil
Parts supplied
Check that all parts are included in parts package.

A.Foam seal
B.Dummy coupling
C.Flexible exhaust hose
D. Window exhaust adapter
E.1/2" screws (2)
F.Wood screws(4)
G. Window-lock bracket(2)
H. Outer slider section panel A
I. Inner slider section panel B
J. Outer slider section panel D
K. Inner slider section panel C
L.3/8"screws (2)
M.Foam seal (2)
N.Foam seal(2)
Location Requirements
NOTES:
■ The flexible exhaust hose allows placement of the air conditioner between 23 ^5/8 " and 64 ^1/8 " (60 cm and 163 cm) from window or door
■ Confirm you are using the correct size air conditioner for the space to be cooled, per sizing recommendations, below:
| Square Footage | Area to be cooled | Capacity needed (BTUs) |
| 200 | Up to a 10 x 20 Room" " | 8,000 |
| 300 | Up to a 15 x 20 Room" " | 10,000 |
| 400 | Up to a 20 x 20 Room" " | 12,000 |
| 500 | Up to a 20 x 25 Room" " | 14,000 |
NOTE: Adjust BTUs to room use and location:
■Shaded room reduce by 10%
■ Sunny room increase by 10%
■For occupancy over two people add 600 BTUs per person
■ Kitchen use add 4,000 BTUs
Vertical Slide Widow

Horizontal Slide Window

NOTES:
■ To ensure proper ventilation, keep the required distance from the return air outlet to the wall or other obstacles at least 23 ^5 / _a " (60 cm).
■ Do not block the air outlet.
■ Provide easy access to the grounded 3 prong outlet.
Electrical Requirements
WARNING

Electrical Shock Hazard
Plug into a grounded 3 prong outlet.
Do not remove ground prong.
Do not use an adapter.
Do not use an extension cord.
Failure to follow these instructions can result in death, fire, or electrical shock.
■ The portable air conditioner should be dedicated to a 115V, 60 Hz, 15-amp fuse grounded 3 prong outlet.
■ The use of a time-delay fuse or time-delay circuit breaker is required.
All wiring must comply with local and the national electrical codes and be installed by a qualified electrician. If you have any questions, contact a qualified electrician.
NOTE: Your air conditioners device may differ from the one shown.

A. Test button
B. Reset button
This room air conditioner is equipped with a power supply cord required by UL. This power supply cord contains state-of-the-art electronics that sense leakage current. If the cord is crushed, the electronics detect leakage current and power will be disconnected in a fraction of a second.

WARNING

Electrical Shock Hazard
Plug into a grounded 3 prong outlet.
Do not remove ground prong.
Do not use an adapter.
Do not use an extension cord.
Failure to follow these instructions can result in death, fire, or electrical shock.
To test your power supply cord:
- Plug power supply cord into a grounded 3prong outlet.
- Press RESET (on some devices, a green light will turn on).
- Press TEST (listen for click; Reset button will trip, and on some devices, a green light will turn off).
- Press and release RESET (listen for click; Reset button will latch, and on some devices, a green light will turn on). The power supply cord is ready for operation.
NOTES:
■ The Reset button must be pushed in for proper operation.
- The power supply cord must be replaced if it fails to trip when the test button is pressed or fails to reset.
- Do not use the power supply cord as an off/on switch. The power supply cord is designed as a protective device.
■ A damaged power supply cord must be replaced with a new power supply cord obtained from the product manufacturer and must not be repaired.
■ The power supply cord contains no user serviceable parts. Opening the tamper-resistant case voids all warranty and performance claims.
INSTALLATION INSTRUCTIONS
Unpack the Air Conditioner
WARNING
Excessive Weight Hazard
Use two or more people to move and install air conditioner.
Failure to do so can result in back or other injury.
Remove packaging materials
■ Remove and recycle packaging materials.
Remove tape and glue residue from surfaces before turning on the air conditioner. Rub a small amount of liquid dish soap over the adhesive with your fingers. Wipe with warm water and dry.
- Keep unit upright at least 2 hours prior to use.
- Do not use sharp instruments, rubbing alcohol, flammable fluids, or abrasive cleaners to remove tape or glue. These products can damage the surface of your air conditioner.
■ Handle the air conditioner gently.
Window Vent Panel And Extensions
The window installation kit allows you to install the air conditioner in most vertical-sliding windows 18" to 50" wide, or casement-style windows from 18" to 50" high.
| Window Length\Panel | A18" | B9" | C17" | D17" | Fig. |
| 18" | √ | a | |||
| 19" - 26" | √ | √ | b | ||
| 27" - 34" | √ | √ | c | ||
| 35" - 50" | √ | √ | √ | d |
- Please check your window length and choose the fit from the above table.
- If your window length need more than 2 panels, after adjust the length, please use a type L screw to fix them.


For an 18" window opening, use the window vent panel by itself.
Fig. "a"

For window openings from 27" to 34", use the window vent panel (Panel A) and a extension panel (Panel C).
Fig. "c"


For window openings from 19" to 26", use the window vent panel (Panel A) and a extension panel (Panel B).
Fig. "b"
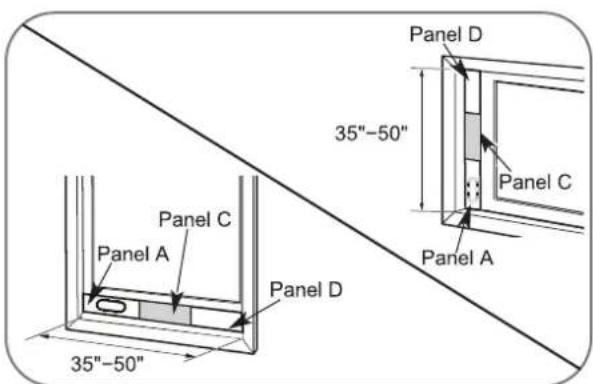
For window openings from 35" to 50", use the window vent panel and two extension panels (Panel C and Panel D).
Fig. "d"
Install Portable Air Conditioner
Install Exhaust Hose and Adapter
- Roll the air conditioner to selected location. see "Location Requirements."
- Stretch the end of the hose. Attach the dummy coupling to the flexible exhaust hose. Turn counter-clockwise until securely locked into place.

natural_image
Illustration of hands manipulating a coiled tube or pipe with a transparent frame (no text or symbols)- Attach the window exhaust adapter to the flexible exhaust hose. Turn counter-clockwise until securely locked into place.

natural_image
Technical line drawing of a coiled pipe or duct assembly with labeled components A and B (no text or symbols beyond labels)A. Flexible exhaust hose
B. Window exhaust adapter
-
Insert the dummy coupling into the slot on the back of the air conditioner.
-
Slide down to lock the hose into place.
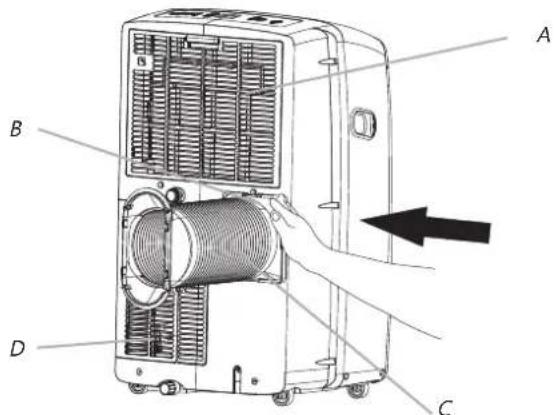
A. Evaporator air intake
B. Dummy coupling
C. Flexible exhaust hose
D. Condenser air intake
Window Installation
Your window slider kit has been designed to fit most standard vertical and horizontal window applications. Roll the air conditioner to selected location. see "Location Requirements."
- Attach the window exhaust adapter to the outer slider section (the piece with the large exhaust hole).
NOTE: Product must be used with included Duct Window installation kit for effective cooling.

A. Outer slider section
B. Window exhaust adapter
Installation In Vertical Sliding Windows
NOTE: The window installation kit can be used with vertical sliding windows between 18" and 50" wide.
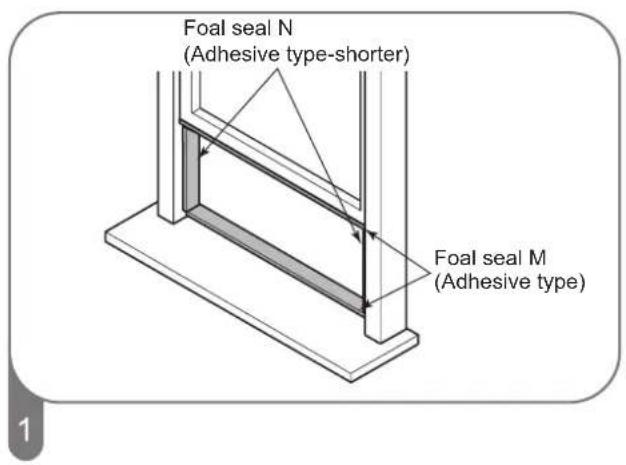
Cut the foam seal M(adhesive type) & N (adhesive type-shorter) to the proper length, and attcah it to the window sash and frame.

Cut the foam seal A(Non-adhesive type) to the window width. Stuff the foam seal A between the glass and the window to prevent air and insects from getting into the room.

Insert the vent panel assembly, including extension panels, if needed, into the window opening. Extend the extension panels, if used.

Install the Window-lock bracket with a E or F screw as shown if you need. E screw is suitable for wood window, F screw is suitable for metal window.
Installation In Horizontal Sliding Windows
NOTE: The window installation kit can be used with vertical sliding windows between 18" and 50" wide.
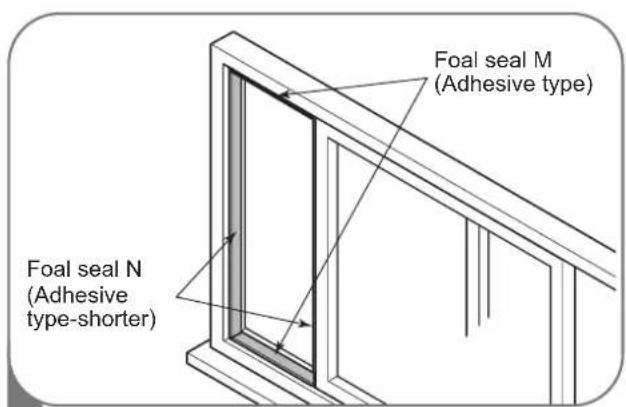
1
Cut the foam seal M(adhesive type) & N (adhesive type-shorter) to the proper length, and attcah it to the window sash and frame.

3
Cut the foam seal A(Non-adhesive type) to the window width. Stuff the foam seal A between the glass and the window to prevent air and insects from getting into the room.

2
Insert the vent panel assembly, including extension panels, if needed, into the window opening. Extend the extension panels, if used.

4
Install the Window-lock bracket with a E or F screw as shown if you need. E screw is suitable for wood window, F screw is suitable for metal window.
PORTABLE AIR CONDITIONER USE
Operating your portable air conditioner properly helps you to obtain the best possible results.
This section explains proper air conditioner operation.
IMPORTANT:
■ The air conditioner display shows the current room temperature.
- When changing modes while the air conditioner is in operation, the compressor will stop for 3 to 5 minutes before restarting.
If a button is pressed during this time, the compressor will not restart for another 3 to 5 minutes.
- In Cooling or Dry mode, the compressor and condenser fan will stop when the room temperature reaches the set temperature.
NOTE: In the event of a power failure, your air conditioner will operate at the previous settings when the power is restored.
Starting Your Portable Air Conditioner

NOTE: The symbols may be different from these models, but the functions are similar.
- Select the mode. See "MODE".
- Select the fan speed. See "FAN".
- Set the temperature. See "TEMPERATURE".
- Press POWER button to start the air conditioner.

POWER
NOTE:
Keep upright at least 2 hours before use to prevent damaging the compressor.
When the air conditioner is turned on for the first time after it is plugged in, it will run in the Smart Mode. When the air conditioner is turned on at all other times, it will run according to the previous setting. Smart Mode can be selected with the remote control only. Only if the unit is operated in EXTREMELY HUMID air, water will be collected in the container inside the unit. If the water container is full, the air conditioner will stop. The screen will displays "E5" to inform you to empty the internal container.
Mode
- Press and release MODE until you see the symbol flashes for the operating modes:

MODE
- Choose Cooling, Dry, Fan Only or Heating.
Cooling-Cools the room. Press FAN to select High, Mid or Low. Press the Plus or Minus button to adjust the temperature.

COOL
Dry-Dries the room. The air conditioner automatically selects the temperature. The fan runs on Low speed only.
NOTE: Dry mode should not be used to cool the room.

DRY
Fan Only mode. Press FAN to select High, Mid or Low.

FAN
Heating-heats the room. Press FAN to select High, Mid or Low. Press the PLUS or MINUS button to adjust the temperature.
NOTE: Heating is NOT available for cooling. To cool, that mode must be selected.

HEAT (Optional)
Fan Speed
- Press and release FAN to choose the desired fan speed.

FAN
- Choose High, Mid or Low.
Auto-automatically controls the fan speed depending on the current room temperature and temperature control setting.
High-for maximum fan speed
HIGH

Mid-for normal fan speed
MED

Low-for minimum fan speed
LOW

Temperature
Press the PLUS button to raise the temperature. Press the PLUS button once to increase the set temperature by 1^ F ( 1^ C).

Press the MINUS button to lower the temperature. Press the MINUS button once to decrease the set temperature by 1^ F ( 1^ C).

NOTE:
In the Cooling mode, the temperature can be set between 61^ F and 86^ F ( 16^ C and 30^ C).
In Fan Only mode, the temperature cannot be set.
To change the temperature display between ^ C and ^ F press both the Plus and Minus Adjust buttons at the same time.

ION (Optional)
Press the ION button to start or stop the Plasma Generator.

When the ION indicator light of the appliance flashes, the Plasma Generator will turn on.
Using the Remote Control
Insert the Batteries
- Remove the battery cover along the arrowed direction.

natural_image
Illustration showing two hand positions: one with a tool, the other with a wrench, both pointing to a device (no text or symbols present)-
Insert new batteries making sure that the (+) and (-) of battery are matched correctly.
-
Re-attach the cover by sliding it back into position.

natural_image
Illustration of hands using a tool to adjust or install a component, enclosed in a circle with an arrow indicating rotation (no text or symbols present)NOTE:
■ Use the included 2 standard AAA(1.5volt) batteries. Do not use rechargeable batteries. Replace batteries with new ones of the same type when the display becomes dim, or after 6 months.
If you reload batteries after removing the old ones, previous settings will be lost.
■ Do not recharge non-rechargeable batteries.
■ Do not mix different types of batteries such as alkaline, carbon-zinc, or rechargeable batteries.
■ Do not mix old and new batteries.
■ Batteries are to be inserted with the correct polarity.
■ Exhausted batteries are to be removed from the product.
Storage tip
The clip on the back of the unit can be used to store the remote control.

How to Use
To operate the room air conditioner, aim the remote controller to the signal receptor. The remote control will operate the air conditioner at a distance of up to 23' (7m) when pointing at signal receptor of the air conditioner.

Remote control
NOTE: Remote control may differ in appearance.

NOTE:
You remote controller may be 88 F instead of 88 °, 88 ° cannot switch to 88 F.
Power On or Off
Press ON/OFF button to turn on or off the unit

NOTE: ■ When changing modes during operation, sometimes the unit does not response at once.
■ Wait 3 minutes before restarting the appliance.
Button and Function
| 1 | ON/OFF | ON/OFF | 8 | SLEEP | SLEEP | |
| 2 | MODE | MODE | 9 | IFEEL | IFEEL | |
| 3 | FAN | FAN | 10 | CLOCK | CLOCK | |
| 4 | UP | 11 | TIMER_OFF | Timer Off | ||
| 5 | DOWN | 12 | TIMER_ON | Timer On | ||
| 6 | SMART | SMART | 13 | SUPER | SUPER | |
| 7 | SWING | SWING | 14 | DIMMER | DIMMER |
Indication symbols
Indication symbols on LCD:
| Cooling indicator | Auto fan speed | ||
| Dry indicator | High fan speed | ||
| Fan only indicator | Medium fan speed | ||
| Heating indicator | Low fan speed |
| ▲Smart indicator | Signal transmit. |
| Sleep indicator | ON OFF 88:88 Display set timer Display current time |
| Ifeel indicator | |
| Super indicator | 88°C Display set temperature |
Mode
- Press MODE repeatedly until you see the symbol flash for the desired setting.
MODE
- Choose Cooling, Dry, Fan Only and Heating.
■Cooling-Cools the room. Press FAN to select AUTO, HIGH, MID or LOW. Press the UP or DOWN button to adjust the temperature.

■ Dry-Dries the room. The air conditioner automatically selects the temperature. The fan runs on Low speed only. NOTE: Dry mode should not be used to cool the room. A decrease or rise of up to 4°F (2°C) can be set with the remote controller if you still feel uncomfortable.

■ Fan Only-Only the fan runs. Press FAN button to adjust fan speed.

NOTE: Auto fan speed cannot be selected in Fan Only mode.
■ Heating-Heats the room. Press FAN to select the fan speed. Press the up or down TEMP button to adjust the temperature.

SMART Mode
Press the SMART button, regardless if the unit is on or off, to set temperature and fan speed automatically based on the actual room temperature.
SMART
Operation mode and temperature are determined by indoor temperature.
With Heater models
| Indoor temperature | Operation mode | Target temperature |
| 70°F 21°C ( ) or below | HEATING | 72°F 22°C ( ) |
| 70-73°F 21-23°C ( ) | FAN ONLY | |
| 73-79°F 23-26°C ( ) | DRY | Room temperature decrease4°F(2°C) after operate for3 minutes |
| Over 79°F 26°C ( ) | COOLING | 79°F 26°C ( ) |
Cooling only models
| Indoor temperature | Operation mode | Target temperature |
| 23°C(73°F) or below | FAN ONLY | |
| 23-26°C(73-79°F) | DRY | Room temperature decrease 4°F(2°C) after operate for 3 minutes |
| Over 26°C (79°F) | COOLING | 26°C(79°F) |
NOTE: Temperature, airflow and direction are controlled automatically in smart mode. However, a decrease or rise of up to 4^ F ( 2^ C) can be set with the remote controller if you still feel uncomfortable.
| What you can do in ▲ mode | ||
| Your feeling | Button | Adjustment |
| Uncomfortable because of unsuitable air flow volume. |  FAN FAN | Indoor fan speed alternates among High, Medium and Low each time this button is pressed. |
| Uncomfortable because of unsuitable flow direction. |  SWING SWING | Press it once, the louver swings to change airflow direction.Press it again, swings stops. |
SUPER
SUPER button is used to start or stop fast cooling or heating.
- Press SUPER button. The air conditioner automatically sets the fan speed to High and the temperature to 61°F (16°C). Fast heating operates at auto fan speed, changing the set temperature automatically to 86°F (30°C).

- To turn off Super control, press any button on the remote control or control panel except Timer On, Timer Off, Clock, Dimmer, I feel and Swing.
NOTE:
■ In the SUPER mode you can set airflow direction or timer.
■ SMART mode is not available in SUPER mode.
■ SUPER button is ineffective in SMART mode.
fast cooling

fast heating

Fan Speed
- Press FAN button, Choose desired fan speed.

■ Auto-Automatically controls fan speed depending on current room temperature and temperature control setting.
NOTE: Auto fan speed cannot be selected in Fan Only mode.

■ High for maximum fan speed

■ Mid for normal fan speed

■ Low for minimum fan speed

Temperature
■ Press the UP button to raise the temperature. Press the UP button once to increase the set temperature by .1 (1)°F °C
■ Press the DOWN button to lower the temperature. Press the DOWN button once to decrease the set temperature by .1°F(1°C)
NOTES:
In the Cooling and Heating mode, the temperature can be set between 61°F and 86°F (16°C and 30°C).
■ In Fan Only mode, the temperature cannot be set.
Sleep mode
SLEEP mode can be set in Cooling, Heating or Dry operation mode. This function gives you a more comfortable environment for sleep.
NOTE:
■ The appliance will stop operation automatically after operating for 8 hours.
■ Fan speed is automatically set at low speed.
In the Cooling mode, if the current room temperature is below 7.3°F (26°C) at 1°F (1°C) during the first hour after Sleep control is activated, then remain the same.
If room temperature is 7.3°F (of above, set temperature will not change.
In Heating mode, the set temperature will decrease by 6 °F (3°C) at most, during 3 hours, then keeps steady.
- Press MODE to select Cooling, Heating or Dry.
NOTE: Sleep control cannot be selected when Fan Only or SMART is selected. - Press the UP or DOWN button to set the temperature.
- Press SLEEP. After 5 seconds, the lights on the control panel display will dim.
NOTE: The temperature and airflow direction may be adjusted during Sleep control. The fan speed is automatically set to Low speed. After 5 seconds, the lights on the control panel display will dim again.
- To turn off Sleep control, press SLEEP, MODE, ON/OFF, FAN, SUPER or wait 8 hours for Sleep control to turn off automatically.
NOTE: The air conditioner will return to previous settings after Sleep control is turned off.
I FEEL
The temperature sensor built into the remote controller is activated. It can sense its surrounding temperature, and transmit the signal back to the unit, when the remote control is pointed towards the air conditioner. The unit can adjust the temperature so as to provide maximum comfort.
NOTE:
■ The I FEEL function is active, as a default setting from the factory.
■ To de-activate the I FEEL function, press the I FEEL button for about 5 seconds, and the transmit signal in the display will disappear, the I FEEL function will be de-activated.

- Pressing the I FEEL button once will activate I FEEL function again.
DIMMER
Press the DIMMER button to turn off the light and the control panel display.

NOTE:
■ When in DIMMER mode, new control inputs will return lighting and display to normal.
Clock function
- You can set or adjust the real time by pressing CLOCK button.

- Use the Up and Down buttons to set the correct time.
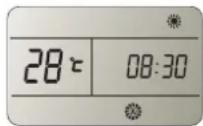
- Press CLOCK button again once the real time is set.
TIMER ON/OFF
It is convenient to set the timer with TIMER ON/OFF buttons.
NOTE: The CLOCK must be set before using the TIMER function.
Using the TIMER
The TIMER ON button can be used to turn on the unit automatically at the time you set.
- Press TIMER ON, Then "On 12:00" flashes on the LCD.

- Press the UP or DOWN button to get your desired time of day to turn on the appliance.

Increase

Decrease

■ Press the UP or DOWN button once to increase or decrease the time setting by 1 minute.
■ Press and hold the UP or DOWN button for 2 seconds to increase or decrease the time setting by 10 minutes.
■ Press and hold the UP or DOWN button for a longer time to increase or decrease the time setting by 1 hour.
- When the desired time is displayed on the LCD, press the TIMER ON button to confirm it.
A "Beep" will be heard, and "ON" stops flashing. The TIMER indicator on the appliance lights up.
- After your desired time is displayed for 5 seconds, the clock will display on the remote control display instead of the desired time.
To cancel Timer On
Press TIMER ON button again, when a "beep" can be heard and the indicator disappears, the TIMER ON mode has been canceled.
NOTE: It is similar to set TIMER OFF, you can make the appliance unit switch off automatically at the time you set.

SWING
Press SWING once to change vertical airflow direction. Press again to hold the airflow louver at desired direction.
NOTE:
■ Airflow is automatically adjusted to a certain angle in accordance with the operation mode after turning on the unit.
■ The direction of airflow can be also adjusted to your own requirement by pressing the SWING button.
■ Do not turn the vertical adjustment louvers manually, to prevent damage. Turn off the unit first and cut off the power supply, then restore power again to reset the louver.
Normal Sounds
When your air conditioner is operating normally, you may hear sounds such as:
■ Air movement from the fan.
■ Clicks from the thermostat cycling.
■ Vibrations or noise due to poor wall or window construction.
■ A high-pitched hum or pulsating noise caused by the high-efficiency compressor cycling on and off.
PORTABLE AIR CONDITIONER CARE
Draining the Air Conditioner

A. Secondary drain plug
B. Secondary drain cover
C. Primary drain plug
D. Primary drain cover
WARNING
Excessive Weight Hazard
Use two or more people to move and install air conditioner.
Failure to do so can result in back or other injury.
- Unplug the air conditioner or disconnect power.
- Move the air conditioner to a drain location or outside.
NOTE: To avoid spilling water from the internal bucket, move the air conditioner slowly and keep it level. - Remove plug the primary drain .cover and
- Drain water completely through . the drain hole
NOTE: If the air conditioner will be stored after use, see "Storing After Use". - Reinstall the drain plug to the primary drain hole.
- Reinstall the primary drain cover to the drain hole.
- Reposition the air conditioner.
- Plug in the air conditioner or reconnect power.
Cleaning the Outside
- Press ON/OFF to turn off the air conditioner.
- Unplug the air conditioner or disconnect power.
- Remove the air filter and clean separately. See "cleaning the Air Filter".
- Wipe the outside of the air conditioner with a soft, damp cloth.
- Plug in the air conditioner or reconnect power.
- Press ON/OFF to start the air conditioner.
Cleaning the Air Filter
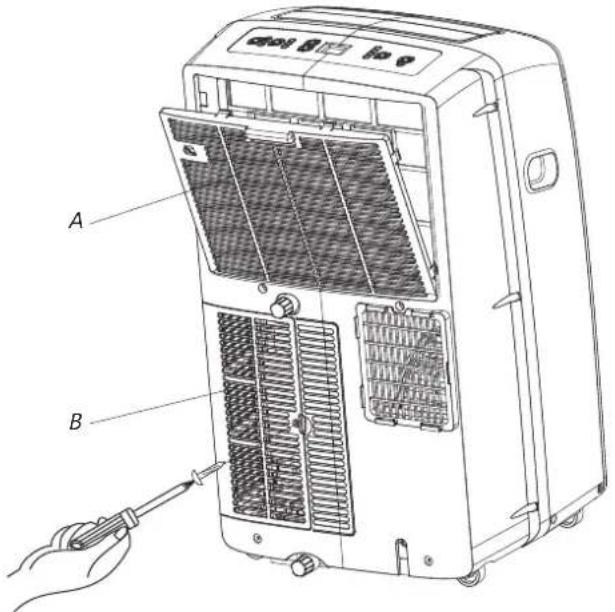
A. doorEvaporator air intake filter panel
B. doorCondenser air intake fliter panel
- Press ON/OFF to turn off the air conditioner.
- Open the filter panel door on the back of the air conditioner and remove.
- Remove the air filter from the filter panel door.
- Remove the tapping screw from the condenser air intake filter panel door and remove.
- Remove the air filter from the filter panel door.
- Use a vacuum cleaner to clean the filter. If the filter is very dirty, wash the filter in warm water with a mild detergent. NOTE: Do not wash the filter in the dishwasher or use any chemical cleaners.
- Air dry the filter completely before replacing to ensure maximum efficiency.
- Reattach the air filter to the filter panel door.
- Reinstall the filter panel door and tapping screw.
- Press ON/OFF to start the air conditioner.
Storing After Use
- Drain the water completely. See "draining the Air Conditioner".
- Run the air conditioner set to Fan Only for approximately 12 hours to dry the air conditioner.
- Unplug the air conditioner.
- Remove the flexible exhaust hose and store with the air conditioner in a clean, dry area. See "installation Instructions".
- Remove the window kit and store with the air conditioner in a clean, dry area. See "Installation Instructions".
- Remove the filter and clean. See Cleaning the Air Filter.
- Clean the outside of the air conditioner. See "Cleaning the Outside".
- Reinstall the filter.
- Remove the batteries and store the remote control with the air conditioner in a clean, dry area.
TROUBLESHOOTING
Before calling for service, try the suggestions below to see whether you can solve your problem without outside help.
Air conditioner will not operate

WARNING

Electrical Shock Hazard
Plug into a grounded 3 prong outlet.
Do not remove ground prong.
Do not use an adapter.
Do not use an extension cord.
Failure to follow these instructions can result in death, fire, or electrical shock.
■ The power supply cord is unplugged.
Plug into a grounded 3 prong outlet. See "electrical Requirements."
■ Time-delay fuse or circuit breaker of the wrong capacity is being used.
Replace with a time-delay fuse or circuit breaker of the correct capacity. See "electrical Requirements".
■ The power supply cord has tripped (Reset button has popped out).
Press and release RESET (listen for click; Reset button will latch and remain in) to resume operation.
■ A household fuse has blown, or a circuit breaker has tripped.
Replace the fuse, or reset the circuit breaker. See "Electrical Requirements".
■ The On/Off button has not been pressed.
Press ON/OFF.
■ The local power has failed.
Wait for power to be restored.
Air conditioner blows fuses or trips circuit breakers
■ Too many appliances are being used on the same circuit.
Unplug or relocate appliances that share the same circuit.
■ You are trying to restart the air conditioner too soon after turning off air conditioner.
Wait at least 3 minutes after turning off air conditioner before trying to restart the air conditioner.
■ You have changed modes.
Wait at least 3 minutes after turning off air conditioner before trying to restart the air conditioner.
Air conditioner power supply cord trips (Reset button pops out)
■ Disturbances in your electrical current can trip (Reset button will pop out) the power supply cord.
Press and release RESET (listen for click; Reset button will latch and remain in) to resume operation.
■ Electrical overloading, overheating, cord pinching or aging can trip (Reset button will pop out) the power supply cord.
After correcting the problem, press and release RESET (listen for click; Reset button will latch and remain in) to to resume operation. If the power cord fails to reset, contact a service technician.
NOTE: A damaged power supply cord must be replaced with a new power supply cord obtained from the product manufacturer and must not be repaired.
Air conditioner seems to run too much
■ Is there a door or window open?
Keep doors and windows closed.
■ The current air conditioner replaced an older model.
The use of more efficient components may cause the air conditioner to run longer than an older model, but the total energy consumption will be less. Newer air conditioners do not emit the “blast” of cold air you may be accustomed to from older units, but this is not an indication of lesser cooling capacity or efficiency. Refer to the efficiency rating (EER) and capacity rating (in Btu/h) marked on the air conditioner.
■ The air conditioner is in a heavily occupied room, or heat-producing appliances are in use in the room.
Use exhaust vent fans while cooking or bathing and try not to use heat-producing appliances during the hottest part of the day. Portable air conditioners are designed as supplemental cooling to local areas within a room. A higher capacity air conditioner may be required, depending on the size of the room being cooled.
Air conditioner runs for a short time only, but room is not cool
■ Set temperature is close to room temperature.
Lower set temperature. See " portable Air Conditioner Use ".
Display error code
■ if the unit display error code E5, it is water full in the unit, you should drain the water, see “Draining the air conditioner”. After draining, you can operate the unit again.
■ if the unit display error code E1/E2/E3/E4/EA, please contact customer service.
Air conditioner runs, but does not cool
■ The filter is dirty or obstructed by debris.
Clean the filter.
■ Air outlet is blocked.
Clear air outlet.
■ Set temperature is too high.
Lower set temperature.
Air conditioner cycles on and off too much
■ The air conditioner is not properly sized for your room.
Check the cooling capabilities of your portable air
conditioner. Portable air conditioners are designed as supplemental cooling to local areas within a room.
■ The filter is dirty or obstructed by debris.
Clean the filter.
■ There is excessive heat or moisture open container cooking, showers, etc.) in the room.
Use a fan to exhaust heat or moisture from the room. Try not to use heat-producing appliances during the hottest part of the day.
■ The louvers are blocked.
Install the air conditioner in a location where the louvers are free from curtains, blinds, furniture, etc.
WARRANTY
TWO-YEAR LIMITED MANUFACTURER'S WARRANTY
This Warranty, provided by Hisense U.S.A. Corporation (hereinafter "Hisense") covers Portable Air Conditioners (hereinafter "Product") in the United States of America, Puerto Rico, Guam and the U.S. Virgin Islands only, excluding any third party provided accessories and/or add-on's purchased separately; This warranty shall apply solely when this Product is purchased, stored, transported, handled, operated and maintained according to the Hisense provided instructions attached to or furnished with the Product. Hisense will, in its sole determination, repair or refund units deemed defective solely for materials or workmanship, at Hisense's discretion, for a limited warranty period of:
FOR 8K BTU and 10K BTU Air Conditioners:
Two (2) years for Parts and Labor, on Product from the date of purchase (requires purchase receipt) for the original buyer only.
FOR 12K BTU and 14K BTU Air Conditioners:
Two (2) years for Parts and Labor, in-home, on Product from the date of purchase (requires purchase receipt) for the original buyer only, and Three (3) years Parts on the compressor only* from the date of purchase (requires proof of purchase) for the original buyer only.
(*Does not include theevaporator, condenser, drier, connecting tubing – and all other parts, which are excluded from this warranty)
Commercial and/or Rental use of this Product is not covered under this warranty.
WHAT IS NOT COVERED:
- Any non-Hisense parts, including any third party provided accessories and/or add-on's;
- Service repairs to correct the installation of the Product, instruction on how to use the Product, replacement of home fuses or resetting circuit breakers, replacing or correcting home wiring.
- Service repairs related to use for other than normal, single family household use.
- Damages of any kind resulting from accidents, alterations, misuse, abuse, fire, floods, acts of God, improper usage, installation not in accordance with electrical or plumbing codes, or use of products/accessories not approved by Hisense in writing.
- Service repair outside of the United States, the Virgin Islands, Guam and Puerto Rico.
- Service or support for units resulting from unauthorized modifications made to the Product.
- Pickup and delivery. This product is designed for repair or replacement only.
- Packaging for the product.
- Damages caused by services performed by owner, service companies not authorized by Hisense in writing, the use of parts other than genuine Hisense parts, or parts obtained from entities other than Hisense authorized service companies.
Obligations for service and parts under this warranty must be performed by Hisense or a Hisense authorized service company. Product features or specification as described or illustrated are subject to change without notice.
DISCLAIMER OF IMPLIED WARRANTIES: LIMITATION OF REMEDIES
Exclusions and Limitations: This Warranty covers manufacturing defects in materials and workmanship encountered in the normal, noncommercial use of the Product, and does not cover consumer instruction, delivery, installation, set-up, adjustments, cosmetic damage or damage due to acts of nature, accident, misuse, abuse, negligence, commercial use or modification of or to any part of the Product. This Warranty applies to the original consumer only and does not cover Products sold to consumers in used, "AS IS" or "WITH ALL PROBLEMS" condition, or consumables (e.g., fuses,
batteries, bulbs etc;; This Warranty is invalid if the factory-applied serial number has been altered or removed from the Product. Damage occurring to any Product returned for service that is caused by environmental hazards, improper or unsecure packaging or shipping by the original consumer purchaser is excluded from coverage under this Warranty. This Warranty is valid only in the United States, the U.S. Virgin Islands, Guam, and Puerto Rico, and only applies to Products purchased and serviced in those regions. Warranty will be voided if attempts of repair are performed by the consumer or any third parties that are NOT authorized by Hisense in writing.
THERE ARE NO EXPRESS WARRANTIES OTHER THAN THOSE EXPRESSLY DESCRIBED ABOVE, AND NO WARRANTIES WHETHER EXPRESS OR IMPLIED, INCLUDING, BUT NOT LIMITED TO, ANY IMPLIED WARRANTIES OF MERCHANTABILITY OR FITNESS FOR A PARTICULAR PURPOSE, SHALL APPLY AFTER THE EXPRESS WARRANTY PERIOD STATED ABOVE, AND NO OTHER EXPRESS WARRANTY OR GUARANTY GIVEN BY ANY PERSON, FIRM OR ENTITY WITH RESPECT TO THE PRODUCT SHALL BE BINDING ON HISENSE. THIS WARRANTY IS THE SOLE AND EXCLUSIVE WARRANTY WITH RESPECT TO THE PRODUCT AND HISENSE IS THE EXCLUSIVE WARRANTY PROVIDER FOR THE PRODUCT. REPAIR OR REFUND, AT HISENSE'S SOLE DISCRETION, IS THE EXCLUSIVE REMEDY OF THE CONSUMER. HISENSE SHALL NOT BE LIABLE FOR ANY INCIDENTAL OR CONSEQUENTIAL DAMAGES CAUSED BY THE USE, MISUSE OR INABILITY TO USE THE PRODUCT.NOTWITHSTANDING THE FOREGOING, CONSUMER'S RECOVERY AGAINST HISENSE SHALL NOT EXCEED THE PURCHASE PRICE OF THE PRODUCT SOLD BY HISENSE. THIS WARRANTY SHALL NOT EXTEND TO ANYONE OTHER THAN THE ORIGINAL CONSUMER WHO PURCHASED THE PRODUCT AND IS NOT TRANSFERABLE UNDER ANY CIRCUMSTANCES.PROOF OF PURCHASE SHALL BE REQUIRED FOR ALL WARRANTY CLAIMS.
If you need assistance, first see the “Troubleshooting” section of your instruction manual; After checking “Troubleshooting,” additional help can be found by calling:
Hisense-USA: 1-877-465-3566 (English & Spanish, Monday–Friday 9 a.m. to 6 p.m. EST)
Keep this Warranty page and your sales receipts together for future reference. You must provide proof of purchase for warranty service.
Write down the following information about your appliance to better help you obtain assistance or service if you should ever need it. You will need to know your complete model and serial number. You can find this information on the model and serial number label located on the Product.
Store name: ____ Model number: ____
Address: ____ Serial number: ____
Phone number: ____ Purchase date: ____
USER GUIDE SUPPORT PAGE ASSISTANCE OR SERVICE
Before calling for assistance or service, please check the troubleshooting section of your user manual. It may save you the cost of a service call. If you still need help, follow the instructions below. When calling, please know the purchase date and the complete model and serial number of your appliance. This information will help us to better respond to your request. If you need to order replacement parts, we recommend that you use only factory-specified replacement parts. Factory-specified replacement parts will fit right and work right because they are made with the same precision used to build every new
The Hisense Call Center can provide assistance with:
■ Features and specifications on our appliances
■ Installation information
■ Use and maintenance procedures
■ Repair parts sales
■ Referrals to service companies.
■ Designated service technicians are trained to fulfill the product warranty and provide after-warranty service, anywhere in the United States and US territories.
For further assistance
If you need further assistance, you can write with any questions or concerns to:
Hisense USA Corp.
Customer Service
PO Box 3289
Suwanee, GA 30024
USA
Please include a daytime phone number in your correspondence.
PRODUCT REGISTRATION
To better safeguard your product, please log on to

www.hisense-usa.com/support/productReg.asp to register your product.
The Benefits of Product Registration:
Product Update
Proper registration will enable Hisense to contact you of safety notifications, updates, accessories, or other product changes.
Proof of Ownership
In the case of an insurance loss such as fire, flood, or theft, your registration will serve as your proof of purchase.
Better Service
If you have any questions about your new Hisense product, your registration will help us assist you.
NOTA: Adjust BTUs to room use and location:

natural_image
Illustration of hands holding a coiled tube wrapped in mesh, with no visible text or symbolsnatural_image
Technical line drawing of a coiled pipe or duct assembly with labeled components A and B (no text or symbols beyond labels)A. Manguera de escape flexible
B. Adaptador de ventana de escape
natural_image
Illustration showing two hand tools in a circular arrangement, one with a magnified view of the tool (no text or symbols)natural_image
Illustration of hands using a tool to adjust or install a component, enclosed in a circle with an arrow indicating rotation (no text or symbols present)NOTA:
It is convenient to set the timer with TIMER ON/OFF buttons.
www.hisense-usa.com/support/productReg.asp para registrar su producto
- ÍNDICE DE CONTENIDOS
- AIR CONDITIONER SAFETY
- Your safety and the safety of others is very important.
- DANGER
- WARNING
- IMPORTANT SAFETY INSTRUCTIONS
- SAVE THESE INSTRUCTIONS
- DISPOSING OF THE UNIT
- INSTALLATION REQUIREMENTS
- Tools and Parts
- Tools needed
- Parts supplied
- Location Requirements
- NOTES:
- Electrical Requirements
- Electrical Shock Hazard
- To test your power supply cord:
- INSTALLATION INSTRUCTIONS
- Unpack the Air Conditioner
- Remove packaging materials
- Window Vent Panel And Extensions
- Install Portable Air Conditioner
- Install Exhaust Hose and Adapter
- Window Installation
- Installation In Vertical Sliding Windows
- Installation In Horizontal Sliding Windows
- PORTABLE AIR CONDITIONER USE
- IMPORTANT:
- NOTE:
- Mode
- Fan Speed
- Temperature
- ION (Optional)
- Using the Remote Control
- Insert the Batteries
- Storage tip
- How to Use
- Remote control
- Power On or Off
- Button and Function
- Indication symbols
- SMART Mode
- SUPER
- Sleep mode
- I FEEL
- DIMMER
- Clock function
- TIMER ON/OFF
- Using the TIMER
- To cancel Timer On
- SWING
- Normal Sounds
- PORTABLE AIR CONDITIONER CARE
- Cleaning the Outside
- Storing After Use
- TROUBLESHOOTING
- Air conditioner runs, but does not cool
- Air conditioner cycles on and off too much
- WARRANTY
- TWO-YEAR LIMITED MANUFACTURER'S WARRANTY
- FOR 8K BTU and 10K BTU Air Conditioners:
- FOR 12K BTU and 14K BTU Air Conditioners:
- WHAT IS NOT COVERED:
- DISCLAIMER OF IMPLIED WARRANTIES: LIMITATION OF REMEDIES
- USER GUIDE SUPPORT PAGE ASSISTANCE OR SERVICE
- The Hisense Call Center can provide assistance with:
- For further assistance
- PRODUCT REGISTRATION
- Product Update
- Proof of Ownership
- Better Service
- NOTA:
Brand : HISENSE
Model : AP-12CR1SEJS
Category : Air conditioner