
DCH-261 - Drone DENVER - Free user manual and instructions
Find the device manual for free DCH-261 DENVER in PDF.


| Product Type | Drone |
| Brand | Denver |
| Model | DCH-261 |
| Suitable Age | 14 years and older |
| Camera Resolution | 640 x 480 pixels |
| Video Resolution | 640 x 480 at 30fps |
| Max Recommended Flight Height | 10 meters |
| Battery Type | LiPo rechargeable |
| Transmitter Battery | 4 x AA 1.5V (not included) |
| Charging Method | USB via computer |
| Operating Frequency | 2.4 GHz |
| Speed Modes | 3 (Low, Medium, High) |
| Flip Function | 360 degree flip |
| Trim Adjustment | Yes (left/right and forward/backward) |
| Calibration | Yes (via transmitter stick procedure) |
| Safety Features | Keep away from rotating blades; not a toy |
| Included Accessories | Drone, transmitter, rechargeable battery, USB cable, manual |
| Color | Black with orange and black blades |
| Recommended Flight Area | Open space, at least 5x5x3 meters |
Frequently Asked Questions - DCH-261 DENVER
User questions about DCH-261 DENVER
0 question about this device. Answer the ones you know or ask your own.
Ask a new question about this device
Download the instructions for your Drone in PDF format for free! Find your manual DCH-261 - DENVER and take your electronic device back in hand. On this page are published all the documents necessary for the use of your device. DCH-261 by DENVER.
USER MANUAL DCH-261 DENVER
Please read the user handbook carefully and then keep it in a safe place for future consultation and maintenance.
1.1 Important Notice
(1) This product is not a toy, it's a piece of complicated equipment which integrated with professional knowledge by mechanic, electric, air mechanics, high-frequency transmitter and so on, so it should be installed correctly and adjusted to avoid any accidents. The owner must always operate in a safe manner, if improper operation that caused human injured or property damage, then we DENVER ELECTRONICS A/S accept no liability for any safety duties from operation. As we have no control over the way they maintained, used and operated.
(2) This product is not suitable for users under 14 years of age.
(3) The use of the drone may be prohibited in some areas like train stations, airports, aircrafts, inhabited areas etc. You should check with the authorities whether the use of the drone is permitted in some public or private areas. Always use the drone bearing in mind not to breach people's privacy. We exclude liability for any wrong use of the drone.
(4) We DENVER accept no liability for any safety duties or fines arising from operation, usage or mis-control after the sale of products. Warranty does not cover if drone crashes and get damaged.
1.2 Safety Precautions
Keep away from crowd when flying, since drone flight is a high risk hobby. Mis-assembled or broken main frame or defective electronic equipment or unskilled operation may cause accidents of machine damaged or injured. Please pay special attention to safety operation.
(1) Keep away from people and obstacles
"The flying speed and status of the drone is uncertain, so it may cause potential danger." When choosing a flying site should stay clear of buildings, trees and power lines. AVOID flying in or near crowded areas. Meanwhile avoid flying in rain, storms, thunder and lightening to protect machinery and parts out of damage.
(2) Keep away from humid environments
Inside of drone is made up of precise electronic components. Stay away from humidity or water vapor to protect machinery and parts.
(3) Safety operation
Please fly your drone according to your physical status and flight skill. Fatigue, listlessness and mis-operation will increase possibilities of accidental hazard.
(4) Keep away from rotating blades
Keep your face and body as well as all spectators away from the rotating blades. The spinning blades of a model of this type can cause serious injury.
(5) We recommend flying the drone below 10 meters of height.
(6) Keep away from heat
A drone is made up of metal, fiber, plastic, electronic components, etc. So keep it away from heat and sunshine to avoid distortion, and damage.
1.3 Check List Before First Flight
(1) Flying field should be in an open space and we suggest at least 5M length *5M wide *3M height.
(2) Make sure the receiver and transmitter is fully charged.
(3) Please strictly obey the order of tum-on, turn-off before operation. When starting your flight, first turn on the transmitter, and connect power cable of drone last; When finishing your flight, please disconnect the power cable of your drone first, tum off transmitter last. An upset in the order of connection may cause your drone loose control to threaten yourself and others safely. Please follow a correct habit of tum-on and tum-off.
(4) Make sure the connection is solid between battery or motor. The ongoing vibration may cause bad connection of power terminal and make the drone uncontrollable.
Name for parts:
1. DRONE
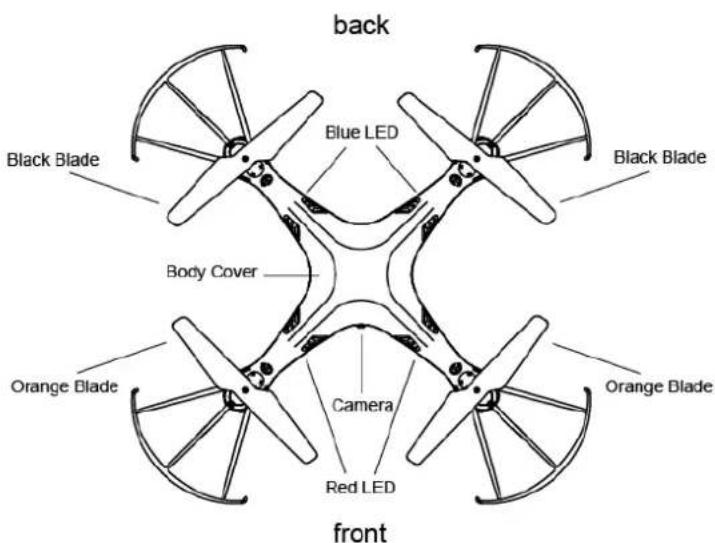
| Body Cover Black blade |
| Camera Black blade |
| Orange blade Red LED |
| Orange blade Blue LED |
2. Transmitter
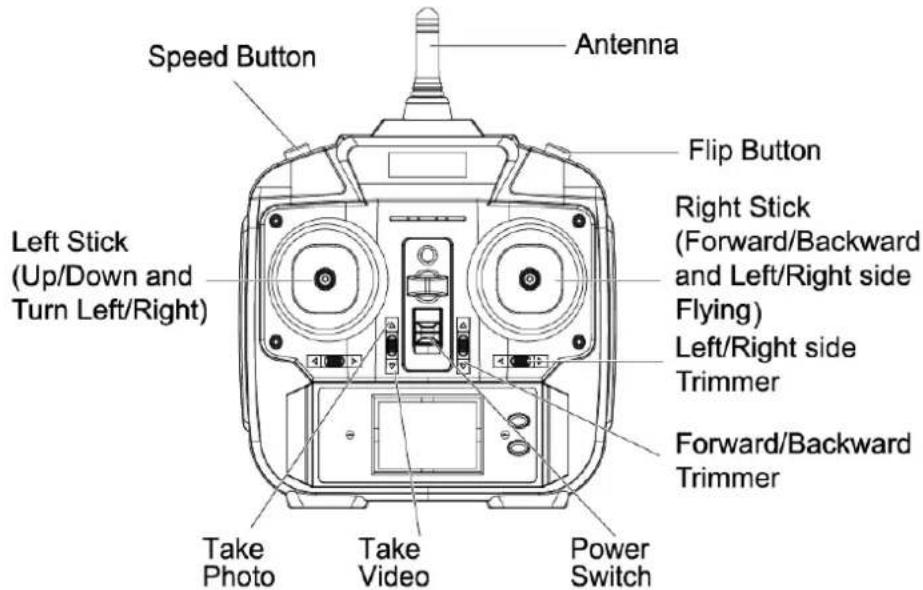
| Antenna |
| Speed Button |
| Flip Button |
| Left Stick(Up/Down and Turn Left/Right) |
| Take Photo |
| Take Video |
| Power Switch |
| Right Stick(Forward/Backward and Left/Right Side Flying) |
| Left/ Right Side Trimmer |
| Forward/Backward Trimmer |
Transmitter battery installation
Open the battery compartment cover of transmitter, install the battery into box according to electrode instructions (Batteries not included).
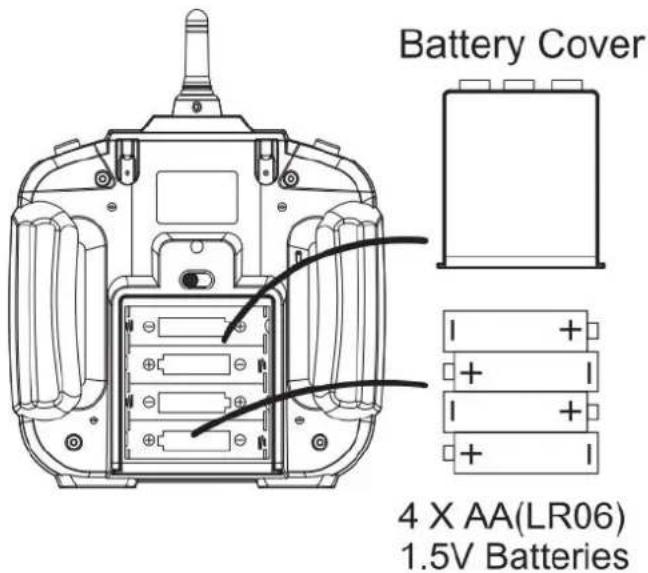
| Battery cover |
| 4X AA 1.5V batteries (NOT INCL.) |
Notice:
- When install the battery, you must insert the batteries correct according to the diagram
- Please don't mix new and old battery together.
- Please don't use different kinds of batteries.
Charger notice:
- Connect 1 or 2 batteries (only one battery incl.) connect USB to computer.
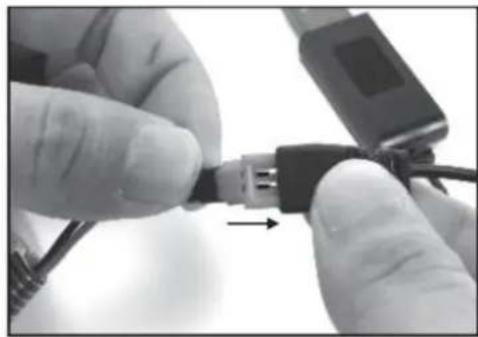
natural_image
Close-up of hands connecting a black cable to a connector with an arrow indicating connection (no visible text or symbols)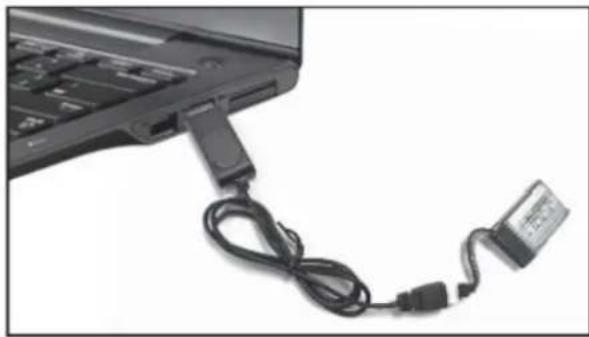
natural_image
Close-up of a laptop with attached cable and power adapter (no visible text or symbols)Connect USB plug to computer
- When charging, the red indicator gets a solid light and then fully charged, then light off.
Warning: Please only use equipped charger to charge for Lipo battery.

LiPo Battery Disposal & Recycling

Lithium-Polymer (LiPo) batteries must not be placed in with household trash. Please contact your environmental or waste agency or the supplier of your model for local regulations and the location of your nearest LiPo battery recycling center.
Calibration instructions
When the drone takes off, hovering can't be adjusted by trim and causes difficult operation, then please adjust the drone according to below steps:
- Pull out the power of drone, power off the transmitter;
- Power on the transmitter, push the throttle stick to utmost and then back to lowest position, then the transmitter is ready to code pairing.
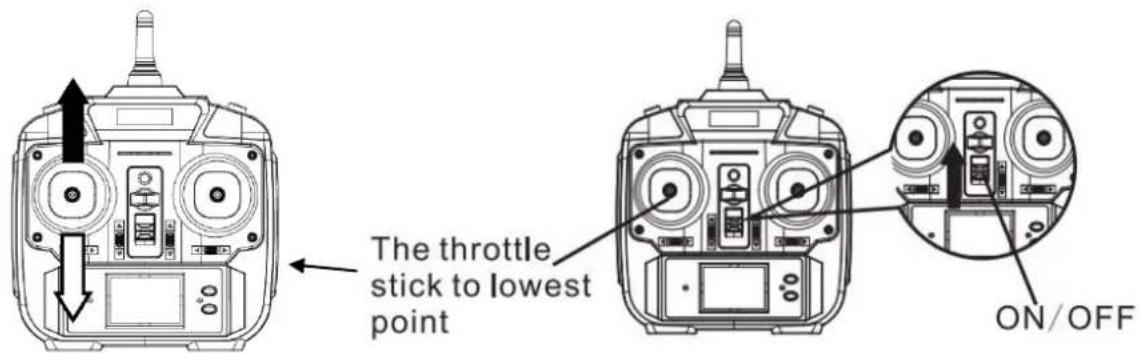
- Power on the drone, and put it in the level surface, The transmitter will make two short "BEEP" sound and the red LED will flash, and it shows code pairing successful.
- When transmitter and drone gets a solid light and no more flashing, it shows adjustment finished and drone is ready to fly.
Flying operation:
-
Power on transmitter, the LED indicator becomes flashing, You need to push the throttle stick to utmost and then back to lowest position, the indicator gets a solid light. It shows transmitter is ready to code pairing.
-
Install the battery to mounted box, power on the drone.
- Put the drone on the flat ground, when light stops flashing and gets a solid light, then drone is ready to fly.
Important notice: When power on the drone, the receiver gyro will need to calibrate level, so it must make sure the surface is level. Then the drone will be ready for controlling.

flowchart
graph LR
    A["Initial Robot with Component"] --> B["Step 1: Insert Robot"]
    B --> C["Step 2: Insert Robot with Component"]
    C --> D["Step 3: Insert Robot with Component"]
    D --> E["Final Step with Left Arrow and Right Arrow"]
Battery installation and power connection for drone
WARNING
When installing the battery, you must obey the electrode instructions, loaded reverse is not allowed, it may cause short circuit.
Non-rechargeable batteries can't be charged, rechargeable battery can only be charged under adult supervision.
Different type pf battery can't be mixed, new and old batteries can't mix.
Please don't overcharge the battery, please don't leave battery charging alone.
Please don't throw the battery into fire or put in high temperature place, it may cause battery explosion.
The charger and battery is not a toy.
Check the product regularly to see if any damage to the components, if any please stop using until repaired ok.
Flying control:
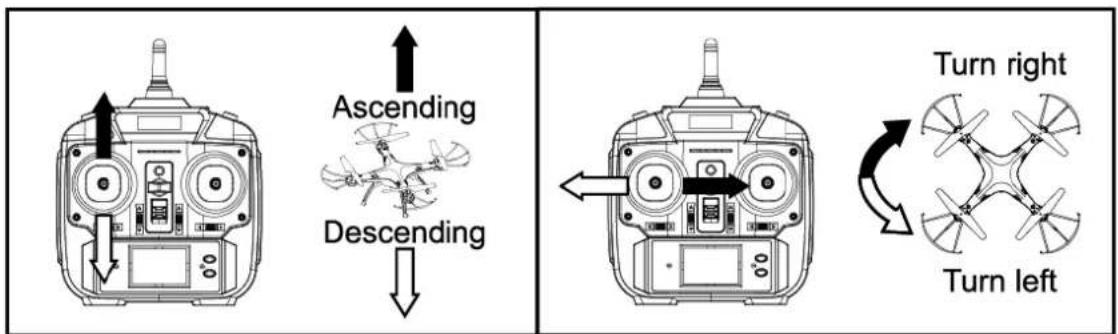
- When move throttle stick up or down, then the drone flying ascending or descending at the same time.
- When move throttle stick to left or right, then the drone flying counterclockwise or clockwise at the same time.
flowchart
graph TD
    A["Top: Drone with Forward/Backward"] --> B["Left: Left sideward fly"]
    C["Right: Right sideward fly"] --> D["Left: Right sideward fly"]
    style A fill:#f9f,stroke:#333
    style C fill:#f9f,stroke:#333
    style B fill:#ccf,stroke:#333
    style D fill:#ccf,stroke:#333
-
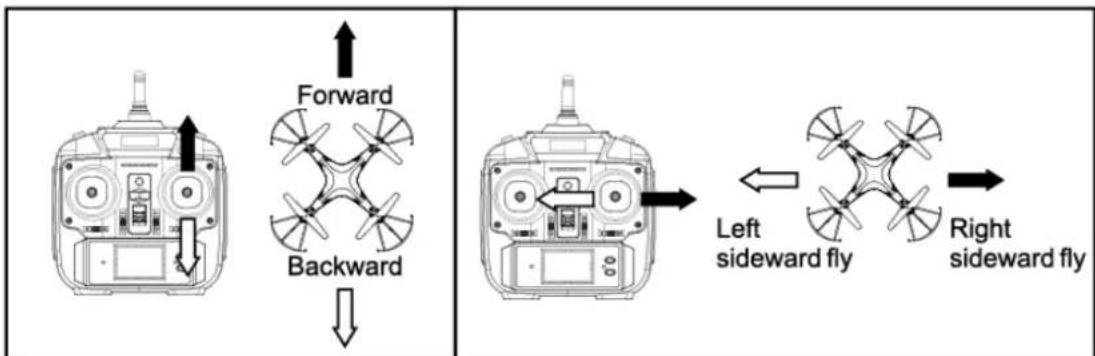
When move right stick up or down,, then the drone flying forward or backward at the same time.
-
When move right stick to left or right, then the drone flying left or right sideward at the same time.
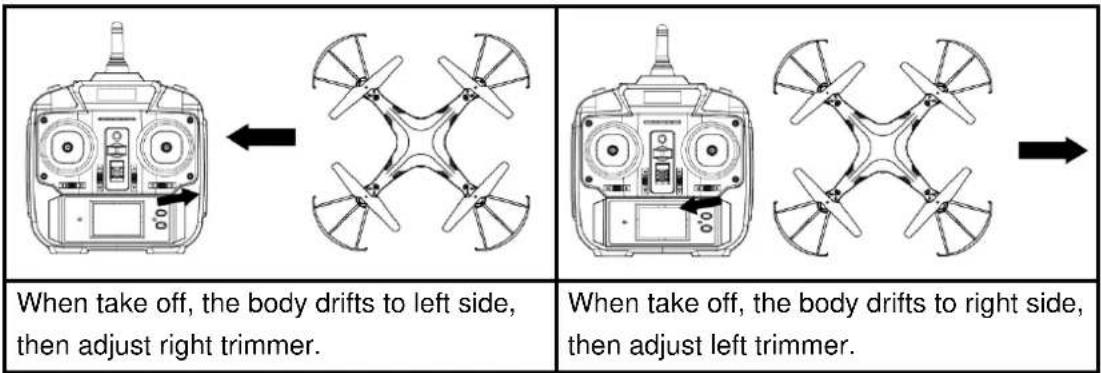
1. Adjust left and right side trimmer
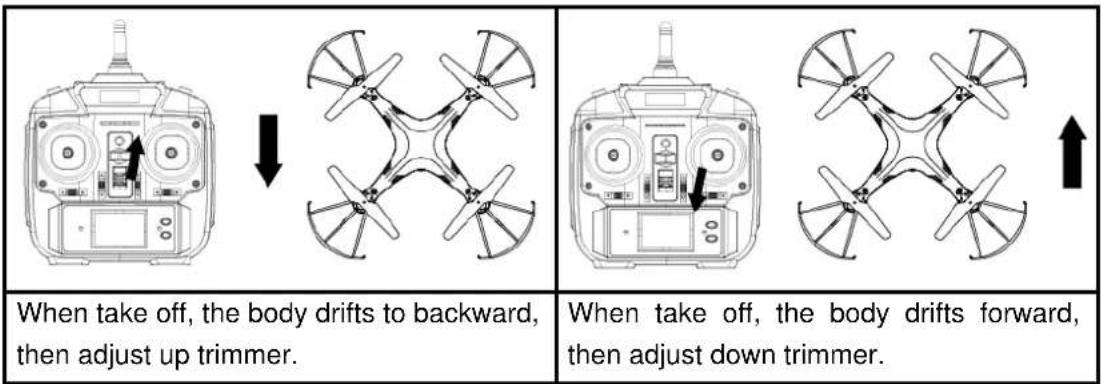
2. Adjust forward and backward trim
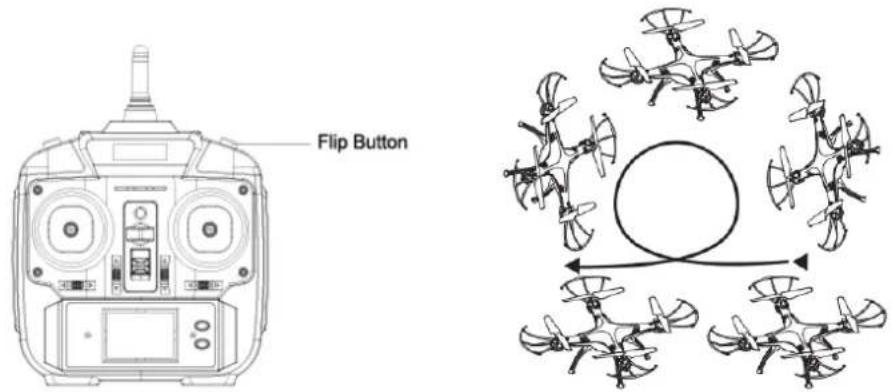
360 degree flip flying
- Make sure the Drone is flying at least 3 meters above the floor, or 3 meters below the ceiling.
- Press the Flip button on the transmitter, the transmitter will make a "Beep" sound, then flick the right stick in any direction, then the Drone will flip in that direction.
- You may need to push up the throttle stick after the flip, if your battery is low on power, in order to keep the Drone high in the air after the flip.
Speed mode
This drone has 3 response modes: Low, Medium, High.
MODE 1(Low): Press the speed mode switch until you hear a single beep, suitable for beginner.
MODE 2(Medium): Press the speed mode switch until you hear two beep, suitable for practician.
MODE 3(High): Press the speed mode switch until you hear three beep, suitable for Skillful player.
How to take video & photo
natural_image
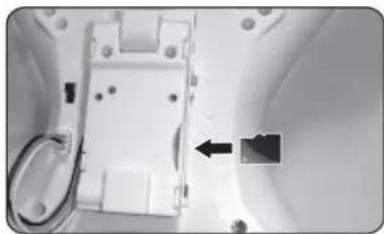
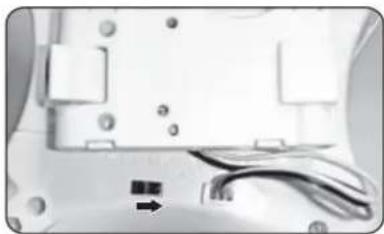
Interior view of a white electronic device with a mounted component and a black arrow pointing to a small component (no visible text or symbols)Step 1: Insert the Micro SD card into the camera(see pic), make sure the direction you selected is correct.
natural_image
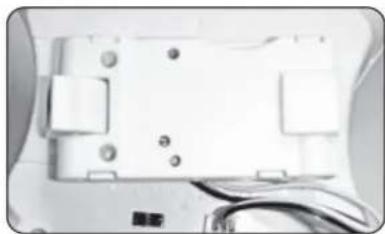
Close-up of a white electronic device with black cables and connectors, no visible text or symbolsStep 2: Turn on the Power Switch of the Drone as you would for any normal flight.
natural_image
Close-up of a white electronic device with buttons and a cable, no visible text or symbolsStep3: A blue light will show on the camera whenever the Drone is in use. A Red light will flash on then off when you take a photo, and A Red light will remain on when taking a video.
When Aerial is over, please disconnect the drone and battery. Pull out the Micro SD, put the Micro SD into the cardreader, then connect the USB to computer.
Drone camera parameters as below:
Video resolution: 640*480P/30fps; Camera resolution: 640*480
Resetting the drone
natural_image
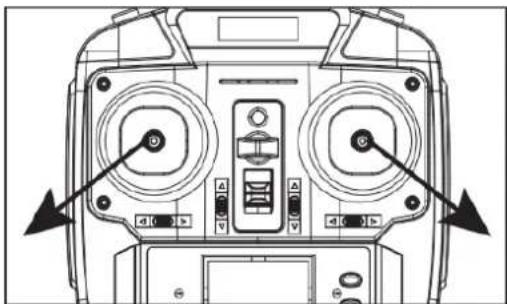
Top-down schematic of a device front panel with control buttons and display (no text or symbols)Push both control sticks to the positions shown in the picture, and hold them for a few seconds. The lights on the drone will start to flash. Now the drone is recovered to its original factory setting and ready to fly again.
sALL RIGHTS RESERVED, COPYRIGHT DENVER ELECTRONICS A/S
DENVER®
www.denver-electronics.com
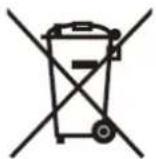
Electric and electronic equipment and included batteries contains materials, components and substances that can be hazardous to your health and the environment, if the waste material (discarded electric and electronic equipment and batteries) is not handled correctly.
Electric and electronic equipment and batteries is marked with the crossed out trash can symbol, seen below. This symbol signifies that electric and electronic equipment and batteries should not be disposed of with other household waste, but should be disposed of separately.
As the end user it is important that you submit your used batteries to the appropriate and designated facility. In this manner you make sure that the batteries are recycled in accordance with legislature and will not harm the environment.
All cities have established collection points, where electric and electronic equipment and batteries can either be submitted free of charge at recycling stations and other collection sites, or be collected from the households. Additional information is available at the technical department of your city.
Hereby, Inter Sales A/S, declares that this product DENVER DCH-261 is in compliance with the essential requirements and other relevant provisions of Directive 1999/5/EC. A copy of the Declaration of conformity may be obtained at: Inter Sales A/S, Stavneagervej 22, DK-8250 Egaa, Denmark.
Imported by:
DENVER ELECTRONICS A/S
Stavneagervej 22
DK-8250 Egaa
Denmark
www.facebook.com/denverelectronics


- Important Notice
- Safety Precautions
- Check List Before First Flight
- Name for parts:
- DRONE
- Transmitter
- Transmitter battery installation
- Notice:
- Charger notice:
- LiPo Battery Disposal & Recycling
- Calibration instructions
- Flying operation:
- WARNING
- Adjust left and right side trimmer
- Adjust forward and backward trim
- degree flip flying
- Speed mode
- How to take video & photo
- Resetting the drone
- DENVER®
Brand : DENVER
Model : DCH-261
Category : Drone