
UB-T580 - Tablet PANASONIC - Free user manual and instructions
Find the device manual for free UB-T580 PANASONIC in PDF.
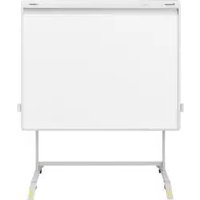


| Product Type | Interactive Electronic Whiteboard (elite Panaboard) |
| Model Numbers | UB-T580, UB-T580W |
| Dimensions (UB-T580) | 1,352 mm x 1,637 mm x 74 mm (without pen holders); 1,352 mm x 1,713 mm x 74 mm (with pen holders) |
| Dimensions (UB-T580W) | 1,352 mm x 1,915 mm x 74 mm (without pen holders); 1,352 mm x 1,991 mm x 74 mm (with pen holders) |
| Screen Board Size (UB-T580) | 1,175 mm x 1,582 mm (H x W) |
| Screen Board Size (UB-T580W) | 1,175 mm x 1,860 mm (H x W) |
| Effective Area (UB-T580) | 1,175 mm x 1,567 mm (77" diagonal, 3:4 aspect ratio) |
| Effective Area (UB-T580W) | 1,037 mm x 1,845 mm (83" diagonal, 9:16) or 1,153 mm x 1,845 mm (86" diagonal, 10:16) |
| Power Supply | USB bus power (5 V, 500 mA, no AC adapter required) |
| Interface | USB 2.0 |
| Touch Features | Finger touch as mouse, draw/erase on computer screen, support Windows 7 multi-touch, save drawings as images |
| Stylus Pen | Included; works like finger touch |
| Electronic Pen (Optional) | Infrared communication; draws with marker (black/red/blue/green), eraser, highlighter, mouse function; low-power mode; range approx. 5 m |
| Software | elite Panaboard software and elite Panaboard book for writing, drawing, attaching images, and saving/retrieving board content |
| Operating Environment | Temperature: 10°C to 35°C; Humidity: 30% to 80% |
| Storage Environment | Temperature: -20°C to 60°C; Humidity: 20% to 80% |
| System Requirements | IBM PC/AT compatible with DVD-ROM, Intel Pentium 4 or later, USB 2.0 |
| Maintenance | Clean screen board with soft damp cloth; clean reflecting tape areas; replace electronic pen tip when worn |
| Battery (Electronic Pen) | 1 x AAA alkaline battery; battery life approx. 30 hours continuous use |
| Optional Accessories | Stand (KX-B061-A), Electronic Pen (UE-608020), Stylus Pen (UE-608021), Replacement Penpoints (UG-6020) |
| Safety Certifications | FCC Class A, RoHS compliant, EN ISO 7779 (noise) |
Frequently Asked Questions - UB-T580 PANASONIC
User questions about UB-T580 PANASONIC
0 question about this device. Answer the ones you know or ask your own.
Ask a new question about this device
Download the instructions for your Tablet in PDF format for free! Find your manual UB-T580 - PANASONIC and take your electronic device back in hand. On this page are published all the documents necessary for the use of your device. UB-T580 by PANASONIC.
USER MANUAL UB-T580 PANASONIC
Operating Instructions
Electronic Board (elite Panaboard)
Model No. UB-T580 UB-T580W

Stand and electronic pen are optional devices.
- Before operating this unit, please read these instructions carefully and keep them for future reference.
- Please refer to attached Installation Manual.
Installation performed by non-authorized individuals could cause safety-related problems with the operation of this equipment.
For U.S.A. only:
• To locate the closest authorized dealer in your area, please call 1-800-449-8989.
Introduction
Thank you for purchasing the Panasonic Electronic Board.
For optimum performance and safety, please read these instructions carefully.
Feature Highlights
You can project your computer screen onto the screen board of elite Panaboard using a projector and perform various operations. The main features of elite Panaboard are as follows.
Touch Features
- Manipulate objects on the computer screen by using your finger as a mouse.
- Draw or erase lines on the computer screen by using your fingers.
- Save what you draw on the computer screen as image files.
- Supports Windows® 7 multi-touch functionality.
elite Panaboard book
Use the elite Panaboard book software that supports elite Panaboard operations, such as writing, drawing, attaching images and computer operations. This software lets you save the contents of the screen board on your computer and retrieve it for later use.
USB bus power operation
The elite Panaboard operates on the power supply received via the USB cable connected to a computer. There is no need to connect the power cord to an AC outlet.
Stylus Pen
The stylus pen works just like using your finger. The finger operation given in this manual also applies to the stylus pen operation.
Electronic Pen (Optional Device)
- Use the electronic pen to draw or erase lines on the computer screen and to select line colors and other options.
- Manipulate objects on the computer screen remotely by using the up and down buttons on the electronic pen.
Usage Scenarios
For Education
- The elite Panaboard makes it easy to use teaching materials efficiently, since it allows you to directly operate various kinds of educational software projected onto the screen board using your finger, or to enter text using your finger or an electronic pen.
- By using illustrations, pictures and other tools along with explanations, you can encourage your students to actively participate in class through the aid of moving images on the screen board.
- Draw your students' interest by using the screen shade feature to show questions to students while hiding the answers, and incrementally showing the rest of the screen.
- The teacher can prepare materials before class to display on the elite Panaboard.
For Business
- Visually convey your product's characteristics and create an appealing product presentation by displaying images and using your finger or the electronic pen to highlight key points.
- Information projected on the elite Panaboard—including what you add, using your finger or the electronic pen—can be displayed in real-time at remote locations using videoconferencing equipment.
Things you should keep a record of
Attach your sales receipt here
| For your future reference | |
| Date of purchase | |
| Model no. | |
| Serial number | |
| Dealer's name | |
| Dealer's address | |
| Dealer's tel no. | |
Abbreviations
Windows® refers to the Microsoft® Windows® operating system. Windows® XP refers to the Microsoft® Windows® XP operating system. Windows Vista® refers to the Microsoft® Windows Vista® operating system. Windows® 7 refers to the Microsoft® Windows® 7 operating system. DirectX® refers to the Microsoft® DirectX® application programming interface.
Trademarks
- Microsoft, Windows, Windows Vista, DirectX, Windows Media, and Internet Explorer are either registered trademarks or trademarks of Microsoft Corporation in the United States and/or other countries.
- IBM is a trademark of International Business Machines Corporation in the United States, other countries, or both. • Intel and Pentium are trademarks of Intel Corporation in the U.S. and other countries.
- Adobe, Reader and Flash are either registered trademarks or trademarks of Adobe Systems Incorporated in the United States and/or other countries.
- All other trademarks identified herein are the property of their respective owners.
Organization of the Manuals
The following documents are provided to help you use the elite Panaboard properly and safely. In addition to these documents, help information is provided for all software.
| Operating Instructions (this document) | Safety precautions, operating procedures, and information on after-sales service are provided. |
| Installation Manual (for qualified service personnel) | Safety precautions on assembly, assembly procedure of elite Panaboard and stand, and wall mounting construction procedure are provided. |
| Help of the Software | Instructions for elite Panaboard software and elite Panaboard book (included) are provided in the help information accompanying the software.For details on accessing this information, see “Viewing the Help of the Software” (page 25). |
Federal Communications Commission Requirements
For United States Only
Note
This equipment has been tested and found to comply with the limits for a Class A digital device, pursuant to part 15 of the FCC Rules. These limits are designed to provide reasonable protection against harmful interference when the equipment is operated in a commercial environment. This equipment generates, uses, and can radiate radio frequency energy and, if not installed and used in accordance with the instruction manual, may cause harmful interference to radio communications. Operation of this equipment in a residential area is likely to cause harmful interference, in which case the user will be required to correct the interference at his own expense.
FCC Warning
To assure continued FCC compliance, the user must use only shielded interface cables. Also, any unauthorized changes or modifications to this equipment would void the user's authority to operate this device.
Warning about saving data
When the system storage device or any of its optional storage devices is adversely affected by operational errors, static electricity, electrical noise, vibration, dust, or when the power has been cut off due to malfunction, repair, or inadvertently, the memory contents may be lost or changed. Before operating the system, make a point of reading the precautionary notes in the Operating Instructions and the help information, and observe them during operation.
Please observe carefully the following precaution:
- Make absolutely sure that all important data is saved by back-up or the original is saved.
The manufacturer hereby declares that it cannot be held accountable for any loss or change in any data stored on floppy disks, hard disks, optical disks, or other memory devices.
System Requirements
| Computer IBM | PC/AT compatible with a DVD-ROM drive |
| CPU Intel | Pentium 4 processor or later |
| Interface USB 2.0 |
Note
- For details about the system requirements, refer to "Read Me First" (page 19) in the install menu of the included DVD-ROM.
- Even when the system requirements are met, the elite Panaboard response may be delayed or the electronic pen may malfunction if other applications, anti-virus software, etc. are active.
Exemption of Liability
Panasonic System Networks Co., Ltd. is not responsible for accidents or injuries caused by, but not limited to, the following:
- Altering the device or improper installation construction.
- Using the device for purposes beyond its intended use.
- Earthquake, fire, flood, tidal wave, hurricane, lightning or other natural phenomena.
- Natural aging of the building or similar phenomena.
For FRG Users (For Germany Only)
Note
Machine noise information regulation - 3.GPSGV, the maximum sound pressure level is 70 dB(A) or less, in conformity with EN ISO 7779.
This device is not intended for use in the direct field of view at visual display workplaces. To avoid accommodating reflexions at visual display workplaces this device must not be placed in the direct field of view.
For Ukraine Only
Declaration of Conformity
with the requirements of Technical Regulation on the Restriction of the use of certain Hazardous Substances in Electrical and Electronic Equipment (adopted by Order №1057 of Cabinet of Ministers of Ukraine)
The Product is in conformity with the requirements of Technical Regulation on the Restriction of the use of certain Hazardous Substances in electrical and electronic equipment (TR on RoHS).
The content of hazardous substance with the exemption of the applications listed in the Annex №2 of TR on RoHS:
- Lead (Pb) – not over 0.1wt % or 1000wt ppm;
- Cadmium (Cd) – not over 0.01wt % or 100wt ppm;
- Mercury (Hg) – not over 0.1wt % or 1000wt ppm;
- Hexavalent chromium (Cr 6+ ) – not over 0.1wt % or 1000wt ppm;
- Polybrominated biphenyls (PBBs) – not over 0.1wt % or 1000wt ppm;
- Polybrominated diphenyl ethers (PBDEs) – not over 0.1wt % or 1000wt ppm.
Names and Uses of the Parts 13
Connecting External Components 17
Installing the Software 19
Setting the Projector 21
Using the elite Panaboard After Positioning the System (Calibration) 22
Viewing the Help of the Software 25
Uninstalling the Software.... 26
Uninstalling Panasonic Software Update Manager 26
Download the Latest Software....26
Appendix 27
Daily Care 27
Cleaning the elite Panaboard 27
Replacing the Penpoint of the Electronic Pen (Optional Device).... 27
Replacing the Battery in the Electronic Pen (Optional Device).... 28
Changing the Attachment Location of the Pen Holders.... 28
Troubleshooting 29
Specifications 32
Supplies & Accessories 33
For Your Safety
To prevent severe injury and loss of life, read this section carefully before using the unit to ensure proper and safe operation of your unit.
- This section explains the graphic symbols used in this manual.
 WARNING WARNING | Denotes a potential hazard that could result in serious injury or death. |
 CAUTION CAUTION | Denotes hazards that could result in minor injury or damage to the unit. |


These symbols are used to alert operators to a specific operating procedure that must not be performed.
This symbol is used to alert operators to a specific operating procedure that must be emphasized in order to operate the unit safely.

WARNING
Power

Stop operation immediately if the unit emits smoke, excessive heat, abnormal smell or unusual noise. These conditions can cause fire or electric shock. Immediately unplug the USB cable, and contact your dealer for service.

During thunderstorms, do not touch the unit and USB cable. It may cause an electric shock.
Installation and Relocation

Have the unit installed, removed and disposed of only by qualified service personnel.

When the unit will no longer be used, in order to prevent it from falling, do not leave the unit installed, but request qualified service personnel to remove the unit. If the unit falls, it can cause injury.
Operating Safeguards: Electronic Pen (Optional Device)

If metal fragments or water gets into the unit, unplug the USB cable immediately. Contact your dealer for service. Operating the contaminated unit can cause fire or electric shock.

Never open or remove unit covers that are screwed with screws unless specifically instructed in the "Operating Instructions". A high-voltage component can cause electric shock.

Do not alter the unit or modify any parts. Alteration or modification can cause fire or electric shock.

CHOKING HAZARD
Keep the penpoint, batteries, screws, and washers out of reach of small children.
They might accidentally swallow these items.

Do not look into the lens while the projector is being used. Strong light is emitted from the projector's lens. If you look directly into this light, it can hurt and damage your eyes. Be especially careful not to let young children look into the lens. In addition, turn the projector off and unplug the power cord when you are away from the projector.
Battery

Use only the specified type of battery. Using the incorrect type of battery can result in overheating/burning or leakage of battery acid.

Make sure that the battery is installed with the correct polarity as indicated on the battery holder. Incorrectly installed batteries may burst or leak, resulting in injuries.

Do not use damaged batteries. Using damaged batteries may result in leaking.

Do not charge, short, heat, break or throw in a fire, as it may result in the battery leaking, generating heat, or bursting.

When disposing of the battery, cover the battery contacts with insulation (e.g., tape). Direct contact with other batteries may result in leaking, fire, or explosion.

Do not solder the battery, as it may result in the battery leaking, generating heat, or bursting.

Remove empty batteries immediately to avoid battery fluid leakage. Avoid contact of battery fluid with eyes, skin or clothing, as this may result in irritation or injury. In these cases, do not rub the affected area, and rinse thoroughly with clean water.


CAUTION
Installation and Relocation

Do not position the unit in a location where it is unstable.

Do not place the unit in a hot humid or dusty environment. Prolonged exposure to these adverse conditions may cause fire or electric shock.

To prevent fire or shock hazard, do not expose this unit to rain or any type of moisture.

When moving the unit, be sure to unplug the USB cable. Otherwise, you may trip over a USB cable, which may cause injury.

Move this unit with two persons. Otherwise, this unit may fall down and cause injury.

After installing or moving the unit, lock the casters and set the fall-prevention extension legs.
Locking the casters (Push to lock)

Operating Safeguards

If the unit falls down or gets damaged, unplug the USB cable. Otherwise, it may cause fire or electric shock.

Do not lean against the unit, even if the unit is mounted on the wall.

When using the stand, be sure to watch your step so that you do not bump into or trip over the fall-prevention extension legs.
The label of precautions is attached to the stand KX-B061-A (optional device).

When operating the screen board with your finger for a long time, be sure to take regular breaks. Continuous use for a long time may hurt your fingertip.
Precautions
Any changes or modifications not expressly approved by the party responsible for compliance could void the user's authority to operate this device.
About Using the Battery
If a battery is used improperly, the battery may leak, causing corrosion of the unit, or it may burst. To prevent this, always follow the precautions given below.
- If the electronic pen ceases to function because the battery has run out, remove it immediately and dispose of it according to local regulations. Leaving a drained battery in the electronic pen may result in leakage.
About Disposing of the Battery of the Electronic Pen (Optional Device)
For Taiwan (台灣)

Recycle used batteries.
Handling of End-of-life Batteries (For Brazil only)

BRASIL
Wrap adhesive tape around the end-of-life battery to isolate the (+) and (-) polarities, and put it in a designated box for collection. Contact with other metals or batteries may cause the battery to leak, generate heat, rupture, or ignite. (Figure 1)
Figure 1. How to isolate a battery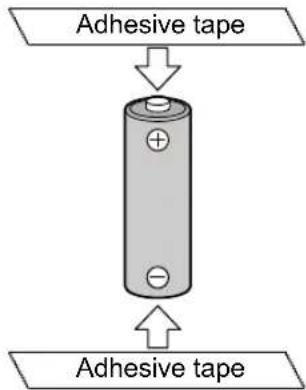
Do not disassemble, remove the battery involucre, or deform with pressure. Gas generated from the battery may irritate the throat, distort the battery seals, or cause a short circuit, which may lead to leakage, heat generation, rupture or fire. Do not incinerate or heat the battery, or expose it to a temperature higher than 100 °C (212 °F). Gas generated from the battery may irritate the throat, distort the battery seals, or cause a short circuit inside the battery, which may lead to leakage, heat generation, rupture or fire.
Avoid contact with leaking batteries. Wash any affected body part with plenty of water. Consult a physician in case of irritation.
Included Accessories
Check that all of the following items are included with your elite Panaboard. In the event that an item is missing, please contact your dealer.
List of Accessories
| Software DVD-ROM 1 Stylus Pen 1 | Operating Instructions(this document) | 1 | ||
 |  |  | ||
| Warranty 1 Installation Manual* 1 Cable Holder* 3 | ||||
 |  | 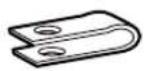 | ||
| Wall Mounting Plate* 1 each Pen Holder* 2 Screw* 7 | ||||
 |  |  | ||
| Cable Clamp* 1 Flat Washer* 4 | ||||
 |  | |||
* These accessories are used for installation work.
Note
- Keep unattached pen holders and their screws in a safe place together with the Operating Instructions (this document).
- Operating Instructions and Installation Manual in other languages may be included, depending on the country/area.
- The warranty may not be included depending on country/area.
- Stand and electronic pen are optional devices (page 33).
- Replacement penpoints for the electronic pen are optional devices (page 33).
About Using the DVD-ROM
To prevent damage to the DVD-ROM:
- Do not touch or write on the surface of the disc.
- Do not leave the disc out of the protective case.
- Do not leave the disc in the direct sunlight or near heat sources.
- Do not place heavy objects on the disc case or drop the case.
- To clean the disc, hold the disc by its edges and wipe it from the center to the edges with a dry, soft cloth.
Names and Uses of the Parts
Main unit
Front View

Status LED
Lights green when the power is on.
Lights red when an error occurs.
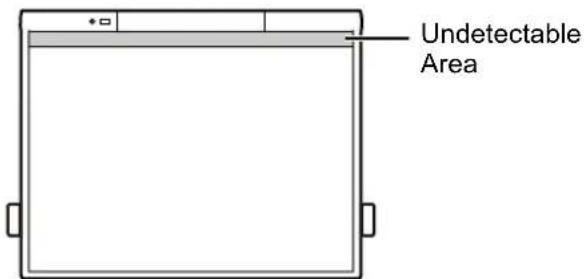
Undetectable Area
The position of your finger or the electronic pen in this area cannot be detected. Make sure that the projected image does not overlap with this area.
Screen Board
Detects the position of your finger or the electronic pen.
Project the contents of a computer screen using a projector.
Electronic Pen Signal Receiver
This receives the signals from the electronic pen.
When performing operations using the electronic pen
from a distance, point the tip of the pen toward this area, and operate.
For the reception ranges of the electronic pen signal, refer to "Operating ranges of the electronic pen" (page 16).
Rear View

USB Cable
Connect the USB plug of the cable to a computer.
The left figure is an example of a screen board that has the USB cable on its left side.
The USB cable can be provided on the right side.
If you want the USB cable on the right side, request the qualified service personnel during installation.
Cable Clamp
Use this when bundling the USB cable.
Pen Holder (2 supplied)
Holds the stylus pen and electronic pen.
You can select a desired attachment location among the 4 possible locations. Ask the qualified service personnel at the time of installation.
For details of the attachment location, refer to "Changing the Attachment Location of the Pen Holders" (page 28).
Notice
- The elite Panaboard is designed exclusively for projector images. Do not write on the screen board with a whiteboard marker.
- Do not place any objects on top of the lower frame of the elite Panaboard. This can result in erroneous operation.
- Do not attach magnets or other similar objects to the screen board of the elite Panaboard. This can result in erroneous operation.
Note
- The elite Panaboard has detected the position of an obstruction about 5 mm (0.2 in.) from the screen board surface. Therefore, the position may be detected without touching the screen board.
Stylus Pen
The stylus pen works just like using your finger. You cannot use both stylus pen and electronic pen simultaneously.

Notice
- When you use a stylus pen, make sure to select the Finger/Stylus Pen mode using the software (page 24).
- Use the stylus pen by bringing the penpoint into contact with the screen board. The screen board may become dirty if the stylus pen is used by bringing its other end into contact with the screen board surface.
- Do not tap or knock the screen board with the stylus pen. Otherwise, it may cause damage.
Electronic Pen (Optional Device)

Notice
- When operating the electronic pen's up button, down button or menu/mode selector button, point the penpoint at the elite Panaboard's electronic pen signal receiver, and operate the button. For the operating ranges of the electronic pen, refer to "Operating ranges of the electronic pen" (page 16).
- To use the electronic pen, switch to the Electronic Pen mode using the software. (To use your finger, switch to the Finger/Stylus Pen mode.)
- Confirm that the status LED lights when using the electronic pen.
- To avoid operating errors, do not touch the penpoint when the electronic pen is not in use.
- Use the electronic pen by bringing the penpoint into contact with the screen board. The screen board may become dirty if the electronic pen is used by bringing its other end into contact with the screen board surface.
- Do not tap or knock the screen board with the electronic pen. Otherwise, it may cause malfunction.
Electronic Pen Features
 Black/Red/Blue/Green Black/Red/Blue/Green | Draws with a marker in the selected color.Marker line thickness and other settings can be specified in the Drawing Menu. |
 Eraser Eraser | Erases marker lines that you have drawn.Eraser size and other settings can be specified in the Drawing Menu. |
 Yellow/Yellowish Green/Pink Yellow/Yellowish Green/Pink | Highlights with a highlighter in the selected color.Highlighter line thickness and other settings can be specified in the Drawing Menu. |
 Mouse Mouse | Operates in the same way as using your finger.• elite Panaboard software: Function selected on the Select Function menu.elite Panaboard book: Function selected on the tool menu.Note• The mouse functions are selected automatically when operation has been switched to the Electronic Pen mode using the Electronic Pen Mode Switching Tool. |
 Low-Power Mode Low-Power Mode | Puts the electronic pen in low-power mode.When not in low-power mode, the electronic pen detects motion to turn itself on or off automatically. To conserve battery power, put the electronic pen in low-power mode before carrying it while walking, when it is not in use. |
Operating ranges of the electronic pen
Distance: Approx. 5 m (16 ft. 4 in.) at the front of the elite Panaboard's electronic pen signal receiver (when there are no obstructions in between)
Angle: Refer to the figure below. (The shading represents the operating ranges of the electronic pen.)
Side panel Top panel

Notice
- Do not place any obstructions between the electronic pen and elite Panaboard.
- Do not expose the elite Panaboard's electronic pen signal receiver to direct sunlight or to the intense light from an inverter fluorescent light.
- Use a dry cloth to wipe off the dust on the elite Panaboard's electronic pen signal receiver.
Connecting External Components
1 Connect the elite Panaboard to a computer using the USB cable.
- Plug the USB cable into a USB port on the computer.
- Do not connect the elite Panaboard to a computer via USB unless elite Panaboard driver/software/book is installed. Only connect the USB cable after following the steps in "Installing the Software" (page 19) to install the software.

* In the case of the UB-T580, the length of the USB cable from the edge of the main unit is approx. 2.7 m (8 ft. 10 5/16 in.) when it is connected to the left side and approx. 2.4 m (7 ft. 10 1/2 in.) when it is connected to the right side. In the case of the UB-T580W, the length is reduced by about 15 cm (5 7/8 in.) each on both sides.
2 Connect the computer to a projector.
- For instructions on connecting your computer and projector, refer to the respective instruction manuals.
About the Usage Location
- Do not place the elite Panaboard where it is directly exposed to sunlight.
- Do not use the elite Panaboard in a location less than 10°C (50 °F) or in a location subject to extreme changes in temperature.
Note
- The elite Panaboard may not work properly when used in one of the above locations.
Moving the elite Panaboard When Using the Stand (Optional Device)
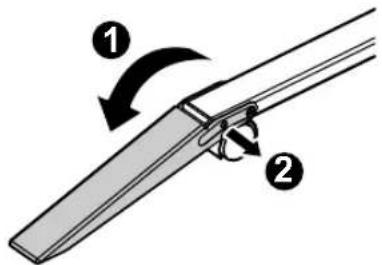
1 Disconnect the USB cable and bundle it using the cable clamp. 2 Release the locks on the casters.
Note
- When folding back the fall-prevention extension legs, release the lock as follows (1, 2).


3 Move the elite Panaboard with 2 people, avoid banging or shaking the board.
Notice
- Do not drag or step on the cable.
4 Lock the casters. 5 Pull the fall-prevention extension legs down.
Installing the Software
To install the elite Panaboard driver/software/book, follow the procedure below.
Notice
- Do not connect the USB cable to the computer until the installation is completed.
- Do not connect more than 1 elite Panaboard to the same computer. (Doing so can cause erroneous behavior on the computer.)
1 Turn on your computer and start the Windows operating system.
- Log into an account with Administrator privileges.
2 Insert the included DVD-ROM into the DVD-ROM drive.
- The setup screen will be displayed.
- If the setup screen does not appear, select your DVD-ROM drive in Explorer and double-click [Menu.exe].
- In Windows Vista or Windows 7, if the Autoplay dialog box is displayed, click [Run Menu.exe].
3 When the "elite Panaboard" screen is displayed, click the type of device you are using.
4 When the "Menu" screen is displayed, click [Read Me First].

- After the system requirements are displayed, make sure that your computer meets the requirements.
5 Click [Install elite Panaboard] on the "Menu" screen.
6 If you agree to the terms in the "END-USER LICENSE AGREEMENT", select "I accept the terms in the license agreement" and then click [Next].
- In Windows Vista, if the "User Account Control" window is displayed, click [Continue] to continue with the installation.
- In Windows 7, if the "User Account Control" window is displayed, click [Yes] to continue with the installation.
7 When the "Select Features" screen is displayed, select the required function or deselect a function that you do not want and then click [Next].
- Click the corresponding check box to select or deselect a function.
- You cannot deselect a function that is shown with a gray check box because it is a mandatory function.
- When you deselect a function that is already installed, this function will be deleted (uninstalled).
- If Panasonic Software Update Manager is already installed, it will not be deleted (uninstalled) even when it is deselected. For details on how to uninstall it, refer to "Uninstalling Panasonic Software Update Manager" (page 26).
8 When the following screen is displayed, confirm that the USB cable is not connected to your computer or the elite Panaboard, and click [OK].
- If the USB cable is connected to the computer, disconnect the cable, and click [OK].
- If Microsoft® .NET Framework 3.0 (SP 2 or later) or 3.5 (SP 1 or later) is not installed, an installation screen will be displayed. Follow the on-screen directions to install these components.
![Software Installation Software installation will begin. Please confirm that the USB cable is disconnected from the electronic board or the computer. * Installation may take a few minutes to complete. During installation, [Cancel] is unavailable.](/content/2026/05/1004763/images/13b8ca0fc2d383f6a71922f22cc8743023ceb189c61d8cd31338d5ef1d6edb72.jpg)
9 When the installation wizard is displayed, follow the on-screen instructions and continue with the installation.
10 When installation has finished, click [Finish].
- Restart your computer if you are prompted to do so. • The [elite Panaboard] group and the [Panasonic Software Update Manager] group will be created in the [Panasonic] group in the program menu.
- The following items are installed in the [elite Panaboard] group. (A function that you deselected on the "Select Features" screen in step 7 will not be displayed.):
- elite Panaboard software
- elite Panaboard book
- Operating Instructions
- Software Help – Download the latest version – HD Visual Communication Unit Screen Selection Tool
- The following items are installed in the [Panasonic Software Update Manager] group. (They are not displayed if they have not been selected on the "Select Features" screen in step 7.):
– Panasonic Software Update Manager - Help
Note
- To view the Operating Instructions, you must have Adobe® Reader® installed on your computer. If your computer is connected to the Internet, you can download Adobe Reader from Adobe's web site.
Setting the Projector
Set up your projector as instructed below.
About Positioning the Image
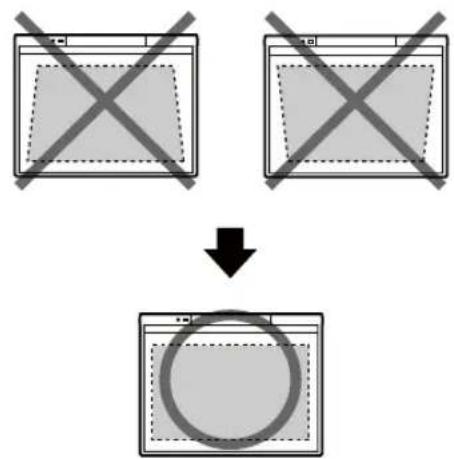
- When using a projector, make sure that the projected image is inside the screen board.
- Do not project an image in the undetectable area.
Project the Image as a Rectangle
- Adjust the location of the projector to project at a right angle with the elite Panaboard.
![graph TD A["Document"] --> B["Document"] B --> C["Monitor"] C --> D["Display"]](/content/2026/05/1004763/images/4259bde88755cd5dcf25dd8d12925af3155bb8f07a9489dd18913d2073f67a53.jpg)
- If the image is projected trapezoidally, the position may not be read correctly. Adjust the projector so that the projected image is a rectangle. Refer to your projector's documentation for information on adjusting the projected image.
Set the Proper Resolution
- Set your computer's and projector's resolutions to the most appropriate setting. If the resolution is not set properly, the image will be difficult to see. Particularly, if the projector's resolution is lower than the computer's, thin lines can appear cut or broken. Refer to your projector's documentation for information on adjusting the resolution.
Do Not Look Directly into the Projector Lamp
- When using a projector, try to avoid looking directly into the projector lamp. Doing so can hurt your eyes.
Using the elite Panaboard After Positioning the System (Calibration)
About Calibration
Calibration refers to setting up the elite Panaboard and projector so that lines and comments drawn with your finger or the electronic pen are displayed in the correct position. Be sure to perform calibration before use.
After you have set up the elite Panaboard, project an image onto the screen board and use the elite Panaboard software installed on your computer to perform calibration.
Performing Calibration
When the elite Panaboard is connected to your computer, the calibration screen is automatically displayed.
Note
- When using the projection screen of a projector to which the HD Visual Communication Unit has been connected, refer to the help menu. For details on accessing the help information, see “Viewing the Help of the Software” (page 25).
1 Connect the elite Panaboard to your computer with the USB cable.
- The calibration screen is displayed.
2 Calibrate the equipment by using your finger to touch the center of the indicated points following the instructions on the screen for about 2 seconds each.
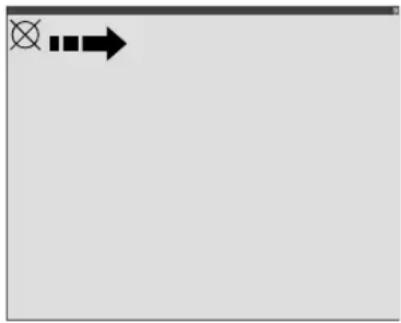
- Raise your finger vertically when touching the screen board, to avoid other fingers being detected. (If other fingers are detected, the position may get shifted.)
- After you touch an indicated point correctly, the next point is shown automatically.
- When calibration has finished normally, a completion dialog box is displayed.
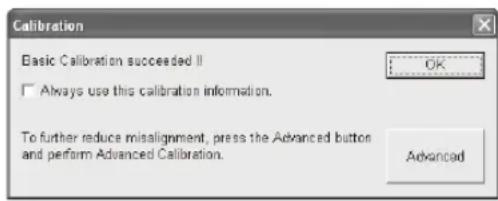
3 If the edges of the image projected on the elite Panaboard are curved, click [Advanced] to perform Advanced Calibration.
(Go to the next step if not required.)
- Advanced Calibration reduces misalignment of a projected image.
4 Click [OK].
- If the elite Panaboard and projector are fixed so that they will not move (wall-mounted case), select the [Always use this calibration information.] check box, and click [OK] to skip calibration from the next time you start the elite Panaboard software.
Starting the elite Panaboard software
When the elite Panaboard software is installed, the icon is displayed in the notification area when calibration is finished, and you can use the elite Panaboard software.
- To display the Select Function Menu, click the Menu Start Tab (left side: / right side: ) on the screen with your finger.

Example of the Select Function Menu
Note
- When the elite Panaboard software is not installed, the icon is not displayed in the notification area. The Menu Start Tab is not displayed on the screen.
Starting the elite Panaboard book
The elite Panaboard book can be started in the following ways.
- If the elite Panaboard software has been installed, click the icon in Select Function Menu.
- Double-click the desktop icon of (elite Panaboard book).
- Click [Start] → [All Programs] → [Panasonic] → [elite Panaboard] → [elite Panaboard book].
Using the Electronic Pen (Optional Device)
When using the electronic pen for the first time, establish the Electronic Pen mode by taking the steps below.
1 Confirm that the elite Panaboard driver/software/book is installed on your computer, and connect the UB-T580 / UB-T580W to your computer.
2 Press and release the menu/mode selector button while pointing the penpoint toward the elite Panaboard's electronic pen signal receiver (next to the status LED in the upper-left part of the main unit).
- The icon, which indicates Electronic Pen mode, is displayed in the notification area of the computer screen, and you can use the electronic pen.
After establishing the mode by taking the steps above, click the icon in the notification area of the computer screen to switch from Finger/Stylus Pen mode to Electronic Pen mode to use the electronic pen.
(The icon displayed in the notification area indicates the current mode.)
When you use the electronic pen away from the elite Panaboard, press and release the menu/mode selector button to switch between the Finger/Stylus Pen mode and the Electronic Pen mode.
| Icon and Mode | Finger/ Stylus Pen operations | Electronic pen operations |
 Finger/ Stylus Pen mode Finger/ Stylus Pen mode | Can use finger or stylus pen operation. | Works just like when you use your finger or the stylus pen.* The selector dial functions cannot be used. |
 Electronic Pen mode Electronic Pen mode | Cannot be used. | Turn the selector dial to select electronic pen functions. |
Note
- The operation to enable the electronic pen must be performed for each computer.
- When you restart your computer, the mode reverts to Finger/Stylus Pen mode. To use the electronic pen, click the Finger/Stylus Pen mode icon in the notification area or press and release the menu/mode selector button on the electronic pen.
- To display the Drawing Menu, touch the screen board while holding the menu/mode selector button on the electronic pen in the Electronic Pen mode.
Example of the Drawing Menu
- For detailed information about using the electronic pen, refer to the help menu. For details on accessing the help information, see “Viewing the Help of the Software” (page 25).
After Calibration
Do Not Move the elite Panaboard or the Projector
- If any of the following changes are made, the operating location of your finger or the electronic pen will no longer be aligned with the position projected by the projector, requiring recalibration.
– The location of the projector changed.
– The location of the elite Panaboard changed.
– The image area or placement was changed due to changes in the zoom, focus, etc.
- The resolution of the projector or the computer changed. (The resolution may be changed when you turn on your computer display.)
- If you are using the elite Panaboard installed on a stand, be aware that accidentally hitting the elite Panaboard or pushing too strongly with the electronic pen while operating can move the stand's position, which will result in misalignment of the projected image and the electronic pen's position.
- Make sure to lock the stand's casters when using the elite Panaboard, as failing to do so can cause misalignment.
Performing the Recalibration (Displaying the Calibration Screen Manually)
- When the elite Panaboard software is already installed:
- Click the icon in the notification area and click [Calibration] in the pop-up menu.
- When the elite Panaboard software is not installed:
- Double-click the desktop icon of (elite Panaboard Calibration Tool).
Exiting the elite Panaboard software
Click on the icon in the notification area, and select [Exit] from the menu.
Viewing the Help of the Software
Follow the procedure below to view the help of the software installed on your computer.
1 Turn on your computer and start Windows.
2 Open "Software Help" from the Start menu.
([Start] → [All Programs] → [Panasonic] → [elite Panaboard] → [Software Help])
- General help information of the installed software is displayed.
3 Open Panasonic Software Update Manager help from the Start menu. ([Start] → [All Programs] → [Panasonic] → [Panasonic Software Update Manager] → [Help])
- Panasonic Software Update Manager help is displayed.
Note
- To access the help information of elite Panaboard software, Stylus Pen and Electronic Pen, click the icon in the notification area and select [Help] from the pop-up menu.
- To access elite Panaboard book help information, select [Help...] from the elite Panaboard book [Help] menu.
- We recommend that you view the help using Internet Explorer ® 6.0 or later for Windows.
Uninstalling the Software
If it is necessary to uninstall the elite Panaboard driver/software/book, follow the procedure below.
1 Turn on your computer and start Windows. - Log into an account with Administrator privileges. 2 Select [Add or Remove Programs] from the Control Panel. - In Windows Vista or Windows 7, select [Uninstall a program]. 3 Select Panasonic elite Panaboard, then remove it. 4 Follow the on-screen instructions. 5 When uninstallation is complete, restart your computer.
Uninstalling Panasonic Software Update Manager
If it is necessary to uninstall the Panasonic Software Update Manager, follow the procedure below.
1 Turn on your computer and start Windows. - Log into an account with Administrator privileges. 2 Select [Add or Remove Programs] from the Control Panel. - In Windows Vista or Windows 7, select [Uninstall a program]. 3 Select Panasonic Software Update Manager, then remove it. 4 Follow the on-screen instructions. 5 When uninstallation is complete, restart your computer.
Download the Latest Software
Follow the procedure below to download the latest version of the software from the download website.
1. Turn on your computer and start Windows. 2. On the Start menu, point to [All Programs] → [Panasonic] → [elite Panaboard], and click [Download the latest version].
Note
- If Panasonic Software Update Manager is installed, the software update programs are notified over the Internet. For details on the Panasonic Software Update Manager operations, refer to Panasonic Software Update Manager help. For the steps to take, refer to "Viewing the Help of the Software" (page 25).
Daily Care
When cleaning the elite Panaboard or inside the elite Panaboard, make sure to unplug the USB cable from the computer.
Cleaning the elite Panaboard
Clean at least once every three months.

Use a soft cloth that has been moistened with water and then thoroughly wrung out to gently wipe off the following areas.
• The screen board surface - Inside the right and left side frame (where the reflecting tape is) - Inside the lower frame (where the reflecting tape is)
Notice
- The elite Panaboard is designed exclusively for projector images. To remove marks written with a whiteboard marker or stubborn stains, use neutral household detergent diluted with water. When doing this, make sure that no detergent will come into contact with the reflecting tape areas. If any contact is made, wipe it off quickly.
- Do not use thinner, benzine, or abrasive chemicals to clean. (Doing so can result in discoloration.)
Replacing the Penpoint of the Electronic Pen (Optional Device)
When the penpoint of the electronic pen starts to wear down, a hole will start to form in the penpoint. Continuing to use the electronic pen in this condition may cause a scratch or malfunction on the screen board. Replace the penpoint with a new one as soon as possible.
- Replacement penpoints are optional devices (page 33).
1 Remove the old penpoint and attach the new one.

Notice
- Dispose the old penpoint which you have removed following the disposal regulations in your country/area.
- Ensure that any penpoints which will be used for replacement purposes are stored in a safe place.
Replacing the Battery in the Electronic Pen (Optional Device)
When the electronic pen battery is low, the electronic pen status LED blinks green. Continued use of the electronic pen can lead to poor performance. Replace the battery as soon as possible.
1 Unlock the battery cover ( ①), and open the cover (②).

2 Insert (replace) the battery.

- Make sure to use a AAA alkaline battery, and ensure that and face the correct directions.
- Dispose of expired batteries quickly, by covering the terminals in tape and following the disposal regulations in your country/area.
3 Close the battery cover and lock the cover using the procedure of step 1 in reverse order.
Changing the Attachment Location of the Pen Holders
When the stand is used, you can change the attachment location of the pen holders.
[See "Names and Uses of the Parts" (page 13) for details.]
Necessary Tool: Phillips-head screwdriver
CAUTION
Before changing the attachment location, lock the casters, and ensure that the location is changed by two persons. Otherwise, this unit may move or fall down, and cause injury.
1 Remove the pen holder that you want to move.
- Remove the 2 screws for the pen holder from the back of the main unit.
2 Select a desired attachment location among the 4 possible locations.
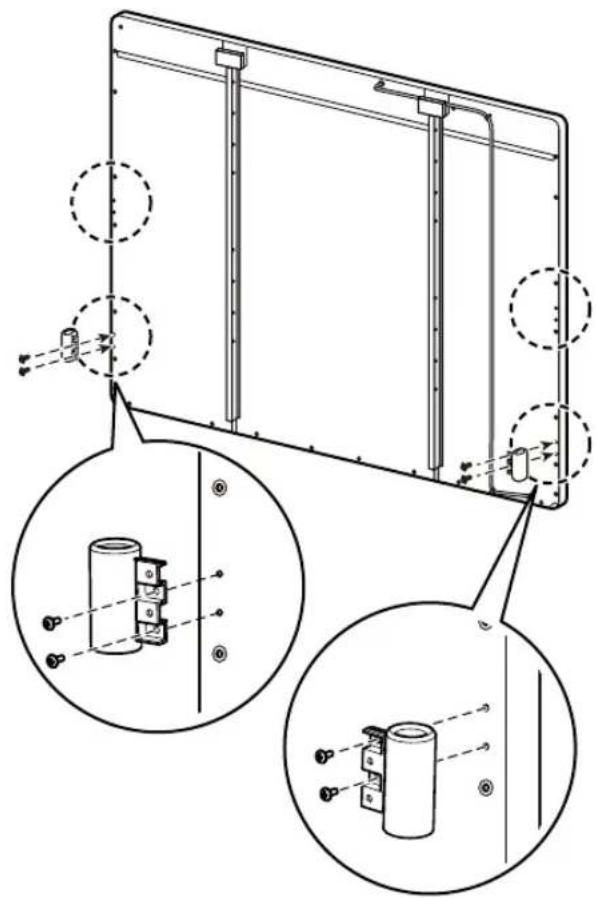
Troubleshooting
When experiencing problems, please refer to the table below for possible solutions. If the problem persists, contact your dealer. In the case of the kinds of trouble which are not described in the table below, refer to "Troubleshooting" in the software help.
| Symptom Possible cause and solution | See page | |
| The Status LED does not light when the USB cable is connected. | Check that the USB plug is properly plugged in.→ Unplug the USB cable, wait at least 5 seconds, and plug it in again. If the status LED still fails to light, contact your dealer. | — |
| The Status LED (red) lights. | The right or left side frame or the reflecting tape inside the lower frame is dirty.→ Use a soft cloth that has been moistened with water and then thoroughly wrung out to gently wipe the dirt off the reflecting tape. If the dirt is impossible to remove or if the reflecting tape has been scratched, contact your dealer.Magnets or other similar objects have been attached to the screen board.→ Do not attach magnets or other similar objects to the screen board.An object has been placed on top of the lower frame.→ Do not place any objects on top of the lower frame.You connected the USB cable while touching the screen board.→ When you connect the USB cable, do not touch the screen board.The temperature has changed suddenly.→ Refrain from using the elite Panaboard in locations where the temperature is subject to sudden changes. | 271313—17 |
| After taking the above steps, unplug the USB cable, wait at least 5 seconds, and plug it in again. If the status LED (red) still lights, contact your dealer. | ||
| The computer does not recognize the elite Panaboard. | The elite Panaboard and your computer are not connected.→ Securely connect the USB cable to your computer.The USB cable is connected to a USB hub or extension cable.→ Connect the USB cable directly to your computer and not via a USB hub or extension cable.A different model was selected when installing the software.→ Select the correct model and reinstall the software.The USB cable is damaged.→ Contact your dealer. | ——19— |
| The connection between the computer and the elite Panaboard is unexpectedly lost. | Check that the elite Panaboard is in an operable state, and that the USB cable is properly connected. | — |
| The elite Panaboard response is delayed. | Other applications or anti-virus software are active.→ Shut down the other applications and anti-virus software. | 5 |
| In Windows 7, there is a considerable delay in the elite Panaboard response when you touch the screen board with your finger. | The USB operation is erratic.→ Unplug and reconnect the USB cable. | — |
| The point of control is out of alignment with your finger or the electronic pen. | The projected image is misaligned.→ Perform the calibration again.The display resolution (pixel count) has been changed.→ Perform the calibration again.The edge of the projected image is curved.→ Perform Advanced Calibration.Another finger was detected during the calibration process.→ Raise your finger vertically when touching the screen board to avoid other fingers being detected when the calibration process is initiated. | 25252222 |
| Unable to operate or draw with your finger. | The Electronic Pen mode is selected.→ Switch to the Finger/Stylus Pen mode.You are touching the screen board with a part of your hand other than your finger.→ Use only your drawing finger tip to touch the screen board.The right or left side frame or the reflecting tape inside the lower frame is dirty.→ Use a soft cloth that has been moistened with water and then thoroughly wrung out to gently wipe the dirt off the reflecting tape. If the dirt is impossible to remove or if the reflecting tape has been scratched, contact your dealer. | 24—27 |
| Lines or comments drawn with your finger are not shown on the computer screen. | Magnets or other similar objects have been attached to the screen board.→ Do not attach magnets or other similar objects to the screen board.An object has been placed on top of the lower frame.→ Do not place any objects on top of the lower frame.The temperature has changed suddenly.→ Refrain from using the elite Panaboard in locations where the temperature is subject to sudden changes. | 131317 |
| The electronic pen loses the functions.(Buttons are unresponsive.)(Lines written with the electronic pen are broken or colors change.) | The Finger/Stylus Pen mode is selected.→ Switch to the Electronic Pen mode.Other applications or anti-virus software are active.→ Shut down the other applications and anti-virus software.The electronic pen is low on batteries.→ Replace the electronic pen's battery.The electronic pen is in low-power mode.→ Turn the selector dial to change the mode.Another electronic whiteboard is in use nearby.→ Change the location of the electronic board so that infrared signals transmitted from electronic pens do not interfere with each other. | 2452816— |
| The electronic pen status LED is blinking. | The electronic pen is low on batteries.→ Replace the electronic pen's battery. | 28 |
| Marks written with a whiteboard marker cannot be erased. | Because the elite Panaboard is designed exclusively for projector images, you cannot erase the marks with a standard eraser.→ Use neutral household cleaner diluted with water. When doing this, make sure that no detergent will come into contact with the reflecting tape areas. If any contact is made, wipe it off quickly. | 27 |
Specifications
| Model Number | UB-T580 / UB-T580W | |
| General Power | Supply from USB bus | (no AC power supply connection required.) |
| Power Consumption 5 V / 500 | mA (USB bus power) | |
| Operating Environment | Temperature: 10 °C to 35 °C (50 °F to 95 °F) Humidity: 30 % to 80 % | |
| Storage Environment | Temperature: -20 °C to 60 °C (-4 °F to 140 °F) Humidity: 20 % to 80 % | |
| Interface USB 2.0 | ||
| Electronic Pen (Optional Device) | Transmission System Infrared | communication system |
| Electronic Pen Power | LR03 (AAA alkaline dry cell battery) × 1 | |
| Electronic Pen Battery Life 30 | hours (when used continuously at 25 °C [77 °F]) * When using Panasonic LR03 alkaline dry-cell batteries. | |
| Model Number | UB-T580 | |
| General External Dimensions: Height × Width × Depth | 1,352 mm × 1,637 mm × 74 mm(4 ft. 51/4 in. × 5 ft. 47/16 in. × 215/16 in.) [When pen holders have been attached on both sides of the main unit: 1,352 mm × 1,713 mm × 74 mm(4 ft. 51/4 in. × 5 ft. 77/16 in. × 215/16 in.)] | |
| Weight | ||
| Input Unit | Screen Board Size: Height × Width | 1,175 mm × 1,582 mm(3 ft. 101/4 in. × 5 ft. 25/16 in.) |
| Interactive Features | Effective Area: Display aspect ratio Height × Width | 3:4 1,175 mm × 1,567 mm(3 ft. 101/4 in. × 5 ft. 111/16 in.) (77 in. diagonal) |
| Model Number | UB-T580W | |
| General External Dimensions: Height × Width × Depth | 1,352 mm × 1,915 mm × 74 mm(4 ft. 51/4 in. × 6 ft. 33/8 in. × 215/16 in.) [When pen holders have been attached on both sides of the main unit: 1,352 mm × 1,991 mm × 74 mm(4 ft. 51/4 in. × 6 ft. 63/8 in. × 215/16 in.)] | |
| Weight | ||
| Input Unit | Screen Board Size: Height × Width | 1,175 mm × 1,860 mm(3 ft. 101/4 in. × 6 ft. 11/4 in.) |
| Interactive Features | Effective Area: Display aspect ratio Height × Width | 9:16 1,037 mm × 1,845 mm(3 ft. 413/16 in. × 6 ft. 5/8 in.) (83 in. diagonal)10:16 1,153 mm × 1,845 mm(3 ft. 93/8 in. × 6 ft. 5/8 in.) (86 in. diagonal) |
Supplies & Accessories
| Optional Device Stand | KX-B061-A | |
| Electronic Pen UE-608020 | ||
| Stylus Pen UE-608021 | ||
| Up / Down Unit UE-608030 | ||
| Stand Table Unit UE-608031 | ||
| Short-Throw Arm Unit UE-608032 | ||
| Consumables Penpoint | (For the electronic pen)(Replace the penpoint with a new one when it is worn and a hole has formed.) | UG-6020 |
- To purchase separately sold items, contact your dealer.
Information for Users on Collection and Disposal of Old Equipment and used Batteries

These symbols on the products, packaging, and/or accompanying documents mean that used electrical and electronic products and batteries should not be mixed with general household waste.
For proper treatment, recovery and recycling of old products and used batteries, please take them to applicable collection points, in accordance with your national legislation and the Directives 2002/96/EC and 2006/66/EC.
By disposing of these products and batteries correctly, you will help to save valuable resources and prevent any potential negative effects on human health and the environment which could otherwise arise from inappropriate waste handling.
For more information about collection and recycling of old products and batteries, please contact your local municipality, your waste disposal service or the point of sale where you purchased the items.
Penalties may be applicable for incorrect disposal of this waste, in accordance with national legislation.

For business users in the European Union
If you wish to discard electrical and electronic equipment, please contact your dealer or supplier for further information.
Information on Disposal in other Countries outside the European Union
These symbols are only valid in the European Union. If you wish to discard these items, please contact your local authorities or dealer and ask for the correct method of disposal.

Note for the battery symbol (bottom two symbol examples):
This symbol might be used in combination with a chemical symbol. In this case it complies with the requirement set by the Directive for the chemical involved.
Information on Disposal for India

For the purpose of recycling to facilitate effective utilization of resources, please return this product to a nearby authorized collection center, registered dismantler or recycler, or Panasonic service center when disposing of this product.
Please see the Panasonic website for further information on collection centers, etc.
http://www.panasonic.co.in/wps/portal/home
Panasonic Corporation of North America
One Panasonic Way, Secaucus, New Jersey 07094
Panasonic Canada Inc.
5770 Ambler Drive, Mississauga, Ontario, L4W 2T3
Panasonic Marketing Europe GmbH
Hagenauer Strasse 43, 65203 Wiesbaden, Germany
For information on compliance with EU relevant regulatory directives, contact the authorized representative:
Directives, Contact to Authorised Representative:
Panasonic Marketing Europe GmbH
Winsbergring 15, 22525 Hamburg, Germany
(For EU only)

Panasonic Corporation
Web Site: http://www.panasonic.net/
Web Site: http://www.panasonic.net/


- OPERATING INSTRUCTIONS
- ELECTRONIC BOARD (ELITE PANABOARD)
- INTRODUCTION
- FEATURE HIGHLIGHTS
- TOUCH FEATURES
- ELITE PANABOARD BOOK
- USB BUS POWER OPERATION
- STYLUS PEN
- ELECTRONIC PEN (OPTIONAL DEVICE)
- USAGE SCENARIOS
- FOR EDUCATION
- FOR BUSINESS
- THINGS YOU SHOULD KEEP A RECORD OF
- ATTACH YOUR SALES RECEIPT HERE
- ABBREVIATIONS
- TRADEMARKS
- ORGANIZATION OF THE MANUALS
- FEDERAL COMMUNICATIONS COMMISSION REQUIREMENTS
- FOR UNITED STATES ONLY
- NOTE
- FCC WARNING
- WARNING ABOUT SAVING DATA
- PLEASE OBSERVE CAREFULLY THE FOLLOWING PRECAUTION
- SYSTEM REQUIREMENTS
- EXEMPTION OF LIABILITY
- FOR FRG USERS (FOR GERMANY ONLY)
- FOR UKRAINE ONLY
- DECLARATION OF CONFORMITY
- APPENDIX
- FOR YOUR SAFETY
- WARNING
- POWER
- INSTALLATION AND RELOCATION
- OPERATING SAFEGUARDS: ELECTRONIC PEN (OPTIONAL DEVICE)
- CHOKING HAZARD
- BATTERY
- CAUTION
- OPERATING SAFEGUARDS
- PRECAUTIONS
- ABOUT USING THE BATTERY
- ABOUT DISPOSING OF THE BATTERY OF THE ELECTRONIC PEN (OPTIONAL DEVICE)
- HANDLING OF END-OF-LIFE BATTERIES (FOR BRAZIL ONLY)
- BRASIL
- INCLUDED ACCESSORIES
- ABOUT USING THE DVD-ROM
- NAMES AND USES OF THE PARTS
- MAIN UNIT
- FRONT VIEW
- STATUS LED
- UNDETECTABLE AREA
- SCREEN BOARD
- ELECTRONIC PEN SIGNAL RECEIVER
- REAR VIEW
- USB CABLE
- CABLE CLAMP
- PEN HOLDER (2 SUPPLIED)
- NOTICE
- OPERATING RANGES OF THE ELECTRONIC PEN
- CONNECTING EXTERNAL COMPONENTS
- CONNECT THE ELITE PANABOARD TO A COMPUTER USING THE USB CABLE
- CONNECT THE COMPUTER TO A PROJECTOR
- ABOUT THE USAGE LOCATION
- MOVING THE ELITE PANABOARD WHEN USING THE STAND (OPTIONAL DEVICE)
- INSTALLING THE SOFTWARE
- TURN ON YOUR COMPUTER AND START THE WINDOWS OPERATING SYSTEM
- INSERT THE INCLUDED DVD-ROM INTO THE DVD-ROM DRIVE
- WHEN THE "ELITE PANABOARD" SCREEN IS DISPLAYED, CLICK THE TYPE OF DEVICE YOU ARE USING
- WHEN THE "MENU" SCREEN IS DISPLAYED, CLICK [READ ME FIRST]
- CLICK [INSTALL ELITE PANABOARD] ON THE "MENU" SCREEN
- IF YOU AGREE TO THE TERMS IN THE "END-USER LICENSE AGREEMENT", SELECT "I ACCEPT THE TERMS IN THE LICENSE AGREEMENT" AND THEN CLICK [NEXT]
- WHEN THE "SELECT FEATURES" SCREEN IS DISPLAYED, SELECT THE REQUIRED FUNCTION OR DESELECT A FUNCTION THAT YOU DO NOT WANT AND THEN CLICK [NEXT]
- WHEN THE FOLLOWING SCREEN IS DISPLAYED, CONFIRM THAT THE USB CABLE IS NOT CONNECTED TO YOUR COMPUTER OR THE ELITE PANABOARD, AND CLICK [OK]
- WHEN THE INSTALLATION WIZARD IS DISPLAYED, FOLLOW THE ON-SCREEN INSTRUCTIONS AND CONTINUE WITH THE INSTALLATION
- WHEN INSTALLATION HAS FINISHED, CLICK [FINISH]
- SETTING THE PROJECTOR
- ABOUT POSITIONING THE IMAGE
- PROJECT THE IMAGE AS A RECTANGLE
- SET THE PROPER RESOLUTION
- DO NOT LOOK DIRECTLY INTO THE PROJECTOR LAMP
- USING THE ELITE PANABOARD AFTER POSITIONING THE SYSTEM (CALIBRATION)
- ABOUT CALIBRATION
- PERFORMING CALIBRATION
- CONNECT THE ELITE PANABOARD TO YOUR COMPUTER WITH THE USB CABLE
- CALIBRATE THE EQUIPMENT BY USING YOUR FINGER TO TOUCH THE CENTER OF THE INDICATED POINTS FOLLOWING THE INSTRUCTIONS ON THE SCREEN FOR ABOUT 2 SECONDS EACH
- IF THE EDGES OF THE IMAGE PROJECTED ON THE ELITE PANABOARD ARE CURVED, CLICK [ADVANCED] TO PERFORM ADVANCED CALIBRATION
- CLICK [OK]
- STARTING THE ELITE PANABOARD SOFTWARE
- STARTING THE ELITE PANABOARD BOOK
- USING THE ELECTRONIC PEN (OPTIONAL DEVICE)
- AFTER CALIBRATION
- DO NOT MOVE THE ELITE PANABOARD OR THE PROJECTOR
- PERFORMING THE RECALIBRATION (DISPLAYING THE CALIBRATION SCREEN MANUALLY)
- EXITING THE ELITE PANABOARD SOFTWARE
- VIEWING THE HELP OF THE SOFTWARE
- UNINSTALLING THE SOFTWARE
- UNINSTALLING PANASONIC SOFTWARE UPDATE MANAGER
- DOWNLOAD THE LATEST SOFTWARE
- DAILY CARE
- CLEANING THE ELITE PANABOARD
- REPLACING THE PENPOINT OF THE ELECTRONIC PEN (OPTIONAL DEVICE)
- REMOVE THE OLD PENPOINT AND ATTACH THE NEW ONE
- REPLACING THE BATTERY IN THE ELECTRONIC PEN (OPTIONAL DEVICE)
- CHANGING THE ATTACHMENT LOCATION OF THE PEN HOLDERS
- TROUBLESHOOTING
- INFORMATION FOR USERS ON COLLECTION AND DISPOSAL OF OLD EQUIPMENT AND USED BATTERIES
- FOR BUSINESS USERS IN THE EUROPEAN UNION
- INFORMATION ON DISPOSAL IN OTHER COUNTRIES OUTSIDE THE EUROPEAN UNION
- NOTE FOR THE BATTERY SYMBOL (BOTTOM TWO SYMBOL EXAMPLES)
- INFORMATION ON DISPOSAL FOR INDIA
- PANASONIC CORPORATION OF NORTH AMERICA
- PANASONIC CANADA INC
- PANASONIC MARKETING EUROPE GMBH
- WEB SITE: HTTP://WWW.PANASONIC.NET
Brand : PANASONIC
Model : UB-T580
Category : Tablet