
TL1000 - Uncategorized DELL - Free user manual and instructions
Find the device manual for free TL1000 DELL in PDF.


| Product Type | Tape Library |
| Model | Dell PowerVault TL1000 |
| Form Factor | Desktop / 1U Rackmount |
| Dimensions (H x W x D) | 4.4 cm x 43.2 cm x 49.0 cm (1.73" x 17.0" x 19.3") |
| Weight | 8.7 kg (19.2 lbs) |
| Power Supply | 100-240 VAC, 50-60 Hz, Auto-sensing |
| Power Consumption | 35 W typical, 50 W maximum |
| Interface | USB 3.0, Mini-SAS (optional) |
| Supported Drives | LTO-3, LTO-4, LTO-5, LTO-6, LTO-7 (up to 1 drive) |
| Maximum Capacity | Up to 15 TB native (with LTO-7) |
| Slots | 1 drive slot, 9 cartridge slots |
| Bar Code Reader | Optional internal bar code reader |
| LED Indicators | Power, Drive, Tape, Error |
| Supported Media | LTO tape cartridges (read/write) |
| Backup Software | Compatible with major backup software (Veritas, CommVault, etc.) |
| Supported OS | Windows, Linux, VMware, etc. |
| Operating Temperature | 10°C to 40°C (50°F to 104°F) |
| Storage Temperature | -40°C to 65°C (-40°F to 149°F) |
| Humidity | 20% to 80% (non-condensing) |
| Acoustic Noise | Less than 55 dB (idle) |
| Compliance | FCC, CE, UL, RoHS |
| Warranty | 3 years hardware warranty (depending on region) |
| Maintenance | Cleaning cartridge recommended every 50 loads |
Frequently Asked Questions - TL1000 DELL
User questions about TL1000 DELL
0 question about this device. Answer the ones you know or ask your own.
Ask a new question about this device
Download the instructions for your Uncategorized in PDF format for free! Find your manual TL1000 - DELL and take your electronic device back in hand. On this page are published all the documents necessary for the use of your device. TL1000 by DELL.
USER MANUAL TL1000 DELL
©2014DellInc.Allrightsreserved.
ReproductioninanymannerwhatsoeverwithoutthewrittenpermissionofDellInc.isstrictlyforbidden.
Trademarks used in this text: Dell, the DELL logo and PowerVault are trademarks of Dell Inc.
Othertrademarksandtradenamesmightbeusedinthisdocumenttorefertoeithertheentitiesclaimingthemarks andnamesortheirproducts.DellInc.disclaimsanyproprietaryinterestintrademarksandtradenamesotherthan itsown.
Type:3572Model:S3H/S4H/S5H/S6H
PrintedAugust2014
Readthisfirst
ContactingDell
ForcustomersintheUnitedStates, call800-WWW-DELL(800-999-3355).
Note: If you donothave an active Internet connection, you can find contact information about your purchase invoice, packingslip, bill, or Dell product catalog.
Dellprovidesonlineandtelephone-basedsupportandserviceoptions.Service availabilityvariesbycountryandproduct,andsomeservicesmightnotbe availableinyourarea.TocontactDellforsales,technicalsupport,orcustomer serviceissuesfollowthestepsthatarelisted:
- Visithttp://dell.com/support.
- Verify your country or region in the Choose A Country/Region menu at the bottomofthepage.
- ClickContactUsontheleftsideofthepage.
- Selecttheappropriateserviceorsupportlinkthatisbasedonyourneed.
- ChoosethemethodofcontactingDellthatisconvenientforyou.
Contents
Readthisfirst. . . . . . . . . . . . . i i i
ContactingDell. . . . . . . . . . . . . . i i i
Figures. . . . . . . . . . . . . . . v i i
Tables. i x
Safetyandenvironmentalnotices...xi
Safetynotices. . . . . . . . . . . . . . x i
Lasersafetyandcompliance. . . . . . . . . x i i
Performingthesafetyinspectionprocedure. . . . x i i
Racksafety. . . . . . . . . . . . . . . x i i
Preface. . . . . . . . . . . . . . . x v
Chapter1.Productdescription . . . . 1 -
Frontpanel 1 - 2
Cartridgemagazine. 1 - 4
Rearpanel 1 - 5
Barcodereader. . . . . . . . . . . . . 1 - 6
SAShostinterface. 1 - 6
Encryption. 1 - 6
SupportedInternetProtocols. . . . . . . . 1 - 7
SimpleNetworkManagementProtocol(SNMP)
messaging. 1 - 7
NetworkTimeProtocol. 1 - 7
Ultriumtape drives. 1 - 8
Media. 1 - 8
Logical Unit Number (LUN) scanning ..... 1-9
Location coordinates and element addresses . . . 1-9
Library specifications . . . . . . . . . . . 1-10
Productenvironment 1
Supported devicedrivers. 1-12
Chapter 2.Userinterfaces ..... 2 - 1
Operator Panel . . . . . . . . . . . . . 2 -
Web User Interface. 2 -
Chapter 3.Installationand configuration. . . . . . . . . . . . . . 3 - 1
Choosing allocation. 3 - 1
Installing in a rack. 3-2
Removing the accessor locking screw ..... 3-7
Attaching the library to a server . . . . . . . 3-8
Configuring thelibrary. 3-10
Configuring your library with the Web User Interface. 3
Configuring your library with the Operator Panel. 3-24
Populating the library with cartridges . . . . . 3-27
Verifying library and drive operation . . . . . 3-28
Taking the Library Online . . . . . . . . . 3-29
Registering for support notification. . . . . . 3-29
Chapter 4. Operations. . . . . . . . 4 - 1
The OperatorPanel 4 - 3
Monitoring thelibrary 4 - 3
Managing thelibrary. . . . . . . . . . 4 - 4
Configuring thelibrary 4 - 9
Servicing the library. . . . . . . . . . 4-14
The Web User Interface. . . . . . . . . . . 4-16
Monitoring thelibrary. . . . . . . . . 4-17
Managing the library. . . . . . . . . 4-20
Configuring the library. . . . . . . . . 4-23
Servicing the library. . . . . . . . . . . 4-34
Chapter 5.Media. . . . . . . . . . . 5 - 1
Data cartridges. 5 - 2
Cartridge compatibility . . . . . . . . . 5 - 3
Write once, read many (WORM) cartridges . . . 5-3
WORM media . . . . . . . . . . . 5 - 3
Data securityon WORMmedia. . . . . . 5 - 4
WORM mediaerrors . . . . . . . . . 5 - 4
RequirementsforWORM capability . . . . . 5 - 4
Cleaning cartridge. 5 - 4
Bar codelabels . . . . . . . . . . . . . 5 - 5
Guidelines for the use of bar code labels . . . 5-6
Write-Protect switch. 5 - 6
Cartridge care and handling 5-7
Providetraining 5 - 7
Ensureproper packaging 5 - 8
Provideproper acclimation and environmental conditions 5 - 8
Perform a thorough inspection. . . . . . . 5 - 9
Handle thecartridge carefully. . . . . . . 5 - 9
Examples of cartridge problems . . . . . . 5-10
11 Environmentalandshipping specificationsfor
tape cartridges. 5-10
Chapter 6.Troubleshooting ..... 6 - 1
How the library reports problems. . . . . . . 6-1
Library error message content . . . . . . . . 6-2 Diagnosing aproblem . . . . . . . . . . 6 - 3
Isolating problems. 6 - 6
Installation and configuration problems. . . . . 6-8
Interpretingfront panelLEDs . . . . . . . . 6 - 8
Reseating cables . . . . . . . . . . . . . . 6-10
Emailing logs . . . . . . . . . . . . . . . 6-10
Chapter 7. Service procedures ..... 7 - 1
I I T D T- D C R . . . . . . . . . . . . . . . . 7
I_11 Contacting Dell technical support. . . . . . . . 7-2
Chapter 8. Removal and replacement procedures. 8 - 1
Requiredtools. 8 - 1
Replacing a defective cartridge magazine . . . . 8-1
Unlocking the cartridge magazine manually . . . 8-1
AppendixA.Errorcodes. . . . . . A - 1 Librarysensedata. . . . . . . . . . C - 1
Libraryerrorcodes. . . . . . . . . . A - 1 Tapedrivesensedata . . . . . . . . C - 3
Driveerrorcodes. . . . . . . . . . A - 1 1
WebUserInterfaceerrormessages. . . . . A - 1
Trapdefinitions(types). . . . . . . . . A - 1 4
AppendixD.LibraryConfiguration
Form . . . . . . . . . . . . . . . . . D - 1
AppendixB.TapeAlertflags. . . . . B - 1 Accessibility. . . . . . . . . . . E - 1
TapeAlertflagssupportedbythelibrary. . . . B - 1
TapeAlertflagssupportedbytheUltriumtape drive. B - 3
Accessibility. . . . . . . . . . . . . E - 1
Glossary F - 1
Index . . . . . . . . . . . . . . . . X - 1
AppendixC.Sensedata. . . . . . C - 1
SenseKeydefinitions. . . . . . . . . . C - 1
Figures
| 1-1.TL1000TapeAutoloader. . . . . . . 1 - 1
1-2.Frontpanelcomponents. . . . . . . 1 - 2
1-3.CartridgeMagazine. 1 - 4
1-4.Cartridgemagazine(topview). . . . . 1 - 4
1-5.Rearpanelcomponents. 1 - 5
1-6.Ultriumhalf-hightapedrive. . . . . . 1 - 8
1-7.Locationcoordinates. 1-10
2-1.OperatorPanelcomponents. 2 - 1
2-2.Libraryreadyscreen. 2 - 4
2-3.Passwordentryscreen. 2 - 4
2-4.Screenelements. 2 - 5
2-5. Confirmationscreen. 2 - 5
2-6.Javasecuritywarningmessage. . . . . 2 - 6
2-7.Loginpage. 2 - 6
2-8.Useraccountwindow. . . . . . . 2 - 7
2-9.Superuseraccountwindow 2 - 7
2-10. Administrator account window . . . . . 2-8
| 3-1.Rackmountscrewlocationsforfrontand rearverticalrails. . . . . . . . . . 3 - 3
| 3-2.Attachingthefrontbracketstothelibrary | chassis . . . . . . . . . . . . . . . . 3 -
3-3. Attaching therearbracketstotherails 3-4
3-4.Creatingtherailassemblies ..... 3 - 5
3-5.Installingtherailassemblies. . . . . 3 - 6
| 3-6.Securingthefrontofthelibraryintherack 3-6
3-7.Securingtherearofthelibraryintherack 3-7
3-8. Thecablesattherearofthelibrary 3-7
3-9.accessorlockingscrew . . . . . . . 3 - 8
3-10. Interfacecableconnection. . . . . . 3 - 8
3-11. Java security warning message. . . . . 3-12
3-12. WebUserInterfaceloginscreen 3-13
3-13. System summary . . . . . . . . . 3-13
3-14. Logical library mode settings . . . . . 3-14
3-15. Cartridge assignment settings . . . . . 3-15
3-16. Networksettings. 3-16
3-17. Date and time settings . . . . . . . 3-17
3-18. Encryption settings. . . . . . . . . 3-18
3-19. Encryption enabled settings . . . . . . 3-19
3-20. Email notifications . . . . . . . . . 3-20
3-21. Trap notifications . . . . . . . . . 3-21
3-22. Traplistsettings. 3-22
3-23. SNMPv3 user list settings . . . . . . 3-22
3-24. User access settings . . . . . . . . 3-23
3-25. Add User dialog . . . . . . . . . . 3-23
4-6.I/Ostation unlocked 4 - 5
4-7. Unlockmagazinecommand . . . . . 4 - 5
4-8.Movecartridgecommand. . . . . . . 4 - 6
4-9.Unloadcommand 4 - 6
4-10. CleanDrivecommand. 4 - 6
4-11.Inventorycommand. . . . . . . . 4 - 7
4-12. Online/Offlinecommand. 4 - 7
4-13. Move to Ship Position command ..... 4-7
4-14. RebootDrivecommand 4 - 8
4-15. RebootLibrarycommand ..... 4 - 8
4-16. Logoutcommand 4 - 8
4-17. AutoCleaningsettings. 4 - 9
4-18. Active slot count settings . . . . . . . 4-9
4-19. Library access mode settings ..... 4-10
4-20. Dateandtimesettings. . . . . . . 4 - 11
4-21. Networksettings. 4-12
4-22. Operator Panel settings . . . . . . . 4-13
4-23. Factory default settings ..... 4-13
4-24. Error status menu . . . . . . . . . 4-14
4-25. Run Library Verify command ..... 4-14
4-26. Drive diagnostic procedures. . . . . . 4-15
4-27. WebUserInterfacemenu. . . . . . 4-16
4-28. SystemSummaryscreen. 4-17
4-29. Library Map screen ..... 4-18
44-30. MoveCartridgescreen. . . . . . . 4-20
4-31. Unload Drive screen . . . . . . . . 4-21
4-32. CleanDrivescreen. 4-21
4-33. Library State screen . . . . . . . . 4-21
4-34. Inventory screen . . . . . . . . . . 4-22
4-35. Inventory progress bar . . . . . . . 4-22
4-36. Unlock magazine . . . . . . . . . . 4-22
4-37. User Access screen. . . . . . . . . 4-23
4-38. Physical library settings screen. . . . . 4-24
4-39. Logical library settings screen ..... 4-24
4-40. Network settings screen . . . . . . . 4-26
4-41. Encryptionsettingsscreen ..... 4-27
4-42. Encryptionsettingsenabledscreen 4-28
4-43. Date and time settings screen . . . . . 4-28
4-44. Email settings screen . . . . . . . . 4-30
4-45. SNMPsettingsscreen. 4-31
4-46. Save/Restoreconfigurationwithcookies 4-33
4-47. Save/Restore screen . . . . . . . . 4-33
4-48. Operator interventions screen . . . . . 4-34
4-49. View Library Logs screen ..... 4-35
4-50. Traces screen. . . . . . . . . . . 4-36
4-51. Download Drive Logs screen ..... 4-36
4-52. Download Library Logs screen. . . . . 4-37
4-53. Reset library and drive screen . . . . . 4-37
4-54. FirmwareUpdatescreen. 4-38
4-55. UsageStatisticsscreen. 4-39
5-1.TheLTOUltriumDataCartridge ..... 5 - 1
35-2.UltriumdataandWORMtapecartridges 5-4
5-3.SamplebarcodelabelontheLTOUltrium6 TapeCartridge 5 - 6
5-4.Settingthewrite-protectswitch. . . . . 5 - 7
5-5.Double-boxingtapecartridgesforshipping 5-8
5-6. Checking forgapsintheseamsofa cartridge 5 - 9
6-1.FrontpanelLEDs 6 - 8
8-1.Cartridgemagazinelockreleaseaccesshole 8-2
Tables
1.ClassILaserProduct. . . . . . . . x i i
1-1. Data capacity and recording format 1-2
1-2.Frontpanelcomponentdescriptions1-2
1-3.Rearpanelcomponentdescriptions1-5
1-4. Ultriumdataandcleaningcartridge compatibilitywithUltriumtapedrive...1-9
1-5.Physicalspecifications. . . . . . . . 1-10
1-6.Electricalspecifications. . . . . . 1-10
1-7.Environmentalspecifications . . . . . 1-10
1-8.Operationalspecifications. . . . . . 1 - 11
1-9.Acousticalspecifications. . . . . . . 1 - 11
2-1.OperatorPanelcomponentdescriptions 2-1
3-1.Locationcriteria . . . . . . . . . 3 - 1
3-2.Defaultlibraryconfigurationsettings 3-10
5-1.Cartridgetypesandcolors 5 - 2
5-2.CartridgeDataCapacityandRecording Formats . . . . . . . . . . . . . . 5 -
5-3.Nominalcartridgelife:Load/unloadcycles 5-3
5-4.Ultriumdatacartridgecompatibilitywith Ultriumtapedrive . . . . . . . . . 5 - 3
5-5.CartridgesandVOLSERscompatiblewith theUltriumTapeDrives . . . . . . . 5 - 5
5-6.Locationofthewrite-protect switch 5-7
5-7.Environment foroperating,storing,and shipping the LTO Ultrium Tape Cartridge . 5-10
6-1.Front PanelLEDindicators. . . . . . 6 - 9
A-1. Libraryerror codes. . . . . . . . A - 1
A-2. Drive error codes . . . . . . . . A-11
A-3. Web user error messages . . . . . . A-11
A-4. Trap list . . . . . . . . . . . . A-14
B-1. TapeAlert flags supported by the library B-1
B-2. TapeAlertflagssupportedbytheUltrium tapedrive . . . . . . . . . . . . B - 3
C-1. Sensekeydefinitions . . . . . . . C - 1
C-2. Librarysensedata . . . . . . . . C - 1
C-3. Ultrium Tape drive sense data . . . . . C-3
XC-4. UltriumTapedrivesensedata-Bytes12 a n d 1 3 . . . . . . . . . . . . . C - 4
Safetyandenvironmentalnotices
Safetynoticesandenvironmentalnoticesforthisproductareshownanddescribed.
Safetynotices
Observethesafetynoticeswhenthisproductisused. Thesesafetynoticescontain dangerandcautionnotices. Thesenoticesaresometimesaccompaniedbysymbols that representtheseverityofthesafetycondition.
Mostdangerorcautionnoticescontainareferencenumber(DxxxorCxxx).
Thesectionsthatfollowdefineeachtypeofsafetynoticeandgiveexamples.
Dangernotice
Adangernoticecallsattentiontoasituationthatispotentiallylethalorextremely hazardoustopeople. Alightningboltsymbolalwaysaccompaniesadangernotice torepresentadangerouselectricalcondition. Asampledangernoticefollows:

DANGER: Anelectrical outlet that is not correctly wired could place hazardous voltage on metal part of the system or the device that attach to the system. It is the responsibility of the custom to ensure that the outlet is correctly wired and grounded to prevent an electrical shock. (D004)
Cautionnotice
Acautionnoticecallsattentiontoasituationthatispotentiallyhazardousto peoplebecauseofsomeexistingcondition,ortoapotentiallydangeroussituation thatmightdevelopbecauseofsomeunsafepractice.Acautionnoticecanbe accompaniedbyoneofseveralsymbols:
| Ifthesymbolis...Itmeans... | |
 | Ahazardouselectricalconditionwithlesseveritythan electricaldanger. |
 | Ahazardousconditionthatisnotrepresentedbyother safetysymbols. |
 Class I Class I | ThisproductcontainsaClassIIlaser.Donotstareintothe beam.(C029)Lasersymbolsarealwaysaccompaniedbythe classificationofthelaserasdefinedbytheU.S.DepartmentofHealthandHumanServices(forexample, ClassI,ClassII). |
 | Ahazardousconditionduetomechanicalmovementinor aroundtheproduct. |
 | Thispartorunitisheavybuthasaweightsmallerthan18 kg(39.7lb).Usecarewhenlifting,removing,orinstalling thispartorunit.(C008) |
| >18 kg(40 lb) | |
 | Ahazardousconditionduetotheunit'ssusceptibilityto electrostaticdischarge. |
Lasersafetyandcompliance
Table1.ClassILaserProduct

Class I
The library might contain alaser assembly that complies with the performance standards set by the US Food and Drug Administration fora Class Ilaser product. Class Ilaser products donotemithazardous laserradiation. The library has then necessary protective housing and scanningsafeguardsto ensure that laserradiation is in accessible during operation or within Class I limits. Externalsafety agencies have reviewed the library and have obtained approvals to the latest standards as they apply.
Performingthesafetyinspectionprocedure
Before you servicetheunit, complet the following safety inspection procedure.
- Stopallactivitybetweenthehostandthelibrary'stapedrive.
- Turn off the power to the library by switching the Power button on the rear of the tapelibrarytotheOffposition.
- Disconnectthetapedrive'sSAScable.
- Unplugthelibrary'spowercordfromtheelectricaloutletandthelibrary's powersupplyunit.
- Checkthelibrary'spowercordsfordamage,suchasapinched,cut,orfrayed cord.
- Checkthetapedrive's SAScablefordamage.
- Check the cover of the library for sharpedges, damage, alteration that expose its internal parts.
- Check the cover of the library for proper fit. It should be in place and secure.
- Check the product label at therearof the library to make sure that it matches the voltage at your outlet.
Racksafety
The following general safety information must be used for all rack-mounted devices.
DANGER

•Alwayslowerthelevelingpadsontherackcabinet.
•Alwaysinstallstabilizerbracketsontherackcabinet.
• To avoid hazardous conditions because of uneven mechanical loading, always install the heaviest devices in the bottom of the rack cabinet. Always install servers and optional devices, starting from the bottom of the rack cabinet.
- Rackmounteddevicesarenottobeusedasashelforworkspace.Do notplaceanyobjectontopofrackmounteddevices.
- Eachrackcabinetmighthavemorethanonepowercord.Besureto disconnectallpowercordsintherackcabinetbeforeyouserviceany deviceintherackcabinet.
- Connectalldevicesthatareinstalledinarackcabinettopower devicesinstalledinthesamerackcabinet.Donotplugapowercord fromadevicethatisinstalledinonerackcabinetintoapowerdevice thatisinstalledinadifferentrackcabinet.
- Anelectricaloutletthatisnotcorrectlywiredmightplacehazardous voltageonthemetalpartsofthesystemorthedevicesthatattachto thesystem.Itistheresponsibilityofthecustomertoensurethatthe outletiscorrectlywiredandgroundedtopreventanelectricalshock.
CAUTION:

- Donotinstallaunitinarackwheretheinternalrackambient temperaturesmightexceedthemanufacturer'srecommendedambient temperatureforallyourrackmounteddevices.
- Donotinstallaunitinarackwheretheairflowiscompromised. Ensurethatairflowisnotblockedorreducedonanyside,front,or backofaunitthatisusedforairflowthroughtheunit.
- Considerationmustbegiventotheconnectionoftheequipmentto thesupplycircuitsothatoverloadingofthecircuitsdoesnot compromisethesupplywiringorovercurrentprotection. Toprovide thecorrectpowerconnectiontoarack, refertotheratinglabelsonthe equipmentintheracktodeterminethetotalpowerrequirementofthe supplycircuit.
•(Forslidingdrawers)Donotpulloutorinstallanydrawerorfeature iftherackstabilizerbracketsarenotattachedtotherack.Donotpull outmorethanonedraweratatime.Therackmightbecomeunstable ifyoupulloutmorethanonedraweratatime.
•(Forfixeddrawers)Thisdrawerisafixeddrawerandmustnotbe movedforservicingunlessspecifiedbythemanufacturer.Attempting tomovethedrawerpartiallyoroutoftherackmightcausetherack tobecomeunstableorcausethedrawertofalloutoftherack.
(R001)
CAUTION:

Removingcomponentsfromtheupperpositionsintherackcabinet improvesrackstabilityduringrelocation.Followthesegeneral guidelineswheneveryourelocateapopulatedrackcabinetwithina roomorbuilding:
- Reducetheweightoftherackcabinetbyremovingequipment, startingatthetopoftherackcabinet.Whenpossible,restoretherack cabinettotheconfigurationoftherackcabinetasyoureceivedit.If thisconfigurationisnotknown,youmustdothefollowing:
-Removealldevicesinthe32Upositionandabove.
-Ensure that the heaviest devices are installed in the bottom of the rack cabinet.
-Ensure that there are no empty U-levels between devices that are installed in the ack cabinet below the 32U level.
- Iftherackcabinetyouarerelocatingispartofasuiteofrackcabinets, detachtherackcabinetfromthesuite.
- Inspecttheroutethatyouplantotaketoeliminatepotentialhazards.
- Verify that theroutethat you choose cansupport the weight of the loaded rack cabinet. Refertothedocumentation that comes with your rack cabinet fortheweight of a loaded rack cabinet.
- Verifythatalldooropeningsareatleast760x2032mm(30x80in.).
- Ensure that all devices, shelves, drawers, doors, and cables are secure.
- Ensure that the four-leveling pads are raised to their highest position.
- Ensure that there is no stabilizer bracket that is installed on the rack cabinet during movement.
- Donotusearamph that is inclined at more than 10 degrees.
- Whentherackcabinetisinthenewlocation:
-Lowerthefourlevelingpads.
-Installstabilizerbracketsontherackcabinet.
- If you removed any devices from the rack cabinet, repopulate the rack cabinet from the lowest position to the highest position.
- Ifalong-distancerelocationisrequired, restoretherackcabinettothe configurationoftherackcabinetasyoureceivedit.Packtherack cabinetintheoriginalpackagingmaterial,orequivalent.Also,lower thelevelingpadstoraisethecastersoffthepalletandbolttherack cabinettothepallet.
(R002)
Preface
|
Thismanualcontainsinformationandinstructionsnecessaryforthesetup, operation,andservicingoftheDell ^TM PowerVault ^TM TL1000TapeLibrary.
Chapter1.Productdescription
natural_image
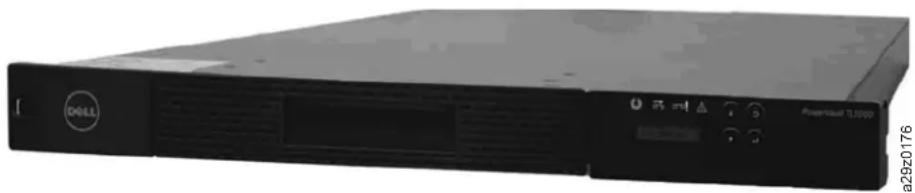
Exterior view of a black Drell CPU server unit (no visible text or symbols on body)Figure1-1.TL1000TapeAutoloader
The Dell ^™ PowerVault ^™ TL1000TapeAutoloaderprovidescompact,high-capacity,low-costsolutionsforsimple,unattendeddatabackup.Thelibraryhasacompact 1Uformfactorwitheasyaccesstotapecartridgeswitharemovablemagazine.The TL1000TapeAutoloaderisanexternalstand-aloneorrack-mountableunitthat incorporatesanUltrium6Half-HighTapeDrive(ModelS6H),Ultrium5Half-High TapeDrive(ModelS5H),orUltrium4Half-HighTapeDrive(ModelS4H).Itis equippedwithaSAS(SerialAttachedSCSI)hostadapterattachmentthathasa datatransferrateofupto6.0Gbps.
The TL1000TapeAutoloaderhasa10-positionremovablecartridgemagazine, providingamaximumof9datacartridgepositions,oramaximumof8data cartridgepositionswithaconfigurable1-slotI/Ostation.Onepositionisreserved asthetapedriveexchangepositionandcanbeaccessedbythelibraryonly.Tape cartridgesthataresupportedintheTL1000TapeAutoloaderincludethe2500GB nativephysicalcapacityLTOUltriumTapeCartridge(Ultrium6),1500GBnative physicalcapacityLTOUltriumTapeCartridge(Ultrium5),800GBnativephysical capacityLTOUltriumTapeCartridge(Ultrium4),400GBTapeCartridge(Ultrium
3),200GBTapeCartridge(Ultrium2),andWORM(Ultrium6,Ultrium5,Ultrium 4).The library data storage capacity can be further increased by using hardware compression.
Table1-1. Data capacity and recording format
| TypeNativeDataCapacityRecordingFormat | |
| Ultrium62500GB(6250GBat2.5:1 compression) | Readsandwritesdataon 2176tracks,16tracksata time. |
| Ultrium51500GB(3000GBat2:1 compression) | Readsandwritesdataon 1280tracks,16tracksata time. |
| Ultrium4800GB(1600GBat2:1 compression) | Readsandwritesdataon896 tracks,16tracksatatime. |
| Ultrium3400GB(800GBat2:1 compression) | Readsandwritesdataon704 tracks,16tracksatatime. |
| Ultrium2200GB(400GBat2:1 compression) | Readsandwritesdataon512 tracks,8tracksatatime. |
| Ultrium1100GB(200GBat2:1 compression) | Readsandwritesdataon384 tracks,8tracksatatime. |
Frontpanel

Figure1-2. Frontpanelcomponents
2
Table1-2. Frontpanelcomponentdescriptions
| NumberComponentDescription | |
| 1OperatorPanelTheOperatorPanelfeaturesamonochrome16-characterLCDgraphicdisplaythatisonthefrontofthelibrary.Libraryoperationsandservicefunctionsarecompletedfromthisscreen.TheWebUserInterfaceofferssomeofthesamefunctionalityastheOperatorPanelwithawebbrowserforremoteaccesstothelibrary.ForinformationabouttheOperatorPanelandtheWebUserInterface,seeChapter2,"Userinterfaces,"onpage2-1. | |
| 2ControlkeysThecontrolkeysarelocatedtotherightoftheOperatorPanelLCDdisplayonthefrontofthelibrary.3 CartridgemagazineThetapelibraryhasasinglecartridgemagazinethatcanholdupto9datacartridges,or8datacartridgeswitha1-slotI/Ostation.SeeFigure1-3onpage1-4.Column5/Tier1inthecartridgemagazinecanbeconfiguredasa1-slotI/Ostation.Column5/Tier2inthecartridgemagazineisreservedfortheexchangepositionandcanbeaccessedbythelibraryonly.TheI/Ostationisusedtoimportandexportcartridgeswithoutinterruptingnormallibraryoperation.BeginningwithColumn4,aminimumofonecolumnncanbereservedforcleaningcartridges.Cleaningcartridgesareusedtocleanthetapedriveheads.Forconfigurationdetails,seeChapter3,"Installationandconfiguration,"onpage3-1. | |
| 4 Cartridgemagazinerelause | Emergencycartridgemagazinelockrelease.Whenthel/Ostationislocked,insertalarge,straightenedpapercliptwiceorholdthepaperclipinplacewhilethecartridgemagazineslidespastthel/Ostationlock. |
| 5 AirventsTheseeventsdrawcoolerairintothelibraryenclosureandallowwarmairtoescapewhichhelpskeepthelibraryatanormaloperatingtemperature. | |
Cartridgemagazine
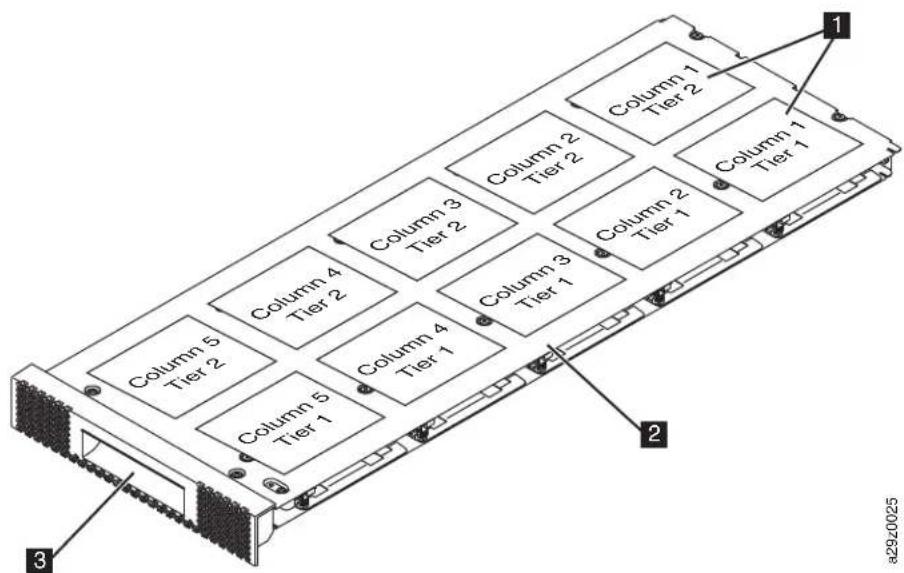
Figure1-3.CartridgeMagazine
1 Cartridgelocationsastheyappear intheLibraryMap. Note: Theselabelsareforreference onlyanddonotdisplayonthe magazine.
2 Cartridgemagazine 3 Magazinehandle
Figure1-4 show the cartridge gelocation label and ruler that appears on the cartridge magazine. Theruler provides an indication of the distance, when the magazine is opened or withdrawn, to the end of the magazine before it clear the front edge of the library. Toprevent dropping them magazine, support both ends of the magazine before it clear the front edge of the library.
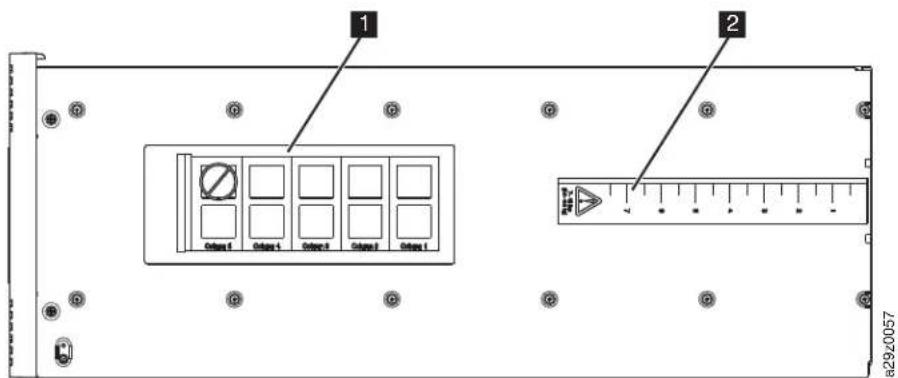
Figure1-4. Cartridgemagazine(topview)
Rearpanel
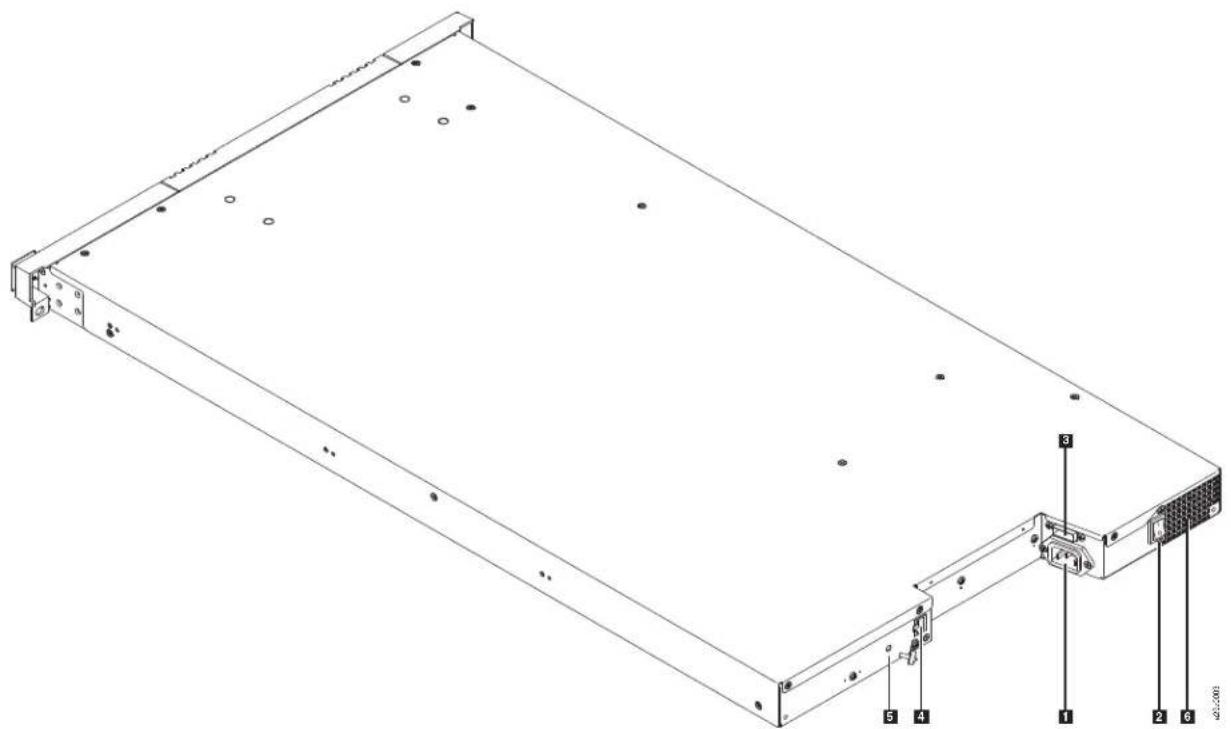
Figure1-5. Rearpanelcomponents
Table1-3. Rearpanelcomponentdescriptions
| Number | ComponentDescription | |
| 1 | PowerconnectorThelibrarycon | connectstoa110/220voltacpower supply. |
| 2 | PowerswitchThelibraryispow | eredONwhentepowersupply switchontherearpanelisON(1).Thelibraryhasno independentpowerswitchonthefrontpanel. |
| 3 | SAShostinterface connector | Serial-attachedSCSIhostinterfacecableconnection. TheUltrium4,5,and6SASdrivesusetheSFF-8088 connectionatthedriveendandSFF-8088orSFF-8470 atthehostadapterend. |
| 4 | EthernetportThisportisusedto | connectthelibrarytoanetwork. |
| 5 | AccessorlockingscrewTheaccessorlockingscrewisusedtolockthe accessorinplaceduringtransportation. Important:Removetheaccessorlockingscrewbefore thelibraryispoweredON. | |
| 6 | Air vent | These vents allow air to escape from the power supplyandtapedrivesled. |
Barcodereader
Thebarcodereaderisapartofthelibraryaccessor.Thebarcodereaderreads eachcartridgegebarcodelabelthatidentifiesthetypesofcartridgemagazinesand tapedrivethatisinstalledinthelibrary.Italsoprovidesinventoryfeedbacktothe hostapplication,OperatorPanel,andWebUserInterface.Thelibrarystoresthe customizedinventorydatainmemory.Libraryfirmwaresupportsa6or 8-charactervolumeserialnumber(VOLSER)onthebarcodelabelonthetape cartridge.
SAShostinterface
TheUltrium4,Ultrium5,andUltrium6Half-HighTapeDrivessupporttheSerial AttachedSCSI(SAS)interface.TheSFF-8088SASconnectorontheUltrium4, Ultrium5,andUltrium6iscompatiblewithSAS-1orSAS-2cables.
AdrivewithaSAS(SerialAttachedSCSI)interfaceislinkeddirectlytocontrollers.SASisaperformanceimprovementovertraditionalSCSI.SASenablesmultiple devices(upto128)ofdifferentsizesandtypestoconnectsimultaneouslywith thinnerandlongercables.Itsfull-duplexignaltransmissionsupports6.0Gb/s(S4H,S5H,andS6H).Inaddition,theTL1000TapeAutoloaderishot-plugged,if necessary.SASdrivescanauto-negotiatespeed.
Encryption
TheLTOUltrium6,Ultrium5,andUltrium4TapeDrivessupporthost ApplicationManagedEncryption(AME)withT10encryptionmethods,forSAS drives.DataencryptionissupportedbyLTOUltrium6,Ultrium5,andUltrium4 DataCartridgesonly.
Note: ApplicationManagedEncryption(AME) does not require a key.
The encryption enabled drive contains the necessary hardware and firmware to encrypt and decrypt the tape application data. Encryption policy and encryption keys are provided by the host application or host server. A directed digital certificate is installed at manufacturing time. Each driver receives a unique serial number and certificate. The T10 application validates each drive instance by checking the drive's digital certificate.
The LTO Ultrium encryption environment is complex and requires knowledge beyond that of product trained Service Support Representatives (SSRs). The Encryption functionontapedrives (desktop, stand-alone, and within libraries) is configured and managed by the customer. In some instances, SSRs are required to enable encryption at a hardware level when service access or service password controlled access is required. Customers setup supports by Field Technical Sales Support (FTSS), customer documentation, and softwaresupportforencryption software problems. Customer's how to support is also provided by way of support line contract.
The encryption-capable library firmware allow the usertoselect None or Application Managed encryption from the WebUser Interface. The factory default is None.
SupportedInternetProtocols
TheTL1000TapeAutoloadersupportstheInternetprotocols:
•IPv4
•IPv6
TolearnmoreaboutIPv4, visithttp://www.iana.org/.TolearnmoreaboutIPv6, visithttp://www.ipv6.org/.
SimpleNetworkManagementProtocol(SNMP)messaging
Occasionally, the library might encounter as ituation that you want to know about, such as an open magazine or a fault that causes the library to stop. The library provides a standard TCP/IP protocol called Simple Network Management Protocol (SNMP) to send alerts about conditions (such as need for operator intervention) over a TCP/IPLAN network to an SNMP monitoring station. These alerts are called SNMP traps. With the information supplied each SNMP trap, the monitoring station (together with customer-supplied software) can alert operations personnel of possible problems or operator intervention that occur.
SNMPtraps
SNMPTrapsarealertsorstatusmessagesthatcanbecollected,monitored,and usedtoproactivelymanageattachedlibrarieswithSNMPprotocolwiththeSNMP monitoringstations.Insummary,eachtrapprovidesthefollowinginformation:
- Product Identification such as product name, description, manufacturer, model number, firmwarelevel, and the URL that the trapis designated for.
- Product Status such as the severity of the trap, status (current and previous) and thetimethetrapoccurred.
- Library State (physical device status) such as identification and status of devices that is monitored. It would include enclosure, powersupply, controller, magazine status, drive count, cartridges lot count, and I/O station count. Also included would be certain library statistics, and where appropriate, the fault FSC (fault symptom code) including these severity and description of that fault.
- Drive Status such as the identification of each drive in the library, firmware level, serialnumber, and otheraddressandstatusinformation.
- Trap Definitions such as library status change, open magazine, I/O accessed, hardfaultinformation,requeststocleanthedrive,excessiveretries,and returningtonormaloperations.
- SNMP MIBs: The library's Management Information Base (MIB) contains units of information that specifically describe an aspect of the system, such as the system name, hardware number, or communications configuration. When with SNMP to monitor your TL1000 Tape Autoloader, makes sure that the TL1000 MIB file is loaded by your SNMP monitoring station. SNMP traps a resent to the SNMP monitoring station that are defined for your library (see "Configuring SNMP trap notifications" on page 4-31).
NetworkTimeProtocol
NTPisanInternetstandardprotocolthatassuresaccuratesynchronizationof computerclocktimesinanetworkofcomputers.Runningasacontinuous backgroundclientprogramonacomputer,NTPsendsperiodictimerequeststoa server,obtainingservertimestamps,andwiththemtoadjusttheclient'sclock.
Ultriumtapedrives
|
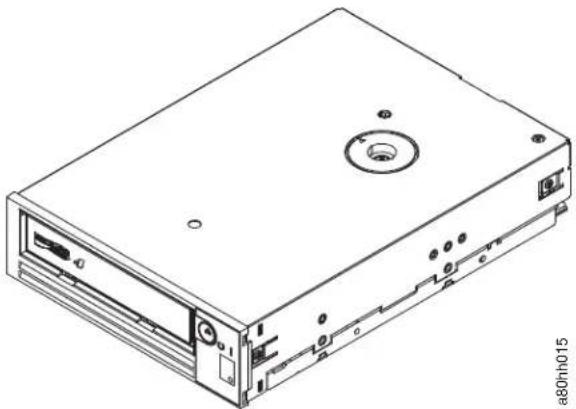
The TL1000 Tape Autoloadersupportsthe Ultrium4(S4H), Ultrium5(S5H), and Ultrium6(S6H) half-hightapedrives.
TheUltrium4,Ultrium5,andUltrium6half-hightapedrivessupporttheSerial AttachedSCSI(SAS)interface.TheyhaveoneMini-SAS(SFF-8088)connector.
natural_image
Line drawing of a beige internal computer drive chassis with mounting holes and drive slots (no text or symbols)Figure1-6.Ultriumhalf-hightapedrive
Speedmatching
Toimprovesystemperformance, the Ultrium4, Ultrium5, and Ultrium6 Tape Drivesuseatechniquethatiscalledspeedmatchingtodynamicallyadjustits native(uncompressed)dataratetotheslowerdatarateoftheattachedserver.
Channelcalibration
ThechannelcalibrationfeatureoftheUltrium4,Ultrium5,andUltrium6Tape Drivescustomizeseachread/writedatachannelforoptimumperformance.The customizationenablescompensationforvariationsintherecordingchannel transferfunction,mediacharacteristics,andread/writeheadcharacteristics.
Powermanagement
The Ultrium4, Ultrium5, and Ultrium6 Tape Drives feature apower management function. This function controls the drive's electronic so that part of the electronics completely turns OFF when circuit functions are not needed for the drive's operation.
Media
1
TheTL1000TapeAutoloaderusesUltriumtapecartridges that provide upto 2500-GBnativecapacity (upto6250GBwith2.5:1hardwaredatacompression) for Ultrium6tapedrives, 1500-GBnativecapacity (upto3000GBwith2:1hardware datacompression) for Ultrium5tapedrives, and 800-GBnativecapacity (upto 1600GBwith2:1hardwaredatacompression) for Ultrium4tapedrives.
Table1-4. Ultriumdata and cleaning cartridge compatibility with Ultriumtapedrive
| Ultrium TapeDrive | LTOUltriumDataCartridges | |||||
| 2500GB (Ultrium6) | 1500GB (Ultrium5) | 800GB (Ultrium4) | 400GB (Ultrium3) | 200GB (Ultrium2) | 100GB (Ultrium1) | |
| Ultrium6Read/WriteRead/WriteReadonly | ||||||
| Ultrium5Read/WriteRead/WriteReadonly | ||||||
| Ultrium4Read/WriteRead/WriteReadonly | ||||||
| Ultrium3Read/WriteRead/WriteReadonly | ||||||
| Ultrium2Read/WriteRead/Write | ||||||
| Ultrium1Read/Write | ||||||
Note: The TL1000 Tape Autoloadersupportsthe Ultrium4(S4H), Ultrium5(S5H), and Ultrium6(S6H) Tape Drivesonly.
Formoreinformationaboutmediacompatability,seeChapter5,"Media,"onpage 5-1
LogicalUnitNumber(LUN)scanning
TheTL1000TapeAutoloaderusesasinglSCSIIIDanddualLUNstocontrolthe tapedrive(LUN0)andlibraryaccessor(LUN1).ThelibraryrequiresaHostBus adapter(HBA)thatsupportsLUNscanning.Ifitisnotenabled,yourhostsystem cannotscanbeyondLUN0andfailstodetectthelibrary.Itseesonlythetape drive.
Important: SomeHBAs, such as RAID controllers, donotsupportLUNscanning.
Locationcoordinatesandelementaddresses
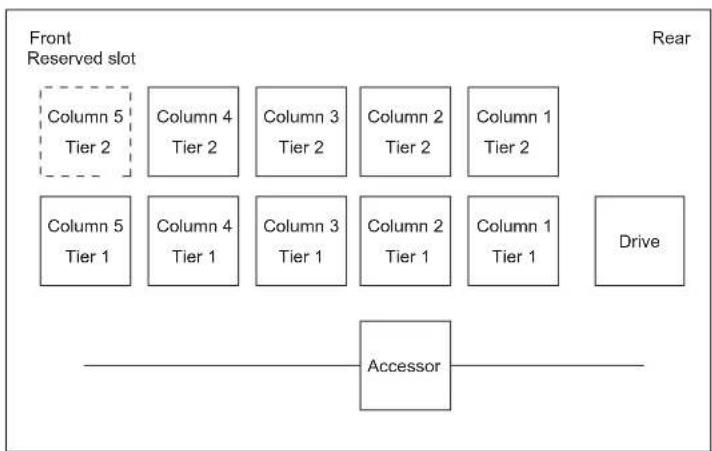
The TL1000 Tape Autoloader incorporates patented high-density (HD) slot technology, which allows multiple cartridge gestobestored inatiered architecture. The depth of a cartridgelocation in a high-density slot is known as a high-density slots are designed to contain multiple cartridges in Tiers and 2.
Note: Each column has as spring-loaded mechanism that pushes at a partridge into Tier1 when it is the only cartridge in that column. As single cartridge in acolumntakes on the Tier2 element addresseven though it physically in Tier1.
flowchart
graph TD
    A["Front Reserved slot"] --> B["Column 5 Tier 2"]
    A --> C["Column 4 Tier 2"]
    A --> D["Column 3 Tier 2"]
    A --> E["Column 2 Tier 2"]
    A --> F["Column 1 Tier 2"]
    A --> G["Column 5 Tier 1"]
    A --> H["Column 4 Tier 1"]
    A --> I["Column 3 Tier 1"]
    A --> J["Column 2 Tier 1"]
    A --> K["Column 1 Tier 1"]
    A --> L["Drive"]
    M["Accessor"] --> N["Horizontal line"]
    style M fill:#f9f,stroke:#333
    style N stroke:#000,stroke-width:2px
Figure1-7.Locationcoordinates
Astoreageelementaddressisassignedtoeachcartridgeatthetimethecartridgeis inserted.Storageelementaddressesrangefrom4097to4105(0x1001to0x1009) whenthel/Ostationisnotenabled,andfrom4097to4104(0x1001to0x1008) whenthel/Ostationisenabled.
Librarianspecifications
Table1-5. Physicalspecifications
| ParameterMeasurement | |
| Frontpanelwidth(chassis/bezel)445mm(17.52in.)/483mm(19.02in.) | |
| Depth850mm(33.46in.) | |
| Height44mm(1.73in.) | |
| Weight(libraryonly)13kg(28.66lbs) | |
Table1-6. Electrical specifications
| ParameterMeasurement | |
| Voltage100-240Vac.(4.0to1.5A) | |
| Frequency50-60Hz | |
| Powerconsumption110W |
Formoreinformationaboutinstallationspecifications,seeChapter3,"Installation andconfiguration,"onpage3-1.
Table1-7.Environmentalspecifications
| ParameterOperating(seeNote) | Storage | Shipping | |
| Temperature | 10 - 38 °C (50 - 100 °F) | 1-60°C(34-140°F) | -40to60°C(-40to 140°F) |
| Temperature variation | 10°C/hour (maximum) | 10°C/hour (maximum) | 10°C/hour (maximum) |
| Relative humidity | 20 - 80% | 10 - 90% | 10 - 90% |
| Wetbulbtemperature | 26°C(78.8°F) maximum | 29°C(84°F) maximum | 29°C(84°F) maximum |
| ParameterOperating(seeNote)StorageShipping | |||
| Altitude(meters)0-2,5000-2,5000-2,500 | |||
| Note:Theoperatingenvironmentofthelibrarymustnotconflictwiththemediastorage requirements. Thelibrarycanoperateatelevatedtemperaturesforanextendedperiod. However, the temperature might shortentheusefullifeofmediathatisstoredinthe library. If mediaisstoredinthelibrary formorethan10 hours, the storage temperature requirements formed a are met. It is assumed that mediastoredinthelibrary is approximately 2 degrees above ambient temperature when the library is powered ON. | |||
Table1-8. Operations specifications
| ParameterModel | S6HModelS5HModelS4H | ||
| Maximumstorage capacity | 22.5TB(56.2TBwith 2.5:1compression) | 13.5TB(27TBwith 2:1compression) | 7.2TB(14.4TBwith 2:1compression) |
| Maximumnumberof datacartridges | 9(includinganoptionall/OStation) | ||
| DrivetypesUltrium6Half | HighUltrium5HalfHigh | Ultrium4HalfHigh | |
| Sustainednatedata transferrate | 160MB/s(320MB/s with2:1 compression) | 140MB/s(280MB/s with2:1 compression) | 120MB/s(240MB/s with2:1 compression) |
| Interface6Gb/sSAS3Gb | /sSAS | ||
| Note:TheUltrium4Half-HightapedriveinS4Hlibrariesthataremanufacturedafter March2011support6.0Gb/sandasustainednatedatarateof120Gb/s. | |||
Table1-9. Acoustical specifications
| Parameter | Measurement |
| IdlingacousticalnoisesoundpowerlevelLwADinBels(1Bel=10dB) | 6.6 |
| MaximumacousticalnoisesoundpowerlevelLwADinBels(1Bel=10dB) | 6.8 |
Productenvironment
The TL1000 Tape Autoloader is designed to operate in a general business environment.
The library meets the acoustical requirements for general business area category 2D. Category 2D states that the library can be installed a minimum of 4 m (13 ft.) from a permanent work station.
To allow for service access, install the library a minimum of 0.9m (3 ft.) from all obstacles.
The library is a precision computer peripheral device. To ensure maximum longevity of your library, locate the library away from dust, dirt, and airborne particulates, as follows:
- Keep the library away from high-traffic areas, especially if the floor is carpeted. Carpeting harbors dust and walking on the carpet can cause the carpet fibers and the dust to become airborne.
- Keepthelibraryoutofprinterandcopierroomsbecauseoftonerandpaper dust. Additionally, donotstorepapersuppliesnexttothelibrary.
- Keepthelibraryawayfrommovingaircausedbydoorways,openwindows,fans,andairconditioners.
Ensure that the machine covers are always kept closed to minimize any contamination from airborne particles.
Supporteddevicedrivers
Devidedriversenablethedrivetointeractwithvariousservers.Forapplications thatusedevicedrivers,seetheapplication'sdocumentationtodeterminewhich driverstouse.
Note: If you donothave Internet access and you need information about device drivers, contact your sales representative.
Chapter2.Userinterfaces
"OperatorPanel"
"WebUserInterface" on page 2-5
The library has a local interface, the OperatorPanel, and a remote Web User Interface (UI).
TheOperatorPanelisonthefrontofthelibraryandallowsuserstoworklocallyonthelibrary.TheWebUserInterfaceallowsusersandadministratorstoviewandperformsomelibraryfunctionsfromremotesites.
TheWebUserInterfaceisimplementedasaJava™ Appletthatrunsinaweb browserfromanyPConthenetwork.TheJavaAppletrequiresthatJava1.5.0or higherisinstalledonyourhostcomputerforfullfunctionality, andisbestviewed withInternetExplorer6.0orhigher.InternetExplorer7.0orhigherisrequiredfor IPv6.
OperatorPanel
TheOperatorPanelisonthefrontbezelofthelibrary.TheOperatorPaneldisplays libraryinformationandmenucommandsthatareusedtorunlibrarymanagement functionsinresponsetothecontrolkeysontherightoftheLCDdisplay.
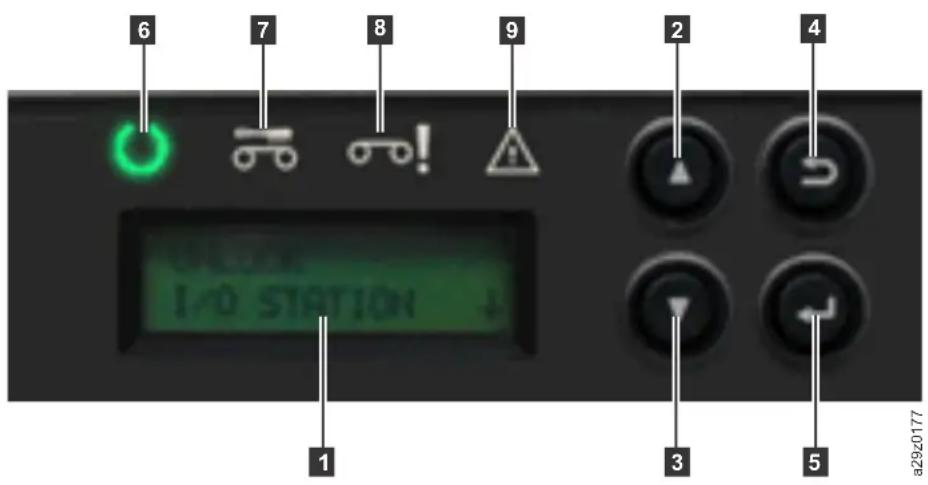
Figure2-1. OperatorPanelcomponents
Table2-1. OperatorPanelcomponentdescriptions
| Number | ComponentDescription | tion | |
| 1 | LC | display16-charac | erLCDgraphicdisplay |
| 2 | Up key (Δ) | Button that is used to navigate upward (↑) through the menu items | |
| 3 | Down key (∇) | Button that is used to navigate downward (↓) through the menuitems | |
Table2-1. OperatorPanelcomponentdescriptions(continued)
| Number | ComponentDescription | |
| 4 | CancelkeyButtonthatis | usedtocancelauseractionandreturntothe lastmenuitem |
| 5 | EnterkeyButtonthatis | usedtodisplayasubmenuortoselectauser action |
| 6 | Ready/Activity LED | GreenLEDlitwhentheunitispoweredON.TheLED flasheswhenthereisanylibraryactivityorthelibraryis offline. |
| 7 | CleanDrive LED | AmberLEDlitwhenthedriveneedscleaning.TheLED turnsOFFafterthedriveiscleanedsuccessfully. |
| 8 | AttentionLEDAmberLED | LEDlitwhenacartridgeisincompatiblewiththe drive,marginal,orinvalid.TheLEDturnsOFFwhenthe mediaisremovedfromthedrive.TheLEDmightalsobelit whenthereisapowersupplyproblem. |
| 9 | Error LED | Amber LED lit when there is an unrecoverable library or drivefailure.Thecorrespondingerormessagedisplayson theLCDdisplay. |
The Operator Panel operates in two basic modes:
- User Interaction mode - Mode that is employed when a user is pushing keys on the Operator Panel.
- System Driven mode - Normal mode of operation where the Operator Panel displays status in response to commands issued from the drive's internal interface.
When an Operator Panel key is pressed and released, the Operator Panel automatically changes to User Interaction mode. User Interaction mode continues until 3 minutes after a user stops pushing keys, or the requested accessor action stops, whichever is longer. Then, the Operator Panel returns to System Driven mode.
If necessary, the Operator Panel automatically changes to System Driven mode. When this change occurs, the library remembers what the user was doing before the display mode changed.
Any operational conflict between commands that are received over the host interface or the Web User Interface and those commands that are entered by way of the Operator Panel are avoided with a reservation mechanism on a first-come, first-served basis. Operator Panel commands are canceled by an Operator Panel logout or timeout.
Library firmware does not allow a user to select an impossible request. Those situations include, but are not limited to -
- Moving a cartridge from any source to a position occupied by another cartridge
- Moving a cartridge from an empty cartridge position
- Loading a cartridge from any source to a full drive
- Unloading a cartridge from an empty drive
Any error that is detected by the library or drive controller and not recoverable through predetermined firmware algorithms is considered unrecoverable. When an error occurs, an error code is displayed on the Operator Panel display and the
errorLEDisON.TheerrorcoderemainsontheOperatorPaneluntilalakeyis pressed,whichcausestheOperatorPaneltoreturntotheHomeScreen.Numeric errorcodesareusedforunrecoverableerrors. Otherwise,textstatusmessagesare displayed.
WhenthelibrarypowersONorresets, itgoesthroughseveralinternallycontrolled initialization processes, calledthePower-On-Self-Test(POST).
FrontpanelLEDs
AllLEDsareupdatedduringpowerONandresetsequences.AtpowerONor softwarereset,allLEDsturnONassoonasPOSTallows.Wheninitialization starts,allLEDsturnOFFandtheReady/ActivityLEDflashesatarateof approximately2secondspercycle.Whenthemechanicalinitializationiscomplete, theReady/ActivityLEDstopsflashingandturnsON.
Ifalibraryfailureoccurs,theReady/ActivityLEDturnsOFFandtheErrorLED turnsON.TheOperatorPanelalsodisplaysanappropriateerrorcodetohelp identifythefailure.
The following are more operational detail of LEDs:
- The Ready/Activity LED (6 in Figure 2-1 on page 2-1) turns ON any time the unitispoweredONandfunctional.TheReady/ActivityLEDflasheswhenever thereislibrary.ThisLEDalsoflasheswhenthelibraryisoffline.
- The Clean Drive LED (7 in Figure 2-1 on page 2-1) turns ON when a "cleaningrequired" command disissued by the drive. The LED turns OFF after a successful drive cleaning operation.
- The Attention LED (8 in Figure 2-1 on page 2-1) turns ON to indicate that a pieceofmediaisbad/marginal,orinvalid.TheLEDturnsOFFwhenall marginalandinvalidcartridgesareexportedfromthelibrary.TheAttentionLED alsoturnsONifAutocleanisenabledandnocleaningcartridgeisinacleaning position.
- The Error LED (9 in Figure 2-1 on page 2-1) turns ON when there is an unrecoverable driveorlibraryfailure.Anerormessageisdisplayedonthe screenandtheLEDremainsONuntiltheerrorstateisresolved.
Forinformation,see "InterpretingfrontpanelLEDs" on page 6-8.
Inputmodes
There are several way to entervalues in the different menu items. These values are selectable predefined values, toggle values (fore example, ON/OFF) and numerical values like network addresses.
Selectingpredefinedvalues
- Tosetthepredefinedvalues, presstheEnterkeytoselectthemenuitem.
- With the Plus and Minus keys, select one of the various predefined values for that item.
- AssoonastheOperatorPaneldisplayshowsthecorrectvalue, presstheEnter keytoapplythevalue.
Togglingvalues
TogglevaluesareusedtoswitchbetweenwodifferentstateslikeONandOFF.
- After you navigate to the menu item, press the Enter key to select the menu item.
- With the Plus and Minus keys, select one of the various predefined states for that item.
- PresstheEnterkeytoapplythenewstate.
Enteringnumericalvalues
Numerical values are needed for network addresses, password entries, and other configuration entries.
- After you navigate to the menu item, the current value is displayed and the cursor highlights the first digit of the value that can be changed.
- Foreachdigittobechangedinthevalue:
a. UsethePlusandMinuskeystoincrementordecrementthedigit.
b. PresstheEnterkeytohighlightthenexteditabledigit. - PresstheEnterkeyatthelastdigittoapplythecompleteentry.Pressthe Cancelkeytocancelthewholeeditprocessandmaintaintheoriginalvalue.
Loggingin
AtpowerONorsoftwarereset, the library readyscreendisplays when POST initialization completely successfully.
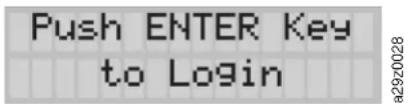
Figure2-2.Libraryreadyscreen
TologintotheOperatorPanel, press the Enter key. The password entryscreen displays.
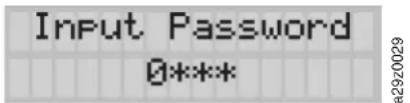
Figure2-3. Passwordentryscreen
PresstheUPandDOWNarrowkeystochangethecurrentdigit.PresstheEnterkeytoadvancetothenextdigit.Thedefaultpasswordis0000.Whenyouare loggedin,youcanchangethepasswordwiththeChangeLoginPassword command.See"ConfiguringOperatorPanelsettings"onpage4-13.
Screenelements
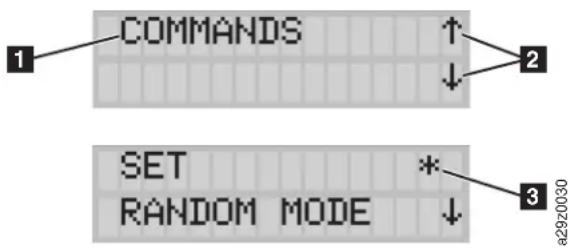
Figure2-4.Screenelements
TheOperatorPaneldisplaysasinglemenuitem(1 inFigure2-4)oneachscreen. Theexistenceofothermenuitemsaboveandbelowthecurrentlydisplayeditemis indicatedbythearrows(2 inFigure2-4)ontherightsideofthescreen.
IntheConfigurationmenu, thecurrentconfigurationsettingisindicated by an asterisk(3 in Figure2-4) ontherightsideofthescreen. Forexample, in Figure2-4, the1/Ostationisenabled. Whena configuration setting is changed, the confirmationscreeninFigure2-5 displays. PresstheEnterkeytoconfirm, or Cancelltoreturntothepreviousscreen.
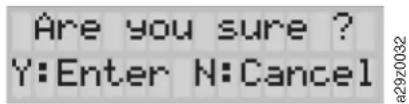
Figure2-5. Confirmationscreen
WebUserInterface
TheWebUserInterfaceJavaAppletrequiresJava1.5.0orhigherbeinstalledon yourhostcomputerforfullfunction, andisbestviewed with InternetExplorer6.0 orhigher.InternetExplorer7.0orhigherisrequiredforIPv6.Ifyourcomputer doesnothaveJavainstalledoryoumustupgradeyourinstallation, downloadthe latestversionoftheJavaRuntimeEnvironment(JRE)foryourplatformfrom http://www.java.com/. Follow the instruction that are provided to enable and configure the JavaRuntimeEnvironment for your browser.
TheWebUserInterfacecanalsobeusedtoupdatethelibraryanddrivefirmware, andtodownloaderrorlogs,drivememorydumps,andotherlibrarydata.
Before the TL1000 Tape Autoloader can be managed over an network with the Web Interface, setup the initial network configuration of the library with the Operator Panel. For information, see "Configuring network settings" on page 3-24.
Loggingin
TologintotheWebUserInterfacefromInternetExplorer,youmustentertheIP addressofthelibrary.TheIPaddresscanbeobtainedwiththeViewSettings commandfromtheOperatorPanel county example,http://192.168.1.1.
When the applet starts, the following warning message displays. This message is normal and does not indicate a problem.
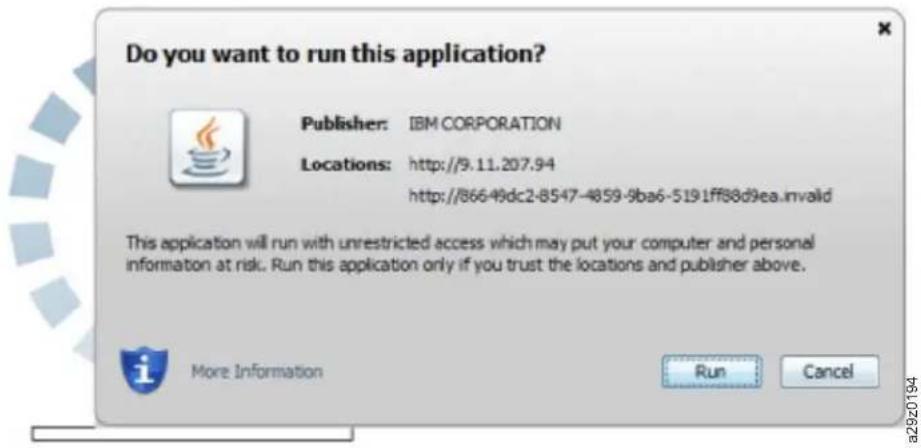
Figure2-6.Javasecuritywarningmessage
AftertheWebUserInterfaceisstarted, the loginwindow is displayed.
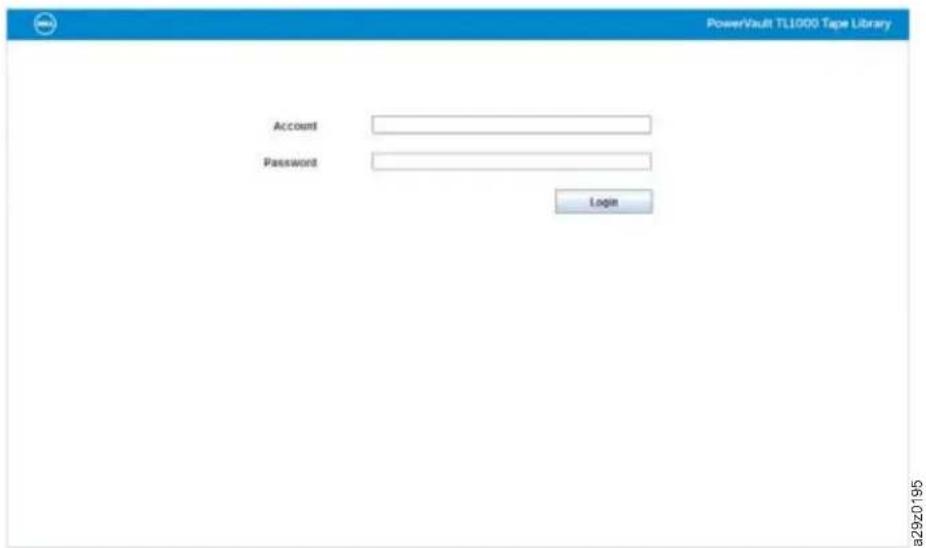
Figure2-7.Loginpage
ThefactorydefaultaccountloginandpasswordforanAdministratoraccountis
- Account:admin
- Password:secure
Theaccountnameandpasswordarecase-sensitive. Afteryouraccountname and password are entered, use your mouse to click Login or press the Enter key.
Forinformationaboutaccountprivileges,see"Userprivileges"onpage2-8.
Commonheaderelements
AllWebUserInterfacewindows(exceptfortheLoginscreen)containthe followingcommonelementsintheheader
- Help-Clicktoreadcontext-sensitivehelpfortheassociatedpage.
- Logoff-ClicktologoutoftheWebUserInterface.
MenusavailablefromtheWebUserInterface
Figure 2-8 shows the Web User Interface window for a User account, Figure 2-9 showsthewindowforaSuperuseraccount,andFigure2-10onpage2-8showsthewindowforanAdministratoraccount.
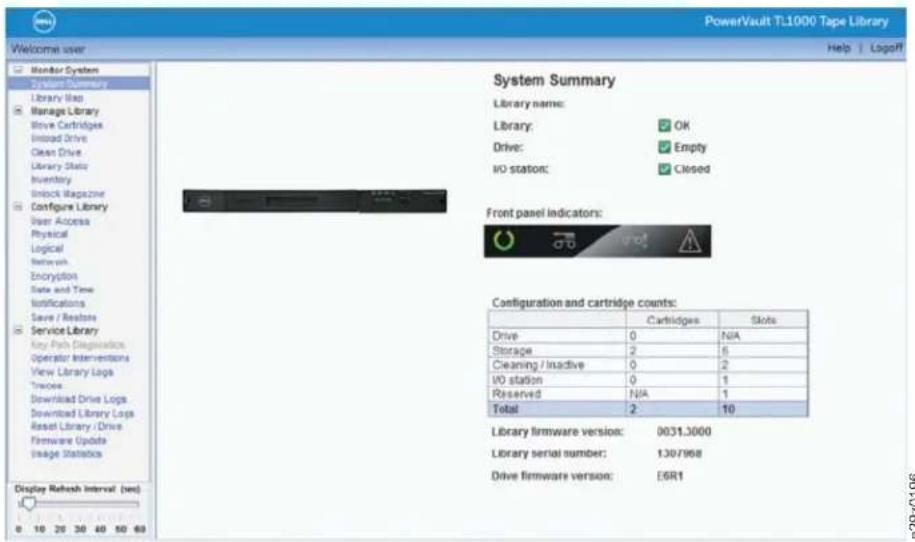
Figure2-8.Useraccountwindow
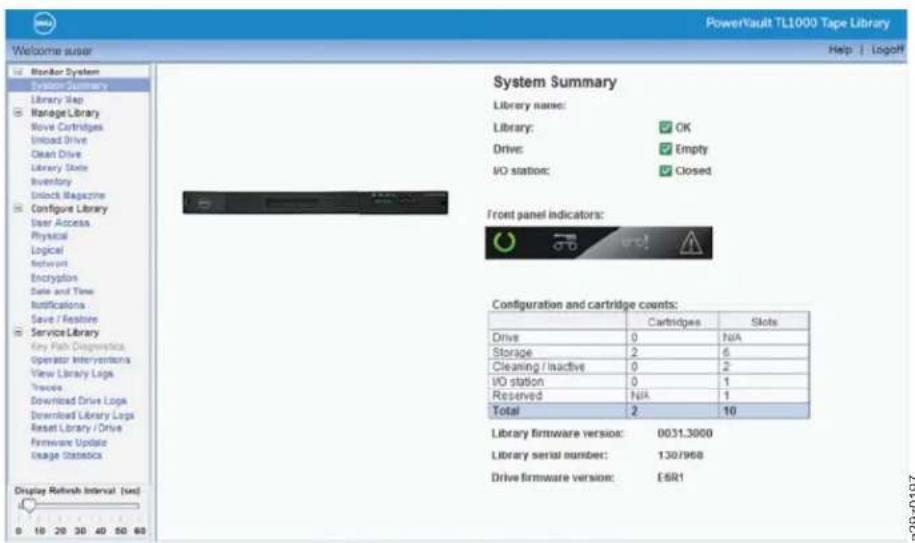
Figure2-9. Superuseraccountwindow
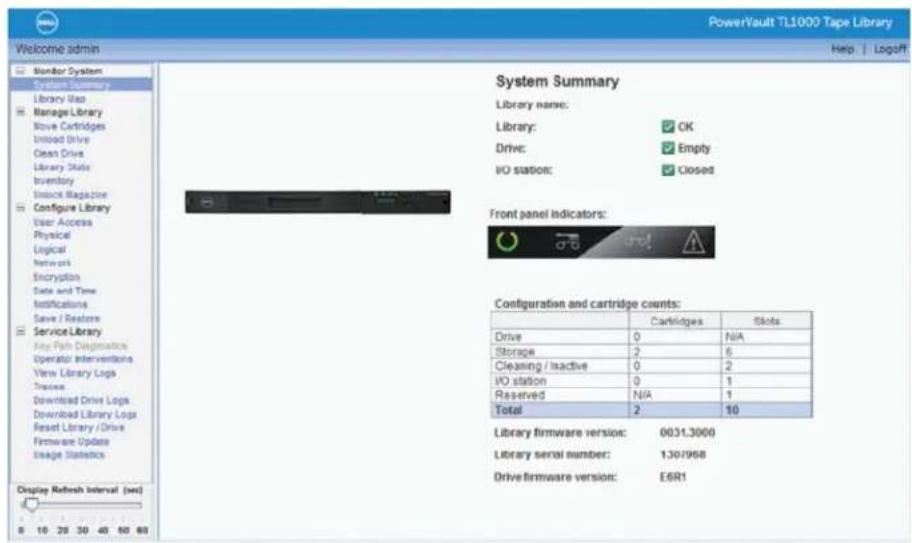
Figure2-10.Administratoraccountwindow
For a complete description of all Web User Interface menu options, see Chapter 4. "Operations," onpage4-1.
Userprivileges
Userprivilegelevelsaremanuallyassignedtouseraccountscreatedwithinthe library. Controllingaccesstoscreensandoperationswithinthelibrarypreserves theintegrityofthelibraryandthedatathatisstoredwithinthelibrary.
Therearethreetypesofuserprivilegesinthelibrary.
- Users are allowed to monitor the library, but not complete actions that affect the physical library.
- Superusers are allowed to operate the physical and logical library, but not complete actions that affect the library configuration.
- Administrator users are allowed access to the entire physical library and logical library, including configuration. Only one administrator user must be assigned the loginnameadmin.
Userprivilegesinclude
- MultipleuserscanbeloggedinatonetimeontheWebUserInterface.
• Anyusercanbeloggedintoinlyoneinterfaceatatime.
Chapter3.Installationandconfiguration
| "Choosingalocation" | |
| "Installinginarack" onpage3-2 | |
| "Removingtheaccessorlockingscrew" onpage3-7 | |
| "Attachingthelibrarytoaserver" onpage3-8 | |
| "ConfiguringyourlibrarywiththeWebUserInterface" onpage3-11 | "LoggingintotheWebUserInterface" onpage3-12 |
| "Checkingfirmwarelevel" onpage3-13 | |
| "Configuringlibrarysettings" onpage3-14 | |
| "Configuringnetworksettings" onpage3-16 | |
| "Configuringdateandtimesettings" onpage3-17 | |
| "Configuringencryptionsettings" onpage3-18 | |
| "Configuringemailnotifications" onpage3-20 | |
| "Configuringtrapnotifications" onpage3-21 | |
| "Managinguseraccess" onpage3-23 | |
| "Savingthelibraryconfiguration" onpage3-24 | |
| "ConfiguringyourlibrarywiththeOperatorPanel" onpage3-24 | "LoggingintotheOperatorPanel" onpage3-24 |
| "Configuringnetworksettings" onpage3-24 | |
| "Configuringlibrarysettings" onpage3-26 | |
| "Populatingthelibrarywithcartridges" onpage3-27 | |
| "Verifyinglibraryanddriveoperation" onpage3-28 | |
| "TakingtheLibraryOnline" onpage3-29 | |
| "Registeringforsupportnotification" onpage3-29 | |
ToinstallandconfigureaTL1000TapeAutoloader,completetheseproceduresin theordertheyarepresented.
Choosingalocation
Table3-1.Locationcriteria
| CriteriaDefinition | |
| Roomtemperature16-32°C(60-90°F) | |
| Voltage100-240Vac.(4.0to1.5A) | Note:Thepowerswitchisontherearofthe libraryandmustbeeasilyaccessible. |
| Frequency50-60Hz | |
| Relativehumidity20-80%non-condensing | |
| AirqualityThelibrarymustbeplacedinanareawith | minimalsourcesofparticulate contamination.Avoidareasnearfrequently useddoorsandwalkways,stacksofsupplies thatcollectdust,printers,andsmoke-filled rooms.Excessivedustanddebriscan damagecartridgesandthetapedrive. |
| Clearance | •Back:Minimumof15cm(6in.)•Front:Minimumof30cm(12in.)•Sides:Minimumof5cm(2in.) |
| RackrequirementsStandardEIA19-inchrack:1Uspace | |
Installinginarack
The TL1000 Tape Autoloader can be easily installed into a standard 19-inchrack system. A standard 19-inchrack system contains multiple mounting locations that are called EIA units as defined by the Electronics Industries Association. Each EIA unit contains three square or round hole that are used to mount track designed equipment. The library requires 1 EIA unit (1U) of racks space. Each unit is separated by a small space.
When you decide on a location in your rack forth the library, consider that the Operator Panel has as small LCD screen. The library must be positioned to allow foreasy viewing. There are of the library must be free from any obstruction to allow easy access to the powers switch and other rear panel components.
Note: Before you begin the installation of the library, read the safety information in "Racksafety" on page iii. Also, verify that nodesktop feet are attached to the bottom of the library.
Toinstallthelibraryinarack:
- Verify that your rackkit includes all then necessary contents.
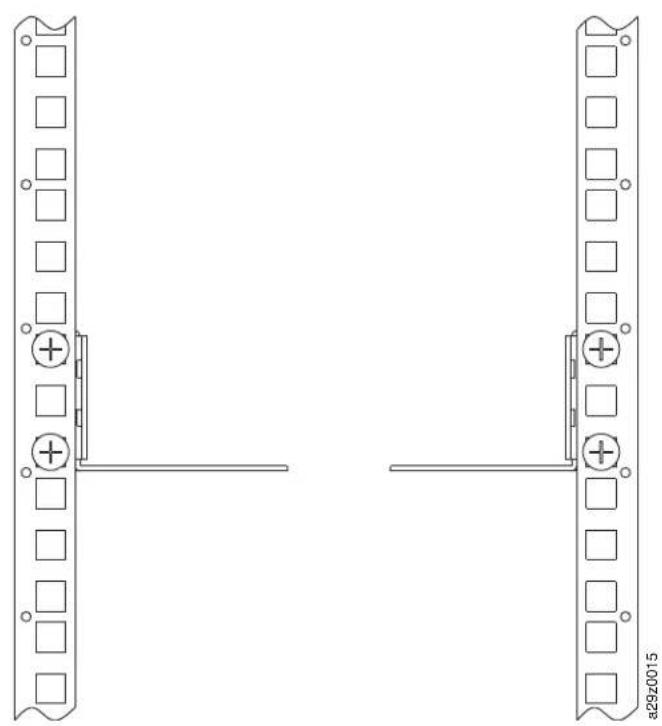
- Determinethelocationinyourrackforyourlibrarytobeinstalled.Witha pencil, markthelocationonthefrontverticalrailsandrearverticalrails (Figure3-1onpage3-3)inyourrack.
natural_image
Technical line drawing of two vertical structural components with mounting holes and mounting holes (no text or symbols)Figure3-1.Rackmountscrewlocationsforfrontandrearverticalrails
- Placethescrews 11 intotheleftandrightbrackets.
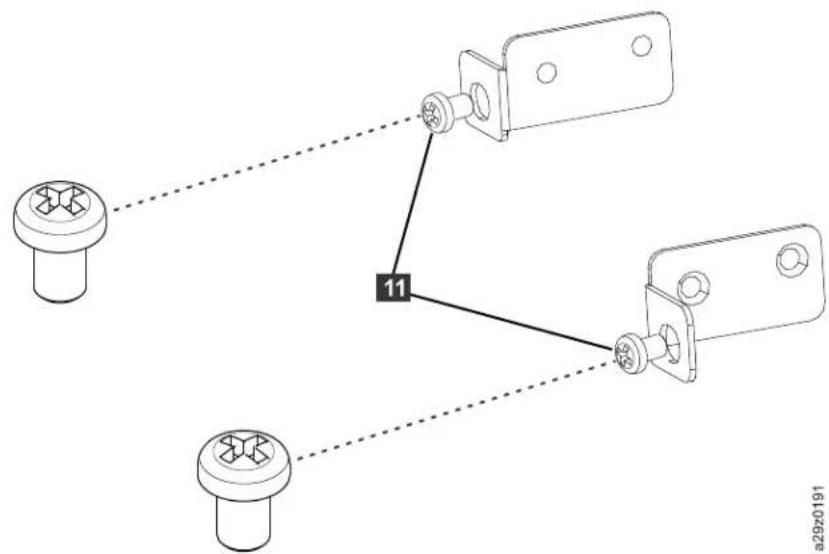
- Attach the left 3 and right 4 (Figure 3-2 on page 3-4) front brackets to the frontofthelibrarychassiswith2flat-headscrews 8 oneachside. Use the toptwoscrewholesoneachside. Theflangeofeachbracketwiththeinserted screws(11) fitsintothecutoutoneachsideofthebezel.
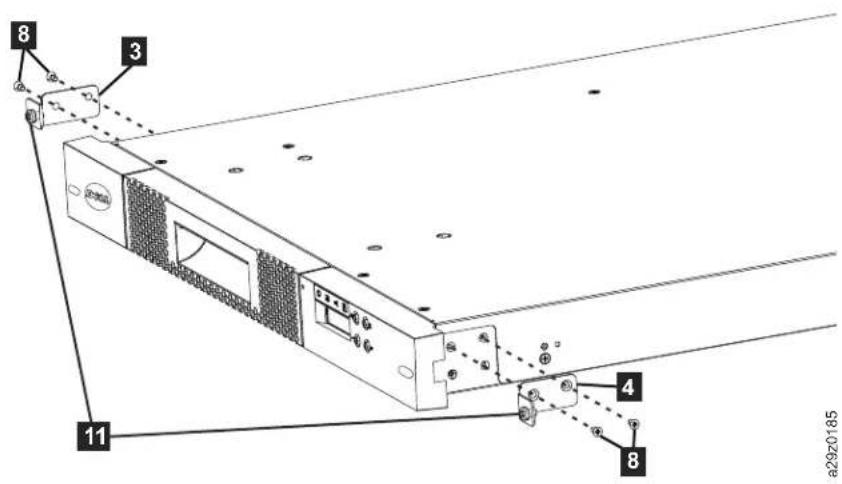
Figure3-2. Attaching the front bracket to the library chassis
- Attach the left 1 and right 2 rear brackets to the left 5 and right 6 frontrailswith2round-headscrews 10 oneachside(Figure3-3).
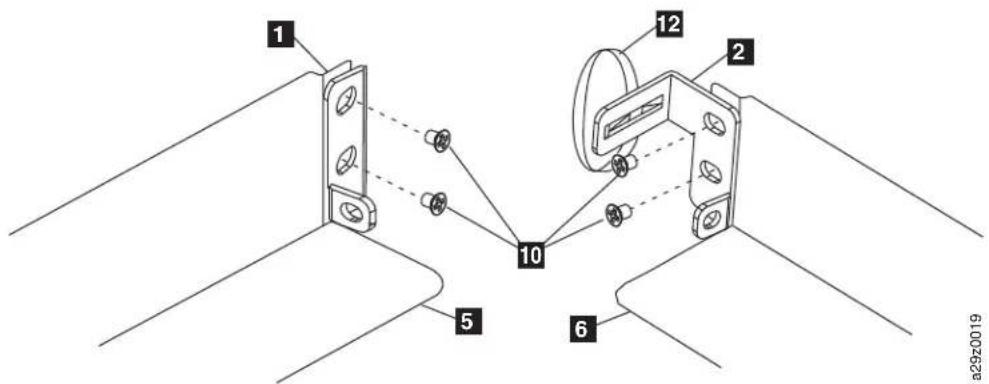
Figure3-3. Attaching therearbracketstotherails
Important: Do NOT tightentheses crews completely.
- Slide in the rear rails 7 from back to front, to create the rail assemblies. Ensure that the crewed whole face outwards (Figure 3-4 on page 3-5).
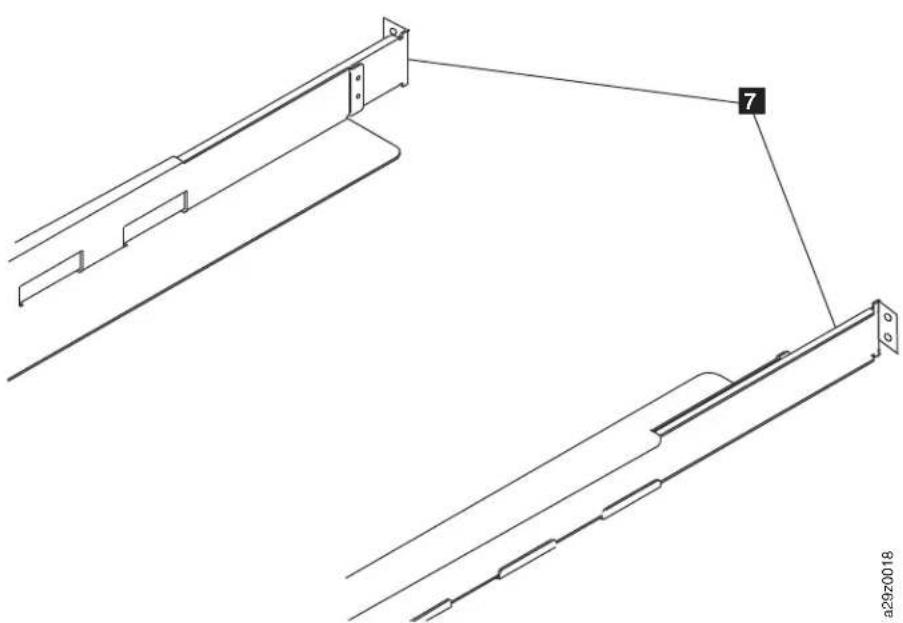
natural_image
Technical line drawing of two metal structural components with mounting brackets and a numbered connection point (no text or symbols)Figure3-4.Creatingtherailassemblies
- Installtherailassembliesintotherack(Figure3-5onpage3-6).Ensurethe3 holesinthefrontoftheunitalignwiththe1Uspacemarkedonthevertical railsinStep2.Securetherailstotherackwith4flat-headscrews 9 oneach sideoftherack.Usethetopandbottomscrewlocationsonthefrontandrear oftherackrail(Figure3-1onpage3-3)).
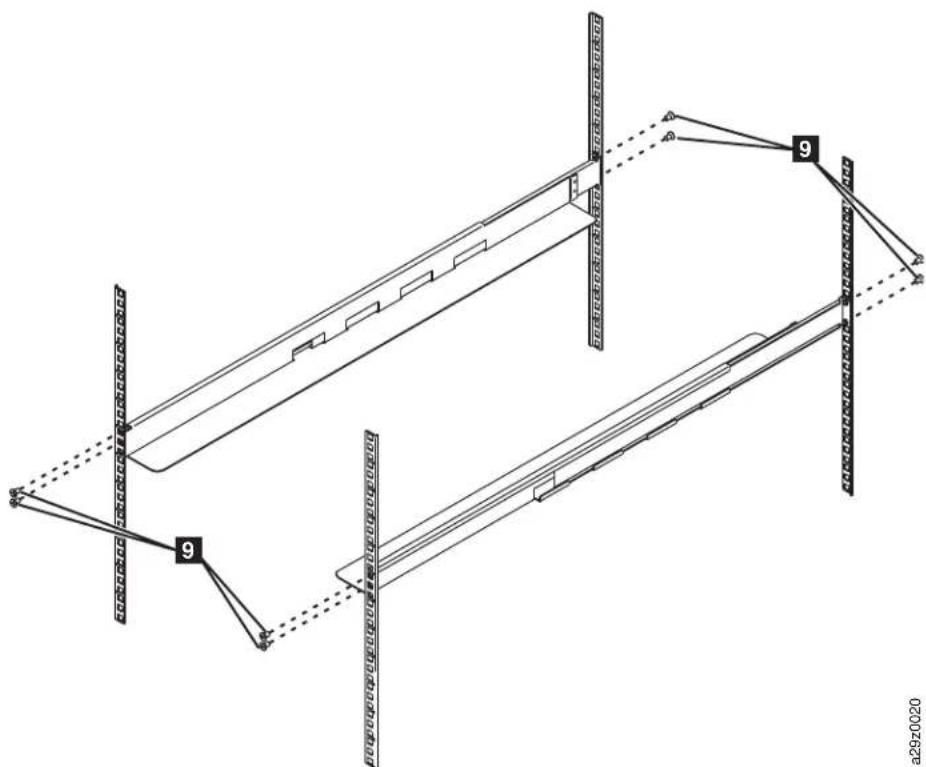
natural_image
Technical line drawing of a structural frame with vertical supports and diagonal braces (no text or symbols)Figure3-5. Installingtherailassemblies
- Slide the library chassis into the rack. The heads of the large screws appearthroughtheovalopeningsoneachsideofthebezel.UseaPhillips screwdrivertoattachthesescrewstotherack(Figure3-6).
11
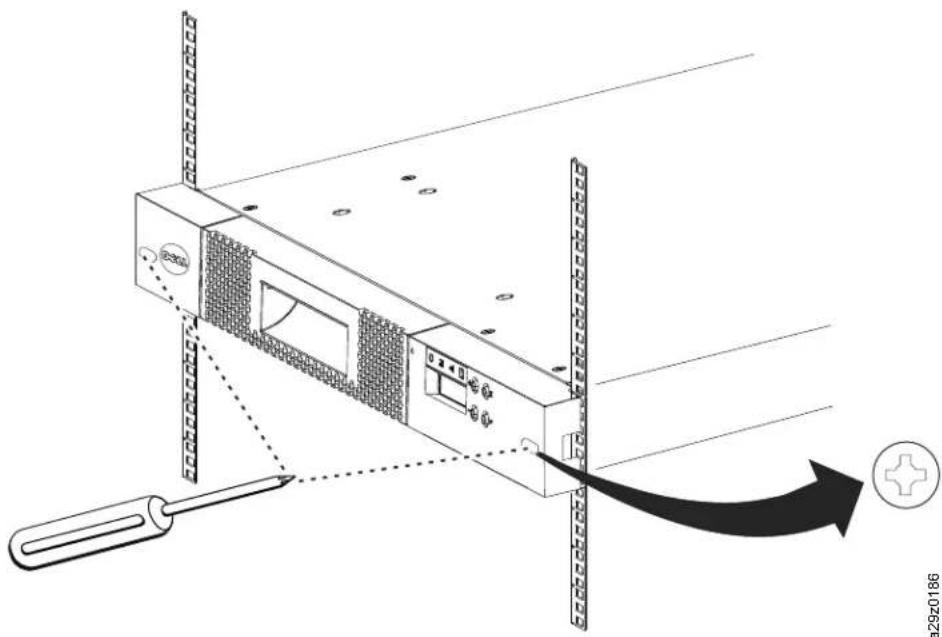
Figure3-6. Securing the front of the library in the rack
3-6 DellPowerVaultTL1000TapeAutoloaderUser'sGuide
- Secure the rear of the library to the rack with a round-head screw 10 on eachrearbracket(Figure3-7). Tightentheotherrearbracketscrewsstosecure thelibrarytotherack.
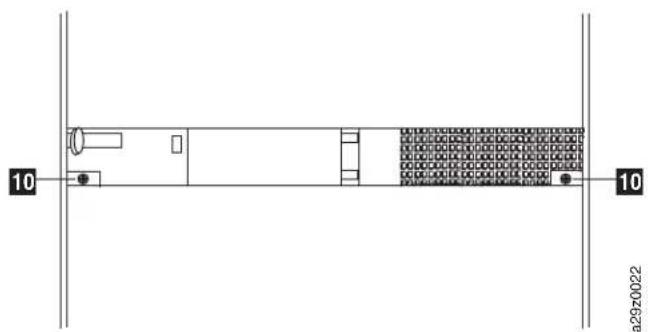
natural_image
Architectural elevation drawing of a building facade with wall-mounted fixtures and brickwork patterns (no text or symbols)Figure3-7. Securing therearofthelibraryintherack
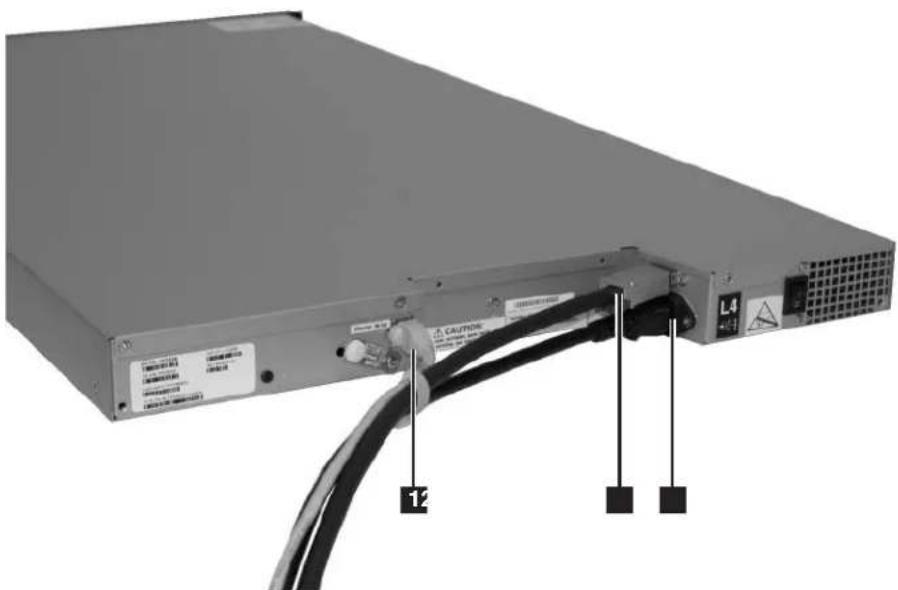
- RuntheSAScable, powercable, and Ethernet cable through the hook-and-loop fastener strap 12 . Leaveenoughslacktoreach the corresponding connectors, thentightenthestrap (Figure3-8).
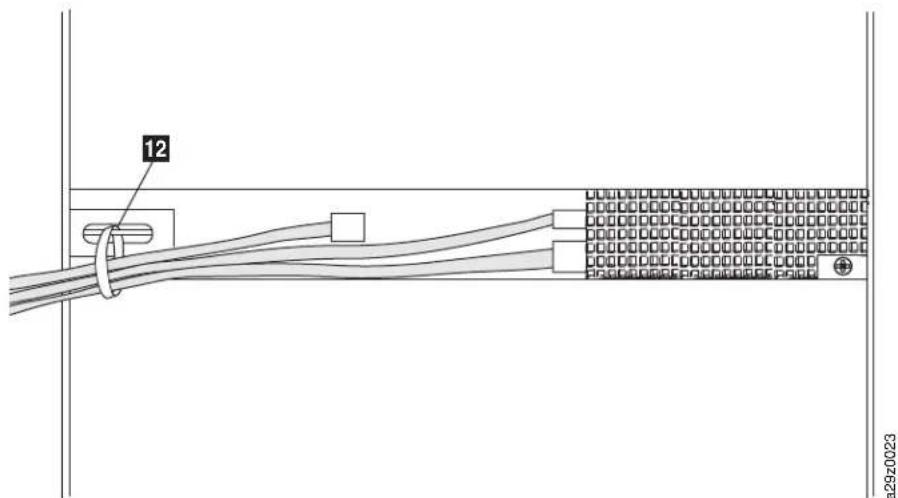
Figure3-8. Thecablesattherearofthelibrary
Note: For information about converting and relocating the library, see
Chapter8,"Removalandreplacementprocedures,"onpage8-1.
Removingtheaccessorlockingscrew
Important: The accessorlockingscrewpreventsthelibraryaccessorfrommoving duringshipmentandmustberemovedbeforethelibraryispowered ON.
Removetheaccessorlockingscrew, located on therear panel of the library (1 in Figure3-9onpage3-8).
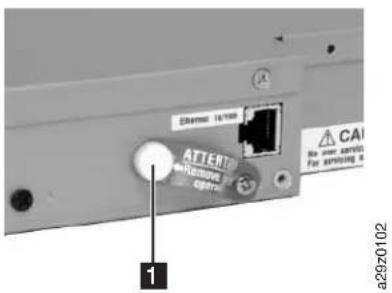
Figure3-9.accessorlockingscrew
Attachingthelibrarytoaserver
The drive is attached to aserver with the Serial Attached SCSI(SAS) interface. The WebUser Interface accesses the library with an ethernet interface.
ConnectingtheHostInterfacecables
Toconnectthehostinterfacecabletothelibrary:
Note: It is recommended that you should down and turn OFF the associated server before you connect the SAS interfaceable. Turn ON the associated server after the SAS interfaceable is connected to the library and server, the library is powered ON, and the library completed the initialization.
a29z0100
Figure3-10. Interfaceable connection
- Attachanethernetcabletotheethernetport(1 inFigure3-10)
Note: Onrackmountinstallations, run the cable through the hook-and-loop fastenerstrapontherightrearbracket.
- Attach the host end of the SAS cable to the drive's SAS connector ( 2 in Figure3-10onpage3-8). See "SAShostinterface" on page1-6 for information about the type of SAS connector that is required for attachment to the drive.
Note: Onrackmountinstallations, run the cable through the hook-and-loop fastener strap on theright rear bracket.
- AttachtheotherendofthehostSASinterfacecabletothehostortoan interposerifrequired.
4.
- Method1: PlugtheethernetcableintoyourserverorPCtoaccesstheWebUserInterfacedirectly.ThismethodmodifiesyourserverorPCnetworksettingstomatchthelibrarydefaultsettings.YoucanalsousethelibraryOperatorPaneltochangethelibrarynetworksettingstomatchtheserverorPCnetworksettingsbeforeyouusetheWebUserInterfacetoaccessthelibrary.IftheethernetconnectionisdirectlyattachedtoaserveroraPC,a crossoverethernetcablemightberequired.
- Method2: Plugtheethernetcableintoanethernetswitchorroutertoaccess theWebUserInterfaceonaLAN(localareanetwork).Thelibrarynetwork settingsmustbeenteredwiththeOperatorPanelbeforetheWebUser Interfaceisusedtoaccessthelibrary.
Connectingthepowercord
Important: ThisproductcanONLYbeusedwithanapprovedpowercordforyour specificgeographicregion.Useofanunapprovedpowercordmightresultin
• Not meeting individual country-specific safety requirements
•Overheatingwithpotentialpersonalinjuryorpropertydamage
- Afracturethatresultsininternalcontactsthatareexposed,whichmightsubject theusertoashockhazard
Toconnectapowercord:
- PlugoneendofthepowercordorrackPDUpowercordintothepower connector(3 inFigure3-10onpage3-8)ontherearpanelofthelibrary.
Note: Onrackmountinstallations, runtherackPDUpowercordthrough the hook-and-loopfastenerstrapontherightrearbracket, andtightenthe strap. TherackPDUpowercordisaspecialpowercordthatplugsintoa rackpowerstrip.
-
Plugtheotherendofthepowercordintothenearestproperlygrounded poweroutlet.Onrackmountinstallations,plugtheotherendoftherackPDU powercordintothenearestrackPDU.
-
PowerONthelibrarybytogglingthepowerswitchonthepowersupplytothe ON(1)position.
-
Waitforthelibrarytoinitialize.
During initialization, the library completes a PowerON Self Test (POST) to ensure that the library hardware is functional. The library also tests communications with the taped drive over the internal bus.
Note: If theOperatorPaneldoesnotinitialize, checkallcableconnections, and ensure that the cartridge magazine is closed and in the locked position. Ensure that the powersupply switch this in the ON position. If theOperator Panel still does not initialize, see Chapter 6, "Troubleshooting," on page 6-1.
Important: Todisconnectallpowerfromthelibrary,turnthepowerswitchtothe OFFposition,thenremovethepowercordfromtheoutlet.Thepower switchremovespowerfromportionsofthelibraryandthedrive,but thepowersupplystillhasacpoweratitsinput.
Note: Whenthelibraryispower-cycled, wait10secondsafterthepowerisOFF beforethelibraryispoweredONagain.
Configuringthelibrary
ThelibrarycanbeconfiguredwiththeWebUserInterfaceortheOperatorPanel.
The preferred method for configuring your library is by using the Web User
Interface.See"ConfiguringyourlibrarywiththeOperatorPanel"onpage3-24
and "ConfiguringyourlibrarywiththeWebUserInterface" on page 3-11.
Forcompletedetailedinformationaboutallofthefunctionsavailableonthe
librarywiththeOperatorPanelandtheWebUserInterface,seeChapter4,
"Operations," onpage4-1.
ThedefaultlibraryconfigurationsettingsarelistedinTable3-2.
Table3-2.Defaultlibraryconfigurationsettings
| ConfigurationItemDefaultSetting | |
| NETWORK | |
| EthernetlinkspeedAuto | |
| SSLsecurityDisabled | |
| IPv4settingsEnabled | |
| DHCP(DynamicHostConfiguration Protocol) | Enabled |
| StaticIPaddressDisabled | |
| IPv4address0.0.0.0 | |
| Subnetmask255.255.255.0 | |
| Gateway0.0.0.0 | |
| IPv6settings | Disabled |
| DHCP(DynamicHostConfiguration Protocol) | Enabled |
| Statelessauto-configuration | Enabled |
| StaticIPaddressDisabled | |
| IPv6address0:0:0:0:0:0:0 | |
| Prefixlength | 64 |
| Gateway | 0:0:0:0:0:0:0 |
| DNSsettingDisabled | |
| DNSIPaddress | 0.0.0.0 |
| PHYSICAL | |
| Libraryname | (Blank) |
| AutoCleaning | Disabled |
| Barcodelabellength | 8characters |
| LOGICAL | |
| LibrarymodeRandom | |
| LoopEnabled | |
| AutoLoadEnabled | |
| Activeslots9+0 | |
| ENCRYPTION | |
| EncryptionmethodNone | |
| DATEandTIME | |
| NTPserverDisabled | |
| NTPserveraddress0.0.0.0 | |
| Timezone(GMT)+00:00 | |
| Date(MM/DD/YYYY)01/08/2008 | |
| AutoadjustmentbyPCEvery1minute | |
| NOTIFICATIONS | |
| SMTP(mail CubaSettings | |
| Mailserveraddress | 0.0.0.0 |
| Mailevent | Erroreventsenabled |
| SNMP(trap CubaSettings | |
| Community | Public |
| Trapevent | Erroreventsenabled |
| SNMPv3engineID | (Setbylibraryfirmware) |
Static library network settings must be entered with the Operator Panel before the library can be accessed remotely with the Web User Interface. If your system is serviced by a Dynamic Host Configuration Protocol (DHCP) server, the network parameters are automatically set. Once remote access is established, you can complete the configuration of your library remotely.
If you choose to use the Operator Panel to configure your library, go to "Configuring your library with the Operator Panel" on page 3-24
Configuring your library with the Web User Interface
If you choose to use the Web User Interface to configure your library, first enter your library network settings with the Operator Panel (see "Configuring network settings" on page 4-12).
To configure your library with the Web User Interface:
- Install Java 1.5.0 or higher on your host computer. Download the latest version of the Java Runtime Environment (JRE) for your platform from http://www.java.com/.
- "Logging in to the Web User Interface" on page 3-12
- "Checking firmware level" on page 3-13
- "Configuring library settings" on page 3-14
- "Configuring network settings" on page 3-16
-
"Configuring date and time settings" on page 3-17
-
'Configuringencryptionsettings" onpage3-18
- "Configuringemailnotifications" onpage3-20
- 'Configuringtrapnotifications"onpage3-21
- "Managinguseraccess" onpage3-23
- "Savingthelibraryconfiguration" on page 3-24
LoggingintotheWebUserInterface
TologintotheWebUserInterface:
- If necessary, obtain the IP address of the library on the Operator Panel.
a. FromthetopmenuoftheOperatorPanel, press the Minus keytoselect View Current Information, and press Enter.
b. Press the Minus key until the IP Address setting is displayed and make a noteofthelPaddress.
c. PresstheCancelkeyrepeatedlytologoutoftheOperatorPanel.
-
OpenInternetExploreronyourserverorPCtoaccesstheWebUserInterface.
-
Inthebrowseraddressfield,enteryourlibrary'sIPaddressURLtostarttheWebUserInterfaceappletinthebrowserwindow.Forexample, http://192.168.1.1
When the applet launches, the warning message in Figure 3-11 displays. This message is normal and does not indicate a problem.
- ClickRun.
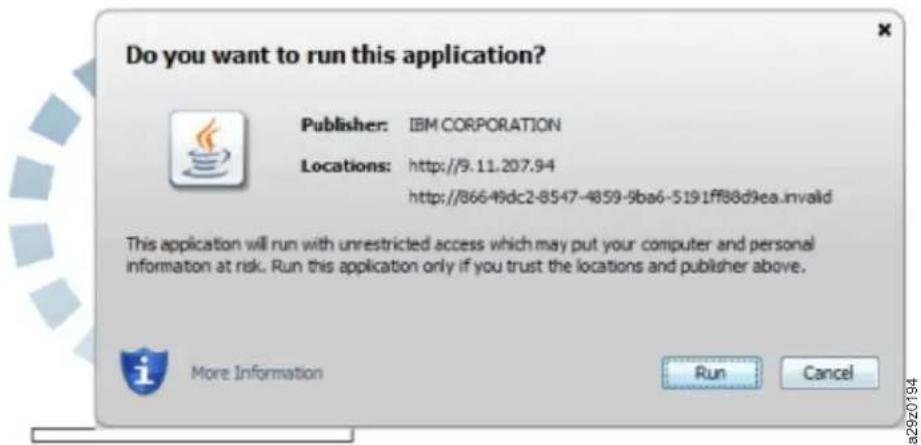
Figure3-11.Javasecuritywarningmessage
- OntheWebUserInterfaceloginscreen,entertheadministratorloginaccount nameanddefaultpassword.
- Account:admin
- Password:secure
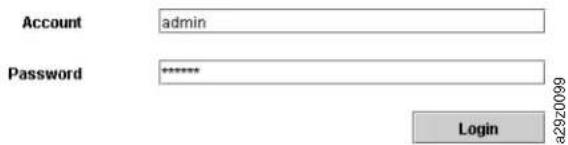
Figure3-12.WebUserInterfaceloginscreen
- ClickLogin.
Checkingfirmwarelevel
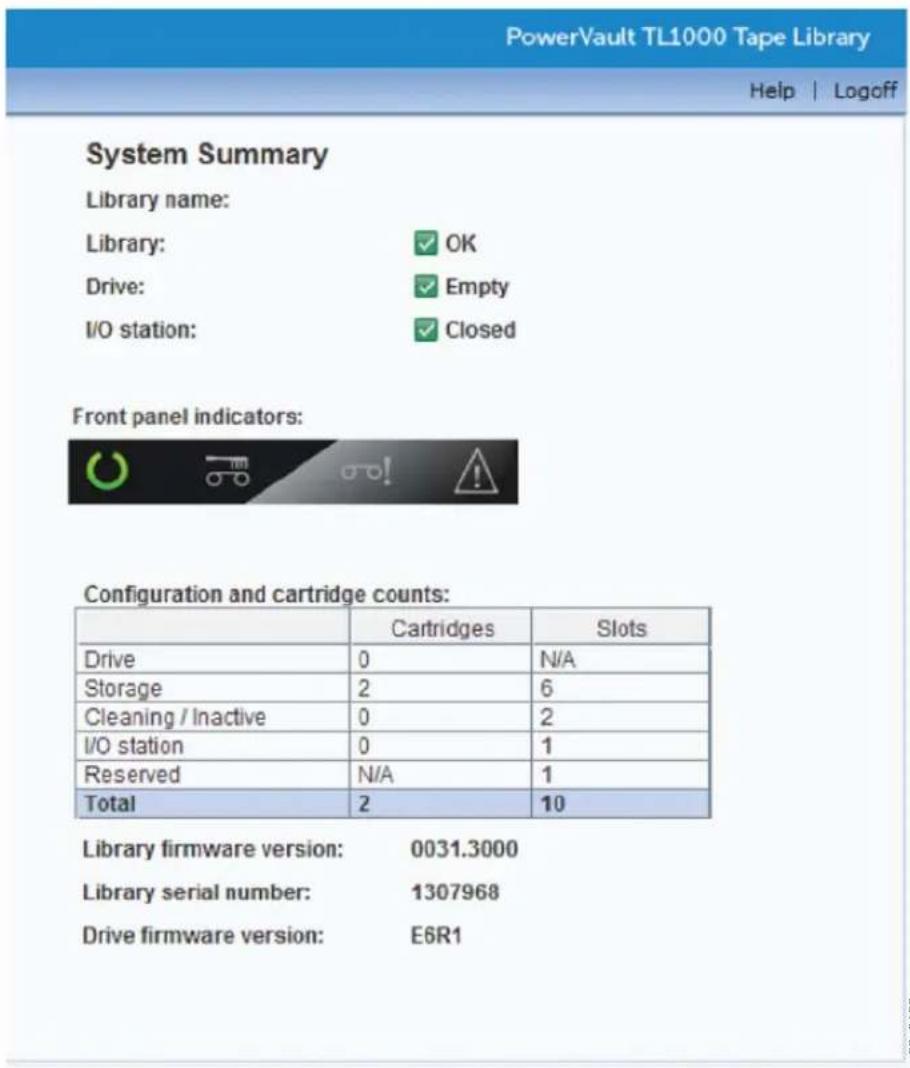
Figure3-13.Systemsummary
Check the current level of library firmware that is displayed in the System Summary. If an updated level off firmware is available, download and update the library firmware before normal operation starts. See "Updating library and drive firmware" on page 4-38.
Configuringlibrarysettings Logicallibrarysettings
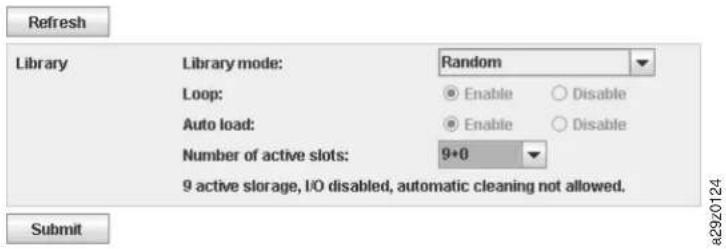
Figure3-14. Logicallibrarymodesettings
Toconfigurethelibraryaccessmodesettingsforthelogicallibrary:
-
Expand Configure Library, if necessary, and click Logical in the left navigation paneoftheWebUserInterface.
-
SelecttheLibraryMode.
- Random - In random mode, the library allows the server's (host's) applicationsoftwaretoselectanydatacartridgeinanyorder.
- Sequential - In sequential mode, the library's firmware predefines the selectionofthecartridges. Afterinitialization, the firmwarecausesthelibrary toselectthefirstavailablecartridgefound(countingfromthelowest Column/Tierpositionthroughthehighestcartridgepositioninyourlibrary) forloadingintothedrive.See"Locationcoordinatesandelementaddresses"
onpage1-9.
-Loop-SequentialmodewithloopmodeONloadsthecartridgeinthe lowestColumn/Tiercartridgepositionafterthecartridgeinthehighest Column/Tiercartridgepositionisfilledwithdataandsentbacktoits homeposition.Thismodeallowsendlessbackupoperationswithoutuser interaction.
-Autoload-SequentialmodewithautoloadmodeONloadsthefirst availablecartridge(thelowestColumn/Tiercartridgepositionthat containsacartridge)automaticallyifthelibrarypowersON,orresets, withanemptydrive.IfthelibrarypowersONwithacartridgealreadyin thedrive,sequentialmodestartsfromthehomepositionofthatcartridge, unlessthehostissuesarewindandunloadcommandtothedrive.In whichcasethenextcartridgeinsequencewillbeloadedintothedrive.
TostartsequentialmodeifautoloadisOFF,usetheMoveCartridge commandtoloadthefirstcartridgeintothedrive.Thesequencestartsfrom thehomepositionofthatcartridge.Cartridgesneednottobeincontiguous slots.
Tostopsequentialmode, use theMoveCartridge command to unload the drive. This command cancels sequential mode; then next sequential cartridge is NOT loaded.
Torestartsequentialmode, usetheMoveCartridge commandagaintoloada cartridge; the loading sequenceresumes from the home position of that cartridge.
- Number of active slots - Select the number of active slots you would like to assigninyourlibrary.Selectingthenumberofactiveslotsdefinesthe numberofstorageslots,numberofcleaning/inactiveslots,whethertheI/O Stationisenabled/disabled,andwhetherautocleaningisallowed.Thefirst digitconfigurethenumberofactivestoragepositions(4,6,8,or9).The
seconddigitconfiguresColumn5, Tier1ofthemagazineasanI/OStation (0whendisabled, and 1whenenabled). The AutoCleaningfunctioncanbe enabled only if there is at least one inactive position in them magazine. If Auto Cleaning is enabled, the inactive positions become cleaning cartridge positions.
- ClickSubmittoenablethesettings.
Physicallibrarysettings
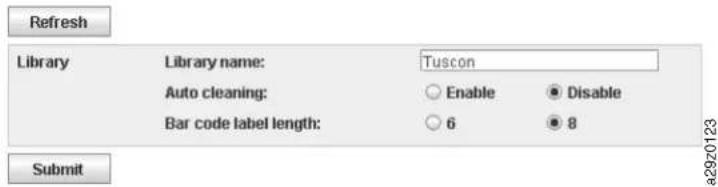
Figure3-15.Cartridgeassignmentsettings
Toconfigurethelibrarycartridgeassignmentsettings, completethefollowing procedure:
-
Expand Configure Library, if necessary, and click Physical in the left navigationpaneoftheWebUserInterface.
-
SelecttheLibrarysettings.
•Libraryname-Enteranameforyourlibrary.
- Auto Cleaning - Automatically cleans the drive when the drive requests that cleaningandacleaningcartridgeispresentinthelibrary.Autocleaningcan beenabledonlywhenthereisatleastoneinactivepositioninthemagazine inthelibrary.
-
Bar code label length - Use to choose the number of characters in the cartridgebarcodethatisreportedtothehostcomputer.
-
ClickSubmittoenablethesettings.
Configuringnetworksettings
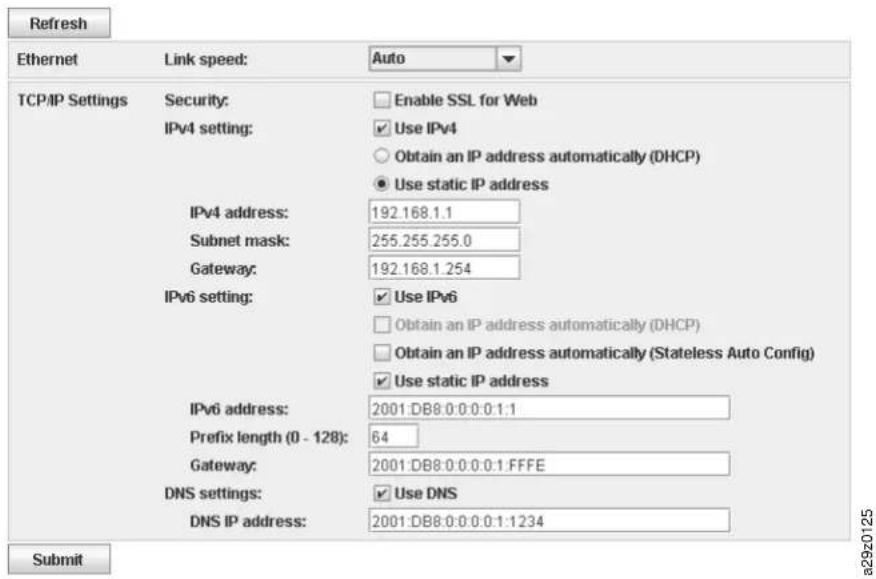
Figure3-16.Networksettings
OncethenetworksettingsareenteredontheOperatorPanel,thecurrentnetwork configurationofthelibrarycanbemodifiedwiththeWebUserInterface.The changesthataremadetothenetworksettingsdonottakeeffectuntilafterthe libraryisrebooted.
Tomodifythenetworksettings:
- Expand Configure Library, if necessary, and click Network in the left navigationpaneoftheWebUserInterface.
- SelecttheEthernetLinkspeed(duplexmode).
-
Select the TCP/IP settings. To enable dual IPv4/IPv6 protocol, select both Use IPv4andUseIPv6andenterparametersforboth.
-
Security - Select Enable SSL for Web to provide secure communications between the web browser and the tapelibrary.
- IPv4 setting - Select Use IPv4 to enable the IPv4 Internet Protocol. Select the correspondingbuttontoobtainanIPaddressautomatically(DHCP)oruse staticIPaddresssettings.WhenwithDHCP,usetheOperatorPanelto determinethelibrary'sassignedIPaddress.See"Configuringnetwork settings"onpage4-12.EnterthefollowingparametersifwithstaticIP addresssettings.
-IPv4address-SetstheTCP/IPv4addressofthelibraryonthenetwork.
-Subnetmask-Definesandlimitsuserswithinalocalnetwork.
-Gateway-Allowsaccessoutsidethelocalnetwork.
- IPv6 setting - Select Use IPv6 to enable the IPv6 Internet Protocol. Select the correspondingbuttontoobtainanIPaddressautomatically(DHCP),to obtainanIPaddresswithstatelessautoconfiguration,orusestaticIP addresssettings.EnterthefollowingparameterifwithstaticIPaddress settings.
-IPv6address-SetstheTCP/IPv6addressofthelibraryonthenetwork.
-Prefixlength-Decimalvaluethatindicatesthenumberofcontiguous, high-orderbitscomprisingthenetworkportionoftheaddress.
-Gateway-Allowsaccessoutsidethelocalnetwork.
- DNS setting - Select Use DNS to use a domain name server. The DNS server, if centered, allows the encryption, date and time, and notifications IP addresses to be specified with host names instead of numerical IP addresses.
-DNSIPaddress-SetstheIPaddressoftheDNSserver.
4. ClickSubmittoenablethesettings.
Configuringdateandtimesettings
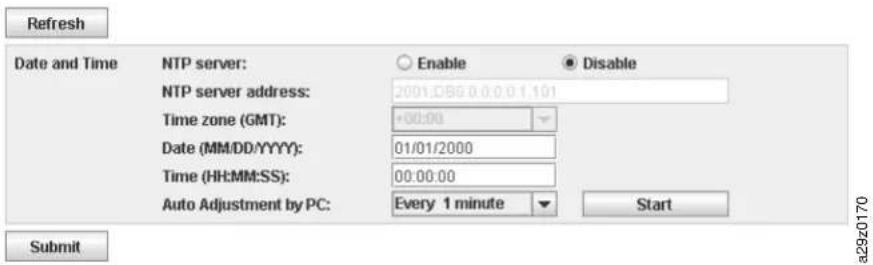
Figure3-17. Dateandtimesettings
Configure the date and timesettings with one of three methods: automatically with a remote NTP timeserveron thenetwork, automatically with the clock on your host computer, or manually.
Note: Selecting Refreshrefreshed date and time.
Note: If you choose manually set your date and time, you must reset the date and time after the library is power-cycled and after a library reset.
Note: Whenthelibraryispower-cycled, wait10secondsafterthepowerisOFF beforethelibraryispoweredONagain.
OncethenetworksettingsareenteredontheOperatorPanel, thecurrentdateand timecanbemodifiedwiththeWebUserInterface.
TheTL1000TapeAutoloadercommunicateswithanNTPserverwiththefollowing conditions:
- Client/serverbasisoperation
• UDP(UserDatagramProtocol)toaccesstheNTPserver
• Does not use authentication keys
• Librarypollingisevery12hours
Tomodifythedateandtimesettings:
-
Expand Configure Library, if necessary, and click Date and Time in the left navigationpaneoftheWebUserInterface.
-
SelecttheDateandTimesettings.
- NTPServer-Enablestimeanddatecontrolwithatimeserveronthe network.
-NTPserveraddress-EntertheIPaddressofthetimeserver.IPv4and IPv6addressesaresupported,dependingontheTCP/IPsettings.Host namescanbeenteredinsteadofnumericalIPaddressesifUseDNSis selectedintheNetworksettings.
- Time zone - Enter the time zone relative to Greenwich Mean Time (GMT).
- If the timeserverisdisabled, enter the local time and datemanually.
-Date-EnterthedatewiththeMM/DD/YYYYformat.
-Time-EnterthetimewiththeHH:MM:SSformat.
- Auto Adjustment by PC - Select a time interval and click Start to synchronizethelibrarywiththeclockonyourhostcomputeratregular intervals.TheWebUserInterfaceJavaAppletmustberunningcontinuously tousethisfunction.
3. ClickSubmittoupdatethesettings.
Configuringencryptionsettings
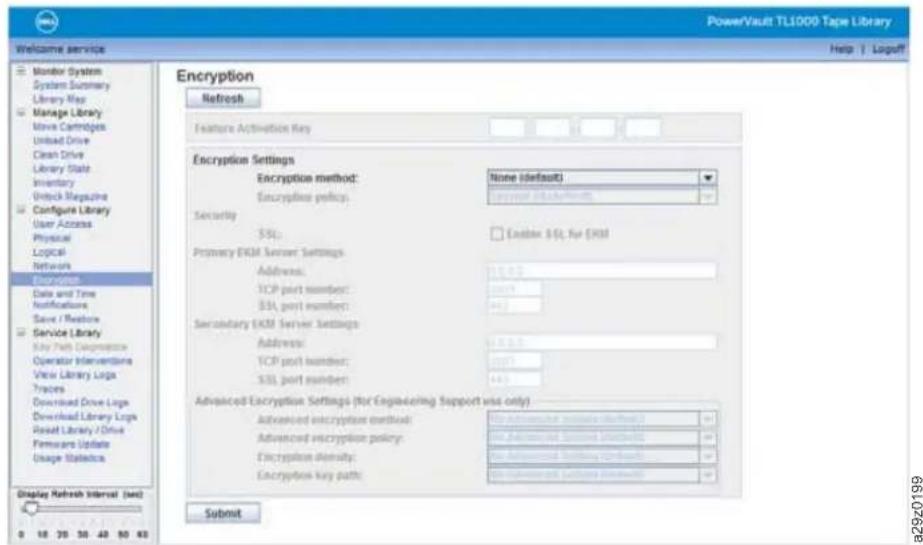
Figure3-18.Encryptionsettings
Before you can use the encryption capability of the taped drive, you must be sure that certain software and hardware requirements are met.
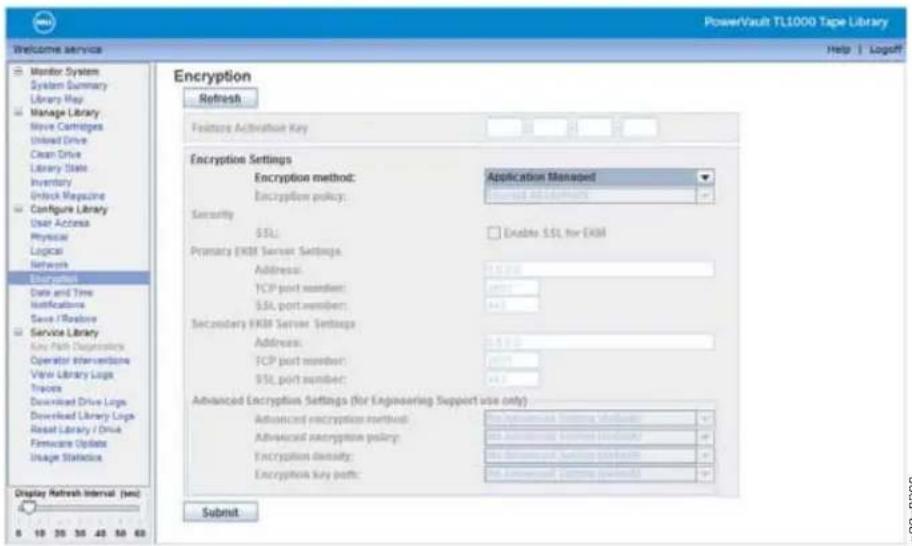
Figure3-19.Encryptionenabledsettings
Tomodifytheencryptionsettings:
-
Expand Configure Library, if necessary, and click Encryption in the left navigationpaneoftheWebUserInterface.
-
In the Encryption method: drop-down menu, choose Application Managed to enable encryption in your library. No further configuration steps are necessary.
Note: LibraryManagedEncryptionandSystemManagedEncryptionarenot supported in this Library.LibraryManagedEncryptionconfiguration options and Keypath Diagnosticsmenus are greyed out in the Library Web Interface.
- ClickSubmittoenablethesettings.
Configuringemailnotifications
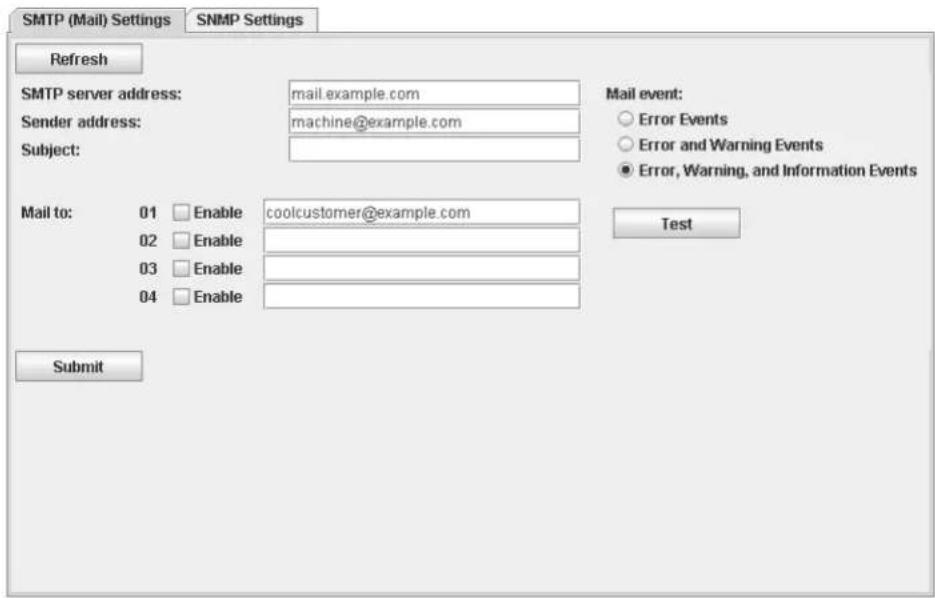
a29z0127
Figure3-20. Email notifications
Note: This procedure is optional.
Tosetupemailnotificationsoflibraryevents:
- Expand Configure Library, if necessary, and click Notifications in the left navigationpaneoftheWebUserInterface.
- ClicktheSMTP(Mail)Settingstab.
-
ConfiguretheSMTPserverandheadersettings.
-
SMTP server address - SMTP mail server address. IPv4 and IPv6 addresses aresupported.HostnamescanbeenteredinsteadofnumericalIPaddresses iftheDNSserverisspecifiedintheNetworksettings.
- Senderaddress-Mailheaderinformation.
-
Subject-Mailheaderinformation.
-
Enter the email addresses to be notified when an event takes place in the Mail Tofields.
- SelecttheeventleveltoreportintheMailEventfield.
- Click Test to send a test email message to the enabled addresses.
- ClickSubmittoenablethesettings.
Configuringtrapnotifications
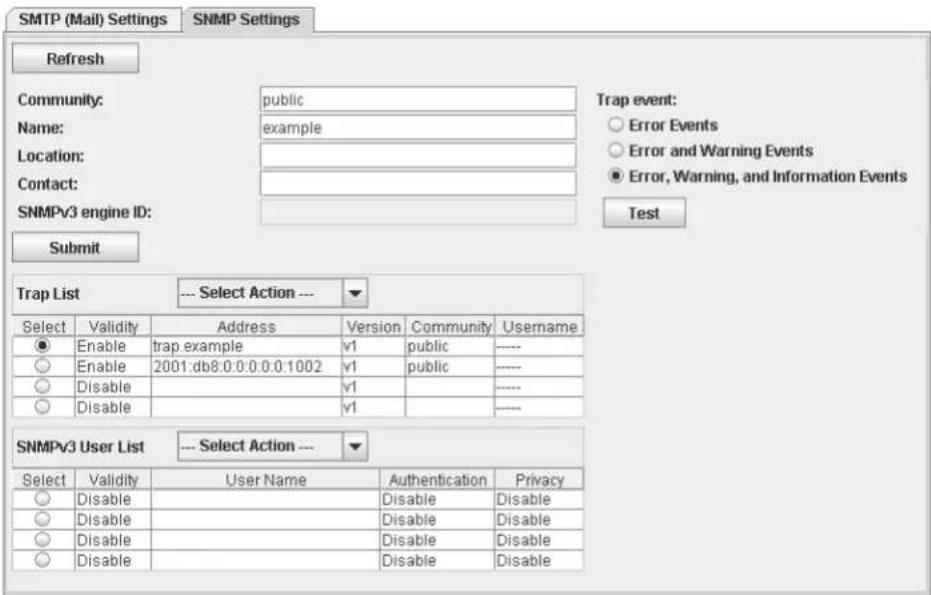
a29z0128
Figure3-21. Trapnotifications
Note: This procedure is optional. SNMP notifications are not enabled unless there is a checkpoint in the SNMP enabled checkbox. Todisable SNMP notifications, clear the SNMP enable checkbox and click Submit.
ThetrapsthataresupportedbytheTL1000TapeAutoloaderarelistedin"Trap definitions(types)"onpageA-14.

TosetuptrapnotificationsforanSNMPserver:
- Expand Configure Library, if necessary, and click Notifications in the left navigationpaneoftheWebUserInterface.
- ClicktheSNMPSettingstab.
- ClicktoplaceacheckmarkintheSNMPEnabledcheckbox.
- ConfiguretheSNMPserverandheadersettings.
•Community-SNMPcommunitynametowhichthelibrarybelongs.
•Name-UniqueSNMPnameforthesystem.
- Location-Physicallocationofthesystem.
- Contact-Contactperson'sname.
•SNMPv3engineID-Aread-onlyattributethatidentifiestheSNMPv3 engine.
- EnterthetrapIPaddressesoftheSNMPmonitoringstationstobenotified when an event takes place and the security settings in the Trap List menu.
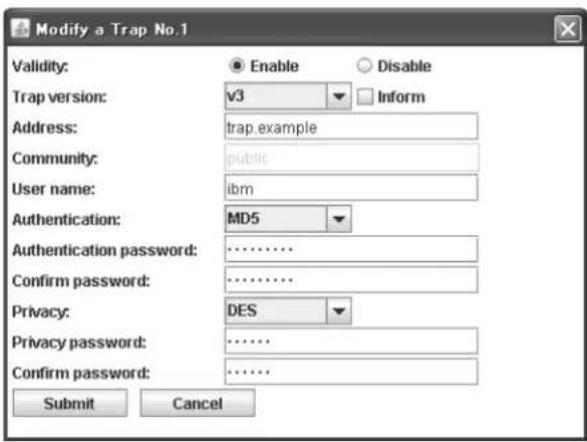
a29z0140
Figure3-22. Traplistsettings
- Validity-Enable/Disablesetting.
- Trap version - v1, v2c, or v3. For v2c and v3, the Inform check box determineswhetheranSNMPINFORMrequestissentinsteadofatrap event.
- IP address - IPv4 and IPv6 addresses are supported. Host names can be entered instead of numerical IP addresses if the DNS server is specified.
•Community(v1orv2c)-SNMPcommunityname.
-Username(v3only)-SNMPv3uniqueusername. - Authentication (v3 only) - Authentication algorithm, MD5, or SHA. When an algorithm misspecified, an authentication password and confirmation of the password are required.
-
Privacy (v3 only) - Privacy service encryption and decryption algorithm, DES or AES. When analgorithm misspecified, a privacy password and confirmation of the password are required.
-
EntertheSNMPv3userswhoareallowedtoaccessthetapelibraryintheSNMPv3UserListmenu.
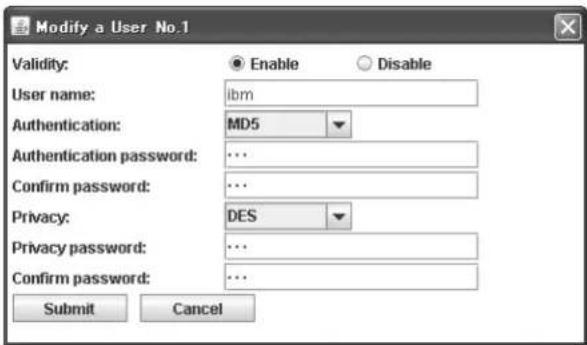
a29z0141
Figure3-23.SNMPv3userlistsettings
- Validity-Enable/Disablesetting.
-Username-SNMPv3uniqueusername. - Authentication-Authenticationalgorithm,MD5,orSHA.Whenan algorithmmisspecified,anauthenticationpasswordandconfirmationofthe passwordarequired.
- Privacy - Privacy service encryption and decryption algorithm, DES or AES. When analgorithm misspecified, a privacy password and confirmation of the password are required.
- Select the event level to report in the Trap event field.
- Click Test to send a test trap notification to the enabled IP addresses.
- ClickSubmittoenablethesettings.
Managinguseraccess
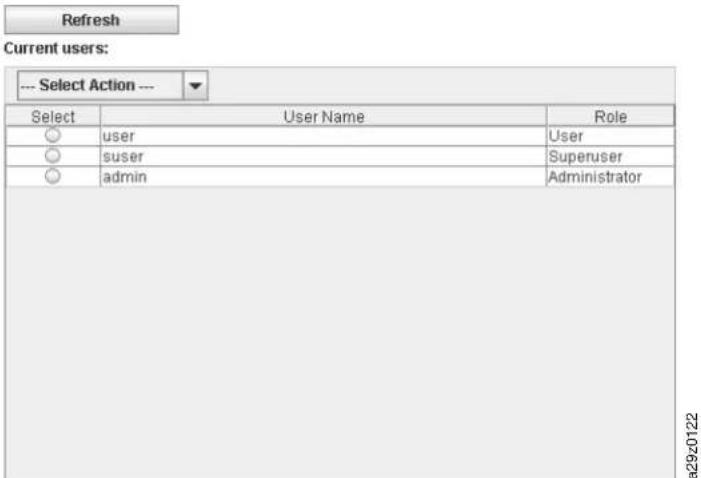
Figure3-24.Useraccesssettings
Note: This procedure is optional.
ToaddusersabletoaccessthelibrarywiththeWebUserInterface:
- Expand Configure Library, if necessary, and click User Access in the left navigationpaneoftheWebUserInterface.
-
SelecttheAddactioninthemenu.
-
Add-Toaddnewusers.
- Modify-Tochangetheselecteduser'saccessroleorpassword.
- Remove-Todeletetheselecteduserfromthesystem.
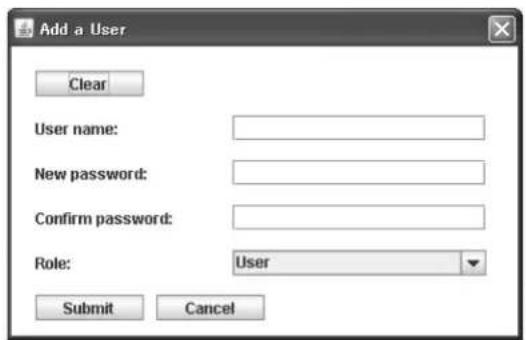
a29z0139
Figure3-25.AddUserdialog
-
Entertheusernameandpasswordinformationinthedialogbox.
-
Assignauseraccessrole.
-
User - User access permission allows users to monitor the library, but not to complete function that affects the library.
- Superuser - Superuser access permission allows users to operate the physical and logical library, but not to change configuration settings.
-
Administrator - Administrator access permission allows users to complete tapelibraryfunctionsandchangeconfigurationsettings.
-
ClickSubmittoenablethesettings.
Savingthelibraryconfiguration

a29z0129
Figure3-26.Saveconfiguration
Note: This procedure is recommended.
Eachtimethatyouchangetheconfigurationofyourlibrary,savetheconfiguration. Thisfunctionalsomaintainsseverallibraryconfigurationprofilesthatcanbe restoredtothelibrarywhenwantedwiththeWebUserInterface.
Tosavelibraryconfiguration:
- Expand Configure Library, if necessary, and click Save/Restore in the left navigationpaneoftheWebUserInterface.
- Click Save to create a configuration file of your library on your computer.
ConfiguringyourlibrarywiththeOperatorPanel
ToconfigureyourlibrarywiththeOperatorPanel,completethefollowing procedures:
- "LoggingintotheOperatorPanel"
- 'Configuringnetworksettings'
- 'Configuringlibrarysettings" onpage3-26
LoggingintotheOperatorPanel
Inmanyenvironments, thedefaultnetworksettingsmightbesufficienttoaccess yourtapelibraryonanetwork.TochangethedefaultnetworksettingswiththeOperatorPanel,completethefollowingprocedure:
- When the library is initialized, press Enter to move to the Password screen.
- Enter0000, thedefaultpassword. Thetopmenuscreendisplays.
- When finished with the Operator Panel, press Cancel to return to the top menu screen.
- When finished, press the Minus key to select Logout, and press Enter.
Configuringnetworksettings
Inmanyenvironments, thedefaultnetworksettingsmightbesufficienttoaccess yourtapelibraryonanetwork.TochangethedefaultnetworksettingswiththeOperatorPanel,completethefollowingprocedure:
-
From the top menu screen, press the Minus key to select Configuration, and pressEnter.
-
Linkspeed(Default:AutoNegotiation)
a. Select Configure Network Settings > Configure Link Speed.
b. SelecttherequiredspeedandpressEnter.
c. Press Enter again to apply the setting, or Cancel to reject the setting. ThespeedmustbesettoSetAutoNegotiationforgigabitEthernet networks.
d. PressCanceltobacktrackthroughthemenuhierarchy.
- DHCPv4(Default:Enabled)
a. Select Configure Network Settings > Configure DHCP > Configure DHCPIPv4.
b. Select Enable DHCP IPv4 and press Enter to enable, or press Down and selectDisableDHCPIPv4todisable.
c. Press Enter again to apply the setting, or Cancel to reject the setting.
d. PressCanceltobacktrackthroughthemenuhierarchy.
- DHCPv6(Default:Disabled)
a. Select Configure Network Settings > Configure DHCP > Configure DHCPIPv6.
b. Select Enable DHCP IPv6 and press Enter to enable, or press Down and selectDisableDHCPIPv6todisable.
c. Press Enter again to apply the setting, or Cancel to reject the setting.
d. PressCanceltobacktrackthroughthemenuhierarchy.
- IPv4/IPv6Address(Default:0.0.0.0).IfDHCPisdisabled,settheIPaddress manually.
a. Select Configure Network Settings > Change IP Address.
b. Select SetIPAddressIPv4toentertheIPv4addressofthetapelibrary.
SetIPAddressIPv6toentertheIPv6IPaddress(splitover4screens).
c. Press Enter again to apply the setting, or Cancel to reject the setting.
d. PressCanceltobacktrackthroughthemenuhierarchy.
- IPv4SubnetMask(Default:255.255.255.0).IfDHCPIPv4isdisabled,setthe IPv4subnetmaskmanually.
a. Select Configure Network Settings > Change Subnet Mask > Set Subnet Mask.
b. EntertheIPv4subnetmask.
c. Press Enter again to apply the setting, or Cancel to reject the setting.
d. PressCanceltobacktrackthroughthemenuhierarchy.
- IPv6PrefixLength(Default:64).IfDHCPIPv6isdisabled,settheIPv6prefix lengthmanually.
a. Select Configure Network Settings > Change Subnet Mask > Set Prefix Length.
b. EntertheIPv4prefixlength.
c. Press Enter again to apply the setting, or Cancel to reject the setting.
d. PressCanceltobacktrackthroughthemenuhierarchy.
- IPv4/IPv6Gateway(Default:0.0.0.0).IfDHCPisdisabled,settheIPaddress manually.
a. Select Configure Network Settings > Change Gateway.
b. Select Set Gateway Address IPv4 to enter the IPv4 gateway address or Set GatewayAddressIPv6toentertheIPv6gatewayaddress(splitover4 screens).
c. Press Enter again to apply the setting, or Cancel to reject the setting.
d. PressCanceltobacktrackthroughthemenuhierarchy.
- Press Cancel to return to the Network Settings menu.
- Press Cancel to return to the Configuration menu.
- PressCanceltoreturntothetopmenuscreen.
Configuringlibrarysettings
Toconfigurethelibrarysettings, completethefollowingprocedure:
- From the top menu screen, press the Minus key to select Configuration, and pressEnter.
- SelectConfigureLibrary, andpressEnter.
- I/OStation(Default:Disabled)
a. Select Configure Library > Configure I/O Station.
b. Select Enable I/O Station to enable the 1-slot I/O station or Disable I/O Stationtodisable.
c. Press Enter again to apply the setting, or Cancel to reject the setting.
d. PressCanceltobacktrackthroughthemenuhierarchy.
- ActiveSlots(Default:All)
a. Select Configure Library > Set Active Slots Count.
b. Selectthenumberofactiveslotsyouwouldliketoassignforthological library.
c. Press Enter again to apply the setting, or Cancel to reject the setting.
- LibraryMode(Default:Random)
a. Select Configure Library > Configure Library Mode.
b. Select Set Random Mode or Configure Sequential Mode, and press Enter.
Random-Inrandommode, the library allow stheserver's (host's) application software to select any data cartridge in any order.
Sequential-Insequentialmode, the library's firmware predefines the selection of the cartridges. After initialization, the firmware cause the library to select the first available cartridge found (counting from the lowest Column/Tier position through the highest cartridge position in your library) for loading into the drive.
- Loop-SequentialmodewithloopmodeONloadsthecartridgeinthe lowestColumn/Tiercartridgepositionafterthecartridgeinthehighest Column/Tiercartridgepositionisfilledwithdataandsentbacktoits homeposition.Thisprocedureallowsendlessbackupoperationswithout userinteraction.
- Autoload-SequentialmodewithautoloadmodeONloadsthefirst availablecartridge(thelowestColumn/Tiercartridgepositionthat containsacartridge)automaticallyifthelibrarypowersON,orresets, withanemptydrive.IfthelibrarypowersONwithacartridgealreadyin thedrive,sequentialmodestartsfromthehomepositionofthat cartridge,unlessthehostissuesarewindandunloadcommandtothe drive.Inwhichcasethenextcartridgeinsequenceisloadedintothe drive.
TostartsequentialmodeifautoloadisOFF,usetheMoveCartridge commandtoloadthefirstcartridgeintothedrive.Thesequencestartsfrom thehomepositionofthatcartridge.Cartridgesneednottobeincontiguous slots.
Tostopsequentialmode, usetheMoveCartridge command to unload the drive. This command cancels sequential mode; then next sequential cartridge is NOT loaded.
Torestartsequentialmode, use the Move Cartridge command against load acartridge; the loading sequencer resumes from the home position of that cartridge.
c. Press Enter again to apply the setting, or Cancel to reject the setting.
d. PressCanceltobacktrackthroughthemenuhierarchy.
- Date/Time-Enterthelocaltimeanddatemanuallyifyoudonotplantousea network-basedtimeserver.
a. Select Configure Library > Configure Date/Time.
b. Select Set Date or Set Time, and press Enter.
- Date-EnterthedatewiththeMM/DD/YYYYformat.
•Time-EnterthetimewiththeHH:MM:SSformat.
c. PressCanceltobacktrackthroughthemenuhierarchy.
- AutoCleaning(Default:Disabled)
a. Select Configuration > Configure Auto Cleaning.
b. Select Enable Auto Cleaning or Disable Auto Cleaning, and press Enter. TheAutoCleaningfunctionisenabledonlyifthereisatleastoneinactive positioninthemagazineinthelibrary.
c. Press Enter again to apply the setting, or Cancel to reject the setting.
d. PressCanceltobacktrackthroughthemenuhierarchy.
Populatingthelibrarywithcartridges
ThemagazineisopenedwiththeOperatorPanel.
Topopulatethelibrarywithdataandcleaningcartridges,completethefollowing procedure:
-
FromthetopmenuscreenontheOperatorPanel, press the Minuskeytoselect Unlock Magazine, and press Enter, or from Web User Interface: Manage Library>UnlockMagazine.
-
Insertcartridgesinthemagazine.
Note: A blue release gate (1 in Figure 3-27) in the upper left corner of each columninthecartridgemagazinepreventseachcartridgefromfalling outofthefrontofthemagazine.Whenmanuallyreleasingthegatewith onehand,positionyourotherhandinfrontofthecolumnopeningto protectcartridgeshataareejectedbytheinternalcolumnspring.
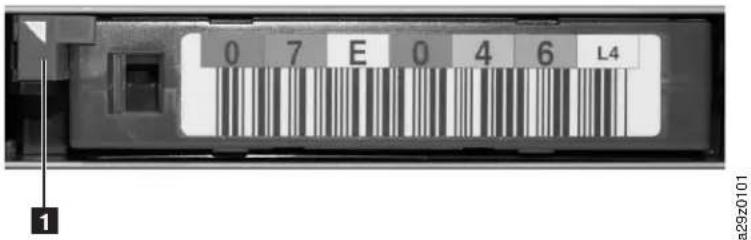
Figure3-27. Cartridgereleasegate
Note:Column5Tier2isreservedastheexchangeposition. This position is accessible by the library only. A locking mechanism prevents insertion of acartridge into the reserved slot.
Eachcartridgemustbeinsertedwiththeindicatorarrowontheleadingedgeof theuppersurfaceofthecartridgepointingtowardsthecartridgemagazine(see Figure3-28).
Note: Donotrelyonthebarcodelabelorientation, if attached, to provide an indication of the correct cartridge orientation. The barcode label is right sideupifattached correctly.
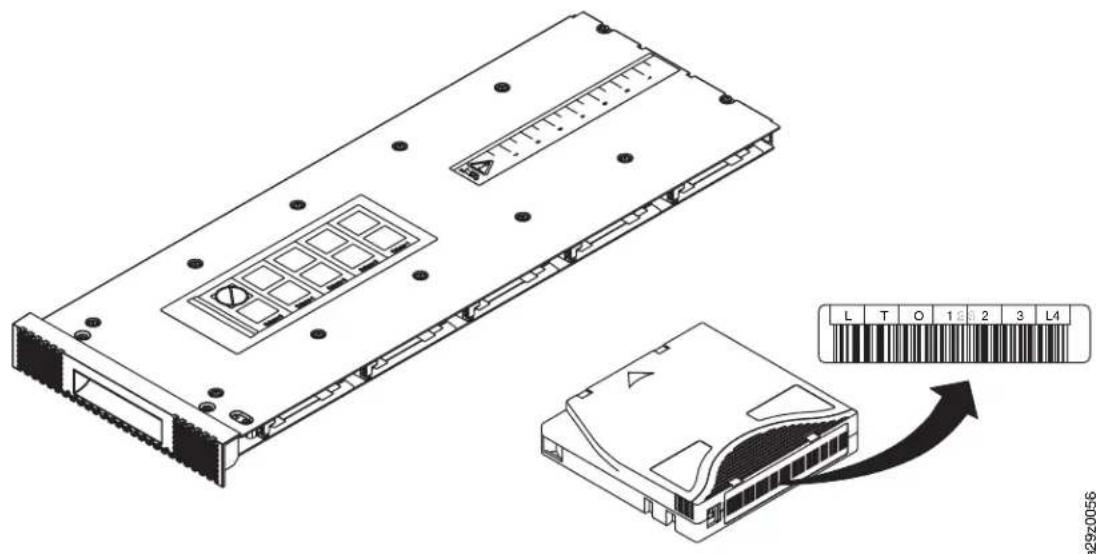
Figure3-28. Cartridgeorientation
TheAutoCleaningfunctioncanbeenabledonlyifthenumberofactiveslotsis lessthanthemaximumavailableslots.Theactiveslotsarealwaysenabled startingwiththelowestnumericalcartridgepositionnumberinthemagazine. Thispositionisatthedriveendofthecartridgemagazine.Placecleaning cartridgesininactivecartridgepositionsforusebytheautocleaningfunction. DonotstoredataorcleaningcartridgesintheI/OStation(Column5,Tier1)if theI/Ostationisenabled.
-
Putthemagazinebackintothelibraryandwaitforthelibraryinventoryto complete.Then,youcanproceedtothenextstep.
-
PressCanceltoreturntothetop-levelmenu.
Verifyinglibraryanddriveoperation
Toverify the library is operating correctly:
-
FromthetopmenuscreenontheOperatorPanel, press the Minuskeytoselect Service.andpressEnter.
-
Press the Minus key to select Diagnostics, and press Enter.
-
Select Run Library Verify, and press Enter. Follow the on-screen instructions Ifthereisacartridgeinadrive, the library movesthecartridgetoitshome position, ortotheI/Ostationifthehomepositionisnotknown.
-
When prompted, insertacustomersupplied scratch cartridge into the I/O station.
Whenthescratchcartridgeisloaded, thebarcodereaderreadsthebarcode labelonthecartridgeandstoresitforlatercomparison. Thecartridgeisthen movedtothetapedrive, wherethdriverunsitsownwrite/read/verifytest. Whenthetestisdone, thelibrarytellsthedrivetoejectthecartridge, and then thecartridgeismovedbacktotheI/Ostation. Thebarcodeisreadagainand comparedwiththevaluestoredearlier.
- When prompted, removethecartridge from the I/O station.
TheresultofthetestisreportedontheOperatorPanel.
Ifanerroroccurs, notetheerrorcodenumberandseeAppendixA, "Error codes," onpageA-1.
- PressCanceltoreturntothetop-levelmenu.
TakingtheLibraryOnline
When your library is configured, you are ready to save the library configuration and take the library online.
Note: Thetapedriveisalwaysonline, regardless of whether the library is online or offline.
TotakethelibraryonlinewiththeOperatorPanel:
- From the top menu screen, press the Minus key to select Commands, and press Enter.
- Select Change Library State, and press Enter.
- Select Set Library Online, and press Enter.
- PressCancelrepeatedlytoreturntothetop-levelmenu.
- Press the Minus key to select Logout, and press Enter.
TotakethelibraryonlinewiththeWebUserInterface:
- Savethelibraryconfiguration.
a. Expand Configure Library, if necessary, and click Save/Restore in the left navigationpaneoftheWebUserInterface.
b. Click Save, and then enter a file name and select a location to save the configurationfile.
- Verifythelibrarystate.
a. Click Library State in the left navigation pane of the Web User Interface.
b. Ifthelibraryisoffline, clickBringOnline.
c. ClickYestoconfirmwhenprompted.
Amessagedialogdisplayswhentheoperationiscompleted.
- ClickLogoffintheupperrightcornerofthewindow.
Registeringforsupportnotification
Supportnotificationregistrationprovidesemailnotificationwhennewfirmware levelsareupdatedandareavailablefordownloadandinstallation.
EnteryourusernameandpasswordontheAppendixD,"LibraryConfiguration Form,"onpageD-1.
Note: Libraryfirmwareandtapedrivefirmwareareverifiedandreleasedtogether. Whenthelatestfirmwareisupdated,verifythatallinstalledcomponents suchasthetapedriveandlibraryareatthelatestlevelsnotedonthe Supportwebsite.Mixingdifferentlevelsoflibraryandtapedrivefirmware isnotsupportedandmightcauseunpredictableresults.
Dellsuggeststhatyouupdatelibraryanddrivefirmwarewhennewlevelsbecome available.Forinstructionsonupdatinglibraryanddrivefirmware,see"Updating libraryanddrivefirmware"onpage4-38.
Nowyouarereadytouseyourlibrary.
Chapter4. Operations
| "TheOperatorPanel" onpage4-3 | MonitoringtheLibrary"Configur | ationsettings"onpage4-3 |
| "Currentinformation"onpage4-4 | ||
| "Firmwarerevision"onpage4-4 | ||
| ManagingtheLibrary"Unlocking | hel/Ostation"onpage4-4 | |
| "Unlockingthecartridgemagazine"onpage4-5 | ||
| "Movingcartridges"onpage4-6 | ||
| "Unloadingthedrive"onpage4-6 | ||
| "Cleaningthedrivemanually"onpage4-6 | ||
| "Conductingalibraryinventory"onpage4-7 | ||
| "Takingthelibraryonlineandoffline"onpage4-7 | ||
| "Poweringdownthelibrary"onpage4-7 | ||
| "Shippingthelibrary"onpage4-7 | ||
| "Rebootingthedrive"onpage4-8 | ||
| "Rebootingthelibrary"onpage4-8 | ||
| "Loggingoutofthelibrary"onpage4-8 | ||
| ConfiguringtheLibrary"Configu | ingautocleaning"onpage4-9 | |
| "Configuringthenumberofactiveslots"onpage4-9 | ||
| "Configuringthelibraryaccessmode"onpage4-10 | ||
| "Configuringdateandtimesettings"onpage4-11 | ||
| "Configuringnetworksettings"onpage4-12 | ||
| "ConfiguringOperatorPanelsettings"onpage4-13 | ||
| "Settingthelibrarytotfactorydefaults"onpage4-13 | ||
| ServicingtheLibrary"Checking | elibraryerrorstatus"onpage4-14 | |
| "Runninglibraryverifydiagnosticprocedures"onpage4-14 | ||
| "Runningdrivediagnosticprocedures"onpage4-15 |
| "TheWebUser Interface"on page4-16 | MonitoringtheLibrary"The systemsummary"onpage4-17 |
| "Thelibrarymap"onpage4-18 | |
| ManagingtheLibrary"Movingcartridges"onpage4-20 | |
| "Unloadingthedrive"onpage4-21 | |
| "Cleaningthedrivemanually"onpage4-21 | |
| "Takingthelibraryonlineandoffline"onpage 4-21 | |
| "Conductingalibraryinventory"onpage4-22 | |
| "Unlockingthecartridgemagazine"onpage 4-22 | |
| ConfiguringtheLibrary"Managinguseraccess"onpage4-23 | |
| "Configuringphysicallibrarysettings"onpage 4-24 | |
| "Configuringlogicallibrarysettings"onpage 4-24 | |
| "Configuringnetworksettings"onpage4-26 | |
| "Configuringencryptionsettings"onpage4-27 | |
| "Configuringdateandtimesettings"onpage 4-28 | |
| "Configuringemailnotifications"onpage4-30 | |
| "ConfiguringSNMPtrapnotifications"onpage 4-31 | |
| "Savingandrestoringconfigurationsettings" onpage4-32 | |
| "Operator interventions"onpage 4-34 | |
| "Librarylogs"onpage 4-35 | |
| "Tracedata"onpage 4-36 | |
| "Downloadingdrive logs"onpage4-36 | |
| "Downloadinglibrary logs"onpage4-37 | |
| "Resettingthelibrary anddrives"onpage 4-37 | |
| "Updatinglibraryand drivefirmware"on page4-38 | |
| "Accessorstatistics"on page4-39 |
TheOperatorPanel
Figure4-1 showsthetop-levelmenutreestructureoftheOperatorPanelonthe frontoftheTL1000TapeAutoloader.Fordetailsonhowtoselectcommandsand options,seethdescriptionin"OperatorPanel"onpage2-1.
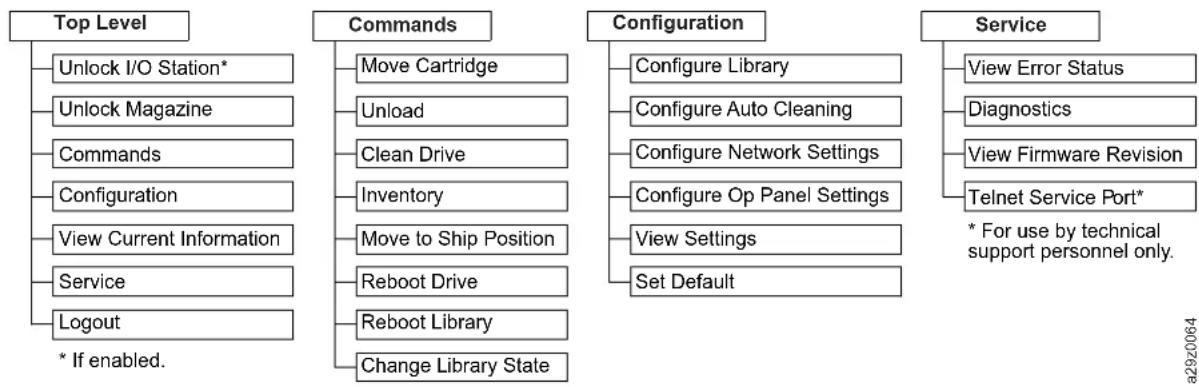
flowchart
graph TD
    A["Top Level"] --> B["Unlock I/O Station*"]
    A --> C["Unlock Magazine"]
    A --> D["Commands"]
    A --> E["Configuration"]
    A --> F["View Current Information"]
    A --> G["Service"]
    A --> H["Logout"]
    H --> I["* If enabled."]

    J["Commands"] --> K["Move Cartridge"]
    J --> L["Unload"]
    J --> M["Clean Drive"]
    J --> N["Inventory"]
    J --> O["Move to Ship Position"]
    J --> P["Reboot Drive"]
    J --> Q["Reboot Library"]
    J --> R["Change Library State"]

    S["Configuration"] --> T["Configure Library"]
    S --> U["Configure Auto Cleaning"]
    S --> V["Configure Network Settings"]
    S --> W["Configure Op Panel Settings"]
    S --> X["View Settings"]
    S --> Y["Set Default"]

    Z["Service"] --> AA["View Error Status"]
    Z --> AB["Diagnostics"]
    Z --> AC["View Firmware Revision"]
    Z --> AD["Telnet Service Port*"]
    AD --> AE["* For use by technical support personnel only."]
Figure4-1. OperatorPaneltopmenus
Monitoringthelibrary
Configurationsettings
Figure4-2.Configurationsettings
Use Configuration > View Settings to display a list of the library configuration settings.
Thesettingsthataredisplayedinclude:
- Librarysettings
-I/Ostation(On/Off)
-Autocleaning(On/Off)
-NumberofcleaningslotswhenAutocleaningisenabled
-OperatorPanelbacklightsetting
•Networksettings
-Linkspeed
-IPaddressprotocol
-IPv4settings(IPaddress, subnetmaskaddress, gatewayaddress, DHCP)
-IPv6settings(IPaddress,gatewayaddress,prefixlength,DHCP,stateless Autoconfiguration)
- Drivesettings
-Modelnumber
Currentinformation
View Current Information
Figure4-3.Currentinformation
Use View Current Information to display the network settings information.
Thesettingsthataredisplayedinclude:
•Networksettings
-Worldwidenodename
-IPaddressprotocolstack
-IPaddress
Firmwareerevision
Service
ViewFirmware Revision
Figure4-4.Firmwarerevision
Select Service > View Firmware Revision to display the current version of the libraryfirmware.
Managingthelibrary
Unlockingthel/Ostation
Unlock I/O Station
Figure4-5. UnlockI/Ostationcommand
SelectUnlockI/OStationtounlocktheI/Ostation.Thismenuoptionisavailable onlywhentheI/Ostationisenabledinthelibraryconfigurationsettings.
Figure4-6.1/Ostation unlocked
AftertheI/Ostationisclosed, waitforthelibrarytocompleteitsinventorybefore you proceed with normal library operations.
Note: Abluereleasegateintheupperleftcornerofeachcolumninthecartridge magazinepreventseachcartridgefromfallingoutofthefrontofthe magazine. When manuallyreleasingthegatewithonehand,positionyour otherhandinfrontofthecolumnopeningtoprotectcartridgesthatare ejectedbytheinternalcolumnspring.
Unlockingthecartridgemagazine
Unlock Magazine
Figure4-7. Unlockmagazinecommand
SelectUnlockMagazinetounlockandremovethecartridgemagazine.
Whenthecartridgemagazineisunlocked,itcanberemovedfromthelibraryto insertorremovedataandcleaningcartridges.Whenthecartridgemagazineis fullyinserted,themagazinelocksintoplace.
Afterthemagazineisclosed, waitforthelibrarytocompleteitsinventorybefore youproceedwithnormallibraryoperations.
Note: Abluereleasegateintheupperleftcornerofeachcolumninthecartridge magazinepreventseachcartridgefromfallingoutofthefrontofthe magazine. When manuallyreleasingthegatewithonehand,positionyour otherhandinfrontofthecolumnopeningtoprotectcartridgesthatare ejectedbytheinternalcolumnspring.
Movingcartridges
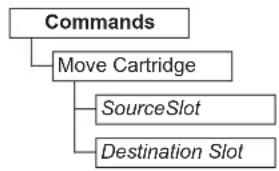
flowchart
graph TD
    A["Commands"] --> B["Move Cartridge"]
    B --> C["SourceSlot"]
    B --> D["Destination Slot"]
Figure4-8. Movecartridge command
Select Commands > Move Cartridge to move data cartridges and cleaning cartridgesbetweentheI/Ostation,storagepositions,andtapedrive.
Specify the following parameters:
- SourceSlot-Specifyasourcethatcontainsacartridge.
- DestinationSlot-Specifythedestination.
PresstheEnterkeytomovethecartridgefromthesourcetothedestination.
Note: Cartridges cannot be removed to the accessor with this command, but can be moved from the accessor if, forexample, the library was powered OFF with atapestillheld in the Picker.
Unloadingthedrive
Cleaningthedrivemanually
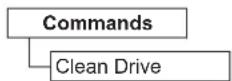
Figure4-10. CleanDrivecommand
Select Commands > Clean Drive to clean the tape drive manually with a cleaning cartridgeineitheracartridgesstoragepositionorthel/Ostation.
PresstheEnterkeytomovethecleaningcartridgetothedriveandstartdrive headcleaning. Thecleaningcartridgeisreturnedtoitshomepositionwhendrive cleaningisfinished.
Conductingalibraryinventory
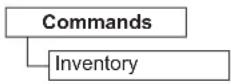
Figure4-11. Inventorycommand
Select Commands > Inventory to force the library to run an inventory of the cartridge magazine, accessor, and taped rivetorefreshthelibrarymap. An inventory is conducted automatically when power is first turned ON or when the cartridge magazine is removed and reinserted.
PresstheEnterkeytoconducttheinventory.
Takingthelibraryonlineandoffline
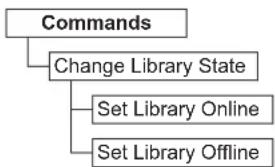
flowchart
graph TD
    A["Commands"] --> B["Change Library State"]
    B --> C["Set Library Online"]
    B --> D["Set Library Offline"]
Figure4-12. Online/Offline command
Select Commands > Change Library State to take the library online or offline.
Itissometimesnecessarytotakethelibraryofflinebeforeservicingfunctionsfor thelibraryaredone.Oncetheseoperationsarefinished,itisnecessarytobringthe libraryonline.
Note: Thetapedriveisalwaysonline, evenwhenthelibraryisoffline.
Poweringdownthelibrary
BeforepoweringOFFthelibrary,ensurethatthelibraryisinanidlestatewithno mechanicalmovementoftheaccessor,andalldataoperations(forexample,backup operations,accessingoflogfiles)arecomplete.Then,powerOFFthelibrarywith thepowerswitchontherearpanelofthelibrary.
Important: If you switch the library power OFF while the library is being accessed, loss of data might occur.
Note: When power cycling the library, wait 10 seconds after the power is OFF before the library is powered ON again.
Shippingthelibrary
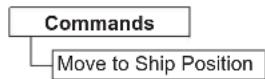
Figure4-13.MovetoShipPositioncommand
Select Commands > Move to Ship Position when the library is prepared to move toanewlocation. Theaccessormustbeplacedinaparkedpositionwithinthe libraryhousing.MovetoShipPositionfinishesallactivecommandsthatare receivedfromthehostapplication,doesnotprocessanynewcommands,and movestheaccessortotheparkedpositionbeforethepoweristurnedOFF.
- When Unlock Magazine is displayed, press the Enter key to unlock the cartridge magazine. Themagazine unlocks and the display prompts the removal of them magazine.
- Remove all cartridges from them magazine and reinsert them magazine into the slidemechanism. Thelibrary completes an inventory to verify nocartridges are in them magazine.
- Ifthemagazineisempty, thelibrarymovestheaccessortotheshipposition. Thelibrarycanbepowereddown. IfthemagazineisNOTempty, thelibrary promptstoremovecartridges. Afterallcartridgesareremovedandthe magazineisreplaced, starttheshippositionprocessagain.
Rebootingthedrive
Commands
Reboot Drive
Figure4-14.RebootDrivecommand
Select Commands > Reboot Drive to force the drive to reboot. You also specify whether the library will come online or offline after it finishes rebooting.
PresstheEnterkeytorebootthedrive.
Rebootingthelibrary
Commands
Reboot Library
Figure4-15.RebootLibrarycommand
Select Commands > Reboot Library to force the library to reboot. You also specify whether the library will come online or offline after it finishes rebooting.
PresstheEnterkeytorebootthelibrary.
Loggingoutofthelibrary
Logout
Figure4-16. Logoutcommand
SelectLogoutologoutofthelibrary.Theloginscreenisdisplayedforthenext user.
Configuringthelibrary
Configuringautocleaning
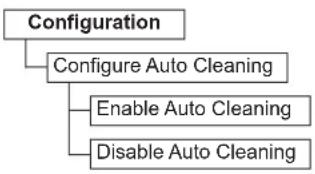
flowchart
graph TD
    A["Configuration"] --> B["Configure Auto Cleaning"]
    B --> C["Enable Auto Cleaning"]
    B --> D["Disable Auto Cleaning"]
Figure4-17. AutoCleaningsettings
Select Configuration > Configure Auto Cleaning to enable or disable automatic headcleaningofthetapedriveinthelibrary.
Note: It is recommended that the AutoClean function is enabled on the library. With the AutoClean function enabled, drive cleaning occurs automatically. The only time AutoCleaning is disabled when your Backup Application requires that ithas control.
Thedrivecanalsobecleanedmanually.Fordetails,see"Cleaningthedrive manually"onpage4-6.
Configuringthenumberofactiveslots
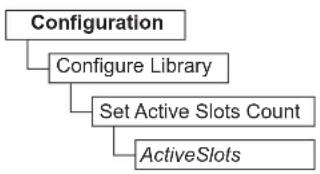
flowchart
graph TD
    A["Configuration"] --> B["Configure Library"]
    B --> C["Set Active Slots Count"]
    C --> D["ActiveSlots"]
Figure4-18.Activeslotcountsettings
Select Configuration > Configure Library > Set Active Slots Count to set the numberofactivatedatacartridgepositionswithinthelogicallibrary.
Configurethenumberofactiveslotswiththefollowingsetting:
- Active Slots - The maximum number of active slots that can be set is dependent upon the I/Ostation configuration and autocleaning setting.
Theactivecartridgeslotsalwaysbeginwiththecartridgepositionwiththelowest cartridgeaddresswithinthelogicallibrary.
Configuringthelibraryaccessmode
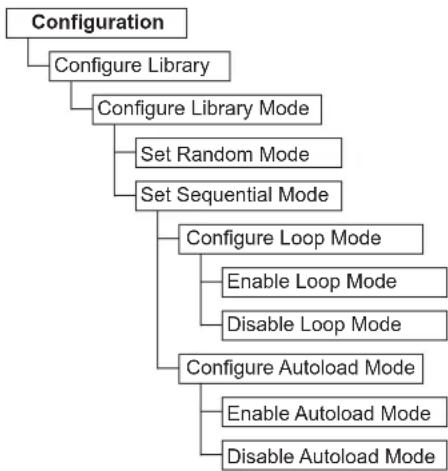
flowchart
graph TD
    A["Configuration"] --> B["Configure Library"]
    B --> C["Configure Library Mode"]
    C --> D["Set Random Mode"]
    C --> E["Set Sequential Mode"]
    E --> F["Configure Loop Mode"]
    F --> G["Enable Loop Mode"]
    F --> H["Disable Loop Mode"]
    E --> I["Configure Autoload Mode"]
    I --> J["Enable Autoload Mode"]
    I --> K["Disable Autoload Mode"]
Figure4-19.Libraryaccessmodesettings
Select Configuration > Configure Library > Configure Library Mode to set the logical library accessmode.
Configurethelibraryaccessmodewiththefollowingsettings:
- Random Mode - In random mode, the library allows the server's (host's) applicationsoftwaretoselectanydatacartridgeinanyorder.
- Sequential Mode - In sequential mode, the library's firmware predefines the selection of the cartridges. After initialization, the firmware cause the library to select the first available cartridge found (counting from the lowest Column / Tier position through the highest cartridge position in your library) for loading into the drive.
-Loop-SequentialmodewithloopmodeONloadsthecartridgeinthelowest Column/TiercartridgepositionafterthecartridgeinthehighestColumn/Tier cartridgepositionisfilledwithdataandsentbacktoitshomeposition.This modeallowsendlessbackupoperationswithoutuserinteraction.
-Autoload-SequentialmodewithautoloadmodeONloadsthefirstavailable cartridge(thelowestColumn/Tiercartridgepositionthatcontainsacartridge) automaticallyifthelibrarypowersON,orresets,withanemptydrive.Ifthe librarypowersONwithacartridgealreadyinthedrive,sequentialmodewill startfromthehomepositionofthatcartridge,unlessthehostissuesarewind andunloadcommandtothedrive,inwhichcasethenextcartridgein sequencewillbeloadedintothedrive.
TostartsequentialmodeifautoloadisOFF, usetheMoveCartridgecommandto loadthefirstcartridgeintothedrive. Thesequencestartsfromthehome positionofthatcartridge.Cartridgesdonotneedtobeincontiguousslots.
Tostopsequentialmode, usetheMoveCartridge command to unload the drive. This mode cancels sequential mode; then next sequential cartridge is NOT loaded.
Torestartsequentialmode, usetheMoveCartridgecommandagaintoloada cartridge; the loadingsequenceresumes from the home position of that cartridge.
Configuringdateandtimesettings
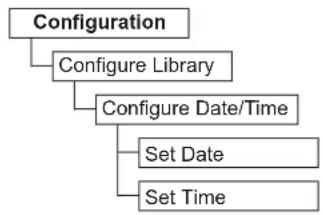
flowchart
graph TD
    A["Configuration"] --> B["Configure Library"]
    B --> C["Configure Date/Time"]
    C --> D["Set Date"]
    C --> E["Set Time"]
Figure4-20. Dateandtimesettings
Select Configuration > Configure Library > Configure Date/Time to set the date and time on your library manually after a power disruption and when daylight saving timesteps and ends. The date is set in MM/DD/YYYY format, and the time is set in 24-hour HH:MM:SS format.
The current date and time is also controlled automatically with an network-based NetworkTimeProtocol(NTP) server. Form more information, see "Configuring networksettings" on page 4-12.
Configuringnetworksettings
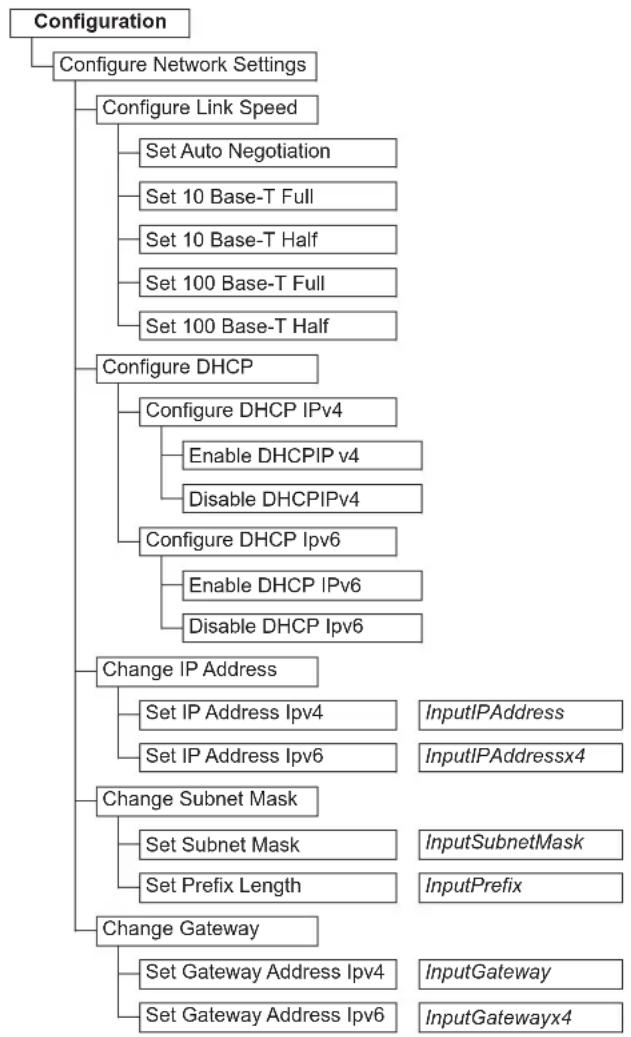
flowchart
graph TD
    A["Configuration"] --> B["Configure Network Settings"]
    B --> C["Configure Link Speed"]
    C --> D["Set Auto Negotiation"]
    C --> E["Set 10 Base-T Full"]
    C --> F["Set 10 Base-T Half"]
    C --> G["Set 100 Base-T Full"]
    C --> H["Set 100 Base-T Half"]
    B --> I["Configure DHCP"]
    I --> J["Configure DHCP IPv4"]
    J --> K["Enable DHCPIP v4"]
    J --> L["Disable DHCPIPv4"]
    I --> M["Configure DHCP IPv6"]
    M --> N["Enable DHCP IPv6"]
    M --> O["Disable DHCP IPv6"]
    B --> P["Change IP Address"]
    P --> Q["Set IP Address IPv4"]
    P --> R["Set IP Address IPv6"]
    P --> S["InputIPAddress"]
    P --> T["InputIPAddressx4"]
    B --> U["Change Subnet Mask"]
    U --> V["Set Subnet Mask"]
    U --> W["Set Prefix Length"]
    U --> X["InputSubnetMask"]
    U --> Y["InputPrefix"]
    B --> Z["Change Gateway"]
    Z --> AA["Set Gateway Address IPv4"]
    Z --> AB["Set Gateway Address IPv6"]
    Z --> AC["InputGateway"]
    Z --> AD["InputGatewayx4"]
Figure4-21.Networksettings
Select Configuration > Configure Network Settings to set the network settings for the library.
Note: The Internet Protocol (IPv4, IPv6, or dual IPv4/IPv6) selection is used for the TL1000 Tape Autoloader IP address, subnetmask, gatewayaddress, time serveraddress, mailserveraddress, SNMP trapaddress, and EKM server addresses.
Configurethenetworkwiththefollowingsettings:
- Link Speed - Ethernet duplex mode (Auto, 10Base-T Full, 10Base-T Half, 100Base-TXFull, 100Base-TXHalf).
- DHCP-(DynamicHostConfigurationProtocol)EnableDHCPtohavethe libraryserverorrouternegotiatetheconnectionwiththelibrary.
-IPv4-SelecttoenableDHCPwiththeIPv4protocol.
-IPv6-SelecttoenableDHCPwiththeIPv6protocol
- IP Address - If DHCP is disabled, set the IP address of the library manually.
-IPv4-SelecttoenterthelibraryIPaddresswiththeIPv4protocol.
-IPv6-SelecttoenterfourlibraryIPaddresseswiththeIPv6protocol.
- Subnet Mask - If DHCP is disabled, set the IP address of the subnet mask.
-SubnetMask-SelecttoenterthesubnetmaskaddresswiththeIPv4 protocol.
-PrefixLength-SelecttoentertheprefixlengthfortheIPv6protocol.
- Gateway - If DHCP is disabled, set the IP address of the gateway.
-IPv4-SelecttoenterthegatewayIPaddresswiththeIPv4protocol.
-IPv6-SelecttoenterfourgatewayIPaddresseswiththeIPv6protocol.
ConfiguringOperatorPanelsettings
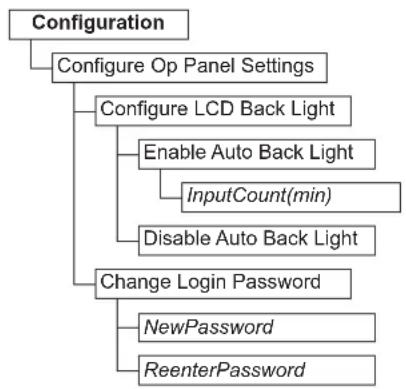
flowchart
graph TD
    A["Configuration"] --> B["Configure Op Panel Settings"]
    B --> C["Configure LCD Back Light"]
    C --> D["Enable Auto Back Light"]
    D --> E["InputCount(min)"]
    D --> F["Disable Auto Back Light"]
    F --> G["Change Login Password"]
    G --> H["NewPassword"]
    G --> I["ReenterPassword"]
Figure4-22. OperatorPanelsettings
Select Configuration > Configure Op Panel Settings to set the preferences when withtheOperatorPanel.
ConfiguretheOperatorPanelwiththefollowingsettings:
- Back light - Select to enable the LCD back light when with the Operator Panel.
-InputCount-Iftheautobacklightisenabled,specifythetimeduration beforethebacklightturnsOFF.Thesettingusesafour-digittimerinminutes.
- Login Password - Select to change the Operator Panel four-character login password. Thenewpasswordmustbereenteredforconfirmationbeforethe passworddischanged(default:0000).
Settingthelibrarytofactorydefaults
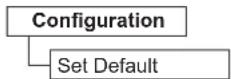
Figure4-23. Factorydefaultsettings
Select Configuration > Set Default to reset the library to the factory default settings. See Table3-2onpage3-10. The date and timemustberesetafterrestoring factorydefaultsettings. See "Configuringdateandtimesettings" on page4-11.
Important: This configuration setting deletes all current library settings, and should be used with utmost caution.
Torestoreyourlibraryconfiguration,see"Savingandrestoringconfiguration
settings"onpage4-32.
Servicingthelibrary
TheServicemenuontheOperatorPanelgivesusersaccesstotroubleshootingandmaintenancediagnostictools.
Checkingthelibraryerrorstatus
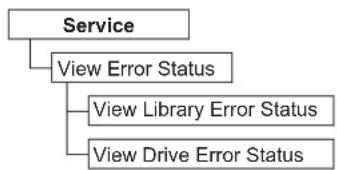
flowchart
graph TD
    A["Service"] --> B["View Error Status"]
    B --> C["View Library Error Status"]
    B --> D["View Drive Error Status"]
Figure4-24. Errorstatusmenu
Select Service > View Error Status to check the status of the major library components.
Select the component to view its error status:
•Library-Checkstheerrorstatusofthelibrary.
- Drive-Checkstheerrorstatusofthetapedrive.
Ifanerroroccurs, presstheEnterkeytodisplayspecificerrorinformation. You
cancheckthemeaningoferrorcodesinAppendixA, "Errorcodes," onpageA-1.
Runninglibraryverifydiagnosticprocedures
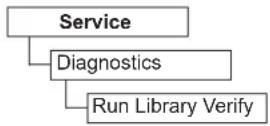
Figure4-25.RunLibraryVerifycommand
Select Service > Diagnostics > Run Library Verify to test the library and drive hardware, communications, and thereadorwritecapabilityofthelibrary.LibraryVerifyisthemostcriticalandmostfrequentlyusedtest,andisrunafterallmaintenanceprocedurestoensurecorrectlibraryperformance.
Note: RunningtheLibraryVerifydiagnostictestunloadstapecartridgesinthe drivesifthehostapplicationhasnotalreadydoneso.
Torunlibraryverificationdiagnostictests:
- Select Run Library Verify, and press Enter. Follow the on-screen instructions. If thereisacartridgeinthedrive, the library movesthecartridgetoitshome position, ortotheI/Ostationifthehomepositionisnotknown.
- When prompted, insert as scratch cartridge into the I/O station.
Whenthescratchcartridgeisloaded,aninventoryisconductedandthebar codereaderreadsthebarcodelabelonthecartridgeandstoresitforlater comparison.Thescratchcartridgeisthenmovedtothetapedrive,wherethe driverunsitsownwrite/read/verifytest.Whenthetestisdone,thelibrary
tellsthedrivetoejectthescratchcartridge, and thenthecartridge is moved back to the I/Ostation. The barcode is read again and compared with the valuestored earlier.
-
When prompted, removethescratchcartridge from the I/Ostation.
Theresultofthetest(PASSEDorerrormessage)isreportedontheOperator Panel. -
ViewtheErrorLogtocheckifanyerrorsoccur.
Ifanerroroccurs,seeAppendixA,"Errorcodes,"onpageA-1toidentifyandlocatetheproblem.
Runningdrivediagnosticprocedures
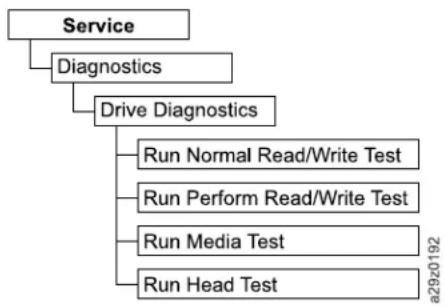
flowchart
graph TD
    A["Service"] --> B["Deagnostics"]
    A --> C["Drive Diagnostics"]
    B --> D["Run Normal Read/Write Test"]
    B --> E["Run Perform Read/Write Test"]
    B --> F["Run Media Test"]
    B --> G["Run Head Test"]
Figure4-26. Drivediagnostic procedures
Select Service > Diagnostics > Drive Diagnostics to run various drive-related diagnostic tests.
Torundrivediagnostictests:
- Select Drive Diagnostics, and press Enter. Select one of the diagnostic tests and followtheon-screeninstructions.
- When prompted, insert as scratch (blank) cartridge into the I/O station.
- Normal R/W Test - Runs a shortened version of the Performance R/W Test. It does not include the POST diagnostic, calibrated drive, or uniquetape motion tests. It checks the motors and head by running read/writetestsona shortened section of tape, both in bound and outbound. Takes approximately 4 minutes (if no error occurs) to 9 minutes (if calibration is required).
- Perform R/W Test (Performance R/W Test) - Runs most of the tests that normally occur when the library is powered ON (POST). When prompted, load a CE scratch cartridge for unthecalibrated drive, read/write, and tape motion tests. The test scale reaches through write channel to optimum settings, run along read/writes test with all serv positions, and exercise all of the lapemotion function so the drive. Takes up to 30 minutes.
- When prompted, removethecartridge from the I/Ostation.
Theresultofthetest(PASSEDorerrormessage)isreportedontheOperator Panel.
•ViewtheErrorLogtocheckifanyerrorsoccur.
Ifanerroroccurs,seeAppendixA,"Errorcodes,"onpageA-1toidentify andlocatetheproblem.
TheWebUserInterface
Figure4-27 shows all themenu options available from the WebUserInterface for
theAdministratorUseraccount.Forinformationonthemenuuseraccess
privilegesforUser,Superuser,andAdministratoraccounts,seeChapter2,"User
interfaces,"onpage2-1.
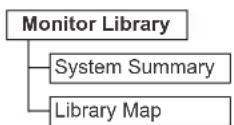
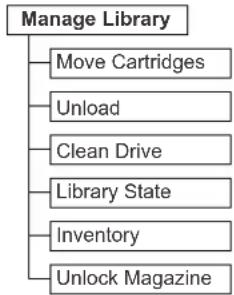
flowchart
graph TD
    A["Manage Library"] --> B["Move Cartridges"]
    A --> C["Unload"]
    A --> D["Clean Drive"]
    A --> E["Library State"]
    A --> F["Inventory"]
    A --> G["Unlock Magazine"]
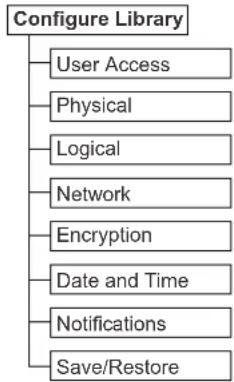
flowchart
graph TD
    A["Configure Library"] --> B["User Access"]
    A --> C["Physical"]
    A --> D["Logical"]
    A --> E["Network"]
    A --> F["Encryption"]
    A --> G["Date and Time"]
    A --> H["Notifications"]
    A --> I["Save/Restore"]
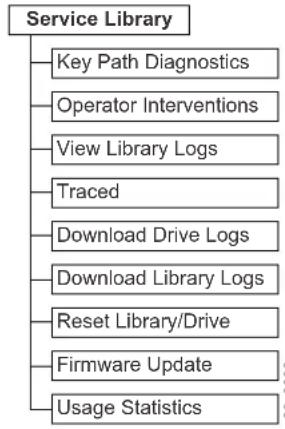
flowchart
graph TD
    A["Service Library"] --> B["Key Path Diagnostics"]
    A --> C["Operator Interventions"]
    A --> D["View Library Logs"]
    A --> E["Traced"]
    A --> F["Download Drive Logs"]
    A --> G["Download Library Logs"]
    A --> H["Reset Library/Drive"]
    A --> I["Firmware Update"]
    A --> J["Usage Statistics"]
Figure4-27.WebUserInterfacemenu
Monitoringthelibrary
Thesystemsummary
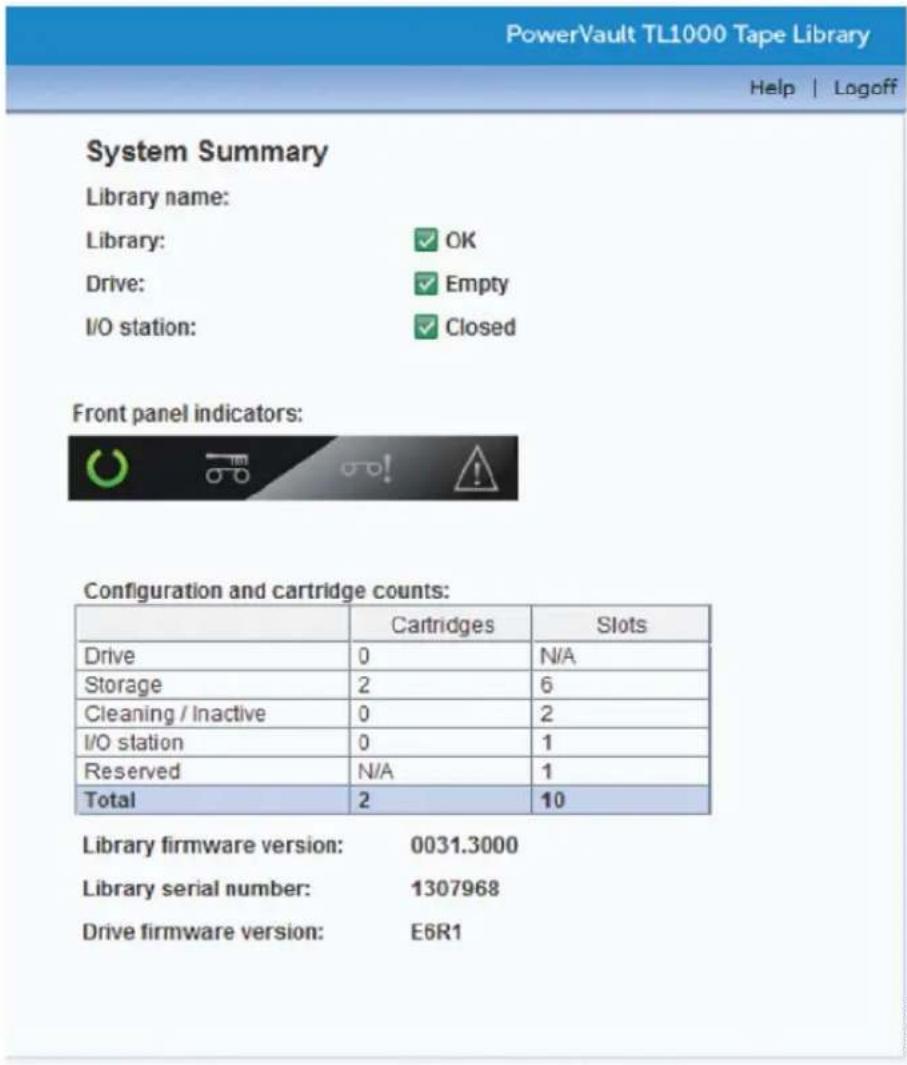
Figure4-28. System Summary screen
Select Monitor Library > System Summary to display a summary of the status of the tapedriveandthelibrary, and the current configuration of the library, comprising:
•Libraryname
- Librarystatus(OK, Degraded, or Failed). It displays Not Ready while initializing.
- Drivestatus(OK,Degraded,orFailed).ItdisplaysEmpty,Loading,orEjected whenthedriveisempty,loadingmedia,ormediaisejectedorunloadedinthe drive.ItdisplaysCleaningwhenthecleaningcartridgeisinthedrive,and Initializingwhileinitializing.
•I/OStationstatus(Open/Closed,whenI/OStationisenabled)
-OperatorPanelLEDindicators
•Numberofcartridgesandslotconfiguration
-Cartridgeinthedrive(0or1);Slotsvalueisalways“N/A”
-Numberofcartridgesintheactiveslots;Numberofactiveslots
-Numberofcartridgesinthecleaning/inactiveslots;Numberof cleaning/inactiveslots
-NumberofcartridgesintheI/OStation(0or1)whenenabled;Numberof I/OStationslots
-Numberofcartridgesinthereservedslot;Numberofreservedslots
•Libraryfirmwareversion
•Libraryserialnumber
-Drivefirmwareversion
Thelibrarymap
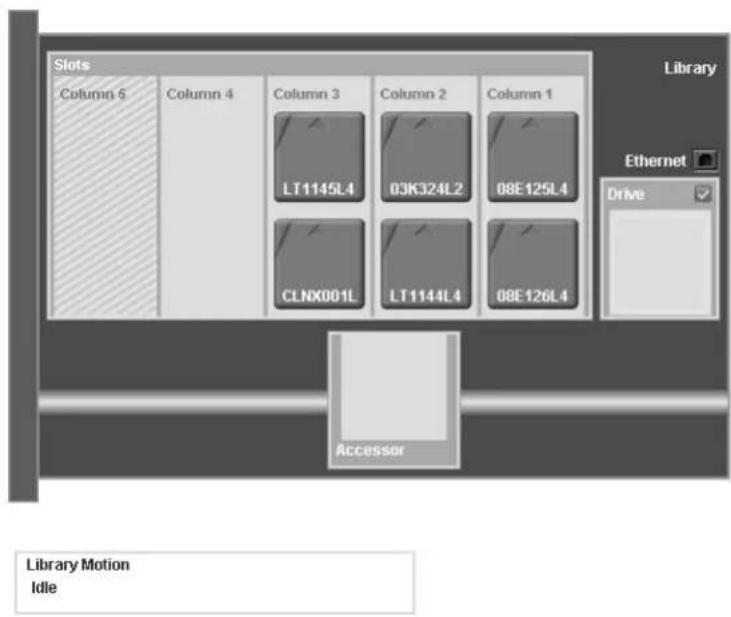
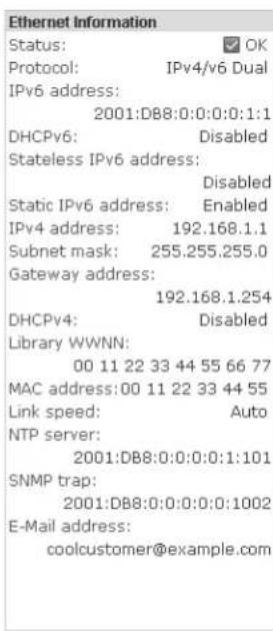
Figure4-29.LibraryMapscreen
Select Monitor Library > Library Map to display a graphical view of the library. Eachcomponentofthelibraryisrepresentedbyaclickableicon.Selecta componentinthelibrarymaptodisplaydetailedinformationforthatcomponent ofthelibraryontherightsideofthepage.Agrayed-outcolumnrepresentsthe I/Ostation.Theinformationthatisdisplayedvariesaccordingtothetypeof deviceselected:
• Libraryinformation
-Accessorstatus(OK, Degraded, or Failed)
-DriveStatus(OK,Degraded,orFailed).DriveStatusdisplaysEmpty, Loading,orEjectedwhenthedriveisempty,loadingmedia,ormediais ejected/unloadedinthedrive.ItdisplaysCleaningwhenthecleaning cartridgeisinthedrive,andInitializingwhileinitializing.
-1/Ostation(EnabledorDisabled)
-Autocleaning(EnabledorDisabled)
-Magazinestatus(InsertedorOpen)
-Librarymode(RandomorSequential).InSequentialmode,LoopandAuto loadmodearealsodisplayed.
•Ethernetinformation
-Status
-Protocol
-IPaddresses
-DHCP(EnabledorDisabled)
-Subnetmask
-Gatewayaddress
-Libraryworldwidenodename
-MACaddress
-Linkspeed
-NTPserver
-SNMPtrap
-Emailaddress
•Cartridge
-Cartridgelabelthatisdetectedbythebarcodereader
-Encryptionsetting(fordatacartridges)
-Mediastatus(OK, Degraded, or Failed)
-Remainingusesforcleaningcartridges.Whenacleaningcartridgeisaddedto thelibrary(I/Ostationorcleaningslot)theremainingusesisdisplayedas50. Theactualremainingusesareupdatedwhenthecleaningcartridgeisloaded intothetapedrive.See"Cleaningcartridge"onpage5-4.
•Columnn,Tiern
- Slotype(Storage,I/Ostation,orCleaning)
-Elementaddress
-Driveinformation
-Status(OK, Degraded, or Failed).DriveStatusdisplaysEmpty, Loading, or Ejectedwhenthedriveisempty, loadingmedia, or mediaisejected/unloaded inthedrive. It displaysCleaningwhenthecleaningcartridgeisinthedrive, and Initializingwhileinitializing.
-VendorID
-ProductID
-Firmwareversion
-Serialnumber
-Worldwidenodename
-Encryptioncapability
-Driveevent
-Cartridgeinformation
- Accessorinformation
-Status(OK, Degraded, or Failed)
-Accessorevent
Managingthelibrary
Movingcartridges
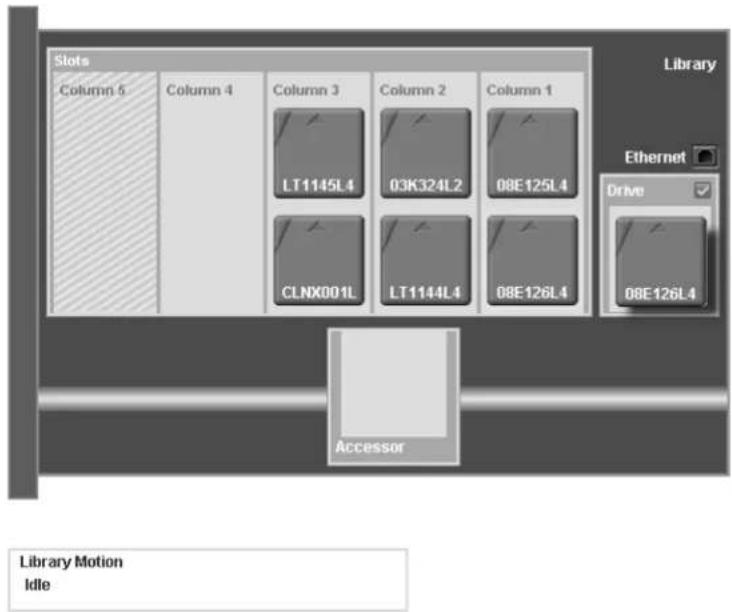
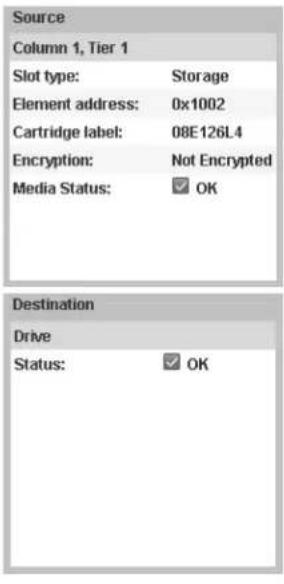
Figure4-30.MoveCartridgesscreen
Use Manage Library > Move Cartridges to move data and cleaning cartridges between the I/O station, storage positions, inactive slots, and taped drive. Move cartridges by clicking and dragging acartridge from onelocation to another, or by right-clicking acartridge and selecting adestination.
SelectacartridgetodisplayinformationforthatcartridgeintheSourcepaneontherightsideofthepage.DragthecartridgetoavaliddestinationlocationtodisplayinformationintheDestinationpane.Releasethemousebuttontorunthemove.
The following information is displayed:
•Source
-Locationcoordinatesinthelibrary(Column, Tier)
- Slotype(Storage, I/Ostation, orCleaning)
-Elementaddress
-Cartridgelabel
-Encryptioncapabilityforstoragecartridges
-Remainingusesforcleaningcartridges.Whenacleaningcartridgeisaddedto thelibrary(I/Ostationorcleaningslot)theremainingusesaredisplayedas 50.Theactualremainingusesareupdatedwhenthecleaningcartridgeis loadedintothetapedrive.See"Cleaningcartridge"onpage5-4.
-Mediastatus(OK, Degraded, or Failed)
- Destination
- Locationcoordinatesinthelibrary(Column, Tier)
-Status(forthetapedrive)
-Slotypeandelementaddress
Note: Each column has as spring loaded mechanism that pushes the cartridges into Tier1. Moving a second cartridge into a column movesthe first cartridge into Tier2. Cartridges cannot be moved directly from Tier1 in one column to Tier2 in another column in a single move operation (intermediatemove operations are required).
Note: Cartridges cannot be removed to the accessor with this command. However, cartridges can be removed from the accessor with this command if the library was powered OFF with a cartridge gestill held in the accessor.
Unloadingthedrive
Unload
Figure4-31.UnloadDrivescreen
Select Manage Library > Unload Drive and click Unload to unload the tape cartridge from the tapered drive head.
Unload when library is in Random mode: The cartridge in the drive is unloaded from the tapehead mechanism, but is still retained inside the tape drive housing. The Move Cartridge command movesthe cartridge from the driveto another location. Moving at a partridge from a driveto another location both unloads and movesthe cartridge in a single action.
UnloadwhenlibraryisinSequentialmode:Thecartridgeinthedriveisunloaded fromthetapeheadmechanism,andreturnedtothecartridgehomeposition
Cleaningthedrivemanually
![Use cartridge: [C5,T1] : CLN1234A Clean](/content/2026/05/1004734/images/91922e235e39de520d1f3d293f023da0183baf2a7584d26e43ae19d509e4a8c2.jpg)
Figure4-32. CleanDrivescreen
Select Manage Library > Clean Drive to clean a drive manually. Select a cleaning cartridge (from them magazine or from the I/Ostation), and click Clean.
Thecleaningcartridgeisreturnedtoitshomepositionwhenthedrivecleaningis finished.
Takingthelibraryonlineandoffline
Current state: Online
Bring Offline
Figure4-33.LibraryStatescreen
Select Manage Library > Library State to take the library online or offline. Check the library status, and click the button that is displayed to change the library status.
Itissometimesnecessarytotakethelibraryofflinebeforelibraryservicing functionsarecompleted. Oncetheseoperationsarefinished,itisnecessarytobring thelibrarybackonline.
Note: Thetapedriveisalwaysonline, evenwhenthelibraryisoffline.
Conductingalibraryinventory

Figure4-34. Inventoryscreen
Select Manage Library > Inventory to force the library to run an inventory of the cartridge magazine, accessor, and taped rivetorefreshthelibrarymap. Conduct an inventory by clicking the Startbutton. The InventoryProgressbar indicates the process in action. Wait until the operation finishes before normal library operations resume.
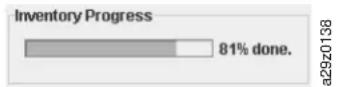
Figure4-35. Inventoryprogressbar
AninventoryisconductedautomaticallywhenthepowerisfirstturnedONor whenacartridgemagazineisinserted.
Unlockingthecartridgemagazine
Magazine state: Locked

a29z0174
Figure4-36. Unlockmagazine
Select Manage Library > Unlock Magazine to unlock and remove the cartridge magazine. Whenthecartridgemagazine is unlocked, it can be removed from the library to insert or removed data and cleaning cartridges. Whenthecartridge magazine is fully inserted, them magazine locks in place. After them magazine is closed, wait forth the library to complete its inventory before normal library operations resume.
Note: Abluereleasegateintheupperleftcornerofeachcolumninthecartridge magazinepreventseachcartridgefromfallingoutofthefrontofthe magazine. When manuallyreleasingthegatewithonehand, positionyour otherhandinfrontofthecolumnopeningtoprotectcartridgesthatare ejectedbytheinternalcolumnspring.
Note: If the cartridge magazine is not removed within 5 minutes, it is automatically locked.
Configuringthelibrary
Managinguseraccess
| Refresh | ||
| Current users: | ||
| --- Select Action --- | ||
| Select | User Name | Role |
| ○ | user | User |
| ○ | suser | Superuser |
| ○ | admin | Administrator |
Figure4-37.UserAccessscreen
Select Configure Library > User Access to add, modify, or remove administrator, superuser, and user accounts, and to change passwords. Upto7 users can be configured with the WebUser Interface.
Add, modify, or remove users with the following information:
- Selectaction
-Add-Toaddnewusers.
-Modify-Tochangetheselecteduser'saccessroleorpassword.
-Remove-Todeletetheselecteduserfromthesystem.
- UserName-Theusernameofaregistereduser.
- Password-Case-sensitivepasswordfortheregistereduser.
- Role-Theuseraccesslevelfortheregistereduser.
-Usersareallowedtomonitorthelibrary, but not complete actionsthataffect the physical library.
-Superusersareallowedtooperatethephysicalandlogicallibrary,butnot completeactionsthataffectthelibraryconfiguration.
-Administratorusersareallowedaccesstotheentirephysicallibraryand logicallibrary,includingconfiguration.Onlyoneadministratorusermustbe assignedtheloginnameadmin.
Anadministratorcanadd/modify/removeextraadministrator, superuser, and user accounts, and change passwords. User accounts are restricted to specific areas of the library. Formoreinformation, see Chapter 2, "User interfaces," on page 2-1.
AUseraccountcanbemodifiedbyanadministratortoprovideauserwith superuseroradministratoraccesspermissionstothelibraryfunctions.
EnteralluserIDsandpasswordsontheLibraryConfigurationformin AppendixD,"LibraryConfigurationForm,"onpageD-1.
ClickSubmittotransferthesettingstothelibrary.Adialogmessageisdisplayed whenthesettingsareupdatedsuccessfully.
ClickRefreshtoreadthecurrentsettingsfromthelibrary.
Configuringphysicallibrarysettings
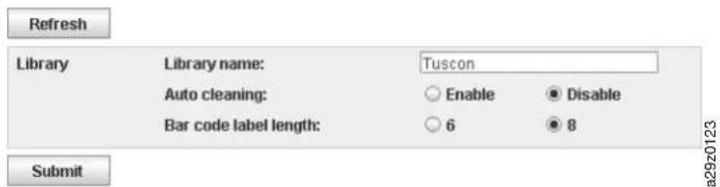
Figure4-38.Physicallibrarysettingsscreen
Select Configure Library > Physical to configure the I/O station and auto cleaning.
ConfiguretheI/Ostationandautocleaningcartridgeslotassignmentwiththe followingsettings:
•Libraryname-Usetoenteranameforyourlibrary.
- Auto cleaning - Use to enable automatic cleaning of the tape drive. Auto cleaning can be enabled only when therethenumberofactiveslotsislessthan the total number of available slotsinthelibrary.
- Bar code label length - Use to choose the number of characters in the cartridge barcodeethatisreportedtothehostcomputer.
ClickSubmittotransferthesettingstothelibrary.Adialogmessageisdisplayed whenthesettingsareupdatedsuccessfully.
ClickRefreshtoreadthecurrentsettingsfromthelibrary.
Configuringlogicallibrarysettings
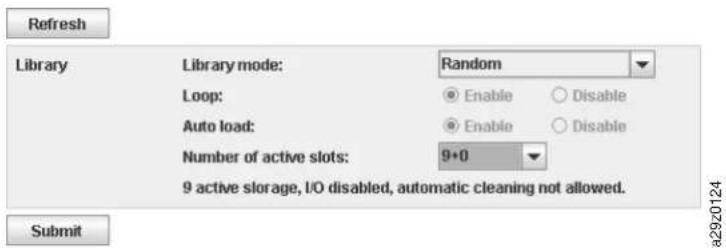
Figure4-39. Logical library settingsscreen
Select Configure Library > Logical to configure the library access mode for the logicallibraryandthenumberofactivecartridgeslots.
Configure the library access modewith the following settings:
- Librarymode-ThelibrarymodecanbesettoRandomorSequential.
-Random-Inrandommode, the library allow stheserver's (host's) application software to select any data cartridge in any order.
-Sequential-Insequentialmode, the library's firmware predefine the selection of the cartridges. After initialization, the firmware cause the library to select the first available cartridge found (counting from the lowest Column/Tier position through the highest cartridge position in your library) for loading into the drive. See "Location coordinates and element addresses" on page 1-9.
Loop-SequentialmodewithloopmodeONloadsthecartridgeinthelowestColumn/TiercartridgepositionafterthecartridgeinthehighestColumn/Tiercartridgepositionisfilledwithdataandsentbacktoitshomeposition.Thismodeallowsendlessbackupoperationswithoutuserinteraction.
Autoload-SequentialmodewithautoloadmodeONloadsthefirstavailable cartridge(thelowestColumn/Tiercartridgepositionthatcontainsacartridge) automaticallyifthelibrarypowersON,orresets,withanemptydrive.Ifthe librarypowersONwithacartridgealreadyinthedrive,sequentialmodewill startfromthehomepositionofthatcartridge,unlessthehostissuesarewind andunloadcommandtothedrive,inwhichcasethenextcartridgein sequencewillbeloadedintothedrive.
TostartsequentialmodeifautoloadisOFF,selecttheMoveCartridges commandtoloadthefirstcartridgeintothedrive.Thesequencestartsfromthe homepositionofthatcartridge.Cartridgesneednottobeincontiguousslots.
Tostopsequentialmode,selecttheMoveCartridgescommandtounloadthe drive.Thismodecancelssequentialmode;thenextsequentialcartridgeisNOT loaded.
Torestartsequentialmode,selecttheMoveCartridgescommandagaintoloada cartridge;theloadingsequenceresumesfromthehomepositionofthat cartridge.
- Number of active slots - Select the number of active slots you would like to assigninyourlibrary.Selectingthenumberofactiveslotsdefinesthenumberof storageslots,numberofcleaning/inactiveslots,whethertheI/Ostationis enabled/disabled,andwhetherautocleaningisallowed.
Thefirstdigitconfiguresthenumberofactivestoragepositions(4,6,8,or9). ThesecondigitconfiguresColumn5,Tier1ofthemagazineasanI/OStation (0whendisabled,and1whenenabled).
The AutoCleaning function can be enabled only if there is at least one inactive position in the magazine. If autocleaning is enabled, the inactive positions become cleaning cartridge positions.
ClickSubmittotransferthesettingstothelibrary.Adialogmessageisdisplayed whenthesettingsareupdatedsuccessfully.
ClickRefreshtoreadthecurrentsettingsfromthelibrary.
Configuringnetworksettings
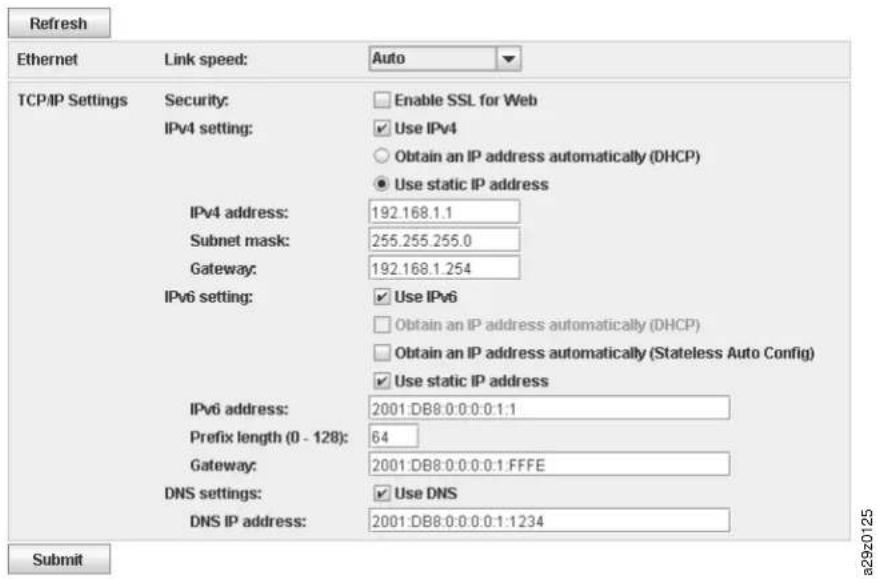
Figure4-40. Networksettingsscreen
Use Configure Library > Network to set the network settings for the library.
Note: The Internet Protocol (IPv4, IPv6, or dual IPv4/IPv6) selection is used for the TL1000 Tape Autoloader IP address, subnetmask, gatewayaddress, time serveraddress, mailserveraddress, SNMP trapaddress, and EKM server addresses.
Configurethenetworkwiththefollowingsettings:
- Link speed - Ethernet duplex mode (Auto, 10Base-T Full, 10Base-T Half, 100Base-TXFull, 100Base-TXHalf).
- TCP/IP settings - IPv4, IPv6, and dual stack IPv4/IPv6 are supported. To enable the dual IPv4/IPv6 protocol, select both Use IPv4 and Use IPv6 and enter parametersforboth.
- Security - Select Enable SSL for Web to provide secure communications between the web browser and the target library.
- IPv4 setting - Select Use IPv4 to enable the IPv4 Internet Protocol. Select the correspondingbuttontoobtainanIPaddressautomatically(DHCP)orusestatic IPaddresssettings.WhenwithDHCP,usetheOperatorPaneltodeterminethe library'sassignedIPaddress.See"Currentinformation"onpage4-4.Enterthe followingparametersifwithstaticIPaddresssettings.
-IPv4address-SetstheTCP/IPv4addressofthelibraryonthenetwork.
-Subnetmask-Definesandlimitsuserswithinalocalnetwork.
-Gateway-Allowsaccessoutsidethelocalnetwork. - IPv6 setting - Select Use IPv6 to enable the IPv6 Internet Protocol. Select the corresponding checkboxestoobtainanIPaddressautomatically(DHCP),to obtainanIPaddresswithstatelessautoconfiguration,orusestaticIPaddress settings.EnterthefollowingparameterifwithstaticIPaddresssettings.
-IPv6address-SetstheTCP/IPv6addressofthelibraryonthenetwork.
-PrefixLength-Decimalvalue0-128indicatingthenumberofcontiguous, high-orderbitscomprisingthenetworkportionoftheaddress.
-Gateway-Allowsaccessoutsidethelocalnetwork.
- DNS setting - Select Use DNS to use a domain name server. The DNS server, if entered, allow the encryption, date and time, and notifications IP addresses to be specified with host names instead of numerical IP addresses.
-DNSIPaddress-SetstheIPaddressoftheDNSserver.
ClickSubmittotransferthesettingstothelibrary.Adialogmessageisdisplayed whenthesettingsareupdatedsuccessfully.
ClickRefreshtoreadthecurrentsettingsfromthelibrary.
Configuringencryptionsettings
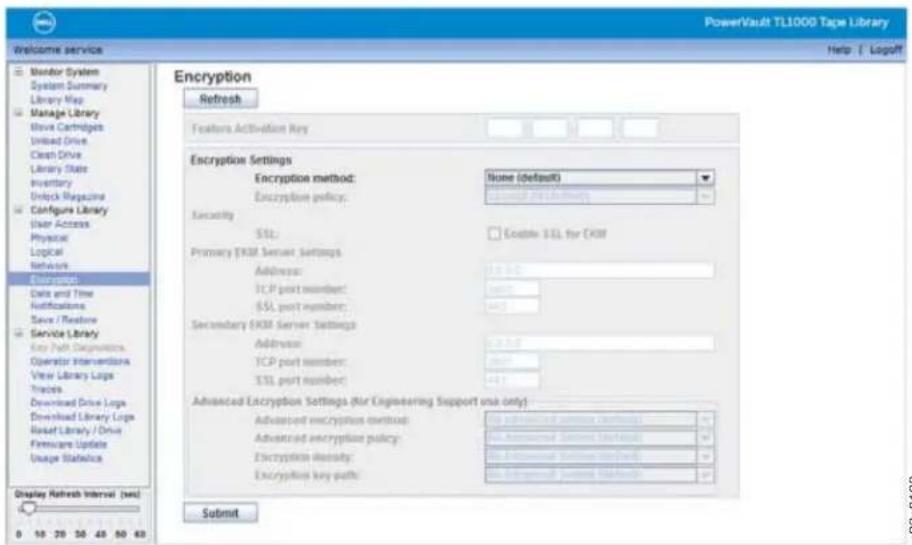
Figure4-41.Encryptionsettingsscreen
Select Configure Library > Encryption to configure an encryption method for data that is stored on a specific method.
Note:ApplicationManagedEncryption(AME)doesnotrequireakey.
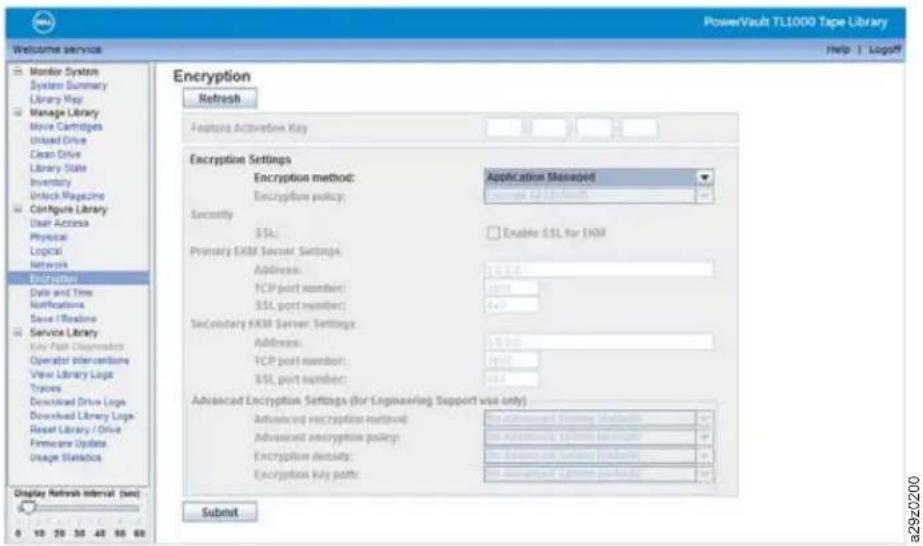
Figure4-42.Encryptionsettingsenabledscreen
Configureencryptionwiththefollowingsettings:
- Expand Configure Library, if necessary, and click Encryption in the left navigationpaneoftheWebUserInterface.
- In the Encryption method: drop-down menu, choose Application Managed to enable encryption in your library. Nofurtherconfigurationsteps are necessary.
Note: LibraryManagedEncryptionandSystemManagedEncryptionarenot supportedinthisLibrary.LibraryManagedEncryptionconfiguration optionsandKeypathDiagnosticsmenusaregreyedoutintheLibrary WebInterface.
To determine whether a cartridge is encrypted, use Configure Library > Library Mapandselectthecartridge.Thescreendisplayswhetherthecartridgeis encrypted,notencrypted,orunknown.
ClickSubmittotransferthesettingstothelibrary.Adialogmessageisdisplayed whenthesettingsareupdatedsuccessfully.
Configuringdateandtimesettings
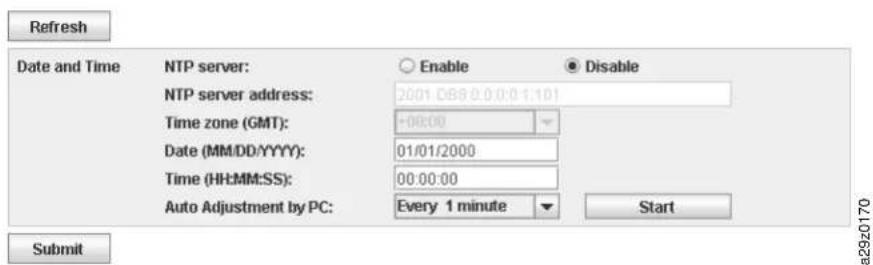
Figure4-43. Dateandtimesettingsscreen
Select Configure Library > Date and Time to configure the date and time settings withoneofthreemethods. Thedateandtimecanbeautomaticallyupdatedwitha
remoteNTPtimeserveroverthenetwork.Alternatively,thedateandtimecanbe synchronizedwiththeclockonyourhostcomputer.Andlastly,thatdateandtimes canbesetmanually.
Note: Selecting Refreshrefreshed date and time.
Note: If you choose manually set your date and time, you must reset the date and time after the library is power cycled and after a library reset.
Note: Whenthelibraryispowercycled, wait10secondsafterthepowerisOFF beforepoweringONthelibraryagain.
The TL1000 Tape Autoloader communicates with an NTP server with the following conditions:
- Client/serverbasisoperation
- UDP(UserDatagramProtocol)toaccesstheNTPserver
- Doesnotuseauthenticationkeys
• Librarypollingisevery12hours
Configurethedateandtimewiththefollowingsettings:
- NTP Server - Enables time and date control with a time server on the network.
-NTPserveraddress-TheIPaddressofthetimeserver.IPv4andIPv6 addressesaresupported,dependingontheTCP/IPsettings.Hostnamescan beenteredinsteadofnumericalIPaddressesifUseDNSisselectedinthe Networksettings.
-Timezone-ThetimezonerelativetoGreenwichMeanTime(GMT).
- Ifthetimeserverisdisabled, enterthelocaltimeanddatemanually.
-Date-ThedatewiththeMM/DD/YYYYformat.
-Time-ThetimewiththeHH:MM:SSformat.
- Auto Adjustment by PC - Select a time interval and click Start to synchronize the library with the clock on your host computer at regular intervals. The Web UserInterface Java Applet must be running continuously to us this function.
ClickSubmittotransferthesettingstothelibrary.Adialogmessageisdisplayed whenthesettingshavebeenupdatedsuccessfully.
ClickRefreshtoreadthecurrentsettingsfromthelibrary.
Configuringemailnotifications
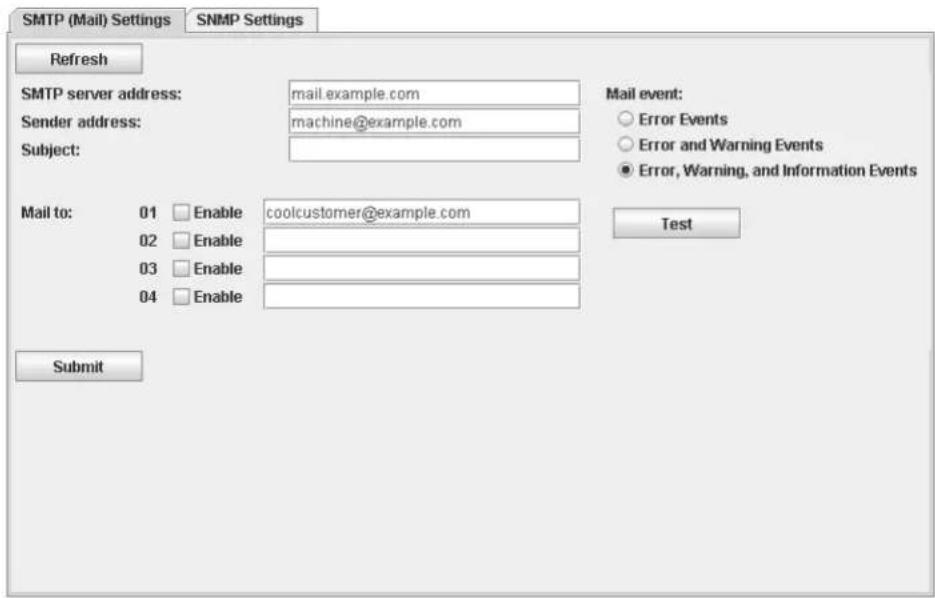
a29z0127
Figure4-44. Emailsettingsscreen
Select Configure Library > Notifications > SMTP (Mail) Settings to configure the emailsettingsforsendingeventinformationwheneveraneventofacertainlevel occurs.
Configure email notification with the following settings:
- SMTP server address - SMTP mail server IPv4 or IPv6 address (depending on networkconfiguration)
- Senderaddress-emailmessageheaderinformation
- Subject-emailmessageheaderinformation
- Mailto-emailaddressesofcontactstobenotifiedoftheevent
•Mailevent-Eventlevelnotificationthreshold
-Errorevents
-ErrorandWarningevents
-Error,Warning,andInformationevents
Click Test to send a test message to the addresses enabled in the Mail to fields.
ClickSubmittotransferthesettingstothelibrary.Adialogmessageisdisplayed whenthesettingsareupdatedsuccessfully.
ClickRefreshtoreadthecurrentsettingsfromthelibrary.
ConfiguringSNMPtrapnotifications
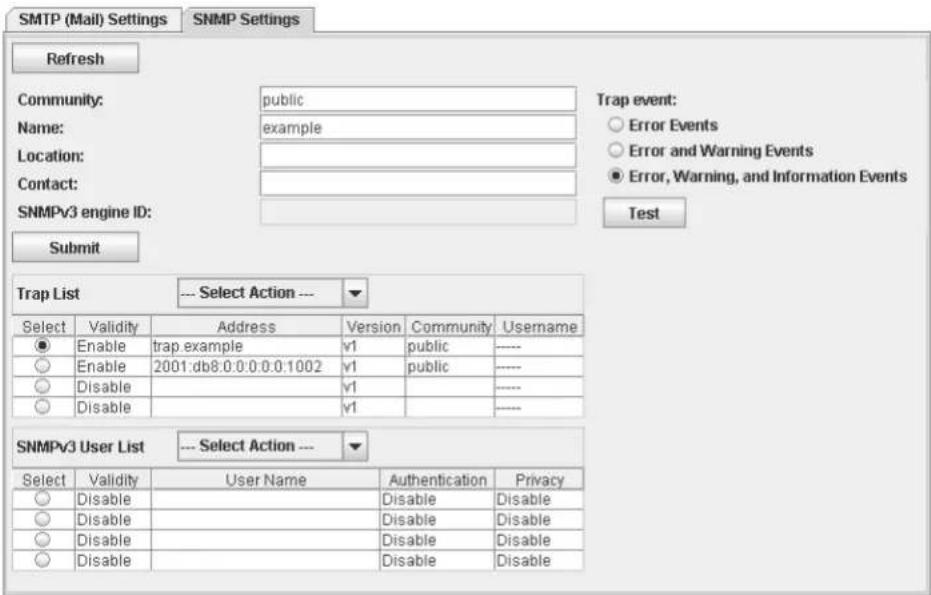
a29z0128
Figure4-45.SNMPsettingsscreen
Use Configure Library > Notifications > SNMP Settings to configure the trap settingsforsendingeventinformationwheneveraneventofacertainleveloccurs, andtoregisteruserswhocanaccessthetapelibrarywithSNMPVersion3.The trapsthataresupportedbytheTL1000TapeAutoloaderarelistedin"Trap definitions(types)"onpageA-14.
DownloadtheSNMPMIBfileforthislibraryfromhttp://www.dell.com/support.InstalltheMIBfileonyourSNMPserver.Refertoyourserverapplicationdocumentationforinstructions.
ConfigureSNMPtrapnotificationwiththefollowingsettings:
- SNMP Enabled - The SNMP Enabled check box must have a check mark to enableSNMPnotifications.
- Community-SNMPcommunityname(forexample,"public")
- Name-Devicename(forexample,"TL1000TapeAutoloader")
- Location-Physicallocationofthetapelibrary
- Contact-Contactindividual'sname
- SNMPv3 engine ID - A read-only attribute that identifies the SNMPv3 engine.
•Trapevent-Eventlevelnotificationthreshold
-Errorevents
-ErrorandWarningevents
-Error, Warning, and Information events
- Trap List - IP addresses of the SNMP monitoring stations to be notified when an eventtakesplaceandthesecuritysettings.
-Validity-Enable/Disablesetting.
- Trap version - v1, v2c, or v3. For v2c and v3, the Inform check box determineswhetheranSNMPINFORMrequestissentinsteadofatrap event.
-IPaddress-IPv4andIPv6addressesaresupported.
-Community(v1orv2c)-SNMPcommunityname.
-Username(v3only)-SNMPv3uniqueusername.
-Authentication(v3only)-Authenticationalgorithm,MD5,orSHA.Whenan algorithmmisspecified,anauthenticationpasswordandconfirmationofthe passwordarequired.
- Privacy(v3only)-Privacyserviceencryptionanddecryptionalgorithm,DES orAES.Whenanalgorithmmisspecified,aprivacypasswordandconfirmation ofthepasswordarerequired.
•SNMPv3UserList-SNMPv3userswhocanaccessthetapelibrary.
-Validity-Enable/Disablesetting.
-Username-SNMPv3uniqueusername.
-Authentication-Authenticationalgorithm,MD5,orSHA.Whenanalgorithm isspecified,anauthenticationpasswordandconfirmationofthepasswordare required.
- Privacy-Privacyserviceencryptionanddecryptionalgorithm,DESorAES. Whenanalgorithmmisspecified,aprivacypasswordandconfirmationofthe passwordarequired.
Click Test to send a test trap to the IP addresses enabled in the Trap to fields.
ClickSubmittotransferthesettingstothelibrary.Adialogmessageisdisplayed whenthesettingsareupdatedsuccessfully.
ClickRefreshtoreadthecurrentsettingsfromthelibrary.
Savingandrestoringconfigurationsettings
Yourlibraryconfigurationcanbesavedandrestoredautomaticallybyacookieand manuallybywiththeWebUserInterface.ItisrecommendedthatyouusetheWebUserInterfacemethodwhetheryouusethecookiemethod.
Important: Verifyallconfigurationsettingsafteryourlibraryconfigurationis restored. Resetthelibrarydateandtime(see "Configuringdateand timesettings" onpage4-28).
Savingandrestoringconfigurationautomaticallywithcookies
Ifallowedbyyourwebbrowserpreferencesettings,cookiesareemployedto automaticallysaveyourlibraryconfigurationonyourhostcomputerand automaticallyrestoreyourlibraryconfigurationifyourlibrarynetwork configurationusesastaticIPaddress. The following flowchart illustrates how VPD dataissaved from and restored to library with cookies.
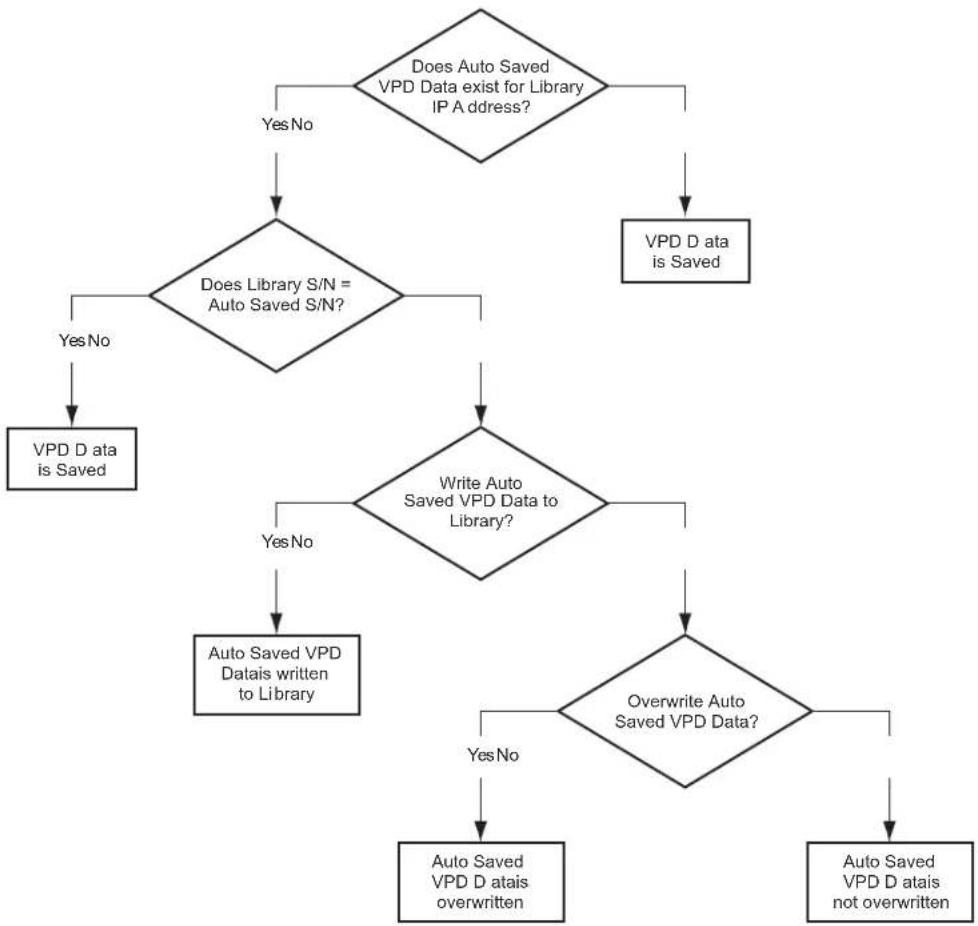
flowchart
graph TD
    A["Does Auto Saved VPD Data exist for Library IP A address?"] -->|Yes No| B{Does Library S/N = Auto Saved S/N?}
    A -->|Yes No| C["VPD D ata is Saved"]
    B -->|Yes No| D["VPD D ata is Saved"]
    B -->|Yes No| E{Write Auto Saved VPD Data to Library?}
    E -->|Yes No| F["Auto Saved VPD Datais written to Library"]
    E -->|Yes No| G{Overwrite Auto Saved VPD Data?}
    G -->|Yes No| H["Auto Saved VPD D atais overwritten"]
    G -->|Yes No| I["Auto Saved VPD D atais not overwritten"]
Figure4-46.Save/Restoreconfigurationwithcookies
SavingandrestoringconfigurationmanuallywithWebUserInterface

Figure4-47.Save/Restorescreen
Select Configure Library > Save/Restore to manually save library configuration settingstoanexternalfileorrestoreconfigurationsettingsfromafile.This functionisusefulwhenyouhaveseverallogicalconfigurationsfordifferenttape storageimplementationsthatyoumustswitchbetweenregularly.
Note: Whenthelibraryconfigurationissavedmanually, the library must be offline to savetofilesandtorestorefromfiles.
ClickSavetosavethecurrentsettingstoafile.
ClickRestoretoloadthesettingsfromafile.
Servicingthelibrary
Operatorinterventions
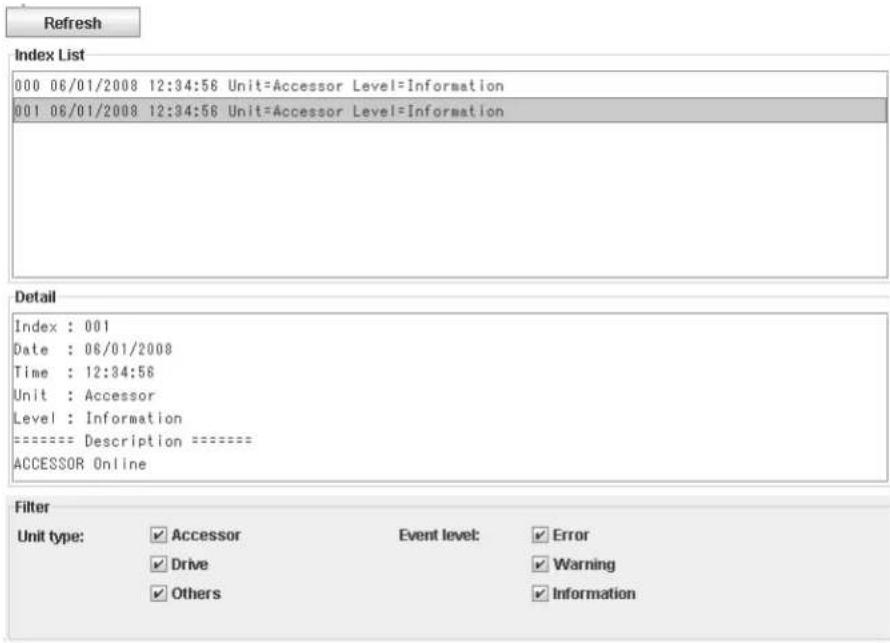
Figure4-48. Operatorinterventionsscreen
Select Service Library > Operator Interventions to display a log history summary of information, warning, anderroevent that occurred for these selected library component units.
Thesummarycanbefilteredtodisplaytheoperatorinterventionlogforaspecific hardwarecomponentandspecificeventlevels. Thelogisstoredinmemoryonthe librarycontrolboard.Whenthememorybufferisfull,neweventsoverwritethe oldestevents. ThelogisnotclearedfrommemorywhenpoweristurnedOFF.
ClickRefreshtoreadthelogofoperatorinterventionsfromthetapelibrary.You canselectaneventintheIndexListpaneltodisplaydataspecifictothateventin theDetailpanel.
The information that is displayed for the operator intervention event comprises:
•Indexnumberoftheevent
•Datetheeventoccurred
•Timetheeventoccurred
•Unitinthelibrarywheretheeventoccurred
•Eventlevel
•Descriptionoftheevent
Librarylogs
![Refresh Index list 006 07/17/2008 16:15:06 Code=6/29/01 POWER ON OCCURRED. 007 01/01/2008 18:01:31 Code=6/29/01 POWER ON OCCURRED. 008 01/01/2008 18:01:18 Code=[0011] Failed in time data acquisition from time server. 009 01/01/2008 19:53:34 Code=6/29/01 POWER ON OCCURRED. 010 01/01/2008 19:52:07 Code=6/29/01 POWER ON OCCURRED. Detail Index : 008 Occurred at : 01/01/2008 18:01:18 Code=[0011] : Failed in time data acquisition from time server. x0 x1 x2 x3 x4 x5 x6 x7 x8 x9 xA xB xC xD xE xF 0000: FF 00 00 00 00 00 00 0A 00 00 00 00 00 00 00 00 0010: 11 00 4D 00 00 00 00 00 00 00 00 00 11 00 00 0020: 0B 0D 11 00 00 00 01 FC 00 00 3D 3D 3D 3D 3D 3D 3D 0030: 00 00 1D 00 00 00 04 0D 12 00 00 00 00 00 00 4D Filter Code: Library/Drive Error [Check Codes] Command Error (Sense Keys) Sense key: No Sense (Code=0/xx/xx) Hardware Error (Code=4/xx/xx) Recovered Error (Code=1/xx/xx) Illegal Request (Code=5/xx/xx) Not Ready (Code=2/xx/xx) Unit Attention (Code=6/xx/xx) Medium Error (Code=3/xx/xx) Aborted Command (Code=B/xx/xx)](/content/2026/05/1004734/images/bb65fafc1b111e0fa055321ca5522b42606ac860a06c0af4a1ab9f7011c4d310.jpg)
a29z0131
Figure4-49.ViewLibraryLogsscreen
Select Service Library > View Library Logs to display a log history summary of errorsthatoccurred.
Theerrorlogisdisplayedwithsensedatainformation.Thesummarycanbe filteredtodisplayerrorswithspecificsensedatacodetypes.
ClickRefreshtoreadthelogoferrorsfromthetapelibrary.Youcanselectanerror in the Index List panel to display data specific to that error in the Detail panel.
Theinformationthatisdisplayedfortheerrorcomprises:
•Indexnumberoftheerror
•Dateandtimetheerroroccurred
- Errorcode
•Descriptionoftheerror
Therearetwotypesoferrordatathataredisplayedinthelibrarylogwith differentCodeattributes:
•Library/Drivesensedata(Sensekey/ASC/ASCQ)
Forexample,a5/3B/0Derrorstatesthatanillegalrequestwasinitiated that resultedina "mediumdestinationelementfull" errorthatisreportedbythe library.Selectinglogentry012providesdetailedsensedataforthisfailure.
InformationaboutsensedataislistedinAppendixC,"Sensedata,"onpageC-1.
•Library/Driveerrorcode([Code])
Forexample, in logentry010, a[0222]errorstates that the library can note reject medium because drive is in state of Prevent Media Removal. Information about errors and action to resolve the problem are listed in Appendix A, "Errorcodes,"
onpageA-1.
Tracedata
![Refresh System Trace Data Index : 008 Occurred at : 01/01/2008 18:01:18 Code=[0011] : Failed in time data acquisition from time server. x0 x1 x2 x3 x4 x5 x6 x7 x8 x9 xA xB xC xD xE xF 0000: FF 00 00 00 00 00 00 0A 00 00 00 00 00 00 00 00 0010: 11 00 4D 00 00 00 00 00 00 00 00 00 11 00 00 0020: 0B 0D 11 00 00 00 01 FC 00 00 30 30 30 31 00 40 0030: 00 00 10 00 00 00 04 00 12 00 00 00 00 00 00 00 0040: 00 05 EE 30 30 11 IA AB 30 00 00 00 00 00 00 00 0050: 00 00 10 00 00 00 04 02 01 0B C2 8O 0O 0O 0O 0O 0060: 0O E9 0O 0O 31 0O 0O 0O 0O 0O 0O 0O 0O 0070: 0O 0O 0O 0O 0O 0O 0O 0O 0O 0O 0O 0O 0080: 0O 0O 1 BC 0O 0O 0O 22 O O O O O 093: 12:24:25:26:27:28:29:3D:35:36:37:38:39:4D:45:46:47:48:49:5D:55:56:57:58:59:6D:7D:75:76:77:78:79:8D:9D:95:96:97:98:99:1D:12D:13D:14D:15D:16D:17D:18D:19D:2D:25D:26D:27D:28D:29D:3D:35D:36D:37D:38D:39D:4D:45D:46D:47D:48D:49D:5D:55D:56D:57D:58D:59D:6D:65D:66D:67D:68D:69D:7D:75D:76D:77D:78D:79D:8D:85D:86D:87D:88D:89D:9D:95D:96D:97D:98D:99D:E:F:F:F:F:F:F:F:F:F:F:F:F:F:F:F:F:F:F:F:F:F:F:F:F:F:F:F:F:F:F:F:F:F:F:F:F:F:F:F:F:F:F:F:F:F:F:F:F:F:F:F:F:F:F:F:F:F:F:F:F:F:F:F:F:F:F:F:F:F:F:F:F:F:F:F:F:F:F:F:F:F:F:F:F:F:F:F:F:F:F:F:F:F:F:F:F:F:F:F:F,F,F,F,F,F,F,F,F,F,F,F,F,F,F,F,F,F,F,F,F,F,F,F,F,F,F,F,F,F,F,F,F,F,F,F,F,F,F,F,F,F,F,F,F,F,F,F,F,F,F,F,F,F,F,F,F,F,F,F,F,F,F,F,F,F,F,F,F,F,F,F,F,F,F,F,F,F,F,F,F,F,F,F,F,F,F,F,F,F,F,F,F,F,F,F,F,F,F,F,F,G,H,H,H,H,H,H,H,H,H,H,H,H,H,H,H,H,H,H,H,H,H,H,H,H,H,H,H,H,H,H,H,H,H,H,H,H,H,H,H,H,H,H,H,H,H,H,H,H,H,H,H,H,H,H,H,H,H,H,H,H,H,H,H,H,H,H,H,H,H,H,H,H,H,H,H,H,H,H,H,H,H,H,H,H,H,H,H,H,H,H,H,H,H,H,H,H,H,H,H,H,\nFilter Trace type: Command Log Number of minutes (1-255): 255 Error Log Retry Log Mechanical Motion Log](/content/2026/05/1004734/images/0f584fbe86d3c55570e47b224bb9fd2983fa206ba3ab135b1cf07d4cbab3aa13.jpg)
Figure4-50.Tracesscreen
Select Service Library > Traces to display a trace history of errors that occurred. Thesummarycanbefilteredtodisplaythetypeoferrorsthatareoccurringwithin aspecifiedtimeperiod.
ThesystemtracedatafortheintervalthatisenteredintheNumberofMinutes fielddisdisplayed.Thesummarycanbefilteredtotracedataforspecificsystem logs.
ClickRefreshtoreadthesystemtracedatafromthetapelibrary.
The information that is displayed in the system traced data comprises:
- Indexnumber
- Dateandtimeofevent
•Sensedata
Downloadingdrivelogs
Normal data filename:
Force data filename:

a29z0137
Figure4-51. DownloadDriveLogsscreen
Select Service Library > Download Drive Logs to download a tape drive memory dumptofileforusebysupportpersonneltohelptroubleshootaproblem.To createadrivememorydump,youmustcreatebothnormalmemorydumpdata (currentlystoredinflash)andforcememorydumpdata(currentlystoredin memoryandmovedtoflash).
Note: Both filename fields must be entered and the filenames must be unique.
Todownloadadrivelog:
- Takethelibraryoffline.
- Foreachtypeofmemorydump(normalorforced),clickthecorresponding Browsebuttontodisplayadialogtoenterafilenameandtoselectalocation tosavethedrivelog.
- ClickDownloadtodownloadthedrivelogandsavetoafile.
Downloadinglibrarylogs
Data filename:

Figure4-52. DownloadLibraryLogsscreen
Select Service Library > Download Library Logs to download a tape library dump tofileforusebysupportpersonneltohelptroubleshootaproblem.
Todownloadalibrarylog:
- Takethelibraryoffline.
- Click Browse to display a dialog to enter a file name and to select a location to savethelibrarylog.
- ClickDownloadtodownloadthelibrarylogandsavetoafile.
Resettingthelibraryanddrives
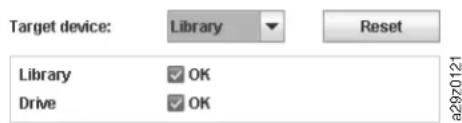
Figure4-53. Resetlibraryanddrivescreen
Select Service Library > Reset Library/Drive to reset the library or the tape drive.
SelectthetargetdeviceandclickReset. Thelibraryand tapedrivestatusis displayed. Adialogmessageisdisplayedwhentheunitisreset. Thereset operationisfullycompletedwhenthetapelibraryistakenonline.
Updatinglibraryanddrivefirmware
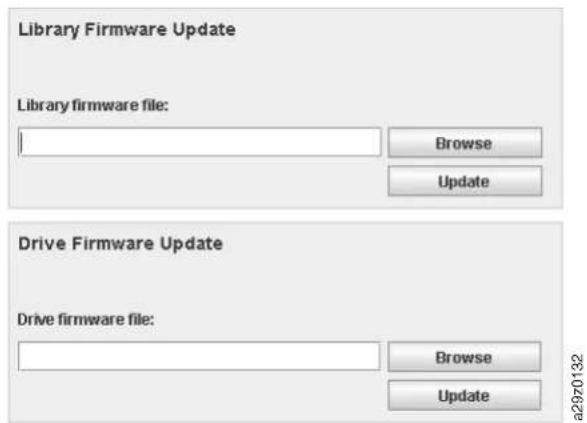
Figure4-54.FirmwareUpdatescreen
Select Service Library > Firmware Update to update the library and drive firmware.
Note: It is the customer's responsibility to maintain the library and drive firmware at them most recent level.
Considertheserecommendationstoprovidemaximumperformanceandreliability:
- Thelatestversionofmicrocodemustbeinstalledonyourtapelibrariesand devices.
- Thelibrarycodemustbeupdatedfirst,unlessnotedotherwise.Thisaction supportsanychangesthatareintroducedinthelibrarycodeforthatdrive,or anychangesmadetothedriveforthatrelease.
• These firmware updates are intended to increase overall reliability, improve tape handling, reduce the possibility of data errors, and enhanced diagnostic capabilities.
TodeterminethecorrectversionofdrivefirmwareinanS4Hlibrary:
-
Use Monitor System > Library Map to display the graphical view of the library.
-
SelecttheDrivecomponentinthelibrarymaptodisplayDriveinformation abouttherightsideofthepage.
-
RefertotheProductIDtodeterminewhichdriveisinstalledinthelibrary.
•ProductID:ULT3580-HH4
•ProductID:ULT3580-HH4V2
-
Ensure that you download and install the correct drive firmware.
-
FirmwarefortheULT3580-HH4driveisnotcompatiblewiththe ULT3580-HH4V2drive.
- FirmwarefortheULT3580-HH4V2driveisnotcompatiblewiththe ULT3580-HH4drive.
Toupdatelibraryanddrivefirmware:
-
Unloadthetapedrive, if there is acartridge in the taperedrive, before the library and drive firmware are updated.
-
Use Service Library > Firmware Update and click Browse to locate the library firmwarefilewithextension".fmg"(forexample,TL1000_31.3000.fmg)orthe LTOSASdrivefirmwarefilewithextension".ro"(forexample,85F0L3AH.ro) thatyoudownloadedfromtheDellwebsite,thenclickUpdate.TheWebUser Interfaceindicatesthattheoperationiscomplete.Thismeansthatthefirmware fileissuccessfullymovedfromthehostcomputertothelibrary.
- Waitforthelibrarytorebootbeforenormallibraryoperationsresume.Itcan takeseveralminutesbeforethelibraryreboots.
- VerifythefirmwareupdatebyviewingtheSystemSummaryontheWebUser Interface.
Important: After the update process starts, you must wait until the library reboots. Donot attempt to interrupt the process in any way, or the upgrade will not be successful.
Accessorstatistics
![Refresh Last refresh: Sunday, July 6, 2008 11:06:56 AM JST Statistics Information Data [Motion Counts] Move : 909 Accessor : 1,832 Picker : 1,818 X Move : 1,818 [Retry Counts] Drive : 1 C1,T2 : 1 C1,T1 : 1 C2,T2 : 2 C2,T1 : 0 C3,T2 : 3 C3,T1 : 0 C4,T2 : 2 C4,T1 : 3 C5,T1 : 2 [Error Counts] Accessor motion : 0 X move motion : 1 Drive loading : 0](/content/2026/05/1004734/images/9957324991b5c0452dbc09f0db6efbada8ea44771ba70210b34881ecc4ac140a.jpg)
Figure4-55. UsageStatisticsscreen
Select Service Library > Usage Statistics to view statistics information about the movementoftheroboticsofthelibrary.
- Motioncounts-Liststheaccumulatedoperationcountforallmovements, accessormovements,pickermovements,andX-axismovements.
- Retrycounts-Liststheaccumulatednumberofretries(reattemptstoload cartridges)inthedriveandthecartridgespositionsbytheaccessor.
- Errorcounts-Liststheaccumulatednumberoferrorsfortheaccessor,X-axis movements,anddriveloadandunloadoperations.
Click Refresh to read the accessor statistics from the library. The Last refresh showsthetimeofthemostrecentlibrarydatarefresh.
Chapter5.Media
| "Datacartridges"onpage5-2 |
| "Writeonce,readmany(WORM)cartridges"onpage5-3 |
| "Cleaningcartridge"onpage5-4 |
| "Barcodelabels"onpage5-5 |
| "Write-Protectswitch"onpage5-6 |
| "Cartridgecareandhandling"onpage5-7 |
| "Environmentalandshipingspecificationsfortapecartridges"onpage5-10 |
Toensure that your Ultrium Tape Drive conform to Dell's specifications for reliability, use only LTO Ultrium tapecartridges. You might use other LTO-certified data cartridges, but they might not meet the standard of reliability that are established by Dell. The LTO Ultrium Data Cartridge cannot be interchanged with themedia used in other non-LTO Ultrium tape products.
Figure5-1showstheLTOUltriumDataCartridgeanditscomponents.
1 LTOcartridgememory 4 Write-protectSwitch
2 Cartridgesoor 5 Labelarea
3 LeaderPin 6 Insertionguide
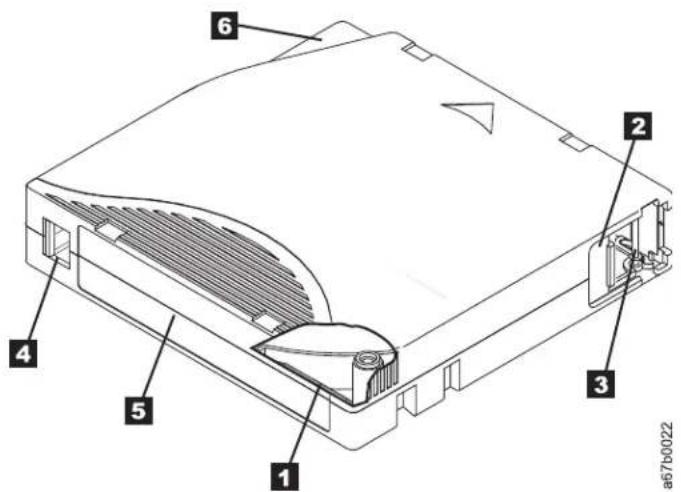
Figure5-1. The LTOUltriumDataCartridge
Note: ThesamecomponentsareonalltheLTOUltriumDataCartridges.
Datacartridges
The different generations of Ultrium data cartridges can be identified by color:
Table5-1.Carridgetypesandcolors
| TypeColor | |
| Ultrium6Black | |
| Ultrium6WORMBlackandSilverygray | |
| Ultrium5Burgundy | |
| Ultrium5WORMBurgundyandSilverygray | |
| Ultrium4Green | |
| Ultrium4WORMGreenandSilverygray | |
| Ultrium3SlateBlue | |
| Ultrium3WORMSlateBlueandSilverygray | |
| Ultrium2Purple | |
| Ultrium1Black |
Allgenerationscontain1/2-inch,dual-coat,magnetictape.
Youcanordertapecartridgeswiththebarcodelabelsincluded,oryoucanordercustomlabels.
Whentapeisprocessedinthecartridges,UltriumTapeDrivesusealinear, serpentinerecordingformat.Thenativedatacapacityandrecordingformatof Ultriumdatacartridgesisasfollows:
Table5-2.CartridgeDataCapacityandRecordingFormats
| TypeNativeDataCapacity | RecordingFormat | |
| Ultrium62500GB(6250GBat2:1 compression) | Readsandwritesdataon2176 tracks,sixteentracksatatime | |
| Ultrium51500GB(3000GBat2:1 compression) | Readsandwritesdataon1280 tracks,sixteentracksatatime | |
| Ultrium4800GB(1600GBat2:1 compression) | Readsandwritesdataon896 tracks,sixteentracksatatime. | |
| Ultrium3400GB(800GBat2:1 compression) | Readsandwritesdataon704 tracks,sixteentracksatatime | |
| Ultrium2200GB(400GBat2:1 compression) | Readsandwritesdataon512 tracks,eighttracksatatime | |
| Ultrium1100GB(200GBat2:1 compression) | Readsandwritesdataon384 tracks,eighttracksatatime | |
The first set of tracksis written from near the beginning of the top etone at the end of the tape. The head then reposition to then next set of tracks for the return pass. This process continues until all tracks are written and the cartridge is full, or until all data is written.
Thecartridgedoor(2 inFigure5-1onpage5-1)protectsthetapefrom contaminationwhenthecartridgeisoutofthedrive. Thetapeisattachedtoa leaderpin(3 inFigure5-1onpage5-1)behindthedoor. Whenthecartridgeis insertedintothedrive,athreadingmechanismpullsthepin(andtape)outofthe
cartridge, acrossthedrivehead, and onto anon-removable take-upreel. The head can then read or writed data from mortothetape.
Thewrite-protectswitch(4 in Figure5-1 on page5-1 prevents data from being written to the tapecartridge. Formoreinformation, see "Write-Protectswitch" on page5-6.
Thelabelarea(5 inFigure5-1onpage5-1)providesallocationtoplacealabel..
Theinsertionguide(6) in Figure5-1onpage5-1)isalarge,notchedareathat preventsthecartridgefrombeinginsertedincorrectly.
Table5-3. Nominalcartridgelife: Load/unloadcycles
| TypeLoad/UnloadCycles | |
| Ultrium620,000(20K) | |
| Ultrium520,000(20k) | |
| Ultrium420,000(20k) | |
| Ultrium320,000(20k) | |
| Ultrium210,000(10k) | |
| Ultrium15000(5k) |
Cartridgecompatibility
Table5-4. Ultriumdatacartridgecompatibility with Ultriumtapedrive
| Ultrium Tape Drive | LTOUltriumDataCartridges | |||||
| 2500GB Ultrium6 | 1500GB Ultrium5 | 800GB Ultrium4 | 400GB Ultrium3 | 200GB Ultrium2 | 100GB Ultrium1 | |
| Ultrium 6 | Read/Write | Read/Write | Readonly | |||
| Ultrium 5 | Read/Write | Read/Write | Readonly | |||
| Ultrium 4 | Read/Write | Read/Write | Readonly | |||
| Ultrium 3 | Read/Write | Read/Write | Readonly | |||
| Ultrium 2 | Read/Write | Read/Write | ||||
| Ultrium 1 | Read/Write | |||||
Writeonce,readmany(WORM)cartridges
CertainRecordsretentionanddatasecurityapplicationsrequireawriteonce,read many(WORM)methodforstoringdataontape.TheLTOUltrium6,Ultrium5, andUltrium4drivesenableWORMsupportwhenaWORMtapecartridgeis loadedintothedrive.
WORMmedia
Becausestandardread/writemediaareincompatiblewiththeWORMfeature,a speciallyformattedWORMtapecartridge(seeFigure5-2onpage5-4)isrequired.
EachWORMcartridgehasaunique,worldwidecartridgeidentifier(WWCID), whichconsistsoftheuniqueCMchipserialnumberandtheuniquetapemedia serialnumber.Ultrium6WORMcartridgesaretwo-toneblackandsilvery-gray.
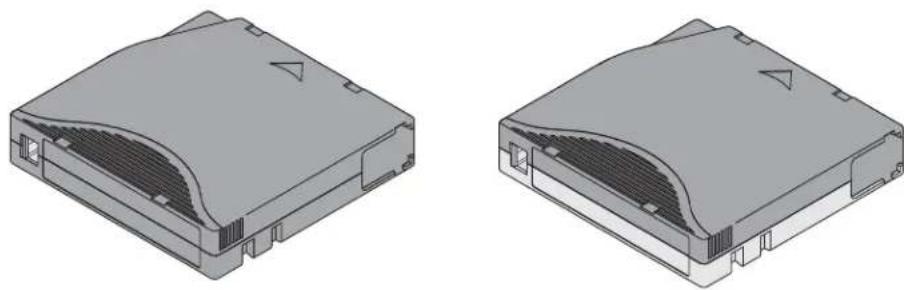
Figure5-2. Ultriumdata and WORMtapecartridges
DatasecurityonWORMmedia
Certainbuilt-insecuritymeasureshelpensurethatthedatawrittenonaWORM cartridgesoesnotbecomecompromised,forexample:
•TheformatofanUltrium6,Ultrium5,orUltrium4WORMtapecartridgeis unlikethatofstandardread/writemedia.Thisuniqueformatpreventsadrive thatlacksWORM-capablefirmwarefromwritingonaWORMtapecartridge. ForLTO6,nativedatacapacityis2500GBandcompresseddatacapacityis6250 GB.
- WhenthedrivesensesaWORMcartridge, the firmware prohibitsthe changing oralteringofuserdatathatarealreadywrittenonthetape. The firmwaretracks the last appendablepointonthetape.
WORMmediaerrors
The following conditions cause WORM media error to occur:
•Informationintheservomanufacturer'sword(SMW)onthetapemustmatch informationfromthecartridgememory(CM)moduleinthecartridge.Ifitdoes notmatch,amediaerrorcode7 postsonthedrive'ssingle-characterdisplay (SCD).
- InsertingaWORMtapecartridgeintoadrivethatisnotcompatiblewith WORMcausesthecartridgetobetreatedasanunsupportedmedium. Thedrive reportsamediaerrorcode7. Upgradingthedrivefirmwaretothecorrectcode levelresolvestheproblem.
RequirementsforWORMcapability
TousetheWORMcapabilityofyourLTOUltriumgeneration6,5,or4drive,you mustuseacompatibleWORMtapecartridge.See"Cartridgecompatibility"on page5-3 forcartridgeandVOLSERcompatibility.
Cleaningcartridge
AnUltriumUniversalCleaningCartridgeisrequiredtocleanthetapedrive.The driveitselfdetermineswhenitmustbecleanedandnotifiesthelibrary.When notified,thelibraryindicatesthatthedriveneedscleaningbyturningONthe "CleanDrive"LEDonthefrontpanelofthelibraryandpostingamessageonthe librarydisplay.
Atapedrivewithinalibraryrequirestheuseofalibrarymenufunctiontoeither automaticallyormanuallycleanthetapedrive.SeeChapter4,"Operations,"on page4-1.
Important: Thedrivemustbecleanedonlywhenitisrequestedbythedrive.
The Ultrium Universal Cleaning Cartridge is valid for 50 uses. The cartridge's LTO-CM (Cartridge Memory) chip track sthenumber of times that the cartridge is used.
Note: Thedriveautomaticallyrejectsanexpiredcleaningcartridge.
Barcodelabels
Abarcodelabelcontains:
•Avolumeserialnumber(VOLSER)thatishuman-readable
•Abarcodethatthelibrarycanread
Note: The LTOUltrium5 and 6 Tape Drives donot require barcode labels, but you might choose to sell labels for a partridge identification purposes.
Whenreadbyalibrary'sbarcodereader,thebarcodeidentifiesthecartridge's VOLSERtothelibrary.Thebarcodealsotellsthelibrarywhetherthecartridgeisa datacartridgeorcleaningcartridge.Inaddition,thebarcodeincludesthe two-character media-type identifier Lx, where x equals 1, 2, 3, 4, 5 or 6. L identifies thecartridgeasanLTOcartridgeandthenumberrepresentsthegenerationof cartridgeforthatcartridgetype.Figure5-3onpage5-6showsasamplebarcode labelfortheLTOUltriumTapeCartridge.
Tapecartridgescanbeorderedwiththelabelsincludedorwithcustomlabels.
Table5-5.CartridgesandVOLSERscompatiblewiththeUltriumTapeDrives
| CartridgesVOLSER | |
| Ultrium6DataCartridgexxxxxxL6 | |
| Ultrium6WORMCartridgexxxxxxLW | |
| Ultrium5DataCartridgexxxxxxL5 | |
| Ultrium5WORMCartridgexxxxxxLV | |
| Ultrium4DataCartridgexxxxxxL4 | |
| Ultrium4WORMCartridgexxxxxxLU | |
| Ultrium3DataCartridgexxxxxxL3 | |
| Ultrium3WORMCartridgexxxxxxLT | |
| Ultrium2DataCartridgexxxxxxL2 | |
| Ultrium1DataCartridge(READONLY)xxxxxxL1 | |
| LTOUltriumCleaningCartridgeCLNxxxLx |
Todeterminethecompletespecificationsofthebarcodeandthebarcodelabel, contactyoursalesrepresentative.
When abarcodelabelis attached to atapecartridge, placethelabel only in the recessed label area (see 5 in Figure 5-1 on page 5-1). Alabel that extends outside of therecessed area acancauseloading problems in the drive.
Attention: Donotplaceanytypeofmarkonthewhitespaceateitherendofthe barcode.Amarkinthisareamightpreventthelibraryfromreadingthelabel.
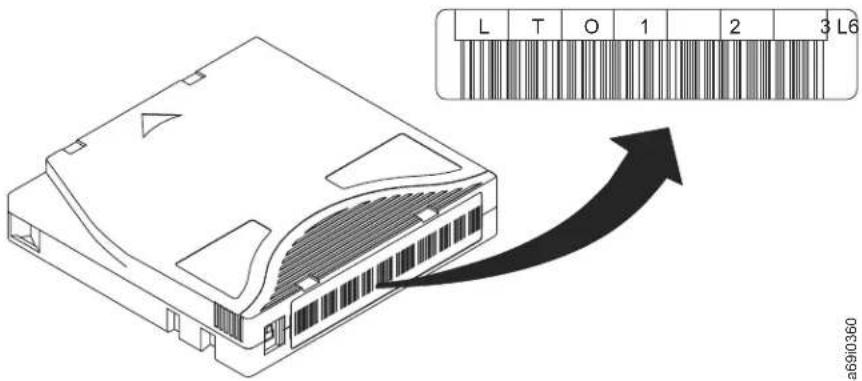
Figure 5-3. Sample bar code label on the LTO Ultrium 6 Tape Cartridge. The volume serial number (LTO123) and bar code are printed on the label.
Guidelinesfortheuseofbarcodelabels
Apply the following guidelines whenever using barcode labels:
- Donotreusealabelorreapplyausedlabeloveranexistinglabel.
• Before you apply anewlabel, remove the old label by slowly pulling it at a right angle to the cartridge case.
- Usepeel-cleanlabelsthatdonotleavearesidueaftertheyareremoved.Ifthere isglueresidueonthecartridge,removeitbygentlyrubbingitwithyourfinger. Donotuseasharpobject,water,orachemicaltocleanthelabelarea.
- Examinethelabelbeforeitisappliedtothecartridge.Donotusethelabelifithasvoidsorsmearsintheprintedcharactersorbarcode(alibrary'sinventoryoperationtakesmuchlongerifthebarcodelabelisnotreadable).
- Removethelabelfromthelabelsheetcarefully.Donotstretchthelabelorcause theedgestocurl.
- Position the label within the recessed label area (see 5 in Figure 5-1 on page 5-1).
- Withlightfingerpressure,smooththelabelsothatnowrinklesorbubblesexist onitssurface.
- Verify that the label is smooth and parallel, and has noroll-up or roll over. The label must be flattow within 0.5mm (0.02in.) over the length of the label and havenofolds, missing pieces, or smudges.
- Donotplaceothermachine-readableabelsonothersurfacesofthecartridge. Theymightinterferewiththeabilityofthedrivetoloadthecartridge.
Write-Protectswitch
The position of the write-protect switch on the tapecartridge (see 1) determines whether you can writetothetape. If these switch is set to:
•Thelockedposition (solidred),datacannotbewrittentothetape.
•The unlocked position(blackvoid), data can bewrittentothetape.
If possible, use your server's application software to write-protect your cartridges (rather than manually setting the write-protect switch). This application allows the server's software to identify a cartridge that no longer contains current data and is
eligible to become as scratch (blank) data cartridge. Donot write-protect scratch (blank) cartridges. Thetaped drive cannot writenew datatothem.
If you must manually set the write-protect switch, slide it left or right to the desired position.
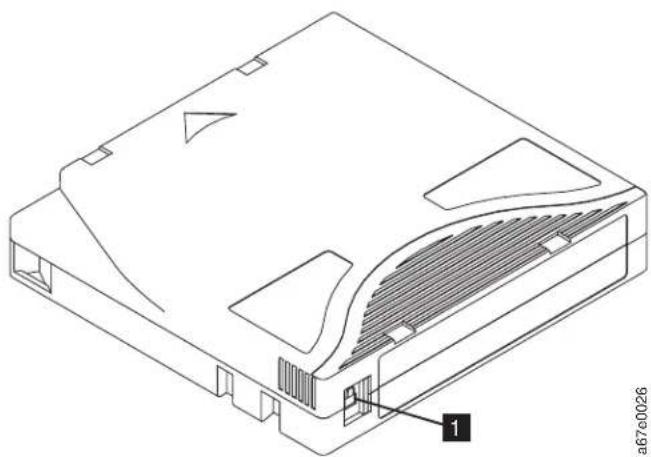
natural_image
Technical line drawing of a mechanical component with labeled part 1 (no text or symbols beyond label)Figure5-4. Settingthewrite-protectswitch
Table5-6.Locationofthewrite-protectswitch
1 Write-Protectswitch
Cartridgecareandhandling
Attention: Donotinsertadamagedtapecartridgeintothedrive. Adamaged cartridgecaninterferewiththereliabilityofadriveandmightvoidthewarranties ofthedriveandthecartridge. Beforeinsertingatapecartridge, inspect the cartridgecase,cartridgedoor,andwrite-protectswitchforbreaks.
Incorrecthandlingoranincorrectenvironmentcandamagecartridgesortheir magnetictape.Toavoiddamagetoyourtapecartridgesandtoensurethe continuedhighreliabilityofyourLTOUltriumTapeDrives,usethefollowing guidelines:
Providetraining
•Postproceduresthatdescribepropermediahandlinginplaceswherepeople gather.
- Ensure that any one who handle a tape has been properly trained in handling and shipping procedures. This includes operators, users, programmers, archival services, and shipping personnel.
- Ensure that any service or contract personnel who perform archiving are properly trained in media-handling procedures.
- Includemedia-handlingproceduresaspartofanyservicescontract.
- Defineandmakepersonnelawareofdatarecoveryprocedures.
Ensureproperpackaging
- Whenshippingacartridge, usetheoriginalorbetterpackaging.
•Alwaysshiporstoreacartridgeinajewelcase.
- Useonlyarecommendedshippingcontainerthatsecurelyholdsthecartridgein itsjewelcaseduringtransportation.
- Nevershipacartridgeinacommercialshippingenvelope. Alwaysplaceitina boxorpackage.
- If you ship the cartridge in a cardboard box or a box of a fast-dorm material, ensure the following:
-Placethecartridgeinpolyethyleneplasticwraporbagstoprotectitfrom dust,moisture,andothercontaminants.
-Packthecartridgesnugly;donotallowittomovearound.
-Double-boxthecartridge(placeitinsideabox,thenplacethatboxinsidethe shippingbox)andaddpaddingbetweenthetwoboxes(seeFigure3-5).
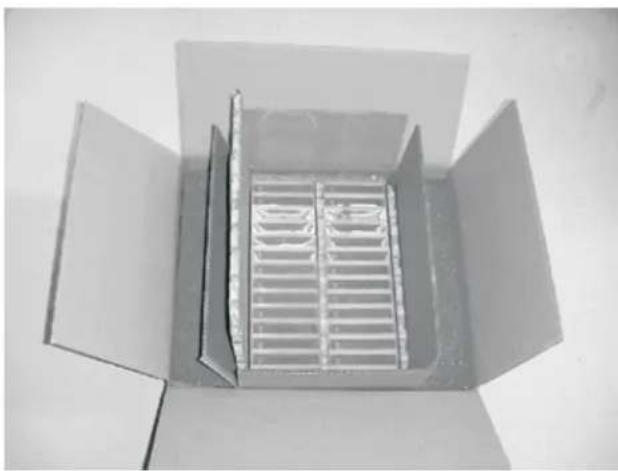
natural_image
Open cardboard box with a metal grate lid, viewed from above (no text or symbols visible)Figure5-5. Double-boxingtapecartridgesforshipping
Provideproperacclimationandenvironmentalconditions
- Beforeyouuseatapecartridge,acclimateittotheoperatingenvironmentfor24 hoursorthetimenecessarytopreventcondensationinthedrive(thetimewill vary,dependingontheenvironmentalextremestowwhichthecartridgewas exposed).
- Ensure that all surfaces of a cartridge are dry before inserting it.
- Donotexposethecartridgetomoistureordirectsunlight.
- Donotexposerecordedorblankcartridgestostraymagneticfieldsofgreater than100oersteds(forexample,terminals,motors,videoequipment,X-ray equipment,orfieldsthatexistnearhigh-currentcablesorpowersupplies).Such exposurecancausethelossofrecordeddataormaketheblankcartridge unusable.
- Maintain the condition that are described in "Environmental and shipping specifications for apecartridges" on page 5-10.
Performathoroughinspection
Afteryoupurchaseacartridgeandbeforeyouuseit,completethefollowingsteps:
- Inspectthecartridge'spackagingtodeterminepotentialroughhandling.
- Whenacartridgeisinspected,openonlythecartridgedoor.Donotopenany otherpartofthecartridgecase.Theupperandlowerpartsofthecaseareheld togetherwithscrews.Separatingthemdestroystheusefulnessofthecartridge.
- Inspectthecartridgefordamagebeforeyouuseorstoreit.
- Inspecttherearofthecartridge(thepartthatloadsfirstintothetapeload compartment)andensurethattherearenogapsintheseamofthecartridge case.Iftherearegapsintheseam(seeFigure5-6),theleaderpinmightbe dislodged.
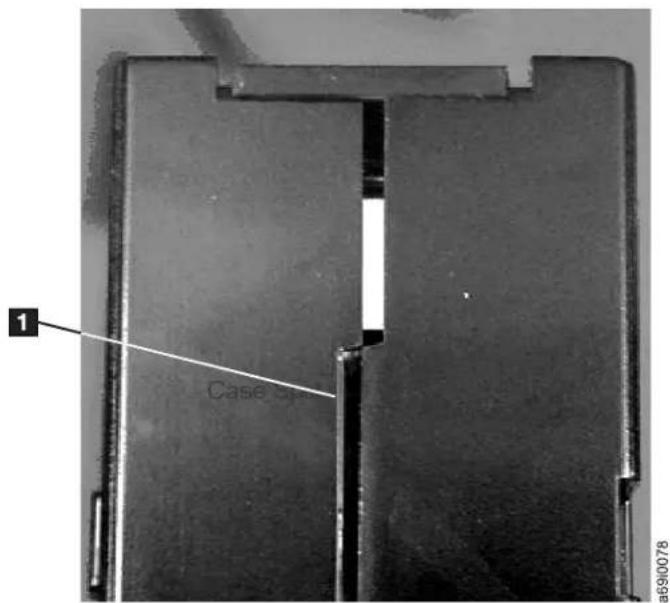
Figure5-6. Checking forgapsin theseam sofacartridge
- Check that the leader pin is properly seated.
- If you suspect that the cartridge gewasmishandled but it appears usable, copy any data onto a good cartridge immediately for possible data recovery. Discard the mishandled cartridge.
• Reviewhandlingandshippingprocedures.
Handlethecartridgecarefully
- Donotdropthecartridge. If the cartridges dropped, slid the cartridges door back and ensure that the leader pin is properly seated in the pin-retainingspring clips.
- Donothandletapethatisoutsidethecartridge. Handlingthetapecandamage thetape'ssurfaceoredges, which might interfere with readerwriter reliability. Pullingontapethatisoutsidethecartridgecandamagethetape and thebrake mechanism in the cartridge.
•Donotstackmorethansixcartridges.
- Donotdegaussacartridgethatyouintendtoreuse.Degaussingmakesthetape unusable.
Examplesofcartridgeproblems
Example: SplitCartridgeCase(see "Performathoroughinspection" on page 5-9)
Thecartridge's case is damaged. There is a high possibility of mediadamage and potential loss. Perform the following steps:
- Lookforcartridgemishandling.
- UsetheLeaderPinReattachmentKit(partnumber08L9129)tocorrectlyseat thepin.Then,immediatelyusedatarecoveryprocedurestominimizechances ofdataloss.
- Reviewmedia-handlingprocedures.
Example:ImproperPlacementofLeaderPin
- Lookforcartridgedamage.
- UsetheLeaderPinReattachmentKit(partnumber08L9129)tocorrectlyseat thepin.Then,immediatelyusedatarecoveryprocedurestominimizechances ofdataloss.
Environmentalandshipingspecificationsfortapecartridges
Before you use a tape cartridge, acclimate it to the operating environment for 24 hours or the time necessary to prevent condensation in the drive (the time varies, depending on the environment at least most which the cartridge was exposed).
The best storage container for the cartridges (until they are opened) is the original shipping container. The plastic wrapping prevents dirt from accumulating on the cartridges and partially protect them from humidity changes.
Whenyoushipacartridge,placeitinitsjewelcaseorinasealed,moisture-proof bagtoprotectitfrommoisture,contaminants,andphysicaldamage.Shipthe cartridgeinashippingcontainerthathasenoughpackingmaterialtocushionthe cartridgeandpreventitfrommovingwithinthecontainer.
Table5-7givestheenvironmentforoperating,storing,andshippingLTOUltrium TapeCartridges.
Table5-7. Environmentforoperating, storing, and shipping the LTOUltrium TapeCartridge
| EnvironmentalSpecifications | ||||
| EnvironmentalFactor | OperatingOperationalStorage1 | ArchivalStorage2 | Shipping | |
| Temperature10-45°C(50-113°F) | 16-32°C(61-90°F) | 16-25°C(61-77°F) | -23to49°C(-9to120°F) | |
| Relativehumidity(non-condensing) | 10-80%20-80%20 | -50%5-80% | ||
| Maximumwetbulbtemperature | 26°C(79°F) | 26°C(79°F) | 26°C(79°F) | |
| Note:1. The short term or operational storage environment is for storage durations of up to six months.2. The long term or archival storage environment is for durations of six months up to 10 years. | ||||
Chapter6.Troubleshooting
| "Howthelibraryreportsproblems" |
| "Libraryerrormessagecontent"onpage6-2 |
| "Diagnosingaproblem"onpage6-3 |
| "Isolatingproblems"onpage6-6 |
| "Installationandconfigurationproblems"onpage6-8 |
| "InterpretingfrontpanelLEDs"onpage6-8 |
| "Reseatingcables"onpage6-10 |
| "Emailinglogs"onpage6-10 |
The TL1000 Tape Autoloader is a customer replaceable unit (CRU). The customer is responsible for the setup and maintenance of the library. Warranty replacement of the TL1000 Tape Autoloader, if required, is provided by exchanging the old unit with anewunit. The customer is charged for on sites service if as service contracts not in place.
Whenanerroroccursduringoperationofthelibrary,thelibrarystopsthecurrent operationanddisplaysanerrorcodeontheOperatorPanel.Unlessotherwise noted,trytoresolvetheproblembycyclingpowertothelibraryandretryingthe lastoperation.
Note: When power cycling the library, wait 10 seconds after the power is switched OFF before the library is powered ON again.
Before you place a service call or inform Dell Technical Support, observe the LEDs on the front panel and errorm messages on the Operator Panel to determine exactly which part is failing. See "Interpreting front panel LEDs" on page 6-8. If the LEDs on all components are functioning properly, see "Diagnosing a problem" on page 6-3
Howthelibraryreportsproblems
The library uses advanced problem detection, reporting, and notification technology to alert customers of problems soon as they occur. It completes numerous self-test stomitor the library's temperature, voltage and currents, and standard library operations. The tests monitor the library when the library is powered ON, and during normal operation when the library is idle.
If the test detects a problem, the library generates messages that identifies which component is likely causing the problem. The library's Error LED and Attention LED might turn ON to indicate an abnormal state. If the problem is not severe, the Attention LED turns ON and the library continues to provide full functionality to the library. If the problem is not recoverable, the Error LED turns ON and an error message is displayed on the Operator Panel.
Whenthelibrarygeneratesanattentioneventoranerrovent,supportstaffcan benotifiedimmediatelybysettingupemaileventnotificationorSNMPtrap notification. ThetypeofeventthatgeneratesemailnotificationorSNMPtrap notificationcanbeselectedtolimitthenumberofeventstoaspecificpriority level.
Customers can frequently resolve simple problem themselves by with the information found in "Diagnosing a problem" on page 6-3. If the problem is unrecoverable, the customer must contact Dell Technical Support (see "Contacting Dell technical support" on page 7-2).
Libraryerrormessagecontent
Whenalibraryeventoccurs, the eventislogged into flashmemory on the Library Control Board.
The library error log is viewed on the Operator Panel by selecting Service > View ErrorStatus. Theloglistsallofthelibraryerrormessagesintheorderinwhich theyoccurred, startingwiththemostrecentatthetop.
TheWebUserInterfaceandisplayaloghistorysummaryofinformation, warning, and error events that occurred by selecting Service Library > Operator Interventions. Thesummarycanbefilteredtodisplaytheoperatorintervention logforaspecifichardwarecomponentandspecificeventlevels. Thelogisstored inmemoryontheLibraryControlBoard. Whenthememorybufferisfull, new eventsoverwritetheoldestevents. Thelogisnotclearedfrommemorywhen poweristurnedOFF. TheinformationthatisdisplayedintheDetailpanelforthe selectedoperatorinterventioneventconsistsof:
•Indexnumberoftheevent
•Datetheeventoccurred
•Timetheeventoccurred
•Unitinthelibrarywheretheeventoccurred
•Eventlevel
•Descriptionoftheevent
TheWebUserInterfacecanalsodisplayaloghistorysummaryoferrorsthat occurred by selecting Service Library > View Library Logs. The error log is displayedwithsensedatainformation. Thesummarycanbefilteredtodisplay errorswithspecificsensedatacodetypes. Theinformationthatisdisplayedinthe Detailpanelfortheselectederrorconsistsof:
•Indexnumberoftheerror
- Dateandtimetheerroroccurred
- Errorcode
•Descriptionoftheerror
Diagnosingaproblem
| ProblemAreaIf...Then... | |||
| CartridgeAcartridgeisnotejectingfromthedrive... | 1. Tryunloadingthedrive(OperatorPanel:Commands>Unload).2. Powercyclethelibrary.3. Ifthecartridgedoesnotejectfromthedrive,see"ContactingDelltechnicalsupport"onpage7-2. | ||
| Thecartridgecaseortapeinsidethecartridgeisdamaged... | |||
| Yourcleaningcartridgeexpires...Replacethecleaningcartridge. | |||
| Abarcodelabelcannotbereadbythebarcodereader... | |||
| CartridgeMagazineThemagazinewillnotunlockafterissuingtheUnlockMagazinecommandfromtheOperatorPanel... | 1. Exportthesuspectcartridgefromthelibrary.2. Confirmthatthebarcodelabelisnotdamagedormissing.Replacethebarcodelabel,ifnecessary.3. Importthecartridgebackintothelibrary.4. Inventorythelibrary.a. Ifnoerrorsarereported,resumenormallibraryoperations.b. Ifanerrorisreported,seeAppendixA,"Errorcodes,"onpageA-1. | ||
| 1. Powercyclethelibrary.2. Tryunlockingthemagazineagain(OperatorPanel:UnlockMagazineorWebuserInterface:ManageLibrary>UnlockMagazine).a. Ifthemagazinedoesnotunlock,see"Unlockingthecartridgemagazinemanually"onpage8-1.b. Ifthemagazinedoesunlock,resumenormallibraryoperations. | |||
| Themagazinecanbepartiallyremovedfromthelibrary...Themagazineseemsstuckonsomethinginsidethelibrary... | |||
| 1. Verifythatyourequestedthelibrarytounlocktheentiremagazine,notjusttheI/Ostation(ifenabled)thenretrytheoperation.2. Carefullypullthemagazineoutofthelibrary.Stopifyoufeelanyresistance(asifsomethingisblockingthemagazineinsidethelibrary).3. Ifthemagazinestillcannotberemovedfromthelibrary,see"ContactingDelltechnicalsupport"onpage7-2. | |||
| Communication Functions | Youareexperiencingdifficulty withexercisingsomelibrary functions(forexample,updating firmwareorloggingintothe libraryremotely)... | 1. Ifyouhavearecentbackupofyourconfiguration, proceedtothenextstep.Ifyoudonot,trytosaveone now(WebUserInterface:ConfigureLibrary> Save/Restore).2. IfastaticIPaddressisused,makenoteofyour library'sIPaddress.WithDHCP,proceedtothenext step.3. Restorefactorydefaults(OperatorPanel:Configuration>SetDefault).4. WithastaticIPaddress,disableDHCP(thedefault setting)andenterthelibraryIPaddress(WebUser Interface:ConfigureLibrary>Network;Operator Panel:Configuration>ConfigureNetworkSettings). WithDHCP,proceedtothenextstep.5. Restorethelibraryconfiguration(WebUserInterface:ConfigureLibrary>Save/Restore). | |
| EncryptionEncryptionerrordisplayedwhen thedrivedetectsanerror associatedwithanencryption operation,iftheproblem occurredwhilethetapedrive waswritingdatato,orreading datafrom,tape... | 1. Checkthehostapplicationtoensurethatthehost applicationisprovidingthecorrectencryptionkey.a. RefertotheSenseDatathatarereturnedforan encryptionoperation.b. Retrytheencryptionoperationafterthehost applicationproblemsareresolved.2. Resetthedrive.a. RefertotheerrorcodedisplayedontheOperator PanelifthedriveresetsandPOSTfails.b. Retrytheencryptionoperationifthedriveresets andPOSTcompletewithouterrors.3. Ensurethatthecorrectmediaisbeingused.Data encryptionissupportedbyLTOUltrium6,5,and4 DataCartridgesonly. | ||
| Encryption-relatederroris posted... | Checkthehostapplication'serrorlogs,devicedriverlogs, tapelibraryerrorlogs,andtapedriveerrorlogsfor entriesthatarerelatedtoencryption. | ||
| ProblemAreaIf...Then... | ||
| ErrorCodesor TapeAlertFlags | Thelibraryissuedanerrorcode... | 1. Makenoteoftheerrorcode.2. Powercyclethelibrary.a. Iftheerrorrecurs,seeAppendixA,"Errorcodes,"onpageA-1.b. Iftheerrordoesnotrecur,resumenormallibrary operations. |
| Anerromessagewasreceived bywayofemailnotification(if enabled)... | ||
| ATapeAlertflagwasreceived... | 1. MakenoteoftheTapeAlertflag.2. Powercyclethelibrary.a. IftheTapeAlertrecurs,seeAppendixB,"TapeAlertflags,"onpageb-1.b. IftheTapeAlertdoesnotrecur,resumenormal libraryoperations. | |
| Theerrorcoderepresentsan unrecoverableerror... | See"ContactingDelltechnicalsupport"onpage7-2. | |
| Yougetrepeatederrors... | 1. Resetthelibrary.2. Ifthelibraryisstillreportingerrors,powercyclethe library.Ifnoerrorsarereported,resumenormal libraryoperations.3. Ifthelibrarystillfails,resetfactorydefaults.Ifno errorsarereported,resumenormallibraryoperations.4. Iftheproblempersists,see"ContactingDelltechnical support"onpage7-2. | |
| Youareexperiencingaproblem withyourlibraryandnoerror codewascreated... | 1. Run Library Verify to identify and resolve the problem.See"Runninglibraryverifydiagnostic procedures"onpage4-14.2. Iftheproblempersists,see"ContactingDelltechnical support"onpage7-2. | |
| FirmwareTheLibrary | firmwaredoesnot completetheboot-upprocessand appearshung... | FailureoftheloginscreentodisplayontheOperator Panelin15minutesindicatesthattheboot-upprocessis notcompleting.1. PowerOFFthelibraryandwaitatleast1minute beforethelibraryispoweredONtorecoverfromthe problem.2. Ifalibraryfirmwareupdatewascompleted,try repeatingtheupdateprocedure. |
| Allfirmware(libraryanddrive) isnotathelatestlevel... | See"Updatinglibraryanddrivefirmware"onpage4-38. | |
| FrontPanelLEDsOne | ormorefrontpanelLEDsis ONorblinking... | See"InterpretingfrontpanelLEDs"onpage6-8. |
| HostAttachment Interface | Youareexperiencinghost attachmentinterfaceproblems... | See"Isolatinghostattachmentinterfaceproblems"on page6-7. |
| Installationand Configuration | Youareexperiencingtrouble installingorconfiguringyour library... | See"Installationandconfigurationproblems"onpage 6-8 |
| ITDT-DCRThePerformance | manceTestduration varies... | Itemsaffectingthedurationofthetest:•Thelevelofadapterdevicedriver•Youradaptermodelandtype |
| LibraryNot Booting | Thereisablankoperator panel/display...Theaccessordoesnotmove...Thedisplayisstuckon initializationforextendedperiod oftime... | FailureoftheloginscreentodisplayontheOperator Panelin15minutesindicatesthattheboot-upprocessis notcompleting.PowerOFFthelibraryandwaitatleast1minute beforethelibraryispoweredONtorecoverfromthe problem.Ifalibraryfirmwareupdatewascompleted,try repeatingtheupdateprocedure. |
| LogsYouarerequired | todaydownloadthe librarylogordrivelog... | UsingtheWebUserInterface.Library log:Service Library > Download Library LogsDrive log:Service Library > Download Drive Logs |
| NetworkTime Protocol(NTP) | Thelibrarytimeisnotbeing updatedbytheNTPserver... | UsingtheWebUserInterface.DisableNTP.Setthetimemanually.EnableNTP. |
| PowerIfthepowersup | plyswitchisON andthelibraryisOFF... | SeeIsolatinglibrarypowerproblems." |
| WebUserInterfaceHT | MLerror404appearson computerscreenwhentryingto launchtheWebUserInterface... | SeeIsolatingWebUserInterfaceproblems"onpage6-7. |
Isolatingproblems
Isolatinglibrarypowerproblems
- Ensure that the power cord is plugged in the powers supply and at the electrical outlet, then turn library power ON. Feel for airthatis flowing out of the cooling fan grill on there are of the library. Power is good if air is flowing from the cooling fan grill.
- If power is not working:
a. Plugthepowercordintoanotherelectricaloutlet.
b. Pluganotherdeviceintotheoutlettotest.
c. If the outlet tests OK, try another power cord.
-
If you verified that the electrical outlet and power cord works properly, but the powersupply is still failing, replacethelibrary.
-
If the powers supply seem to be delivered power to the library; but air does not flow from the power-supply cooling fan grill on there are of the library, replace the library.
Isolatingdriveproblems
- Ensure that the drive firmware is at the latest level (visit http://www.dell.com/support).
- Cyclelibrarypower.
- If the drive is experiencing permanent or temporary errors or if the Clean LED is lit on the front panel of the library, clean the drive.
- RunLibraryVerify.
a. Ifthetestfails, replacethelibrary.
- With the host interface test tool, ITDT, run the Scan function to verify that the host application interface can detect the drive and the library. To further test
theinterfacecommunicationpath, runtheTestDevicefunction, if available, afterthedriveisselected. This function writes and reads data across the interface, also sending a command to the drivetor unthe internal performance read/writetest.
- If the host tool, ITDT, cannot detect the drive or library, look for problem with the host interface cabling, the HBA, the device driver, or the backup application software.
IsolatingWebUserInterfaceproblems
- Verify that you entered the account name and password correctly. The account name and password are case-sensitive.
- Verify that other library users are not entering commands from the Web User Interface or Operator Panel at the same time you are issuing commands.
- Ensure that library firmware is at the latest level (visit http://www.dell.com/support).
- Ensure that the Ethernet cable is securely plugged in therear of the library at the Ethernet port.
- Ensure that the correct IP, net mask, and gateway addresses are keyed into the network parameters.
- Ensure that the correct IP address is being used on the web browser.
- If the Ethernet connection is direct connection between the PC and the library, as special "crossover" Ethernet cable is required.
Note: OnnewerPCs, either straight through hor crossover Ethernet cables might be used sincethe crossover requirement is provided internally.
-
ChecktheEthernetcablecarefully(ortryanothercable)and,ifthecableis connectedtoanetworkhuborswitch,tryadifferentport.
-
If the WebUserInterface is still malfunctioning, refer to "Contacting Dell technical support" on page 7-2.
Isolatinghostattachmentinterfaceproblems
Aftersuccessfullyexercising"Isolatingdriveproblems"onpage6-6,andmore specifically"Runninglibraryverifydiagnosticprocedures"onpage4-14fromthe Operator Panel (Service > Library Verify), the following procedures are suggested tohelpisolatethefailuretoproperlyestablishconnectivitytotheHostBusadapter (HBA).
- UsetheITDT-DCRutilitytoevaluateconnectivityfromtheHBAthroughthe cablingtothedrive.ITDT-DCRdoesnotrequireseparatedevicedrivers,thus theOperatingSystemcanscan,andfindalltheLTOdevicesthatareattached.
a. IfITDT-DCR cannot successfully locate the LTODrive, suspectcablingor HBAproblems, and skiptoStep4.
b. IfITDT-DCRsuccessfullylocated theLTOdrive, proceed to Step3. See "ITDT-DCR" on page 7-1 for a brief description of ITDT-DCRand instructions on how to download the tool from the web.
-
If ITDT-DCR successfully locates the LTO devices, verify that the correct application device drivers and backup applications software is properly installed.
-
Ensure that all there required or latest available Operating System file or updates (DLLs, PTFs) are installed and applied.
Installationandconfigurationproblems
Problemsthatareencounteredduringtheinstallationofthelibraryarecausedby improperapplicationsoftwareconfigurationerrorsonanincorrectlyconfigured operatingsystem.Iftheapplicationsoftwarethatyouareusingisnot communicatingwiththelibraryafterinstallation,check:
- Accessor locking screw: Ensure that the accessor locking screw on the rear panel of the library is removed before the library is powered ON. See "Removing the accessor lockingscrew" on page 3-7.
- HBA LUN 0/1 support: A single ID addresses both drive and library since the driveisLUN0andthelibraryisLUN1.ThesemodelsrequireanHBAthat supportsLUNscanning,whichmustbeenabledattheHBA.See"Logica Unit Number(LUN)scanning"onpage1-9.
- Cable connections: Ensure that there are no bent pins on cables and that all connections are securely fastened.
- SAS cables and interposers: Ensure that SAS cables and interposers (if any) are properly attached. See "ConnectingtheHostInterfacecables" on page 3-8.
- Backup application installation: Refer to the documentation included with your backup application software for instructions on how to verify installation.
- Device driver installation: Ensure that the correct device driver, if applicable, is installed forthelibrary.
Note: Many backup applications usetheirowndriversforthelibraryanddrive. Beforeadriverisinstalled, makesurethatitisnotinconflictwiththe software.Contactyourbackupapplicationvendorforthisinformation.
ReviewtheinformationinChapter3, "Installationandconfiguration," onpage3-1 todeterminewhetherastepwasmissedormisread.
If you are still experiencing difficulty within installing or configuring your library, see "Contacting Dell technical support" on page 7-2.
Important: Donotdisassemblethelibrary. Thewarrantyonyourlibraryisvoided iftheunitidisassembledwithouttheapprovalofDellTechnical Support.
InterpretingfrontpanelLEDs
Lightemittingdiodes(LEDs)onthefrontpanelofthelibraryprovideavisual indicationaboutthestatusofcertainlibrarycomponents.TheLEDscan communicatethataproblemexistswhenoperatorinterventionscannot.
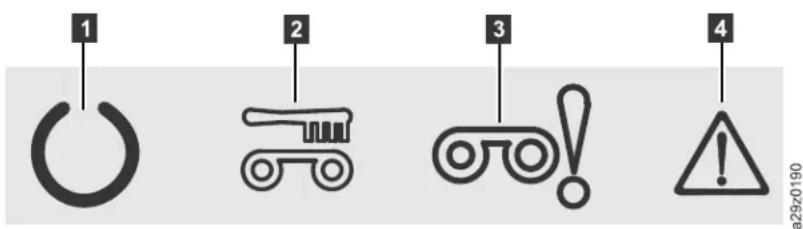
Figure6-1.FrontpanelLEDs
1 Ready/ActivityLED 3 AttentionLED
2 CleaningLED 4 ErrorLED
Table6-1.FrontPanelLEDindicators
| Library Condition | Ready/Activity LED | CleaningLEDAtentionLEDErrorLED | Messageon Display | ||
| POST(PowerON SelfTest) | Flashes2times persecond | OFFOFFOFFINITIALIZING... | INVENTORY... | ||
| MagazineopenFlashes2times persecond | OFFOFFOFFPLEASEINSERT | MAGAZINE | |||
| Magazine unlocked | Flashes2times persecond | OFFOFFOFFMAGAZINE | UNLOCKED | ||
| I/OStationopenFlashes2times persecond | OFFOFFOFFPLEASECLOSE | I/OSTATION | |||
| I/OStation unlocked | Flashes2times persecond | OFFOFFOFFI/OSTATION | UNLOCKED | ||
| Libraryfirmware isbeingupdated | Flashes2times persecond | OFFOFFOFFFLOADER | FIRMWARE UPDATING! | ||
| Drivefirmwareis beingupdated | Flashes2times persecond | OFFOFFOFFDRIVE | FIRMWARE UPDATING! | ||
| Drivedumpis beinguploadedto hostcomputer | Flashes2times persecond | OFFOFFOFFDRIVEDUMP | DATA UPLOADING! | ||
| LibraryisofflineFlashes2times persecond | OFFOFFOFFOFFLINE | ||||
| Cartridgeisbeing moved | Flashes1timeper second | OFFOFFOFFREADY | |||
| Libraryerror occurred | ONOFFOFFON ***CHK*** | CODE:[XXXX] | |||
| Driveerror occurred | ONOFFOFFON DRIVEFAULT | CODE:[X] | |||
| Cartridgeerror occurred | ONOFFONOFFMEDIAFAULT | CODE:[X] | |||
| Cleaning cartridgeexpired | ONOFFONOFFREPLACE | CLEANING MEDIA | |||
| Driverequested cleaning | ON | ONOFFOFFCLEANDRIVE | |||
| Driveisbeing cleaned | ON | Flashes1timeper second | OFFOFFCLEANING... | ||
| Libraryisonline andreadyto receivea command | ONOFFOFFOFFREADY | ||||
Reseatingcables
Toreseatexternallibrarycables,completethefollowingsteps:
- Locatethefollowingcablesontherearpanelofthelibrary.
a. SASattachmentforthedrive
b. Ethernetcableforconnectiontoanetwork
c. Powersupplycable
-
Checkandreseat, if necessary, allof the cable that are connected to your library.
-
Verify that there is nodamageto any connector pins.
Emailinglogs
Logsprovideasummaryofthestatus,warnings,anderrorsinthelibrary,andincludeconfigurationsettingsandinformationthatisprovidedinOperatorInterventions.
Downloadcurrentlogsofthelibraryanddrivewhenrequestedbyyourservice representative.Toemailcurrentlogs:
- Ensure that no applications are accessing the library. If a library operation is in progress, wait until it finishes before attempting to generate the logs.
- Download the current library log from the WebUser Interface by selecting Service Library > Download Library Logs, click Refresh, and click Download.
- Download the current drivelog from the WebUserInterface by selecting Service Library > Download Drive Logs, click Refresh, and click Download.
- When requested by Dell, attach the log to an email message and send it to Dell technical support for further diagnosis.
Chapter7. Serviceprocedures
"TTDT-DCR"
"ContactingDelltechnicalsupport" on page 7-2
ITDT-DCR
ITDT-DCRisatoolwithmultifunctioncapabilityandisaquick,convenient,and efficientmethodfordrivefirmwareupdates.Itcanalsoassistwithdrivedump retrievals.
Someofthecapabilitiesofthistool:
- Runsquickorextendeddiagnosticproceduresontapedrives. If the library is online to the server/hostwherethetoolis, ITDT-DCR communicates with the drivethroughthe library to load and unloadatest cartridge.
•Retrievesfirmwarememorydumpsfromtapedrivesandlibraries. - Completesafirmwareupdateontapedrivesorlibraries.Seethenoteabout libraryfirmwareupdates.
- Teststheperformanceoftheenvironmentbycompletelywritingacartridgeand measuringperformance.
•Retrievesanddisplayscartridgeinformation. - Verifiestheencryptionenvironment.
- Does not require special device drivers.
- Isavailableformostmajorplatforms.Scansthehostinterfaceandfindsand displaysforselectionallLTOdevices.
The Tape Diagnostictool(ITDT-DCR) is available as a command-line utility and graphical user interface (GUI) version.
- The Tape Diagnostic Tool (ITDT-DCR) is a command-line utility. Start it by entering the executable command from the directory where the tool is located. The Help feature gives brief explanation of each function and shows the required syntax.
- The Tape Diagnostic Tool (ITDT-DCR) is a GUI version for Microsoft Windows. MicrosoftWindowsXPandMicrosoftWindowsServer2003(IX86,32-bit) are supported.
Note: BesurethatyouhavethemostcurrentversionofITDT-DCRifyouare updatingfirmwareonarecentdrivetype.BeforeITDT-DCRisused, verify thatyourlibraryhostoperatingsystemisatthelatestreleasedlevel.This verificationensuresoptimumread/writeoperationsfordiagnostic procedures.
Note: If the library has a BCR (Barcode Reader) that requires 9.00 or greater firmware, the Update function stops with an error code of "Unexpected Data" if you attempt to downgrad the library firmware.
TodownloadtheITDT-DCRtoolandinstructionsforusingthetool,visit http://www.dell.com/support.
ContactingDelltechnicalsupport
ForcustomersintheUnitedStates, call800-WWW-DELL(800-999-3355).
Note: If you donothave an active Internet connection, you can find contact information about your purchase invoice, packingslip, bill, or Dell product catalog.
Dellprovidesonlineandtelephone-basedsupportandserviceoptions.Service availabilityvariesbycountryandproduct,andsomeservicesmightnotbe availableinyourarea.TocontactDellforsales,technicalsupport,orcustomer serviceissuesfollowthestepsthatarelisted:
-
Visithttp://www.dell.com/support.
-
Verify your country or region in the Choose A Country/Region menu at the bottomofthepage.
-
ClickContactUsontheleftsideofthepage.
-
Selecttheappropriateserviceorsupportlinkthatisbasedonyourneed.
-
ChoosethemethodofcontactingDellthatisconvenientforyou.
Chapter8. Removal and replacement procedures
"Requiredtools"
"Replacingadefectivecartridgemagazine"
"Unlockingthecartridgemagazinemanually"
Requiredtools
Installingorrelocatingtherackmountkitordesksidekitforyourlibraryrequires thefollowingtool:
- #2Phillipsscrewdriver
Replacingadefectivecartridgemagazine
Afteryourreplacementcartridgemagazineisreceived,completethefollowing stepstoreplacethedefectivecartridgemagazine.Thelibrarydoesnotneedtobe poweredOFFforthisprocedure.
- RemovethedefectivecartridgemagazinefromthelibrarywiththeOperatorPanel,theWebUserInterface,orthemanualmethodofremoval.
-OperatorPanel:UsetheUnlockMagazinecommand.See"Unlockingthecartridgemagazine"onpage4-5.
- Web UI: Manage Library > Unlock Magazine. See "Unlocking the cartridge magazine" on page 4-22.
- Manualmethod:See"Unlockingthecartridgemagazinemanually."
-
After the defectivem magazine is removed from the library, remove all cartridges from the defectivem magazine and insert them into other replacement magazine.
-
Insertthenewmagazinewithcartridgesintothelibrary.Waitforthelibraryto completeitsinventorybeforenormallibraryoperationsresume.
-
Properly dispose of the defectivem magazine.
Unlockingthecartridgemagazinemanually
Thisprocedureisusedtoremovethecartridgemagazinemanuallywhen,for example,thepoweristurnedOFForifthemagazinefailstounlockinresponseto theUnlockMagazinecommandfromtheOperatorPanelandWebUserInterface.
Tounlockthecartridgemagazinemanually:
- Onthefrontpanel, locatetheaccessholeforthecartridgemagazinelock releasemechanismtotheleftoftheOperatorPanel(1 inFigure8-1onpage 8-2).
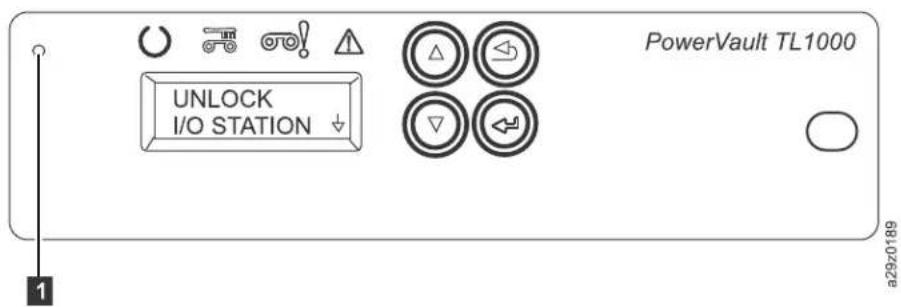
Figure8-1.Cartridgemagazinelockreleaseaccesshole
- Inserttheendofastraightenedpaperclip,orsimilarobject,intothelock releaseaccesshole.Gentlypushthelockmechanismtoreleasethelockand ejectthecartridgemagazine.
- If the I/Ostation is enabled, push the lock mechanism twice or push hand hold the lock mechanism until the cartridge is withdrawn, therefore clear the I/Ostation lock.
- Removethecartridgemagazinefromthefrontofthelibrary.Ifthemagazineis stuckinthelibraryanddoesnoteject,see"ContactingDelltechnicalsupport" onpage7-2
- Examinethemagazine and cartridges for damage.
- If there is damagetoacartridge, replacethat cartridge.
- Ifthereisdamagetothemagazine,replacethemagazine.
AppendixA.Errorcodes
| "Libraryerrorcodes" |
| "Driveerrorcodes"onpageA-11 |
| "WebUserInterfaceerrormessages"onpageA-11 |
| "Trapdefinitions(types)"onpageA-14 |
Whenanerroroccursduringoperationofthelibrary,thelibrarystopsthecurrent operationanddisplaysanerrorcodeontheOperatorPanel.Unlessotherwisenoted,trytoresolvetheproblembycyclingpowertothelibraryandretryingthe lastoperation.
Note: When power cycling the library, wait 10 seconds after the power is switched OFF before powering ON again.
Libraryerrorcodes
TableA-1.Libraryerrorcodes
| Code(H) | DescriptionPanelIndicationActionRequired | ||
| 0000No | validerrorcodeinformation.- | ||
| 0001 | Atpower-oninitialization,a firmwareerrorwasdetected. | A 114 L E D s O | Upgrade/reinstallfirmwareandtryagain.Cyclethepowersupplyandtryagain.Iftheproblemiscorrected,runLibrary Verifybeforenormallibraryoperations resume.Iftheproblempersists,see“Contacting Delltechnicalsupport”onpage7-2. |
| 0002 | Atpower-oninitialization,aRAM (basearea)errorwasdetected. | Ready/Activity LEDONand ErrorLEDON | |
| 0003 | Atpower-oninitialization,aRAM (bufferarea)errorwasdetected. | CHK0003 | |
| 0008 | Ausabledrivecouldnotbe detected. | CHK0008 | ObserveLEDs.See“Interpretingfrontpanel LEDs”onpage6-8.Reseatallcables.See“Reseatingcables”on page6-10.Cyclethepowersupplyandtryagain.Iftheproblemiscorrected,runLibrary Verifybeforenormallibraryoperations resume.Iftheproblempersists,see“Contacting Delltechnicalsupport”onpage7-2. |
| 0009 | Theaccessorlockingscrewhas notbeenremoved. | CHK0009 | Removetheaccessorlockingscrews.See“Removingtheaccessorlockingscrew”on page3-7.Cyclethepowersupplyandtryagain.Iftheproblemiscorrected,runLibrary Verifybeforenormallibraryoperations resume.Iftheproblempersists,see“Contacting Delltechnicalsupport”onpage7-2. |
| Code(H) | DescriptionPanelIndicationActionRequired | ||
| 0010 | Informationacquisitionfromthe DHCPserverfailed. | - | 1. ObserveLEDs.See“Interpretingfrontpanel LEDs”onpage6-8.2. ConfirmtheDHCPserversettings.3. Reseatallcables.See“Reseatingcables”on page6-10.4. Cyclethepowersupplyandtryagain.Iftheproblemiscorrected,runLibrary Verifybeforenormallibraryoperations resume.Iftheproblempersists,see“Contacting Delltechnicalsupport”onpage7-2. |
| 0011 | TimeacquisitionfromtheNTP serverfailed. | - | 1. ObserveLEDs.See“Interpretingfrontpanel LEDs”onpage6-8.2. Confirmthetimeserversettings.3. Reseatallcables.See“Reseatingcables”on page6-10.4. Cyclethepowersupplyandtryagain.Iftheproblemiscorrected,runLibrary Verifybeforenormallibraryoperations resume.Iftheproblempersists,see“Contacting Delltechnicalsupport”onpage7-2. |
| 0020 | LDII/Ferror.Transmitdataabnormality detected(NAKreception). | - | 1. ObserveLEDs.See“Interpretingfrontpanel LEDs”onpage6-8.2. Reseatallcables.See“Reseatingcables”on page6-10.3. Cyclethepowersupplyandtryagain.Iftheproblemiscorrected,runLibrary Verifybeforenormallibraryoperations resume.Iftheproblempersists,see“Contacting Delltechnicalsupport”onpage7-2. |
| 0021 | LDII/Ferror.Receivetimeoutdetected (ACK/NAKreception). | - | |
| 0022 | LDII/Ferror.Responsepacketreception timeoutdetected. | - | |
| 0023 | LDII/Ferror.ENQreceivetimeoutdetected. | - | |
| 0024 | LDII/Ferror.Receivedataabnormality detected. | - | |
| 0029LDI | commandendsabnormally.- | 1. ConfirmtheEncryptionKeyManager settings.2. Reseatallcables.See“Reseatingcables”on page6-10.3. Cyclethepowersupplyandtryagain.Iftheproblemiscorrected,runLibrary Verifybeforenormallibraryoperations resume.Iftheproblempersists,see“Contacting Delltechnicalsupport”onpage7-2. | |
| 002A | CommandstotheEncryptionKey Managerovertheretrylimit. | - | |
| 002B | Commandstotheencryptioncapabledriveovertheretrylimit. | - | |
| 002C | LDII/Ferror.ACKIUeventtimeoutdetected. | - | |
| 002D | LDII/Ferror.ResponseIUeventtimeoutdetected. | - | |
| 002E | LDII/Ferror.TransferReadyIUeventtimeoutdetected. | - | |
| 002F | LDII/Ferror.Undefinederrordetected. | - | |
| 0040 | Adrivemediaerrordetecteduponinsertion. | CHK0040 | |
| 0041 | Ahardwareerrordetecteduponmediainsettion | CHK0041 | |
| 0042 | Adriveloadtimeoutrordetecteduponinsertion. | CHK0042 | |
| 0048 | Incompatiblemediuminstalled.CHK0048 | ||
| 0053 | Responseacknowledgeerrorreceivedfrombarcodereader.Suspectthebarcodereadercableconnection. | CHK0053 | |
| 0056 | Receivedatachecksumerrorreceivedfrombarcodereader.Suspectthebarcodereadercableconnection. | CHK0056 | |
| 0057 | Invalidatareceivedfrombarcodereader.Suspectthebarcodereadercableconnection. | CHK0057 | |
| 0058 | Abarcodereaderread-errordetected.Suspectthebarcodereadercableconnection. | CHK0058 | |
| 0059 | AbarcodereaderFLASHcontrolerrordetected.Suspectthebarcodereadercableconnection. | CHK0059 | |
| 005A | Abarcodereaderdiagnosticserrordetected.Suspectthebarcodereadercableconnection. | CHK005A | |
| 005B | I^2CI /Ferror.Atransferretrydetected.Suspectthebarcodereadercableconnection. | CHK005B | |
| 005C | I^2CI /Ferror.Interrupttimeoutdetected.Suspectthebarcodereadercableconnection. | CHK005C | |
| 005D | I^2CI /Ferror.Invalidsignal(NAK)detected.Suspectthebarcodereadercableconnection. | CHK005D | |
| 005E | I^2CI /Ferror.Busarbitrationlosterordetected.Suspectthebarcodereadercableconnection. | CHK005E | |
| 005F | I^2CI /Ferror.Readyconditiondoesnotoccur.Suspectthebarcodereadercableconnection. | CHK005F | |
| 0070 | Calibrationfailedbecausetheaccessorcontainsmedia.Suspectthecenteringsensor. | CHK0070 | |
TableA-1.Libraryerrorcodes(continued)
| Code(H) | DescriptionPanelIndicationActionRequired | ||
| 0071 | Calibrationfailedduetoan emptymagazine.Suspectthe magazinesetsensor. | CHK0071 | Cyclethepowersupplyandtryagain.Iftheproblemiscorrected,runLibraryVerify beforenormallibraryoperationsresume.Iftheproblemsists,see“ContactingDell technicalsupport”onpage7-2. |
| 0072 | Calibrationmeasurementinvalid dataerror.Suspectthecentering sensor,Xmotor,orP'motor. | CHK0072 | |
| 0074 | GET,centeringcheck,orbarcode readerreadoperationfailed because the accessor contains media.Suspectthecentering sensor. | CHK0074 | |
| 0075 | PUToperationfailedbecausethe accessorcontainsnomedia.Suspectthecenteringsensor. | CHK0075 | |
| 007C | DrivedoesnotenterEJECTstate (andmedianotejected)within 200secondsofaGETcommand.Suspectthedrive. | CHK007C | 1. Ifthecartridgedoesnoteject,trytounload thecartridgefromthedrivewiththeOperatorPanel(Commands>Unload) or theWebUserInterface(ManageLibrary>Unload).Movethecartridgefromthedrive totheI/OStation.Removethecartridge fromthelibraryandinspectfordamageand replace,ifnecessary.2. Cyclethepowersupplyandtryagain.Iftheproblemiscorrected,runLibrary Verifybeforenormallibraryoperations resume.Iftheproblemsists,see“Contacting Delltechnicalsupport”onpage7-2. |
| 007D | DrivedoesnotenterMOUNT statewithin200secondsofaPUT command.SuspectthedriveorX motor. | CHK007D | Cyclethepowersupplyandtryagain.Iftheproblemiscorrected,runLibraryVerify beforenormallibraryoperationsresume.Iftheproblemsists,see“ContactingDell technicalsupport”onpage7-2. |
| 007E | DrivedoesnotenterSETstate within3secondsofaPUT command.SuspectthedriveorX motor. | CHK007E | |
| 007F | DriveI/Forconnectionerror occursduringaPUToperationor GEToperation.Suspectthedrive. | CHK007F | 1. Reseatallcables.See“Reseatingcables”on page6-10.2. Cyclethepowersupplyandtryagain.Iftheproblemiscorrected,runLibrary Verifybeforenormallibraryoperations resumeIftheproblemsists,see“Contacting Dell technicalsupport”onpage7-2. |
| Code(H) | DescriptionPanelIndicationActionRequired | ||
| 0080 | Xmovementerror#1.DuringXmovement,thetarget stopposition'soriginsensorerror detected.SuspecttheXorigin sensorXmotor. | CHK0080 | 1. Checktheaccessorlockingscrew and removeitifitisinstalled.See"Removingthe accessorlockingscrew"onpage3-7.2. Cyclethepowersupplyandtryagain.Iftheproblemiscorrected,runLibrary Verifybeforenormallibraryoperations resume.Iftheproblempersists,see"Contacting Delltechnicalsupport"onpage7-2. |
| 0081 | Xmovementerror#2.DuringXmovement,amotor syncerrordetected.SuspecttheX encodersensororXmotor. | CHK0081 | |
| 0082 | Xmovementerror#3.Duringinitialization,amotorsync errordetected.SuspecttheX encodersensororXmotor. | CHK0082 | |
| 0083 | Duringanejectoperationormove operation(toastorageposition), theXoriginsensorcouldnotbe detected.SuspecttheXorigin sensororXmotor. | CHK0083 | |
| 0084 | Duringinitialization,theXorigin positioncouldnotbedetected.SuspecttheXoriginsensororX motor. | CHK0084 | |
| 0088 | Xcalibrationerror#1.DuringXcalibration,centering sensorOFFconditioncouldnotbe detected. | CHK0088 | |
| 0089 | Xcalibrationerror#2.DuringXcalibration,centering sensorONconditioncouldnotbe detected. | CHK0089 | |
| 008F | DuringXoperation,thecartridge magazinewasremoved.Suspect themagazinesetsensor. | CHK008F | 1. Confirmthatthemagazineisclosed.2. Cyclethepowersupplyandtryagain.Iftheproblemiscorrected,runLibrary Verifybeforenormallibraryoperations resume.Iftheproblempersists,see"Contacting Delltechnicalsupport"onpage7-2. |
| 00B0 | Failedtodetectmediainthe accessoratcompletionofGET operation.Suspectthecentering sensor,Xmotor,orPmotor. | CHK00B0 | 1. Confirmthemediaiscompatible.2. Cyclethepowersupplyandtryagain.Iftheproblemiscorrected,runLibrary Verifybeforenormallibraryoperations resume.Iftheproblempersists,see"Contacting Delltechnicalsupport"onpage7-2. |
TableA-1.Libraryerrorcodes(continued)
| Code(H) | DescriptionPanelIndicationActionRequired | |
| 00B1 | Nomediaiscontainedinthe specifiedcell(CellEmpty).Suspectthecenteringsensor,X motor,orPmotor. | CHK00B1 |
| 00B2 | Mediadetectedintheaccessorat completionofcenteringcheck operation.Suspectthecentering sensor. | CHK00B2 |
| 00B3 | Mediadetectedintheaccessorat completionofPUToperation.Suspectthecenteringsensor. | CHK00B3 |
| 00B8 | accessorerror#1.ReverseREVposition(PP1)error (accessororiginnotdetectedor FWDpositiondetected).Suspect thePoriginsensor,FWDsensor, orPmotor. | CHK00B8 |
| 00B9 | accessorerror#2.ForwardFWDposition(PP2) error(accessororigindetectedor FWDnotdetected).SuspecttheP originsensor,FWDsensor,orP motor. | CHK00B9 |
| 00BA | accessorerror#3.PUT/GET/barcodereader position(PP4/PP5/PPBF/PPBR) error(accessororiginorFWD detected,orcellfull).Suspectthe Poriginsensor,FWDsensor,orP motor. | CHK00BA |
| 00BC | Duringinitialization,theaccessor origincouldnotbedetected. SuspectthePoriginsensor,FWD sensor,orPmotor. | CHK00BC |
| 00BD | Duringaccessormovement,the movementstopcondition detected.SuspectthePencoder sensororPmotor. | CHK00BD |
| 00BF | Nogapconditiondetectedatthe completionofaccessoroperation. Suspectthecenteringsensor,P originsensor,FWDsensor,orP motor. | CHK00BF |
TableA-1.Libraryerrorcodes(continued)
| Code(H) | DescriptionPanelIndicationActionRequired | ||
| 00C0 | accessoroperationdisabled becauseacartridgemagazinewas removed.Suspectthemagazine setsensor. | CHK00C0 | 1. Confirmthatthemagazineisclosed.2. Cyclethepowersupplyandtryagain.Iftheproblemiscorrected,runLibrary Verifybeforenormallibraryoperations resume.Iftheproblempersists,see“Contacting Delltechnicalsupport”onpage7-2. |
| 00C8 | Centeringcalibrationerror#1.Duringcenteringcalibration, centeringsensorOFFcondition couldnotbedetected.Suspectthe centeringsensororPmotor. | CHK00C8 | Cyclethepowersupplyandtryagain.Iftheproblemiscorrected,runLibraryVerify beforenormallibraryoperationsresume.Iftheproblempersists,see“Contacting Dell technicalsupport”onpage7-2. |
| 00C9 | Centeringcalibrationerror#2.Duringcenteringcalibration, centeringsensorONcondition couldnotbedetected.Suspectthe centeringsensor,Xmotor,orP motor. | CHK00C9 | |
| 00D0 | Checksumerrordetectedduring firmwareupdate. | CHK00D0 | 1. Confirmthefirmwarefileversion.2. Reinstallthefirmwarefile.3. Cyclethepowersupplyandtryagain.Iftheproblemiscorrected,runLibrary Verifybeforenormallibraryoperations resume.Iftheproblempersists,see“Contacting Dell technicalsupport”onpage7-2. |
| 00D1 | FirmwareIDerrordetected duringfirmwareupdate. | CHK00D1 | |
| 00D2 | Bootinformationerrordetected duringfirmwareupdate. | CHK00D2 | |
| 00D3 | Barcodereaderisnotin maintenancemodeduringbar codereaderfirmwareupdate (operationinterrupted).Suspect thebarcodereadercable connection. | CHK00D3 | 1. Initiateaninventory.See“Conductinga libraryinventory”onpage4-7(Operator Panel)or“Conductingalibraryinventory” onpage4-22(WebUserInterface).2. Cyclethepowersupplyandtryagain.Iftheproblemiscorrected,runLibrary Verifybeforenormallibraryoperations resume.Iftheproblempersists,see“Contacting Dell technicalsupport”onpage7-2. |
| 00D9 | Magazinefailedtounlock. Suspectthemagazineor magazinesensor. | CHK00D9 | 1. Cyclethepowersupplyandtryagain.Manuallyunlockthemagazine,removethe magazinefromthelibrary,andinspectitfor damage.Ifnotdamaged,returnittothelibraryand runLibraryVerifybeforenormallibrary operationsresume.Ifdamaged,replacethemagazine. |
| 00DA | I/OStationfailedtounlock. Suspectthemagazineor magazinesensor. | CHK00DA | |
| 00DD | Anerordetectedduringbarcode readerfirmwarecheck.Suspect thebarcodereadercable connection. | CHK00DD | |
| 00E0 | Writeoperationnotfinished within1mswhenwritingdatato flashmemory. | CHK00E0 | |
| 00E1 | Clearoperationnotfinished within10secondwhenclearinga sectorinflashmemory. | CHK00E1 | |
| 00E2 | Errordetectedintapelibrary configurationstoredinflash memory. | CHK00E2 | |
| 00E3 | Checksumerrordetectedinflash memory. | CHK00E3 | |
| 00F0 | Sensorerror#1.AccessorencodersensorBerror detectedduringblinkcheck.Suspecttheaccessorencoder sensorB. | CHK00F0 | |
TableA-1.Libraryerrorcodes(continued)
| Code(H) | DescriptionPanelIndicationActionRequired | ||
| 00F1 | Sensorerror#2.AccessorencodersensorAerrordetectedduringblinkcheck.SuspecttheaccessorencodersensorA. | CHK00F1 | Cyclethepowersupplyandtryagain.Iftheproblemiscorrected,runLibraryVerifybeforenormallibraryoperationsresume.Iftheproblempersists,see“ContactingDelltechnicalsupport”onpage7-2. |
| 00F2 | Sensorerror#3.Xencodersensorerrordetectedduringblinkcheck.SuspecttheXencodersensor. | CHK00F2 | |
| 00F3 | Sensorerror#4.Magazinesensorerrordetectedduringblinkcheck.Suspectthemagazinesensor. | CHK00F3 | |
| 00F8 | Sensorerror#5.Xoriginsensorerrordetectedduringblinkcheck.SuspecttheXoriginsensor. | CHK00F8 | |
| 00F9 | Sensorerror#6.Cartridgesensorerrordetectedduringblinkcheck.Suspectthecartridgesensor. | CHK00F9 | |
| 00FA | Sensorerror#7.accessorforwardsensorerrordetectedduringblinkcheck.Suspecttheaccessorforwardsensor. | CHK00FA | |
| 00FB | Sensorerror#8.accessororiginsensorerrordetectedduringblinkcheck.Suspecttheaccessororiginsensor. | CHK00FB |
Driveerrorcodes
TableA-2.Driveerrorcodes
| Code(H)Description | PanelindicationAction | Required | |
| 0200Invalid | atasenttodrive. | CHK0200 | Rescatallcables.See"Reseating cables"onpage6-10. |
| NAKdetected. | Cyclethepowersupplyandtry again.Iftheproblemiscorrected,run LibraryVerifybeforenormal libraryoperationsresumes.Iftheproblempersists,see "ContactingDelltechnical support"onpage7-2. | ||
| 0201Timeout | terroroccurred whiledriveiswaitingfor response. | CHK0201 | |
| 0203Driven | connected.CHK0203 | ||
| 0205Drivebusy | CHK0205 | ||
| 0206Command | dcouldnotbe executedbecausedriveis notmounted. | CHK0206 | |
| 020EDriveerrordetected | CHK020E | ||
| 020FUnsupporteddrive detected. | CHK020F | ||
| 0222Mediacouldnotbe ejectedbecausedriveis inPreventMedium Removalstate. | CHK0222 | ReleasethedrivePreventMedium Removalstatefromthehost.Reseatallcables.See"Reseating cables"onpage6-10.Cyclethepowersupplyandtry again.Iftheproblemiscorrected,run LibraryVerifybeforenormal libraryoperationsresumes.Iftheproblempersists,see "ContactingDelltechnical support"onpage7-2. | |
WebUserInterfaceerrormessages
TableA-3.Webusererrormessages
| TitleMessageIssuingPanel | ||
| Error | Usersfull. | UserAccess |
| Youcannotremoveyourself. | UserAccess | |
| ParameterErrorLoginfailure.Login | ||
| Unsupportedupdatefile.FirmwareUpdate | ||
| Invalidparameterfoundin[**].ConfigureLibrary | ||
| Pleaseinputparameterof[**].ConfigureLibrary | ||
| Passwordparametererror.UserAccess | ||
| Usernameparametererror.UserAccess | ||
| Notenoughrole.UserAccess | ||
| Ausernameunmatched.UserAccess | ||
| Auserisalreadyexisting.UserAccess | ||
| Usersfull.UserAccess | ||
| FlushROMwriteerrordetected.UserAccess | ||
| Userinformationaccessfailure.UserAccess | ||
| CommandError | Movecommandexecutionfailure. (Code:"****") | MoveCartridges |
| Unloadcommandexecutionfailure: [****]. | UnloadDrive | |
| Drivenotready. | UnloadDrive,DownloadDriveLogs,FirmwareUpdate | |
| Mediumnotpresent. | UnloadDrive | |
| Onlinecommandexecutionfailure: [****]. | LibraryState | |
| Offlinecommandexecutionfailure: [****]. | LibraryState | |
| Resetcommandexecutionfailure: [****]. | ResetLibrary/Drive | |
| Inventorycommandexecution failure:[****]. | Inventory | |
| "NormalDump"commandexecution failure:[****]. | DownloadDriveLogs | |
| "ForceDump"commandexecution failure:[****]. | DownloadDriveLogs | |
| Restorefailure.Libraryserialnumberisunmatched | Save/Restore | |
| Writingtocookiewasfailure.Theconfigurationdatawasnotsaved tocookie. | All | |
| CleaningCommandErrorIllegalmedium. | CleanDrive | |
| Sourceelementempty.CleanDrive | ||
| Destinationelementfull.CleanDrive | ||
| Drivefailure.CleanDrive | ||
| Preventmediumremoval.CleanDrive | ||
| Duringimport/exportelement access. | CleanDrive | |
| Gapdetected.CleanDrive | ||
| Notloaded.CleanDrive | ||
| Expiredmedium.CleanDrive | ||
| Writeprotecterror. | CleanDrive | |
| Cleaningexecutionfailure:[****]. | CleanDrive | |
| I/OError | Fileopenfailure. | DownloadDriveLogs,Download LibraryLogs,Save/Restore, FirmwareUpdate |
| Unsupportedfile. | Save/Restore,FirmwareUpdate | |
| NetworkError | ***commandtransmissionfailure. | ManageLibrary |
| ***informationaccessfailure. | All | |
| Librarylogsdownloadfailure. | DownloadLibraryLogs | |
| Retrydownload. | ||
| Emailsubmitfailure. | Notifications | |
| SNMPtrapsubmitfailure. | Notifications | |
| Logdataaccessfailure. | Traces,ViewLibraryLogs | |
| Portopenfailure[**.**.**.****]. Doyouwanttoretry? | Applet3timesretry | |
| Portopenfailure[**.**.**.****]. Checkthelibraryandthenetwork conditionsetting. Appletshutdown. | Displayedafter3unsuccessful attemptsusingtheJavaApplet. | |
| Webinterfaceversionisnotmatched betweenLibraryandJavaApplet. Shutabrowserandrestartthe Applet. Thereisapossibilityof malfunctioningifyyouproceed operationfromWeb. ClearthecacheofJavawhenthis messagedisplaysevenifitrestarts. | All | |
| LibraryBusy | Libraryinformationupdatingnow. Cannotaccesslibraryinformation | All |
Trapdefinitions(types)
TheTL1000librarysupportsthefollowingtypesofSNMPtraps.
TableA-4. Traplist
| TrapIDEvent | TypeDescription | CleanDriveLEDAntention | onLEDErrorLED | ||
| 1Emergency | •Driveerror | - | - | ON | |
| 2 | •Libraryerror | - | - | ON | |
| 21Error | •Driveerror | - | - | ON | |
| 22 | •Libraryerror | - | - | ON | |
| 51(Drive) | Warning | •Driveerror•Libraryerror•Endurance frequency attainment | - | - | ON |
| 52(Library) | |||||
| 53(Drive) | •Cleaning demand receptionfrom drive | ON | - | - | |
| 54(Library) | •Cleaning cartridge demandforan exchange | - | ON | - | |
| 101(Drive) | Information | •Beginningof inventory•Changein library operationmode•Beginningof mediummove•Completionof mediummove•Library/Drive notready•Library/Drive toonline•Magazine unlock operation•I/OStation unlock operation | - | - | - |
| 102(Library) |
AppendixB.TapeAlertflags
"TapeAlertflagssupportedbythelibrary"
"TapeAlertflagssupportedbytheUltriumtapedrive"onpageB-3
Additionalinformationisprovidedtothereaderaboutthetapelibraryandtape drive.Allerrorcodeanddiagnosticinformationcannotbeaccessedfromthe OperatorPanelofthelibrary.TheOperatorPanelwill,however,displayother libraryerrorcodesanddriveerrorcodeswhenproblemsoccur.Foralistingof OperatorPanelerrormessages,seeAppendixA,"Errorcodes,"onpageA-1.
TapeAlertisastandardthatdefinesstatusconditionsandproblemsthatare experiencedbydevicessuchastapedrives,autoloaders,andlibraries.The standardenablesaservertoreadTapeAlertmessages(calledflags)fromatape drive.TheserverreadstheflagsfromLogSensePage0x2E.
ThislibraryiscompatiblewithTapeAlerttechnology,whichprovideserrorand diagnosticinformationaboutthedrivesandthelibrarytotheserver.Because libraryanddrivefirmwaremightchangeperiodically,theSNMPinterfaceinthe librarydoesnotrequirecodechangesifdevicesaddextraTapeAlertsthatarenot supportedtoday.However,ifthischangeoccurs,theMIBiswrittentominimize impacttotheSNMPmonitoringstation.Atthetimeofthiswriting,theTapeAlert flagsinthisappendixcorrectlyrepresentTapeAlertsthataresent.TheMIBfile mustnotbetakentomeanthatalltrapsthataredefinedintheMIBwillbesent bythelibraryorthattheywillbesentinthefuture.
TapeAlertflagssupportedbythelibrary
TableB-1. TapeAlertflagssupportedbythelibrary
| Flag Number | FlagName | DescriptionActionRequiredType | 1 |
| 01LibraryHardwareA | Thelibrary mechanismis having trouble with communicating with the taped drive. | 1. Cycle the powers supply and try again.2. If the problem persists, see “Contacting Dell technical support” on page 7-2. | C |
| 02LibraryHardwareB | Thelibrary mechanism has a hardware fault. | W | |
| 03LibraryHardwareC | Library mechanism has a hardware fault that requires a reset to recover. | 1. Reset the library. Ford details, see “Rebooting the drive” on page 4-8.2. Restart the operation.3. If the problem persists, see “Contacting Dell technical support” on page 7-2. | C |
| Flag Number | FlagName | descriptionActionRequiredType | 1 |
| 04Library HardwareD | Thelibrary mechanismhasa hardwarefaultthat isnot mechanism-related, orrequirespower cletorecover. | 1. Cyclethepowersupplyandtryagain.2. Iftheproblempersists,see“Contacting Delltechnicalsupport”onpage7-2. | C |
| 06Library Interface | Thelibrary identifiedan interfacefault. | 1. Checkallcablesandcableconnections.2. Restarttheoperation.3. Iftheproblempersists,see“Contacting Delltechnicalsupport”onpage7-2. | C |
| 08Library Maintenance | Librarypreventive maintenance required. | Preventivemaintenanceofthelibraryis required.Consultthelibraryuser'smanualfor device-specificpreventivemaintenancetasks. | W |
| 12LibraryStray Tape | Acartridgewasleft inthedriveinside thelibrarybya previoushardware fault. | 1. Tryunloadingthecartridgefromthedrive withtheOperatorPanelorWebUser Interface.•Ifthecartridgeunloads,movethe cartridgefromthedrivetotheI/O station.Removethecartridgeandinspect fordamage.Ifnotdamaged,returnthe cartridgetothelibrary.RunLibrary Verifybeforenormallibraryoperations resume.•Ifthecartridedidnotunloadfromthe drive,cyclethepowersupplyandtry again.2. Iftheproblempersists,see“Contacting Delltechnicalsupport”onpage7-2. | C |
| 13LibraryPick Retry | Thereisapotential problemwiththe driveejectinga cartridgeshortor withthelibrary mechanismpicking acartridgefroma slot. | Noactionisrequired.W | |
| 14LibraryPlace Retry | Thereisapotential problemwiththe librarymechanism placingacartridge intoaslot. | Noactionisrequired.W | |
| 16LibraryI/O station | Theoperationfailed becausethelibrary I/Ostationisopen. | ClosetheI/Ostation.W | |
| 17Library Mailslot | Mechanicalproblem withtheI/O station. | Thereisamechanicalproblemwiththelibrary I/Ostation. | C |
TableB-1. TapeAlertflagssupportedbythelibrary(continued)
| Flag Number | FlagNameDescriptionActionRequiredType | 1 | ||
| 18Library Magazine | Librarymagazine notpresent. | Thelibrary cannot operate without the magazine.1. Insert them magazine into the library.2. Restart the operation. | C | |
| 21Library Offline Librarymanually turned offline. | Thelibrary was manually turned offline and is unavailable for use. | I | ||
| 22Library Drive Offline | Library turned internal drive offline. | Thedrive inside the library wastaken offline. This flagis for information purposes only. No action is required. | I | |
| 23Library Scan Retry | There is a potential problem with the barcode of the scanner hardware in the library mechanism. | No action is required. W | ||
| 28Power Supply PSU failure inside the library subsystem. | The powers supply failed inside the library. See "Contacting Dell technical support" on page 7-2 | W | ||
| ^1 C=Critical: Needs immediate action. W=Warning: Action to be taken. I=Information: Information for user. | ||||
TapeAlertflagssupportedbytheUltriumtapedrive
TableB-2. TapeAlertflagssupportedbytheUltriumtapedrive
| FlagNumberFlag | Name | Description | ActionRequired |
| 3 | Harderror | Setforanyunrecoverableread, write,orpositioningerror(thisflag issetwithflags4,5,or6). | Seetheactionthatisrequiredfor FlagNumber4,5,or6,ifset,in thistable. |
| 4 | Media | Setforanyunrecoverableread, write,orpositioningerrorthatis becauseofafaultytapecartridge. | Replacethetapecartridge. |
| 5 | Readfailure | Setforanyunrecoverableread errorwheretheisolationis uncertainandfailuremightbe becauseofafaultytapecartridge ordrivehardware. | IfFlagNumber4isalsoset,the tapecartridgeisdefective.Replace thetapecartridge. |
| 6 | Writefailure | Setforanyunrecoverablewriteor positioningerrorwhereisolationis uncertainandfailuremightbe becauseofafaultytapecartridge. | IfFlagNumber9isalsoset,make surethatthewrite-protectswitchis setsothatdatacanbewrittento thetape.See"Write-Protectswitch" onpage5-6.IfFlagNumber4isalsoset,the tapecartridgeisdefective.Replace thetapecartridge. |
| 7 | Medialife | Setwhenthetapecartridgereaches itsendoflife(EOL). | 1. Copythedatatoanothertap cartridge.2. Discardtheold(EOL)tape. |
| FlagNumberFlag | NameDescriptionAction | Required | |
| 8Notdatag | adeSetwhenthetapecar | tridgeisnotdata-grade.Anydatathyoubackuptothetapeisatrisk. | Replacethetapecartridgewithadata-gradetapecartridge. |
| 9Writeprotect | Setwhenthetapedrive | detectsthatthetapecartridgeiswrite-protected. | Ensurethatthecartridge'swrite-protectswitchissetsothatdatacanbewrittentothetape.See"Write-Protectswitch"onpage5-6. |
| 10Noremoval | Setwhenthetapedrive | receivesanUNLOADcommandaftertheserverpreventedthetapecartridgefrombeingremoved. | Refertothedocumentationforyourserver'soperatingsystem. |
| 11Cleaning | mediaSetwhenacleaning | tapeisloadedintothedrive. | Noactionthatisrequired.Statusonly. |
| 12Unsupported | FormatSetwhenanon | -supportedcartridgetypeisloadedintothedriveorwhenthecartridgeformatwascorrupted. | Replacetheinvalidcartridgewithasupportedtapecartridge. |
| 14Unrecoverable | snappedtape | Setwhentheoperationfailedbecausethetapeinthedrivesnapped. | Donotattempttoextractthetapecartridge.See"ContactingDelltechnicalsupport"onpage7-2. |
| 15Cartridges | memorychipfailure | Setwhenacartridgememory(CM)failureisdetectedontheloadetapecartridge. | Replacethetapecartridge. |
| 16Forcedeject | Setwhenatapecartridgewas | gewasunloadedmanuallywhilethedrivewasreadingorwriting. | Noactionthatisrequired.Statusonly. |
| 17Mediathatare | loadedisRead-only format | Setwhenacartridgemarkedasread-onlyisloadedintothedrive.Theflagisclearedwhenthecartridgeisejected. | Noactionthatisrequired.Statusonly. |
| 18Tapedirectorythat | iscorruptedincartridgememory | Setwhenthetapedrivedetectsthatthetapedirectoryinthecartridgememorywascorrupted. | Re-readalldatafromthetapetorebuildthetapedirectory. |
| 19Nearingmedialife | Setwhenthetapecartridgeis | nearingitsspecifiedendoflife.Itislearedwhenthecartridgeisremovedfromthedrive. | 1. Copythedatatoanothertapecartridge.2. Replacethetapecartridge. |
| 20Cleannow | Setwhenthetapedrivedetectsthatitneedscleaning. | Cleanthetapedrive. | Cleanthetapedriveassoonaspossible.Thedrivecancontinuetooperate,butrequirescleaningsoon. |
| 21Cleanperiodic | Setwhenthetapedrivedetectsthatitneedsroutinecleaning. | Cleanthetapedriveassoonaspossible.Thedrivecancontinuetooperate,butrequirescleaningsoon. | Cleanthetapedriveassoonaspossible.Thedrivecancontinuetooperate,butrequirescleaningsoon. |
| 22Expiredcleaning | media | Setwhenthetapedrivedetectsacleaningcartridgethatisexpired. | Replacethecleaningcartridge. |
| 23Invalidcleaning | cartridge | Setwhenthedriveexpectsacleaningcartridgetobeloadedandtheloadedcartridgeisnotacleaningcartridge. | Useavalidcleaningcartridge. |
| 30HardwareA | Setwhenahardwarefailureoccurs | thatrequiresthatyouresetthetapedrivetorecover. | See"ContactingDelltechnicalsupport"onpage7-2. |
| 31Hardware | BSetwhenthetapedrive | failsitsinternalPower-OnSelf-Tests(POSTs). | Notetheerrorcodeonthesingle-characterdisplayandsee"ContactingDelltechnicalsupport"onpage7-2. |
| 32Interface | Setwhenthetapedrivedet | ectsaproblemwiththehostinterface. | See'ContactingDelltechnicalsupport"onpage7-2. |
| 33Ejectmedia | aSetwhenafailureoccursthat | thatrequiresthetapecartridgetobeunloadedfromthedrive. | Unloadthetapecartridge,thenreinsertandrestarttheoperation.Ifthisprocedurefails,usedifferentmedia. |
| 34Download | failSetwhenanFMRimageis | unsuccessfullydownloadedtothetapedriveviatheSASinterface. | ChecktheFMRimageiscorrect.Ifnecessary,downloadthecorrectFMRimage. |
| 36Drivetemperature | Setwhenthedrivetemperaturesensorindicatesthatthedrive'stemperatureexceedstherecommendedtemperatureofthelibrary. | See'ContactingDelltechnicalsupport"onpage7-2. | |
| 37Drivevoltage | ageSetwhenthedrivedetectspowersupplyvoltagesthatapproachorexceedthespecifiedvoltagelimits. | ||
| 38Predictive | failureofdrivehardware | Setwhenahardwarefailureofthetapedriveispredicted. | |
| 39Diagnostics | requiredSetwhentapedrivedetectsafailurethatrequiresdiagnosticsforisolation. | ||
| 51Tapedirectory | invalidatunload | Setwhenthetapedirectoryonthetapcartridgethatwaspreviouslyunloadediscorrupted.Thefile-searchperformanceisdegraded. | Useyourbackupsoftwaretorebuildthetapedirectorybyreadingallthedata. |
| 52Tapesystem | mareawritefailure | Setwhenthetapecartridgethatwaspreviouslyunloadedmightnotwriteitssystemareasuccessfully. | Copythedatatoanothertapecartridge,thendiscardtheoldtapecartridge. |
| 53Tapesystem | mareareadfailure | Setwhenthetapesystemareamightnotbereadsuccessfullyatloadtime. | Copythedatatoanothertapecartridge,thendiscardtheoldtapecartridge. |
| 55Loadfailure | reSetwhenahardware | malfunctionpreventsthetapecartridgefrombeingloadedintothedrive,orwhenatapecartridgeisstuckinthedrive. | Ifthetapecartridgedoesnotloadinthedrive:1. Removethetapecartridgefromthelibraryandinspectitfordamage.lfdamaged,discardit.2. Insertanothertapecartridgeintothetapedrive.Iftheproblempersists,see"ContactingDelltechnicalsupport"onpage7-2.Ifthetapecartridgeisstuckinthedrive:1. Attempttounloadthetapefromthedrivewiththehostbackupapplicationthatiswiththedrive,orwiththeremoteorlocalUI.2. Ifthecartridgestilldoesnotunload,see"ContactingDelltechnicalsupport"onpage7-2. |
| 56Unloadfailure | ureSetwhenadrivehard | wareerrorpreventsthetapecartridgefrombeingunloadedfromthetapedrive,orwhenthetapecartridgeisstuckinthedrive. | 1. UnloadthecartridgefromthedrivewiththeOperatorPanelortheWebUserInterface.2. Tryapowercycleoftheentirelibrary.Thisprocedurecausesthedrivetoresetandattempttorewindandunloadwhenpowerisstored.Ifthecartridgeunloads,removeitfromthelibraryandinspectit.Ifdamaged,discardit.3. TrytounloadthecartridgefromthedriveagainwiththeOperatorPanelortheWebUserInterface.4. Ifthecartridgestilldoesnotunloadfromthedrive,see"ContactingDelltechnicalsupport"onpage7-2. |
| 59WORMM | mediaintegritycheckfailed | SetwhenthedrivedeterminesthatthedataonthetapeissuspectfromaWORMpointofview. | 1. CopythedatatoanotherWORMtapecartridge.2. DiscardtheoldWORMtape. |
| 60WORMM | mediaoverwriteattempted | SetwhenthedriverejectsawriteoperationbecausetherulesforallowingWORMwritesarenotmet.DataisappendedtoWORMmediaonly.OverwritestoWORMmediaarenotallowed. | AppendtheinformationaboutaWORMtapecartridgeorwritethedatatoanon-WORMcartridge. |
AppendixC.Sensedata
"SenseKeydefinitions"
"Librara sensedata"
"Tapedrivesensedata"onpageC-3
SenseKeydefinitions
TableC-1.Sensekeydefinitions
| SKDefinition | |
| 00NoSense | |
| 01RecoveredError | |
| 02NotReady | |
| 03MediaError | |
| 04HardwareError | |
| 05IllegalRequest | |
| 06UnitAttention | |
| 07DataProtect | |
| 08BlankCheck | |
| 09Reserved | |
| 0AReserved | |
| 0BAbortedCommand | |
| 0CReserved | |
| 0DVolumeOverflow | |
| 0EReserved | |
| 0FReserved |
Librara sensedata
"Librariansensedata" lists the AdditionalSenseCodes(ASC) and AdditionalSense CodeQualifiers(ASCQ) associated with thereportedSenseKeys.
Asensekeyof00h(nosense)hasnoASC/ASCQassociatedwithit.Afew ASC/ASCQsareassociatedwithmorethanonesensekey.Thesensekeysthatcan giveaparticularASC/ASCQareindicatedwithintheSenseKeycolumn.
TableC-2.Librarysensedata
| SenseKeyASCASCQ | Description | ||
| NoSense(00)00 | 00 | Nosense | |
| 30 | 03 | Cleaningcartridgeinstalled | |
| Recovered Error (01) | 5B | 02 | Log counter at maximum |
| SenseKeyASCASCQDescription | |||
| NotReady(02)0400Logi | calunitnotready,causenotreportable | ||
| 0401Logicalunitisinprocessofbecomingready | |||
| 0403Manualinterventionrequired | |||
| 3A02Medianotpresent(trayopen) | |||
| 8005Duringreprogrammingmode | |||
| HardwareError(04)1501M | Mechanicalpositionerror | ||
| 40nnDiagnosticfailureoncomponentnn(80h-ffh) | |||
| 4400Internaltargetfailure | |||
| 5300Medialoadorejectfailed | |||
| 8007NVRAMfailure | |||
| IllegalRequest(05) | 1A00Parameterlistlengtherror | ||
| 2000Invalidcommandoperationcode | |||
| 2101Invalidelementaddress | |||
| 2400InvalidfieldinCDB | |||
| 2500Logicalunitnotsupported | |||
| 2600Invalidfieldinparameterlist | |||
| 3000Incompatibledmediuminstalled | |||
| 3B | 0D | Mediadestinationelementfull | |
| 3B | 0EMediasourceelementempty | ||
| 3B83Sourcedrivenotunloaded | |||
| 5302Mediaremovalprevented | |||
| 8010Drivefailure | |||
| 8020Exchangeslotfull | |||
| 8021Cartridgewronginsertion | |||
| UnitAttention(06) | 2800Not-readytoreadytransition,mediamay | ||
| 2801Importorexportelementaccessed | |||
| 2900PowerONoccurred | |||
| 2A02Logparameterchanged | |||
| 3F | 01Microcodehasbeenchanged | ||
| 41 | FEDriveerrormessagedetected* | ||
| AbortedCommand(0B) | 41nnLDlcommandfailure** | ||
| *Thiscodeispreservedonlyinthelibrarylogwhen“FID”or“ATTNDRV”messageisreceivedfromthetapedrive. Thiscodeisnotreportedtothehostserver.**Thiscodeispreservedonlyinthelibrarylog. Thiscodeisnotreportedtothehostserver. | |||
Tapedrivesensedata
TableC-3.Ultrium Tapedrivesensedata
| Byte | BitAddressorName | |||||||
| 7 | 6 | 5 | 4 | 3 | 2 | 1 | 0 | |
| 0Valid | AddressBit | ErrorCode | ||||||
| 1SegmentNumberx'00' | ||||||||
| 2FilemarkEOM | (Endof medium) | ILI (Incorrect length indicator | ReservedSenseKeySee"SenseKeydefinitions"onpageC-1. | |||||
| 3Informationbyte(mostsignificantbyte) | ||||||||
| 4-5Informationbytes | ||||||||
| 6Informationbyte(leastsignificantbyte) | ||||||||
| 7Additionalsenselength | ||||||||
| 8-11Commandspecificinformationbytes | ||||||||
| 12-13ForUltriumTapedrivesensedataforBytes12and13,seeTable C-4onpageC-4. | ||||||||
| 14 | FieldReplaceableUnit(FRU)ID | |||||||
| 15 | SKSV | C/D | Reserved | BPV(Bitpointer valid) | Bitpointer | |||
| 16-17 | SKSV=0:FirstErrorFaultSymptomCode(FSC);SKSV=1:FieldPointer | |||||||
| 18-19 | FirstErrorFlagData | |||||||
| 20 | Reserved(0) | |||||||
| 21 | CLNReserved Reserved Vol Valid | |||||||
| 22-28 | VolumeLabel | |||||||
| 29 | CurrentWrap | |||||||
| 30-33 | RelativeLPOS | |||||||
| 34 | SCSIAddress | |||||||
| 35 | Framenumber | Drivenumber | ||||||
| 36-39 | PortIdentifier(RelativeTargetPortAddress)ReportingSenseThisisthehashedSASaddresssofthedriveport(forexample,F32A94)withbyte36beingreserved. | |||||||
| 40 | Tape Directory Valid | Reserved | Reserved | Reserved | Reserved | Relative Target Port Reporting Sense0:Reserved1:RelativeTargetPort1(Port0)2:RelativeTargetPort2(Port1)3:RelativeTargetPort3(LibraryPort) | ||
| 41 | HostCommand(SCSIOpcode) | |||||||
| 42DensityType0:Nomediapresent1:Gen1(384track)2:Gen2(512track)3:Gen3(704track) | MediaType(VendorReserved) | |||||||
| 43-44VolumeLabelCartridgeType | ||||||||
| 45-48LogicalBlockNumber(CurrentLBAthatwouldbereportedinReadPositioncommand) | ||||||||
| 49-52DataSetNumber | ||||||||
| 53-541stErrorFSC | ||||||||
| 55-561stErrorFlagData | ||||||||
| 57-582ndErrorFSC | ||||||||
| 59-602ndErrorFlagData | ||||||||
| 61-62Next-to-LastErrorFSC | ||||||||
| 63-64Next-to-LastErrorFlagData | ||||||||
| 65-66 | LastErrorFSC | |||||||
| 67-68 | LastErrorFlagData | |||||||
| 69 | LPOSRegion | |||||||
| 70-85 | ERPSummaryInformation | |||||||
| 86-89 | ProductRevisionLabel:YMDV(AsdefinedinStandardInquiry;thisisalsoknownastheCodeLevel) | |||||||
| 90-95 | Reserved(0) | |||||||
TableC-4. Ultrium Tapedrivesensedata-Bytes12and13
| Byte12ASC | Byte13ASCQ | Description |
| 00 | 00 | No additional sense - The flags in the sense data indicate the reason for the commandfailure |
| 00 | 01 | Filemark detected - A Read or Space command terminated early due to an FM. The FMflagisset. |
| 00 | 02 | EOM - A Write or Write File Marks command failed because the physical end of tapewasencountered,oraReadorSpacecommandencounteredEOM.TheEOM flagisset. |
| 00 | 04 | BOM - A space command ended at Beginning of Tape. The EOM bit is also set. |
| 00 | 05 | EOD - Read or Space command terminated early because End of Data was encountered. |
| 04 | 00 | Cause not reportable - A cartridge is present in the drive, but it is in the process of beingunloaded. |
| 04 | 01 | Becoming Ready - A media access command was received during a front panel initiatedloadoranimmediatereportedloadcommand. |
TableC-4. Ultrium Tapedrivesensedata-Bytes12and13(continued)
| Byte12ASCByte13ASCQDescription |
| 0402InitializingCommandRequired-Acartridgeispresentinthedrive,butisnot logicallyloaded.ALoadcommandisrequired. |
| 0403ManualInterventionRequired-Acartridgeispresentinthedrivebutcouldnotbe loadedorunloadedwithoutmanualintervention. |
| 0C00WriteError-AWriteoperationhasfailed.Thisisprobablyduetobadmedia,but maybehardwarerelated. |
| 1100UnrecoveredReadError-AReadoperationfailed.Thisisprobablyduetobad media,butmaybehardwarerelated. |
| 1112Auxiliarymemoryreaderror.Thedrivereportedthatitisunabletoreadthe AuxiliaryMemoryinaWORMcartridge. |
| 1400RecordedEntityNotFound-AspaceorLocatecommandfailedbecauseaformat violationpreventedthetargetfrombeingfound. |
| 1403EndOfDatanotfound-AReadtypeoperationfailedbecauseaformatviolation relatedtoamissingEODdataset. |
| 1410NotReady-Auxiliarymemorynotaccessible.Thedriveisnotabletobecome readybecauseitisunabletoaccesstheAuxiliaryMemoryinaWORMcartridge. |
| 1A00Parameterlistlengtherror-Theamountofparameterdatasentisincorrect. |
| 2000InvalidCommandOperationCode-TheOperationCodeinthecommandwasnot avalidOperationCode. |
| 2400InvalidfieldinCDB-AninvalidfieldhasbeendetectedinaCommandDescriptor Block. |
| 2500LUNnotsupported-Thecommandwasaddressedtoanon-existentlogicalunit number. |
| 2600InvalidFieldinParameterList-Aninvalidfieldhasbeendetectedinthedatasent duringthedataphase. |
| 2700WriteProtect-AWritetypeoperationhasbeenrequestedonacartridgewhichhas beenwriteprotected. |
| 2800NotReadytoReadyTransition-Acartridgehasbeenloadedsuccessfullyintothe driveandisnowreadytobeaccessed. |
| 2900Reset-Thedrivehaspoweredon,receivedaresetsignalorabusdevicereset signalsincetheinitiatorlastaccessedit. |
| 2A01ModeParametersChanged-TheModeparametersforthedrivehavebeen changedbyaninitiatorotherthantheoneissuingthecommand. |
| 3000IncompatibleMediaInstalled-Awritetypeoperationcouldnotbeexecuted becauseitisnotsupportedonthecartridgetypethatisloaded. |
| 3001UnknownFormat-Anoperationcouldnotbecarriedoutbecausethecartridgein thedriveisofaformatnotsupportedbythedrive. |
| 3002IncompatibleFormat-AnoperationcouldnotbecompletedbecausetheLogical Formatisnotcorrect. |
| 3003CleaningCartridgeInstalled-Anoperationcouldnotbecarriedoutbecausethe cartridgeinthedriveisacleaningcartridge. |
| 3007CleaningFailure-Acleaningoperationwasattempted,butcouldnotbecompleted forsomereason. |
| 300CDataProtect-WORMoverwriteattempted.Thedriverejectedawriteoperation becauseitwouldhaveresultedinanoverwrite.Overwriteisnotallowedon WORMmedia. |
| 300DMediumError-WORMintegritycheck. ThedriverejectedaReaderWrite operationbecausethecartridgeisasuspiciousWORMcartridge. |
| 3100Mediaformatcorrupted-Datacouldnotbereadbecausetheformatontapeisnot valid,butisaknownformat.AfailureoccurredattemptingtowritetheFID. |
| 3700Roundedparameter-AModeSelectcommandparameterhasbeenrounded becausethedrivecannotstoreitwiththeaccuracyofthecommand. |
| 3A00MediaNotPresent-Amediaaccesscommandhasbeenreceivedwhenthereisno cartridgeloaded. |
| 3B00SequentialPositioningError-Acommandhasfailedandlefthelogicalpositionat anunexpectedlocation. |
| 3D00InvalidbitsinidentifyMessage-AnillegalIdentifyMessagehasbeenreceivedat thedriveatthestartofacommand. |
| 3E00LogicalUnithasnotSelf-Configured-Thedrivehasjustpoweredonandhasnot completeditsselftestsequenceandcannotprocesscommands. |
| 3F01CodeDownload-ThefirmwareinthedrivehasjustbeenchangedbyaWrite Buffercommand. |
| 40xxDiagnosticfailure-Adiagnostictesthasfailed.Thexx(ASCQ)isavendorspecific codeindicatingthefailingcomponent. |
| 4300MessageError-Amessagecouldnotbesentorreceivedduetoexcessive transmissionerrors. |
| 4400Internaltargetfailure-Ahardwarefailurehasbeendetectedinthedrivethathas causedthecommandtofail. |
| 4500Select/ResetFailure-Anattempttoselectaninitiatorinordertocompletethe commandhasfailed. |
| 4B00DataPhaseError-Acommandcouldnotbecompletedbecausetoomanyparity errorsoccurredduringtheDataphase. |
| 4E00OverlappedCommands-Aninitiatorselectedthedriveeventthoughhitalready hadacommandoutstandinginthedrive. |
| 5000WriteAppendError-Awritetypecommandfailedbecausethepointatwhichto appenddatawasunreadable. |
| 5100Erasefailure-AnErasecommandfailedtoerasetherequiredareaonthemedia. |
| 5200Cartridgefault-Acommandcouldnotbecompletedduetoafaultinthetape cartridge. |
| 5300MediaLoad/EjectFailed-(SenseKey03)Anatempttoloadorejectthecartridge failedduetoaproblemwiththecartridge. |
| 5300MediaLoad/EjectFailed-(SenseKey04)Anatempttoloadorejectthecartridge failedduetoaproblemwiththedrive. |
| 5302MediaRemovalPrevented-AnUnloadcommandhasfailedtoejectthecartridge becausemediaremovalhasbeenprevented. |
| 5D00FailurePredictionThreshold-FailurePredictionthresholdshavebeenexceeded indicatingthatafailuremayoccursoon. |
| 5DFFFailurePredictionFalse-AModeSelectcommandhasbeenusedtotestforFailure Predictionsystem. |
| 8282Driverequirescleaning-Thedrivehasdetectedthatacleaningoperationis requiredtomaintaingoodoperation. |
| 8283BadCodeDetected-Thedatattransferredtothedriveduringafirmwareupgrade iscorruptorincompatiblewithdrivehardware. |
| SenseKey0(NoSense) |
| EE13Encryption-KeyTranslate |
| EF13Encryption-KeyTranslateEKM |
| SenseKey3(MediumError) |
| 3002Encryption-Encryptionfeatureisnotenabledsoformat/processingisnot supported. |
| EE60Encryption-ProxyCommandError |
| EED0Encryption-DataReadDecryptionFailure |
| EED1Encryption-DataReadafterWriteDecryptionFailure |
| EEE0Encryption-KeyTranslationFailure |
| EEE1Encryption-KeyTranslationAmbiguous |
| EEF0Encryption-DecryptionFenced(Read) |
| EEF1Encryption-EncryptionFenced(Write) |
| SenseKey4(HardwareError) |
| EE0EEncryption-KeyServiceTimeout |
| EE0FEncryption-KeyServiceFailure |
| 4000Encryption-FailureHardware,POSTorModuleFailure |
| SenseKey5(IllegalRequest) |
| EE00Encryption-KeyServiceNotEnabled |
| EE01Encryption-KeyServiceNotConfigured |
| EE02Encryption-KeyServiceNotAvailable |
| EE10Encryption-KeyRequired |
| EE20Encryption-KeyCountExceeded |
| EE21Encryption-KeyAliasExceeded |
| EE22Encryption-KeyReserved |
| EE23Encryption-KeyConflict |
| EE24Encryption-KeyMethodChange |
| EE25Encryption-KeyFormatNotSupported |
| EE26Encryption-UauthorizedRequest-dAK |
| EE27Encryption-UauthorizedRequest-dSK |
| EE28Encryption-UauthorizedRequest-eAK |
| EE29Encryption-AuthenticationFailure |
| EE2AEncryption-InvalidRDKi |
| EE2BEncryption-KeyIncorrect |
| EE2CEncryption-KeyWrappingFailure |
| EE2DEncryption-SequencingFailure |
| EE2EEncryption-UnsupportedType |
| EE2FEncryption-NewKeyEncryptedWritePending |
| EE30Encryption-ProhibitedRequest |
| EE31Encryption-KeyUnknown |
| EE32Encryption-KeystoreRelatedProblem |
| EE42Encryption-EKMChallengePending |
| EEE2Encryption-KeyTranslationDisallowed |
| EEFFEncryption-SecurityProhibitedFunction |
| EF01Encryption-KeyServiceNotConfigured |
| 2611Encryption-IncompleteKey-AssociateDataSet |
| 2612Encryption(T10)-VendorSpecificReferenceKeyNotFound |
| 5508Encryption(T10)-MaximumNumberofSupplementalKeysExceeded |
| SenseKey6(UnitAttention) |
| EE12Encryption-KeyChangeDetected |
| EE18Encryption-Changed(Read) |
| EE19Encryption-Changed(Write) |
| EE40Encryption-EKMIdentifierChanged |
| EE41Encryption-EKMChallengeChanged |
| EE50Encryption-InitiatorIdentifierChanged |
| EE51Encryption-InitiatorResponseChanged |
| 2A11Encryption-DataEncryptionParametersChangedbyAnotherI_TNexus |
| 2A12Encryption-DataEncryptionParametersChangedbyVendorSpecificEvent |
| SenseKey7(DataProtect) |
| EF10Encryption-KeyRequired |
| EF11Encryption-KeyGeneration |
| EF13Encryption-KeyTranslate |
| EF1AEncryption-KeyOptional |
| EFC0Encryption-NoOperation |
| 2610Encryption-DataDecryptionKeyFailLimit |
| 2A13Encryption-DataEncryptionKeyInstanceCounterChanged |
| 7400SecurityError |
| 7401Encryption-UnabletoDecryptData |
| 7402Encryption-UnencryptedDataEncounteredWhileDecrypting |
| 7403Encryption-IncorrectDataEncryptionKey |
| 7404Encryption-CryptographicIntegrityValidationFailed |
| 7405Encryption-ErrorDecryptingData |
The descriptions below serve only as an overview of sense reporting in the tape drive. This tape drive conforms to all sense field reporting as specified in the SCSI standards.
- The Error Code field (Byte 0) is set to 70h to indicate a current error, that is one associated with the most recently received command. It is set to 71h to indicate a deferred error which is not associated with the current command.
-
The segment number (Byte 1) is zero since the Copy, Compare, and Copy and Verify commands are not supported.
-
TheFileMarkflag(Byte2, bit7)issetifaSpace, Read, or Verifycommand did not complete because a file mark was read.
- TheEndofMedia(EOM)flag(Byte2,bit6)issetifaWriteorWriteFile Markscommandcompletedintheearlywarningarea.SpacingintoBOMalso causesthisflagtobeset.Itisalsosetonanattempttoreadorspacepast EOD,orifanattemptismadetospaceintoBeginningofMedia.
- The Illegal Length Indicator (ILI) flag (Byte2, bit5) is set if a Reader Verify ended because a block was read from tapethat did not have the block length requested in the command.
- TheInformationBytes(Bytes3-5)areonlyvalidiftheValidflagisset.This occursonlyforcurrenterrorsandnotfordeferrederrors.
- TheFieldReplaceableUnitfield(Byte14)issettoeitherzeroortoanon-zero, vendor-specificcodeindicatingwhichpartofthedriveissuspectedofcausing thefailure.
- TheClean(CLN)flag(Byte21,bit3)issetifthedriveneedscleaningand clearotherwise.
- TheVolumeLabelFieldsValid(VolValid)bit(Byte21, bit0)issetiftheVolumeLabelbeingreportedisvalid.
- TheVolumeLabelfield(Bytes22-28)reportsthevolumelabelifacartridgeis loadedinthedriveandVolumeLabelFieldsValidisset.
- TheCurrentWrapfield(Byte29)reportsthephysicalwrapofthetape.The leastsignificantbitreflectsthecurrentphysicaldirection.A0hmeansthatthe currentdirectionisawayfromthephysicalbeginningofthetape.A1hmeans thatthecurrentdirectionistowardsthephysicalbeginningofthetape.
- RelativeLPOSfields(Bytes30-33)reportsthecurrentphysicalpositiononthe tape.
- SCSIAddressfield(Byte34) reports the SCSI Bus Address forthedrive. Values returned range from 00h to 0Fh.
- Thisfield(Byte35)containstheframeanddrivenumber, passedacross the RS-422serialinterface.
AppendixD.LibraryConfigurationForm
Makeacopyofthisform,fillitoutasyouareinstallingandconfiguringyour library. Updatetheformeachtimechangesaremadetothelibrary.The informationthatiscontainedonthisformisimportant,andhelpfulifacalltoDell serviceisnecessary.Storethisforminasecurelocation.
PhysicalLibrary
| MachinetypeTL1000 | |
| SerialNumber | |
| LibraryName | |
| AutoCleaning | |
| Barcodelabellength |
LogicalLibrary
| LibraryAccessMode | |
| Loop | |
| Autoload | |
| ActiveSlots |
TapeDrive
| SerialNumber | |
| WorldwideNodeName |
NetworkSettings
| EthernetLinkSpeed | |
| SSLSecurity | |
| IPv4 | |
| DHCP | |
| StaticIPaddress | |
| SubnetMaskAddress | |
| GatewayAddress | |
| IPv6 | |
| DHCP | |
| StatelessAutoConfiguration | |
| StaticIPaddress | |
| PrefixLength | |
| Gateway | |
| DNS | |
| DNSIPaddress | |
| NTPDate/TimeServer | |
| NTPServerIPaddress | |
| TimeZone | |
| AutoAdjustmentbyPC | |
| SMTP(Mail)Server | |
| SMTPServerAddress | |
| SenderAddress | |
| Subject | |
| Mailto01 | |
| Mailto02 | |
| Mailto03 | |
| Mailto04 | |
| MailEventLevel | |
| SNMPServer | |
| Community | |
| Name | |
| Location | |
| Contact | |
| Trapto01 | |
| Trapto02 | |
| Trapto03 | |
| Trapto04 | |
| User1 | |
| User2 | |
| User3 | |
| User4 | |
| TrapEventLevel |
LibraryandDriveFirmware
| TypeofFirmwareCurrentFirmwareLevel | |||||
| Library | |||||
| Drive | |||||
UsersAccounts
TheAdministrator(admin)passwordlistedinthetablebelow.Modifyandadd extraAdministrator,Superuser,andUsernamesandpasswordsthatarecreated.
| UsernameAccessLevelPassword | ||
| adminAdministratorsecure | ||
SupportNotification
| Username | |
| Password |
Accessibility
Accessibilityfeatureshelpauserwithaphysicaldisability,suchasrestricted mobilityorlimitedvision,successfullyusetheHTMLversionofthecustomer documentation.
Features
These are them major accessibility features for the HTML version of the Dell Power Vault TL1000 Tape Autoloader User's Guide.
- Youcanusescreen-readersoftwareandadigitalspeechsynthesizertohearwhat isdisplayedonthescreen.Thefollowingscreenreadersaretested:WebKingand Window-Eyes.
- Youcanoperateallfeatureswiththekeyboardinsteadofthemouse.
Navigatebykeyboard
Youcanusekeysorkeycombinationstoperformoperationsandinitiatemany menuactionsthatcanalsobedonethroughmouseactions.Youcannavigatethe HTML version of the Dell PowerVault TL1000 Tape Autoloader User's Guide help systemfromthekeyboard.Usethefollowingkeyboardcombinations:
- http://www.dell.com/support
- To traverse to the next link, button, or topic, press Tab inside a frame (page).
- Tomovetotheprevioustopic, press^orShift+Tab.
• To scroll all the way up or down, press Home or End. - Toprintthecurrentpageoractiveframe,pressCtrl+P.
•Toselect,pressEnter.
Accessthepublications
YoucanviewthepublicationsforthislibraryinAdobePortableDocumentFormat (PDF)withtheAdobeAcrobatReader.ThePDFsareprovidedatthefollowing website:http://www.dell.com/support
Glossary
This glossary definesthespecialterms, abbreviations, and acronymsthatareused in this publication. If you donot find the term that you are looking for, referto the index to the Dictionary of Computing, 1994.
Numbers
2:1 compression
Therelationshipbetweenthequantityofdatathatcanbestoredwith compressionascomparedtothequantityofdatathatcanbestored withoutcompression.In2:1compression,twiceasmuchdatacanbestored withcompressionascanbestoredwithoutcompression.
A
AAmpere.
acAlternatingcurrent.
accessmethod
Atechniqueformovingdatabetweenmainstorageandinputoroutput devices.
accessor
This component contains the library robot and barcodereader. The accessormoves cartridge to and from the I/O station, storageslots, and tapedrives.
adaptercard
Acircuitboardthataddsfunctiontoacomputer.
adjAdjustment.
AHAuthenticationHeader.AnInternetProtocolintendedtoguarantee connectionlessintegrityanddataoriginauthenticationofIPdatagrams. Further, itcanoptionallyprotectagainstreplayattacksbyusingthesliding windowtechniqueanddiscardingoldpackets.
AIXAdvancedInteractiveExecutive.IBM'simplementationoftheUNIX operatingsystem.TheSystempsystem,amongothers,usesAIXasit's operatingsystem.
alphanumeric
Pertainingtoacharactersetthatcontainsletters,numerals,andother characters,suchaspunctuationmarks.
alterTochange.
ambienttemperature
Thetemperatureofairorothermediainadesignatedarea,particularlythe areathatissurroundingequipment.
AMEApplicationManagedEncryption.
ampere(A)
Aunitofmeasureforelectriccurrentthatisequivalenttoaflowof1coulombpersecond,ortothecurrentproducedby1voltappliedacrossa resistanceof1ohm.
ANSIAmericanNationalStandardsInstitute.
application-managedencryption
Tapeencryptionthatiscontrolledbyanapplication.
archive
Tocollectandstorefilesinadesignatedplace.
ASCIIAmericanNationalStandardCodeforInformationInterchange.A7bit codedcharacterset(8bitsincludingparitycheck)thatconsistsofcontrol charactersandgraphiccharacters.
assigningadevice
The establishing of the relationship of a device to running tasks, process, job, or program.
assignment
Thenamingofaspecificdevicetoperformafunction.
asynchronous
Pertainingtotwoormoreprocessesthatdonotdependuponthe occurrenceofspecificeventssuchascommontimingsignals.
attention(notice)
Awordforcallingattentiontothepossibilityofdangertoaprogram, device,orsystem,ortodata.Contrastwithcautionanddanger.
ATTNAttention.
B
backup
Tomakeextracopiesofdocumentsorsoftwareforsafekeeping.
barcode
Acodethatrepresentscharactersbysetsofparallelbarsofvarying thicknessandseparation,whicharereadopticallybytransversescanning.
barcodelabel
Paperbearingabarcode and having an adhesive backing. The barcode label must be affixed to a paracar tridgeto enable the library to identify the cartridge and its volume serial number.
barcodereader
Alaserdevicethatisspecializedforscanningandreadingbarcodesand convertingthemintoeithertheASCIIorEBCDICdigitalcharactercode.
bezelDecorativeandsafetycover.
bicolored
Havingtwocolors.
bitEitherofthedigits0or1whenusedinthebinarynumberingsystem.
BOMorbillofmaterials
Alistofspecifictypesandamountsofdirectmaterialsthataareexpectedto beusedtoproduceaspecificjoborquantityofoutput.
BorderGatewayProtocol(BGP)
BGPisthecoreroutingprotocoloftheInternet.Itworksbymaintaininga tableofIPnetworksor'prefixes'thatdesignatenetworkreachability amongautonomoussystems(AS).
BRMSBackupRecoveryandMediaServices.
browser
Aclientprogramthatinitiatesrequeststoawebserveranddisplaythe informationthattheserverreturns.
buffer
Aroutineorstoragethatisusedtocompensateforadifferenceinrateof flowofdataortimeofoccurrenceofevents,whendataistransferredfrom onedevicetoanother.
busAfacilityfortransferringdatabetweenseveraldevicesthatarelocated betweenwoendpoints,onlyonedeviceabletotransmitataspecified moment.
byteAstringthatconsistsofsomebits(usually8)thataretreatedasaunitand representacharacter.Afundamentaldataunit.
C
CAcertification
Incryptography, acertificate from acertificate authority (CA).
capacity
The amount of datathat can be contained on storagemedia and expressed in bytes of data.
cartridgemanualrewindtool
Adevicethatcanbefittedintothereelofacartridgeandusedtorewind tapeintooroutofthecartridge.
cartridgememory(CM)
Withineachdatacartridge, an embedded electronics and interfacemodule that can store and retrieve a cartridge's historical usage and other information.
cartridgesorageslot
Individualslotthatislocatedwithinamagazinethatisusedtohousetape cartridges.
caution(notice)
Awordtocallattentiontopossiblepersonalharmtopeople. Contrastwith attentionanddanger.
CECustomerengineer; fieldengineer; servicerepresentative.
centimeter(cm)
Oneone-hundredthofameter(0.01m). Approximately 0.39inch.
channelcommand
Aninstructionthatdirectsadatachannel,controlunit,ordeviceto performanoperationorsetofoperations.
charCharacter.
CHKCheck.
cleaningcartridge
Atapecartridgethatisusedtocleantheheadsofatapedrive.Contrast withdatacartridge.
CODCapacityOnDemand.
command
A controlsignalthatinitiatesanactionorthestartofasequenceofactions.
compactdisc(CD)
Adisc, usually 4.75 inches indiameter, from which data is read optically by using alaser.
compression
The processofeliminatinggaps,emptyfields,redundancies,and unnecessarydatatoshortenthelengthofrecordsorblocks.
concurrent
Referstodiagnosticprocedurethatcanberunononecontrolunitwhile therestofthesubsystemremainsavailableforcustomerapplications.
contingentconnection
A connection between an channel path and a drivethatis caused when a unit check occurs during an I/O operation.
controller
Adevicethatprovidestheinterfacebetweenasystemandoneormore tapedrives.
controlpathdrive
controller A device that provides the interface between asystem and one or more taped drives. control path drive A drivethat communicates messages from the host computer to the library in which the drive is installed.
cookie A packet of dat a that is exchanged between the library and a web browser to track configuration.
CPCircuitprotector.
CPFControlPathFailover.
CRUCustomerReplaceableUnit.
CSACanadianStandardsAssociation.
ctrlControl.
CUControlunit.
D
danger(notice)
Awordtocallattentiontopossiblelethalharmtopeople.Contrastwith attentionandcaution.
dataAnyrepresentationssuchascharactersoranalogquantitiestowhich meaningisormightbeassigned.
databuffer
The storage buffer in the control unit. This buffer is used to increase the data transferrate between the control unit and the channel.
datacartridge
Atapecartridgethatisdedicatedtostoringdata.Contrastwithcleaning cartridge.
datacheck
Asynchronousorasynchronousindicationofaconditionthatiscausedby invaliddataorincorrectpositioningofdata.
dcDirectcurrent.
DCSDesignatedCleaningSlot.
degauss
Tomakeamagnetictapenonmagneticbyusingelectricalcoilsthatcarry currentsthatneutralizethemagnetismofthetape.
degausser
Adevicethatmakesmagnetictapenonmagnetic.
degradation
Adecreaseinqualityofoutputthroughputoranincreaseinmachine errorrate.
degraded
Decreased inequality of output through put or increased machine error rate.
deserialize
Tochangefromserial-by-bittoparallel-by-byte.
detented
Apartthatisheldinpositionwithacatchorlever.
deviceAnyhardwarecomponentorperipheraldevice,suchasatapedriveortapelibrary,thatcanreceiveandsenddata.
devicedriver
Afilethatcontainsthecodethatisneededtouseanattacheddevice.
DHCPv6
TheDynamicHostConfigurationProtocolforIPv6.AlthoughIPv6's statelessaddressautoconfigurationremovestheprimarymotivationforDHCPinIPv4,DHCPv6canstillbeusedtostatefullyassignaddressesif thenetworkadministratorwantsmorecontroloveraddressing.
DHgroup
Diffie-Hellmangroup.
DIAG
Diagnosticsectionofmaintenanceinformationmanual.
differential
See High Voltage Differential (HVD).
directaccessstorage
Astoragedeviceinwhichtheaccesstimeisindependentofthelocationof thedata.
displaycontrast
ThebrightnessofthedisplayontheOperatorPanel.
DLLDynamicLinkLibrary.TheMicrosoftimplementationofthesharedlibrary concept.Theselibrariesusuallyhavethefileextensiondll,ocs(forlibraries thatcontainactiveXcontrols,ordrv(forlegacysystemdrivers).
DNSDirectoryNameSystem. This allows the library to recognize text-based addresses instead of numericIP addresses.
download
Totransferprogramsordatafromacomputertoaconnecteddevice, typicallyapersonalcomputer.
Totransferdatafromacomputertoaconnecteddevice,suchasa workstationorpersonalcomputer.
DPFDataPathFailover.
DRAM
Dynamicrandom-accessmemory.
drive,magnetictape
Amechanismformovingmagnetictapeandcontrollingitsmovement.
DriveNotConfigured
Thismessageoccursduringthefirstbootafterafactorysettingsrestoreis run. Thismessageisnotarealissuesinceittakestimeforthelibraryto configure.
DRVDrive.
DSAkey
Encryptionkeytype.
DSEDatasecurityerase.
Aunitofmeasure, which is established by the Electronic Industries Association, equal to 44.45 millimeters (1.75 inches).
ejectToremoveorforceoutfromwithin.
EKMEncryptionKeyManager.
electronicmail
Correspondence in the form of message that are transmitted between user terminalsoveracomputernetwork.
emailSeeelectronicmail.
encryption
Amethodofstoringdatainaformatthathelpsprotectdatafrom inadvertentordeliberatecompromise.Anencryption-enableddrive containsthenecessaryhardwareandfirmwaretoencryptanddecrypthost tapeapplicationdata.Encryptionpolicyandencryptionkeysareprovided bythehostapplicationorhostserver.
encryptionkeymanager(EKM)
AJavasoftwareprogramthatassistsencryptingtapedrivesingenerating, protecting, storing, and maintaining encryption key that encrypt information that is written to and decrypt information that is read from tapemedia.
entitlement
Entitlementistheofficialrighttoreceiveserviceandsupportforyourtape library.
EPOEmergencypoweroff.
EPROM
Erasableprogrammablereadonlymemory.
EQCEquipmentcheck.
equipmentcheck
Anasynchronousindicationofamalfunction.
Errorlog
A datasetorfileinaproductorsystemwhereerrorinformationisstored forlateraccess.
ESDElectrostaticdischarge.
ESPEncapsulatingSecurityPayload.AnInternetProtocolthatprovidesoriginauthenticity,integrity,andconfidentialityprotectionofapacket.ESPalsosupportsencryption-onlyandauthentication-onlyconfigurations,butencryptionwithoutauthenticationisdiscouragedbecauseitisinsecure.
F
faultsymptomcode(FSC)
Ahexadecimalodethatisgeneratedbythedriveorthecontrolunit microcodeinresponsetoadetectedsubsystemerror.
FCFeaturecode.
FCCFederalcommunicationscommission.
FEFieldengineer,customerengineer,orservicerepresentative.
fiducial
Atargetthatisusedforteachingaphysicalallocationtoarobot.
fieldreplaceableunit(FRU)
Anassembly that is replaced in its entirety when anyone of its components fails.
fileAnamedsetofrecordsthatarestoredorprocessedasaunit.Alsoreferred toasadataset.
fileprotection
Theprocessesandproceduresthatareestablishedinaninformation systemthataredesignedtoinhibitunauthorizedaccessto,contamination of,ordeletionofafile.
filetransferprotocol(FTP)
IntheInternetsuiteofprotocols,anapplicationlayerprotocolthatuses TCPandTelnetservicestotransferbulk-datafilesbetweenmachinesor hosts.
firmware
Proprietarycodethatisdeliveredasmicrocodeaspartofanoperating system.Firmwareismoreefficientthansoftwareloadedfromanalterable mediumandmoreadaptabletochangethanpurehardwarecircuitry.An exampleoffirmwareistheBasicinput/outputsystem(BIOS)inread-only memory(ROM)onaPCsystemboard.
FLASHEEPROM
Anelectricallyerasableprogrammableread-onlymemory(EEPROM)that canbeupdated.
FMRFieldmicrocodereplacement.
format
The arrangementorlayoutofdataonadatamedium.
formatter
Partofamagnetictapesubsystemthatperformsdataconversion,speed matching,encoding,firstlevelerrorrecovery,andinterfaceoneormore tapedrives.
FPFileprotect.
frayed Damagedasifbyanabrasivesubstance.
FRUFieldreplaceableunit.
FSCFaultsymptomcode.
FSIFaultsymptomindex.
FTSSFieldTechnicalSalesSupport.
functionalmicrocode
Microcodethatisresidentinthemachineduringnormalcustomer operation.
G
gGram.
GBgigabyte.
GBICGigabitInterfaceConverter.
Gbsgigabits/second
Gbigigabit
gigabit(Gbit)
1000000000bits.
gigabyte(GB)
1000000000bytes.
GigabitInterfaceConverter(GBIC)
Convertscopperinterfacetoopticinterface.
gndGround.
H
HBAHostBus Adapter.
HDSlotTechnology
High-density(HD)slottechnology. Allows multiplecartridgesobestored inatiered architecture.
hertz(Hz)
Unitoffrequency. 1hertzequalsonecyclepersecond.
hex Hexadecimal.
HighVoltageDifferential (HVD)
A logic signaling system that tenables data communication between a supported host and the library. HVD signaling uses apaired plus and minus signal level to reduce the effects of noise on the SCSI bus. Any noise that is injected into the signal is present in both a plus and minus state, and is canceled. Synonymous with differential.
HVDSCSIBusHighVoltageDifferential
HzHertz(cyclespersecond).
|
IDIdentifier.
identifier(ID)
(1)Inprogramminglanguages,alexicalunitthatnamesalanguageobject;forexample,thenamesofvariables,arrays,records,labels,orprocedures.Anidentifierusuallyconsistsofaletteroptionallyfollowedbyletters,digits,orothercharacters.(2)Oneormorecharactersthatareusedtoidentifyornamedataelementandpossiblytoindicatecertainpropertiesofthatdataelement.(3)Asequenceofbitsorcharactersthatidentifiesaprogram,device,orsystemtoanotherprogram,device,orsystem.
IEC International Electrotechnical Commission.
IKEInternetKeyExchangethatisusedintheIPsecprotocol.
IMLInitialmicroprogramload.
incompatible magazine
ThismessagemightdisplayontheOperatorPanelduringlibrary initialization.ItoccursduringfactoryrestoreorVPD.Thismessageisnota realissuesinceittakestimeforthelibrarytoconfigure.
initialmicroprogramload(IML)
The action of floating a micro program from an external storage to writable control storage.
initiator
Thecomponentthatrunsacommand.Theinitiatorcanbethehostsystem orthetapecontrolunit.
INSTInstallation.
interface
Asharedboundary.Aninterfacemightbeahardwarecomponenttolink twodevicesoritmightbeaportionofstorageorregistersaccessedbytwo ormorecomputerprograms.
InternetProtocolVersion4(IPv4)
SeeIPv4.
InternetProtocolVersion6(IPv6)
SeeIPv6.
interposer
Thepartthatisusedtoconverta68-pinconnectortoa50-pinD-shell connector.
interventionrequired
Manualactionisneeded.
INTRO
Introduction.
I/OInput/output.
I/Ostation
Cartridgeslocationthatisdedicatedfortheinsertionofcartridgesintoand theremovalofcartridgesfromthelibrary.
IOPInput/outputprocessor.
IPInternetProtocol.
IPaddress
AnidentifierforacomputerordeviceonanInternetProtocol(TCP/IP) network.NetworksthatusetheTCP/IPprotocolroutemessagesthatare basedonthelPaddressofthedestination.SeeIPv4andIPv6.
IPLInitialprogramload.
IPSec(IPsecurity)
AsetofprotocolsforsecuringIPv6networkcommunicationsby authenticationandencryption.
IPStack
ATCP/IPprotocolstackthatmanagesstaticIPaddresses.
IPv4Anetworklayerprotocolforpacket-switchednetworks.IPv4supports2 (about4.3billion)addresses.
IPv6Anetworklayerprotocolforpacket-switchednetworks.Itisthedesignated successorofIPv4forgeneraluseontheInternet.Themainimprovement thatisbroughtbyIPv6istheincreaseinthenumberofaddressesavailable fornetworkeddevices,allowing,forexample,eachmobilephoneand mobileelectronicdevicetohaveitsownuniqueaddress.
ISVIndependentsoftwarevendor.
ITSTIdle-timeself-test.
K
Kerberos
KerberosAuthenticationisastandard(RFC1510)third-party authenticationprotocolthatprovidesend-to-endsecurityfordistributed computingenvironments.
kilogram(kg)
1000grams(approximately2.2pounds).
kmkilometer.1000Meters, Approximately5/8mile.
L
LANLocalareanetwork.Acomputernetworkwithinalimitedarea.
LCBLibraryControlBlade
LCDSeeliquidcrystaldisplay.
LDAPLightweightDirectoryAccessProtocol. This allows the library to us login and password information that is stored on a server to grant access to the library functionality.
LDAPS
SecureLDAPoverSSL.
LDILibraryDriveInterface.
LEDLight-emittingdiode.
librarycertification
Incryptography, acertificatethatisprovidedbythelibrary.
library-managedencryption
Tapeencryptionthatiscontrolledbythetapelibrary.
LinearTape-Open(LTO)
AtypeoftapestoragetchnologythatisdevelopedbytheIBM Corporation,Hewlett-Packard,andQuantum.LTOtechnologyisan"open format"technology,whichmeansthatitsusershavemultiplesourcesof productandmedia.The"open"natureofLTOtechnologyenables compatibilitybetweendifferentvendors'offeringsbyensuringthatvendors complywithverificationstandards.TheLTOtechnologyisimplementedin twoformats:theAccelisformatfocusesonfastaccess;theUltriumformat focusesonhighcapacity.TheUltriumformatisthepreferredformatwhen capacity(ratherthanfastaccess)isthekeystorageconsideration.An Ultriumcartridgehasacompresseddatacapacityofupto6250GB(2.5:1 compression)andanativedatacapacityofupto2500GB.
liquidcrystaldisplay(LCD)
Alow-powerdisplaytechnologythatisusedincomputersandotherI/O devices.
loadable
Theabilitytobeloaded.
LMELibraryManagedEncryption.
LTOcartridgememory(LTO-CM)
WithineachLTOUltriumdatacartridge,anembeddedelectronics and interfacemodulethatcanstoreandretrieveacartridge'shistoricalusage and otherinformation.
LUNLogicalUnitNumber.
LVDSCSIBusLowVoltageDifferential
M
MACaddress
TheMediaAccessControladdressofacomputernetworkingdevice.
magnetictape
Atapewithamagneticsurfacelayeronwhichdatacanbestoredby magneticrecording.
MAPMaintenanceanalysisprocedure.
maskApatternofcharactersthatcontrolstheretentionoreliminationofportions ofanotherpatternofcharacters. Touseapatternofcharacterstocontrol theretentionoreliminationofportionsofanotherpatternofcharacters.
masterfile
Afilethatisusedasanauthorityinajobandthatisrelativelypermanent, even though its contents might change. Synonymous with main file.
MaximumTransmissionUnit(MTU)
Thesizeofthelargestpacketthatanetworkprotocolcantransmit.
MBMegabyte(expressedasdatarateinMB/sorMB/second).
mediacapacity
The amount of data that can be contained on last or aged medium, expressed in bytes of data.
media-typeidentifier
PertainingtothebarcodeonthebarcodelabeloftheUltriumTape
Cartridge,a2-charactercode,L1,thatrepresentsinformationaboutthe cartridge.L identifiesthecartridgegeasonethatcanbereadbydevicesthat incorporateLTOtechnology;1 indicatesthatitisthefirstgenerationofits type.
megaOnemillionof.
meterIntheMetricSystem,thebasicunitoflength;equaltoapproximately39.37 inches.
MIBManagementInformationBase.Informationrepositorythatisusedby SNMP.
microOnemillionthof.
microcode
(1)Oneormoremicroinstructions.(2)Acode,representingthe instructionsofaninstructionset,whichisimplementedinapartofstorage thatisnotprogram-addressable.(3)Todesign,write,andtestoneormore microinstructions.(4)Seealsomicroprogram.
microdiagnosticroutine
Aprogramthatrunsunderthecontrolofasupervisor, usually to identify fieldreplaceable units.
microdiagnosticutility
Aprogramthatisrunbythecustomerengineertotestthemachine.
microinstruction
Abasicorelementarymachineinstruction.
microprogram
Agroupofmicroinstructionsthatwhenrunperformsaplannedfunction.
The term microprogram represents dynamic arrangement or selection of oneormoregroupsofmicroinstructionsforexecutiontoperforma particular function. The term microcoderepresents microinstruction that are used in a product as an alternative to hard-wired circuitry to implement certain functions of a processor or othersystem component.
MIMMediainformationmessage.
mmMillimeter.
modifier
Thatwhichchangesthemeaning.
mountadevice
ToassignanI/Odevicewitharequesttotheoperator.
MPMicroprocessor.
msMillisecond.
MSGMessage.
multipath
Pertainingtousingmorethanonepath.
N
N/ANotapplicable.
NetworkAddressTranslation(NAT)
NATinvolvesrewritingthesourceordestinationaddressesofIPpackets
astheypassthrougharouterorfirewall.MostsystemsthatuseNATdoso toenable multiplehostsonaprivatenetworktoaccesstheInternetovera singlepublicIPaddress.
NEMA
National Electrical Manufacturers Association.
nodeInanetwork, apointatwhichoneormorefunctionalunitsconnect channelsordatacircuits.
NTPNetworkTimeProtocol. This protocol allows the library to set its internal date and timethatis based on the date and time of a server.
NVSNonvolatilestorage.Astoragedevicewhosecontentsarenotlostwhen poweriscutoff.
0
oersted
Theunitofmagneticfieldstrengthintheunrationalized centimeter-gram-second(cgs)electromagneticsystem.Theoerstedisthe magneticfieldstrengthintheinteriorofanelongated,uniformlywound solenoidthatisexcitedwithalinearcurrentdensityinitswindingof1 abampereper4π centimetersofaxiallength.
offline
Pertainingtotheoperationoffunctionalunitwithoutthecontinual controlofacomputer.Contrastwithonline.
online Pertaining to the operation of a functional unit that is under the continual controlofacomputer. Contrast with offline.
OPEROperation.
ovOvervoltage.
overrun
Lossofdatabasebecauseareceivingdeviceisunabletoacceptdataattherate itistransmitted.
overtightening
Totightentoomuch.
P
parameter
Avariablethatisgivenaconstantvalueforaspecifiedapplicationand thatmightdenotetheapplication.
pbitParitybit.
PCParitycheck.
PCCPowercontrolcompartment.
PDFPortableDocumentFormat.
PEParityerror.Productengineer.
PFSPerfectforwardsecrecy.
pick Pertainingtothelibrary, toremove, by usingaroboticdevice, atape cartridgefromastorageslotordrive.
pickerAroboticmechanismthatislocatedinsidethelibrarythatmoves cartridgesbetweenthecartridgetorageslotsandthedrive.
PMPreventivemaintenance.
PORPower-onreset.
portAphysicalconnectionforcommunicationbetweenthe3590andthehost processor.The3590has2SCSIports.
PortableDocumentFormat(PDF)
AstandardthatisspecifiedbyAdobeSystems, Incorporated, forthe electronicdistributionofdocuments.PDFfilesarecompact, can be distributedglobally(bywayofemail, theweb, intranets, orCD-ROM), and can be viewedwiththeAcrobatReader, whichissoftwarefromAdobe SystemsthatcanbedownloadedatnocostfromtheAdobeSystemshome page.
Privatekey
Acryptographickeythatisusedtodecryptamessage.
PROM
Programmablereadonlymemory.
PSPowersupply.
PTFProgramtemporaryfix.Asinglebugfixorgroupofbugfixesthatare distributedinaformreadytoinstallforcustomers.
PWRPower.
R
rackAunitthathousesthecomponentsofastoragesubsystem,suchasthe library.
rackmountkit
Apackagedcollectionofarticlesthatareusedtoinstalltherackmounted versionofthelibrary.
RAMRandomaccessmemory.
Randomaccessmemory
Astoragedeviceintowhichdataisenteredandfromwhichdatais retrievedinanonsequentialmanner.
RASReliability, availability, and serviceability.
recordAcollectionofrelateddataorwords,whicharetreatedasaunit.
recordingdensity
Thenumberofbitsinasinglelineartrackmeasuredperunitoflengthoftherecordingmedium.
recoverableerror
Aerrorconditionthatallowscontinuedexecutionofaprogram.
refReference.
reg Register.
reinventory
Toinventoryagain.
retension
Theprocessorfunctionoftighteningthetapeontothecartridge,ifitis sensedthatthetapehasaloosewraponthecartridge.
RFC(RequestforComments)
RequestforComments(RFC)documentsareaseriesofmemoranda,which encompassesnewresearch,innovations,andmethodologiesapplicableto Internettechnologies.
RHRelativehumidity.
RIDtag
Repairidentificationtag.
RMLRackMountLine.
robotPicker.
robotics
Pickerassembly.
rootCAcertification
Incryptography, a root certificate from a certificate authority (CA).
RPQRequestforpricequotation.
RSAkey
Encryptionkeytype.
R/Wread/write.
S
sSecondsoftime.
SACServiceActionCode.CodethatisdevelopedtoindicatepossibleFRUor FRUstoreplacetorepairthehardware.
SANStorageareanetwork.
SASSerialAttachedSCSI.Acomputerbustechnologyandserial communicationprotocolfordirectattachedstoragedevices.SASisa replacementforparallelSCSIwithhigherspeeds,butstillutilizingSCSI commands.
scratchcartridge
Adatacartridgethatcontainsnousefuldata,butcanbewrittentowith newdata.
SCDSingleCharacterDisplay.
SCSISmallcomputersysteminterface.
SESingle-ended.
segment
Apart.
selSelect.
SerialAttachedSCSI(SAS)
AdrivewithaSASinterfacecanbelinkeddirectlytocontrollers.SASisa performanceimprovementovertraditionalSCSIbecauseSASenables multipledevices(upto128)ofdifferentsizesandtypestobeconnected simultaneouslywiththinnerandlongercables.Itsupportsfull-duplex signaltransmissionupto3Gb/s.Inaddition,SASdrivescanbe hot-plugged.
serialize
Tochangefromparallel-by-bytetoserial-by-bit.
serializer
Adevicethatconvertsaspacedistributionofsimultaneousstates, which representsdataintoacorrespondingtimesequenceofstates.
servo,servos
Anadjectiveforuseinqualifyingsomepartoraspectofaservomechanism.
servomechanism
Afeedbackcontrolsysteminwhichatleastoneofthesystemsignals representsmechanicalmotion.
signature
Adigitalsignaturethatisusedincryptographytoidentifyonepartyto ensureauthenticity.
slotblocker
Aslotblockerisusedtorestrict/closeoffadatacellsoadatacartridge cannotbeinserted.
SmallComputerSystemsInterface(SCSI)
Astandardthatisused by computer manufacturers for attaching peripheral devices (such as fasted drives, hard disks, CD-ROM players, printers, and scanners) to computers (servers). Pronounced "scuzzy". Variations of the SCSI interface provide for faster data transmission rates than standard serial and parallel ports (upto 320 megabytes per second). The variations include:
- Fast/WideSCSI:Usesa16-bitbus,andsupportsdataratesofupto20 MBps.
•SCSI-1:Usesan8-bitbus,andsupportsdataratesof4MBps.
- SCSI-2:SameasSCSI-1,butusesa50-pinconnectorinsteadofa25-pin connector,andsupportsmultipledevices.
- UltraSCSI:Usesan8-or16-bitbus,andsupportsdataratesof20or40 MBps.
- Ultra2SCSI:Usesan8-or16-bitbusandsupportsdataratesof40or80 MBps.
- Ultra3SCSI:Usesa16-bitbusandsupportsdataratesof80or160 MBps.
- Ultra160SCSI:Usesa16-bitbusandsupportsdataratesof80or160 MBps.
•Ultra320SCSI:Usesa16-bitbusandsupportsdataratesof320MBps.
SMI-SSeeStorageManagementInitiativeSpecification(SMI-S).
SMTPSimpleMailTransferProtocol.SMTPisastandardforemailtransmissions acrosstheinternet.
SNMP
SimpleNetworkManagementProtocol.SNMPisusedbynetwork managementsystemstomonitornetwork-attacheddevicesforconditions thatwarrantadministrativeattention.
SNTPSimpleNetworkTimeProtocol.Usedtosynchronizetheclocksof network-attacheddevices.
SMWServoManufacturer'sWord.
SNSSense.
specialfeature
Afeaturethatcanbeorderedtoenhancethecapability, storagecapacity, or performanceofaproduct, butisnotessentialforitsbasicwork.
SPISecurityParametersIndex.
SRServicerepresentative,seealsoCE.
SRAM
Staticrandomaccessmemory.
SSStatusstore.
SSL(SecureSocketsLayer)
AsetofcryptographicprotocolsforsecurecommunicationsontheInternet forsuchthingsaswebbrowsing, email, Internetfaxing, instantmessaging, and other datatransfer. SSL allows application to communicate across a network in away that is designed to prevent eavesdropping, tampering, and message forgery.
SSPSerialSCSIProtocol.
STStore.
standardfeature
Thesignificantdesignelementsofaproductthatareincludedaspartof thefundamentalproduct.
START
Startmaintenance.
StartTLS
SecureLDAPcommunicationthatusesTLS.
StorageManagementInitiativeSpecification(SMI-S)
AstoragestandardthatisdevelopedandmaintainedbytheStorage NetworkingIndustryAssociation(SNIA).ItisalsoratifiedasanISO standard. ThemainobjectiveofSMI-Sistoenablebroadinteroperable managementofheterogeneousstoragevendorsystems.
subsystem
Asecondaryorsubordinatesystem, capable of operating independently of, orasynchronously with, a controlling system.
SUPPSupport.
syncSynchronous, synchronize. Occurring with aregularor predictable time relationship.
T
tachometer,tach
Adevicethatemitspulsesthatareusedtomeasure/checkspeedor distance.
tapecartridge
Acontainerthatholdsmagnetictape, that can be processed without separating it from the container.
tapevoid
Anareainthetapeinwhichnosignalcanbedetected.
TCP/IP
TransmissionControlProtocol/InternetProtocol.
TCUTapecontrolunit.
TDTTapeDiagnostictool.
THThermal.
thread/loadoperation
Aprocedurethatplacestapealongthetapepath.
TMTapemark.
transportmode
End-to-endcommunicationssecurityinwhichtheend-pointcomputersdo thesecurityprocessing.
trustedcertification
Incryptography,atrustworthycertificatethatisnotregisteredwitha certificateauthority.
tunnelmode
Port-to-portcommunicationssecurityinwhichsecurityisprovidedto severalmachinesbyasinglenode.
U
UARTUniversalasynchronousreceiver/transmitter.
ULUnderwriter's Laboratories.
UltriumTapeDrive
Locatedwithinthelibrary,adata-storagedevicethatcontrolsthe movementofthemagnetictapeinanLTOUltriumTapeCartridge.The drivehousesthemechanism(drivehead)thatreadsandwritesdatatothe tape.
unload
Preparethetapecartridgeforremovalfromthedrive.
utilities
Utilityprograms.
utilityprograms
Acomputerprogramminggeneralsupportoftheprocessesofacomputer;for instance,adiagnosticprogram.
uvUndervoltage.
V
VOLSER
Volumeserialnumber.
volume
Acertainportionofdata,togetherwithitsdatacarrier,thatcanbehandled convenientlyasaunit.
VPDVitalproductdata. The information that is contained within the tapered drive that requires nonvolatile storage that is used by functional areas of the drive, and information that is required for manufacturing, RAS, and engineering.
W
wordAcharacterstringthatisconvenientforsomepurposetoconsiderasan entity.
WorldWideNodeName(WWNN)
AuniquecharacterstringwhichidentifiesFibreChannelHostBus adapters(HBA).
WORM
WriteOnceReadMany.
WriteWritecommand.
WTWorldtrade.
WWCID
WorldwideCartridgeIdentifier.
WWNWorldwideName.
WWNN
WorldwideNodeName.
WWPN
Worldwideportname.
X
XRExternalregister.
XRAExternalregisteraddressregister.
Index
A
accessmode
libraryconfiguration3-14
accessibility
keyboardE-1
repeatrateofupanddown
buttonsE-1
shortcutkeysE-1
accessor4-39
accessorlockingscrew
removing3-7
Accessorlockingscrew1-5
accessorstatistics,viewing4-39
accounttypes2-5
Acousticalspecifications1-10
activeslots3-14,3-26,4-9,4-24
address3-17
administrator4-23
applicationmanagedencryption4-27
applicationmanagedencryption
AME)3-18
AttentionLED2-1
authentication3-21
autocleaning3-14,3-26,4-24
autoload3-14,3-26
B
backlight4-13
barcodelabellength4-24
Barcodelabels5-5
guidelinesforusing5-6
Barcodereader1-6
C
cables6-10
cables,reseating6-10
cartridge
Write-Protectswitch5-6
Cartridge5-1
capacityscaling5-2
cleaning5-4
compatibility5-3
data5-2
properhandling5-7
specifications5-10
cartridgeassignment3-14
cartridgemagazine1-2,1-4,8-1
cartridgemagazine, unlocking4-22
cartridgemagazines4-5
Cartridge, environment5-8
cartridges1-9,3-27,4-6
cleaning1-9
CElog,dumping4-37
channelcalibration1-8
CleanDriveLED2-1
cleaning4-6
cleaningthedrive4-21
configuration3-8,3-10,4-3,4-9,4-26,4-28,4-32
WebUserInterface3-11
configuringautocleaning4-9
controlkeys1-2
D
datacartridges1-9
dateandtimesettings4-28
datesettings3-26,4-11,4-28
defaultsettings3-10,4-13
devicedrivers,supported1-12
DHCP3-16,3-24,4-12
diagnosingproblems6-3
diagnostics4-14,4-15
displayelements2-5
DNSserverIPaddress3-16,3-24
downloadingdrivelogs4-36
downloadinglibrarylogs4-37
driveA-11
rebooting4-8
drivecleaning4-6
drivediagnostics4-15
drivelogs, downloading4-36
E
EKM3-18
electricalspecifications1-10
email3-20,4-30
emailnotifications3-20,4-30
emailing6-10
emailinglogs6-10
emergencyrelease1-4
Encryption1-6
configuration3-18
encryptionkeymanager3-18
EncryptionKeyManager(EKM)3-18
encryptionkeymanager
configuration3-18
encryptionpolicy3-18,4-27
encryptionsettings4-27
environmentalspecifications1-10
errorcodesA-1,A-11
ErrorLED2-1
errorlogs6-2,6-10
errormessages6-2,A-11
errormessagesandresolutions6-2
errorstatus4-14
ethernetport1-5,3-8
F
firmware4-4
firmware,updating4-38
frequency,electricalsupply1-10
frontpanel1-2
G
gateway3-16,3-24,4-12
glossaryF-1
H
hardwareattributes,viewing4-4
HostBusAdapter(HBA)1-9
hostinterfacecable3-8
Hostinterfacecables, connecting3-8
|
I/Ostation4-4,4-24
I/OStation3-26
I/OStation, configuration3-14
Inputmodes2-1
installation1-11,3-1,3-2,3-7,3-10,3-28,
8-1
rack
safetyxiii
installationlocation3-1,3-2
installingrails3-2
inventory4-7,4-22
IPaddress3-16,3-24,4-12
IPv4address3-16,3-24
IPv4settings4-13,4-26
IPv6address3-16,3-24
IPv6prefixlength3-16,3-24,4-13,4-26,
4-28
IPv6settings4-13,4-26
ITDT-DCR7-1
J
Java3-12
K
keyboardE-1
L
labels
barcode5-5
Labels
barcode
guidelinesforusing5-6
laser
compliancexii
safetyxii
LCDcontrast4-13,4-28
LCDdisplay1-2
LEDs6-8
LEDs,frontpanel6-8
LEDs,interpreting6-8
library3-1,3-29,6-1,A-1,B-1
autocleaning4-9
library(continued)
configuring3-10
configuringactiveslots4-9
loggingout4-8
poweringdown4-7
preparingtoship4-7
rebooting4-8
Library3-27
libraryaccessmode3-14
libraryanddrives,resetting4-37
Libraryconfiguration
save/restore3-24
LibraryConfigurationFormD-1
librarydepth1-10
librarydimensions1-10
libraryinrack3-2
libraryinventory4-22
librarylogs, downloading4-37
librarymanagedencryption4-27
librarymanagedencryption(LME)3-18
librarymap4-17
librarymode4-10
librarysettings4-10,4-24
Librarysettings
configuration3-26
librarystate4-21
libraryverify4-14
Libraryverify
diagnostics3-28
libraryverifydiagnosticprocedures4-14
libraryweight1-10
librarywidth1-10
library,diagnosingproblems6-3
library,viewinglogs4-35
linkspeed3-16,3-24,4-26
linkspeed(ethernet)3-16,3-24,4-12, 4-26
location3-1
locationinrack3-2
loggingoutofthelibrary4-8
logicallibrarysettings4-24
LogicalUnitNumber(LUN)
scanning1-9
login2-5
WebUserInterface3-12
logs,emailing6-10
looping3-14
loopingaccessmode3-26
LUNscanning1-9
M
maintenance8-1
Media1-9,5-1
mediaerrors5-4
menus2-5,4-1,4-16
mountinglocation,library3-1
moving4-6
movingcartridges4-20
N
Network
configuration3-16,3-24
networksettings1-5,4-26
Networksettings3-16,3-24,4-12
NetworkTimeProtocol(NTP)1-7
notificationsettings3-20,4-30
Notificationsettings3-21
notificationsettings, email3-20
NTP1-7
NTPaddress3-17,4-28
NTPserver4-28
configuration3-17
0
offline4-7
online4-7
onlineoroffline4-21
online/offlineicon2-1
Operatingprocedures
OperatorPanel4-1
operationalspecifications1-10
operatorinterventions4-34
OperatorPanel1-2,2-1,3-24,3-26,3-28,
-7,4-8,4-9,4-10,4-11,4-12,4-13,4-14,
-15
currentinformation4-4
firmwarerevision4-4
libraryinventory4-7
manuallycleaningthedrive4-6
menus4-3
movingcartridges4-6
takingthelibraryonlineand offline4-7
unloadingthedrive4-6
unlockingcartridgemagazine4-5
unlockingI/Ostation4-4
viewingsettings4-3
OperatorPanelsettings4-13
Orderingmedia
OrderingWORMcartridges5-3
P
passwords2-5
passwords,changing2-5,4-13,4-23
physicallibrarysettings4-24
physicalspecifications1-10
policyconfiguration3-18
populatingthelibrarywith cartridges3-27
powerbutton1-5
powerconnector1-5
powerconsumption1-10
powercord,connecting3-8
powermanagement1-8
powersocket1-5
powersupply1-5
problemdiagnosis6-3
productenvironment1-11
R
rackinstallation
safetyxiii
rackmounting3-2
rackmountingrails3-2
RAID1-9
randomaccessmode3-14,3-26,4-10
Read/Writecapability5-3
Ready/ActivityLED2-1
rearpanel1-5
rebootingthedrive4-8
rebootingthelibrary4-8
removingaccessorlockingscrew3-7
removingduringinstallation8-1
reportinglibraryproblems6-1
reportingproblems6-1
reseatingcables6-10
resettingthelibraryanddrives4-37
S
safetyinformation
lasercompliancexii
lasersafetyxii
SAS3-8
SASHostInterface1-6,3-8
SASinterface1-5
saving/restoring4-32
SCSITD1-9
security3-12
sendingyourcommentsiii
sequentialaccessmode3-14,3-26,4-10
serialattachedSCSI1-5
SerialAttachedSCSI(SAS)1-5
serialnumberlabel1-2,1-4
Serverattachment3-8
servicelibrary4-34
servicemode4-14
serviceprocedures7-1
shippingthelibrary4-7
shortcutkeysE-1
SNMP3-21,4-31
messaging1-7
SNMPnotifications3-21,4-31
SNTPserver4-12
sound4-13
Specifications
cartridges5-10
library1-10
specifications,physical1-10
speedmatching1-8
SSL3-16,3-24
StatelessDHCP4-13
storagecapacity1-10
subnetmask3-16,3-24,4-12
superuser4-23
supportnotificationiii
SupportNotification
registration3-29
systemsummary4-17
T
takingonline3-29
takingthelibraryonlineoroffline4-21
tapealertflagsB-1,B-3
tapedrive4-6,B-3
tapedriveconfiguration3-14
tapedrivediagnostics4-15
tapedrives, downloadingdrive logs4-36
TCP/IP3-16,3-24,4-26
TCP/IPconfiguration3-16,3-24
technicalsupportiii
timeserver3-17,4-28
timesettings3-26,4-11,4-28
tools,required8-1
topmenu4-3
topmenus4-16
tracedata4-36
tracedate,viewing4-36
trapdefinitionsA-14
trapnotifications4-31
Trapnotifications configuration3-21
troubleshooting6-1
typesA-14
U
Ultriumtapedrives1-8
unloading4-6
unloadingdrive4-21
unlock4-22
unlocking4-5
unlockingthecartridgemagazine4-22
updatinglibraryanddrive firmware4-38
user4-23
useraccess,managing4-23
useraccounts4-23
Useraccounts configuration3-23
userinterfaces2-1
userprivileges2-5
userroles4-23
V
verifyinglibrary3-28
viewingaccessorstatistics4-39
viewingcommunicationinformation4-3
viewinglibrarylogs4-35
viewingsettings4-17
viewingtracedata4-36
voltage1-10
W
WebUserInterface2-1,2-5,4-1,4-16,
4-17,4-20,4-21,4-22,4-23,4-24,4-26,
4-27,4-28,4-30,4-31,4-32,4-34,4-35,
4-36,4-37,4-38,4-39,A-11
WORM5-3,5-4
WORM(writeonce,readmany)5-3
WORMcapability5-4
WORM,datasecurity5-4
wraptest4-15
Writeonce,readmany5-4
Writeonce,readmany(seeWORM)5-3
Write-Protectswitch
setting5-6
Printed in USA
- Readthisfirst
- ContactingDell
- Contents
- Readthisfirst. . . . . . . . . . . . . i i i
- Figures. . . . . . . . . . . . . . . v i i
- Tables. i x
- Safetyandenvironmentalnotices...xi
- Preface. . . . . . . . . . . . . . . x v
- Chapter1.Productdescription . . . . 1 -
- Chapter 2.Userinterfaces ..... 2 - 1
- Chapter 3.Installationand configuration. . . . . . . . . . . . . . 3 - 1
- Chapter 4. Operations. . . . . . . . 4 - 1
- Chapter 5.Media. . . . . . . . . . . 5 - 1
- Chapter 6.Troubleshooting ..... 6 - 1
- Chapter 7. Service procedures ..... 7 - 1
- Chapter 8. Removal and replacement procedures. 8 - 1
- Figures
- Tables
- Safetyandenvironmentalnotices
- Safetynotices
- Dangernotice
- Cautionnotice
- Lasersafetyandcompliance
- Performingthesafetyinspectionprocedure
- Racksafety
- DANGER
- CAUTION:
- Preface
- Chapter1.Productdescription
- Frontpanel
- Cartridgemagazine
- Rearpanel
- Barcodereader
- SAShostinterface
- Encryption
- SupportedInternetProtocols
- SimpleNetworkManagementProtocol(SNMP)messaging
- SNMPtraps
- NetworkTimeProtocol
- Ultriumtapedrives
- Speedmatching
- Channelcalibration
- Powermanagement
- Media
- LogicalUnitNumber(LUN)scanning
- Locationcoordinatesandelementaddresses
- Librarianspecifications
- Productenvironment
- Supporteddevicedrivers
- Chapter2.Userinterfaces
- OperatorPanel
- FrontpanelLEDs
- Inputmodes
- Selectingpredefinedvalues
- Togglingvalues
- Enteringnumericalvalues
- Loggingin
- WebUserInterface
- Commonheaderelements
- MenusavailablefromtheWebUserInterface
- Userprivileges
- Chapter3.Installationandconfiguration
- Choosingalocation
- Installinginarack
- Toinstallthelibraryinarack:
- Removingtheaccessorlockingscrew
- Attachingthelibrarytoaserver
- ConnectingtheHostInterfacecables
- Connectingthepowercord
- Toconnectapowercord:
- Configuringthelibrary
- Configuring your library with the Web User Interface
- LoggingintotheWebUserInterface
- Checkingfirmwarelevel
- Configuringlibrarysettings Logicallibrarysettings
- onpage1-9.
- Physicallibrarysettings
- Configuringnetworksettings
- Tomodifythenetworksettings:
- ClickSubmittoenablethesettings.
- Configuringdateandtimesettings
- ClickSubmittoupdatethesettings.
- Configuringencryptionsettings
- Configuringemailnotifications
- Configuringtrapnotifications
- Managinguseraccess
- Savingthelibraryconfiguration
- ConfiguringyourlibrarywiththeOperatorPanel
- LoggingintotheOperatorPanel
- Configuringlibrarysettings
- Populatingthelibrarywithcartridges
- Verifyinglibraryanddriveoperation
- TakingtheLibraryOnline
- Registeringforsupportnotification
- TheOperatorPanel
- Monitoringthelibrary
- Configurationsettings
- Currentinformation
- Firmwareerevision
- Managingthelibrary
- Unlockingthel/Ostation
- Figure4-6.1/Ostation unlocked
- Unlockingthecartridgemagazine
- Unlock Magazine
- Figure4-7. Unlockmagazinecommand
- Movingcartridges
- Unloadingthedrive
- Cleaningthedrivemanually
- Conductingalibraryinventory
- Takingthelibraryonlineandoffline
- Poweringdownthelibrary
- Shippingthelibrary
- Rebootingthedrive
- Rebootingthelibrary
- Loggingoutofthelibrary
- Configuringautocleaning
- Configuringthenumberofactiveslots
- Configuringthelibraryaccessmode
- ConfiguringOperatorPanelsettings
- Settingthelibrarytofactorydefaults
- Servicingthelibrary
- Checkingthelibraryerrorstatus
- Runninglibraryverifydiagnosticprocedures
- Runningdrivediagnosticprocedures
- Torundrivediagnostictests:
- TheWebUserInterface
- Thesystemsummary
- Thelibrarymap
- - Selectaction
- Configuringphysicallibrarysettings
- Configuringlogicallibrarysettings
- ConfiguringSNMPtrapnotifications
- Savingandrestoringconfigurationsettings
- Savingandrestoringconfigurationautomaticallywithcookies
- SavingandrestoringconfigurationmanuallywithWebUserInterface
- Operatorinterventions
- Librarylogs
- Tracedata
- Downloadingdrivelogs
- Downloadinglibrarylogs
- Resettingthelibraryanddrives
- Updatinglibraryanddrivefirmware
- Accessorstatistics
- Chapter5.Media
- Datacartridges
- Cartridgecompatibility
- Writeonce,readmany(WORM)cartridges
- WORMmedia
- DatasecurityonWORMmedia
- WORMmediaerrors
- RequirementsforWORMcapability
- Cleaningcartridge
- Barcodelabels
- Guidelinesfortheuseofbarcodelabels
- Write-Protectswitch
- Cartridgecareandhandling
- Providetraining
- Ensureproperpackaging
- Provideproperacclimationandenvironmentalconditions
- Performathoroughinspection
- Handlethecartridgecarefully
- Examplesofcartridgeproblems
- Environmentalandshipingspecificationsfortapecartridges
- Chapter6.Troubleshooting
- Howthelibraryreportsproblems
- Libraryerrormessagecontent
- Isolatingproblems
- Isolatinglibrarypowerproblems
- Isolatingdriveproblems
- IsolatingWebUserInterfaceproblems
- Isolatinghostattachmentinterfaceproblems
- Installationandconfigurationproblems
- InterpretingfrontpanelLEDs
- Reseatingcables
- Emailinglogs
- Chapter7. Serviceprocedures
- ITDT-DCR
- ContactingDelltechnicalsupport
- Chapter8. Removal and replacement procedures
- Requiredtools
- Replacingadefectivecartridgemagazine
- Unlockingthecartridgemagazinemanually
- AppendixA.Errorcodes
- Libraryerrorcodes
- Driveerrorcodes
- WebUserInterfaceerrormessages
- Trapdefinitions(types)
- AppendixB.TapeAlertflags
- TapeAlertflagssupportedbythelibrary
- TapeAlertflagssupportedbytheUltriumtapedrive
- AppendixC.Sensedata
- SenseKeydefinitions
- Librara sensedata
- Tapedrivesensedata
- AppendixD.LibraryConfigurationForm
- UsersAccounts
- Accessibility
- Features
- Navigatebykeyboard
- Accessthepublications
- Glossary
- Numbers
- 2:1 compression
- A
- accessmethod
- accessor
- adaptercard
- alphanumeric
- ambienttemperature
- ampere(A)
- application-managedencryption
- assigningadevice
- asynchronous
- attention(notice)
- B
- backup
- barcode
- barcodelabel
- bicolored
- BOMorbillofmaterials
- BorderGatewayProtocol(BGP)
- browser
- buffer
- C
- CAcertification
- capacity
- cartridgemanualrewindtool
- cartridgememory(CM)
- cartridgesorageslot
- caution(notice)
- centimeter(cm)
- channelcommand
- command
- compactdisc(CD)
- compression
- concurrent
- contingentconnection
- controller
- controlpathdrive
- D
- danger(notice)
- databuffer
- datacartridge
- datacheck
- degauss
- degausser
- degradation
- degraded
- deserialize
- detented
- devicedriver
- DHCPv6
- DHgroup
- DIAG
- differential
- directaccessstorage
- displaycontrast
- download
- DRAM
- drive,magnetictape
- DriveNotConfigured
- DRVDrive.
- DSAkey
- electronicmail
- encryptionkeymanager(EKM)
- entitlement
- EPROM
- equipmentcheck
- Errorlog
- F
- faultsymptomcode(FSC)
- fiducial
- fieldreplaceableunit(FRU)
- fileprotection
- filetransferprotocol(FTP)
- firmware
- FLASHEEPROM
- format
- formatter
- FPFileprotect.
- functionalmicrocode
- G
- gigabit(Gbit)
- gigabyte(GB)
- GigabitInterfaceConverter(GBIC)
- H
- HDSlotTechnology
- hertz(Hz)
- HighVoltageDifferential (HVD)
- |
- identifier(ID)
- incompatible magazine
- initialmicroprogramload(IML)
- initiator
- interface
- InternetProtocolVersion4(IPv4)
- InternetProtocolVersion6(IPv6)
- interposer
- interventionrequired
- INTRO
- I/Ostation
- IPaddress
- IPSec(IPsecurity)
- IPStack
- K
- Kerberos
- kilogram(kg)
- L
- LDAPS
- librarycertification
- library-managedencryption
- LinearTape-Open(LTO)
- liquidcrystaldisplay(LCD)
- loadable
- LTOcartridgememory(LTO-CM)
- M
- MACaddress
- magnetictape
- masterfile
- MaximumTransmissionUnit(MTU)
- mediacapacity
- media-typeidentifier
- microcode
- microdiagnosticroutine
- microdiagnosticutility
- microinstruction
- microprogram
- modifier
- mountadevice
- multipath
- N
- NetworkAddressTranslation(NAT)
- NEMA
- 0
- oersted
- offline
- overrun
- overtightening
- P
- parameter
- PortableDocumentFormat(PDF)
- Privatekey
- PROM
- R
- rackmountkit
- Randomaccessmemory
- recordingdensity
- recoverableerror
- reinventory
- retension
- RFC(RequestforComments)
- RIDtag
- robotics
- rootCAcertification
- RSAkey
- S
- scratchcartridge
- segment
- SerialAttachedSCSI(SAS)
- serialize
- serializer
- servo,servos
- servomechanism
- signature
- slotblocker
- SmallComputerSystemsInterface(SCSI)
- SNMP
- specialfeature
- SRAM
- SSL(SecureSocketsLayer)
- standardfeature
- START
- StartTLS
- StorageManagementInitiativeSpecification(SMI-S)
- subsystem
- T
- tachometer,tach
- tapecartridge
- tapevoid
- TCP/IP
- U
- V
- W
- WorldWideNodeName(WWNN)
- WORM
- WWCID
- WWNN
- WWPN
- X
- Index
- E
- J
Brand : DELL
Model : TL1000
Category : Uncategorized