
TM15 - Flashlight Nitecore - Free user manual and instructions
Find the device manual for free TM15 Nitecore in PDF.


| Product Type | Flashlight |
| Brand | Nitecore |
| Model | TM15 |
| Light Source | 3x CREE XM-L2 LEDs |
| Max Output | 2400 lumens |
| Beam Distance | 300 meters |
| Peak Beam Intensity | 22500 cd |
| Modes | Turbo, High, Mid, Low, Strobe, SOS |
| Power Supply | Rechargeable Li-ion (4x 18650 or 2x 18650 via extension) |
| Charging | Micro USB, with smart charging circuit |
| Dimensions | 130 mm length, 40 mm head diameter, 25 mm body diameter |
| Weight | 270 g (without batteries) |
| Impact Resistance | 1 meter |
| Waterproof Rating | IPX-7 (submersible up to 1m for 30 minutes) |
| Switch | Tail cap switch for on/off and mode change, side switch for mode selection |
| Material | Aerospace-grade aluminum alloy |
| Finish | Type III hard-anodized anti-abrasive finish |
| Lens | Toughened ultra-clear glass with anti-reflective coating |
| Reflector | Orange peel reflector |
| Included Accessories | Lanyard, spare O-rings, USB charging cable |
| Maintenance | Clean threads and contacts with a dry cloth; lubricate O-rings sparingly |
Frequently Asked Questions - TM15 Nitecore
User questions about TM15 Nitecore
0 question about this device. Answer the ones you know or ask your own.
Ask a new question about this device
Download the instructions for your Flashlight in PDF format for free! Find your manual TM15 - Nitecore and take your electronic device back in hand. On this page are published all the documents necessary for the use of your device. TM15 by Nitecore.
USER MANUAL TM15 Nitecore
- At 2650 lumens the TM15 is world's smallest and brightest rechargeable searchlight
• Utilizes 3 x CREE XM-L2 LEDs
• Thermal protection circuit prevents overheating - Compatible with both 18650 Li-ion and CR123 batteries
- Intelligent charging circuit with status detection. Recharge easily, safely and quickly
- Exceptionally long runtimes using 4 × 18650 Li-ion or 8 × CR123 batteries
- Capable of using 1 × 18650 or 2 × CR123 batteries in emergency situations
- Innovative single button two-stage switch provides a user-friendly interface (Patented)
- Integrated power indicator light displays remaining battery power (Patented)
- Power indicator secondary function displays battery voltage (accurate to 0.1V)
- Coated mineral glass resists scratches
- Aluminum reflector ensures a consistent and powerful beam
- Stainless steel retaining ring protects the core components from damage
- Constructed from aircraft grade aluminum alloy
• HA III Military grade hard-anodized - IPX-8 standard waterproof (two meters)
Dimensions
Length: 158mm (6.22")
Head diameter: 60 mm (2.36")
Tube diameter: 50mm (1.96")
Weight: 447g (15.77oz) (without battery)
Accessories
Charger, quality holster, lanyard, spare O-ring
Battery Options
| SIZE | Nominal voltage | Compatible | |
| 18650 Rechargeable Li-ion battery | 18650 3.7V | Yes (Recommended and can be recharged) | |
| Primary Lithium battery * | CR123 3V | Yes (Compatible but can NOT be recharged) | |
| Rechargeable Li-ion battery * | RCR123 | 3.7V | Yes (Compatible but can NOT be recharged) |

*Warning: Charge 18650 rechargeable Li-ion batteries only, do not attempt to charge non-rechargeable batteries, CR123 or RCR123 batteries.
Output & Runtime
| FL 1 STANDARD | TURBO | HIGH | MID | LOW | LOWER |
| 2650LUMENS | 1400LUMENS | 600LUMENS | 330LUMENS | 110LUMENS | |
| 1h | 3h10min | 8h20min | 16h30min | 52h | |
| 1h10min | 3h | 6h20min | 13h | 36h | |
| 465m(Beam Distance) | |||||
| 54100cd(Peak Beam Intensity) | |||||
| 1.5m(Impact Resistant) | |||||
| IPX-8, 2m(Waterproof AND Submersible) | |||||
NOTICE
Stated data has been measured according to the international flashlight testing standards ANSI/NEMA FL1 using four quality NITECORE 18650 (3.7V 2600mAh) battery or eight NITECORE CR123 (3V 1550mAh) batteries under laboratory conditions. The data may vary due to individual usage habits and environmental conditions.
NITECORE (SYSMAX) is a member of PLATO, participating in and helping to develop the ANSI FL1 standard of measurement. Product testing data is in accordance with these internationally recognized scientific standards.
Operation instructions
Battery installation
Insert 4 × 18650 Li-ion or 8 × CR123 batteries with the positive (+) end pointing toward the flashlight head. In special circumstances, such as emergency situations, between one and three 18650 Li-ion or two and six CR123 batteries may be used. After loading the batteries, the power indicator light will blink to indicate the battery voltage. Please refer to the "Power Tips" section of this manual for details.
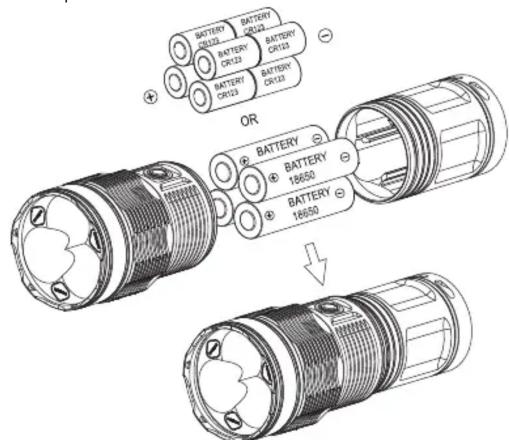
Note: The potential risks of over-discharging batteries can include leakage and explosion so caution must be exercised when using less than 4 x 18650 or 8 x CR123. Ensure you know your batteries' limits and use the TM15's emergency functionality sparingly. Furthermore, maximum output may be reduced when using less than the maximum amount of batteries.
WARNING
- Insert batteries with the positive (+) end pointing toward the flashlight head.
- Do not mix rechargeable and non-rechargeable batteries.
- Do not mix batteries of different types/brands.
- Do not mix batteries of different charge levels.
- Do not use lithium batteries without a protected circuit board.
- This product does not support 18650 rechargeable Li-ion batteries without a protection circuit board as these batteries are too short for the TM15's battery compartment.
Charging the TM15
- Connect the charging cable to the flashlight and the A/C power adapter to the wall outlet as shown in the adjacent image. Fully charging four depleted 18650 batteries takes approximately 7 hours.
- Under normal charging conditions, the blue indicator light on the on/off switch will blink twice every second.
- If a problem is detected while charging the TM15 will stop charging and the blue indicator will blink rapidly. This can be caused by faulty or incorrectly inserted batteries.
- When charging is complete, the blue indicator will remain on.

natural_image
Technical line drawing of a cylindrical mechanical component with threaded end and internal structure (no text or symbols)Caution:
- Do not charge batteries of different types or different brands together.
- Under normal charging conditions, fully or half press the switch the power indicator light will blink to indicate the battery voltage. Please refer to the "Power Tips" section of this manual for details.
General Operation
NB: The TM15 utilizes a 2-stage switch similar to a camera shutter button. The light's numerous functions are selected according to the depth the switch is pressed.
Switching ON/OFF
The TM15 has two modes: Daily mode and Turbo mode. With the light turned off:
- Press the switch partway down and hold to enter Momentary Daily mode. Release the switch to turn the light off again.
- Press the switch all the way down and hold to enter into Momentary Turbo mode. Release the switch to turn the light off again.
- Press the switch partway down and release within one second to access Constant Output Daily mode. Press switch to turn light off again.
- Press the switch all the way down and release within one second to access Constant Turbo mode. Press switch to turn light off again.
Standby mode
With the light turned on:
Press the switch all the way down and release within one second to enter into standby mode. In this mode, the light will consume small amounts of power to maintain the settings in the MCU (micro control unit) but appear to be turned off. When in standby mode the power indicator light will flash once every three seconds to show the location of the light.
Brightness Selection
When turned on in Daily mode, press the switch partway down to select a brightness level of ultra low, low, medium, high or turbo. Holding the switch for more than one second to access turbo mode, and the selected brightness level will be memorized when the light is turned off.
When turned on in Turbo mode, press the switch partway down to cycle through the brightness level of turbo and high output level. There's no memory function in Turbo mode.
Strobe Function
With the light turned on, press the switch all the way down twice in quick succession to access strobe mode. Press once again to exit the strobe mode.
Lockout and Unlock functions
With the light turned on: Press the switch all the way down and hold for more than one second. The light will turn off and enter into lockout mode. Lockout mode consumes almost no battery power and prevents the light from accidentally turning on. Holding the switch for more than one second to exit the lockout mode.
NB:
- When entering lockout mode, the power indicator will flash to indicate specific battery voltage. Please refer to the "Power Tips" section of this manual for details.
- When TM15 is kept in a backpack or left unused for extended periods, Nitecore recommends the bezel is loosened to cut off the power entirely, thus saving battery power and preventing accidental activation of the flashlight.
Power Tips
- When the light is on, the blue power indicator will blink once every two seconds when power levels reach 50%.
- When the light is on, the blue power indicator will flicker constantly when power is very low.
- Each time batteries are inserted, the light is put into lockout Mode or half/fully press the switch under normal charging conditions, the power indicator light will blink in various patterns to show the battery voltage (accurate to ±0.1V ). For example, when the battery voltage is at a maximum charge of 4.2V, the power indicator will blink 4 times in quick succession, followed by a one second pause and two more blinks, indicating a total battery voltage of 4.2V.
Thermal protection
TM15 is very compact. Extended operation in Turbo mode will cause the body temperature to continually rise, thus, making it too hot to use. So NITECORE does not recommend using the TM15 in Turbo mode for extended periods. TM15 built-in thermal protection circuit prevents overheating. For your safety and to protect the flashlight from failure, the TM15 will automatically reduce its output to prevent overheating once it has reached 60 degrees.
Precaution: When the flashlight is hot, do not attempt to cool it by submerging it in liquid.
Changing batteries
When the power indicator blinks consistently it means the batteries need to be replaced or recharged. Alternatively if the light becomes dim or unresponsive to adjustments once again, the batteries need to be replaced or recharged.
Maintenance
Every 6 months, threads should be wiped with a clean cloth followed by a thin coating of silicon-based lubricant.
Warranty Service
All NITECORE ^® products are warranted for quality. DOA / defective products can be exchanged for replacement through a local distributor/dealer within the 14 days of purchase. After 14 days, all defective / malfunctioning NITECORE ^® products will be repaired free of charge for a period of 18 months from the date of purchase. After 18 months, a limited warranty applies, covering the cost of labor and maintenance, but not the cost of accessories or replacement parts. The warranty is nullified in all of the following situations:
- The product(s) is/are broken down, reconstructed and/or modified by unauthorized parties.
- The product(s) is/are damaged through improper use.
- The product(s) is/are damaged by leakage of batteries.
For the latest information on NITECORE® products and services, please contact your national NITECORE® distributor or send an email to service@nitecore.com

Please follow our facebook for more info: NITECORE Flashlights
SYSMAX ind.
SYSMAX Industry Co., Ltd.
TEL: +86-20-83862000
FAX: +86-20-83882723
E-mail: info@nitecore.com
Web: www.nitecore.com
Address: Rm1407-08, Glorious Tower, 850 East Dongfeng Road, Guangzhou, China 510600

- Dimensions
- Accessories
- NOTICE
- Operation instructions
- Battery installation
- WARNING
- Charging the TM15
- Caution:
- General Operation
- Switching ON/OFF
- Standby mode
- Brightness Selection
- Strobe Function
- Lockout and Unlock functions
- NB:
- Power Tips
- Thermal protection
- Changing batteries
- Maintenance
- Warranty Service
- SYSMAX ind.
Brand : Nitecore
Model : TM15
Category : Flashlight