
PGI 64 C - Cooker Philco - Free user manual and instructions
Find the device manual for free PGI 64 C Philco in PDF.


| Product Type | Freestanding Cooker |
| Brand | Philco |
| Model | PGI 64 C |
| Energy Type | Gas (oven: electric) |
| Dimensions (H x W x D) | 85 x 60 x 60 cm |
| Weight | Approx. 45 kg |
| Power Supply | 230 V ~ 50 Hz |
| Number of Burners | 4 gas burners |
| Oven Capacity | 58 liters |
| Oven Functions | Conventional top and bottom heat, grill |
| Ignition | Automatic ignition for burners |
| Safety Features | Flame failure safety device on burners, oven door safety lock |
| Cleaning | Easy-clean enamel interior, removable oven door glass |
| Spare Parts Availability | Burner caps, grates, oven elements available via authorized service |
| Repairability Index | 7.5 / 10 (estimated) |
| Energy Class | A (estimated) |
Frequently Asked Questions - PGI 64 C Philco
User questions about PGI 64 C Philco
0 question about this device. Answer the ones you know or ask your own.
Ask a new question about this device
Download the instructions for your Cooker in PDF format for free! Find your manual PGI 64 C - Philco and take your electronic device back in hand. On this page are published all the documents necessary for the use of your device. PGI 64 C by Philco.
USER MANUAL PGI 64 C Philco
UNIVERSAL USER'S MANUAL FOR PHILCO GAS COOKTOPS
PHILCO

Famous for Quality the World Over
Dear customer,
Thank you for buying a PHILCO brand product. So that your appliance serves you well, please read all the instructions in this user's manual.
CONTENTS
PART 1: SAFETY PRECAUTIONS ...... 2
PART 2: DESCRIPTION OF THE APPLIANCE .... 4
PART 3: INSTALLATION .... 6
PART 4: USING THE COOKTOP ....7
- Igniting a burner ....8
- Tips for using the cooktop....8
PART 5: MAINTENANCE AND CLEANING....9
PART 6: BEFORE YOU CALL THE SERVICE CENTRE....11
PART 7: INSTRUCTIONS FOR THE TECHNICIAN....12
Gas connection....12
• Electrical connection....13
• Installing the cooktop....14
• Built-in options....16
PART 8: TECHNICAL SPECIFICATIONS....17
PART 1: SAFETY PRECAUTIONS
Important safety instructions
Recommendation:
Carefully read these instructions before installing and using this cooktop.
Write down the serial number found on the rating label of the cooktop in the space below. It is essential that you store this user's manual in a safe place so that you can use it in the future. If you intend to sell the appliance, give it to another owner, or if you move, always make sure that the user's manual is attached to the appliance, so that the new owner can learn about the operation of the appliance and the relevant warnings.
SERIAL NUMBER:
Important Notices:
- This appliance must not be used by persons (including children) with physical or mental impairments or by inexperienced persons, unless properly trained or schooled in the safe use of the appliance, or unless they have been properly supervised by a qualified person who will be responsible for their safety. Children must be supervised to ensure that they do not play with the appliance.
• This appliance may only be used by adults or children under constant adult supervision. - Small children must not play with any part of the appliance or play near the appliance.
- Accessible parts of the appliance may heat up during operation to a high temperature. Children should not approach the appliance until it cools down. Children could also be injured when pulling cookware from the appliance.
Installing the Appliance
- Remove all advertising and packaging materials before installing the appliance. Dispose of them according to regulation in force in a given country. Then check that the appliance is not damaged in any way, including the power cord.
- The installation and the important installation steps must only be carried out by a qualified technician or an approved person in accordance with the rules and regulations in force in a given country.
- Make sure that the area around the appliance is well ventilated. An insufficient air supply may lead to an insufficient amount of oxygen.
- Check that the electrical and gas connection conforms to the gas and electrical current type shown on the rating label, which as a rule is located near the gas supply pipe.
- This appliance is not supplied with a connection to a waste gas exhaust device. So it is necessary for it to be installed and connected according to valid installation codes, especially ensuring sufficient ventilation of the room where the appliance is to be installed.
- If you wish to connect a different electrical appliance to a power socket near the appliance, ensure that the power cords do not touch each other. Place both power cords at a sufficient distance from the appliance.
- We recommend that the appliance is connected to an independent circuit and an independent power socket.
- When using the gas cooking appliance, excessive heat and moisture may form in the room where the appliance is installed. Therefore ensure that the kitchen is equipped with proper ventilation: keep natural ventilation openings open or install a mechanical ventilation device (mechanical fume extraction device).
- Long term intensive use of the appliance may require additional ventilation, e.g. by opening a window or increasing the power setting on the mechanical ventilation device (if one is installed).
Operating the Appliance
- This appliance is designed for cooking meals in a household. Do not use the appliance in a non-domestic environment or for purposes other than those for which it was designed.
- Tampering with and adjusting or modifying the appliance without the express approval of the manufacturer or an authorised representative may lead to the warranty becoming void, loss of the appliance, damage to property and last but not least serious health damage to people.
- For hygiene and safety reasons regularly clean the appliance. Accumulated food residues may result in a fi re hazard.
- Do not use the appliance if water has spilled on it. First remove the water and check that the cooktop surface is clean.
- Do not use the appliance if you have wet or damp hands.
- Do not leave the appliance without supervision if it is in operation especially when cooking with oil and fats.
- Only use quality cookware. Do not use unstable or deformed cookware as it could tip over and brake and so cause injury or damage to property.
- Do not use plastic or aluminium containers or aluminium foils or place them on the surface of the appliance.
- Do not store foods that spoil, plastic containers and sprays above or below the appliance as the heat from the cooktop could damage them.
• After finishing cooking food, turn off the hotplates. Check that all the hotplates are turned off. - Do not use the appliance as a workbench. Do not place any items on the appliance, excluding cookware suitable for use with the appliance.
Maintenance and Repair
- Prior to performing maintenance, cleaning, moving or if you will not be using the appliance for a long time, check that all the hotplates are turned off, then disconnect the power cord from the power socket and shut off the gas supply (on models with a gas burner).
- Do not disconnect the power cord by pulling on the power cord. Always disconnect it by pulling on the power plug.
• Clean the appliance in accordance with the instructions contained further in this user's manual. - Before cleaning the appliance, allow it to cool down. The residual heat indicator lights will show you whether the hotplates have cooled down.
- Do not use petrol, benzene, thinners or any other solvents for cleaning. Do not use coarse cleaning agents, steel wool or sponges with steel wool.
- Do not use steam cleaners to clean the appliance.
- Never place containers made from plastic or aluminium foil on the appliance. They could heat up as a result of the heat and damage the appliance. If this occurs it is necessary to immediately scrape the melt away while it is still hot and then wipe it off so that the surface is not damaged. You can, in the same way, remove sugar or food residue with a high sugar content using the scraper specially designed for this type of appliance.
- Keep the appliance in a clean condition. In this way you will extend its lifetime.
- Perform regular maintenance of the appliance and check the power cord. If the power cord is damaged, turn off the appliance and contact an authorised service centre. Do not use an appliance with a damaged power cord or an appliance displaying signs of damage. The power cord may only be replaced by authorised and professional personnel.
- Do not attempt to repair the appliance yourself. Repairs carried out by untrained persons may lead to injuries or serious damage to the appliance. Contact a local service centre.
- If components need to be replaced, ensure that the service technician uses spare parts directly from the manufacturer or recommended by the manufacturer.
- The appliance is resistant against impact, but it is not indestructible! Hard or sharp items falling on to the appliance from a height may damage it. If you find any scratches or cracks, disconnect the power cord from the power socket so that the danger of injury by electrical shock is eliminated and contact an authorised service centre.
PART 2: DESCRIPTION OF APPLIANCE

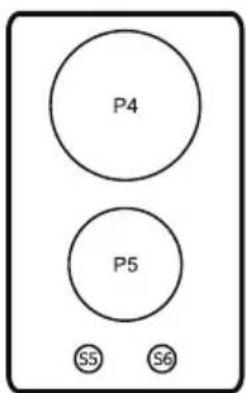

30 cm Inox - Glass 30 cm Inox 2E 40 cm Glass 2G1W
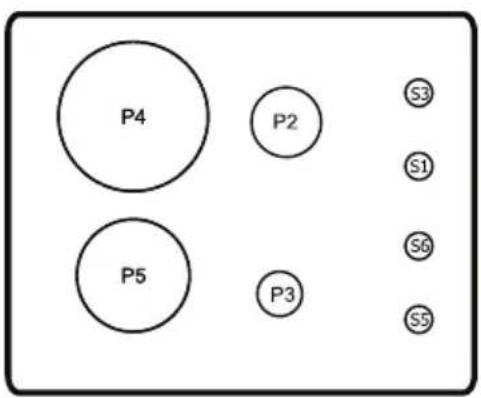
60 cm Inox – Glass 2G2E 60 cm Inox – Glass 3G1E


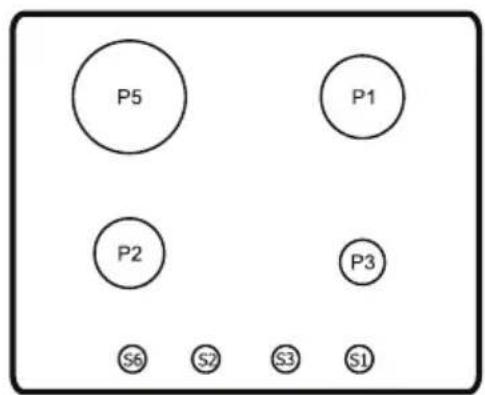
60 cm Inox – Glass 60 cm Inox – Glass 3G1E


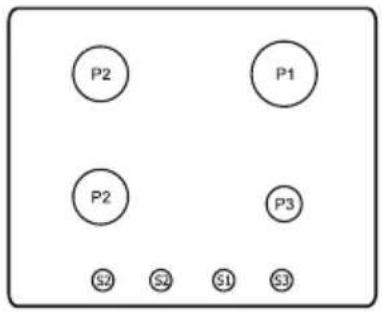
70 cm Inox 70 cm Glass 60 cm Inox – Glass
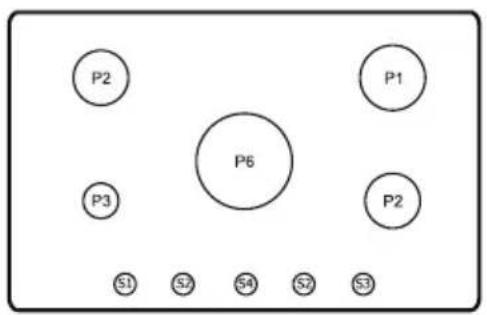

90 cm Inox - Glass 90 cm Glass
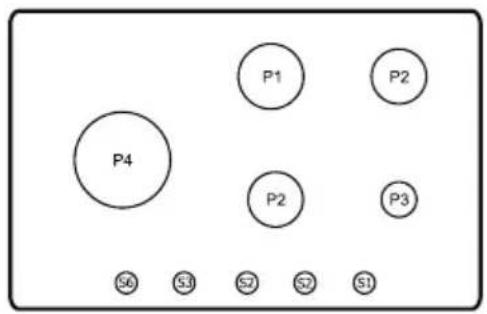
90 cm Glass 4G1E
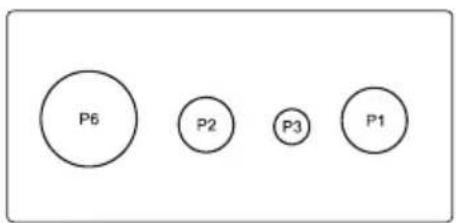
120 cm Glass
P1) Fast burner P3) Auxiliary burner P5) Hotplate ∅145
P2) Medium fast burner P4) Hotplate ∅180 P6) Wok burner
S1) Auxiliary burner control dial S3) Fast burner control dial
S2) Medium fast burner control dial S4) Wok burner control dial
S5) Hotplate ∅145 control dial
S6) Hotplate ∅180 control dial
PART 3: INSTALLATION
All gas appliance installations must be performed by a qualified personnel in accordance with the codes and regulations in force.
Important installation instructions are included further on in the manual.
Make sure that for the event of a malfunction the appliance is installed in such a way that it is easily accessible for the service technician.
NOTE:
Neither the manufacturer nor the vendor take any responsibility for damage arising from not adhering to safety and installation instructions contained in this manual and not adhering to the codes valid in a given country.
After installing the appliance remove all protective and advertising labels.
PART 4: USING THE COOKTOP
After completing the installation check that the appliance is installed in accordance with the here contained instructions and valid codes, or request that a qualified technician performs a test ignition of all burners and inspects all hotplates so as to check for gas leaks from the gas pipes and whether the electrical wiring is connected properly.
NOTE:
To achieve the maximum efficiency of a burner, it is necessary to only use pots and pans which are suitable for the given cooktop type, the diameter of which corresponds to the size of the respective burner. In this way you will prevent the flame from extending past the bottom edge of the cookware.
Suitable cookware
Use cookware with a diameter of 12 – 18 cm on the smaller hotplate / burner.
Use cookware with a diameter of 24 – 28 cm on the larger hotplate / burner.
Symbols on the control panel
| Symbol | Meaning |
| No gas supply | |
| Maximum gas supply | |
| Minimum gas supply |

natural_image
Abstract geometric composition with circles, dots, and squares (no text or symbols)
CAUTION!
Before igniting a burner or placing pots or pans on it, check that the protective grill is in its place, it is clean and the rubber washers are properly attached.
Lighting a burner
Automatic ignition
Press and hold down the respective control dial. Then release the control dial and turn it clockwise until the
symbol indicating the ignition of the respective hotplate / burner comes on, e.g.

If the burner does not ignite automatically or if there is an electrical power outage, hold down the control dial until a flame appears. Then release the control dial and turn it anticlockwise to adjust the flame.
Adjust the flame by turning the control dial between the maximum and minimum gas supply symbols.
Turn it clockwise to turn off the flame.
NOTE:
Some cooktop models are equipped with an automatic gas supply shut off function which is activated when the burner is suddenly blown out by a breeze, overflowing pot contents or a gas supply interruption.
NOTE:
If the flame cannot be ignited even after several attempts, check whether the burner "cover" and the "crown of the burner" are in the correct position.
NOTE:
If an electrical power outage occurs, it is possible to light the burner even without the electrical device.
Place a flame next to the burner, press the respective control dial and turn it to the maximum position.

CAUTION!
Keep the burner control dial pressed down for a maximum of 15 seconds. If the burner does not ignite even after 15 seconds, release the control dial, turn it to position and wait at least one minute, and only then attempt to ignite it again. If for some reason the flame goes out, turn the control dial to position, wait at least one minute and only then attempt to ignite the burner again.
Tips for using the cooktop
- As soon as water or another liquid starts to boil, turn down the flame so that it only simmers.
- Only use pots and pans with a fl at bottom.
- If you use a pot or pan the base of which is smaller than the size of the burner (crown of the burner), the flame will reach past the base perimeter and may cause the handle to overheat.
- Take care when cooking meals containing fat or oil as these meals could overheat and subsequently cause a fire.
- It is not recommended to cook meals in cookware made from stone, soapstone or on cast iron plates. Do not use aluminium foil to protect the surface of the cooktop.
• To achieve a lower gas consumption, place the pot or pan in the middle of the circle. - Do not use unstable or deformed pots and pans as they could tip over, the contents could spill and in this way this could cause an accident.
• Neither pots nor pans may extend past the zone with the control dials. - If it becomes hard to turn the control dial, or if the appliance is malfunctioning, turn off all the control dials, disconnect the power cord from the power socket and contact an authorised service centre.
PART 5: MAINTENANCE AND CLEANING
Prior to maintenance or cleaning it is necessary to disconnect the power cord from the power socket and to turn off the gas supply.
If the cooktop is hot then wait several minutes until it cools down. It is easier to remove food residues from the surface while the surface is still slightly hot.
NOTE:
No part or accessory of the appliance is designed for washing in a dishwasher.
Clean the appliance after every use. Not only will maintenance be faster and easier, but this will also extend the lifetime of the appliance.
Do not use sharp utensils or items to remove food residues.
Regular maintenance
The appliance must be inspected regularly. The technician who installed the cooktop or an authorised service centre will inspect the gas supply and pressure setting (if the appliance is equipped with one).
Protective grills
Protective grills are mounted on metal pins (depending on the model), located on the sides of the cooktop to ensure they are in correct position. To clean them better, you may remove the grills from the cooktop. Hold the grills in a horizontal position and lift them upwards.

CAUTION!
Do not lift up the grills at an angle as this could apply too much force to the metal pins. The pins could be damaged and crack.
Wash the protective grills in warm water with a small amount of kitchen detergent. To remove stubborn stains you may also use a cleaning paste. Rinse and wipe dry.
Horizontally attach the protective grill on to the cooktop. While attaching it, take care not to scratch the surface of the cooktop. Check that the grills are properly attached before using the appliance.
Cooktop
Regularly wipe the surface of the cooktop with a soft sponge lightly dipped in water with a small amount of kitchen detergent. Wipe dry using a clean wiping cloth.
Do not use steel wool, sponges with steel wool, petrol, benzene, thinners or any other solvents and similar compounds, domestic cleaning agents and bleaches, sink stain removers, etc.
If the surface of the cooktop is very dirty, use special cooktop cleaning agents based on the surface type of the cooktop.

CAUTION!
If cracks appear on the appliance, disconnect the appliance from the power socket and shut off the gas supply so that injury by electrical shock cannot occur and contact an authorised service centre. Do not place any items which could melt (plastics, aluminium foil) on the cooking surfaces.
Burners
The cover and crown of the burner can be removed for the purpose of maintenance and cleaning.
Wash the cover and crown of the burner in warm water with a small amount of kitchen detergent. Rinse and wipe dry. You can use a gentle cleaning paste or even steel wool to clean away deposits.
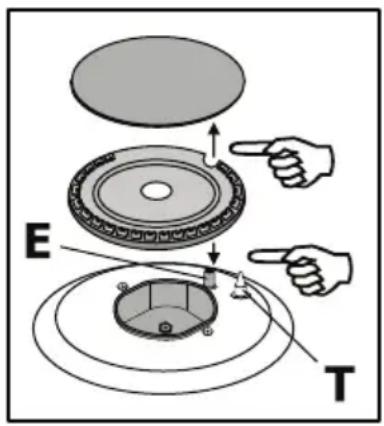
Ignition electrode
If you are using a model with electrical ignition, which is performed by means of a ceramic and metal electrode, it is necessary to constantly maintain the ignition components clean so that the burner ignites easily. Therefore regularly check that the holes in the crown of the burner allow gas to pass through.
On models with ventilation also regularly clean the ventilation opening, which provides for the airflow necessary for igniting the burner.
NOTE:
Do not use the burner or the entire appliance unless the burner is correctly assembled.
PART 6: BEFORE YOU CALL THE SERVICE CENTRE
If the appliance is not working as it should, read the instructions below, which may help you fix the problem before calling the service centre.
If the problem persists or it is not included in the table below, stop using the appliance, check that all control dials are turned off, disconnect the power cord from the power socket and contact an authorised service centre.
Under no condition should you repair the appliance yourself.
| Problem | Solution |
| A spark is not present during ignition. | Check that the power plug is properly inserted into the power socket.Check that there is electrical power in the power socket with the help of another working electrical appliance.Check that the main safety control dial is not loose, if the appliance is equipped with one.Check whether the fuse has not burned out.Check that the burner is correctly assembled, especially the crown and the cover. |
| Uneven flame Check that | the main jet is not clogged, or that there are no food remains in the cover or crown of the burner.Check that the burner is correctly assembled, especially the crown and the cover. |
| The burner does not ignite. | Check that the burner is correctly assembled, especially the crown and the cover. |
PART 7: INSTRUCTIONS FOR THE TECHNICIAN

CAUTION!
Installation and maintenance may only be performed by qualified personnel in accordance with valid codes.
The appliance must be disconnected from the power supply before any action is taken. If an electrical connection is necessary for the performance of work, ensure that all necessary safety precautions are adhered to.
The side walls of cabinets into which the cooktop is to be installed must not extend past the height of the workbench.
Do not install the appliance near flammable materials such as for example curtains, drapes, etc.

CAUTION!
NEITHER THE MANUFACTURER NOR THE VENDOR TAKE ANY RESPONSIBILITY FOR DAMAGES ARISING FROM NOT ADHERING TO SAFETY AND INSTALLATION INSTRUCTIONS CONTAINED IN THIS MANUAL AND NOT ADHERING TO THE CODES VALID IN A GIVEN COUNTRY.
Gas connection
For the gas connection you may choose either rigid connections or a flexible hose from stainless steel conforming to valid codes in force.
If you do use a flexible metal hose, it is important that the hose nowhere touches any moving parts and that it is not crimped anywhere. The same measures must apply when the cooktop is combined with an oven.

CAUTION!
To ensure correct operation, energy savings and a long lifetime of the appliance it is necessary that the voltage and pressure of the appliance conforms to the recommended values. The adjustable connection is attached to a complete ramp using nuts with a G 1/2" thread.
Screw on the parts without using excessive force. Set the connection in the required direction and tighten.
When using fl exible non-metallic hoses
Use a flexible hose that conforms to valid regulations, if it is possible to perform a complete inspection of the connection. The hose must be firmly attached using clamps in accordance with valid regulations.
Always seal with an end nut and an adjustable connection. Then continue with the gas connection.
The hose must be prepared for use as follows:
- it must not be longer than 1500 mm.
- it must be easily accessible for easy inspection of its condition.
- it must not overheat, the temperature must not exceed room temperature (30°C).
- in must not be exposed to torsion or tensile forces and it must not be crimped.
- it must not be in contact with sharp corners or edges.
When inspecting a fl exible hose, check whether:
- it has any tears, cuts or signs of burning.
- the connecting clamps are causing cuts.
- the material is elastic, it must not be brittle.
- its lifetime has expired.
If you identify any of the above signs, do not repair the hose, replace it instead.
It is important to install pipes correctly. Incorrect installation may cause gas leaks.

CAUTION!
After completing the installation, check that every pipe joint seals perfectly by using a soap solution.
NEVER USE A FLAME TO CHECK FOR GAS LEAKS!!!
Electrical wiring connection
Connect the appliance to a single-phase electrical power supply with a voltage of 230 V. Before connecting the appliance, check that the voltage on the appliance's rating label corresponds to the voltage in your power socket.
The connection must be carried out in accordance with valid laws and regulations.
Before connecting this appliance, check that:
- the power supply is properly grounded according to valid codes.
- the main fuse and the domestic electrical wiring correspond to the given load (see rating label).
- the wall socket or bipolar switch used for the electrical connection are easily accessible even after the appliance is built-in to the cabinet.
The appliance is supplied with a power cord equipped with a proper power plug suitable for the given load marked on the rating label. The plug must be inserted into a properly grounded power socket.
If you will be connecting the appliance directly to the electricity grid it is necessary to install a bipolar switch between the appliance and the grid with a minimum distance between contacts of 3 mm. This switch must correspond to the required load in accordance with valid codes.
Do not use an adapter to connect the appliance to a mains power socket.
The power cord must be located in such a way that at no point can its temperature exceed 90^ C.
The brown phase lead (connected to the terminal box to the contact marked with the letter "L") must always be connected to the phase in the grid.
If you will not be using the appliance for a longer period of time, before cleaning, maintenance, moving, etc., remove the power plug from the power socket to prevent overheating or a fi re hazard.
NOTE:
The manufacturer takes no responsibility for damage or injury caused by incorrect installation, unprofessional, incorrect or inappropriate use of the appliance.
If the power cord is damaged, do not use the appliance, disconnect it from the power socket and have the power cord replaced at an authorised service centre or by a qualified person. The replaced power cord must correspond to the parameters designated by the manufacturer (T90°C).
The appliance must be installed according to the instructions contained in this user's manual and according to the standards valid in the country of its use.
Installing the cooktop
The cooktop can be installed into a built-in kitchen cabinet which is resistant to temperatures up to 90 °C. The dimensions of the cooktops are provided further on in the manual.
Prior to placing the cooktop into the kitchen cabinet, it is necessary to adhere to the following dimensions:
1) Minimum distance from the edge of the cut out to the rear wall must be at least 100 mm.
2) Minimum distance from the edge of the cut out to the side wall, walls of furniture, etc. must be at least 100 mm.
3) Minimum distance from the edge of the cut out to a suspended cabinet or a range hood must be at least 650 mm.
Cooktop dimensions
Cut out an opening in the workbench according the dimensions provided for the individual cooktops.
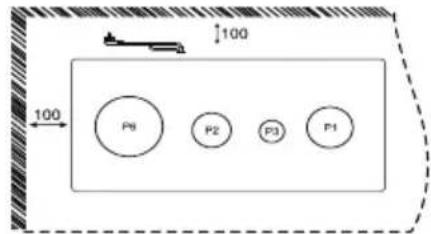

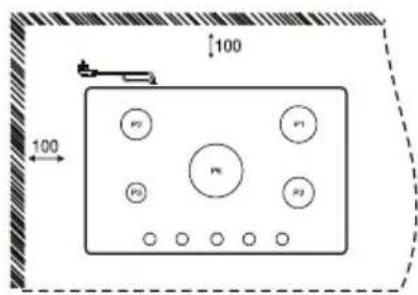
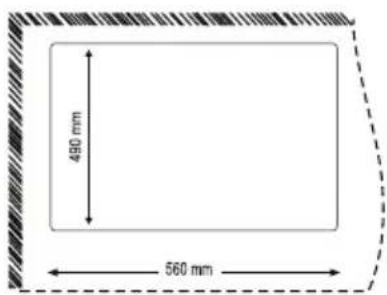
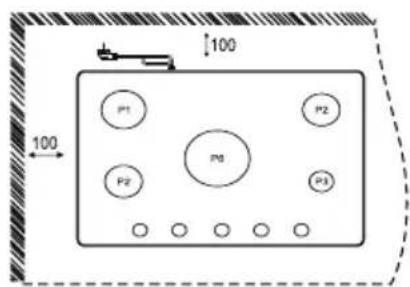


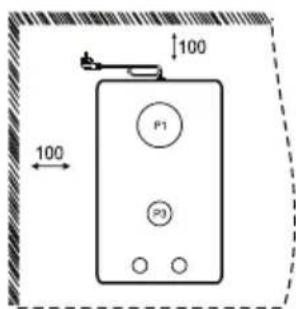

Before installing the cooktop into the cut out, first place a sealing adhesive tape on to the underside edge of the cooktop. Check that no gaps remain in the seal through which liquids spilled in the vicinity of the cooktop could enter into the bottom cabinet.
- Remove the protective grill, cover and crown of the burner and turn the cooktop upside down. Take care not to damage the spark plugs.
- Place the sealing tape around the entire top perimeter. Check that the ends touch but do not overlap.
- Place the cooktop into the cut out and centre it.
- Secure the cooktop in place using suitable clamps supplied together with the jet pack. Do not use glues, silicone or other similar substances to attach the cooktop.
Built-in options
a) Kitchen cabinet with doors
If you will be installing the cooktop into a kitchen cabinet with doors and a top cover, it is necessary to perform certain modifications in the design of the cabinet so that the hot underside of the cooktop does not come into direct contact with the cabinet. The minimum recommended distance between the underside of the cooktop and the top part is 10 cm. The panel under the cooktop must be easily removable for easy access in the event of a repair event.
If you will be performing an installation into a kitchen cabinet without a top cover it is necessary to maintain a minimum recommended distance from inserted items and foods.
b) Kitchen cabinet with an oven
If you will be installing the cooktop into a kitchen cabinet with an oven it is necessary to maintain minimum distances noted above and it is necessary to ensure that the cooktop has a sufficient supply of air.
Install according to the illustrations below to avoid it from overheating.
For safety reasons the electrical wiring connection of the cooktop and the oven must be separate so that it is possible to easily remove the oven from the cabinet if necessary.


PART 8: TECHNICAL SPECIFICATIONS
| Category II 2H 3B/P 220 | -230 V ~ 50 Hz | |||
| "Electrical oven" 1500 W Nominal pressure LPG, 30 mmbar NG, 20 mbar | ||||
| Wok pan 3.8 kW Hs 0.103 m3/H 3.8 kW Hs 0.334 | m3/h | |||
| Fast burner 3.0 kW Hs 0.079 m3/H 2.6 kW Hs 0.227 m3/H | ||||
| Medium fast burner 1.75 kW Hs 0.046 m3/H 1.75 | kW Hs 0.159 m3/H | |||
| Auxiliary burner 1.0 kW Hs 0.026 m3/H 1.0 kW Hs | 0.088 m3/H | |||
NOTE:
All the here mentioned data is subject to change.
INSTRUCTIONS AND INFORMATION REGARDING THE DISPOSAL OF USED PACKAGING MATERIALS
Dispose of packaging material at a public waste disposal site.
DISPOSAL OF USED ELECTRICAL AND ELECTRONIC APPLIANCES

The meaning of the symbol on the product, its accessory or packaging indicates that this product shall not be treated as household waste. Please, dispose of this product at your applicable collection point for the recycling of electrical & electronic equipment waste. Alternatively in some states of the European Union or other European states you may return your products to your local retailer when buying an equivalent new product. The correct disposal of this product will help save valuable natural resources and help in preventing the potential negative impact on the environment and human health, which could be caused as a result of improper liquidation of waste. Please ask your local authorities or the nearest waste collection centre for further details. The improper disposal of this type of waste may fall subject to national regulations for fi nes.
For business entities in the European Union
If you wish to dispose of an electrical or electronic device, request the necessary information from your seller or supplier.
Disposal in other countries outside the European Union
If you wish to dispose of this product, request the necessary information about the correct disposal method from local government departments or from your seller.

This product meets all the basic EU regulation requirements that relate to it.
Changes to the text, design and technical specifications may occur without prior notice and we reserve the right to make these changes.
UNIVERZÁLNÍ NÁVOD K POUŽITÍ PRO PLYNOVÉ VARNÉ DESKY ZNAČKY PHILCO
PHILCO

Famous for Quality the World Over
Vážený zákazníku
natural_image
Abstract geometric composition with circles, dots, and squares (no text or symbols)
UPOZORNĚNÍ!
ČÁST 6: PŘEDTÍM NEŽ ZAVOLÁTE DO SERVISU
Famous for Quality the World Over
Vážený zákazník
natural_image
Abstract geometric composition with circles, dots, and squares (no text or symbols)
UPOZORNENIE!
Dispose of packaging material at a public waste disposal site.
DISPOSAL OF USED ELECTRICAL AND ELECTRONIC APPLIANCES

The meaning of the symbol on the product, its accessory or packaging indicates that this product shall not be treated as household waste. Please, dispose of this product at your applicable collection point for the recycling of electrical & electronic equipment waste. Alternatively in some states of the European Union or other European states you may return your products to your local retailer when buying an equivalent new product. The correct disposal of this product will help save valuable natural resources and help in preventing the potential negative impact on the environment and human health, which could be caused as a result of improper liquidation of waste. Please ask your local authorities or the nearest waste collection centre for further details. The improper disposal of this type of waste may fall subject to national regulations for fi nes.
For business entities in the European Union
If you wish to dispose of an electrical or electronic device, request the necessary information from your seller or supplier.
Disposal in other countries outside the European Union
If you wish to dispose of this product, request the necessary information about the correct disposal method from local government departments or from your seller.

This product meets all the basic EU regulation requirements that relate to it.
Changes to the text, design and technical specifications may occur without prior notice and we reserve the right to make these changes.
POZNÁMKY
POZNÁMKY
POZNÁMKY
Dovozce:
FAST ČR, a.s.


- UNIVERSAL USER'S MANUAL FOR PHILCO GAS COOKTOPS
- PHILCO
- CONTENTS
- PART 1: SAFETY PRECAUTIONS
- Important safety instructions
- Recommendation:
- Important Notices:
- Installing the Appliance
- Operating the Appliance
- Maintenance and Repair
- PART 2: DESCRIPTION OF APPLIANCE
- PART 3: INSTALLATION
- NOTE:
- PART 4: USING THE COOKTOP
- Suitable cookware
- CAUTION!
- Lighting a burner
- Automatic ignition
- Tips for using the cooktop
- PART 5: MAINTENANCE AND CLEANING
- Regular maintenance
- Protective grills
- Cooktop
- Burners
- Ignition electrode
- PART 6: BEFORE YOU CALL THE SERVICE CENTRE
- PART 7: INSTRUCTIONS FOR THE TECHNICIAN
- Gas connection
- When using fl exible non-metallic hoses
- Electrical wiring connection
- Installing the cooktop
- Cooktop dimensions
- Built-in options
- a) Kitchen cabinet with doors
- b) Kitchen cabinet with an oven
- PART 8: TECHNICAL SPECIFICATIONS
- INSTRUCTIONS AND INFORMATION REGARDING THE DISPOSAL OF USED PACKAGING MATERIALS
- DISPOSAL OF USED ELECTRICAL AND ELECTRONIC APPLIANCES
- For business entities in the European Union
- Disposal in other countries outside the European Union
- UNIVERZÁLNÍ NÁVOD K POUŽITÍ PRO PLYNOVÉ VARNÉ DESKY ZNAČKY PHILCO
- UPOZORNĚNÍ!
- ČÁST 6: PŘEDTÍM NEŽ ZAVOLÁTE DO SERVISU
- UPOZORNENIE!
- POZNÁMKY
Brand : Philco
Model : PGI 64 C
Category : Cooker