
PC 32614 - Refrigerator Philco - Free user manual and instructions
Find the device manual for free PC 32614 Philco in PDF.


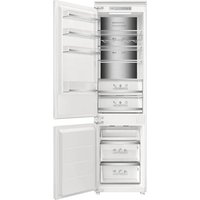
| Product Type | Refrigerator with freezer compartment |
| Brand | Philco |
| Model | PC 32614 |
| Dimensions (H x W x D) | 180 cm x 60 cm x 60 cm |
| Weight | 70 kg |
| Energy Efficiency Class | A+ |
| Power Supply | 220-240 V ~ 50 Hz |
| Climate Class | N-ST |
| Thermostat Control | Mechanical knob, adjustable from 1 to 7 |
| Cooling System | Static (manual defrost) |
| Lighting | Interior LED lamp |
| Door Reversibility | Reversible door (user-installable) |
| Shelves | 3 glass shelves |
| Salad Drawer | 1 humidity-controlled crisper |
| Door Bins | 3 adjustable door racks |
| Freezer Compartment | 3-star rating, 4-star freezer star rating |
| Freezing Capacity | 2.5 kg/24h |
| Noise Level | 40 dB |
| Maintenance & Cleaning | Clean with mild soap and water; defrost freezer when ice exceeds 5 mm |
| Safety Precautions | Install in dry, ventilated area; do not block ventilation openings; do not store flammable substances |
| Spare Parts Availability | Shelves, crisper, door bins, thermostat available through service centers |
| Repairability Index | 7.4 / 10 (estimated) |
Frequently Asked Questions - PC 32614 Philco
User questions about PC 32614 Philco
0 question about this device. Answer the ones you know or ask your own.
Ask a new question about this device
Download the instructions for your Refrigerator in PDF format for free! Find your manual PC 32614 - Philco and take your electronic device back in hand. On this page are published all the documents necessary for the use of your device. PC 32614 by Philco.
USER MANUAL PC 32614 Philco
TWO DOOR COMBINATION
REFRIGERATOR
USER'S MANUAL
PHILCO

Famous for Quality the World Over
Dear customer,
Thank you for buying a PHILCO brand product. So that your appliance serves you well, please read all the instructions in this user's manual.
CONTENTS
PART 1: BEFORE PUTTING INTO OPERATION....2
- Safety notices....2
• Safety instructions for gas R600a....4
PART 2: DESCRIPTION OF THE APPLIANCE .... 5
PART 3: INSTALLATION....6
• Transport and unpacking ....6
• Installation location ....7
- Cleaning before use....8
• Electrical connection....8
• Procedure for switching the door opening direction......
PART 4: OPERATING THE APPLIANCE....15
• Controlling temperature....15
- Setting the temperature in the refrigerator....15
- Setting the temperature in the freezer 15
• Super Freeze function 16
• Holiday function....16
• Refrigerator accessories 16
PART 5: ARRANGEMENT OF FOOD ...... 17
• Advice about refrigerating food....17
Chart on storing food in the refrigerator 17
• Storage of frozen food 18
Chart on storing food in the freezer 19
PART 6: DEFROSTING AND REGULAR MAINTENANCE ...... 20
PART 7: WHAT SHOULD I DO WHEN....22
PART 8: INFORMATION SHEET ...... 24
EN - 1
PART 1: BEFORE PUTTING INTO OPERATION
Safety notice
Symbols:

General advice for the optimal operation of the appliance

General dangers

Hot surfaces
Before you put the appliance into operation
- Carefully study the user's manual and installation instructions before installing and using the appliance! This user's manual includes important information regarding the installation, operation and maintenance of the appliance. Store the user's manual also for future reference, or for other owners of the appliance if the appliance is sold.

If the appliance is transported in a horizontal position the oil from the compressor may leak into the cooling circuit. For this reason, allow the appliance to rest in a vertical position for 12 hours before turning it on, so that the oil can flow back into the compressor.
After unpacking the appliance, carefully inspect that it has in no way been damaged. Also check that the power cord is not damaged. If you discover any defects, turn off the appliance and contact the vendor or in the case of a damaged power cord contact the service centre. If the appliance and all its parts are in order, install it according to the instructions in the relevant chapter.
- When installing the appliance in its place, or when moving the appliance, the power cord could be penetrated or damaged. Check that the power cord is not interfering anywhere.
- Before connecting the appliance to the electricity power source check that the capacity of the system corresponds to the specifications on the appliance's rating label.
- Any kind of home electric wiring necessary for the connection of the appliance must only be carried out by a qualified electrician.

If you move the appliance from its usual position, it is necessary to understand, that although you have disconnected the power cord, the components on the rear side of the appliance may remain very hot for some time.

This appliance is not designed to be built-in. Do not cover or block the air inflow or outflow openings. Insufficient ventilation will cause bad operation and damage to the appliance.
EN - 2
Operating the appliance
- Use the appliance only for the purposes for which it has been designed.
• This appliance is designed only for household use, for storing or freezing food and for preparing ice. - The temperature inside the refrigerator and freezer may rise or fall slightly, and so these appliances are not suitable for storing products (e.g. medicines), which require a stable temperature.

Do not use any other electric appliances (e.g. heating elements, electric ice cream machines, etc.) inside the appliance. There is a danger of explosion!
Do not place food inside the refrigerator containing flammable propulsion gases (e.g. sprays) and no explosives, contaminants or volatile substances. There is a danger of explosion!
Do not store liquids inside bottles and cans (especially beverages containing carbon dioxide) inside the freezer. The bottles and cans could crack!
• Store liquor only with a firmly tightened cap and in a vertical position.
- Do not use the base, drawers, door of the appliance, etc. as a step or as a support. There is a danger of injury to persons or damage to the appliance.
- Ensure that the plastic parts of the appliance and the door gasket seals are not soiled with oil or grease. The plastic parts and the gasket seals would then become porous.
- Do not consume frozen food immediately after taking it out of the freezer compartment. There is a danger of frost bite!

Avoid prolonged hand contact with frozen food, ice or evaporating pipes. There is a danger of frost bite and freezing to these objects!
We do not recommend placing hot liquids or food inside the refrigerator and filling containers all the way to the rim.
Do not put fragile, heavy or unstable objects on the refrigerator.
Children in the household
- Never leave packaging and its parts with the children. There is a danger of poisoning or suffocation by the cardboard boxes and plastic sheets!
• This appliance is in no way a toy for children! - For appliances with door locks: do not leave keys within the reach of children!
- If you will no longer be using the refrigerator, remove the doors, gasket seals and store it in a safe place. In this way you will prevent the danger of children becoming trapped inside the refrigerator.
Maintenance and cleaning

Before you begin with regular or exceptional maintenance, disconnect the appliance's power cord or turn off the fuse or circuit breaker. Never pull the electric power cord, only pull on the power plug.
Do not use mechanical or any other devices, except for devices recommended by the manufacturer for the purpose of accelerating the defrosting process.
- Do not defrost or clean the appliance using a steam cleaning device! The steam may come into contact with the electric components inside the appliance, where a short circuit could occur. There is a danger of electric shock!
- Do not remove the frozen ice layer and frozen on food using a knife or a sharp object. This could damage the cooling medium pipes. The escape of the cooling medium may cause eye injuries or may catch on fire.
General instructions
- This appliance must not be used by persons (including children) with physical, sensory or psychological impairments or by inexperienced persons, unless properly trained or schooled in the safe use of the appliance, or unless they have been properly supervised by a person who will be responsible for their safety. Children should be supervised so as not to play with the appliance.
• This appliance has been tested in accordance with the directives in force in the European Union. - The tightness of the cooling circuit has been verified.
- This appliance conforms to the relevant safety provisions for electrical appliances in force in the European Union.
Technical safety

The appliance contains a cooling gas, ISOBUTHAN (R600a). Only transport or move the appliance with the utmost care, prevent excessive impacts and shaking to prevent damaging the appliance. If the cooling circuit becomes damaged and the cooling gas may be escaping, there is a risk of an explosion, which may be ignited by a spark or flame. If the appliance shows signs of damage, it must not be put into operation. In such a case contact the service centre, ventilate the room where the appliance is located and prevent the spreading of flames or other interference with the appliance.
Safety instructions for gas R600a
Measures in case of an unexpected release
If ventilation is possible, allow the material to evaporate.
Characteristics of the gas
The gas is highly flammable, it is necessary to completely prevent contact with an open flame and hot surfaces. Because the R600a gas is heavier than air, it may become very concentrated at the level of the ground, where ventilation is weak.
First aid
Inhalation
Take the affected person from the contaminated area to a warm, well ventilated location. Staying in a contaminated location for a long time may cause suffocation, or potentially loss of consciousness. If necessary, provide mouth-to-mouth resuscitation and in exceptionally serious situations, under expert medical supervision, give oxygen.
Contact with the skin
Random contact with the skin will not endanger health, it is better to thoroughly wash the affected area. The liquid spray or dispersed liquid may cause frost bite, wash the affected area with large amounts of water and contact a medical doctor.
Contact with the eyes
If eyes have been affected, wash out with large amounts of water, while trying to keep the eyes open, and call a specialised doctor as soon as possible.
If contact or inhalation of the R600a gas occurs, contact your medical doctor.
EN - 4
PART 2: DESCRIPTION OF THE APPLIANCE
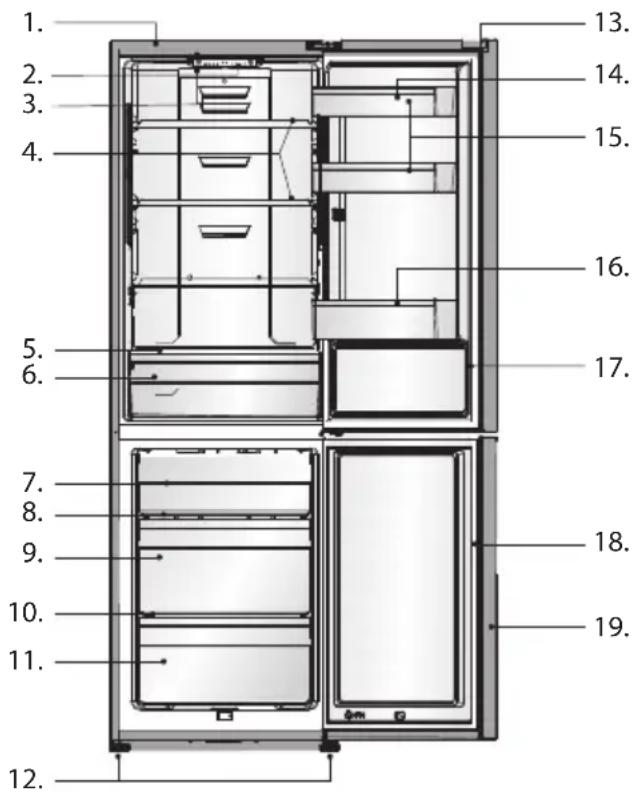
- Outer case
- Display
- LED light
- Glass shelves
- Cover of the fruit and vegetable drawer
- Fruit and vegetable drawer
- Top freezer drawer
- Top glass shelf of the freezer
- Middle freezer drawer
-
Middle glass shelf of the freezer
-
Bottom freezer drawer
- Levelling feet
- Refrigerator door
- Egg holder
- Top shelf
- Bottom shelf
- Door gasket seals of the refrigerator
- Door gasket seals of the freezer
- Freezer door
NOTE:
Due to the continuous innovation of products, the actual appliance may differ from this user's manual but the functions and methods of use remain the same. For more room in the freezer, you may remove the drawers (except for the bottom drawer) and install grates and the ice tray.
PART 3: INSTALLATION
Transport and unpacking
If the appliance is transported in a horizontal position the oil from the compressor may leak into the cooling circuit. For this reason, allow the appliance to rest in a vertical position for 12 hours before turning it on, so that the oil can flow back into the compressor.
Remove the external packaging, remove the protective plastic film from the surface of the appliance (if used) and clean the external parts of the appliance with an agent designed for this purpose. Do not use steel wool or any coarse agents, which could irreparably damage the surface of the appliance. Carefully remove all papers and adhesive tape from the appliance, doors and other parts packed in polystyrene. Remove documents and accessories from inside the appliance.
The packaging material is recyclable and is marked with a recycling symbol. For disposal follow the local regulations. Packaging materials (plastic bags, polystyrene parts, etc.) must be kept out of the reach of children, because they present a possible source of danger.
Carefully inspect the appliance. If you discover any faults, stop the installation and contact the vendor.
Operating conditions
The proper operation of the appliance, the cooling and freezing temperature are guaranteed only when the following conditions are met:
- The temperature in the room where the appliance is located conforms to the climate class stated on the appliance's rating label.
• Maximum ambient relative humidity: 90%. - The appliance must be placed at a sufficient distance from heat sources (e.g. baking ovens, central heating, direct sunlight, etc.).
• The appliance must be located in such a place that it is protected against the effects of weather.
• Regular maintenance is performed according to the instructions in this user's manual.
• The ventilation openings in the cover of the appliance must not be covered by anything. - Correct installation (e.g. levelling, the capacity of the system correspond to the specifications on the rating label of the appliance.)
Table – Climatic class
| Climatic class Ambient temperature | |
| SN +10°C to +32°C | |
| N +16°C to +32°C | |
| ST +16°C to +38°C | |
| T +16°C to +43°C | |
Installation location
The location for the placement of the appliance must meet the requirements in the paragraph "Operating conditions" and must have a stable floor with a load bearing capacity corresponding to the weight of the appliance.
Furthermore you must maintain distances and dimensions of the appliance, so that correct operation is ensured:
- Top part at least 20 cm;
- Rear part at least 10 cm;
- The wall on the side where the door opens at least 30 cm.
Level the appliance using the levelling feet, ensure there is a gap between the bottom edge of the appliance and the ground, so that there is sufficient circulation of the cooling air, by which you will ensure the optimal performance of the cooling circuit.
Check whether any cooling circulation pipes have been damaged during the installation.
- Use the appliance only for the purposes for which it has been designed.
- The appliance must be located on a rigid and even surface.
In this way you will ensure free circulation of the coolant and effective operation of your appliance.
- If possible, place the appliance into a cool, well ventilated and dry room.
- Do not locate the appliance in direct sunlight, or in a room with a high temperature, in the vicinity of any sources of direct heat, such as heating, an oven, a stove, etc. – this would mean that the compressor would need to work a lot harder resulting a substantially higher power consumption level.
If it is not possible to prevent the installation in the vicinity of a heat source, we recommend the insertion of an appropriate insulating board (do not use asbestos) between the appliance and the heat source; or at least to maintain the following minimum distances:
• From a gas or electric stove 3 cm;
• From a heater or oven, etc. 30 cm;
• From another cooling appliance 2 cm.
Do not place any appliances on the appliance, which emit heat on to the appliance, such as microwave ovens, toasters, etc.
Never cover the ventilation grill. Pull out the power plug by pulling on the plug itself, never pull on the cord when disconnecting the appliance.

Before turning on the appliance allow it to stand in its final location for 12 hours, the coolant circuit will stabilise in this way and no operating problems will occur. Before connecting the appliance to the power grid check that it is perfectly dry inside – especially in the corners.

Danger warning The coolant may be highly flammable, depending on its composition. The coolant circuit was hermetically closed and sealed and was tested many times for possible leaks. Any unqualified tampering with the product may cause a fire hazard. Check that there is no mechanical interruption or effect on the coolant circulation, namely in the accessible parts around the compressor. Only professionally qualified persons may work on the cooling system.
NOTE:
The doors open up to an angle of 135^ . Therefore, ensure sufficient space on the side where the doors open. See the following picture.

Cleaning before use
Check that you have removed from the appliance all adhesive tape used to hold accessories. Then clean all the inside parts using lukewarm water with a neutral cleaning agent, vinegar or sodium carbonate – in this way you will remove the characteristic odour of new parts – then dry carefully. Do not use detergents or aggressive agents, which could damage the surfaces.
Electrical connection
Before connecting the power plug to the power socket, check that:
- Your hands are completely dry.
- The voltage and frequency shown on the rating label of the appliance corresponds to that in the home power grid (permitted tolerance from -6% to +6% for nominal voltage. For use with different voltages, use a voltage changer with the corresponding parameters).
- The power cord and the plug are not damaged or caught under heavy objects.
• The power cord is not excessively tensioned, it is not permitted to use an extension cord.

Do not connect the appliance to a voltage rectifier (e.g. solar power plant) or use an extension cord.
The appliance must be connected to a working grounding lead.
If the power socket of the home system is not grounded in accordance with the current legal regulations, connect the appliance after consulting a specialised technician to the grounding lead itself.
The manufacturer takes no responsibility for injuries caused as a result of not following these instructions.
If you do not correctly level the refrigerator during the installation, the doors may not close shut and seal properly, which may cause problems with the cooling, ice build up or moisture. Levelling the refrigerator is very important.
Level the refrigerator using the levelling feet – turn them clockwise to lift the refrigerator and turn them anticlockwise to lower the refrigerator.
Procedure for switching the door opening direction
You can change the door opening direction - from the right (as supplied by the manufacturer) to the left if the location of the refrigerator requires it.

WARNING:
When changing the door opening direction, the appliance must not be connected to the power supply. Check that you have disconnected the plug of the power cord from the mains power socket.
Tools
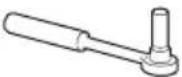 |  |
| 8mm socket wrench Philips screwdriver | |
 |  |
| Narrow fl at screwdriver 8mm wrench | |
NOTE:
Prior to starting with the change, place the appliance on its back so as to gain access to its underside. Lay the appliance down on to a soft mat or similar material so that the cooling circuit located in the rear of the appliance is not damaged.
To change the door opening direction, proceed as follows.
- Stand the refrigerator upright. Take all food and shelves out of the refrigerator to prevent their possible damage.

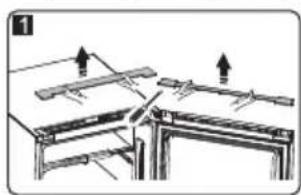
- Open part ① in the top part of the refrigerator from the right side and then remove part ③ and part ④ on the top door in the same manner. Remove part ② and put it back into the plastic bag.

natural_image
Technical diagram showing two mechanical assembly steps with arrows indicating motion direction (no text or symbols)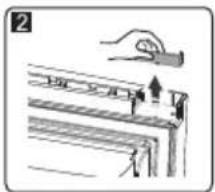
natural_image
Illustration of a hand pressing down on a mechanical component with arrows indicating motion (no text or symbols)
natural_image
Diagram of a train on an elevated track with overhead crane (no text or symbols)- Remove the corner cover.

natural_image
Diagram showing a 3D object with internal structure and an inset close-up of a hand holding a tool (no text or symbols)- Using a screwdriver, screw out the screws 1 and remove part 2
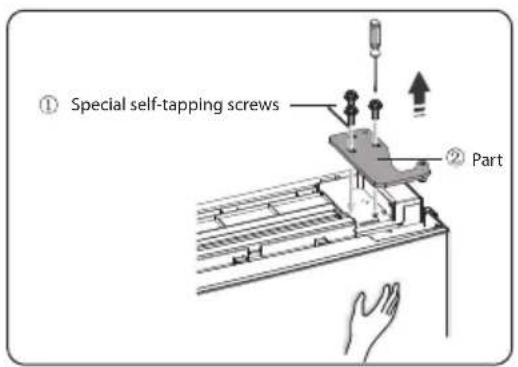
NOTE:
Hold the refrigerator door with one hand so that it does not fall off.
- Pull out the top door upwards and place it on a soft mat with the inside part facing downwards. Loosen screws ③, remove parts ② and ①, then install parts ① and ② (from the plastic bag) on the left side and secure in place with screws ③. Place the removed part ② into the plastic bag.

flowchart
graph TD
    A["Door holder"] --> B["Door stopper"]
    B --> C["Self-tapping screws"]
- Screw out the special self-tapping screws from the middle hinge and remove the middle hinge which is holding the bottom door.
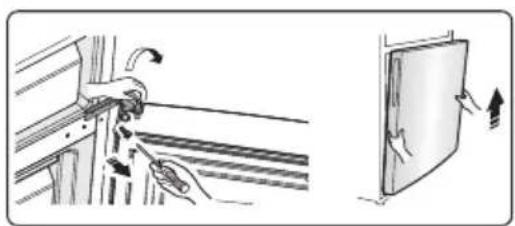
natural_image
Illustration showing a hand adjusting a metal bracket with arrows indicating movement, next to an open door with directional arrows (no text or symbols)- Pull out the bottom door upwards and place it on a soft mat with the inside part facing downwards. Loosen screws ③, remove parts ② and ①. Rotate part ① by 180^ and then install parts ① and part ② in the appropriate location on the left part and secure in place with screws ①.

- Remove the screw hole covers from the left side as shown on the picture below and move them to the other side on to the uncovered holes.

natural_image
Technical line drawing of a door frame with an arrow indicating direction (no text or symbols)- Place the refrigerator on its back on a soft underlay. Remove part ③ and loosen screws ④. Remove parts ② and ①.
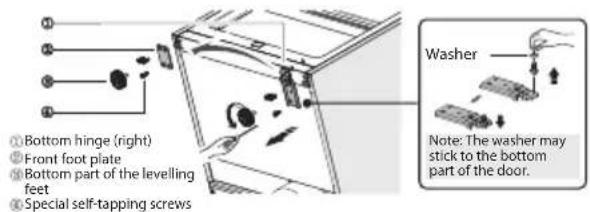
-
Screw out the bottom hinge, turn it over and screw it on to the other side.
-
Again attach parts in 9. Change part ① to the left side and part ② to the right side and then secure in place with screws ④. Finally install part ③.
EN - 12

- Seat the bottom door on the hinge pin, level respective to the bottom and top shaft. Rotate the central hinge by 180^ , replace the washer on the shaft to the top part, set the central hinge to the appropriate position and secure in place.

- Screw out the shaft of the top hinge, rotate the top hinge and insert the shaft into it. Then install the second side.
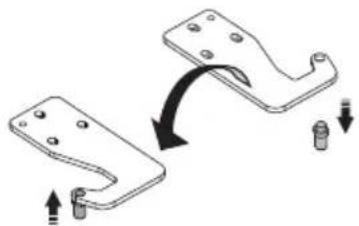
natural_image
Mechanical assembly diagram showing two components with arrows indicating motion (no text or symbols)- Seat the top door on the hinge pin, level part ① and the top door. The secure part ① in place using screws ②. (Hold the door in place with your other hand during the installation.)

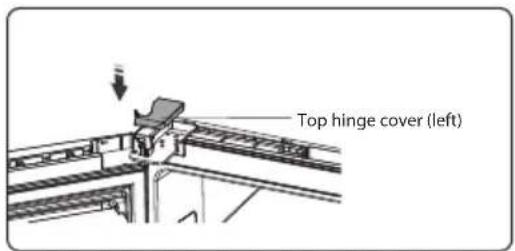
- Install the top door hinge cover (take it out of the plastic bag). Screw {screw}
- Rotate part ① by 180^ and install it in the right corner of the top door. Then attach part ②. (You removed both parts in step 2.)


natural_image
Diagram showing a mechanical assembly with a downward arrow indicating force or direction (no text or symbols present)- Install part ① and then part ②.

natural_image
Diagram showing a hand holding a tool with a downward arrow, no text or symbols present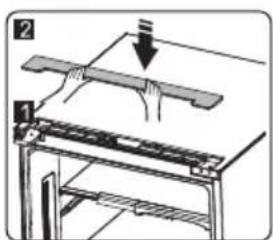
natural_image
Diagram of a kitchen appliance with a handle and lever mechanism (no text or symbols)- Open the doors and reinsert the shelves and drawers and then close the doors.
PART 4: OPERATING THE APPLIANCE
The appliance is operated using the display located in the top part of the refrigerator.
The icons on the display will be backlit when the appliance's power plug is connected to a power socket. The icon backlight will automatically turn off if you do not touch any icon and the doors are closed.
Controlling temperature
When you turn on the appliance for the first time or after an extended period, the temperature in the refrigerator will be set to 4 °C and in the freezer to -18 °C. If you wish to adjust the temperature, proceed according to the instruction in another part of this user's manual.

WARNING:
Please keep in mind that when you set a temperature, this is an average temperature in the entire area of the refrigerator / freezer. The temperatures inside each compartment may differ slightly from the temperature on the display, and this depends on the amount of inserted food, the number of times the door is opened, etc. Likewise, ambient temperature may also affect the final temperature inside the refrigerator.
Setting the temperature in the refrigerator
Fridge
Short press the 📄 Radio S sector Holiday icon to set the temperature inside the refrigerator from 2 °C to 8 °C as required. The indicator light of the selected temperature will be lit on the control panel. The temperatures will change in the following order:

For standard operation we recommend that the appliance be set to a temperature of 4 – 6 °C.
IMPORTANT:
During hot summer days when the temperature control dial is set to 2 °C, the compressor may run continuously. This is normal as the compressor is trying to maintain the temperature at the set level.
NOTE:
Inside the refrigerator there are outlets from the cold air distribution ducts. These outlets must remain freely accessible and must not be blocked so that the proper operation of the appliance is ensured.
Setting the temperature in the freezer
Freezer
Short press the 3 set for Super Freeze icon to set the temperature inside the refrigerator from -16 °C to -24 °C as required. The indicator light of the selected temperature will be lit on the control panel. The temperatures will change in the following order:

For standard operation we recommend that the appliance be set to a temperature of -18 - -20^ .
Super Freeze function
The Super Freeze function rapidly lowers the temperature inside the freezer by which it very quickly freezes the inserted food, which will retain the vitamins and nutritional values of fresh food.
Press and hold the Freezer Hold 3 sec for Super Freeze button for approx. 3 seconds to activate the Super Freeze function. The 🎨 icon will be lit.
If you insert the maximum amount of food that the freezer is able to freeze, wait 24 hours until it is fully frozen. The Super Freeze function automatically turns itself off after 26 hours.
You can turn off the Super Freeze function while it is running by pressing and holding down the Freezer Hold 3 sec for Super Freeze button for approx. 3 seconds. The temperature setting will return to the initial setting.
Holiday function
If you will be away from home for an extended period of time, you can activate the Holiday function.
Press and hold the Fridge Hold 3 sec for Holiday button for approx. 3 seconds until the icon is lit on the display.
As soon as the Holiday function is turned on, the temperature inside the refrigerator will automatically be set to 15^ C to reduce power consumption.
Warning:
Do not store any food inside the refrigerator during this time.
You can cancel the Holiday function by pressing and holding down the Fridge Hold 3 sec for Holiday button. The temperature setting will return to the initial setting.
Refrigerator accessories
Refrigerator shelves
The refrigerator shelves can be moved to a different height if necessary by being inserted into a respective rail or taken out for easy cleaning.
Shelves in the door
These are used for storing smaller-sized food such as cheeses, meat, eggs and bottles. They can be installed at various heights as required.
Fruit and vegetable drawer
It is used for storing fruit and vegetables.
Freezer drawers
These are used for storing frozen food.
EN - 16
PART 5: ARRANGEMENT OF FOOD
- Food products, which are susceptible to the absorption of odours or that release odours must always be stored in closed boxes or in appropriate packaging.
- Fruit, vegetables and salad products can be stored unpacked in the vegetable drawers.
• Appropriate wrapping materials for food is plastic wrap, aluminium foil, glass jars, etc. - The products should not touch the back wall, otherwise they may freeze on.
• Always allow hot dishes to cool down before placing them into the refrigerator. - Open the door only for a short time so that the inside area of the fridge is not heated. This saves energy.
- Never store explosive materials or products with flammable compressed gasses (e.g. whipped cream sprayers with pressurised capsules/cartridges, spray cans) – DANGER OF EXPLOSION!
- Do not place oils intended for the preparation of meals into the removable drawers in the refrigerator door. This may cause cracks caused by the pressure in the plastic on the door.
- Alcoholic beverages must always be stored in the cold zone, in a vertical position and firmly and safely closed.
Advice about refrigerating food
While the air in the refrigerator circulates, areas with various temperatures arise. These areas are especially useful for storing various types of food. Arrange the food in such a way that air can freely flow around the food. The coldest zones (suitable for example for storing meat) are found immediately above the vegetable drawers. On the other hand the zones that are less cold are at the top towards the outside and inside the door (ideal for storing butter and cheese).
Table - Storing food in the refrigerator
| Food Storage method Zone Durability | |||
| Meat and fi sh (various), hard cheeses | Plastic foil, aluminium foil, closed glass containers, plastic containers | Bottom part of the refrigerator | 1-2 days |
| Cooked dishes, cold dishes, confectionery | Closed glass or plastic containers | Any shelf 1-2 days | |
| Fruit and vegetables | Closed packaging or in bulk | Fruit and vegetable drawer | 3-4 days |
| Bananas, potatoes, onion, garlic | Do not store in the refrigerator | - | - |
| Water, wine, beer, milk, fruit juices, fi zzy drinks | Food grade glass or plastic bottles | Tray in the door | Depends on expiry date |
| Pickled or in oil marinated food, sauces, butter, soft cheese, eggs | Original packaging Tray in the door | Depends on expiry date | |
| Yoghurt Original packaging Any shelf | Depends on expiry date | ||
Storage of frozen food
All frozen food must be put into the freezer as soon as possible after being bought, so that they do not defrost and cause potential contamination.
Store frozen products according to the manufacturer's instructions on the packaging.
Pay increased attention to handling the drawer, so that you do not damage the cooling circuit.
Placing fresh food into a freezer
Ensure that the freezer is clean as the freezing process itself does not sterilise food. We recommend freezing food in the original packaging, or in various containers suitable for freezing or in special freezer bags. Never place hot or warm dishes into the freezer. Allow dishes to fully cool down before placing them into the freezer, wrap them in a plastic bag, aluminium foil or put them in a jar. Check the label on the freezer, to check how many kilos of fresh food (at a room temperature of 25^ C) the freezer is able to freeze in 24 hours. Never insert more food than the permitted amount.

WARNING:
Never place bottles with fizzy drinks into the freezer nor any other bottles.
For better freezing results give the food sufficient room for air circulation.
We recommend a setting between the medium and maximum value for standard use and for long term food storage in the freezer.
ATTENTION:
- Do not store cans and bottles with beverages containing carbon dioxide in the freezer. The contents expand during the freezing process, which may rip the bottle or can apart. Risk of injury and damage!
- Consume ice cream only several minutes after removing it from the freezer – you will avoid injury to your lips and tongue. Do not touch the inside of the freezer if you have wet hands.
Important information
- Place only properly wrapped food into the freezer.
- When storing deep frozen food intended for immediate consumption, note the expiry date marked by the manufacturer.
- Remember that only quality fresh food is suitable for freezing.
- Freeze fresh food in appropriately sized portions.
- Ensure that you use an appropriate wrapping material (plastic wrap, aluminium foil, freezing bays).
- Push all air out of the packages.
• To close the packages use rubber bands, plastic clips, tie wire or adhesive tape resistant to cold. - Plastic bags and tubes can also be closed using a food sealing appliance.
- On the closed package, write down the contents, weight and date of freezing.
- Before placing plastic bags into the freezer check that they are dry so as to prevent them from freezing to each other.
- To prevent partial defrosting, place the food that is to be frozen in such a way that it is not touching the already frozen food.
- Do not refreeze fully or partially defrosted food apart from the case where they were heat processed (cooked or fried/baked).
- Do not consume food that has been stored for a period longer than their expiry date. You may cause yourself food poisoning.
EN - 18
Chart on storing food in the freezer
| Food Storage method Zone Durability | |||
| Storing frozen food, ice cubes and ice creams | Original packaging, well sealed | Top part of the freezer | Depends on expiry date |
| Frozen food: meat and fi sh | Original packaging, well sealed. Food containers suitable for low temperatures, hermetically sealed. | Best in the bottom part of the freezer | Beef: 12 months Pork: 12 months Minced pork: 6 months Rabbit: 6 monthsVeal: 9 months Mutton: 9 months Poultry: 6 monthsFish: 6 months |
| Frozen food: pasta dishes, fruit, vegetables, confectionery | Food containers suitable for low temperatures, hermetically sealed. | Top part of the freezer 6-12 months | |
PART 6: DEFROSTING AND REGULAR MAINTENANCE
For hygiene reasons, it is necessary to regularly clean the appliance (including the outside and inside accessories) at least once every two months.
ATTENTION:
The appliance must not be connected to the power socket during cleaning. Danger of injury by electric shock! Before cleaning the appliance, disconnect the power plug from the power socket.
Cleaning the outer surface
In order for the appliance to serve you long and well, it is necessary to clean it regularly.
- Wipe the control panel and display using a soft clean wiping cloth.
- Apply water on to the wiping cloth instead of on the appliance. This will ensure that the water is spread evenly over the surface of the appliance.
- Wipe the door, handles, sides with a wiping cloth dipped in lukewarm water with a little kitchen detergent and then wipe dry.
ATTENTION:
• Do not use sharp objects, coarse cleaning agents which could scratch the surface of the appliance.
- Do not use thinners, car cleaners, chlorine, petrol, coarse cleaning agents, benzene or any other similar agents for cleaning. They can damage the surface of the appliance and cause a fire.
The use of steam cleaning appliances is extremely dangerous and so is strictly forbidden.
Cleaning the inside area
It is necessary to regularly clean the inside area. It will be easier to clean the inside area if there is not too much food inside the appliance. Wipe the inside area using a soft wiping cloth dipped in a weak solution of water and baking soda or vinegar, wipe using a wiping cloth dipped in clean warm water. Then wipe dry using a clean wiping cloth before reinserting the shelves and drawers.
Thoroughly dry out the inside area and accessories.
Removal of excess moisture
Your refrigerator is equipped with an excess moisture removal system, which may accumulate when food is stored.
In the bottom of the refrigerator there is a hole through which excess condensate is drained out of the refrigerator into a tank.
This hole must under no condition be blocked, clogged or otherwise covered. It serves for the proper regulation of humidity in the refrigerator.
The condensate tank, which is located in the rear part of the appliance should be taken out at least once a year and cleaned out. This will ensure the proper and long term operation of your appliance.
Defrosting
There is no need to defrost the appliance as it is equipped with an automatic defrost function that is active during operation.
Cleaning gasket seals
Keep the door gasket seals clean.
Sticky foods and beverages may cause the gasket seal to stick to the inner edge and result in damage when the door is opened. Wash the gasket seal with a soft wiping cloth dipped in warm water with a small amount of kitchen detergent. Rinse and thoroughly wipe dry.
EN - 20
ATTENTION:
Only turn on the appliance once the gasket seal is thoroughly dry.
Replacing the light

WARNING:
The light must be replaced by a service technician or qualified person! If the LED light is damaged, please contact an authorised service centre. To replace the LED light, proceed as follows:
- Disconnect the appliance from the power socket.
- Remove the light cover.
- Pull out the light connector.
- Screw out the light screws and replace the light with the same type.
- Return the cover and connect the connector.
- Return the light cover.
Taking out of operation for an extended period
If you are not going to be using the refrigerator for an extended period of time, do the following:
Disconnect the refrigerator from the power source by pulling it out of the power socket. Clean out the inside and dry it out as described in the part Cleaning the refrigerator. Leave the door open to prevent an unpleasant odour forming inside.
Please be aware:
Compressor
The compressor is controlled by the thermostat, which is set by the temperature dial, and turns itself on automatically when temperature inside the appliance is exceeded and then turns itself off as soon as it again reaches this temperature.
When any compressor – cooling system is turned on – noise can be heard. These sounds are made when the motor in the compressor is working and they are also made by the coolant circulating in the circuit of the cooling system. These noises are normal and do not indicate any malfunction in the operation of the appliance. In unheated rooms or in cold weather conditions condensate may form on the exterior walls of the appliance. This does not indicate a malfunction and this condensate will disappear as soon as the temperature rises.
Contact the service department only when, after analysing all possible factors of the malfunction, you cannot find any cause for the malfunction or you are unable to remedy the malfunction yourself. So, first focus on: "What should I do when...."
PART 7: WHAT SHOULD I DO WHEN...
If you notice problems with your appliance or if you find that the appliance is not working properly, you can remedy some of the most common faults yourself prior to contacting an authorised service centre. Check the appliance and proceed according to the instructions below before contacting an authorised service centre.

WARNING:
Do not attempt to repair the appliance on your own. If the problem persists after performing the inspection, please contact an authorised service centre, a qualified technician or the vendor from whom you purchased the appliance.
| Problem Possible | cause Solution | |
| The appliance is not working. | The appliance is not turned on. Turn on the appliance. | |
| The power cord is connected to a power socket, or is not loosened. | Check the power cord. | |
| A fuse is burned out or damaged. Check the fuse. | ||
| The power socket is damaged. Contact a qualified electrician. | ||
| The appliance cools too much. | The temperature is set too low. Change the temperature. | |
| The appliance is not cooling suff iciently. | The correct temperature is not set. Change the temperature. | |
| The door was left open for a longer period of time. | Only open the door for the necessary time. | |
| You have placed a large amount of food inside. | Set a lower temperature. | |
| The appliance is near a heat source. | Move the appliance or the heat source – more information in a preceding part of this user's manual. | |
| The light does not light up. | The light tube is destroyed. Change the light tube. | |
| Large layer of frost especially near the gasket seals. | The gasket seals are not sealing properly (probably after the door opening direction has been changed). | Carefully heat up the frost deposit using a fan (set to cold air current). At the same time use your hand to shape the door gasket to remove frost and to make sure that the gasket is correctly seated. |
| Unusual sounds. | The appliance is not levelled. | Level the appliance using the levelling feet. |
| The appliance is touching a wall or another object. | Carefully move the appliance. | |
| A part of the appliance, e.g. power cord is touching another appliance or wall. | Lead such a part along a different path, or move the appliance if necessary. | |
| The compressor does not engage after a temperature change. | This is a normal event, where there is a certain time lag between the set temperature and the engagement of the compressor. | After the time lag elapses, the compressor will be engaged. |
| Water is dripping on to the floor or remains in the drawers. | The water drain is clogged. Clear out the water drain. | |
PART 8: INFORMATION SHEET
Information Sheet
INFORMATION SHEET: Philco
Philco brand:

| Brand Philco | |
| Product number PCE 32614 N | |
| Type of appliance 3) 7 | |
| Energy effi ciency class(A... low electricity consumption to G high electricity consumption) | A+ |
| Electricity consumption per 365 days 1) kWh 312 | |
| Total available volume: l 326 | |
| of which: refrigerator part l 233 | |
| of which: freezer part l 93 | |
| Star mark for the freezer area **** | |
| Freezing capacity kg/24h 12 | |
| Climatic class 2) SN-N-ST-T | |
| Voltage 220 - 240 V ~ 50 Hz | |
| Noise level 4) dB (re 1pW) | 42 |
| Dimensions cm (h x w x d) cm | 1850x595x680 |
| Weight kg | 76 |
1) Electricity consumption in kWh/year is based on the results of a normalised test carried out over a period of 24 hours. Actual electricity consumption depends on the use and location of the appliance.
2) SN: ambient temperatures from +10 °C to +32 °C
ST: ambient temperatures from +18 °C to +38 °C
N: ambient temperatures from +16 °C to +32 °C
3) 1 = Refrigerator without low temperature areas
7 = Refrigerator/freezer with low temperature areas ( ** )
8 = Upright freezer
9 = Chest freezer
4) Noise level according to European norm EN 60704.
NOTE: All the here provided data is subject to change.
INSTRUCTIONS AND INFORMATION REGARDING THE DISPOSAL OF USED PACKAGING MATERIALS
Dispose of used packaging material at a site designated for waste in your municipality.
DISPOSAL OF USED ELECTRICAL AND ELECTRONIC EQUIPMENT

This symbol on products or original documents means that used electric or electronic products must not be added to ordinary municipal waste. For proper disposal, renewal and recycling hand over these products to determined collection points. Or as an alternative in some European Union states or other European countries you may return your products to the local retailer when buying an equivalent new product. Correct disposal of this product helps save valuable natural resources and prevents damage to the environment caused by improper waste disposal. Ask your local authorities or collection facility for more details. In accordance with national regulations penalties may be imposed for the incorrect disposal of this type of waste.
For business entities in European Union states
If you want to dispose of electric or electronic appliances, ask your retailer or supplier for the necessary information.
Disposal in other countries outside the European Union
This symbol is valid in the European Union. If you wish to dispose of this product, request the necessary information about the correct disposal method from the local council or from your retailer.

This product complies with EU rules and regulations regarding electromagnetic compatibility and electrical safety.
Changes in the text, design and technical specifications may be made without prior notice and we reserve the right to make these changes.
DVOUDVEŘOVÁ KOMBINOVANÁ
CHLADNIČKA
NÁVOD K OBSLUZE
PHILCO

Famous for Quality the World Over
Vážený zákazníku
natural_image
Diagram showing a mechanical component with a close-up view of a hand operating a tool (no text or symbols present)natural_image
Illustration showing a hand adjusting a wall-mounted tool with directional arrows, next to a door with an arrow indicating upward motion (no text or symbols present)natural_image
Technical line drawing of a door frame with an arrow indicating direction (no text or symbols)natural_image
Diagram showing two mechanical components with arrows indicating a transformation or assembly (no text or symbols present)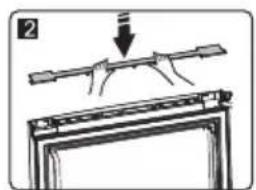
natural_image
Diagram showing a mechanical assembly with a downward arrow indicating force or direction (no text or symbols present)natural_image
Diagram showing a hand holding a tool with a downward arrow, no text or symbols present
natural_image
Diagram of a kitchen appliance with a tray and handle, showing a downward force (no text or symbols)Famous for Quality the World Over
Vážený zákazník
natural_image
Diagram showing a 3D object with internal structure and an inset view of a hand holding a tool (no text or symbols present)natural_image
Illustration showing a hand adjusting a metal bracket with arrows indicating movement, next to an open door with directional arrows (no text or symbols)natural_image
Diagram of a door frame with an arrow indicating direction (no text or symbols)natural_image
Diagram showing two mechanical components with arrows indicating a transformation or assembly (no text or symbols present)
natural_image
Diagram showing a mechanical assembly with a lever and frame structure (no text or symbols)natural_image
Diagram showing a hand holding a tool with a downward arrow, no text or symbols present
natural_image
Diagram of a kitchen appliance with a tray and handle, showing a downward force (no text or symbols)- Otvorte dvierka a vložte spät police a priehradky a potom znovu zavrite.
ČASŤ 4: OVLÁDANIE SPOTREBIČA
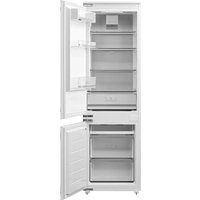
- TWO DOOR COMBINATION
- REFRIGERATOR
- USER'S MANUAL
- PHILCO
- CONTENTS
- PART 1: BEFORE PUTTING INTO OPERATION....2
- PART 2: DESCRIPTION OF THE APPLIANCE .... 5
- PART 3: INSTALLATION....6
- PART 4: OPERATING THE APPLIANCE....15
- PART 5: ARRANGEMENT OF FOOD ...... 17
- PART 6: DEFROSTING AND REGULAR MAINTENANCE ...... 20
- PART 7: WHAT SHOULD I DO WHEN....22
- PART 8: INFORMATION SHEET ...... 24
- PART 1: BEFORE PUTTING INTO OPERATION
- Safety notice
- Symbols:
- Before you put the appliance into operation
- EN - 2
- Operating the appliance
- Children in the household
- Maintenance and cleaning
- General instructions
- Technical safety
- Safety instructions for gas R600a
- Measures in case of an unexpected release
- Characteristics of the gas
- First aid
- Inhalation
- Contact with the skin
- Contact with the eyes
- PART 2: DESCRIPTION OF THE APPLIANCE
- NOTE:
- PART 3: INSTALLATION
- Transport and unpacking
- Operating conditions
- Installation location
- Cleaning before use
- Electrical connection
- Procedure for switching the door opening direction
- WARNING:
- Tools
- EN - 12
- PART 4: OPERATING THE APPLIANCE
- Controlling temperature
- Setting the temperature in the refrigerator
- IMPORTANT:
- Setting the temperature in the freezer
- Super Freeze function
- Holiday function
- Refrigerator accessories
- Refrigerator shelves
- Shelves in the door
- Fruit and vegetable drawer
- Freezer drawers
- PART 5: ARRANGEMENT OF FOOD
- Advice about refrigerating food
- Storage of frozen food
- Placing fresh food into a freezer
- ATTENTION:
- Important information
- PART 6: DEFROSTING AND REGULAR MAINTENANCE
- Cleaning the outer surface
- Cleaning the inside area
- Removal of excess moisture
- Defrosting
- Cleaning gasket seals
- Replacing the light
- Taking out of operation for an extended period
- Please be aware:
- Compressor
- PART 7: WHAT SHOULD I DO WHEN...
- PART 8: INFORMATION SHEET
- INSTRUCTIONS AND INFORMATION REGARDING THE DISPOSAL OF USED PACKAGING MATERIALS
- DISPOSAL OF USED ELECTRICAL AND ELECTRONIC EQUIPMENT
- For business entities in European Union states
- Disposal in other countries outside the European Union
- DVOUDVEŘOVÁ KOMBINOVANÁ
- CHLADNIČKA
- NÁVOD K OBSLUZE
- ČASŤ 4: OVLÁDANIE SPOTREBIČA
Brand : Philco
Model : PC 32614
Category : Refrigerator