
PDA 1291 BIT - Dishwasher Philco - Free user manual and instructions
Find the device manual for free PDA 1291 BIT Philco in PDF.


| Product Type | Built-in Dishwasher |
| Brand | Philco |
| Model | PDA 1291 BIT |
| Dimensions (H x W x D) | 85 cm x 60 cm x 60 cm |
| Weight | Approx. 45 kg |
| Voltage / Frequency / Power | 220-240 V / 50 Hz / 1900 W |
| Water Consumption | 10 liters per cycle |
| Energy Consumption | 0.93 kWh per cycle |
| Noise Level | 47 dB(A) |
| Place Settings | 12 |
| Programs | Eco, Intensive, Quick, Glass Care, Pre-wash |
| Energy Efficiency Class | A+ |
| Safety Features | Child lock, anti-flood system |
| Maintenance | Clean filter regularly; descale as needed |
| Reparability | Spare parts available for up to 10 years |
| Installation Type | Built-in or freestanding (adjustable) |
Frequently Asked Questions - PDA 1291 BIT Philco
User questions about PDA 1291 BIT Philco
0 question about this device. Answer the ones you know or ask your own.
Ask a new question about this device
Download the instructions for your Dishwasher in PDF format for free! Find your manual PDA 1291 BIT - Philco and take your electronic device back in hand. On this page are published all the documents necessary for the use of your device. PDA 1291 BIT by Philco.
USER MANUAL PDA 1291 BIT Philco
Famous for Quality the World Over
Dear customer,
Thank you for buying a PHILCO brand product. So that your appliance serves you well, please read all the instructions in this user's manual.
CONTENTS
PART 1: BEFORE PUTTING INTO OPERATION....2
- Important safety instructions....2
PART 2: DESCRIPTION OF THE PRODUCT .... 5
PART 3: INSTALLATION ....6
- Unpacking....6
- Placement....6
- Electrical connection....7
• Water supply....7 - Connecting the drain hose....8
• Built-in....9
PART 4: CONTROL PANEL ...... 12
• Before first use ....13
• Water softener 13
- Adding salt....15
- Adding rinsing aid 16
• Function of the detergent 17
Dosage of the detergent....18
PART 5: WASHING DISHES / CUTLERY 19
- Filling the upper rack....20
• Filling the lower rack 20 - Setting the upper rack....21
- Setting the lower rack....23
- Basket for cutlery 23
• Turning on the appliance / starting a washing program 25 - Changing a program 25
PART 6: MAINTENANCE AND CLEANING....27
- Filtration system....27
• Installing the filter 27 - Cleaning the filter 28
• Dishwasher care 28
• Protection against frost 29
PART 7: PREVENTION OF MINOR MALFUNCTIONS .... 31
- Error codes .... 33
PART 8: TECHNICAL SPECIFICATIONS....34
PART 1: BEFORE PUTTING INTO OPERATION
Important safety instructions
- Read carefully and store for future use.
- The safety of this appliance complies with industry norms and meets legal appliance safety requirements. However, as manufacturers, we consider it our duty to provide you with the following safety instructions.
- It is essential that you store this user's manual in a safe place so that you can use it in the future. If you intend to sell the appliance, give it to another owner, or if you move, always make sure that the user's manual is attached to the appliance, so that the new owner can find out about the operation of the appliance and the relevant warnings.
- Before installation or operation of the appliance you MUST carefully read all the safety instructions and the user's manual.
- Before putting the appliance into operation for the first time, check that it has not been damaged during transport.
- If the appliance is supplied in the winter months, when the temperature falls under 0^ C, store the appliance at room temperature for 24 hours before first use.
- This dishwasher is designed for washing household dishwasher-safe dishes. Use the dishwasher only for the purposes for which it was designed. The dishwasher is designed for a maximum of 12 sets of dishes!
- This appliance must not be used by any persons (including children) with mental disabilities, weak strength or by inexperienced persons, unless they have been properly trained or schooled in the safe use of the product, or unless they are properly supervised by a qualified person who is responsible for their safety.
• Children must be supervised to ensure that they do not play with the appliance.
Installation
- Check that the dishwasher has not been damaged during transport. Never connect a damaged appliance. If the dishwasher is damaged, contact the supplier.
- It is necessary to remove all packaging from the dishwasher before it is used. Dispose of the packaging materials in a proper manner. Do not allow children to play with the packaging material. There is a danger of suffocation!
- The electrical and plumbing installation necessary for the connection of this dishwasher may only be performed by a person with relevant qualifications.
• Maximum permitted water pressure is 1 Mpa. Minimum permitted water pressure is 0.03 Mpa. - Connect the appliance to the water source using a new hose, do not use a used hose.
- The power cord must not be excessively or dangerously bent or pressed during the installation.
- For safety reasons, changing the technical parameters, or making any other modifications to the appliance is dangerous.
- Never use the dishwasher, if the electrical connection or the water hose are damaged, or if the control panel, workbench or its support is damaged, when the inside of the appliance is freely accessible. Contact a local service centre to avoid exposing yourself to possible dangers.
- You must not drill into any side of the dishwasher so that you do not damage the plumbing and electrical components.
- Do not turn on your dishwasher until all covers are properly installed.

WARNING!
When using the dishwasher follow all the notices below.

Grounding instructions
- This appliance must be grounded. In the event of a failure or malfunction the grounding will reduce the risk of injury by electrical shock by ensuring a lower resistance to the electrical current. This appliance is equipped with a power cord with a grounding conductor and power plug.
- You must connect the power plug into an appropriate power socket installed and grounded in accordance with local laws and regulations.

WARNING!
- The incorrect connection of the grounding conductor may create a risk of injury by electrical shock.
- If you have any doubts about the proper grounding of the appliance, ask a qualified electrician or service technician for verification. Do not modify the power plug included with the appliance, if it does not fit into the power socket. Ask a qualified electrician to install a proper power socket.
Correct use
- Before inserting dishes or kitchen utensils, check that they are suitable for washing in a dishwasher. The manufacturer of the dishes or kitchen utensils will provide more details, or such information is included in the attached documentation. Not adhering to this notice may lead to the damage of dishes or kitchen utensils, or also the appliance. The warranty does not cover this kind of damage.
- Do not wash plastic items in the dishwasher unless they are marked by the manufacturer as dishwasher-safe. For plastic items without such markings, follow the recommendations of the manufacturer.
- When using the dishwasher you should prevent the plastic items from coming into contact with the heating element. (These instructions are intended only for dishwashers with freely accessible heating elements.)
- Use only agents (detergents and rinsing aids, salt and polishing agents) designed to be used with automatic dishwashers.
- Never use soap, washing or cleaning detergents designed for hand washing. Keep all these substances out of the reach of children.
- Store all cleaning agents in a safe place. Keep children away from all washing and rinsing agents and at a sufficient distance from the open dishwasher door, because there could be remains of detergents inside.
- Do not use any solvents in the dishwasher. The could cause an explosion.
- Dishwasher detergents are very alkaline and their ingestion may be life threatening! Avoid contact with the skin or eyes, because there is a danger of chemical burns of eyes or skin. Keep children at a sufficient distance from the dishwasher when the door is open. Follow the safety instructions of the dishwasher detergent manufacturer.
• The water inside the dishwasher is not intended for drinking. It may contain remains of detergents. - Place sharp items in such a way that they do not damage the door seal.

WARNING!
Knives and other utensils with sharp tines and blades must be placed inside the basket with tips facing downwards or in a horizontal position.
- Ensure that the dishwasher door is always closed, except for the time when dishes are being inserted or removed. This will prevent the danger of tripping over the door and subsequent injury. If the door is open, do not allow children to come close to the dishwasher.

WARNING!
Do not sit on the door or on the wire racks, do not stand on them or handle them with brute force. Do not touch the heating elements during operation or immediately afterwards.
(These instructions are intended only for dishwashers with freely accessible heating elements.)
Do not place any heavy items on the door when it is open and do not stand on it. The appliance could tip over.
- Open the dishwasher carefully during operation so that water does not spray out and so that you do not get scalded by the escaping steam.
- Do not pull any dishes out of the dishwasher until the cycle is completed.
• After the completion of a washing cycle, check that the detergent compartment is empty.
• After using the dishwasher, disconnect it from the power source and turn off the water supply.
• Under no circumstances tamper with the control buttons.
Servicing, disposal
- If it is necessary to repair the appliance, contact an authorised service technician, who should use only original spare parts.
- If the power cord is damaged it must be replaced by the manufacturer or the manufacturer's service technician, to prevent injury to persons or damage to the appliance.
- Never attempt to repair the appliance yourself. Repairs carried out by inexperienced persons may lead to injuries or serious damage to the appliance. Contact a local service centre. Always request original spare parts.
- When taking an old dishwasher out of service or when disposing it, remove the dishwasher door. This will prevent children or animals from closing themselves inside the dishwasher and prevent this life threatening situation.
PART 2: PRODUCT DESCRIPTION

natural_image
Mechanical assembly diagram showing two circular components connected by a rod, with no visible text or symbols- Top rack with partitions
- Top spraying arm
- Lower rack
- Bottom spraying arm
- Filters
- Rating label
- Control panel
- Washing detergent and rinsing aid compartment
- Basket for cutlery
- Salt compartment (located in the bottom part of the appliance)
- Rail of the upper rack
- TURBO drying system for better dish drying results in the dishwasher
PART 3: INSTALLATION
Unpacking
Remove the external packaging, remove the protective plastic film from the surface of the appliance (if used) and clean the external parts of the appliance with an agent designed for this purpose. Do not use steel wool or any coarse agents, which could irreparably damage the surface of the appliance. Carefully remove all papers and adhesive tape from the appliance, doors and other parts packed in polystyrene. Remove documents and accessories from inside the appliance.
The packaging material is recyclable and is marked with a recycling symbol. For disposal follow the local regulations. Packaging materials (plastic bags, polystyrene parts, etc.) must be kept out of the reach of children, because they present a possible source of danger.
Carefully inspect the appliance. If you discover any faults, stop the installation and contact the vendor.
Placement
Place the appliance in the desired location. The dishwasher is equipped with a water supply hose and a drain hose, which can be connected either on the right or left hand side of the dishwasher.
Levelling the appliance
After placing the dishwasher in its place it is not level, you can level it by using the levelling feet. Under no circumstances should the dishwasher be tilted by more than 2^ .
Connecting to a power source

WARNING!
For reason of personal safety:
Do not connect to an extension cord or a multi-plug socket. Under no circumstances remove or cut away grounding from the power cord.
Power source demands
Information about the required voltage for the connection of the dishwasher to a suitable power source is contained on the appliance's rating label. Use the required 10 - 16A fuse, the recommended delaying fuse or circuit breaker and ensure that this appliance has its own independent electrical circuit.

Before use, check that the appliance is properly grounded.
Electrical connection
Check that the voltage and frequency of the used power source correspond to the information on the appliance's rating label. Insert the power plug only into a properly grounded power socket. If the socket to which the appliance will be connected is not properly grounded, replace the socket rather than using adapters, etc., which could lead to overheating or burning.

WARNING!
• The incorrect connection of the grounding conductor may create a risk of injury by electrical shock.
- If you have any doubts about the proper grounding of the appliance, ask a qualified electrician or service technician for verification.
- Do not modify the power plug supplied with the appliance. If the power plug does not correctly fit into your power socket, ask a qualified electrician to replace it.
Water supply
How to connect the water supply hose?
You must connect the dishwasher to a water supply using a new hose. Do not use perished, old or otherwise damaged hoses.
Water pressure must be in the range 0.03 MPa to 1 MPa. If the water pressure in your system is lower, ask for advice from our service department.
• Pull out the hose fully from the storage area in the rear part of the dishwasher.
- Screw in the water supply hose to a tap with a 3/4" thread.
• Fully open the water supply before turning on the dishwasher.
Water supply hose
The water supply hose has double wall. The water filling system guarantees intervention by blocking the water supply in the event that the water supply hose fails.

WARNING!
The hose connected to the water supply to the sink may break, if the sink is connected to the same water system as the dishwasher. We recommend that you disconnect the hose and seal the opening.
How to disconnect the water supply hose?
- Shut off the water inlet.
- Reduce water pressure by pressing the reduce pressure button. This will reduce the water pressure and prevent water from possibly squirting out into the room.
• Unscrew the water supply hose from the water tap.


WARNING!
To prevent water from staying in the hose, close the water inlet into the dishwasher. (This does not apply to dishwashers with the aqua-stop function.)
Connecting the drain hose
Insert the drain hose into the waste water pipe with a minimum diameter of 4 cm or leave it lying in the sink and ensure that it is not bent or dented. Use a special plastic bracket supplied with the appliance. The hose must be at a height of 50 to 110 cm above the ground. The loose end of the hose must not be submerged in water so that reverse water flow does not occur.

NOTE:
The hose must be at a height of 50 to 110 cm above the ground. The loose end must not be submerged in water.
Draining water
- Connect the drain hose. The drain hose must be properly attached so that water does not leak. Check that the hose is not knotted up or pinched.
Extending the hose
• If you need to extend the drain hose, you must use the same type of drain hose.
- The hose must not be longer than 4 meters. Otherwise the efficiency of the dishwasher would be reduced.
Connecting the drain hose
You must connect the drain hose at a height from 50 cm (minimum) to 110 cm (maximum) from the bottom part of the appliance. Secure the drain hose using a clamp. The loose end must not be submerged in water.


natural_image
Abstract diagram with a central X and curved line, no text or symbols presentBuilt-in
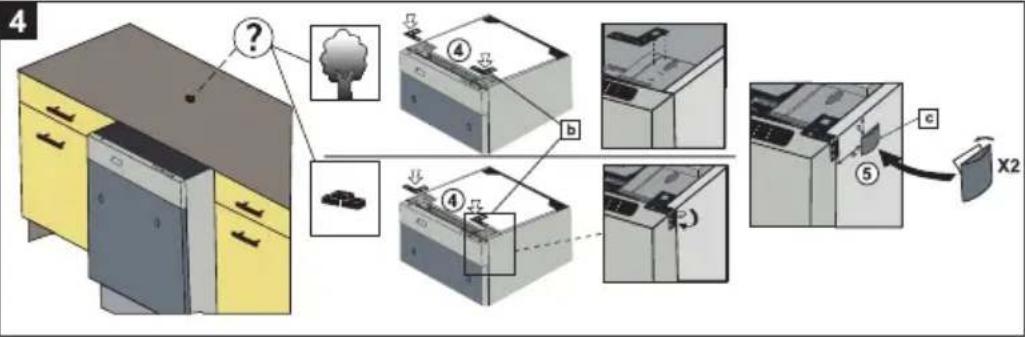
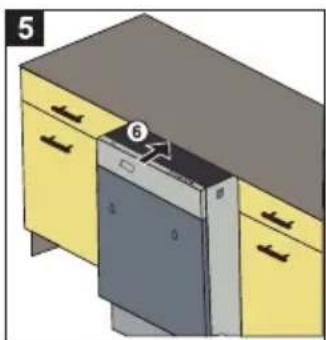
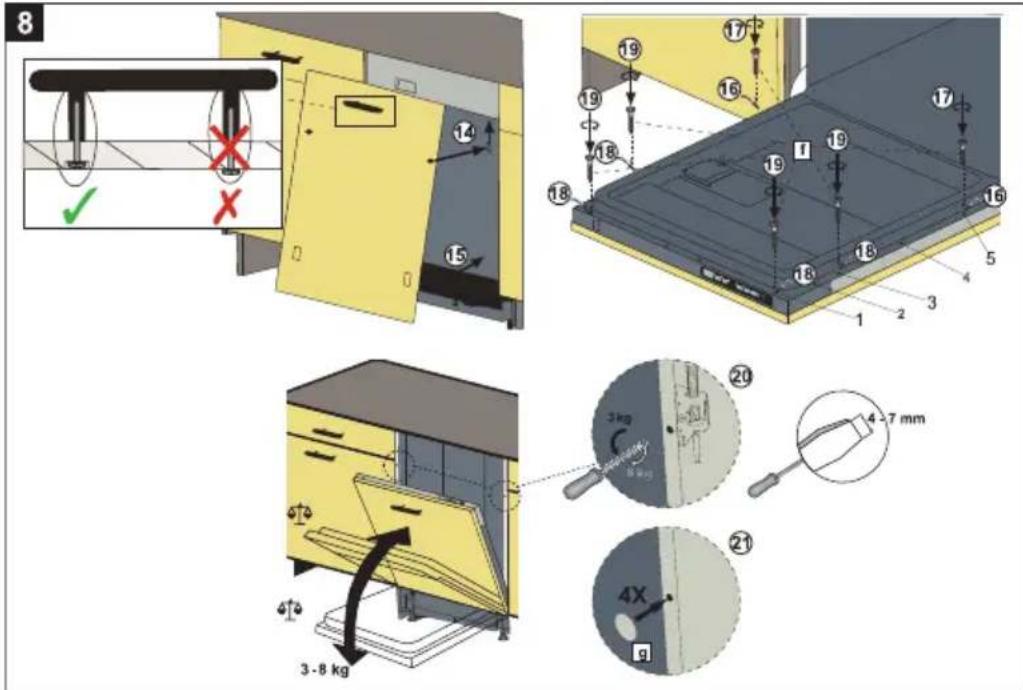
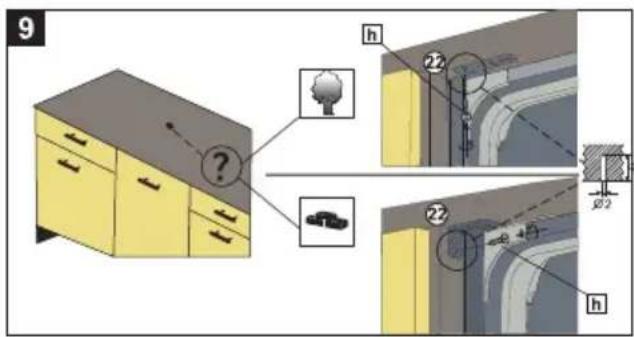
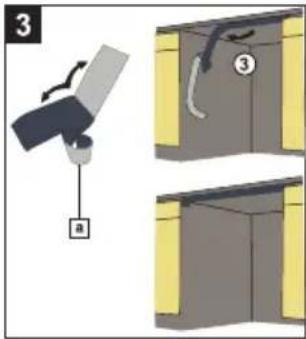
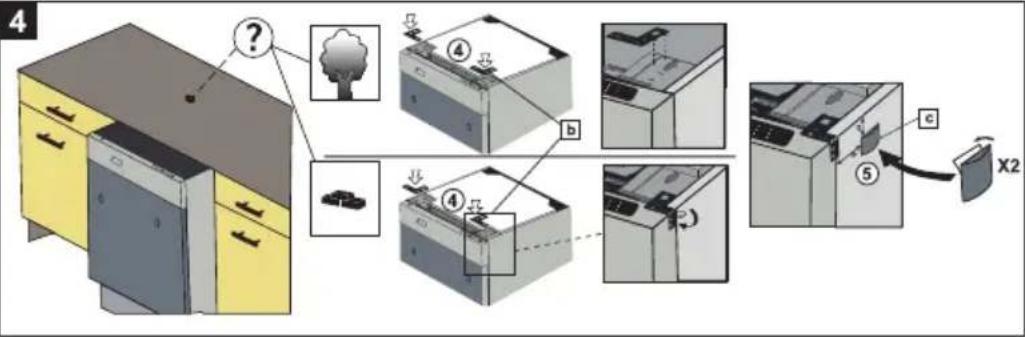
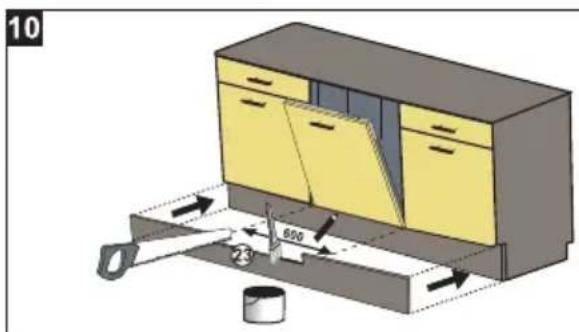
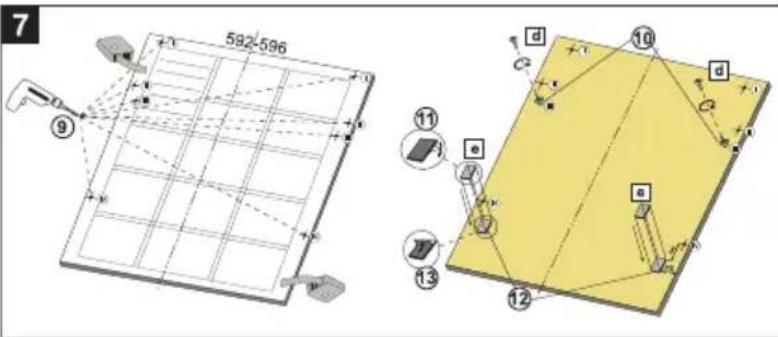
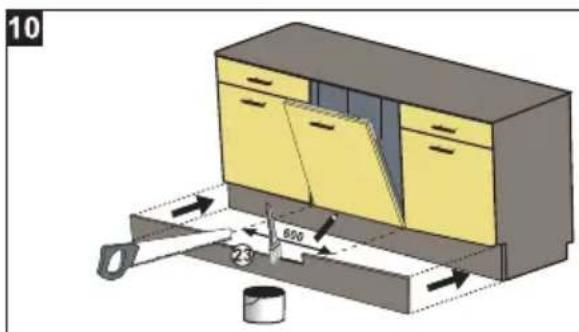
This dishwasher is designed to be built-in. Adhere to all warnings and instructions contained in this user's manual during installation.
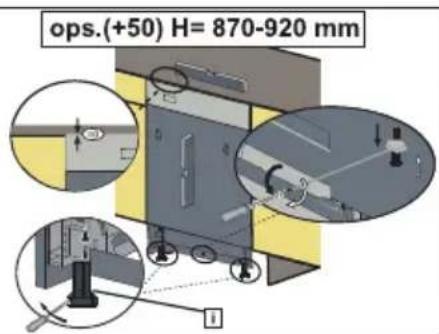
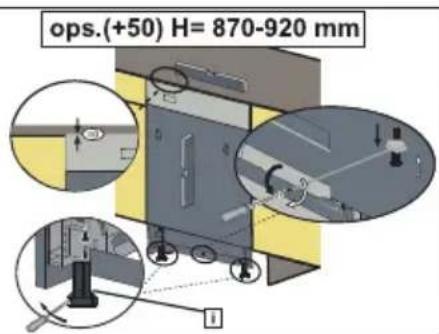
Before installation check that the required dimensions of the dishwasher to be built-in correspond to the dimensions of the installation location – see illustration below.

2
ops.(+50) H= 870-920 mm


4
natural_image
Illustration of a kitchen appliance with a door and side drawers, no text or symbols present




WARNING!
After removing the cover, all rigid parts must remain stable to ensure balance.

WARNING!
Only remove the top cover if it is absolutely necessary for the installation into the built-in area. The dimensions of some built-in areas may be higher and so the dishwasher will fit in with the top cover attached.
Turning on the dishwasher
Before turning on the dishwasher, check the recommendation below.
• The dishwasher is levelled and properly seated.
• Is the inlet valve opened?
• Joints do not leak in the connection points.
• Cables are properly connected.
• Is the power source turned on?
• The water supply hose and the drain hose are not knotted up.
• You have removed all packaging material and all printed materials.
PART 4: CONTROL PANEL
Control panel

-
ON/OFF switch: turn the appliance on / off. After turning on, the „end“ of Program indicator light will come on.
-
Display: display the washing cycle type and time remaining until the end of the selected washing program.
-
Program button: select the desired program.
-
Delayed start button: press repeatedly to delay the start by 1 to 19 hours. In order to activate the delayed start function it is necessary to select a washing program. If you need to change the delayed start time, repeatedly press the delayed start button. The most recently set value will apply.
-
Tablet button: use this if you are using 3-in-1 tablets containing washing detergent, salt, rinsing aid.
-
Pre-wash button: use this for heavily soiled dishes to improve the washing cycle results. The temperature and duration of the washing cycle will change.
NOTE:
If you select the pre-wash for a program for which the pre-wash is not compatible, a warning sound will be made.
NOTE:
Note: If you want to set only the pre-wash program, then select pre-wash using the the program button.
- Half dish load button: by using the half dish load function you can reduce the washing cycle time and reduce water and electricity consumption. You can select from three types of programs:
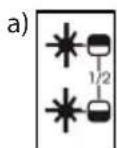
If you have half a dishwasher load and the dishes are located in both the racks, press this button and select the options where both the indicator lights are lit (see the icon at the beginning of paragraph a)).

If you put in half a dishwasher load only into the upper rack, press this button repeatedly until only the top indicator light is lit (see icon at the beginning of paragraph b)).

If you put in half a dishwasher load only into the lower rack, press this button repeatedly until only the bottom indicator light is lit (see icon at the beginning of paragraph c)).
- Salt warning indicator light: It will light up if salt needs to be refilled.
Rinsing aid warning indicator light: It will light up if rinsing aid needs to be refilled.
The warning indicator lights will turn off during the washing cycle or when using 3-in-1 tablets even if the amount is insufficient.
End of program indicator
As soon as the washing program finishes, the end of program indicator „end“ will be lit. A sound will be made 5 times.
NOTE:
The washing program that was set previously will remain in the dishwasher's memory. Before turning on the dishwasher again, check that you have selected the correct washing program.
Before first use
Before you put your dishwasher into operation:
a) set water softening;
b) pour 3/4 litre of water into the salt compartment and fill it up with salt;
c) fill the rinsing aid compartment;
d) fill the dishwashing detergent compartment.
Water softener
The water softener is made so that it releases minerals and salts contained in water, which would have a negative effect on the operation of the dishwasher. The higher the content of these minerals and salts, the harder the water is. You should set the water softener according to the water hardness in your area. Information about water hardness in your area should be provided by your water supply company.
If you use hard water in your dishwasher, scale deposits will be left on your dishes, which may negatively affect the washing efficiency and lifetime of your dishwasher.
The appliance should be equipped with a special softener, which uses the salt compartment for salt specifically designed for eliminating scale and minerals from water.
Identifying water hardness
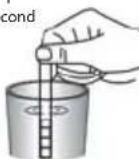
The dish washing efficiency of your dishwasher depends on the hardness of the water used. Therefore, your dishwasher is equipped with a system which reduces water hardness at the main water inlet. The better the system is set up the better the achieved washing efficiency. Your water supplier should provide you with information about water hardness in your area or you may measure it yourself using a simple harness test, a special testing strip (not included).
| Take the testing strip out of the packaging. | Allow your tap water to flow over the strip for approximately 1 minute. | Leave the testing strip dipped in the water for approximately 1 second. | Take it out of the water and tap it. | Wait approximately 1 minute for the result. | Compare the hardness value on the strip to the hardness table supplied with the testing strip. |
 |  |  |  |  | Level 1 □□□□□□□□□ No LimeLevel 2 □□□□□□□□ Very low lime contentLevel 3 □□□□□□□□ Low lime contentLevel 4 □□□□□□□□ Medium lime contentLevel 5 □□□□□□□□ Lime contentLevel 6 □□□□□□□ High lime content |
Setting salt consumption
The dishwasher is designed to enable the adjustment of salt consumption on the basis of the hardness of the water used. This should optimise and adapt the level of salt consumption.
Table for setting up water hardness
| Water hardness level | dH (German unit) | dF (French unit) | dE (English unit) | Water hardness setting indicator |
| 10 – 50 – 90 – 6L | 1 will appear on the display | |||
| 26 – 1110 – 207 – | 14 L2 will appear on the display | |||
| 312 – 1721 – 301 | 5 – 21 L3 will appear on the display | |||
| 418 – 2231 – 402 | 2 – 28 L4 will appear on the display | |||
| 523 – 3141 – 552 | 9 – 39 L5 will appear on the display | |||
| 632 – 5056 – 904 | 0 – 63 L6 will appear on the display | |||
- When the dishwasher is turned off, press and hold the program button.
- At the same time press the ON/OFF button to turn on the dishwasher.
- Hold down the program button until the „SL“ displayed on the screen disappears. Then release the button.
- The display will show the last setting. Use the program selection button to set the water hardness level.
- To confirm and save into the dishwasher's memory press the ON/OFF button.
NOTE:
Your water supplier will provide you with information about the hardness of your water.

CAUTION!
If your dishwasher does not have a water softening system, you can skip this chapter.
Adding salt into the salt container
Always use salt designed for dishwashers.
The salt compartment is located under the lower rack and you should refill it in the following manner.

NOTE
- Use only salt specifically designed for use in dishwashers! Any other kind of salt, which is not specifically designed for use in dishwashers, particularly table salt, would damage the softener system in the dishwasher. Damage caused by the use of inappropriate salt is not covered by the manufacturer's guarantee and the manufacturer takes no responsibility for any damages caused.
- Add the salt before starting one of the full washing cycle programs. This will prevent salt crystals or salt water from lying at the bottom of the dishwasher, where this could lead to corrosion.
natural_image
Mechanical assembly diagram showing a gear and bearing component (no text or symbols)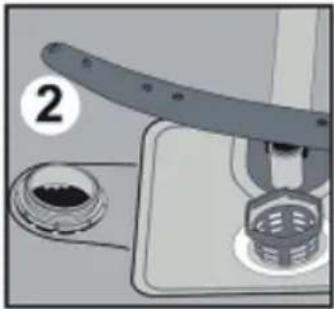
natural_image
Mechanical assembly diagram showing a clamping mechanism with a numbered component (no text or symbols present)
natural_image
Illustration of a microscope pouring liquid into a container with a base (no text or symbols)
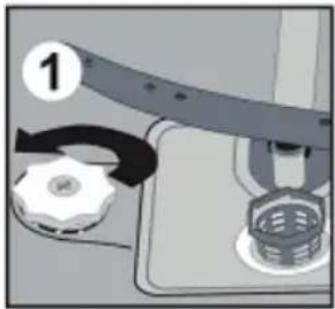
a) Slide out the lower rack and then unscrew the lid of the salt compartment – see pic. 1/2.
b) Before the first wash, pour 3/4 litre of water into the salt compartment.
c) Place the funnel (included accessory) on the opening of the compartment and pour 2 kg of salt into it.
- It is normal for a smaller amount of water to run out of the compartment.
d) After filling the compartment screw the lid back on by turning it in the clockwise direction.
e) You should start a washing program immediately after the salt compartment has been refilled (we recommended the rinse or quick wash program). Otherwise the salt water could damage the filtration system, pump and other important part of the dishwasher. This is not covered by the warranty.

NOTE
- Only refill the salt compartment when the salt warning indicator light on the control panel lights up. Depending on how well the salt dissolves, the warning indicator light may stay on even after the salt compartment has been refi lled.
- If there is no salt warning indicator light on the control panel (on some models), you can estimate the amount after adding salt to the system by the number of cycles performed by the dishwasher.
• If salt runs out anywhere, remove it by starting the rinse program or the quick wash program.
Adding rinsing aid
Rinsing aid compartment
- The rinsing aid is released during the last rinse so that water drops do not remain on your dishes causing stains. It also improves drying due to the fact that all the water flows off the dishes. Your dishwasher is designed to only be used with a liquid rinsing aid. The rinsing aid compartment is located on the inside wall of the door next to the dishwashing detergent compartment.
- Fill up the compartment by opening it and pouring in the rinsing aid until the indicator goes completely dark. The capacity of the rinsing aid compartment is approximately 110 ml.
NOTE:
Use only branded dishwasher rinsing aids. Never pour other mixtures (such as liquid detergents, etc.) into the rinsing aid compartment. Otherwise the dishwasher may be damaged.
When should the rinsing aid be refi lled?
If the rinsing aid compartment is empty, the relevant indicator light on the control panel will turn on indicating the need to add rinsing aid. After filling the compartment with rinsing aid the entire indicator is dark. As the rinsing aid is gradually used up the point of the indicator becomes smaller. Never allow the amount of rinsing aid to fall below 1/4 of the compartment volume.

CAUTION
Wipe any spilled rinsing aid with a wiping cloth, so that excessive suds are not formed in the following wash. Do not forget to put the lid back on before closing the dishwasher door.
Setting dial (rinse)
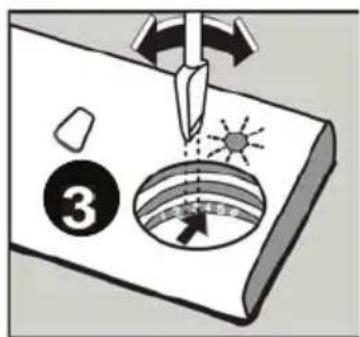
The rinsing aid compartment has six different settings. Its factory level setting is 3. If stains form on the dishes or if there is a problem with drying the dishes, increase the released amount of the rinsing aid by removing the lid and turning the dial to "4". If despite this step the dishes are not without stains after drying, adjust the setting again to a higher level until the dishes are clean after drying. If rinsing aid residues remain on the dishes, reduce the level to 1 – 2. The recommended setting is "3". (The value set by the manufacturer is "3".)

natural_image
Hand turning a knob on a device, showing rotational motion (no text or symbols)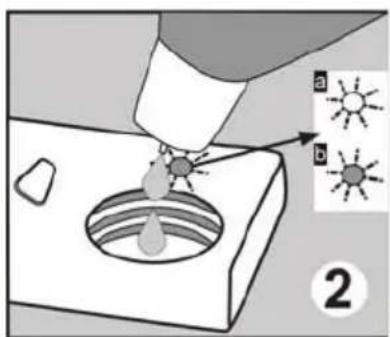
NOTE:
If there are water drops or scale stains on the dishes after the wash, increase the dosage. If there are white stains or blueish layers on glasses or knife blades, lower the dosage.
Function of the detergent
Dishwashing detergents with their chemical additives are essential for the removal of soils, their decomposition and removal from the dishwasher. For this purpose the majority of commercial quality dishwashing detergents are suitable.
Dishwashing detergents
There are 3 types of dishwashing detergents:
- containing phosphates and chlorine;
- containing phosphates and without chlorine;
- without phosphates and without chlorine.
New dishwashing detergents usually do not contain phosphates and so the softening function of the phosphates is missing. In such a case we recommended the use of a softening salt even when the water hardness is a mere 6^ dH. If you use dishwashing detergents without phosphates and have hard water, this leads to the frequent appearance of white stains on dishes and glasses. In such a case you will therefore achieve better results if you add more dishwashing detergent. Chlorine-free dishwashing detergents whiten only slightly. For this reason strong and colourful stains will not be completely removed. In such a case select a program with a higher temperature.
Concentrated dishwashing detergents
Based on their chemical composition dishwashing detergents are divided into two basic types:
• standard, alkaline dishwashing detergents with caustic additives;
• less alkaline dishwashing detergents with natural enzymes.
Using "standard" washing programs in combination with concentrated dishwashing detergents reduces pollution and is appropriate for your dishes. These programs are specifically improved with enzymes, which are contained in concentrated dishwashing detergents, that can dissolve soils. For this reason you can achieve the same results with concentrated dishwashing detergents using a "standard" washing program, as you would achieve only with the use of an "intensive" program.
Dishwashing tablets
The dissolving speed of various brands of dishwashing tablets may differ. For this reason some tablets may not dissolve during the short programs and therefore fail to perform their cleaning function. So when using tablets use the long programs to ensure the removal of all dishwashing detergent remains.
Dishwashing detergent compartment
You must fill up the compartment before starting any washing cycle according to the instructions contained in the dishwashing cycle table. Your dishwasher uses less dishwashing detergent and rinsing aid than an ordinary dishwasher. Generally a single tablespoon of dishwashing detergent is sufficient for a standard wash. For more heavily soiled dishes you will need more dishwashing detergent. Always add the dishwashing detergent immediately before starting the dishwasher, otherwise it could become damp and subsequently not dissolve completely.

NOTE
• If the lid is closed, press the button. The lid will open.
• Always add the dishwashing detergent immediately before starting each washing cycle.
• Use only branded dishwashing detergents designed for dishwashers.

WARNING!
The dishwashing detergent is corrosive! Keep it out of children's reach.
Using the dishwashing detergent
Use only dishwashing detergent specifically designed for use in dishwashers. Store the dishwashing detergent in a dark and dry place.
Do not put dishwashing detergent powder into the compartment unless you intend to start the dishwasher.
Dosage of the dishwashing detergent
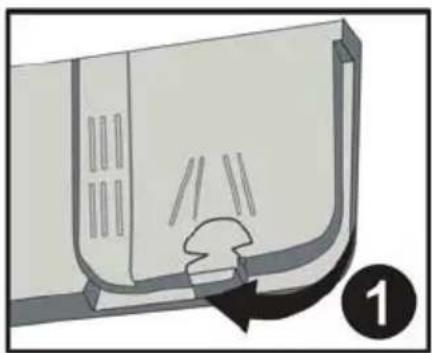
- Release the clip to open the dishwashing detergent compartment.
- Place the required amount of dishwashing detergent into the main wash detergent compartment (if you are using a dishwashing powder). Make sure that the amount of the dishwashing detergent is between the MIN and MAX level lines.
- If the dishes are overly soiled, also add dishwashing detergent into the pre-wash partition.
- Close the dishwashing detergent compartment.
- Now turn on the dishwasher.
natural_image
Diagram of a mechanical component with a curved base and internal features, labeled with number 1 (no text or symbols on the diagram itself)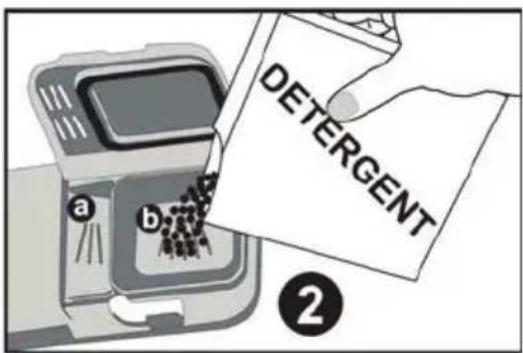
NOTE:
The mark „MIN“ in the main wash detergent compartment corresponds to approximately 20g of dishwashing detergent. The pre-wash detergent compartment will take approximately 5g of dishwashing detergent.
Follow the recommended dosages and storage indicated by the manufacturer on the packaging of the dishwashing detergent.
Close the lid and press it down until it clicks in.
If the dishes are heavily soiled, also add dishwashing detergent into the pre-wash compartment. This dose will be used during the pre-wash phase of the wash.
NOTE:
You can find the information about dishwashing detergent dosages in the washing program table.
Keep in mind that the results may differ depending on the degree of soiling and hardness of the water used.
Follow the manufacturer's recommendations on the dishwashing detergent package.
PART 5: WASHING DISHES / CUTLERY
• Purchase dishes designated as dishwasher safe.
- Use a gentle dishwashing detergent marked as "gentle on dishes". If necessary seek out further information from the dishwashing detergent manufacturer.
- For certain types of dishes select a lower temperature.
- To prevent possible damage, remove glassware and cutlery from the dishwasher as soon as possible after the end of the wash.
Unsuitable are:
• cutlery with wooden, bone or mother-of-pearl handles;
• plastic parts that are not heat resistant;
- older cutlery with glued parts that are not heat resistant;
• glued cutlery or dishes;
• tin or copper dishes;
• crystal glassware;
• metal parts susceptible to corrosion;
• wooden cutting boards;
• dishes made from synthetic fi bres.
Partially suitable are:
• some types of glass may corrode after several washes;
• silver and aluminium cookware may become discoloured by the wash;
- glazed patterns may fade if washed frequently.
NOTE:
Your dishwasher will achieve the best performance if you follow these instructions for inserting dishes into the racks. The function and appearance of the racks and the cutlery basket may differ depending on the model of the dishwasher.
NOTE:
Do not place any items into the dishwasher soiled by cigarette ash, wax, varnish or paint. When buying new dishes, check that they are dishwasher safe.
First remove remaining or burned on foods. It is not necessary to wash dishes under running water.
Insert the dishes into the dishwasher as follows.
- Items such as cups, glasses, pots / pans, etc., should be placed bottom up.
- Curved cookware and cookware with projections should be placed at an angle to allow water to freely flow out.
- Place dishes safely so that they cannot tip over.
- Place dishes in such a way that the spraying arms can rotate freely during the wash.
NOTE:
Do not wash very small pieces in the dishwasher because they can easily fall out of the rack.
- Hollow cookware, e.g. cups, glasses, pans, etc. should be placed bottom up so that water does not accumulate inside them during the wash.
• Dishes and cutlery must not be inserted into each other or to cover each other.
• To prevent damaging glasses, they must not touch each other. - Place hard-to-clean large cookware in the lower rack.
• The upper rack is intended for lighter and fragile dishes, such as glasses, cups and mugs.
• Knives with a large blade placed in a vertical position are dangerous! - Long and/or sharp cutlery, e.g. kitchen knives must be placed horizontally in the upper rack.
- Do not overfill your dishwasher. For better washing results and lower power consumption.
Taking dishes out of the dishwasher
To prevent water dripping down from the upper rack on to the dishes in the lower rack, we recommended you first empty the lower rack and only then the upper rack.
Filling the upper rack
The upper rack is designed for lighter dishes:
- glasses, cups and mugs and saucers, also small plates, small bowls and shallow pots (if they are not too soiled).
Place the dishes in such a way that they will not be moved by the sprayed water current.

natural_image
3D rendered diagram of a grid-like structure with multiple circular components and layered surfaces (no text or symbols)Loading the lower rack
We recommend you place larger cookware and hard-to-clean cookware into the lower rack:
- pots, pans, lids, serving plates and bowls.
It is better to place serving plates and lids on the sides of the rack, so that the spraying arm does not become blocked.

Remember that:
- pots, serving bowls, etc. must be place bottom up;
• deep pots should be placed at an angle so that water can freely run out of them;
• the tines on the lower rack can be folded, so that you can insert larger pots and pans or more smaller items.
Special cookware, e.g. large pans or plates should be placed in the lower rack. The recommended placement is shown below.
Incorrect arrangements of dishes

Setting the upper rack
Setting the height of the upper rack
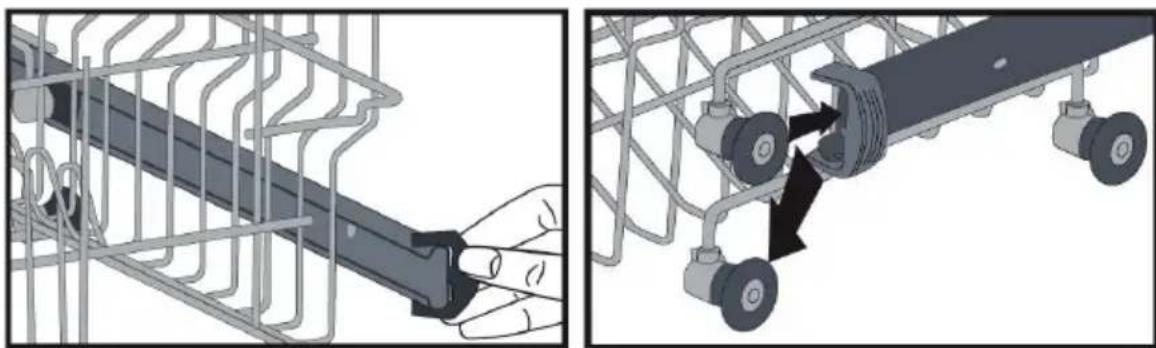
The height of the upper rack can be set so as to create more space for larger dishes in the upper / lower rack. The height of the upper rack can be set by inserting the wheels at various heights into the rails. Long pieces of cookware, eating utensils, ladles and knives should be placed in the rack so that they do not interfere with the rotation of the spraying arms.
If you will not use a rack, you may tilt it down or even remove it.
natural_image
Two-panel illustration showing a hand adjusting a cable inside a wire cage and a mechanical component with arrows indicating motion (no text or symbols)Upper rack partitions
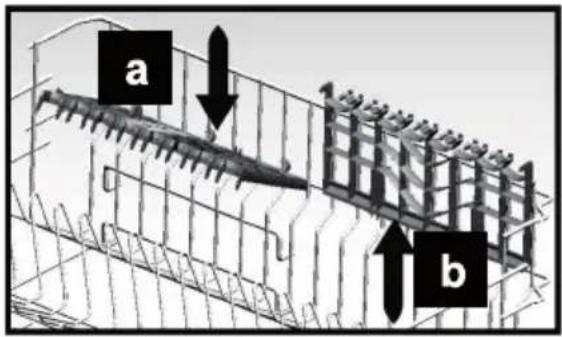
The upper rack partitions (a, b) can be tilted upwards as necessary for example for loading tall glasses.
Setting the lower rack
Tilting down the tines in the lower rack
The lower rack contains 4 tine sections, which can be tilted down, and they make placing dishes into the lower rack easier, e.g. pots, pans, plates, etc. Tilt the tines up or down as necessary.


natural_image
Isometric technical diagram of a multi-level mechanical or electrical enclosure with no visible text, numbers, or symbols.Basket for cutlery
Place cutlery into the basket with the handle downwards. If the basket has side partitions, place spoons separately into the appropriate openings. Particularly long cutlery should be place in a horizontal position in the front part of the upper rack as shown in the picture.

- Table spoons
- Forks
- Knives
- Dessert spoons
- Tea spoons
- Ladles
- Serving spoons
- Serving forks

WARNING!
- Ensure that no cutlery projects through the bottom of the basket.
• Always place sharp cutlery with the tip pointing downwards!
For your personal safety and to achieve the maximum quality way place cutlery into the basket, ensuring that:
• individual items are not lying on each other;
• the cutlery is placed with the handle pointing downwards;
- place knives and other dangerous cookware with the handle pointing upwards.
Program table
| Program | Auto intensive wash | Auto normal wash | Auto gentle wash | Hygienic wash | 50°60°C | Economical wash | Quick wash Rinse | Extra hygienic wash (pre-wash +hygienic wash 60°C) |
| Temperature | 60 - 70°C (P1) | 50 - 60°C (P2) | 30 - 50°C (P3) | 60°C (P4) | 60°C (P5) | 50°C (P6) | 40°C (P7) | - (P8) |
| Food types | Detects the degree to which dishes are soiled and sets the temperature, amount of water and length of the washing cycle. | Heavily soiled dishes for hygienic removal of soils | Dishes soiled from soup, sauces, pasta, eggs, rice, potatoes, stewed meat, fried foods | Lightly soiled dishes from coff ee, milk, tea, cold meat, vegetables | Lightly soiled dishes from coff ee, milk, tea, cold meat, vegetables | Pre-wash for releasing food remains from dishes before the main washing cycle. | ||
| Degree of soiling High | High Low High | Medium Medium | Low - | High | ||||
| Dishwashing detergent A: 25 cm3/15 cm3 B: 5 cm3 | A+B | A+B | A | A+B | A+B | A+B | A | A+B |
| Washing cycle process | Detects the degree to which dishes are soiled and sets the temperature, amount of water and length of the washing cycle. | Pre-wash | Pre-wash | Pre-wash | Pre-wash | Pre-wash | ||
| Wash 60°C | Wash 60°C | Wash 50°C | Wash 40°C | End | ||||
| Cold rinse | Cold rinse | Cold rinse | Cold rinse | |||||
| Hot rinse Hot | Hot rinse Hot | Hot rinse | Cold rinse | |||||
| Drying | Drying | Drying | Drying | |||||
| End | End | End | End | |||||
| Drying | ||||||||
| End | ||||||||
| Washing cycle time (min) | 111-183 | 100 - 127 | 64-92 | 123 | 55 | 162 | 30 | 15 |
| Electricity consumption (kW/h) | 1.22-1.8 | 1.12-1.3 | 0.81-0.96 | 1.55 | 1.07 | 0.95 | 0.88 | 0.02 |
| Water consumption (l) | 13.3-24.6 | 10.9 - 18.5 | 10.6-17.7 | 15 | 11 | 9.0 | 11 | 4.2 |

WARNING!
Short programs do not include the drying function. The above mentioned values were obtained on the basis of laboratory tests according to relevant standards. These values may change depending on conditions such as the type of dishes used, degree of dirtiness, type of dishwashing detergent, water pressure, water hardness, etc.).
Turning on the appliance / starting a washing program
- Pull out the lower and upper rack, load it with dishes and then slide back in.
We recommend that you first load the lower rack and only then the upper rack (see "Load the dishwasher racks"). - Fill the compartment with dishwashing detergent (see section "Dosage of the dishwashing detergent").
- Connect the power plug to the power socket. Power source is 220 - 240 V \~ 50 Hz, power socket specification 12 A, 250 V \~. Check that the water inlet is fully open.
- Press the ON / OFF button. The Start/Pause indicator light will turn on.
- Repeatedly press the program button to select the desired program.
- If necessary select an additional function.
- Press the Start/Pause button to start the program. The indicator light of the selected program will turn off when the program is started.
Monitoring the program
After the completion of a washing cycle the "end" indicator light will be lit and a sound will be made five times.
NOTE:
Do not open the dishwasher until the 'end of washing cycle' indicator light turns on. During the drying process the dishwasher will not make any sound for 40 – 50 minutes. This is a normal event.
Changing a program
A) Changing a program that is already running
- Carefully open the door and allow the current program to stop and excess steam to be released.
- Use the program button to select a new washing program.
- Close the door and the new washing program will start.
B) Changing a program by resetting
- Carefully open the door and allow the current program to stop and excess steam to be released.
- Press and hold the program button for approximately 3 seconds. The "end" indicator light will start flashing and "1" will appear on the display.
- The dishwasher will drain the water after the door is closed.
- Then a sound will be made five times indicating the end of the program.

WARNING!
It is dangerous to open the dishwasher door during a wash because you could be scalded by hot water.
After the end of the washing cycle
Wait a few minutes before taking dishes out of the dishwasher so that you do not handle the dishes while they are hot and more susceptible to breakage, and they will dry better too.
NOTE:
If you open the door during the washing cycle or an electrical power outage occurs, the washing cycle will be interrupted and it will resume after the door is closed or the electrical power supply is renewed.
PART 6: MAINTENANCE AND CLEANING
Filtration system
The fi Iter prevents food remains or other foreign items from entering the pump.
Food remains may clog the filter and in such a case it is necessary to take it out.
The filtration system consists of a coarse filter, a plastic filter and a micro-filter (fine filter).
1 Plastic fi Iter
Food remains and soils caught by this filter are pulverised by a special jet on the bottom spraying arm and flushed down the drain.
2 Coarse fi Iter
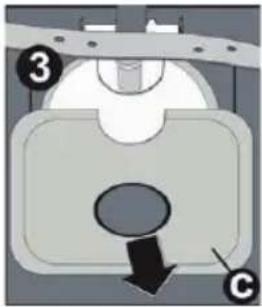
Larger parts, e.g. bits of bone or glass, which could clog the drain are stopped by the coarse filter. Remove the soils caught by this filter by taking the filter out - gently press the plug on the top of this filter and lift it up.
3 Fine fi Iter
This filter stops the remains of soils and food in the area of the water tank and prevent the remains from returning back to the area of the dishwasher during the wash.
Installing the fi Iter
The filter effectively removes food remains from the water used to wash the dishes and so this water can be used repeatedly during the wash. You will achieve better wash results if you regularly clean out the filter. For this reason it is better to remove the food remains from the filter after every wash by flushing out the semi-circular filter and containers under running water. Take out the filter by pulling upwards on the container handle.

WARNING!
• Never use the dishwasher without a fi Iter.
- An incorrectly seated filter may lower the efficiency of the dishwasher and cause damage to dishes.
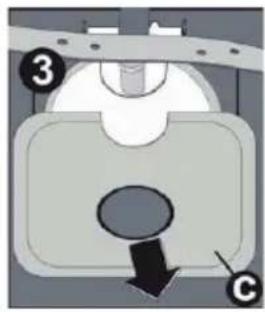
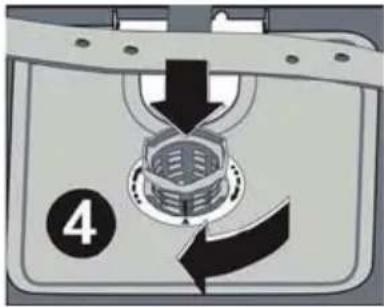
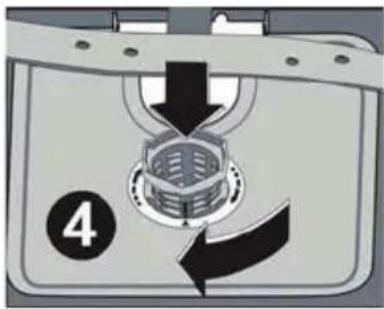
- To remove and clean the filtration system turn the filter anticlockwise and then lift it up.
- Pull out the metal/plastic fi Iter.
- Take the course fi Iter out of the fi ne fi Iter.

natural_image
Diagram of a mechanical device with directional arrows indicating motion, no readable text or symbols present.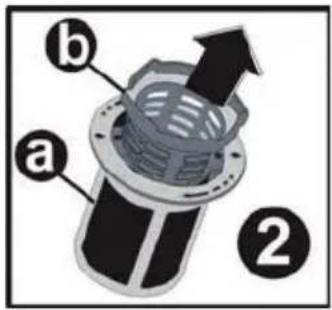

NOTE:
Follow all the steps of this procedure remove the filtration system; then reinstall it by proceeding from step 3 to step 1.
Recommendation:
• After every use of the dishwasher check that the filters are not clogged.
- You can take out the filtration system by unscrewing the coarse filter. Remove any food remains and clean out the filters under running water.
NOTE:
You should clean the entire fi ltration set once per week.
Cleaning the fi Iters
To clean the coarse and fine filters use a brush. Reassemble the individual parts of the filter as shown on pictures 1, 2 and 3. Reinsert them back into the dishwasher in their place and press them downwards.

WARNING!
Do not knock on the filters when cleaning them. Otherwise the filters could bend, which would lower the efficiency of the dishwasher. Never use the dishwasher without a filter. An incorrectly seated filter may lower the efficiency of the dishwasher and cause damage to dishes.
Dishwasher care
You can clean the control panel using a light damp wiping cloth. Thoroughly dry the area after cleaning.
Clean the exterior parts of the dishwasher using a quality polish.
Never use any sharp items, steel wool or coarse, sandy cleaning products to clean any part of the dishwasher.
Cleaning the door
To clean the door edges use a soft, warm, damp wiping cloth. To prevent water leaking into the door lock or its electronic parts, do not use any cleaning agents in sprays.

WARNING!
- Never use cleaning agents in sprays to clean the dishwasher door because this could damage the door lock and electrical parts.
- Do not use sandy cleaning agents or certain types of kitchen paper towels, because they could scratch or leave marks on the stainless steel parts of the dishwasher.
Protection against frost
In winter take steps against the dishwasher freezing. After every wash do the following:
- Disconnect the dishwasher from the power source.
- Close the water inlet and disconnect the supply hose from the water valve.
- Drain water from the water supply hose and the water valve. (Drain the water into a container.)
- Reconnect the water supply hose to the water valve.
- Take out the filter on the bottom of the dishwasher and using a sponge suck up the water from the waste tank.
NOTE:
If your dishwasher is not working because it has frozen, contact an authorised service technician.
Cleaning the spraying arms
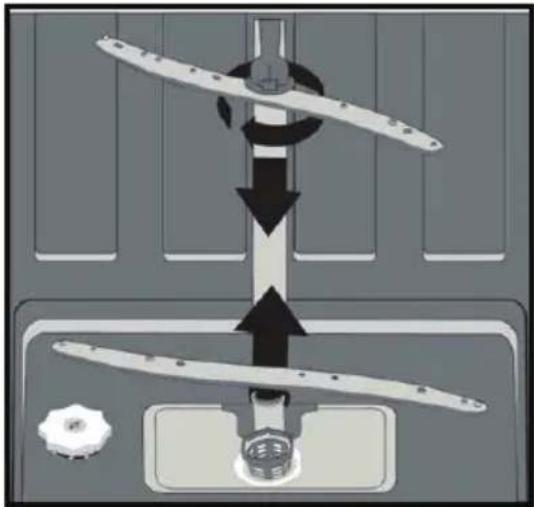
It is important to regularly clean the spraying arms so that hard water minerals do not clog the jets and the bearings of the spraying arms. Detach the spraying arms by turning the nut clockwise, remove the washer from the spraying arm and then the spraying arm itself.
Wash the spraying arms in warm soapy water and clean out the jets using a brush. After thoroughly flushing them reattach them.
natural_image
Diagram of a mechanical device with directional arrows indicating motion or force (no text or symbols)How to keep your dishwasher in good condition?
• After every wash
After every wash close the water inlet into the dishwasher and leave the door slightly open so that humidity that would otherwise accumulate inside is ventilated out.
- Disconnect from the power socket
Always disconnect the dishwasher from the power source before cleaning or any maintenance.
• No solvents or sandy cleaning agents
Never clean the external or rubber parts of the dishwasher using solvents or sandy cleaning agents.
Only use a wiping cloth dipped in warm soapy water.
Remove stains from the surface of the dishwasher using a wiping cloth dipped in water with a little vinegar or a cleaning agent specially designed for dishwashers.
- When taking out of operation for an extended period
We recommend that you run an empty cycle without dishes and then disconnect the dishwasher from the power source, shut off the water supply and leave the dishwasher door slightly open. This will help to increase the lifetime of the door seals and will prevent the accumulation of odours inside the dishwasher.
- Moving the appliance
In the event that you need to move the appliance, you must move it in the vertical position. If it is really necessary place it down on its rear side.
- Seal
One of the factors causing odours inside the dishwasher is food remains, which get caught in the seals. You can prevent this by regularly cleaning with a damp sponge.
PART 7: PREVENTION OF MINOR MALFUNCTIONS

| Technical problems | Problem Possible causes What to do | ||
| The dishwasher will not start. | A burned fuse or the circuit breaker is off. | Replace the fuse or turn on the circuit breaker. Disconnect any other appliances sharing the same circuit. | |
| Power source is not turned on. | Check that the dishwasher is turned on and the door is shut properly. Check that the power plug is correctly connected to the power socket. | ||
| Water pressure is low. | Check that the water supply is correctly connected and whether it is open. | ||
| The dishwasher door is not closed properly. | Check that the door is closed properly and secured with the latch. | ||
| The dishwasher is not draining water. | There is a knot on the drain hose. | Check the drain hose. | |
| The fi lter is clogged. | Check the coarse fi lter (see section "Cleaning the fi Iters"). | ||
| The kitchen sink is clogged. | Check the kitchen sink and ensure that it drains well. If the problem is an incorrectly draining sink, fi rst call a plumber and only then the service technician. | ||
| General problems | There are suds in the dishwasher. | An incorrect dishwashing detergent was used. | Use only special detergents for dishwashers to prevent the formation of suds. If this occurs, open the dishwasher and allow the suds to evaporate. Pour 0.4 l of cold water into the dishwasher. Close the dishwasher to the latch and then start the rinse cycle to drain the water.Repeat if necessary. |
| The rinsing aid has spilled out. | Always immediately clean the rinsing aid. | ||
| There are stains inside the dishwasher. | You have used a dishwashing detergent with dyes. | Use a dishwashing detergent not containing dyes. | |
| There is a white fi lm inside the dishwasher. | The white fi lm is caused by hard water minerals. | Clean out the inside of the dishwasher using a damp sponge with detergent. Use rubber gloves. To prevent the risk of the formation of suds never use any other detergents than those designed for use with dishwashers. | |
| On the cutlery there are rust stains. | The affected items are not resistant to corrosion. | ||
| After refi lling the salt you did not start any program.Salt particles got into the washing cycle. | After adding salt always run a quick wash without dishes and without the Turbo function activated (if available). | ||
| Loose water softener lid | Check the lid. Check that it is pulled tight. | ||
| Noise | Problem Possible causes What to do | ||
| Banging noise is coming from the dishwasher. | The spraying arm is hitting some dishes located in a rack. | Interrupt the program and rearrange the dishes, so that they no longer interfere. | |
| The dishwasher coming from the dishwasher. | Dishes are placed loosely in the dishwasher. | Interrupt the program and rearrange the dishes. | |
| Knocking noise coming from the hoses. | This may be caused by the installation or diameter of the hoses. | This has no affect on the operation of the dishwasher.If in doubt contact an authorised service centre. | |
| The results of the wash are not satisfactory. | The dishes are not clean. | The dishes were not loaded into the dishwasher correctly. | See chapter "Washing dishes / cutlery". |
| The program was not sufficiently intensive. | Select a more intensive program.See "Program table". | ||
| Insufficient amount of dishwashing detergent. | Use more dishwashing detergent or use a different one. | ||
| Dishes are blocking the spraying arms. | Rearrange the dishes so that the spraying arms can rotate freely. | ||
| The flters on the bottom of the dishwasher are not clean or correctly installed.This may cause the spraying arm jets to become clogged. | Clean the fliter or install them properly.Clean out the spraying arms.See "Cleaning the spraying arms". | ||
| There is rust on glass. | Combination of soft water and an excessive dose of dishwashing detergent. | If you have soft water, for cleaning and washing glass use less dishwashing detergent and a shorter cycle. | |
| Black or brown stains on plates | Aluminium dishes were leaning against the plates. | Remove these stains using a gentle cleaning agent. | |
| Dishwashing detergent remained in the compartment. | The dishes blocked the lid of the compartment. | Rearrange the dishes in the dishwasher. | |
| Drying results are not satisfactory. | The dishes are not dry. | The dishes were incorrectly loaded. | Load the dishwasher with dishes according to the instructions. |
| You did not add enough rinsing aid. | Increase the amount of rinsing aid / fi ll up the rinsing aid compartment. | ||
| You took the dishes out too soon. | Do not take the dishes out of the dishwasher immediately after the wash. Slightly open the door so that steam is released. Only take the dishes out when they are warm and you can hold them in your hand. First unload the lower rack. This will prevent wetting the dishes with water dripping from the upper rack. | ||
| You selected an incorrect program. | During a short program the water temperature is lower. This also reduces the washing effi ciency. Select a longer program. | ||
| Knives do not have a quality surface treatment. | Water drainage is a somewhat more diffi cult from these items. These types of knives or dishes are not suitable for dishwashers. | ||
Error codes
| Codes | Meaning Possible causes | |
| F5 | Insufficient water supply | Check that the water inlet is fully open and that the water supply was not interrupted.Shut off the water inlet. Unscrew the water supply hose and clean out the fi lter on the end of the hose.Restart the dishwasher, contact an authorised service centre. |
| F3 | Water supply failure | Shut off the water inlet.Contact an authorised service centre. |
| F2 | It is not possible to pump residual water out of the dishwasher. | The drain hose is clogged.The fi lters may be clogged.Turn off the dishwasher and turn on the cancel wash programs.If the problem persists contact an authorised service centre. |
| F8 | Heat malfunction Contact an authorised service centre. | |
| F1 | The warning indicator light is activated when the dishwasher overflows. | Turn off the dishwasher and close the water inlet.Contact an authorised service centre. |
| FE | Faulty electronic card Contact an authorised service centre. | |
| F7 | Overheating malfunction (the temperature of the dishwasher is too high) | Contact an authorised service centre. |
| F9 | Malfunction of the divider area | Contact an authorised service centre. |
| F6 | Heat sensor error | Contact an authorised service centre. |

WARNING!
- In the event that the dishwasher becomes flooded, close the water supply before calling the service technician.
- If as a result of flooding or a water leak there is water in the bottom container, pour it out before turning on the dishwasher again.
PART 8: TECHNICAL SPECIFICATIONS
| Operating voltage / frequency (V/Hz) 220 – 240 V ~ 50 Hz |
| Water pressure (MPa) 0.03 - 1.0 MPa |
| Capacity 12 sets of dishes |
| Hot water supply connection max. 70 °C |
| Total power input (W) 2200 W |
| Noise level (dB) 45 dB |
| Dimensions (h x w x d) cm 82-87 x 59.6 x 55 cm |
| Weight 38 kg |
NOTE:
All the here mentioned data is subject to change.
INSTRUCTIONS AND INFORMATION REGARDING THE DISPOSAL OF USED PACKAGING MATERIALS
Dispose of packaging material at a public waste disposal site.
DISPOSAL OF USED ELECTRICAL AND ELECTRONIC APPLIANCES

The meaning of the symbol on the product, its accessory or packaging indicates that this product shall not be treated as household waste. Please, dispose of this product at your applicable collection point for the recycling of electrical & electronic equipment waste. Alternatively in some states of the European Union or other European states you may return your products to your local retailer when buying an equivalent new product. The correct disposal of this product will help save valuable natural resources and help in preventing the potential negative impact on the environment and human health, which could be caused as a result of improper liquidation of waste. Please ask your local authorities or the nearest waste collection centre for further details. The improper disposal of this type of waste may fall subject to national regulations for fi nes.
For business entities in the European Union
If you wish to dispose of an electrical or electronic device, request the necessary information from your seller or supplier.
Disposal in other countries outside the European Union
If you wish to dispose of this product, request the necessary information about the correct disposal method from local government departments or from your seller.

This product meets all the basic EU regulation requirements that relate to it.
Changes to the text, design and technical specifications may occur without prior notice and we reserve the right to make these changes.
MYČKA NA NÁDOBÍ
NÁVOD K OBSLUZE
PHILCO

Famous for Quality the World Over
Vážený zákazníku
natural_image
Close-up of mechanical components with a numbered label pointing to a circular component (no readable text or symbols)
VAROVÁNÍ!
natural_image
Abstract diagram with a central X and curved line, no text or symbols presentVestavba
4

natural_image
Illustration of a kitchen appliance with a door and side drawers, no text or symbols present



UPOZORNĚNÍ!
natural_image
Mechanical assembly diagram showing a gear and housing with no visible text or symbols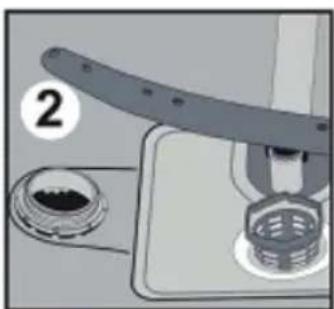
natural_image
Mechanical assembly diagram showing a clamping device with a bolt and housing (no text or symbols)
natural_image
Illustration of a coffee machine pouring liquid into a container on a stand (no text or symbols)

UPOZORNĚNÍ
natural_image
Hand turning a knob on a control panel, with a numbered dial indicator (no text or symbols on the knob itself)

POZNÁMKA:
natural_image
Diagram of a mechanical component with a curved base and internal features, labeled with number 1 (no text or symbols on the diagram itself)
POZNÁMKA:
natural_image
3D rendering of industrial equipment with cylindrical components and mesh grids (no visible text or symbols)natural_image
Two technical diagrams showing a hand operating a cable and a mechanical device with wheels, no text or symbols present.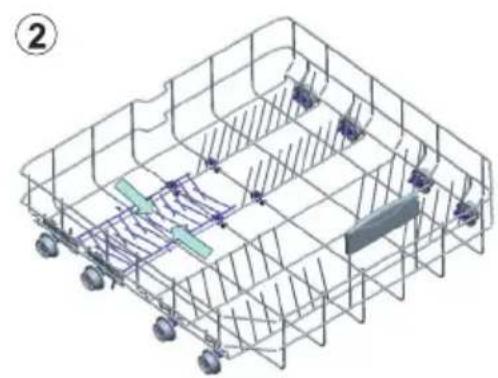
natural_image
Isometric view of a wireframe shopping cart with wheels and internal components (no text or symbols)Košík na příbory
natural_image
Illustration of a woven basket with a side view showing its grid layout and corresponding food icons below (no text or symbols)natural_image
Diagram of a mechanical component with directional arrows and a numbered label (1), no readable text or symbols present.
POZNÁMKA:
natural_image
Diagram of a mechanical device with directional arrows indicating motion or force (no text or symbols)Famous for Quality the World Over
Vážený zákazník
natural_image
Close-up of mechanical components with no visible text or symbols
VAROVANIE!
natural_image
Pure electrical circuit lines without any symbolsVstavanie

4


natural_image
Illustration of a kitchen appliance with a door and side drawers, no text or symbols present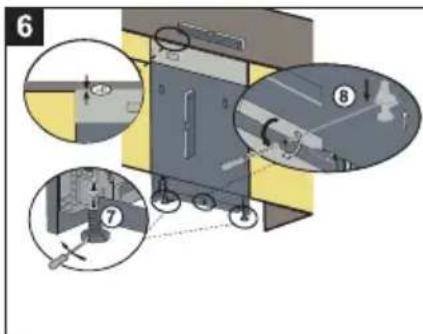



UPOZORNENIE!
natural_image
Mechanical assembly diagram showing a gear and bearing component (no text or labels)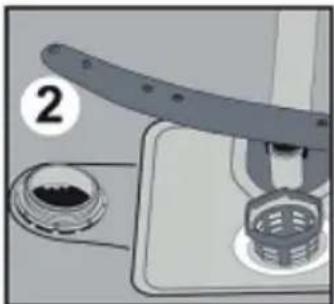
natural_image
Mechanical assembly diagram showing a clamping device with a numbered component (no text or symbols present)
natural_image
Illustration of a coffee maker pouring liquid into a container on a stove (no text or symbols)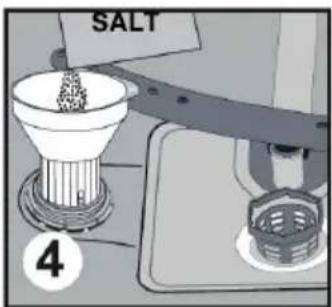

UPOZORNENIE
natural_image
Hand turning a knob on a control panel with a numbered dial (no text or symbols)

POZNÁMKA:
natural_image
Diagram of a mechanical component with a curved housing and a curved base, showing internal structure (no text or symbols)
POZNÁMKA:
natural_image
3D rendering of industrial equipment with cylindrical tanks and insulators (no visible text or symbols)natural_image
Two technical diagrams showing a hand operating a cable and a mechanical device with wheels, no text or symbols present.
natural_image
Isometric technical drawing of a multi-level mechanical or electrical enclosure with wheels and internal components (no text or symbols)Košík na príbory
natural_image
Diagram of a mechanical device with directional arrows and a numbered label (1), no readable text or symbols present.

POZNÁMKA:
natural_image
Diagram of a mechanical device with directional arrows indicating motion or force (no text or symbols)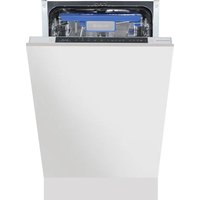
- CONTENTS
- PART 1: BEFORE PUTTING INTO OPERATION....2
- PART 2: DESCRIPTION OF THE PRODUCT .... 5
- PART 3: INSTALLATION ....6
- PART 4: CONTROL PANEL ...... 12
- PART 5: WASHING DISHES / CUTLERY 19
- PART 6: MAINTENANCE AND CLEANING....27
- PART 7: PREVENTION OF MINOR MALFUNCTIONS .... 31
- PART 8: TECHNICAL SPECIFICATIONS....34
- PART 1: BEFORE PUTTING INTO OPERATION
- Important safety instructions
- Installation
- Grounding instructions
- WARNING!
- Correct use
- Servicing, disposal
- PART 2: PRODUCT DESCRIPTION
- PART 3: INSTALLATION
- Unpacking
- Placement
- Levelling the appliance
- Connecting to a power source
- Power source demands
- Electrical connection
- Water supply
- How to connect the water supply hose?
- Water supply hose
- How to disconnect the water supply hose?
- Connecting the drain hose
- Draining water
- Extending the hose
- Built-in
- Turning on the dishwasher
- PART 4: CONTROL PANEL
- Control panel
- End of program indicator
- Before first use
- Water softener
- Identifying water hardness
- Setting salt consumption
- Adding salt into the salt container
- NOTE
- Adding rinsing aid
- Rinsing aid compartment
- NOTE:
- When should the rinsing aid be refi lled?
- CAUTION
- Setting dial (rinse)
- Function of the detergent
- Dishwashing detergents
- Concentrated dishwashing detergents
- Dishwashing tablets
- Dishwashing detergent compartment
- Using the dishwashing detergent
- Dosage of the dishwashing detergent
- PART 5: WASHING DISHES / CUTLERY
- Unsuitable are:
- Partially suitable are:
- Insert the dishes into the dishwasher as follows.
- Taking dishes out of the dishwasher
- Filling the upper rack
- Loading the lower rack
- Remember that:
- Incorrect arrangements of dishes
- Setting the upper rack
- Setting the height of the upper rack
- Upper rack partitions
- Setting the lower rack
- Tilting down the tines in the lower rack
- Basket for cutlery
- Turning on the appliance / starting a washing program
- Monitoring the program
- Changing a program
- After the end of the washing cycle
- PART 6: MAINTENANCE AND CLEANING
- Filtration system
- Plastic fi Iter
- Coarse fi Iter
- Fine fi Iter
- Installing the fi Iter
- Recommendation:
- Cleaning the fi Iters
- Dishwasher care
- Cleaning the door
- Protection against frost
- Cleaning the spraying arms
- How to keep your dishwasher in good condition?
- • After every wash
- - Disconnect from the power socket
- • No solvents or sandy cleaning agents
- - When taking out of operation for an extended period
- - Moving the appliance
- - Seal
- PART 7: PREVENTION OF MINOR MALFUNCTIONS
- PART 8: TECHNICAL SPECIFICATIONS
- INSTRUCTIONS AND INFORMATION REGARDING THE DISPOSAL OF USED PACKAGING MATERIALS
- DISPOSAL OF USED ELECTRICAL AND ELECTRONIC APPLIANCES
- For business entities in the European Union
- Disposal in other countries outside the European Union
- MYČKA NA NÁDOBÍ
- NÁVOD K OBSLUZE
- PHILCO
- Vážený zákazníku
- Vestavba
- UPOZORNĚNÍ!
- UPOZORNĚNÍ
- POZNÁMKA:
- Košík na příbory
- Vážený zákazník
- Vstavanie
- UPOZORNENIE!
- UPOZORNENIE
- Košík na príbory
Brand : Philco
Model : PDA 1291 BIT
Category : Dishwasher