
PMD 20 BIX - Microwave Philco - Free user manual and instructions
Find the device manual for free PMD 20 BIX Philco in PDF.


| Product Type | Countertop Microwave |
| Brand | Philco |
| Model | PMD 20 BIX |
| Capacity | 20 Liters |
| Microwave Power | 800 W |
| Grill Power | 1000 W |
| Control Type | Digital touch + rotary dial |
| Display | LED digital display |
| Number of Power Levels | 5 |
| Defrost Function | Yes, by weight or time |
| Auto Cooking Programs | 8 pre-set programs |
| Timer | Up to 95 minutes |
| Interior Light | Yes |
| Turntable | Yes, glass tray |
| Child Lock | Yes |
| Door Safety Interlock | Yes |
| Dimensions (W x D x H) | 44 x 36 x 26 cm |
| Weight | 10.5 kg |
| Power Supply | 230 V, 50 Hz |
| Power Consumption | 1200 W |
| Material | Stainless steel exterior, ceramic interior |
| Cleaning | Wipe with damp cloth; avoid abrasive cleaners |
| Spare Parts | Glass tray, roller ring, filters available online |
| Reparability | DIY possible for simple parts; professional service recommended for electronics |
Frequently Asked Questions - PMD 20 BIX Philco
User questions about PMD 20 BIX Philco
0 question about this device. Answer the ones you know or ask your own.
Ask a new question about this device
Download the instructions for your Microwave in PDF format for free! Find your manual PMD 20 BIX - Philco and take your electronic device back in hand. On this page are published all the documents necessary for the use of your device. PMD 20 BIX by Philco.
USER MANUAL PMD 20 BIX Philco
Famous for Quality the World Over
Dear customer,
Thank you for buying a PHILCO brand product. So that your appliance serves you well, please read all the instructions in this user's manual.
CONTENTS
PART 1: SAFETY PRECAUTIONS ...... 2
- Important safety instructions....2
- Radio wave interference ....4
- Grounding instructions ....4
PART 2: DESCRIPTION OF THE APPLIANCE .... 5
PART 3: INSTALLATION....6
• Built-in installation ....6
PART 4: THE BASICS OF COOKING IN A MICROWAVE OVEN ...... 9
• Guide to kitchen dishes....9
PART 5: CONTROL PANEL .... 10
PART 6: OPERATING INSTRUCTIONS FOR THE MICROWAVE OVEN....11
- General use .... 11
- Quick heat .... 11
- Defrosting....12
• Automatic cooking....12
• Combination cooking / Grill ....12
• Child safety lock 13 - Setting the digital clock....13
- Timer 13
• Pausing and cancelling the cooking process 13
PART 7: MAINTENANCE AND CLEANING....14
PART 8: BEFORE YOU CALL THE SERVICE CENTRE....15
PART 9: TECHNICAL SPECIFICATIONS....16
PART 1: SAFETY PRECAUTIONS
Recommendation:
Carefully read these instructions before installing and operating this microwave oven. Write down the serial number found on the rating label of the oven in the space below. It is essential that you store this user's manual in a safe place so that you can use it in the future. If you intend to sell the appliance, give it to another owner, or if you move, always make sure that the user's manual is attached to the appliance, so that the new owner can learn about the operation of the appliance and the relevant warnings.
SERIAL NUMBER:
- Under no circumstances should you start the microwave oven with the door open as you could expose yourself to the effects of dangerous microwave energy radiation. It is important that you do not damage or modify the safety locks on the microwave oven door.
- Do not block the front part of the microwave oven and the door with any object and make sure that dirt or remains of detergent do not accumulate on the oven's gasket seals.
- Do not use the microwave oven if it is damaged. It is especially important that the door is properly shut and also inspect the following for damage:
a. door (that it is not bent);
b. door hinges and locks (damaged or loose);
c. door gasket seals and other seals.
The microwave oven may only be adjusted or repaired by an authorised service technician.
Important safety instructions
Adhere to all basic safety measures when using electrical appliances, including the following.

WARNING!
Adhere to the directives below to avoid the dangers of burns, injury by electrical shock, fire hazards, injuries or explosion caused by large amounts of microwave energy.
- This appliance may not be used by any persons (including children) with mental disabilities, weak strength or by inexperienced persons, unless they have been properly trained or schooled in the safe use of the product, or unless they are properly supervised by a qualified person who is responsible for their safety. Children must be supervised to ensure that they do not play with the product.

WARNING!
To limit the risk of a fire hazard, electric shock, injury or exposure to excessive amounts of microwave energy:
- Read all the instructions before using this appliance.
- Only use the appliance for the purposes for which it was designed and in the manner described in this user's manual. This oven is designed only to heat, cook or dry food. It is not designed for industrial or laboratory purposes. Do not use caustic chemicals on this appliance.
- Do not attempt to use the microwave oven with the door open. You could expose yourself to the effect of microwaves. Do not run the microwave oven when it is empty.
- Do not use this oven if the power cord or power plug is damaged, if it is not working correctly, if it is damaged or if it has been dropped on the floor. Any repair of the microwave oven or replacement of a damaged power cord may only be carried out by an authorised service centre or another similarly qualified person, as this will prevent a dangerous situation from occurring.
- WARNING: If the door or the door gasket seal is damaged then the oven must not be used until repaired by an authorised service centre or qualified person.
- WARNING: It is dangerous for anybody other than an authorised service centre or qualified person to carry out any repairs or maintenance whatsoever that leads to the removal of any cover providing protection against microwave energy radiation.
- WARNING: The use of the oven by unsupervised children is only permitted after sufficient instructions are given, so that the child is able to use the oven in a safe manner and understands the dangers resulting from incorrect use.
• To limit the risk of a fire hazard inside the oven, use only kitchen dishes suitable for use in microwave ovens. When heating a meal on plastic or paper dishes, regularly check the oven to prevent it catching on fire. - If you notice smoke, turn off the appliance and disconnect the power plug from the socket. Leave the oven door closed to prevent potential fire from spreading.
- If you are not using the oven do not leave paper materials, kitchen dishes or food inside.
• WARNING: Liquids or other meals must not be heated in closed containers as they could explode.
• Heating of beverages in the microwave may cause a delayed boil and so you should be careful when handling containers and dishes. - Do not fry food in the microwave oven. Hot oil may damage parts of the oven, dishes or may also cause skin burns.
- Eggs in their shells and whole hard boiled eggs must not be heated in the microwave oven because they could explode.
• Before cooking, prick food that has a thick peel, such as potatoes, pumpkins, apples and chestnuts. - The content of baby bottles and baby food needs to be mixed or shaken before being served to the infant and the temperature needs to be checked to prevent burns.
-
Kitchen dishes may become hot as a result of the heat transferred from the heated food. Sometimes it may be necessary to use protective gloves.
• IMPORTANT - kitchen dishes and utensils, which must not be used in the microwave oven: -
metal pans and crockery with metal handles or with metal decorations;
- clamps on plastic bags;
- dishes with melamine surface treatment;
- standard thermometers, which are used for measuring the temperature of meat etc.
Radio wave interference
The use of the oven may cause interference to a radio, television or similar receivers. If interference occurs, it may be limited by the following measures:
- keeping the door and the surface of the oven seals clean;
- redirecting the radio or television signal reception antenna;
- moving the microwave oven further away from the receiver;
- connecting the microwave oven to a different power socket so that the microwave oven and the receiver do not share the same circuit.
Grounding instructions
This microwave oven must be grounded. The microwave oven is equipped with a power cord, which has a ground wire with a grounding power plug. The power plug must be connected to a mains socket outlet that is correctly installed and grounded. This reduces the risk of injury by electric shock if a short circuit occurs – in such a case the electric current goes through the earthing wire. We recommend that the microwave oven be connected to an independent electrical circuit. The use of high voltage is dangerous and may lead to a fire or another accident that can damage the microwave oven.

WARNING!
An incorrectly grounded power socket may present a danger of electric shock.
NOTE:
- If you are uncertain about the grounding of your mains power socket, contact an authorised service centre or a qualified electrician.
- Neither the manufacturer nor the vendor is responsible for damages to property and health if the microwave oven is connected incorrectly and not in accordance with the presented recommendations.
PART 2: DESCRIPTION OF THE APPLIANCE

- Ventilation openings
- Rotating glass plate – made from special fire-resistant glass. Always ensure that the plate is correctly seated in the oven before operating it. Do not use the oven without the glass plate inserted.
- Control panel
- Safety door closing system – if the door is closed then the appliance will turn off automatically. If you open the door while the appliance is running, the appliance will turn off automatically, including the magnetron.
- Rotating ring – must always be installed under the glass plate if you wish to use the oven.
- Microwave oven window – enables you to check progress while cooking. The window is equipped with a shield through which light can pass, but microwaves are blocked.
- Grill
PART 3: INSTALLATION
- Make sure that you have removed all packaging materials and advertising labels from inside the appliance.
- WARNING: Check that the microwave oven is not damaged and that the door and the locks fit well, that the gasket seal is not damaged, that the hinges and locks are not destroyed or loosened and that the inside area is in order. If you discover any damage, please contact an authorised service centre.
- This microwave oven must be placed on an even, stable surface, that can bear its weight even with food inserted.
- Do not install the oven in the vicinity of heat sources, moisture or high humidity, or near flammable materials.
- For proper operation of the microwave oven it is necessary to provide sufficient air ventilation. Allow free space of 20 cm above the top surface of the oven, 10 cm from behind and 5 cm on the sides. Do not cover or block the openings in the appliance. Do not remove the feet of the microwave oven.
- Do not use the microwave oven without the glass turning plate, drive assembly and the rotating ring installed.
- Make sure that the power cord is not damaged and is not lead under the oven or over a hot or sharp surface.
- The power socket must be freely accessible so that you can disconnect the microwave oven at any time if necessary.
- Do not use the microwave oven outdoors.
- This appliance is designed to be built-in.
Built-in
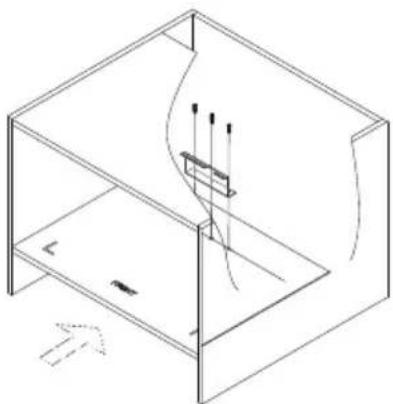
- Template
- Stopper
- 4 x 10 screw
- Screw cover
- 4 x 35 screw

Dimensions
Dimensions of the appliance: 350 mm (d) x 580 mm (w) x 365 mm (h)
The above dimensions must be adhered to. At the same time these are the minimum dimensions. Check that the load bearing capacity of the cabinet inside which the appliance will be installed corresponds to the weight of the appliance.
Ensure that the ventilation vents are not blocked.


Installation procedure
- Check that the installation location is large enough for the installation of the oven (see dimensions above).
- Place the template in to the installation location and attach the stopper using 3 screws. The location of the stopper is marked out on the template.
natural_image
Isometric line drawing of a 3D container with internal structure and arrows indicating flow or movement (no text or symbols)NOTE:
The template should be flush with the left, right and front edge.
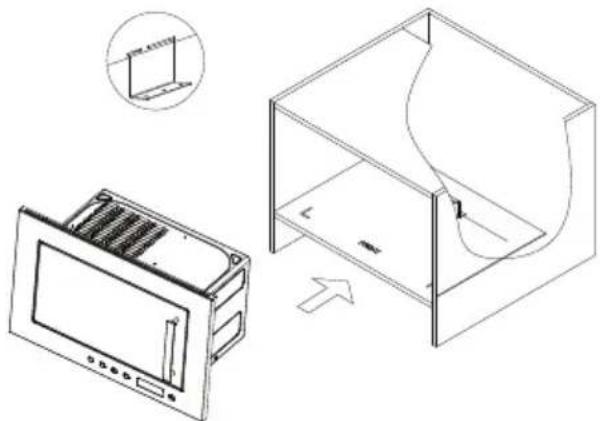
- Insert the microwave into the installation location. Check that the distance on the right and left side is the same and that the stopper is in the back part.
natural_image
Technical line drawing showing a device with a front panel and internal structure, including an inset diagram of a 3D box (no text or symbols present)- After placement, open the oven door and in the front part of the interior of the oven there is a hole for the locking screw (4 x 35 mm). Insert the screw into this hole and screw it in. Check that it is properly tightened. Place the cover over the screw.
NOTE:
In the back part of the cabinet and along its sides, it is necessary to provide for at least a 10 cm distance from the wall or floor.

natural_image
Technical line drawing of a microwave oven with open door and internal panel, shown from two views (no text or symbols)EN - 8
PART 4: THE BASICS OF COOKING IN A MICROWAVE OVEN
- Carefully organise the food. Place the largest food pieces towards the centre of the plate.
- Set the correct cooking time. Use short time periods for cooking, if necessary extend them. When cooking food at high temperatures smoke may be created or a fire may start.
- Cover food when heating or cooking it. Covering the food will prevent juices from squirting and will help to achieve even heating/cooking.
- To speed up the heating/cooking of food, such as chickens or hamburgers, turn them over once during heating/cooking. Large pieces of food such as roasts must be turned over at least once.
- Meals with sauces need to be stirred in the centre so that the sauce is heated evenly.
Guide to kitchen dishes
- The ideal type of dish for cooking in the microwave oven is a transparent container, which permits the penetration of microwaves inside for the heating of food.
- Microwaves do not travel through metal and so metal dishes or bowls with metal rims are not suitable for use in a microwave oven.
- Do not use recycled paper products that may contain small metal particles for cooking in the microwave.
- Round/oval containers are better than square/rectangular containers as food in the corners may overcook.
- You should use containers suitable for microwave ovens only in accordance with the instructions of the manufacturer.
This table will help you select the right type of dishes.
| Dishes Microwaves | |
| Heat resistant glass Yes | |
| Normal glass No | |
| Heat resistant ceramics Yes | |
| Plastic containers for microwave cooking Yes | |
| Kitchen paper Yes | |
| Metal platter/plate No | |
| Metal stand No | |
| Aluminium foil and containers from foil | No |
PART 5: CONTROL PANEL
Control panel

- MICRO / GRILL button
- AUTO MENU button
- TIME / WEIGHT button
- CLOCK / TIMER button
- Display
- START / RESET button
PART 6: OPERATING INSTRUCTIONS FOR THE MICROWAVE OVEN
General use
- Connect the power plug to a power socket with a rating of 230 V \~ 50 Hz.
- Place the food into a container suitable for use in a microwave oven, open the door. Check that the guide and the rotating plate are correctly installed. Place the container on to the glass plate.
- Close the door. Check that it is closed properly.
- You can open the microwave oven door at any time and this will pause the operation of the oven. To continue, close the door and press the START/RESET button.
- If you do not set the power level, the microwave oven will heat at the maximum power level.
- After cooking is fi nished, fi ve sounds will be made.
- If you press the START/RESET button and the oven does not start, check the space between the door and the gasket seal for any obstacles preventing it from closing. Check that the door is closed properly. The microwave oven will not start until the door is properly closed or the program will be reset.
NOTE:
Check that the microwave oven is properly installed and connected to the power socket.
Quick heat
This function makes it possible to turn on the microwave oven at maximum power for 1 minute.
Example: if you wish to heat a glass of milk
- Place the glass of milk on to the rotating plate and close the oven door.
- Press the START/RESET button. The microwave oven will automatically start at the maximum power level for a time of 1 minute.
- After heating is finished, 5 sounds will be made.
Cooking using a microwave
A. Quick microwave heating (100% power)
Example: heating food at 100% power for a time of 5 minutes.
-
Use the TIME/WEIGHT button to set the time to "5:00"
-
Press the START/RESET button.
B. Manual power setting
Example: heating food at 70% power for a time of 10 minutes.
- Repeatedly press the MICRO/GRILL button to set "P70" on the display.
- Use the TIME/WEIGHT button to set the time to "10:00".
- Press the START/RESET button.
Microwave cooking power table
| Number of presses Approximate value in % Power level (shown on the display) | ||
| 1 100 P100 | ||
| 2 70 P70 | ||
| 3 50 P50 | ||
| 4 30 P30 | ||
| 5 10 P10 | ||
Defrosting
The defrosting function is used to defrost various types of food. The maximum weight is 2 kg.
Example: you want to defrost 0.4 kg of frozen food.
- Repeatedly press the MICRO/GRILL button to set "dEF" on the display.
- Using the TIME/WEIGHT button set the weight to "0.4".
- Press the START/RESET button.
Automatic cooking
For this function it is necessary to select a type of food and its weight, after which the power and heating time will be set automatically.
Example: heating 400g of fi sh
- Repeatedly press the AUTO MENU button until "A-5" appears on the display.
- Repeatedly press the TIME/WEIGHT button and set the weight to "0.4".
- Press the START/RESET button.
Unit: g
| Menu / Weight / Number of presses | Rice (A-1) | Vegetables (A-2) | Meat (A-3) | Pasta (A-4) | Fish (A-5) | Chicken (A-09) |
| 1 0.1 0.1 0.2 1 0.1 0.2 | ||||||
| 2 0.2 0.2 0.3 2 0.2 0.4 | ||||||
| 3 0.3 0.3 0.4 0.3 0.6 | ||||||
| 4 0.4 0.4 0.5 0.4 0.8 | ||||||
| 5 0.5 0.5 0.6 0.5 1.0 | ||||||
| 6 0.6 0.8 0.6 1.2 | ||||||
| 7 | 1.0 0.7 1.4 | |||||
| 8 | 0.8 1.6 | |||||
| 9 | 0.9 1.8 | |||||
| 10 | 1.0 2.0 |
Combination cooking / Grill
This microwave oven is equipped with 3 possible cooking combinations. The maximum time setting is 60 minutes.
Option 1: 85 % grill; shown on display: "G-1".
Option 2: Combination cooking I: (55 % microwave + 45 % grill); shown on display: "C-1".
Option 3: Combination cooking II (30 % microwave + 70 % grill); shown on display: "C-2".
NOTE:
If you select only grilling, the grilling process will be automatically interrupted, two sounds will be made, informing you to turn the food over. Turn the food over, close the door and press the START/RESET button. The cooking process will resume. If you do not perform any operation within 1 minute, the cooking process will resume automatically.
Child Safety Lock
To activate the child safety lock function, press and hold the AUTO MENU and CLOCK/TIMER buttons for approx. 2 seconds.
To deactivate the child's safety lock function, press and hold the AUTOMENU and CLOCK/TIMER buttons for approx. 2 seconds.
Setting the digital clock
The microwave oven is equipped with a 24-hour digital clock system.
Example: If you wish to set 16:40.
- Press the CLOCK/TIMER button, the display will start flashing, then use the TIME/WEIGHT button to set the hours.
- Press the CLOCK/TIMER button again and then use the TIME/WEIGHT button to set the minutes.
- Press the CLOCK/TIMER button again to confirm the clock settings.
- If you want to edit the time, proceed according to the steps described above.
Timer
The microwave timer makes it possible to start and stop the cooking process at a preset time. The clock needs to be set before the timer is used.
Example: it is 16:30 and you wish to start cooking at 18:15, at 70% power, for 10 minutes.
- Press the CLOCK/TIMER button. Repeatedly press the TIME/WEIGHT button to set the time to "18:15".
- Press the MICRO/GRILL button to set the power to 70%.
- Set the cooking time to 10 minutes.
- Press the START/RESET button.
NOTE:
If you do not set the power and the cooking time and press the START/RESET button, only the time will be reset.
Pausing and cancelling the cooking process
- The door is open.
Press the START/RESET button to cancel a setting or a cooking program.
- The door is closed.
Press the START/RESET button to start cooking after setting a cooking program.
Press the START/RESET button to continue cooking if the cooking process is paused.
Press the START/RESET button to stop the cooking process.
PART 7: MAINTENANCE AND CLEANING
- Turn off the microwave oven and disconnect from the power socket before performing regular or exceptional maintenance.
- Keep the inside area clean. If the walls of the microwave oven are splattered with food juices then wipe them away using a damp cloth. If the microwave oven is heavily soiled, you can use a weak solution of a neutral cleaning agent. Do not use cleaning agents in a spray or other coarse agents as they could scratch, damage or degrade the surface of the microwave oven.
- Wipe the exterior surface with a damp cloth. To prevent damaging the operating parts of the oven, make sure that water does not enter the ventilation openings.
- Regularly clean both sides of the door and window, door gasket seal and other parts using a damp cloth so as to remove drops or food remains. Do not use cleaning agents causing abrasion.
- Do not expose the control panel to moisture. Clean it using a fine damp cloth. Leave the door open when cleaning the control panel so as not to accidentally start the oven.
- If the inside of the oven or around the door fogs up with steam from food, wipe it off with a clean dry wiping cloth. This condition may arise if the oven is installed in a humid environment. This is a normal event.
- Regularly clean the glass plate. You can clean the plate in warm water or in a dishwasher.
- The rotating ring and the underside of the inside area of the oven should be regularly cleaned to prevent excessive noise. Simply clean out the underside of the interior of the oven using a weak neutral detergent solution. You may wash the rotating ring in a weak neutral cleaning agent solution or in a dishwasher. Do not forget to correctly return the rotating ring back into the microwave oven after taking it out.
- To remove unpleasant odours from the oven, place a glass (check that it is suitable for use in a microwave oven) of water with juice and peal from one lemon into the microwave oven and allow it to cook in the microwave mode for 5 minutes. Thoroughly wipe out the inside area of the oven until dry with a fine cloth.
- If the interior light needs to be replaced, please contact an authorised service centre.
- Regularly clean the oven and remove food remains. Otherwise, the surface of the oven may be damaged or its lifetime may be reduced or there may be a risk of a hazardous situation arising.
PART 8: BEFORE YOU CALL THE SERVICE CENTRE
If the oven is not working properly:
- Check that the microwave oven is correctly connected to the power socket. If not, take the power plug out of the power socket, wait 10 seconds and then reinsert it.
- Check whether a fuse has burned or a circuit breaker has been disconnected. If everything appears to be in order, try a different appliance in the same power socket.
- Check that you have set the proper values on the control panel.
- Check that the door is properly closed and that the door safety system is working properly. Otherwise microwaves will not be produced in the oven.
IF THE ABOVE MENTIONED STEPS DO NOT HELP, CONTACT AN AUTHORISED SERVICE CENTRE. DO NOT ATTEMPT TO MODIFY OR REPAIR THE MICROWAVE OVEN YOURSELF.
PART 9: TECHNICAL SPECIFICATIONS
| Nominal voltage range 230 V | |
| Nominal frequency 50 Hz | |
| Rated power input 1080 W | |
| Microwave power output 700 W | |
| Grill 800 W | |
| Operating frequency 2,450 MHz | |
| Noise level 48/53 dB (A) (at start up) | |
| Volume 20 l | |
| External dimensions (h x w x d) 376 x 592 x | 313 mm |
| Internal dimensions (h x w x d) 296 x 315 x | 211 mm |
| Weight 12.5 kg | |
| Number of power levels | 5 |
NOTE:
All the here mentioned data is subject to change.
INSTRUCTIONS AND INFORMATION REGARDING THE DISPOSAL OF USED PACKAGING MATERIALS
Dispose of packaging material at a public waste disposal site.
DISPOSAL OF USED ELECTRICAL AND ELECTRONIC APPLIANCES

The meaning of the symbol on the product, its accessory or packaging indicates that this product shall not be treated as household waste. Please, dispose of this product at your applicable collection point for the recycling of electrical & electronic equipment waste. Alternatively in some states of the European Union or other European states you may return your products to your local retailer when buying an equivalent new product. The correct disposal of this product will help save valuable natural resources and help in preventing the potential negative impact on the environment and human health, which could be caused as a result of improper liquidation of waste. Please ask your local authorities or the nearest waste collection centre for further details. The improper disposal of this type of waste may fall subject to national regulations for fines.
For business entities in the European Union
If you wish to dispose of an electrical or electronic device, request the necessary information from your seller or supplier.
Disposal in other countries outside the European Union
If you wish to dispose of this product, request the necessary information about the correct disposal method from local government departments or from your seller.
This product meets all the basic EU regulation requirements that relate to it.
Changes to the text, design and technical specifications may occur without prior notice and we reserve the right to make these changes.
MIKROVLNNÁ TROUBA
NÁVOD K OBSLUZE
PHILCO

Famous for Quality the World Over
Vážený zákazníku
Rozměry
natural_image
Isometric line drawing of a 3D container with internal structure and no visible text or symbolsPOZNÁMKA:
natural_image
Technical line drawing showing a device with a fan and a 3D box, no text or symbols presentnatural_image
Technical line drawing of a microwave oven with an open door and internal panel, shown from two views (no text or symbols present)ČÁST 4: ZÁSADY VAŘENÍ V MIKROVLNNÉ TROUBĚ
ČÁST 8: PŘEDTÍM NEŽ ZAVOLÁTE DO SERVISU
Famous for Quality the World Over
Vážený zákazník
Rozmery
Rozmery spotrebiča: 350 mm (h) × 580 mm (š) × 365 mm (v)
Rozmery rámčeka: 20 mm (h) × 592 mm (š) × 376 mm (v)
natural_image
Isometric line drawing of a 3D rectangular box with internal structure and no visible text or symbolsPOZNÁMKA:
natural_image
Technical line drawing showing a microwave oven and its internal structure with a magnified inset (no text or symbols)natural_image
Technical line drawing of a microwave oven with an open door and internal panel, shown from two different angles (no text or symbols present)ČAST 4: ZÁSADY VARENIA V MIKROVLNNEJ RÚRE
- CONTENTS
- PART 1: SAFETY PRECAUTIONS ...... 2
- PART 2: DESCRIPTION OF THE APPLIANCE .... 5
- PART 3: INSTALLATION....6
- PART 4: THE BASICS OF COOKING IN A MICROWAVE OVEN ...... 9
- PART 5: CONTROL PANEL .... 10
- PART 6: OPERATING INSTRUCTIONS FOR THE MICROWAVE OVEN....11
- PART 7: MAINTENANCE AND CLEANING....14
- PART 8: BEFORE YOU CALL THE SERVICE CENTRE....15
- PART 9: TECHNICAL SPECIFICATIONS....16
- PART 1: SAFETY PRECAUTIONS
- Recommendation:
- SERIAL NUMBER:
- Important safety instructions
- WARNING!
- Radio wave interference
- Grounding instructions
- NOTE:
- PART 2: DESCRIPTION OF THE APPLIANCE
- PART 3: INSTALLATION
- Built-in
- Dimensions
- Installation procedure
- EN - 8
- PART 4: THE BASICS OF COOKING IN A MICROWAVE OVEN
- Guide to kitchen dishes
- PART 5: CONTROL PANEL
- PART 6: OPERATING INSTRUCTIONS FOR THE MICROWAVE OVEN
- General use
- Quick heat
- Cooking using a microwave
- Defrosting
- Automatic cooking
- Combination cooking / Grill
- Child Safety Lock
- Setting the digital clock
- Timer
- Pausing and cancelling the cooking process
- PART 7: MAINTENANCE AND CLEANING
- PART 8: BEFORE YOU CALL THE SERVICE CENTRE
- PART 9: TECHNICAL SPECIFICATIONS
- INSTRUCTIONS AND INFORMATION REGARDING THE DISPOSAL OF USED PACKAGING MATERIALS
- DISPOSAL OF USED ELECTRICAL AND ELECTRONIC APPLIANCES
- For business entities in the European Union
- Disposal in other countries outside the European Union
- MIKROVLNNÁ TROUBA
- NÁVOD K OBSLUZE
- PHILCO
- Rozměry
- POZNÁMKA:
- ČÁST 4: ZÁSADY VAŘENÍ V MIKROVLNNÉ TROUBĚ
- ČÁST 8: PŘEDTÍM NEŽ ZAVOLÁTE DO SERVISU
- Rozmery
- ČAST 4: ZÁSADY VARENIA V MIKROVLNNEJ RÚRE
Brand : Philco
Model : PMD 20 BIX
Category : Microwave