
ETV-6960wh - Oven Concept - Free user manual and instructions
Find the device manual for free ETV-6960wh Concept in PDF.


| Product Type | Built-in Electric Oven |
| Brand | Concept |
| Model | ETV-6960wh |
| Color | White |
| Dimensions (H x W x D) | 59.5 cm x 59.5 cm x 56 cm |
| Weight | 35 kg |
| Power Supply | 220-240 V, 50/60 Hz, 3500 W |
| Energy Class | A |
| Oven Capacity | 65 Liters |
| Functions | Conventional, Fan-assisted, Grill, Defrost, Bottom heat |
| Temperature Range | 50°C - 250°C |
| Control Type | Knob + Timer |
| Interior Light | Yes |
| Cleaning | Enamel interior, Easy-clean |
| Safety Features | Cool touch door, Child lock, Auto shut-off |
| Accessories Included | Baking tray, Wire rack, Grill rack |
| Spare Parts Availability | Yes, through official service centers |
| Warranty | 2 years |
Frequently Asked Questions - ETV-6960wh Concept
User questions about ETV-6960wh Concept
0 question about this device. Answer the ones you know or ask your own.
Ask a new question about this device
Download the instructions for your Oven in PDF format for free! Find your manual ETV-6960wh - Concept and take your electronic device back in hand. On this page are published all the documents necessary for the use of your device. ETV-6960wh by Concept.
USER MANUAL ETV-6960wh Concept
CZ SK
PLEN
PODĚKOVÁNÍ
Příslušenství
natural_image
Simple line drawing of a rectangular sheet with horizontal lines and a label 'A' pointing to its bottom-left corner (no text or symbols on the sheet itself)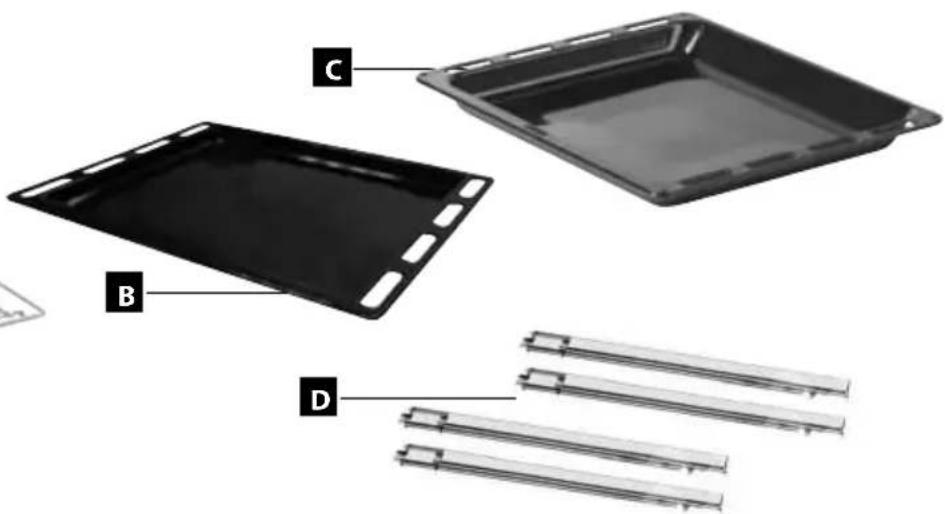
Teleskopické výsuvy
natural_image
Diagram of a hand pulling a wooden rack with arrows indicating motion (no text or symbols)Obr. 3
natural_image
Illustration of a hand placing a tray with arrows indicating rotation or movement (no text or symbols)Obr. 4
POPIS OVLÁDACÍHO PANELU
K1. Volič teploty
natural_image
Line drawing of a modern kitchen cabinet with oven, door, and cabinet (no text or symbols)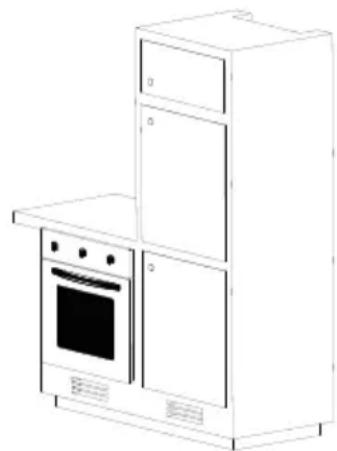
natural_image
Line drawing of a modern kitchen appliance with oven, cabinet, and oven (no text or symbols)Obr. 7b
natural_image
Pure diagram of a 3D rectangular box with internal arrows indicating flow or movement, no text or symbols present.SERVIS
Výměna žárovky
natural_image
Diagram of a mechanical component with a rotating arrow indicating rotation (no text or symbols)OCHRANA ŽIVOTNÍHO PROSTŘEDÍ
natural_image
Simple line drawing of a rectangular sheet with horizontal lines and a label 'A' pointing to its bottom (no text or symbols on the sheet itself)
Teleskopické výsuvy
natural_image
Diagram of a hand pulling a wooden rack with arrows indicating motion (no text or symbols)Obr. 3
natural_image
Illustration of a hand placing a tray with arrows indicating rotation or movement (no text or symbols)Obr. 4
POPIS OVLÁDACIEHO PANELU
natural_image
Line drawings of two kitchen appliances: one with an oven and one with a oven (no text or symbols)Obr. 7b
Pripojenie do elektrickej siete
natural_image
Pure diagram of a 3D rectangular box with internal arrows indicating flow or movement, no text or symbols present.SERVIS
Výmena žiarovky
natural_image
Diagram of a mechanical component with a rotating arrow indicating rotation (no text or symbols)OCHRANA ŽIVOTNÉHO PROSTREDIA
natural_image
Simple line drawing of a rectangular object with horizontal lines and a labeled point A (no text or symbols beyond label)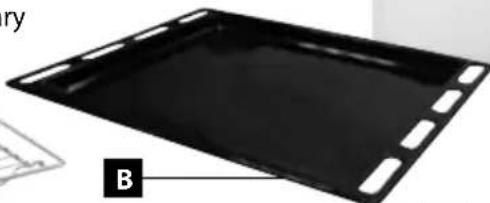
natural_image
Black rectangular electronic device with labeled component B, no visible text or symbols on the device itself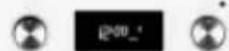
1
2
3
4
natural_image
Nighttime black-and-white photo of a large industrial machine with illuminated components and control panels (no visible text or symbols)concept
C
natural_image
Black rectangular tray with a flat surface and a small hole, no text or symbols visible.D
natural_image
Pure electrical circuit lines without any symbolsnatural_image
Diagram of a hand using a tool to lift a rack with arrows indicating motion (no text or symbols)Rys. 3 Rys. 4
natural_image
Illustration of a tray being placed on an appliance rack, with arrows indicating motion (no text or symbols)OPIS PANELU STEROWANIA
natural_image
Line drawing of a modern kitchen cabinet with oven, door, and cabinet (no text or symbols)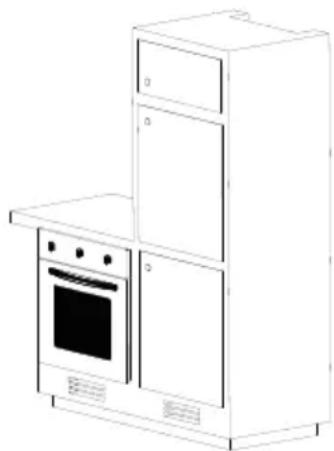
natural_image
Line drawing of a modern kitchen appliance with oven, stove, and cabinet (no text or symbols)Rys. 7b
natural_image
Pure diagram of a 3D rectangular box with internal arrows indicating flow or movement, no text or symbols present.Demontaż
natural_image
Illustration of a mechanical component with a rotating arrow indicating rotation (no text or symbols)OCHRONA ŚRODOWISKA
Thank you for purchasing a Concept product. We hope you will be satisfied with our product throughout its service life.
Please study the entire Operating Manual carefully before you start using the product. Keep the manual in a safe place for future reference. Make sure other people using the product are familiar with these instructions.
TABLE OF CONTENTS
Technical Parameters 37
Important Notices 38
Product Description 39
Telescopic rails 40
Description of the Control Panel 41
Operating Instructions 41
Basic Functions of the Unit 41
Individual Functions of Baking 42
Informative Values of Temperature,
Position Heights and Times of Baking 43
Baking Tips 43
Advanced Functions of Baking 45
Cleaning and Maintenance 46
Installation of the Unit 46
Servicing 48
Environmental protection 48
| TECHNICAL PARAMETERS | |
| Voltage | 230 V ~ 50 Hz |
| Max. input | 3350 W |
| Input of the upper heater | 1300 W |
| Input of the lower heater | 1300 W |
| Input of the rear circular heater 2000 W | |
| Input of the grill heater | 3200 W |
| Temperature setting range | 0 – 250 °C |
| Installation dimensions (w x d x h): | 560 x 560 x 590 mm |
| External dimensions (w x d x h): | 595 x 585 x 590 mm |
| Internal dimensions (w x d x h): | 450 x 345 x 420 mm |
| Internal volume | 66 l |
| Weight | 45 kg |
| Noise level | < 63 dB(A) |
IMPORTANT NOTICES
Upon delivery
- Check the package and unit immediately after delivery for any damage that may have occurred during shipping.
- WARNING! Some edges of the unit that are hidden after the installation may be sharp! Proceed with caution to prevent an injury!
- If the unit is damaged, do not operate it. Contact the supplier as soon as possible.
- Remove all the covering and marketing materials from the unit before the first use.
- Dispose of the packaging material properly.
During installation
- Follow the instructions for the appliance connection and installation.
- Do not lift the unit holding it by the handle of the door.
- The unit has to be disconnected from the power socket during installation.
- Make sure the mains voltage and current protection correspond to the values on the rating plate. Use grounded wall outlets only.
• After installation of the unit its plug or circuit breaker shall be freely accessible.
During normal operation
- Use the unit only as described in this operating manual.
- Use the unit in the household and for baking food only.
- Do not use the unit if you are barefoot.
- Do not put oversized food or metal objects inside the oven. These could cause a fi re.
- Do not sit or stand on the open door of the unit.
- The appliance is not intended for use by people with reduced physical, sensory or mental capabilities or lack of knowledge, unless under the supervision of an acquainted person responsible for their safety.
- WARNING! A large volume of steam may be released or grease may splash out when you open the door. Be careful. There is a risk of scalding!
- Do not touch hot surfaces or heaters during use or shortly after use of the unit.
- Do not store anything inside the unit.
- Do not touch the unit with wet or damp hands.
- Turn off the unit and disconnect the plug from the mains outlet in case of any failure.
- Never pull the cord to disconnect the plug from the socket; hold the plug instead.
- Check the appliance and power cord for damage regularly. Never switch on a damaged appliance.
- Do not use the unit if the door or packing is damaged. Have the unit repaired in an authorised service centre.
- Do not immerse the power cord, plug, or appliance in water or any other liquid.
- Make sure that all controls are in the OFF position when the appliance is not in use.
- When the unit is in operation, do not leave the doors of the cupboards above it open, otherwise these could be damaged by the released steam and heat e.g. in case of opening the oven door.
- Do not use accessories which have surface treatment damaged, are worn or have other defects.
If there are children in the household
- Do not allow children or unskilled people to handle the unit. Use the unit out of the reach of these individuals.
- Persons with limited movement capacities, reduced sensory perception, insufficient mental capacity or those who are unaware of the proper handling should use the product only under the supervision of a responsible, aware person.
• Take extra care when using the unit near children. - Don't let anyone use the unit as a toy.
- Only use accessories recommended by the manufacturer.
WARNING!
Open the unit only for a short time to put in or take out food, so as to prevent injury caused e.g. by tripping. Children could lock themselves in the unit (risk of suffocation), or be exposed to other dangers.
Possible defects
- Only a qualified technician may repair the unit. The unit shall be disconnected from the mains during repairs and other interventions. Switch off the circuit breaker, or disconnect the plug of the supply cable.
- When disconnecting the unit from the wall outlet, never pull the power cord. Grasp the plug and disconnect it by pulling.
Failure to follow the manufacturer's instructions may lead to refusal of warranty repair.
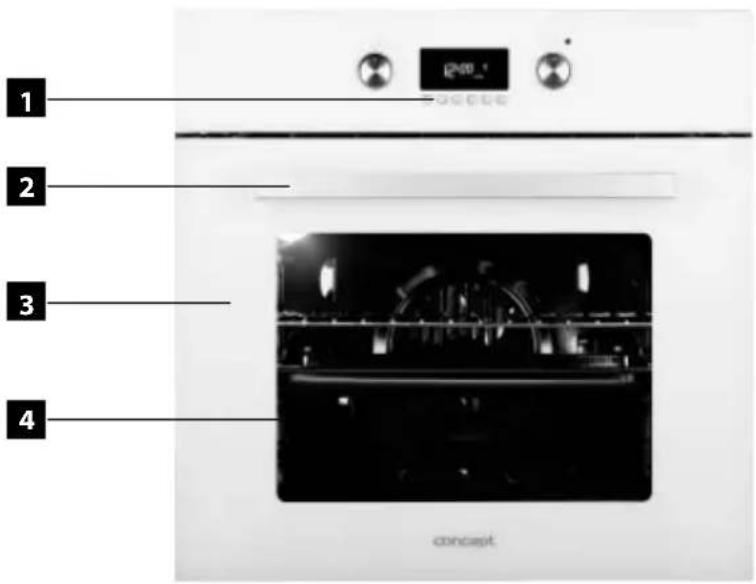
PRODUCT DESCRIPTION
- Control panel
- Door handle
- Door
- Triple-glass window of the door
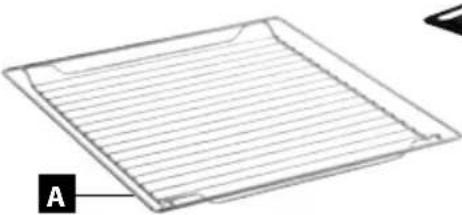
Accessories
A Big oven grill 1 piece
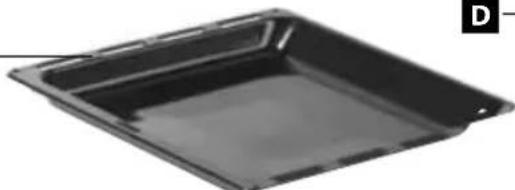
B Baking pan 1 piece
C Deep baking pan 1 piece
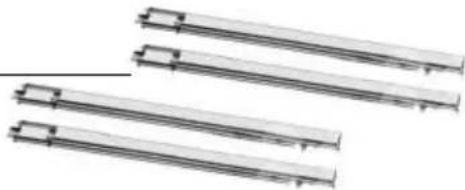
D Telescopic rails 2 pairs
natural_image
Simple line drawing of a rectangular plate with horizontal lines and a labeled point A (no text or symbols beyond label)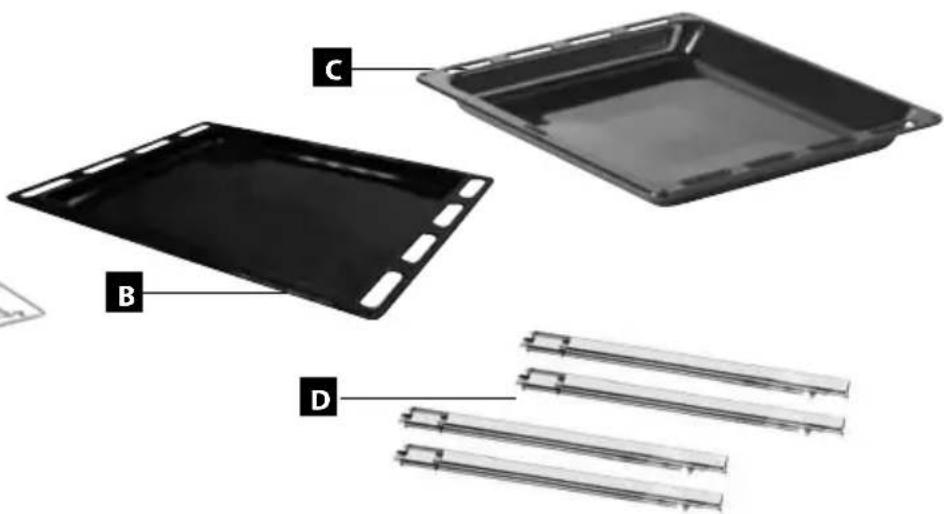
Telescopic rails
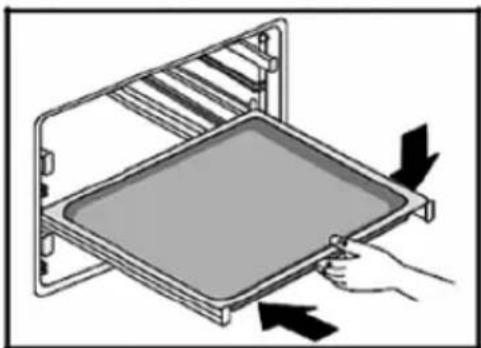
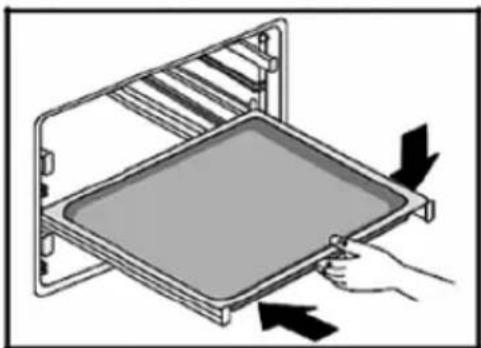
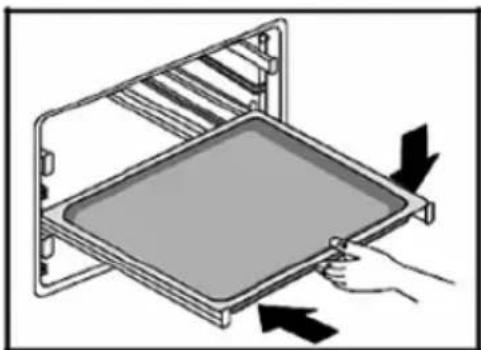
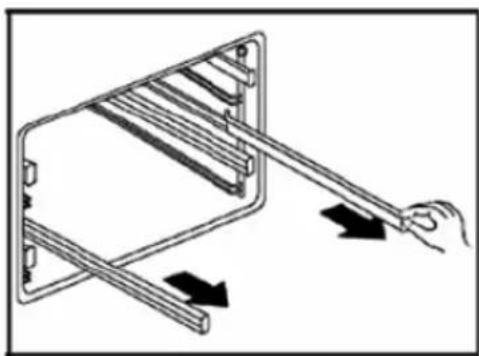
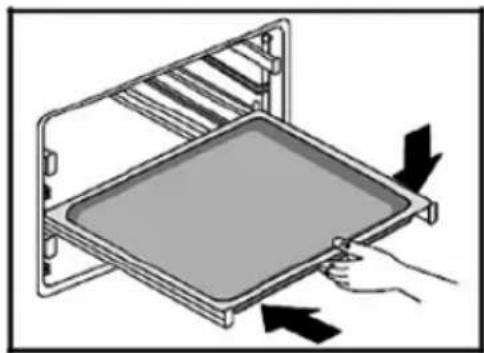
The unit is equipped with 2 pairs of telescopic rails that allow withdrawing the baking pans, thus making access easier when putting in and taking out the baking pans, or when checking the baked food. (Fig. 3, 4)
WARNING!
The telescopic rails get very hot during the operation. There is a risk of burning yourself! When putting the baking pans in, place them on the protrusions at the ends of the Rais.
When putting in or taking out the baking pans proceed with caution and make sure the pans do not slide down from the rails.
The telescopic rails can be used in all positions. To change the height of the rails proceed as follows:
- Take out the food trays and the rack from the oven.
- Take out the side racks including the telescopes.
- Remove the telescopes from side racks
- Slide the telescopes into the desired position and re-attach them.
- Re-attach the side racks back to oven cavity.
natural_image
Diagram of a hand using a tool to lift a ladder inside a frame (no text or symbols)Fig. 3 Fig. 4
natural_image
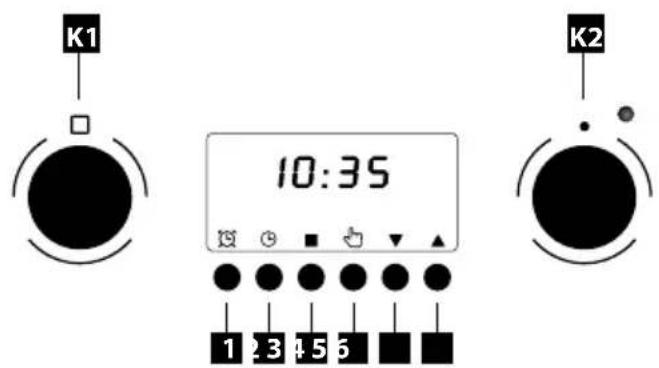
Illustration of a hand placing a tray with arrows indicating motion (no text or symbols)K1. Temperature knob
K2. Function knob
1-6. buttons
OPERATING INSTRUCTIONS
Before the first use
Prior to using a new unit, wipe the surface and the inside with a wet cloth for hygienic reasons. Wash all the removable parts in warm water with a detergent, or in a dishwasher.
Then, heat the unit without food at maximum temperature for 20 minutes (see the Operating Instructions below). It's possible that the unit will emit a slight smell and smoke, which should disappear after a while. Air the room well during this process.
After connecting in the mains
- After connecting the appliance to the mains the display show symbols 12:00.
- Press the button (4) to activate mode setting time of day. Symbol „:“ start flash.
- Use (5) and (6) buttons to set the current time.
- The settings are saved itself after 5 seconds of inactivity. Symbol „:“ stops fl ashing.
Note: Pressing button (5) You can change the intensity of sound (3 levels). Pressing the button (6) You can change the intensity of the display light (3 levels).
Basic Functions of the Unit
- Put the tray with food in the selected height of oven.
- Turn (K1) to set the desired temperature.
- Turn (K2) to set the desired function.
- When you have finished cooking, set the knobs (K1) and (K2) at the „0" position.
Note: In basic baking must be light symbol at the display,"(Fig. 1)
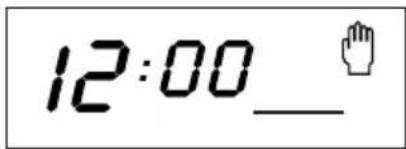
Fig. 1
Individual Functions of Baking
| Symbol Function description | |
 | Grilling together with the fan function. Because of the air circulation, the temperature in the oven is higher in its upper part (above the grill or pan).The temperature can be set within the range of 50 – 200 °C.Note: This function is suitable for grilling or roasting big pieces of meat at a higher temperature. Leave the oven door closed. Pre-heating the oven is not necessary. |
 | Heating of the oven by the upper and lower heater.The temperature can be set within the range of 50 – 250 °C.Put in the food only after pre-heating the oven to the set temperature. During baking open the door as rarely as possible. |
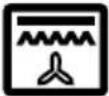 | Grilling together with the fan function. Because of the air circulation, the temperature in the oven is higher in its upper part (above the grill or pan).The temperature can be set within the range of 50 – 200 °C.Note: This function is suitable for grilling or roasting big pieces of meat at a higher temperature. Leave the oven door closed. Pre-heating the oven is not necessary. |
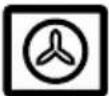 | Heating of the oven by the circular heater and the fan function. The air circulation makes an even temperature in the entire space of the oven.The temperature can be set within the range of 50 – 240 °C.Note: This function is also suitable for baking food on two pans simultaneously (suitable for baking higher and thicker baked goods, such as cakes, or larger amounts of food).Pre-heating the oven is not necessary. |
 | The air heated by the lower heater is distributed by the fan around the food. This mode can also be used for preserving food at a temperature of 50 – 250 °C. Pre-heating the oven is not necessary. |
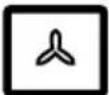 | This mode of oven function setting serves for particularly careful defrosting of food. Air at room temperature is forced into the internal space of the oven.Note: This function is suitable for defrosting food or raw products before final preparation. |
 | Heating of the oven by the lower heater only. Preset temperature 60°C.Note: Thus function is suitable for the completion of baking foods which require a higher temperature from below (pizza). |
Informative Values of Temperature, Position Heights and Times of Baking
| Food Weight (g) | Position height | Baking function | Recommended temperature (°C) | Baking time (min.) | Dishes used | ||
| 1. str. 2. | str. | ||||||
| Cakes | - | 3  | 160 | 20-30 | |||
| - | 3  | 160 | 20-30 | ||||
| - | 1+;  | 160 | 20-30 | ||||
| Apple pie | - | 2  | 190 | 50-70 | |||
| - | 1+;  | 190 | 50-70 | ||||
| Swiss roll | -3 |  -18 - Pan -18 - Pan | |||||
| Sausages | 400 g | 4 |  | 240 | 5-10 | 3-6 | Grill |
| Beef | 1000 g | 2 |  | 210 | 10-20 | 5-15 | Grill* |
| Pork | 1000 g | 2 |  | 190 | 19-30 | 11-21 | Grill* |
| Chicken | 1300 g | 2 | [WAX] | 180 | 35-45 | 15-25 | Grill |
| Hamburgers | 1000 g | 4 |  | 240 | 10-20 | 5-10 | Grill* |
| Pork pieces | 1000 g | 4 |  | 240 | 15-25 | 10-20 | Grill* |
| Beef pieces | 1000 g | 4 |  | 240 | 10-20 | 5-15 | Grill* |
* - put a pan with a little water in position height 1 under the grill to collect the drippings.
Baking Tips
- The exact values of temperature for each kind of food and each way of baking have to be tried out.
- During baking open the oven door as rarely as possible. Otherwise the temperature mode of baking would be disturbed, the time of baking would extend and the food could be burnt.
- Marinated meat and meat without bones roast faster than unprepared meat. To check thorough roasting of meat, press it e.g. with a fork. If it does not release juice, it is well done.
- Meat which is larded or covered with bacon must not be roasted at too high a temperature, so that the grease does not sputter.
- When roasting big pieces of meat fluids evaporate, which then condense on the oven door. This is and it does not imply any danger to the use of the unit. After the end of baking, wipe the oven door and the neighbouring space in the oven dry.
- The pastry will swell only after 2/3 of the stated baking time. The time of baking depends on the type of filling (fruits, marmalade).
• Whipped dough should not contain too much water, which extends the time of baking.
- Do not put utensils directly on the bottom of the oven, otherwise they would prevent the spreading of heat and thus could cause damage to the enamel because of overheating.
- When baking in more pans, the simultaneously inserted foods do not have to be ready at the same time.
- Baking pans are not designed for long-term storage of food (more than 48 hours). For longer storage move the food to a suitable utensil.
- When baking without the fan we recommend pre-heating the oven for approximately 10 – 15 minutes. Do not open the oven door unnecessarily during baking.
- Before grilling pre-heat the grill for approx. 5 minutes (until the grill heater is red). The grill with food should be placed as close as possible to the heater. To collect the drippings, put a pan with a little water under the grill. Grilling will enable browning and a crispy surface on the roasted meat.
WARNING!
When using the grill, the accessible parts of the oven may become too hot. Prevent children from accessing the hot parts of the oven.
- When baking with the fan it is not necessary to pre-heat the oven, except for baking food with very short baking times, or in the case of baking food with a high water content (e.g. fruit cakes) to prevent condensation of water vapours. Various food with similar times of baking can be prepared in two pans simultaneously, even if the time of baking differs. The scent and taste of the foods do not influence each other. Putting in and taking out of the food does not involve great heat losses. The temperature is quickly compensated by the fan. The baking temperatures are lower than those used in the standard baking mode (by 20 – 30°C for pastry and by 30 – 40°C for meat); the time of baking is longer (by approx. 5 – 10 minutes). When baking small pastries in two pans, we recommend swapping the height of both pans after 2/3 of the baking time or taking the pan that is ready sooner out earlier.
- When defrosting, lay the frozen food in the packing on a dish, put it on the grill in the centre of the oven and switch on the oven in the mode. The oven door must be closed.
- When grilling with the fan it is not necessary to pre-heat the oven. Grill with the oven door closed. When grilling this way set the thermostat as needed within the range from 50 to 200^ . The distance between the food and the grill heater must correspond to the required results:
- smaller distance for a brown surface and underdone inside,
- bigger distance for thorough roasting of the food.
To collect the drippings, put a pan with a little water under the food.
ADVANCED FUNCTIONS OF BAKING
The advanced functions extend the baking possibilities and thus provide a more comfortable use of the unit. Time functions are set in the central part of the control panel.
Timer function
- Press the button (1) to get to the setup of timer (alarm).
- The display shows the symbol (Fig. 2)
- Use (5) and (6) buttons to set the desired countdown.
- The set time will save after 5 seconds of inactivity.
- The ovens starts beep after the time expires. The beep can interrupt by pressing any button.
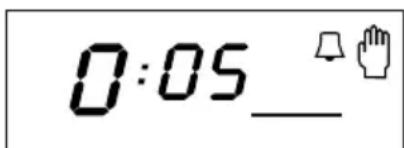
obr. 2
Countdown function
- Put the tray with food in the selected height of oven.
- Press button (2) to get to the set cooking time.
- The display shows the symbol (Fig. 3)
- Use (5) and (6) buttons to set the cooking time. The setting will save after 5 seconds of inactivity.
- Set knobs (K1) and (K2) the desired temperature and cooking function.
- after the completion of the baking Oven will off after the countdown and oven starts to beep.
The beeping can stop by pressing any buttons.
- Turn the knobs (K1) and (K2) to "0" position.
obr. 3
End of baking function
- Put the tray with food in the selected height.
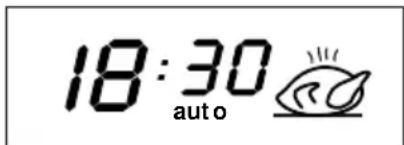
- Press button (3) to get to set the end of cooking.
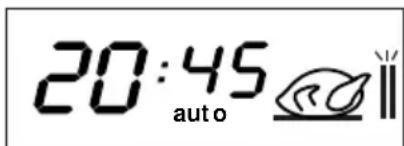
- The display shows the symbol. (Fig. 4)
- Use (5) and (6) buttons to set the end of cooking time. The setting will save after 5 seconds of inactivity.
- Use (K1) and (K2) knobs to set the desired function and cooking temperature.
- When the time expire the oven turn off and start to beep. Press any button to stop beeping.
- Set knobs (K1) and (K2) to the position. "0"
Note: The day time must be set for end of baking function.
obr. 4
Setting of the delayed start and end of baking
-
Put the tray with food in the selected height.
-
Press button (2) to get to set cooking time.
3 The display shows the symbol (Fig. 3)
- Use (5) and (6) buttons to set the time which oven will bake. The settings will save automatically after 5 seconds of inactivity.
5 Press (3) button you get to set the end of cooking.
6 The display shows the symbol. (Fig. 4)
- Use (5) and (6) buttons to set the end of cooking time. The settings will save automatically after 5 seconds of inactivity.
8 Use (K1) and (K2) knobs to set the desired function and cooking temperature.
-
When the time expire the oven turn off and start to beep. Press any button to stop beeping
-
Set (K1) and (K2) knobs to the position. "0"
Note: The day time must be set for Setting of the delayed start and end of baking.
Cooling fan
The fan is located on the upper side of the oven and provides circulation of cool air in the furniture and through the baking oven door. The fan switches on automatically, once the temperature of the outer housing of the oven exceeds 60^ C. After the oven is switched on and the thermostat is set to 200^ C, the fan switches on after approximately 10 minutes. The fan switches off automatically, once the temperature of the outer housing of the oven drops below 60^ C. After an oven run at a temperature of 200^ C is switched off, the cooling fan switches off after approximately 10 minutes.
CLEANING AND MAINTENANCE
For the sake of good appearance and reliability, keep the unit clean.
The modern design of the unit facilitates the maintenance to the minimum.
The parts of the unit which come into contact with food have to be cleaned regularly.
- Before any maintenance and cleaning disconnect the power cord from the mains or switch off the circuit breaker of the mains outlet of the unit.
- Set all controls in the OFF position.
- Wait until the inside of the unit is not hot anymore but remains lukewarm - cleaning is easier than when it is cold.
- Clean the outer surface of the unit with a damp cloth, soft brush or fine sponge and then wipe it dry.
- The bottom and ceiling of the oven can be wiped with a damp cloth, soft brush or sponge. In cases of heavy soiling, use hot water with non-aggressive detergent.
- For cleaning the glass of the oven door do not use coarse abrasive cleaners or sharp metal scrapers, since they can scratch the surface or the glass can be broken.
- Never leave aggressive or acidic substances (lemon juice, vinegar) on the enamelled, varnished or stainless parts.
- Do not use autoclave for cleaning the unit!
- The baking pans may be washed in a dishwasher.
UNIT INSTALLATION
- Only the customer is responsible for installation in situ. Defects caused by incorrect installation are not covered by the warranty.
- Do not lift the unit by holding it by the handle of the door!
- WARNING! Some edges of the unit that are hidden after the installation can be sharp! Proceed with caution to prevent an injury!
- The manufacturer bears no responsibility for damage caused to people, animals or objects as a result of incorrect installation.
- To ensure the correct function of the unit, place it in suitable furniture.
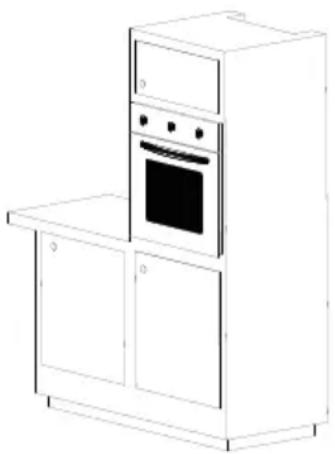
- The unit should be installed in standardised kitchen furniture designed for built-in appliances or in properly adapted furniture of dimensions according to Fig. 7a, 7b.
- The kitchen furniture must be made of sufficiently heat-resistant material. The materials and adhesives used must be resistant to heating of the unit according to standard ČSN EN 60335-2-6. Materials and adhesives that do not meet the stated standard may deform or loosen.
Connecting to the mains
- Make sure the mains voltage and current protection correspond to the values on the rating plate. We recommend using a separate outlet circuit with a 16A circuit breaker.
- Use grounded wall outlets only.
- Do not use adapter plugs, connectors or extension cables. They could create a risk of fire due to overheating.
- The supply cable plug or circuit breaker have to be freely accessible even after the installation of the unit.
- Only a qualified expert can perform connection changes.
natural_image
Line drawing of a modern kitchen cabinet with oven and door (no text or symbols)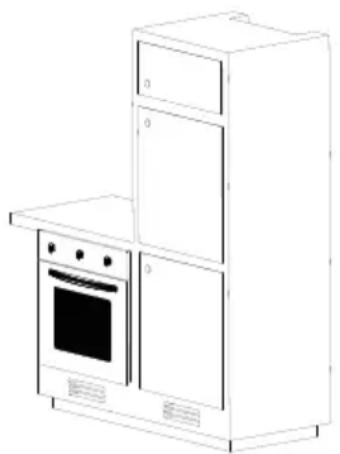
natural_image
Line drawing of a modern kitchen appliance with oven, cabinets, and stove (no text or symbols)Fig. 7b
- The electrical safety of the unit can only be guaranteed if the protective terminal of the unit is connected to the protective conductor of the mains.
- The manufacturer bears no responsibility for damage caused to people or objects as a result of a missing or bad protective connection.
- The power cord must be located so that it does not come into contact with hot parts of the unit and so that it is not deformed or excessively bent.
Follow the installation instructions:
- Remove all the covering and marketing materials from the unit before the first use.
- For the required built-in box dimensions see Fig. 7a. 7b. For the sake of efficient air circulation the unit has to be located according to the dimensions on the pictures and the design of the cabinet must enable air flow into its bottom part.
- Put the unit on the edge of the cabinet and run the power cord through the rear wall of the cabinet so that its plug is accessible after installation.
- Push the unit carefully to the selected place in the cabinet. Be careful not to squeeze the power cord.
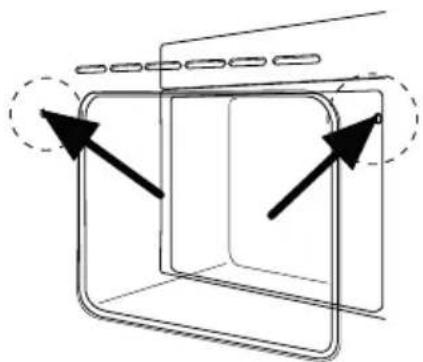
- Attach the unit to the cabinet by screwing 2 screws in the holes in the side walls of the unit. The holes can be seen after opening the door.
- Plug the supply cable into the wall outlet.
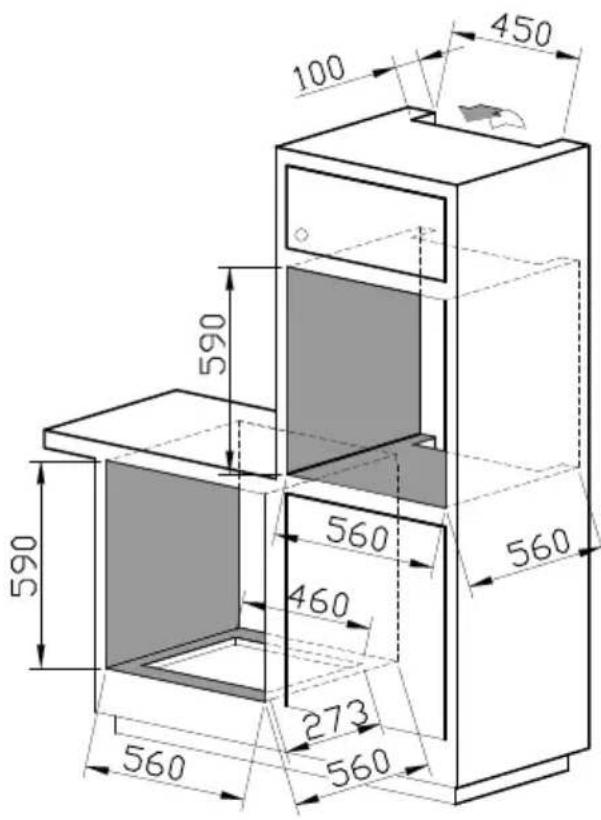
Fig. 7a
Removal
To uninstall the unit, it is important to proceed correctly:
- First, unplug the power cord from the mains (pull out the plug or switch off the circuit breaker).
- Remove the attachment screws.
- Slide out the unit and at the same time pull out the power cord carefully.
natural_image
Diagram of a 3D rectangular container with internal compartments and arrows indicating flow or movement (no text or symbols)REPAIR & MAINTENANCE
Bulb replacement
The bulb of the internal space lighting is special, with high thermal resistance (25 W, 300°C).
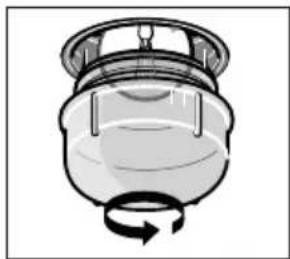
For the replacement proceed as follows:
• Pull out the power cord from the mains outlet or switch off the circuit breaker of the unit's mains outlet.
- Unscrew the covering glass and replace the bulb with a new one of the same type.
- Screw the covering glass back in place.
WARNING!
The customer may only perform the bulb replacement. Any extensive maintenance or repair that requires access
to the inner parts of the product must be performed by an expert service centre.
natural_image
Diagram of a mechanical component with a rotating arrow indicating rotation (no text or symbols)ENVIRONMENTAL PROTECTION
- Packaging materials and obsolete appliances should be recycled.
• The transport box may be disposed of as sorted waste.
• Polyethylene bags shall be handed over for recycling.
Appliance recycling at the end of its service life:
A symbol on the product or its packaging indicates that this product should not go into household waste. It must be taken to the collection point of an electric and electronic equipment recycling facility. By making sure this product is disposed of properly, you will help prevent the negative effects on the environment and human health that would otherwise result from inappropriate disposal of this product. You can learn more about recycling this product from your local authorities, a household waste disposal service or in the shop where you bought this product.
concept
CZ
Záruční podmínky
SK
Záručné podmienky
PL
Karta gwarancyjna
EN
Warranty Certificate
CZ
ZÁRUČNÍ PODMÍNKY
| Model: | |
| Production number: | |
| Date of purchase: | Seal and signature of vendor: |
| Product installed and functions introduced by: | |
| Date: | Seal and signature of authorized person: |
| The reconstruction of the appliance to a different kind of gas was performed by: | |
| Type of gas: | |
| Date: | Seal and signature of authorized person: |
The vendor is obliged to inform the consumer of the features and parameters of the product and fill in the Warranty Certificate fully and legibly on the day of purchase.
The Certificate is not valid without all the prescribed data correctly filled in!
The manufacturer (or importer) is responsible for the features of the product under the applicable technical standards and conditions for the warranty period.
The warranty period is 24 months from the date of purchase, unless stated otherwise by the manufacturer (or importer).
Under the warranty the consumer is entitled to the free, timely and duly executed remedy of faults (see below), or to receive a replacement of the defective part of the product, provided it is not disproportionate with regards to the nature of the fault. The right to replacement of the product or termination of the purchase contract can be exercised only if all the legal preconditions have been met, on the condition that the product was not excessively worn or damaged.
The validity of the guarantee is subject to:
- Observance of the instructions mentioned in the Operating Manual;
- A document proving payment including all the prerequisites, or a valid Warranty Certificate;
Any claims with regards to product liability shall be exercised by the consumer with the vendor where the product was purchased.
The right to repair can be exercised at the location where you purchased the product or at an authorized service centre; a list of the centres is included in the product package or you may find it on the website www.my-concept.com.
Notice for consumers
The consumer is obliged to keep the Warranty Certificate and cash voucher to demonstrate payment for the product. When exercising a claim on a product, it has to be cleaned and packed in order to prevent any damage during transport to an authorized centre. The manufacturer (or importer) reserves the right not to accept a product which is not cleaned duly. Additional cleaning of the product will be charged.
The manufacturer (or importer) reserves the right not to pay the cost of false claims and to require that the claiming party cover all the necessary costs related to the examination of the qualification and solution of the claim.
The right to free repair of the product, or refund, shall not be exercised in the following cases:
- The conditions of the installation, operation and handling of the product, mentioned in the Operating Manual, were not observed;
- The fault occurred due to mechanical, thermal or chemical damage, short circuit or overvoltage;
- The fault is due to the unauthorized intervention of a third party;
- The fault is due to force majeure;
- The fault is due to insufficient or undue maintenance in conflict with the Operating Manual, including faults caused by limescale and other sediments;
- Wear and tear of the product, or its part, caused by regular use;
- Change of the colour of heating surfaces, or scratched surfaces due to regular use;
- Changes of appearance and function due to sunshine, thermal radiation, or limescale and other sediments;
- Expired service life of some parts of the product, e.g. accumulators, bulbs etc.
The nature of the fault can be determined only by the manufacturer, importer, authorized centre, or authorized expert, not by the vendor or consumer.
The consumer shall have no claim to faulty spare parts replaced within a warranty repair.
In the case of termination of the purchase contract, the consumer is obliged to return the complete product, including the accessories and documents supplied.
There is no warranty related to promotional items supplied with the product, the price of which was not charged to the consumer.
The consumer has all the minimum rights under the applicable laws.
Note: Claims regarding products damaged during transport shall be governed by the complaint procedure of the freight forwarder.
CONCEPT GUARANTEE 2+1 - Extended warranty
CONCEPT GUARANTEE offers you one more year of free servicing in addition to the 2 years of statutory warranty on faults due to defects of material, or caused by incorrect use. The free servicing includes the cost of transport and price of spare parts. These costs will be paid for you by manufacturer (or importer). Free servicing does not include replacement, or termination of the purchase contract.
Note: This type of warranty is not binding for importers in foreign countries.
Manufacturer:
Jindřich Valenta - ELKO Valenta, Vysokomýtská 1800, 565 01 Choceň, Czech Republic,
tel: +420 465 471 433, fax: +420 465 473 304, email: servis@my-concept.cz, www.my-concept.com
Importer:
Jindřich Valenta - ELKO Valenta Czech Republic, Vysokomýtská 1800,
565 01 Choceň, Tel. +420 465 471 400, Fax: 465 473 304, www.my-concept.com
concept
CZ SEZNAM SERVISNÍCH MÍST
SK ZOZNAM SERVISNÝCH STREDISIEK
PL WYKAZ PUNKTÓW SERVISOVYCH
concept
Česká republika
Jindřich Valenta – ELKO Valenta Czech Republic
Vysokomýtská 1800,565 01 Choceň
Tel. +420 465 322 895, Fax: +420 465 473 304
www.my-concept.cz
ELKO Valenta – Slovakia, s.r.o.
Hurbanova 1563/23, 911 01 Trenčín
Tel.: +421 326 583 465, Fax: +421 326 583 466
www.my-concept.sk
Elko Valenta Polska Sp. Z. o. o.

- PODĚKOVÁNÍ
- Příslušenství
- Teleskopické výsuvy
- POPIS OVLÁDACÍHO PANELU
- SERVIS
- Výměna žárovky
- OCHRANA ŽIVOTNÍHO PROSTŘEDÍ
- POPIS OVLÁDACIEHO PANELU
- Pripojenie do elektrickej siete
- Výmena žiarovky
- OCHRANA ŽIVOTNÉHO PROSTREDIA
- OPIS PANELU STEROWANIA
- Demontaż
- OCHRONA ŚRODOWISKA
- TABLE OF CONTENTS
- IMPORTANT NOTICES
- Upon delivery
- During installation
- During normal operation
- If there are children in the household
- WARNING!
- Possible defects
- PRODUCT DESCRIPTION
- Accessories
- Telescopic rails
- K1. Temperature knob
- K2. Function knob
- 1-6. buttons
- OPERATING INSTRUCTIONS
- Before the first use
- After connecting in the mains
- Basic Functions of the Unit
- Baking Tips
- ADVANCED FUNCTIONS OF BAKING
- Timer function
- Countdown function
- End of baking function
- Setting of the delayed start and end of baking
- Cooling fan
- CLEANING AND MAINTENANCE
- UNIT INSTALLATION
- Connecting to the mains
- Follow the installation instructions:
- Removal
- REPAIR & MAINTENANCE
- Bulb replacement
- ENVIRONMENTAL PROTECTION
- Appliance recycling at the end of its service life:
- concept
- CZ
- ZÁRUČNÍ PODMÍNKY
- The Certificate is not valid without all the prescribed data correctly filled in!
- Notice for consumers
- CONCEPT GUARANTEE 2+1 - Extended warranty
- Manufacturer:
- Importer:
Brand : Concept
Model : ETV-6960wh
Category : Oven