
MNV-2560 - Dishwasher Concept - Free user manual and instructions
Find the device manual for free MNV-2560 Concept in PDF.


| Product Type | Built-in Dishwasher |
| Brand | Concept |
| Model | MNV-2560 |
| Dimensions (H x W x D) | 815 x 448 x 570 mm |
| Capacity | 10 Place Settings |
| Energy Efficiency Class | E (EU 2019/2017) |
| Energy Consumption per Cycle | 0.72 kWh |
| Water Consumption per Cycle | 8.5 L |
| Noise Level | 47 dB(A) |
| Number of Programs | 6 |
| Programs | Eco, Normal, Intensive, Quick, Glass, Soak |
| Drying System | Condensation Drying |
| Control Type | Electronic with LED Display |
| Delay Start | Yes, up to 24 hours |
| Salt and Rinse Aid Indicators | Yes |
| Adjustable Rack | Fold-down tines, adjustable upper basket |
| Water Connection | Cold water only |
| Power Supply | 220-240 V, 50 Hz, 10 A |
| Weight | 35 kg |
| Safety Features | Child lock, anti-flood system, door safety switch |
| Warranty | 2 years |
Frequently Asked Questions - MNV-2560 Concept
User questions about MNV-2560 Concept
0 question about this device. Answer the ones you know or ask your own.
Ask a new question about this device
Download the instructions for your Dishwasher in PDF format for free! Find your manual MNV-2560 - Concept and take your electronic device back in hand. On this page are published all the documents necessary for the use of your device. MNV-2560 by Concept.
USER MANUAL MNV-2560 Concept
natural_image
Exterior view of a modern stainless steel multi-chamber appliance (no visible text or symbols)MNV2560
SK PL ENCZ
PODĚKOVÁNÍ
POPIS OVLÁDACÍHO PANELU
1dH = 1,25 Clarke = 1,78fH = 0,178mmol/l
dH = German degree
fH = French degree
Clark = British degree
natural_image
3D diagram of a mechanical device with a curved component and labeled 'Open' (no text or symbols on the device itself)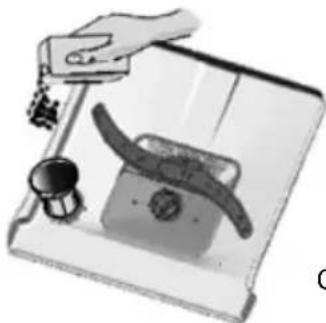
natural_image
Illustration of a hand holding a small object over a device with a curved handle and control knob (no text or symbols)Obr. 20br. 1
Obr. 6
natural_image
Technical illustration of a mechanical assembly with multiple components arranged in a grid (no text or symbols visible)Přední stěna koše
natural_image
Diagram of a grid-based mechanical or electrical component with multiple components and no visible text or symbolsSpodní koš
natural_image
3D rendering of industrial heat exchangers with coiled insulation and meshed components (no text or symbols visible)natural_image
Close-up of a wire cage with diagonal hatching and a hand touching the surface (no text or symbols visible)Obr. 8
Etažér
natural_image
Technical line drawing of a mechanical assembly with internal components and directional arrows (no text or symbols)Obr. 9
natural_image
Technical line drawing of a washing machine with internal components and a magnified view (no text or symbols)natural_image
Line drawing of a laboratory funnel with a stopper and cap (no text or symbols)natural_image
Technical line drawings of mechanical components, showing two views with numbered annotations (6 and 7) and no readable text or symbols.Obr. 18
Demontáž
RYCHLÝ PRŮVODCE NÁVODEM K POUŽITÍ - CONCEPT MYČKA NÁDOBÍ MNV2560
POPIS OVLÁDACIEHO PANELA
Clark = British degree
natural_image
3D diagram of a mechanical device with a curved handle and two wheels, labeled 'Open' with an arrow (no text or symbols on the device itself)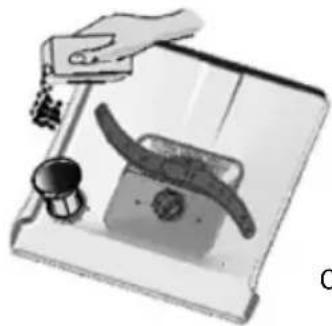
natural_image
Illustration of a hand holding a device with a curved handle and control knob (no text or symbols)Obr. 20br. 1
Obr. 6
natural_image
Technical illustration of a mechanical assembly with insulators and gears (no text or symbols)Predná stena koša
natural_image
Grid-based diagram with mechanical components and arrows, no visible text or symbolsSpodný kôš
natural_image
3D rendering of a mechanical component with threaded and ribbed surfaces (no text or symbols visible)natural_image
Close-up of a wire cage with metal grating and a hand adjusting the panel (no text or symbols visible)Obr. 8
natural_image
Technical line drawing of a mechanical assembly with internal components and a directional arrow (no text or symbols)Obr. 9
Obr. 11
natural_image
Technical line drawing of a washing machine with internal components and a magnified view (no text or symbols)natural_image
Line drawing of a faucet with a funnel and valve (no text or symbols)Pripojenie do elektrickej siete
natural_image
Technical diagram showing two circular views of mechanical components with numbered annotations (6 and 7), no readable text or symbols present.Obr. 18
Demontáž
RÝCHLY SPRIEVODCA NÁVODOM NA POUŽITIE – UMÝVAČKA RIADU CONCEPT MNV2560
OPIS PANELU STEROWANIA
Clark = British degree
Uwaga 2.
natural_image
Diagram of a mechanical component with a curved handle and circular base, showing an open operation arrow (no text or symbols present)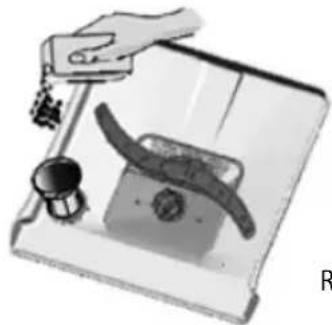
natural_image
Illustration of a hand holding a device with a curved handle and control knob (no text or symbols)Rys. 2Rys. 1
Rys. 6
natural_image
Technical illustration of a mechanical component grid with multiple cylindrical parts and a central threaded shaft (no text or symbols)natural_image
Grid-based scientific apparatus with multiple components including rods, gauges, and droplets (no text or labels)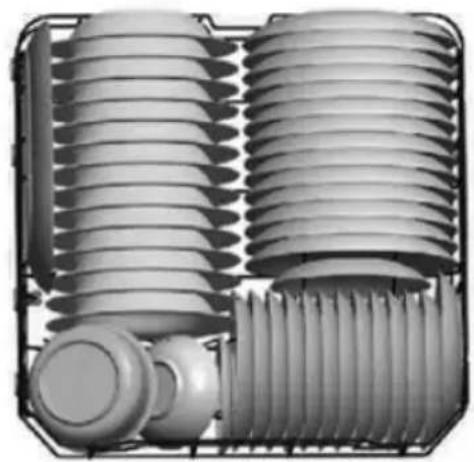
natural_image
Technical illustration of a dual-hinged electrical transformer with insulating core and cooling fins (no text or symbols)Dolny kosz
natural_image
Close-up of a wire cage with diagonal hatching and a hand touching the surface (no text or symbols visible)Rys. 8
natural_image
Technical line drawing of a mechanical assembly with internal components and directional arrows (no text or symbols)Rys. 9
Rys. 11
natural_image
Technical line drawing of a refrigerator with internal components and a close-up view of the interior (no text or symbols)natural_image
Illustration of a laboratory funnel mounted on a pipette, labeled 'Rys. 17' (no text or symbols on the diagram itself)natural_image
Technical line drawings of mechanical components, showing two views with numbered annotations (6 and 7) and no readable text or symbols.Rys. 18
Demontaż
SZYBKI PRZEWODNIK PO INSTRUKCJI OBSŁUGI - ZMYWARKA DO NACZYŃ CONCEPT MNV2560
Thank you for purchasing a Concept product. We hope you will be satisfied with our product throughout its service life.
Please study the entire Operating Manual carefully before you start using the product. Keep the manual in a safe place for future reference. Make sure other people using the product are familiar with these instructions.
Technical parameters.... 61
Important safety precautions....62
Appliance description 63
Control panel description.... 64
Instructions for Use 64
Water softening device 64
Water softening device set-up 64
Rinse aid container fill 65
Rinse aid dosage set-up 66
Dishwashing detergent use....66
Dishwashing detergent fill....67
How to save 67
3-in-1 dishwashing detergents use 67
Unsuitable dishes 68
Dishes placement 68
Program overview 70
Dishwasher operation 71
Maintenance and cleaning.... 72
Dishwasher connection and assembly 74
Dishwasher installation....76
Troubleshooting 77
Servicing 79
Environment protection 79
| TECHNICAL PARAMETERS | |
| Voltage 220-240 V ~ 50 Hz | |
| Power input 1760-2100 W | |
| Width 598 mm | |
| Height 815 mm | |
| Depth 570 mm | |
| Water supply pressure range 0.04-1.00 MPa (max.) | |
| Capacity 12 dish sets | |
| Water consumption ("Normal" program) 12,5 litres | |
| Number of dishwashing programs 6 | |
| Supply water maximum temperature | 60°C |
| Weight | 43 kg |
| Noise level | < 49dB(A) |
The manufacturer reserves the right to perform technical modifications, print errors and differences in the provided figures without prior notice.
IMPORTANT SAFETY INSTRUCTIONS
Upon delivery
- Check the package and the dishwasher immediately upon delivery for any damage that might occur during shipping.
- If damaged, do not operate the dishwasher. Contact the supplier as soon as possible.
- Dispose of the packaging material properly.
During installation
- Follow the instructions for the appliance connection and assembly.
- The dishwasher must be disconnected from the mains while being assembled.
- Make sure the mains voltage corresponds to the values stated on the dishwasher's rating plate. Use grounded wall mains outlets only.
• Install standard or built-in dishwashers only under compact worktops fixed to cupboards in order to ensure stability. - Once the dishwasher is installed, its plug and Aqua-Stop safety valve must be freely accessible.
- The electric safety valve (Aqua-Stop) is in the supply hose plastic casing; the power supply cable is in the supply hose. Therefore, neither cut the supply hose nor immerse the safety valve casing in water.
- If the appliance is not built-in and thus its side wall is accessible, the door hinge section must be covered sideways for safety reasons (risk of injury).
Normal operation
- Only use the dishwasher as described in these Instructions for Use.
- Knives and other sharp-pointed items must always be placed in the dish rack with their sharp edges facing downwards or horizontally.
- Only use the dishwasher in the household and solely to wash kitchen utensils.
- Do not sit or stand on the dishwasher's open door. The dishwasher might overturn.
• The water in the dishwashing chamber is not drinkable. - Do not use any solvents in the dishwashing chamber. Danger of explosion.
- Only use products exclusively designed for dishwashers.
- When a program is running, open the door carefully, as water may splash out.
- Follow the safety precautions and instructions on the dishwashing and rinse aids' packaging.
- Do not touch hot surfaces or heaters during or shortly after using the appliance.
- Do not store anything inside the appliance.
- Do not touch the appliance with wet or damp hands.
- Turn off the appliance and disconnect the plug from the mains outlet in the event of any failure.
- Check the appliance and power cord for damage regularly. • Never turn the appliance on if damaged.
- Turn off the appliance and let it cool for at least 30 minutes before cleaning.
- CAUTION! A large volume of steam may be released, or water may splash out when you open the door. Be careful. Risk of scalding!
- Do not use the appliance if the door or door sealing is damaged. Have the appliance repaired in an authorised service centre.
- Do not use the appliance without properly installed covers or the front panel.
- Only wash dishes designed for washing in a dishwasher. Prevent plastic dishes from coming into contact with the appliance heaters.
- Do not immerse the power cord or plug in water or any other liquid.
Safety precautions for children and the handicapped
- Do not allow children or handicapped persons to handle the appliance; always use it out of their reach.
- Persons with limited movement capacity, reduced sensory perception, insufficient mental capacity, or those who are unaware of the proper handling must only use the appliance under the supervision of a responsible person familiar with the appliance's operation.
• Exercise utmost caution when using the appliance with children in close proximity. - Never allow anyone to use the appliance as a toy.
- Only use accessories recommended by the manufacturer.
- Hide dishwashing and rinse aids from children.
- Do not allow children in close proximity to the dishwasher; there could still be remnants of dishwashing detergents inside.
CAUTION!
Only open the dishwasher for a short time, to fill and empty, to prevent injury, e.g. tripping.
Children could lock themselves in the appliance (risk of suffocation), or be exposed to other dangers.
Possible failures
- Only qualified personnel may repair the dishwasher and make any intervention in the appliance.
- The appliance must be disconnected from the mains during repairs and interventions. Switch off the circuit breaker, or disconnect the plug.
- When disconnecting the appliance from the power outlet, never pull the power cord; instead, grasp the plug and disconnect it by pulling.
Failure to follow the manufacturer's instructions invalidates the warranty.
PRODUCT DESCRIPTION
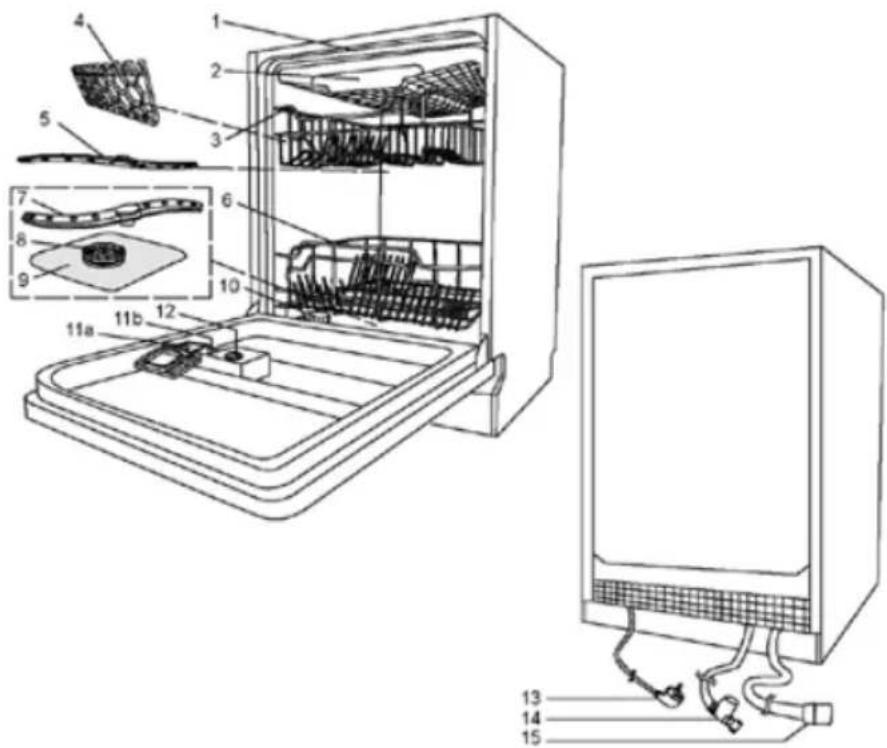
- Upper spray jet
- Rack for cutlery
- Upper rack
- Multi-level sub-rack
- Upper spray arm
- Lower rack
- Bottom spray arm
- Strainer
- Main filter
- Regenerative salt container
- Dishwashing detergent container
11A - Main wash
11B - Pre-wash - Rinse aid container
- Service cabel
- Supply hose connection
- Draining hose connection
CONTROL PANEL DESCRIPTION
- Main switch pushbutton Display
- Power indicator
- Program indicator lights (the selected program is on)
- P - Dishwashing program selection pushbutton
- Clock - Delayed start function pushbutton
- Delayed start function indicator lights (3h/6h/9h/12h)
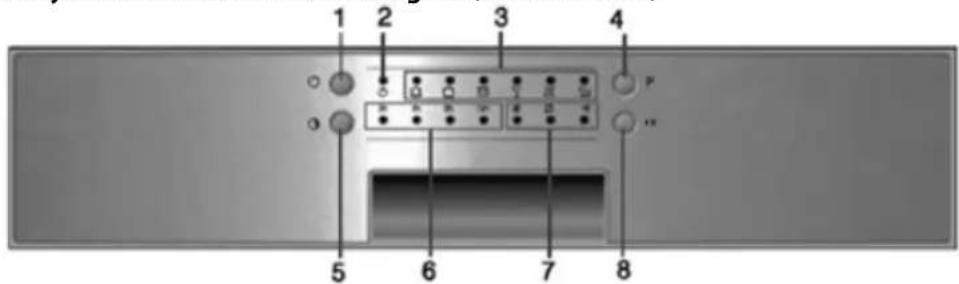
- Regeneration salt and rinse aid presence indicator lights
Indicator of the end of the selected washing program - Start/Pause pushbutton
OPERATING INSTRUCTIONS
For the first dishwashing, buy
- a regenerative salt (according to water hardness – See below)
• a dishwashing detergent - a rinse aid.
• Exclusively use products designed for dishwashers.
WATER SOFTENING DEVICE
Soft water is needed for effective dishwashing, i.e. water with a low calcium content; otherwise lime scale is created on dishes and inside the appliance. Tap water that exceeds the given hardness level must be softened for dishwashing, i.e. decalcified. This is done by the regenerative salt in the dishwasher water softening device. The setting and needed quantity of the salt depend on the tap water hardness.
Water hardness is indicated in equivalent degrees of hardness: German °dH, French °TH, British °Clark, and mmol/l (millimol per litre – the international unit for water hardness).
The softener should be set according to the hardness of the local water. Information on the local water hardness in the given area is available from the local water utilities provider. Set the water softener dosing regulator according to the table below (Figure 1).
Water softening device setting
- Turn on the dishwasher by pressing the main switch (1).
- Press the Start/Pause pushbutton (8) for more than 5 seconds to activate the water softening device set-up, which you can complete in the next 60 seconds.
- By pressing the Start/Pause pushbutton (8), set up the required H1-H6 value.
- Confirm the set-up by pressing the main switch pushbutton (1), or wait 5 seconds for the set-up automatic save.
| WATER HARDNESS | Position value | Salt consumption (g/dishwashing cycle) | Number of dishwashing cycles per 1 kg of salt | |||
| °dH °fH °Clarke mmol/l | ||||||
| 0~5 0~9 0 | ~6 0~0.94 H1 0 / | |||||
| 6-11 10-20 | 7-14 1.0-2.0 | H2 | 20 | 60 | ||
| 12-17 | 21-30 | 15-21 | 2.1-3.0 | H3 | 30 | 50 |
| 18-22 | 31-40 | 22-28 | 3.1-4.0 | H4 | 40 | 40 |
| 23-34 | 41-60 | 29-42 | 4.1-6.0 | H5 | 50 | 30 |
| 35-55 | 61-98 | 43-69 | 6.1-9.8 | H6 | 60 | 20 |
Note: 1.
| 1 dH = 1,25 Clarke = 1,78 fH = 0,178 mmol/l |
| dH = German degree |
| fH = French degree |
| Clark = British degree |
Note: 2. This dishwasher was set at the value of H4 (EN50242) by the manufacturer.
Regenerative salt fill
Salt effects
During dishwashing, the salt is automatically washed out of the container into the softening device where it dissolves calcium. The dissolved calcium is washed out of the appliance. The water softening device is then ready for the next operation. This regenerative process works only if the salt is dissolved in water.
Fill the regenerative salt before running the dishwashing program so that any spilt remnants of the salt are washed immediately and prevented from increasing the risk of corrosion of internal parts by its chemical effects!
- Pull out the lower rack.
- Open the container closing (Figure 1).
- Pour 0.5 l of water into the container before the first use.
- Put the supplied funnel on the container opening.
- Pour the regenerative salt slowly into the container (capacity about 1.2 kg). The salt will wash excess water out (Figure 2).
- Close the container and fasten the closing gently.
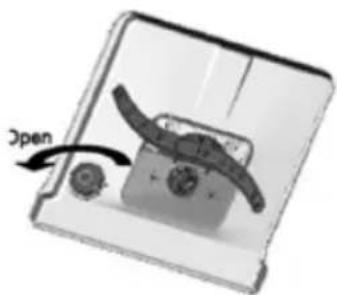
natural_image
Diagram of a mechanical device with a curved handle and two wheels, labeled 'Open' with an arrow (no text or symbols on the diagram itself)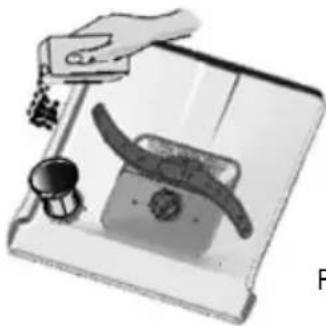
natural_image
Illustration of a hand holding a small object with a curved handle and a knob, next to a rectangular device (no text or symbols visible)Fig. 2 Fig. 1
CAUTION!
Exclusively use regenerative salt designed for dishwashers. Do not use kitchen salt! Never put a dishwashing detergent in the water softener container!
Note: At first, the salt lever indicator light will go on. It will go out after a while when the sufficient salt concentration has been achieved.
Caution
Never put a dishwashing detergent in the regenerative salt container. Otherwise the softening device might be destroyed.
Salt level indicator
The salt must be refilled immediately before the first dishwashing when the salt level indicator is on.
Rinse aid container fill
The rinse aid is used in the last stage of rinsing. It prevents water droplets from drying and creating stains on the surface during drying.
Fill the rinse aid before starting the dishwashing program so that any spilt remnants of the agent are washed away immediately and prevented from increasing the risk of corrosion of internal parts by its chemical effects!
- Open the appliance door.
- Open the container closing (Figure 3).
- Pour the rinse aid slowly into the container (Figure 4); the container capacity is about 140 ml.
CAUTION!
Only use the rinse aid designed for dishwashers. Never put a dishwashing detergent in the rinse aid container!
- Close the container and fasten the closing gently (Figure 5).
If the rinse aid indicator light is displayed during the program, it is necessary to refill the rinse aid before starting the next dishwashing program! The volume of the rinse aid can also be checked visually. If the window next to the rinse aid container door is black, the rinse aid container is sufficiently filled. If the window is light, the container is empty.
Rinse aid dosage set-up
The rinse aid dosage can be set from 1 to 6. Set the rinse aid dosage to 2 before the first use.
If water marks remain on dishes, add the rinse aid.
If a sticky film remains on dishes, reduce the rinse aid amount.
- Open the appliance door.
- Open the container closing (Figure 3).
- Increase/reduce the rinse aid dosage.
- Close the container and fasten the closing gently (Figure 5).
If you only use the dishwashing detergent mixed with the rinse aid, leave the rinse aid container empty, or reduce the dosage to the minimum.
Dishwashing detergent use
Dishwashing detergents can be grouped by their form as follows:
a) Loose (powder),
b) Liquid,
c) Tablets,
d) Combined (e.g. 3-in-1 tablets).
They can be divided into two groups by their chemical composition:
a) Alkaline,
b) With natural enzymes.
They can further be grouped as follows:
a) Phosphate and chlorine,
b) Phosphate and chlorine-free,
c) Phosphate-free and chlorine-free.
When using phosphate-free agents in hard water, white sediment may appear on dishes and internal walls. This can be prevented by higher amounts of the dishwashing detergent.
Chlorine-free dishwashing detergents have less bleaching effect. This may lead to a higher appearance of tea stains or discolouration on plastic parts.
A stronger dishwashing program, increased amount of dishwashing detergent, or use of chlorine dishwashing detergent can help here.
The suitability of the dishwashing detergent use for silver can be determined by reading the packaging instructions.
For further inquiries contact the manufacturer of the dishwashing detergent.
Dishwashing detergent instructions
Use commonly supplied liquid or powder brand-name products for dishwashers, or tablets (do not use agents for hand dishwashing!)
Dishwashing detergent container with dosage
The doses in the container will help pour in the correct amount of dishwashing detergent (Figure 6). The container consists of a compartment for main dishwashing (1) and pre-dishwashing (2).
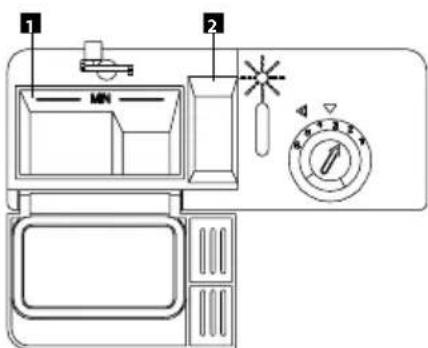
Fig. 6
Fill the dishwashing detergent when the door is fully open.
Should the dishwashing detergent container remain closed, open it by pushing the closing lever.
- Fill the container with the dishwashing detergent. For proper dosage, please follow the manufacturer's instructions. Do not overfill the dishwashing detergent container while filling.
Due to the different operation of dishwashing tablets their washing power may not always fully develop during short programs. For these programs, powder dishwashing detergents are more suitable.
- Close the dishwashing detergent container and close the dishwasher's door.
How to save
- If dishes are only slightly stained, a lower amount of the dishwashing detergent than specified shall generally suffice.
Using 3-in-1 or 2-in-1 dishwashing detergents
Put the dishwashing detergent (a tablet, gel bag etc.) into the container (Figure 6) in the main dishwashing compartment (1). Should pre-dishwashing be needed, it is necessary to put the dishwashing detergent (a tablet, gel bag etc.) into the pre-dishwashing compartment (2) as well. In terms of savings and environmental protection, use a 2-in-1 pre-dishwashing detergent (a tablet, gel bag etc.). The use of so-called „combined“ dishwashing detergents may make the use of a rinse aid and/or salt unnecessary.
Currently, various types of combined dishwashing detergents are available.
a) 3-in-1: Combines the dishwashing detergent, rinse aid, and salt,
b) 2-in-1: Combines the dishwashing detergent, the rinse aid or salt.
Find out what type of dishwashing detergent or combined dishwashing detergent you have!
Follow the service instructions or directions on the packing.
When using combined dishwashing detergents, the use of regenerative salt is not necessary if water hardness is 21^ dH ( 37^ TH, 3.7 mmol/l) or less. For water hardness over 21^ dH ( 37^ TH, 3.7 mmol/l), the salt is required.
Note: The optimum dishwashing and drying results can be achieved by using classic dishwashing detergents combined with the separate use of salt and a rinse aid.
Following the respective service instructions or directions on the combined dishwashing detergent packaging is critical for its effectiveness.
Caution
Despite the fact the rinse aid indicator light and/or the salt refill indicator light is on, the dishwashing program using 3-in-1 agents is running faultlessly.
Unsuitable dishes
Do not wash:
- Cutlery and dishes having wooden parts; these soak in the dishwasher and lose their nice appearance. Also, glues used for wood are not suitable for the dishwashing temperatures inside the dishwasher.
- Finely decorated glasses and vases, or irreplaceable antiquities. Such kitchen utensils were not designed for washing in dishwashers. Some types of glass may become cloudy after several dishwashing cycles.
- Plastic parts of dishes sensitive to hot water and dishes made of copper and tin. Also, aluminium or silver decorations on glass can change or lose colour.
Absorbent materials, such as sponges and towels, do not belong to items washable in dishwashers.
Recommendation:
Only wash dishes confirmed as suitable for dishwashing in your dishwasher.
Caution
Dishes soiled by ash, wax, lubricating grease or paint should not be washed in the dishwasher.
Glass/dishes damage
Causes:
- The type of glass and its manufacturing process.
- The chemical composition of the dishwashing detergent.
• The temperature of water and the dishwasher program duration.
Recommendation:
- Use just glass and porcelain designated as suitable for dishwasher washing by the manufacturer.
- Use the dishwashing detergent designated by the manufacturer as dish-friendly. Inquire at the manufacturers.
- Select programs with the shortest duration.
- In order to prevent any damage, remove glass and cutlery from the dishwasher as soon as possible once the program is over.
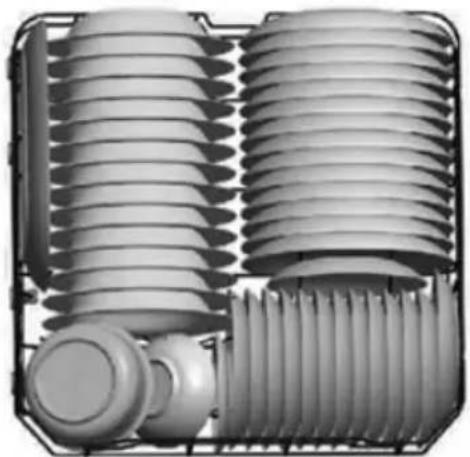
Placing dishes
Placing dishes
Remove large leftovers from dishes. Rinsing under running water prior to dishwashing is not necessary.
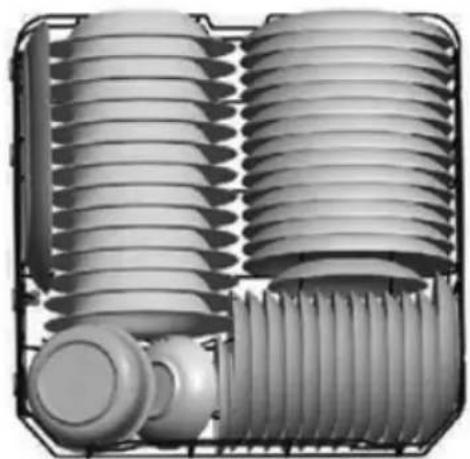
Place dishes in the dishwasher as follows:
- Place cups, glasses, pots etc. upside down.
- Place convex or hollow dishes at an angle to allow water to drain away.
• Dishes must stay firm and must not sway. - Dishes must not prevent spray arms from rotating.
Do not wash very small dishes in the dishwasher as they might fall out of racks easily.
Removing dishes
In order to prevent water and water droplets from running down from the upper rack onto dishes in the lower rack, it is recommended to first remove dishes from the lower rack and then from the upper racks.
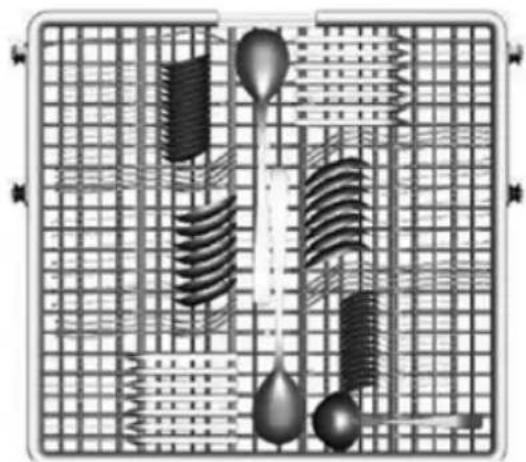
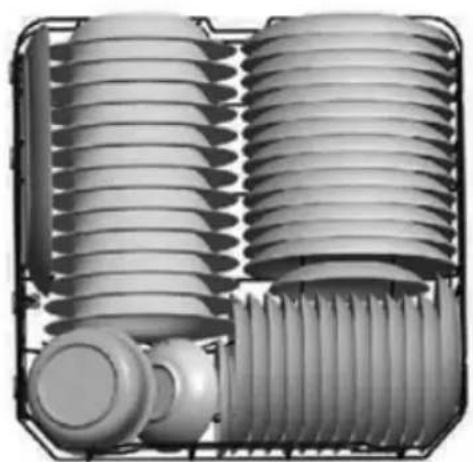
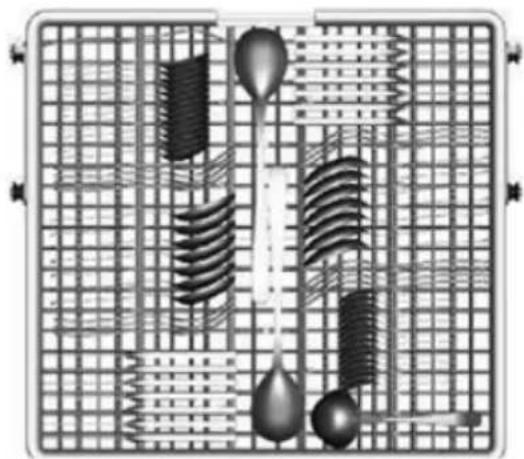
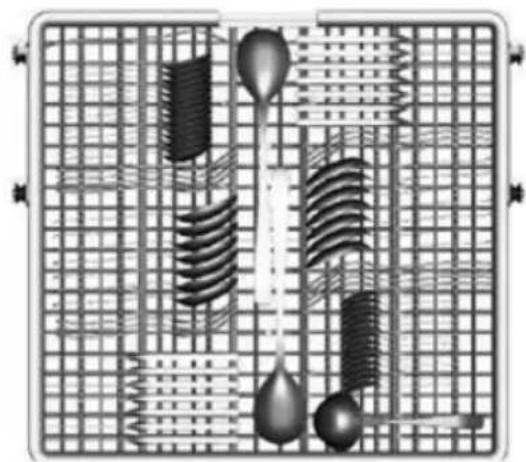
Dish placement example:
Upper rack Cutlery rack
Rack rear side
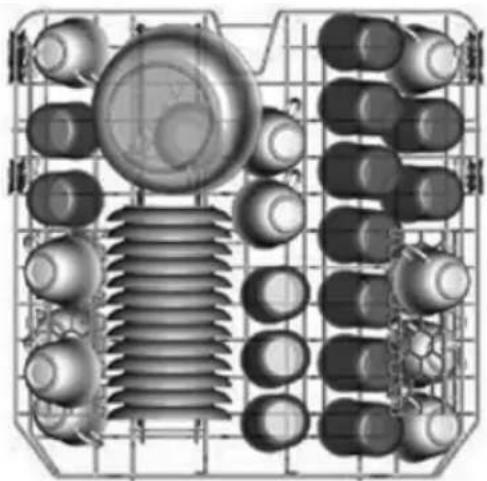
natural_image
3D technical illustration of a mechanical assembly with cylindrical components and a threaded base (no text or symbols)Rack front side
natural_image
Diagram of a grid-based mechanical or electrical component with springs and drop holders (no text or symbols)Lower rack
natural_image
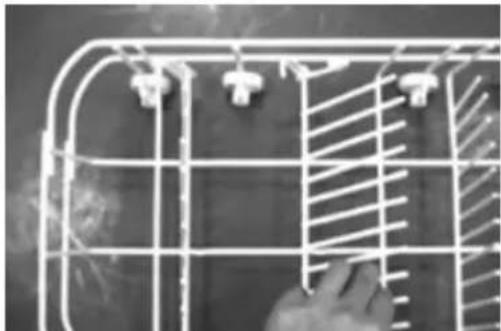
3D rendering of a mechanical component with threaded and ribbed surfaces (no text or symbols visible)For dishwashing larger items (pots, pans etc.) tilt plate holders in the lower rack (Figure 8).
Cutlery
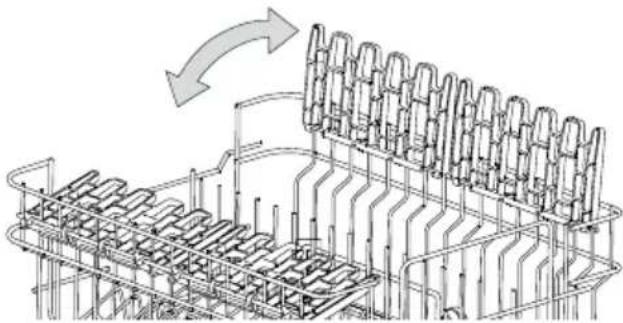
Place cutlery into the cutlery rack; knives with the sharp edge down. Place bent cutlery (forks, spoons, teaspoons) in the rack in one direction (to achieve better dishwashing effects). Place long and sharp items that do not fit in this rack onto the multi-level sub-rack of the upper rack (Figure 8).
Upper multi-level sub-rack
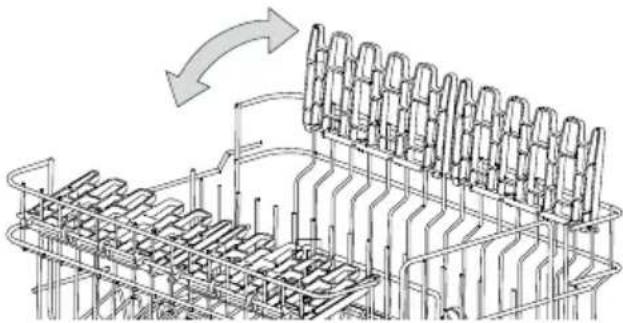
Lean goblets and high glasses on the multi-level sub-rack (instead of on other dishes).
Place long items, serving and salad cutlery, ladles and kitchen knives so that they do not prevent spray arms from rotating. The multi-level sub-rack can be tilted and height adjusted as needed (Figure 9).
natural_image
Close-up of a wire cage with metal grating and a hand adjusting the panel (no text or symbols visible)Fig. 8
natural_image
Technical line drawing of a mechanical assembly with internal components and directional arrows (no text or symbols)Fig. 9
Upper rack height adjustment
The upper rack for dishes can be height adjusted as needed for making more space available either in the upper or lower racks for high dish items. The height of the rack is adjustable by means of small levers on the rack's sides.
Program overview
| Program Type of soiling Program stage | Dishwashing detergent amountPre-wash/wash | Washing time (min) | Energy consumption(kWh) | Water consumption(l) | |
Intensive | Very dirty pots, pans,casseroles, and harddried food leftovers. | 1. Pre-wash (50°C)2. Pre-washWash (65°C)1. Rinse2. Rinse (55°C)Drying | 5/25 gor 3-in-1 165 1,419 | ||
Daily | For less dirty dishes,plates, trays, glasses | Pre-wash (45°C)Wash (50°C)RinseRinse (60°C)Drying | 5/25 gor 3-in-1 175 1,1515 | ||
Economy (EN 50242) (EN 50242) | For less dirty dishes,plates, trays, glasses | Pre-washWash (50°C)Rinse (60°C)Drying | 5/25 gor 3-in-1 | 170 1,02 12 | |
| Glass[07A6] | For less dirty dishes, glasses, porcelain | Pre-washWash (40°C)Rinse (60°C)RinseDrying | 20 g 110 0,95 | 15,8 | |
  | For dishes for which rinsing and slight drying is enough | Pre-wash (50°C)Wash (60°C)Rinse (60°C)Drying | 5/25 g 60 1,1 | 11 | |
 | Accelerated program for less dirty dishes that do not require drying | Wash (40°C)1. Rinse2. Rinse (45°C) | 20 g 35 0,5 | 11,5 |
Note: When no temperature is indicated for the program phase, the dishwasher does not heat water in that phase.
Note: For a lightly loaded dishwasher, using the next weaker program is adequate.
Program information
The stated data applies under normal conditions.
Major differences may occur due to:
• Differing amounts of dishes,
• The incoming water temperature,
• The water mains pressure,
• The adjacent temperature,
• The voltage tolerance in the mains,
- By deviations in the dishwasher's operation (e.g. the temperature, water quantity etc.).
Dishwashing procedure
-
Open the dishwasher's door
-
Check and, if needed, add salt or rinse aid.
-
Pull out, ll, and push in racks in an orderly manner.
-
Put the relevant amount of dishwashing detergent into the corresponding compartments of the container.
-
Close the dishwasher's door.
-
Open the water tap fully.
-
Turn on the dishwasher by pressing the main switch (1).
-
Select the required program by repeatedly pressing the P pushbutton (4). The selected program indicator light goes on.
-
Ending the set of programs is indicated by the sound effect (8 seconds) and the indicator lights up permanent programs (not flashing).
-
If a delayed dishwashing start is needed, repeatedly press the delayed start function pushbutton (5) in order to set up the required delay start time (3h/6h/9h/12h). The selected delayed start function turn-on indicator light goes on.
-
By pressing the Start/Pause (8) pushbutton, you start the selected program, or the delayed start function countdown.
-
By pressing the main switch (1), turn the dishwasher off and open the door carefully.
CAUTION!
Be careful when opening the dishwasher. A large volume of steam might release when the door is opened.
-
Close the water mains tap.
-
Hot dishes are very fragile. It is recommended to wait for about 15 minutes before removing your dishes to let them cool down.
-
Remove the dishes from the lower rack first, then from the upper racks, to prevent water dripping from the dishes placed above onto those below.
In case the selected program is to be changed:
a) If the program has not started yet, select another program or press the main switch pushbutton (5) – the dishwasher turns off and the preset program is cleared from the memory.
b) If the program is already running, press the main switch pushbutton (5) – the dishwasher turns off and the preset program is cleared from the memory.
Note: If you decide to change the selected program, check to see if there is any dishwashing detergent in the container, or if it has already been used, and if required add more before starting a new program.
If you need to add dishes to the dishwasher when a program is running
-
Press the Start/Pause pushbutton (8); the running program will stop. Wait until the spray arms stop moving.
-
Open the door, add dishes into the dishwasher, and close the door.
-
Press the Start/Pause pushbutton (8); the stopped program will resume running.
CAUTION!
Be highly careful when adding dishes into the dishwasher. A large volume of steam may be released, or hot water may splash out when the door is opened. Hot water with a dishwashing detergent can be chemically aggressive when in contact with skin or furniture.
MAINTENANCE AND CLEANING
Regular checking and maintenance of the dishwasher may prevent failures. Therefore, the dishwasher must be carefully inspected from time to time.
For maintaining the perfect appearance of the dishwasher's internal chamber it is recommended to use a special dishwasher washing agent at intervals of 4 to 6 months.
Overall dishwasher condition
- Check the washing chamber for grease and scale sediments. If there are sediments, fill the dishwashing detergent container and run the dishwashing program at the highest temperature.
- Wipe door seals regularly with a wet dishcloth to remove sediment.
- Check the salt dosage indicator light, and refill the salt if needed.
- Check the rinse aid indicator light. Refill the rinse aid if needed.
Drain filters
Drain filters protect the pump against large leftovers from the washing water. These leftovers may eventually clog the filters. The filtering system (Figure 10) consists of a main filter (1), a coarse filter (2), and a fine filter (3).
Check the condition of the filters after each washing. The filtering system can be removed once the coarse filter cylinder is taken out. Remove sediments and clean the filters under running water. Follow the reverse steps to reinstall the filters.
Never use the dishwasher without properly installing the filtering system!
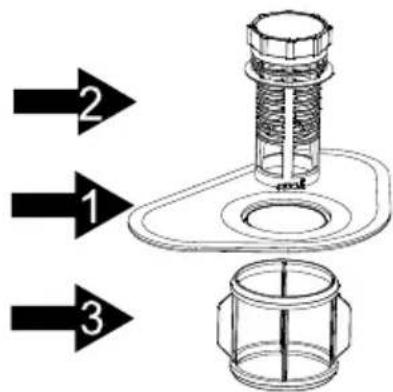
Fig. 10
Spray arms
Lime scale and sludge from dishwashing water can block jets and spray arm bearings.
- Check output jets of spray arms for clogging by leftovers.
- If needed, unscrew spray arms, and remove them (Figure 11). Rinse them under running water and reinstall.
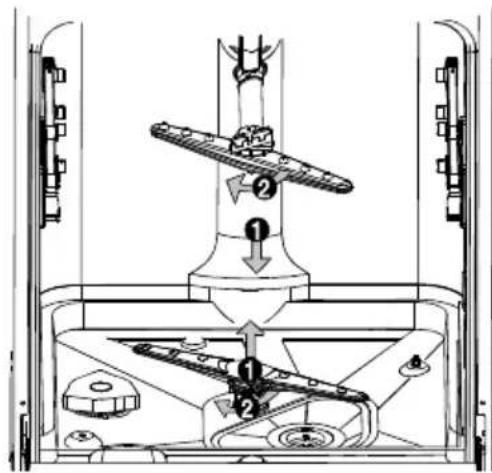
Fig. 11
Control panel and external dishwasher cleaning
Use a soft, wet cloth. Do not use abrasive or sharp objects or aggressive cleaning agents.
Protect the door lock against intrusion of dampness and water.
Protection against freezing
If the dishwasher is not going to be used for a lengthy period of time, or stored in a place with a low temperature, the following procedure must be followed:
- Disconnect the dishwasher from the mains.
- Disconnect the dishwasher from the water supply.
- Demount the supply hose and drain water from the dishwasher. A shallow tray, e.g. a sink tub, may be used for collecting the drained water.
- Reconnect the supply hose to the dishwasher.
- Remove the filtering system in the dishwasher's bottom and dry the remaining water in the drain e.g. with a sponge.
Some maintenance tips
- After every use, turn off the water supply, and leave the dishwasher's door slightly open to prevent dampness and odour from accumulating.
- Before maintaining and cleaning, disconnect the supply cord from the electric socket.
Do not use rough tools or hand-washing sponges. They might scratch the surface. Use a wet cloth soaked in water with detergent.
- When leaving your apartment for a longer period of time, run a dishwashing program with the dishwasher empty; once the program is over, disconnect the power supply cord from the electric socket, close the water tap, and leave the door slightly open to prevent dampness and odour from accumulating inside. The ajar door also prolongs the life of the door seals.
- If the appliance is to be relocated, keep it in the vertical position during transfer. If this is impossible, turn and move it onto its back side.
- Impurities accumulated around individual seals are one of the sources of odour. Check them and wipe with a wet cloth if needed.
DISHWASHER CONNECTION AND ASSEMBLY
General
Standard and built-in dishwashers installed additionally as free-standing appliances must be protected from overturning. They should, for example, be screwed to the wall, or placed under a compact worktop fixed to cupboards.
The dishwasher has to be expertly connected to ensure its proper operation. The data for water input and output and electric parameters must correspond to the data indicated in the technical parameters or assembly instructions.
Preparation for installation
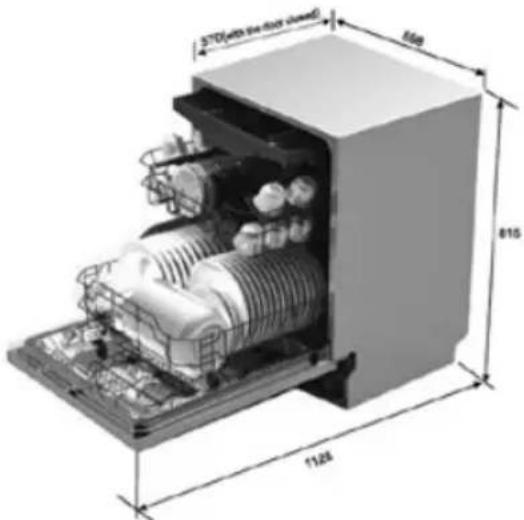
The built-in dimensions are shown in Figure 12. Leave a minimum space of 50 mm around the open door.
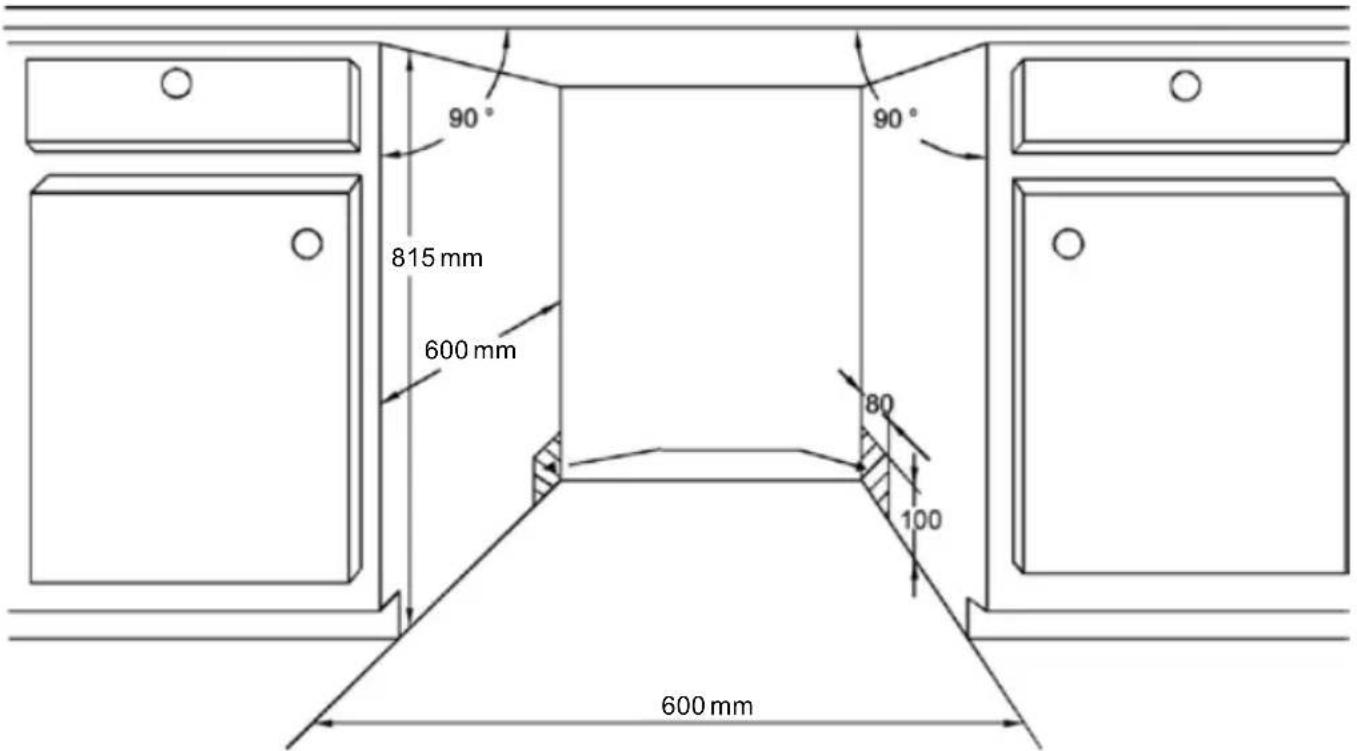
Fig. 12
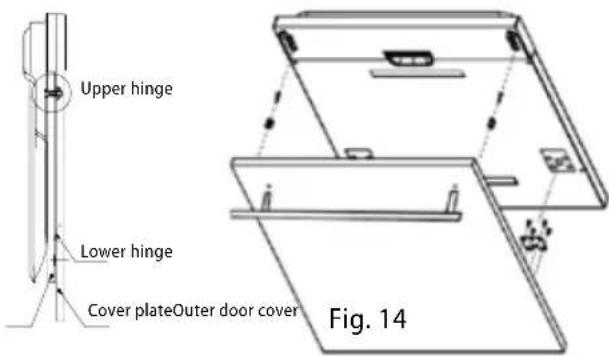
Fix the holder to the cover plate so that the holder's fixing bolts have sunken heads not protruding from the cover plate back side. Mount swivels in holes with a min. diameter of 2 mm (Figure 13) and slide the whole assembly onto the dishwasher door (Figure 14).
Fig. 13
Door lifting spring strength adjustment
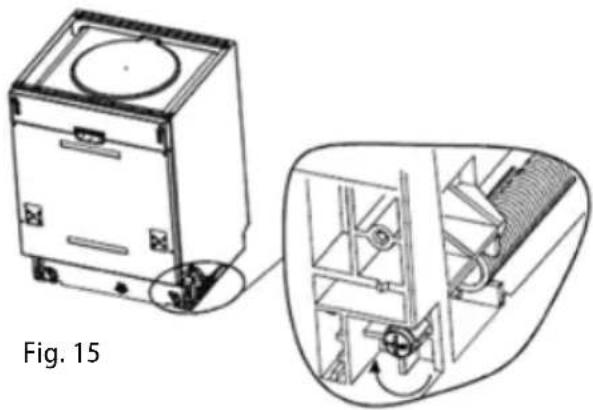
The door cover plate weight depends on the material used. The spring strength can be adjusted by turning the screws (Figure 15) on the front side so that the door holds in the open position, and closes smoothly when lifted.
natural_image
Technical line drawing of a front-mounted appliance with internal components, shown from two views: top is exploded view, bottom is detailed view (no text or symbols)Drain hose connection
Connect the drain hose:
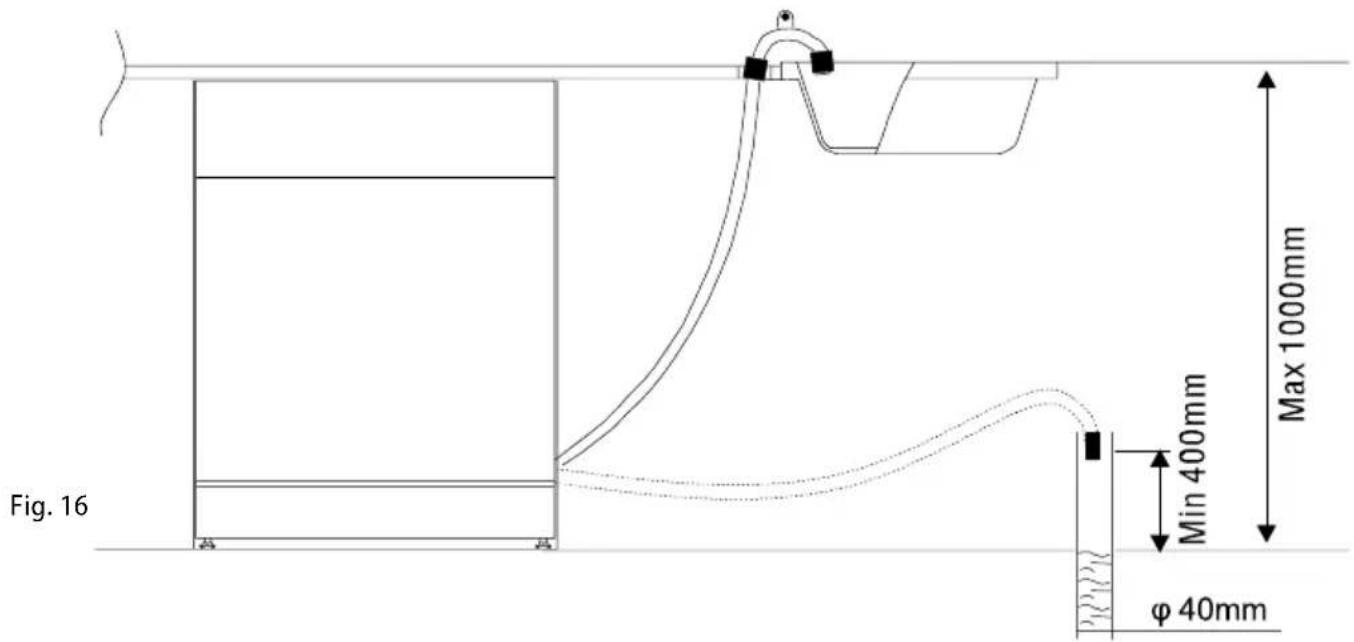
a) to the drain tube 40 mm in diameter with a vent,
b) or use the supplied adapter allowing drainage into a sink tub or a bathtub.
Note: When used, the adapter must be fixed properly. Otherwise, it may come loose and water may spill on the floor.
c) or use the siphon side hose of the sink or basin. Fix the hose to the lower side of the worktop. Thus, the water is prevented from flowing back into the dishwasher.
The end of the drain hose should be 400-1000 mm (Figure 16) above the floor, and not immersed in water to prevent water back flow.
Make sure the hose is not bent or jammed to prevent the water supply from becoming reduced or stopped.
Water inlet connection
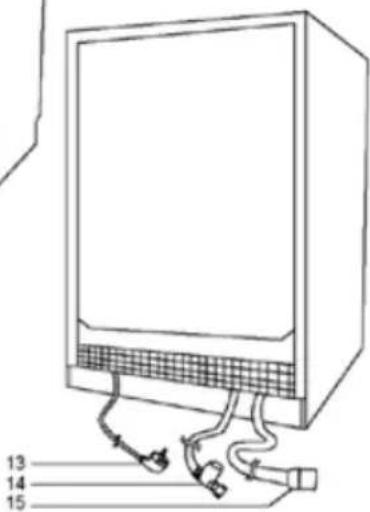
- Prior to connecting the supply hose to the water mains, make sure the water pressure complies with values of 0.04-1.00 MPa. In case of higher water pressure, a pressure reduction valve must be installed.
- The dishwasher can be connected to hot (maximum 60^ ) or cold water. Connection to cold water is recommended. A hot water supply may not necessarily be effective for very stained dishes, as it reduces the time of the washing program too much.
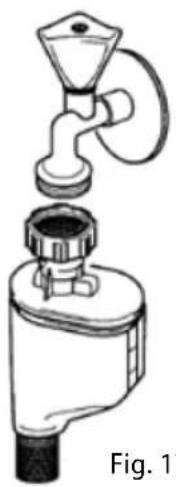
- Connect the supply hose to a water tap with a 3/4" thread (Figure 17). Make sure the supply hose is not bent, pressed, or tangled.
- When an old dishwasher is replaced with a new one, a new water supply hose must always be used to connect to the water source; the old supply hose must never be reused.
- In case the water mains are new or were not used for a long time, let a sufficient volume of water run out before connecting the water supply hose so that pipes may get flushed and any potential deposits are prevented from entering the dishwater.
natural_image
Illustration of a faucet with a funnel and valve (no text or symbols)Fig. 17
Connecting to the mains
- Make sure the mains voltage corresponds to the values on the rating plate.
• Only use grounded electric sockets. - Never use adapter sockets, connectors and extension cords. They might create a risk of fire due to overheating.
- The dishwasher supply cord plug must remain freely accessible after the dishwasher is installed.
- Only a qualified specialist may perform any changes in connection.
DISHWASHER INSTALLATION
When installing the dishwasher, follow these instructions:
-
Check the dishwasher after delivery. Note: All the dishwasher functions have been checked thoroughly during manufacture. Small water stains may be left after these tests. They will disappear after the first washing.
-
Fix the cover plate on the dishwasher door.
-
Adjust the door lifting spring strength.
-
Connect the water supply hose to the water mains.
-
Connect the drain hose to the water sink.
-
Connect the dishwater to the mains.
-
Fix the condensation strip to the plate bottom following the instructions on the condensation strip backside. Dampness will condense on it, and the wooden desk will thus be protected.
-
Push the dishwasher into the selected place in the cupboard.
-
Level the dishwasher horizontally by adjusting the feet. In the centre of the lower side front section, there is a screw allowing adjustment of the back height. Check the horizontal position using a level.
-
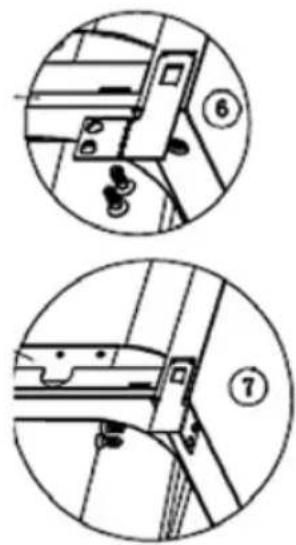
Make sure the dishwasher is secured in the cupboard against displacement by fixing sheet metal plates and wood screws fixed to the upper board or/and to the side board of the corpus.
natural_image
Technical diagram showing two circular views of mechanical components with numbered annotations (6 and 7), no readable text or symbols present.Fig. 18
Demounting
When demounting the dishwasher, it is important to proceed in the correct sequence of operations:
- First, disconnect the dishwasher from the mains (pull out the plug).
- Close the water supply.
- Loosen the water drain and inlet hoses.
- Loosen the fixing screws.
- Demount the plate base when used with the dishwasher.
- Pull out the dishwasher and in doing so pull out carefully also the water drain and supply hoses, and the supply cord.
TROUBLESHOOTING
Dishwasher users may resolve most minor faults that may occur during the dishwasher operation themselves without calling the service centre. This will save them money and help them put the dishwasher back in operation. The following overview table should be consulted in finding out causes of fault occurrences.
| Problem Cause Solution | ||
| The dishwasher can't be operated. | Plug inserted into the mains outlet incorrectly or insufficiently. | Check the plug connection. |
| The mains outlet is not live. Check for voltage, e.g. by connecting another appliance. | ||
| The dishwasher does not run. | The dishwasher is not closed properly. | Make sure the dishwasher is ON and the door is closed tight. |
| The water tap is not open. Check to make sure the water supply is open. | ||
| The supply hose sieve is clogged. Turn off the dishwasher and disconnect the power cable from wall outlet. Close the water supply. Clean the sieve located on the supply hose connection. | ||
| The lower or upper spray arm turns with difficulty. | The arm is blocked by dishes or food particles. | Check the position of the dishes, or clean the arm. |
| The dishwasher detergent container can't be closed. | The container is full. Remove the excess amount of dishwasher detergent. | |
| The mechanism is blocked by stuck remnants of dishwasher detergent. | Clean the closing mechanism of the dishwasher detergent container. | |
| The light indicators do not go out after washing. | The main switch is still ON. Turn the dishwasher off by pushing the main switch. | |
| Remnants of dishwasher detergent are stuck in the container. | The container was wet during filling. | Pour the dishwasher detergent only into a dry container. |
| Water remains in the dishwasher after washing. | The discharge hose is clogged or bent. | Check the clearness of the discharge hose. |
| The filters are clogged. Check and replace the filters. | ||
| The discharge pump is blocked. Have the unit repaired by a qualified specialist. | ||
| Soapy water in the washing zone. | Unsuitable dishwasher detergent, spilled rinse aid. | Use only dishwasher detergent designed for dishwashers; if there is soapy foam in the washing zone, leave the dishwasher open. Add 4.5 liters of cold water to the washing zone, close the dishwasher and pump out the water. Repeat the steps if necessary. Always wipe up spilled rinse aid. |
| Stains in the washing zone. | Colored dishwasher detergent was used. | Do not use colored dishwasher detergents. |
| The dishes aren't dry. | The rinse aid container is empty. | Make sure the rinse aid container is filled. |
| The dishes and cutlery aren't clean. | Wrong program. Select a more effective program. | |
| Incorrectly loaded dishwasher. Make sure the operation of the rinse aid container and spray arms is not blocked by incorrectly loaded dishes. | ||
| Stains and film on glasses and cutlery. | Extremely hard water, low water temperature, overloaded dishwasher, incorrectly loaded dishwasher, old or wet dishwasher detergent, empty rinse aid container, wrong dosage of the dishwasher detergent. | Take out metal dishes, do not add dishwasher detergent, select the longest program, run the dishwasher for 18 – 20 minutes, during main washing open the door, pour 2 cups of vinegar on the bottom, close the door, and let the dishwasher finish the washing cycle. If the vinegar does not work, repeat the whole procedure and add 14 cup of citric acid. |
| Stains on glass. | Combination of soft water and too much dishwasher detergent. | Use less dishwasher detergent in case of soft water, and select the shortest washing cycle for washing glass. |
| Yellow or brown film on the internal surface. | Ferrous sediments in the water can cause this film. | Contact a company specializing in water treatment and ask for a suitable filter. |
| White film on the internal surface. | Mineral sediments from hard water. | Use a wet sponge with detergent; put rubber gloves on. Never use any other cleaning agents than those designed for dishwashers. |
| Slight steam leakage. | Normal phenomenon. It is common for steam to leak through the door lock during drying and water discharge. | |
| Black or gray stains on the dishes. | Aluminum cutlery was touching the dishes during washing. | Use a soft abrasive to clean the stains. Do not use this agent in the dishwasher! |
| Water remains in the washing zone. | Normal phenomenon. A small volume of water around the drain holes on the bottom keeps the sealing lubricated. | |
| The dishwasher is leaking. | The dishwasher detergent or rinse aid container is overflowing, or the dishwasher is not in a horizontal position. | The dishwasher detergent or rinse aid container is overflowing, or the dishwasher is not in a horizontal position. |
| Indicator of Rapid program is flashing | The dishwasher has been pumping water for a long time. | Check the water supply. |
| Indicator of Glass program is flashing | The dishwasher is overflowing. Too much water supplied. Check the supply water pressure. | |
Note: The angled water tap sold in the Czech Republic mostly contains a check valve that can be blocked when Aqua-Stop equipment is used, and, therefore, the appliance does not pump water. To make sure the operation is correct the check valve must be removed from the tap.
CAUTION!
Please note you will have to pay, even during the guarantee period, for the visit of a service technician in case of operating the appliance incorrectly, or when some of the faults described here occurred.
REPAIR & MAINTENANCE
Any extensive maintenance or repair that requires access to the inner parts of the product must be performed by an expert service centre.
WARNING!
Please take note of the fact that you will have to pay for the visit of a service technician in case of mishandling or some of the defects mentioned here, even during the guarantee period.
ENVIRONMENTAL PROTECTION
- Packaging materials and obsolete appliances should be recycled.
- The transport box may be disposed of as sorted waste.
- Polyethylene bags shall be handed over for recycling.
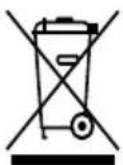
Appliance recycling at the end of its service life:
A symbol on the product or its packaging indicates that this product should not go into household waste. It must be taken to the collection point of an electric and electronic equipment recycling facility. By making sure this product is disposed of properly, you will help prevent the negative effects on the environment and human health that would otherwise result from inappropriate disposal of this product. You can learn more about recycling this product from your local authorities, a household waste disposal service or in the shop where you bought this product.
QUICK GUIDE THROUGH INSTRUCTIONS FOR USE - CONCEPT - MNV2560 DISHWASHER
These instructions are designed as the compendious description; detailed information is contained in the Instructions for Use.
| Turn on the dishwasher | Open the door and press the main switch | |
| Fill the container with the dishwashing detergent | Compartment 1 - for washing - always Compartment 2 - just for pre-washing programs 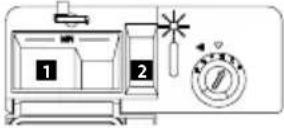 | |
| Check the rinse aid | 1. Visually = by means of the indicator on the container2. According to signalisation on the panel |  |
| Check the amount of regenerative salt | 1. According to signalisation on the panel |  |
| Fill racks with dishes | Put dishes cleared of large leftovers in racks | |
| Select a program | Select the required program by pressing the „P“ pushbutton |  |
| Start the dishwasher | Check whether the water tap is open; close the dishwasher door Dishwashing starts automatically in 10 seconds | |
| Program change possibility | 1. Carefully open the dishwasher door (danger of hot water/steam scalding)2. Discontinue the running program by pressing the „P“ pushbutton for more than 3 seconds3. Select and set up the newly required program by pressing the „P“ pushbutton4. Check whether dishwashing detergents are in the container5. Close the dishwasher door; the program starts in 10 seconds | |
| Forgotten dishes insertion possibility | 1. Carefully open the dishwasher door (danger of hot water/steam scalding)2. Insert forgotten dishes3. Close the dishwasher door; the program starts in next 10 seconds. | |
| Power supply failure | 1. Carefully open the dishwasher door (danger of hot water/steam scalding)2. Select and set up the newly required program by pressing the „P“ pushbutton.3. Check whether dishwashing detergents are in the container4. Close the dishwasher door; the program starts in 10 seconds | |
| Once the program is over, turn off the dishwasher. | The program end is signalled acoustically Carefully open the dishwasher door (danger of hot water/steam scalding); then turn the dishwasher off by pressing the main switch |  |
| Final steps | Close the water supply tap; let dishes cool off for at least 15 minutes (danger of burning by hot dishes); then remove dishes from the dishwasher | |
Jindřich Valenta – ELKO Valenta Czech Republic, Vysokomýtská 1800, 565 01 Choceň, Tel. +420 465 322 895, Fax: +420 465 473 304, www.my-concept.cz
ELKO Valenta – Slovakia, s.r.o., Hurbanova 1563/23, 911 01 Trenčín
Tel.: +421 326 583 465, Fax: +421 326 583 466, www.my-concept.sk
Elko Valenta Polska Sp. Z. o. o., Ostrowskiego 30, 53-238 Wrocław
Tel.: +48 71 339 04 44, Fax: 71 339 04 14, www.my-concept.pl

- PODĚKOVÁNÍ
- POPIS OVLÁDACÍHO PANELU
- Etažér
- Demontáž
- RYCHLÝ PRŮVODCE NÁVODEM K POUŽITÍ - CONCEPT MYČKA NÁDOBÍ MNV2560
- POPIS OVLÁDACIEHO PANELA
- Pripojenie do elektrickej siete
- RÝCHLY SPRIEVODCA NÁVODOM NA POUŽITIE – UMÝVAČKA RIADU CONCEPT MNV2560
- OPIS PANELU STEROWANIA
- Uwaga 2.
- Demontaż
- SZYBKI PRZEWODNIK PO INSTRUKCJI OBSŁUGI - ZMYWARKA DO NACZYŃ CONCEPT MNV2560
- IMPORTANT SAFETY INSTRUCTIONS
- Upon delivery
- During installation
- Normal operation
- Safety precautions for children and the handicapped
- CAUTION!
- Possible failures
- PRODUCT DESCRIPTION
- CONTROL PANEL DESCRIPTION
- OPERATING INSTRUCTIONS
- For the first dishwashing, buy
- WATER SOFTENING DEVICE
- Water softening device setting
- Regenerative salt fill
- Salt effects
- Caution
- Salt level indicator
- Rinse aid container fill
- Rinse aid dosage set-up
- Dishwashing detergent use
- Dishwashing detergent instructions
- Dishwashing detergent container with dosage
- How to save
- Using 3-in-1 or 2-in-1 dishwashing detergents
- Find out what type of dishwashing detergent or combined dishwashing detergent you have!
- Unsuitable dishes
- Do not wash:
- Recommendation:
- Glass/dishes damage
- Causes:
- Placing dishes
- Removing dishes
- Dish placement example:
- Upper rack Cutlery rack
- Cutlery
- Upper multi-level sub-rack
- Upper rack height adjustment
- Program information
- Dishwashing procedure
- In case the selected program is to be changed:
- If you need to add dishes to the dishwasher when a program is running
- MAINTENANCE AND CLEANING
- Overall dishwasher condition
- Drain filters
- Never use the dishwasher without properly installing the filtering system!
- Spray arms
- Control panel and external dishwasher cleaning
- Protection against freezing
- Some maintenance tips
- DISHWASHER CONNECTION AND ASSEMBLY
- General
- Preparation for installation
- Door lifting spring strength adjustment
- Drain hose connection
- Water inlet connection
- Connecting to the mains
- DISHWASHER INSTALLATION
- Demounting
- TROUBLESHOOTING
- REPAIR & MAINTENANCE
- WARNING!
- ENVIRONMENTAL PROTECTION
- Appliance recycling at the end of its service life:
- QUICK GUIDE THROUGH INSTRUCTIONS FOR USE - CONCEPT - MNV2560 DISHWASHER
Brand : Concept
Model : MNV-2560
Category : Dishwasher