
GELATO1SS - Ice machine BAUMATIC - Free user manual and instructions
Find the device manual for free GELATO1SS BAUMATIC in PDF.


| Product Type | Ice Machine |
| Brand | Baumatic |
| Model | GELATO1SS |
| Ice Production Capacity | Up to 12 kg per 24 hours |
| Water Tank Capacity | 2.0 L |
| Ice Cube Size | Small and Large (selectable) |
| Ice Storage Capacity | Approximately 600 g |
| Refrigerant | R600a (environmentally friendly) |
| Power Supply | 220-240 V ~ 50 Hz |
| Power Consumption | 150 W |
| Net Weight | 9.5 kg |
| Dimensions (W x D x H) | 300 x 350 x 340 mm |
| Self-Cleaning Function | Yes, with automatic cleaning cycle |
| Control Type | Electronic touch panel with LED indicators |
| Safety Features | Auto shut-off when ice basket full or water low |
| Noise Level | < 45 dB(A) |
| Material | Stainless steel housing with transparent lid |
| Accessories Included | Ice scoop, water reservoir, user manual |
| Repairability Index | 7.5 / 10 (based on manufacturer data) |
| Spare Parts Availability | Through Baumatic service centers or online |
| Warranty | 2 years (standard) |
Frequently Asked Questions - GELATO1SS BAUMATIC
User questions about GELATO1SS BAUMATIC
0 question about this device. Answer the ones you know or ask your own.
Ask a new question about this device
Download the instructions for your Ice machine in PDF format for free! Find your manual GELATO1SS - BAUMATIC and take your electronic device back in hand. On this page are published all the documents necessary for the use of your device. GELATO1SS by BAUMATIC.
USER MANUAL GELATO1SS BAUMATIC
GELATO1SS 1.5 Litre freestanding automatic ice cream and sorbet maker
INSTRUCTION MANUAL

natural_image
Simple line drawing of a fish with fins and tail, no text or symbols presentUSER MANUAL FOR YOUR BAUMATIC
GELATO1SS
1.5 Litre freestanding automatic ice cream and sorbet maker
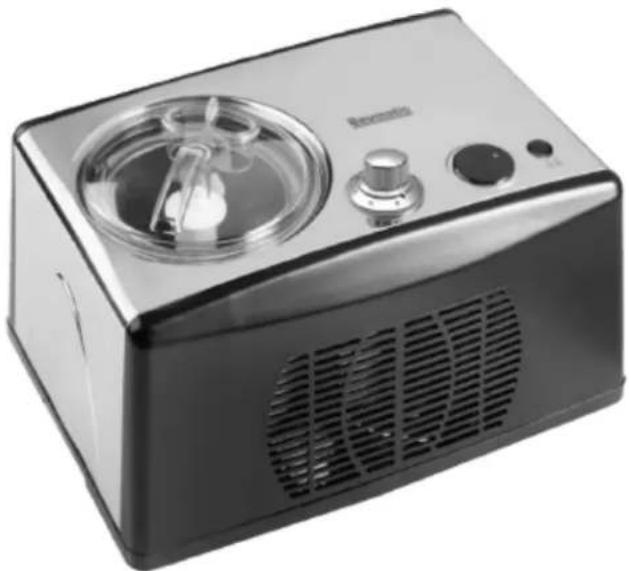
natural_image
Black and white photo of a portable electric stove with control panel and fan (no visible text or symbols)
NOTE: This User Instruction Manual contains important information, including safety & installation points, which will enable you to get the most out of your appliance. Please keep it in a safe place so that it is easily available for future reference, for you or any person not familiar with the operation of the appliance.
DD 30/04/10
Contents
E n v i r o n m e n t a l
Important safety information 5 - 6
Specifications of your GELATO1SS 7
D e s c r i p t i o n o f
Using your Baumatic ice cream maker 8-11
B e f o r e s w i t c h i
Prior to making ice cream
M a k i n g i c e c r e
Removal and storage of ice cream
E x t e n d e d c o o l i
A d j u s t i n g s e t t
I n s t a l l a t i o n
Electrical connection (UK only) 12
Electrical connection (European countries) 13
P o s i t i o n i n g
Contact details 14-15
G u a r a n t e e
Environmental note
Note: Before discarding an old appliance, switch off and disconnect it from the power supply. Cut off and render any plug useless. Cut the cable off directly behind the appliance to prevent misuse. This should be undertaken by a competent person. Disable the door lock to make sure that children cannot get stuck inside the appliance.
This appliance is marked according to the European directive 2002/96/EC on Waste electrical and Electronic Equipment (WEEE). By ensuring this product is disposed of correctly, you will help prevent potential negative consequences for the environment and human health, which could otherwise be caused by inappropriate waste handling of this product.
The symbol

accompanying the product, indicates that this appliance may not be treated as household waste. Instead it shall be handed over to the applicable collection point for the recycling of electrical and electronic equipment.
Disposal must be carried out in accordance with local environmental regulations for waste disposal.
For more detailed information about treatment, recovery and recycling of this product, please contact your local city office, your household waste disposal service or the shop where you purchased the product.

natural_image
Symbol of a trash bin crossed with no text or labels, representing waste sorting or disposal (no text present)- The packaging materials that Baumatic uses are environmentally friendly and can be recycled.
- Please discard all packaging material with due regard for the environment.
Important safety information

natural_image
Illustration of an owl reading a book (no text or symbols present)Your safety is of the utmost importance to Baumatic Please make sure that you read this instruction booklet before attempting to install or use the appliance. If you are unsure of any of the information contained in this booklet, please contact the Baumatic Advice Line.

IMPORTANT: Any installation work must be carried out by a qualified electrician or competent person.
Use of the appliance
- Your appliance is only designed to be used in the home. It is suitable for making ice cream and sorbets. If it is used for any other purpose or it is not used correctly, then Baumatic Ltd. will accept no liability for any damage that is caused.

natural_image
Simple black-and-white icon of a house with windows and trees, no text or symbols present.- Altering the specification of the appliance must not be attempted for reasons of safety.
Before using your appliance
- Check the appliance for any signs of transport damage. If you notice any damage, then you should not connect your appliance to your mains supply and should contact your retailer.
Refrigerant
- Your appliance contains R134a refrigerant, which is a natural gas that does not contain CFCs that can damage the environment. However it is a flammable substance, therefore care should be taken:
- During the transportation and installation of the appliance, make sure that the refrigeration pipework does not get damaged.
- If it does become damaged then sources of ignition and open flames should be avoided. Also the room that the appliance is situated in should be thoroughly ventilated.
- Do not place any objects on top of the appliance, as this may damage the table top.

natural_image
Cartoon illustration of a distressed container with arms and legs, showing a sad face (no text or symbols)Child safety
- Packaging material should be kept away from children.
○ Children should not be allowed to touch the controls or play with the appliance.

General safety
- Do not pull on the power supply cable to remove the plug from your mains supply socket.
- Do not pull out or insert the plug with wet hands.
Do not attempt to use your appliance outdoors or any place where it is likely to come into contact with the elements.

natural_image
Illustration of a cloud with raindrops falling (no text or symbols)Before cleaning the appliance or performing maintenance work, ensure that the appliance has been disconnected from your mains supply.
○ Always ensure that the location where you are installing your appliance is free of stored items such as papers and other flammable materials.
- Never block the ventilation openings of the appliance on its exterior.
- It is vital to keep your appliance well ventilated.

natural_image
Abstract black-and-white circular pattern with six petal-like segments radiating from center (no text or symbols)Service
You should not attempt to repair the appliance yourself, as this could cause injury or a more serious malfunction. If your appliance is not functioning correctly, then you should contact the Customer Care Department.
natural_image
Illustration of five different tools: pliers, wrench, adjustable wrench, and screwdriver (no text or symbols present)Specifications of your GELATO1SS
Congratulations on purchasing a Baumatic ice cream maker
- Push button/control knob operation
○ Capacity: 1.5 litres
○ Churning and chilling time: 10 – 60 minutes - Timer dial
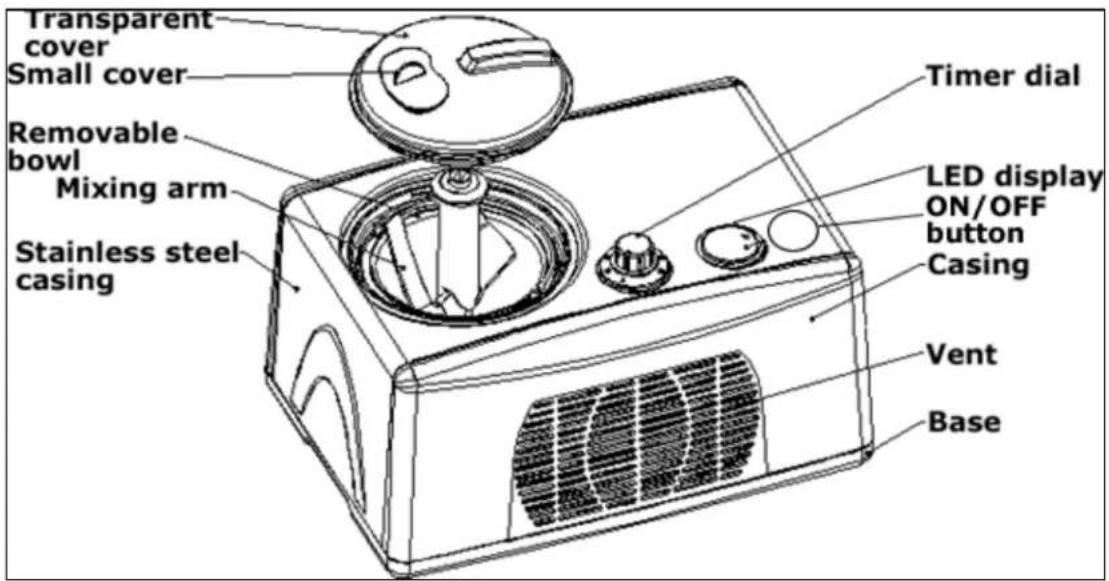
○ ON/OFF button - Transparent cover
- Removable ice cream bowl
- Fixed bowl with mixing arm
- Stainless steel exterior
Dimensions of appliance
Height: 245 mm
Width: 402 mm
Depth: 281 mm
Description of the appliance
Using your Baumatic ice cream maker
Before switching on
○ Make sure that it has been installed by a suitably qualified person, as per the information contained in Baumatic's installation instructions.
- After delivery, wait for a couple of hours before connecting the appliance to your mains supply. This will allow any oil from the compressor that may have been disturbed during the transportation process to settle.
- The outside of the appliance and the removable accessories contained within it, should be cleaned with a solution of liquid detergent and water.
- The interior of the appliance should be cleaned with a solution of sodium bicarbonate dissolved in lukewarm water. The interior and accessories should be thoroughly dried, after the cleaning process has been completed.
There can be an odour when you first switch on the appliance. It will lessen when the appliance is used.

natural_image
Cartoon illustration of a smiling cube character giving thumbs up, next to a mortar and pestle (no text or symbols)Prior to making ice cream
- Your appliance MUST be placed on a flat surface, to ensure that the built in compressor operates properly.
- The appliance MUST have 20 cm of space each side of it and the ventilation slot should not be obstructed.
- IMPORTANT: The appliance MUST NOT be connected to your mains supply until all of the steps below have been followed.
- Thoroughly wash all parts of the appliance that will come into contact with ingredients and ice cream (including the fixed bowl, removable bowl, mixing arm and transparent cover).
o Prepare the required recipe ingredients, by following your own recipe or from one contained in this user manual. - Place the prepared ingredients into the removable bowl. IMPORTANT: There is no need to freeze the ingredients prior to placing them inside the ice cream maker. The appliance has a built in compressor which will do this.
○ IMPORTANT: DO NOT fill the removable bowl more than 80% full, as the contents will expand during the cooling process and there is the chance of the bowl overflowing.
- Place the removable bowl inside of the fixed bowl and then place the mixing arm inside of the removable bowl. The mixing arm should just rest inside the centre of the bowl, with the circle side facing upwards.
- Insert the mixing arm into the socket that is found in the base of the motor section. IMPORTANT: You must ensure that the mixing arm is securely fixed into the socket.
- Place the transparent cover on the top of the appliance, making sure that it is firmly fixed in position. Finally make sure that the small lid is securely in place on the transparent cover.
Making ice cream
- Connect your appliance to your mains supply, making sure that the electrical connection information contained in this booklet has been read and followed.
- Press the ON/OFF button and then set the required time by turning the timer dial.
○ A 40 minute time setting will give soft textured ice cream, the default operating time of 50 minutes will give medium textured ice cream and a 60 minute time setting will give hard textured ice cream.
- The LCD display will show the temperature progressively decreasing as the appliance begins to function. It will indicate that it has entered its cooling phase by showing the temperature it's reached.
- When the countdown period ends, the cooling process will end automatically and an audible signal will sound.
- Switch the appliance off using the ON/OFF button and unplug the appliance from your mains supply.
Removal and storage of ice cream

IMPORTANT: Before attempting to remove the ice cream, YOU MUST disconnect the appliance from your mains supply.
- Take out the removable bowl from the fixed bowl.
- The removable bowl should not be used for long term storage of ice cream in a freezer. The maximum time period that the removable bowl should be placed in a freezer for is 30 minutes. If the removable bowl is placed in a freezer for longer than this, it may be damaged.
- If you wish to store the ice cream for longer than 30 minutes, then you should use a plastic scoop or wooden spoon to remove the ice cream. IMPORTANT: DO NOT use a metal scoop or spoon to remove the ice cream; otherwise the removable bowl will get scratched.
Once removed, you should place the ice cream in a plastic, airtight container. We do not recommend that ice cream made in this appliance is stored for a prolonged period. After 1 – 2 weeks, the structure of the ice cream will deteriorate and the fresh taste will be lost. - You should ensure that the freezer is maintaining a temperature of at least -18°.
- You should mark the date that you prepared the ice cream on the lid of the container.
- If you partially or fully defrost the ice cream, then DO NOT refreeze it.
- Thoroughly wash all parts of the appliance that came into contact with the ingredients and ice cream (including the fixed bowl, removable bowl, mixing arm and transparent cover).
Extended cooling function
- After the ice cream making process has completed, if the appliance is not switched off within 10 minutes, then it will enter the extended cooling function.
- The extended cooling function will keep the ice cream frozen and stop it from defrosting.
- The extended cooling function will run for a maximum of 1 hour, after which the appliance will enter stand-by mode. After 1 hour, the ice cream will no longer remain frozen.
Adjusting settings
- If you wish to stop the ice cream making process before the countdown time has elapsed, you should press the ON/OFF button.
- Whilst a countdown time is in progress, it is possible to adjust the countdown time by turning the timer dial to your required setting.
When the appliance has finished a countdown time, if the ice cream is not to your required consistency then it is possible to extend the cooling time. Turn the timer dial to your required additional countdown time.
Installation
Electrical connection (UK only)
- Your ice cream maker comes supplied with a 13 amp plug fitted. If in future you need to change the fuse in this plug, then a 13 amp ASTA approved (BS 1362) fuse must be used.

The wiring in the mains lead is coloured as follows:
Brown- Live
Blue- Neutral
Green and yellow- Earth
- As the colours of the wires in the appliance's mains lead may not correspond with the coloured markings identifying the terminals in your spur box, please proceed as follows:-
The brown wire must be connected to the terminal marked "L" (live), or coloured red.
The blue wire must be connected to the terminal marked "N" (neutral), or coloured black.
The green and yellow wire must be connected to the terminal marked "E" (earth), or by the earth symbol, or coloured green and yellow.
- When the connection is completed, no stray strands or cut wire should be present. The cord clamp must be secured over the outer sheath.
Electrical connection (European countries)
Your ice cream maker comes supplied with a European plug.
- As the colours of the wires in the appliance's mains lead may not correspond with the coloured markings identifying the terminals in your spur box, please proceed as follows:-
The brown wire must be connected to the right hand terminal.
The blue wire must be connected to the left hand terminal.
- When the connection is completed, no stray strands or cut wire should be present. The cord clamp must be secured over the outer sheath.
Positioning
- Your appliance should not be located in direct sunlight or exposed to continuous heat or extremes of temperature (e.g. next to a radiator or boiler). If this is not feasible, then you should install an insulation plate between the appliance and the adjacent heat source.
- You should check whether there is an electrical socket available, which will be accessible after your appliance is installed.
- Place the appliance flatly and firmly on a solid base.
- The appliance MUST have 20 cm of space each side of it and the ventilation slot should not be obstructed.

IMPORTANT: If your appliance appears not to be operating correctly, then you should disconnect it from your mains supply and then contact Baumatic Customer Care on telephone number (0118) 933 6911 for guidance.
* If you are not based in the UK, then please refer to the telephone number for the relevant Baumatic country on the next page for guidance.
DO NOT ATTEMPT TO REPAIR THE APPLIANCE YOURSELF.
IMPORTANT: Baumatic Ltd. operates a policy of continuous improvement and reserves the right to adjust and modify its products without prior notification.
Baumatic®
United Kingdom
Baumatic Ltd., Baumatic Buildings, 6 Bennet Road, Reading, Berkshire RG2 0QX United Kingdom
Sales Telephone
(0118) 933 6900
Sales Fax
(0118) 931 0035
Customer Care Telephone
(0118) 933 6911
Customer Care Fax
(0118) 986 9124
Spares Telephone
(01235) 437244
Advice Line Telephone
(0118) 933 6933
E-mail:
sales@baumatic.co.uk customercare@baumatic.co.uk spares@baumatic.co.uk technical@baumatic.co.uk
Website:
www.baumatic.co.uk
Republic of Ireland
Service Telephone
1-890 812 724
Spares Telephone
091 756 771
Czech Republic
- GELATO1SS 1.5 Litre freestanding automatic ice cream and sorbet maker
- INSTRUCTION MANUAL
- USER MANUAL FOR YOUR BAUMATIC
- GELATO1SS
- Litre freestanding automatic ice cream and sorbet maker
- Contents
- Environmental note
- Important safety information
- Use of the appliance
- Before using your appliance
- Refrigerant
- Child safety
- General safety
- Service
- Specifications of your GELATO1SS
- Congratulations on purchasing a Baumatic ice cream maker
- Dimensions of appliance
- Description of the appliance
- Using your Baumatic ice cream maker
- Before switching on
- Prior to making ice cream
- Making ice cream
- Removal and storage of ice cream
- IMPORTANT: Before attempting to remove the ice cream, YOU MUST disconnect the appliance from your mains supply.
- Extended cooling function
- Adjusting settings
- Installation
- Electrical connection (UK only)
- Electrical connection (European countries)
- Positioning
- Baumatic®
- United Kingdom
- Sales Telephone
- Sales Fax
- Customer Care Telephone
- Customer Care Fax
- Spares Telephone
- Advice Line Telephone
- E-mail:
- Website:
- Republic of Ireland
- Service Telephone
- Czech Republic
Brand : BAUMATIC
Model : GELATO1SS
Category : Ice machine