
GOY 105 TXT - Washing machine CANDY - Free user manual and instructions
Find the device manual for free GOY 105 TXT CANDY in PDF.
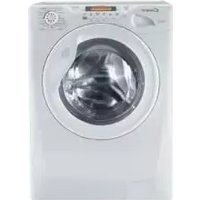


| Product Type | Washing Machine |
| Brand | Candy |
| Model | GOY 105 TXT |
| Load Capacity | 10 kg |
| Spin Speed | 1050 rpm |
| Energy Class | A+++ |
| Dimensions (H x W x D) | 85 x 60 x 55 cm |
| Weight | 70 kg |
| Power Consumption | 2000 W |
| Water Consumption | 50 L per cycle |
| Noise Level (Wash/Spin) | 56 / 76 dB |
| Functions | Delay start, Quick wash, Eco wash, Anti-allergy |
| Drum Material | Stainless steel |
| Control | Electronic display |
| Safety | Child lock, Overflow protection |
| Maintenance | Clean pump filter regularly, descale monthly |
| Spare Parts | Drum bearings, door seal, control board |
| Reparability | Easy access to main components |
| General | Free user manual download available |
Frequently Asked Questions - GOY 105 TXT CANDY
User questions about GOY 105 TXT CANDY
0 question about this device. Answer the ones you know or ask your own.
Ask a new question about this device
Download the instructions for your Washing machine in PDF format for free! Find your manual GOY 105 TXT - CANDY and take your electronic device back in hand. On this page are published all the documents necessary for the use of your device. GOY 105 TXT by CANDY.
USER MANUAL GOY 105 TXT CANDY




Quick Start
Washing


WARNING!
Loading Laundry
WARNING!
WARNING!
With the purchase of this Candy household appliance, you have shown that you will not accept compromises: you want only the best.
Candy is happy to present their new washing machine, the result of years of research and market experience through direct contact with consumers.

You have chosen the quality, durability and high performance that this washing machine offers.
Candy is also able to offer a vast range of other household appliances: washing machines, dishwashers, washer-dryers, cookers, microwave ovens, traditional ovens and hobs, refrigerators and freezers.
Ask your local retailer for the complete catalogue of Candy products.
Please read this booklet carefully as it provides important guidelines for safe installation, use and maintenance and some useful advice for best results when using your washing machine.
Keep this booklet in a safe place for further consultation.
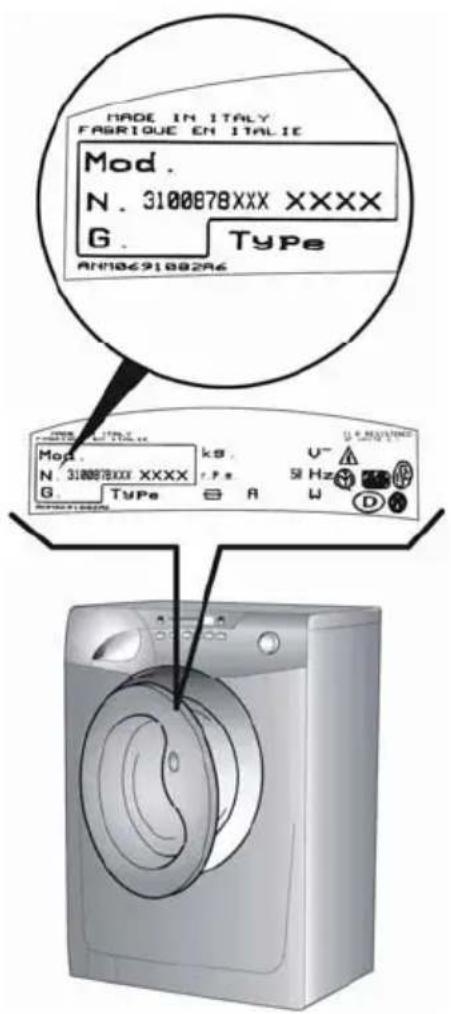
When contacting Candy or a Customer Services Centre always refer to the Model, No., and G number (if applicable) of the appliance (see panel).
Contents Page
Preface 42
General delivery notes 42
Technical data 43
Safety notes 44
Quick start 46
Useful advice for the users 46
Installation 47
Water supply 47
When using your new Infotext for the first time 49
A detailed guide around your Infotext menu 51
Description of controls 54
Detergents, washing aids and amounts to use 62
Program selector 64
Main wash 66
Table of programs 70
Cleaning and routine maintenance 72
Transporting and storing the appliance for long periods when the appliance is not in use 73
Troubleshooting 74
Customer service 75
Before switching on the appliance, make sure it is correctly installed and that the transit brackets are removed as shown in the chapter "Installation".
Preface
Read these instructions for use and all other information enclosed with the washing machine and act accordingly.
Keep all documentation for future reference or for any future owners.
Note: this machine is solely for domestic use.
Notes on disposal
All packaging material used is environmentally-friendly and recyclable. Please help dispose of the packaging via environmentally-friendly means.
Your supplier or local council will be able to give you details of current means of disposal.
Appliances which are finished with are not worthless rubbish! Valuable materials can be salvaged via scrap reprocessing.
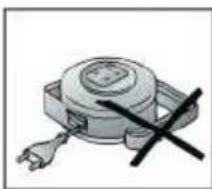
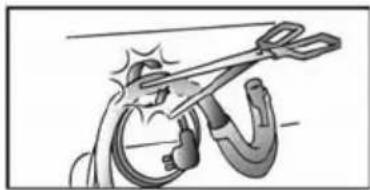
Note: pull out the mains plug from appliances which are finished with. Cut the power cable and dispose of it, together with the plug.
When disposing of an old washing machine, please ensure that the porthole lock is rendered inoperable to prevent children shutting themselves in the appliance.
General delivery notes
On delivery, check that the following items are included with the appliance:
- Instruction manual;
- Customer service addresses;
- Guarantee certificates;
- Caps;
- Bend for outlet tube;
- Filling hose
and check that no damage has occurred during transit. If any damage is found, call your nearest Authorized Technical Support Service agent (see Customer Service).
Technical data
Maximum wash load dry kg 5
Supply voltage V 220-240
Power input W 1850
Energy consumption (prog. 90°C) kWh 1.8
Power current fuse amp A 10
Normal water level L 6...15
Water pressure
MPa
min. 0.05
max. 0.8
SPIN r.p.m. 1000
NB: For specifications regarding electrical data, see the data panel on the front of the washing machine (porthole area).
CE Appliance complies with European Directives 73/23/EEC and 89/336/EEC, replaced by 2006/95/EC and 2004/108/EC, and subsequent amendments.
Electricity supply and safety advice
Washing machines are supplied to operate at a voltage of 220-240V, 50 Hz single-phase.
Check that the conductor is powerful enough to supply at least 3.0 kW, then connect the plug to a 10A earthed socket.
After installation, the appliance must be positioned so that the plug is accessible.
Check that the electricity supply to your home has an earthing system.
The socket in your home and the plug on the appliance must be of the same type.
It is generally not advisable to use multiple adapters and/or extension leads.
All Candy washing machines comply with the safety requirements laid down by the Quality Trademark Institute.
Safety notes
Note: for any cleaning or maintenance procedure for the washing machine:
a. Pull out the plug;
b. Candy equips all its appliances with earthing. Ensure that the mains supply is earthed, and if it is not, seek assistance from a qualified person.
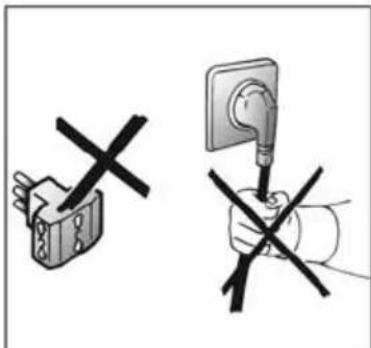
c. Do not use adaptors or multiple plugs;
d. Do not pull the power cable or the appliance itself to remove the plug from the socket.


e. Do not allow children or unauthorised persons to use the appliance without supervision;
f. The appliance must not be exposed to weather conditions (rain, direct sun, etc...);
g. When moving the appliance never lift it by the controls or by the detergent drawer.
When in transit never rest the porthole against the trolley;
h. The appliance should be lifted by two people.
i. After the machine has been installed, ensure that the mains plug and water supply valves are easily accessible.
j. Extreme care should be taken if extension leads are used in bathrooms or shower rooms. Avoid this where possible.
k. Turn off the water inlet tap;

I. Do not touch the appliance when hands or feet are wet or damp. Do not use the appliance with bare feet;

m. Check there is no water left in the drum before opening the door;
WARNING!
During the washing cycle, the water can reach a temperature of 90°C.


n. Glass fibre curtains should never be put into this machine;
N.B! If the appliance is installed on a carpeted floor ensure that the ventilation holes on the sheet are not obstructed.
o. Lint or fluff must not be allowed to collect on the floor around the outside of this machine; p. Always ensure that the door locked indicator neon has switched itself off before opening the door. By doing so the machine is allowed to cool down before the laundry is handled; q. Always ensure that the base panel is fitted to the machine. r. If the appliance is not running properly or breaks down, switch it off, turn off the tap and do not tamper with the appliance.
Consult only the Authorised Technical Support Service for possible repair and ask them to use original spare parts.
Failure to comply with the above can compromise the safety of the appliance.
If the appliance's power cable should ever need replacing, consult the Authorised Technical Support Service.
Quick Start
Washing
- Press the button inside the door handle to open the door.
- Select laundry and put it in the machine.
- Close the door.
- Put detergent in the dispenser compartments, compartment 1 for pre wash and compartment 2 for all other programs.
- Select program by turning the program knob (Your desired program may be seen on the display).
- Adjust the wash temperature if necessary.
- Select any function buttons required and then press the Start/Pause button (▶III). – There may be a short time delay from pressing the start/pause button to the start of the program, while the machine senses the water required and sets the parameters for the program.
When the program has finished
– The display will read "DOOR LOCKED-WAIT TO OPEN". - After 2 minutes the display will read "PROGRAM ENDED - DOOR OPEN". - Switch off the machine by turning the control knob to the off position. - Open the door and remove the laundry.
Disconnect the plug from the mains power supply and turn off the water supply after every use.
Useful advice for users
Tips on using your domestic appliance in the most environmentally-friendly and economical way.
Do a full load in your washing machine.
To prevent any possible waste of energy, water or detergent we recommend that you put a full load in your washing machine, not exceed the maximum load size.
Save up to 50% energy by washing a full load instead of 2 half loads.
When is prewashing really needed?
Only with particularly dirty loads! Energy savings of 5 to 15% are made by not selecting the prewash option for normally soiled laundry.
Which wash temperature should you choose?
Using stain removers before machine washing reduces the need to wash at temperatures over 60°C. Energy savings of up to 50% can be made by using a 60°C wash temperature.
Installation
After removing the machine from the packaging, proceed as follows:
On the back of the machine:
1) Carefully cut the securing strap that holds the main cord and the drain hose. 2) Fix the sheet of corrugated material on the bottom as it is shown in the picture. You can find the fastener means in the instruction booklet pack.
N.B! If the appliance is installed on a carpeted floor, ensure that the ventilation holes on the sheet are not obstructed.
3) Remove the 4 fixing screws marked (A) and remove the 4 spacers marked (B). 4) Cover the 4 holes using the caps provided in the instruction booklet pack.


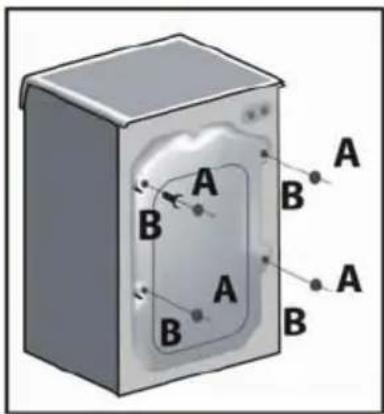
Note: we recommend you keep the spacers and screws to immobilize the machine for future transit. The manufacturers will not be responsible for any possible damage to the machine caused by not following the rules relating to releasing the mechanism. The user is responsible for all costs of installation.
WARNING!
Do not leave the packaging in the reach of children as it is a potential source of danger.
Use the 4 feet to level the machine with the floor: a) Turn the nut clockwise to release the screw adjuster of the foot. b) Rotate the foot to raise or lower it until it stands firmly on the ground. c) Lock the foot in position by turning the nut anti-clockwise until it comes up against the bottom of the machine.
Water supply
The machine has an inlet hose with 3/4" threaded ferrules fitted to the ends to attach between the threaded connector on the appliance and the cold water supply.
The appliance must be connected to the water mains using new hose-sets. The old hose-sets should not be reused.
The appliance must only be connected to the cold water supply.
Connection to a warm water supply, that is over 40°, may damage certain delicate fabrics.
Note: it is advisable to turn off the tap after each wash to isolate the washing machine from the water supply.
If the inlet hose's connection point is changed, check that the 3/4'' threaded ferrule on the inlet hose is firmly attached to the electrovalve connector.


For the washing machine to function properly the terminal end of the discharge hose (mouth) must be at a minimum of 50 cm and a maximum of 85 cm from the ground.

When using your new Infotext for the first time
A quick guide around your Candy Infotext menu:
Connect product up to the electric / water supplies and drainage (see "Water supply").
Select any wash program. After a short time a message will be displayed:
accurate time can be reset later.
this is displayed if prog. 1 is selected.
Prior to entering the Infotext pre set, remember time is limited while you decide on your options (30 sec. / section). If you run out of time start from this point again.
Hold down at the same time the (°C Temp.) and (×按钮) buttons for 5 sec. until screen changes to:
SET CONTRAST
to adjust contrast, press the (x100) button.
Press (°C Temp. This confirm and enters an option)
ADOPT LANGUAGE ENGLISH
Your washing machine is automatically set to English.
Press (°C Temp.)
SET NEW TIME hh:
To change hours, press (x100) until correct.
Press (°C Temp.)
SET NEW TIME mm:
To change minutes, press ( ) until correct.
Press (°C Temp.)
SET TIME MODE ABSOLUTE
If RELATIVE is displayed, press (x100) (this changes a menu option).
Press (°C Temp.)
SET FINAL BEEP YES
If NO is displayed, press (x).
Press (°C Temp.)
ENABLE MEMORY ? YES
If NO is displayed, press the (x)100 button.
Press (°C Temp.
SET DEMO MODE ? NO
Always select NO. If YES is displayed, press (x100).
Press (°C Temp.
EXIT MENU? YES
If NO is displayed, press the ( ) button.
Press (°C Temp.
| 12 | COTTON«1:50» | 90 |
The machine reverts back to the wash program selected.
You are now able to select any wash program. You can, if you wish, also set a delay start. Where more detailed information is required, refer to the relevant section from the following pages.
A detailed guide around your Infotext menu
This machine will operate prior to programming the Infotext set up. However, this machine has Start Delay and Program End functions, and for these functions to work efficiently, the Infotext set must be programmed. This is a simple operation, and special care has been taken during manufacture to ensure that the user can operate this machine simply and effectively.
Programming the machine
Infotext needs to be programmed so that the correct clock setting, language, and personal requirements are set. When the machine is turned on and the program dial is moved away from the “off” position to the program selections, a welcome message will appear.
WELCOME
00.00
This message is displayed for a short time while the machine recognizes which program has been selected. When the machine is ready, the program details will appear on the display and from here you may now begin programming the machine.
Example
| 12 | COTTON《1:50》 | 90 |
Enter the Menu
Prior to entering the Infotext menu please note you have 30 seconds per operation to make your selection. Should you run out of time the display will return to the start screen, and you simply have to re-enter the Infotext menu and continue with the programming.
From this stage the menu can be programmed. Hold down the (°C Temp.) and the (× button) together for 5 seconds or until the beep sounds.
The menu options can be changed by pressing the (x100) button.
To confirm and enter an option press the (°C) button.
Set Contrast
To adjust contrast, press the (x100) button.
The contrast level will decrease to a minimum level for each push of the button and then increase to the maximum level.
To enter your selection press the (°C Temp.) button and the display will then show if you wish to "Set the language".
Setting the language
Your washing machine is automatically set to English. If you require another language (it is this language you will read when utilizing the machine) follow this procedure:
Scroll through the language options by pressing the (x100) button until you reach the language of your choice.
Release the (°) button and press the ( ) button to enter your selection.
When you have entered your chosen language, the display will then ask for the "New time" to be set.
Set New Time
This function needs to be set for two reasons: firstly to display the current time of day on the screen and secondly for the program end/delay start settings to work correctly.
You will notice in the display window that the hours on the clock will be flashing.
Set the hours by continually pressing the (x100) button and then press the (°C) button to enter the hour.
Next the minutes on the clock will begin to flash, again press the (x100) button until the required minutes are displayed and press (°C Temp) to input the selection.
When you have Set the New Time, the display will then ask if you wish to "Setting the time mode".
Setting the time mode
There are two ways to select the time mode.
The first is if you wish program end or delay start to be programmed by starting the actual time you want the program to end or begin, e.g., program to end 18.00. This is called Absolute Time Mode.
When utilising the program end function (or start delay), an example can be seen below when the Absolute Time Mode has been selected in the menu set-up stage.
PROGRAM END
AT 18:00
Therefore, when setting the Program end time, the program (as shown above) will end at 18.00. The second option is if you wish the program end time or delay start to be programmed by adding hours; e.g., program to end in 1 1/2 hours. This is called Relative Time Mode.
When utilizing the program end function (or start delay), an example can be seen below when the Relative Time Mode has been selected in the menu set-up stage.
PROGRAM END
IN 1H 30M
Both options are very useful, but we feel that the Absolute Time Mode will be more beneficial and easier to use since there will be no need to calculate how many hours you will need to leave before you want the machine to end or start.
On reaching the set time mode, you will be asked if you would like to select "Relative" time or - by scrolling through using the (x100) button - "Absolute" time.
Enter the preferred setting by pressing the (°C) Temp.) button.
When you have entered your preferred time-mode, the display will then ask for the Enable Final Beeping to be set.
Enable Final Beeping
Here you have the option to have a beeping alarm to let you know the wash cycle has finished.
By pressing the (x100) button you can scroll through the "yes" and "no" options.
To enter your selection press the (°C Temp.) button and the screen will then move to the next stage and ask you to "Enable memory"
Enable Memory
This is a useful feature if you frequently wash laundry using the same program.
Selecting "Enable Memory" will tell the machine to remember the last program/functions used and set them in the memory. This function works only on cottons, delicates, synthetics and woolens program. The memory does not retain settings within the special program group.
Select "Yes" or "No" to this option by using the (x100) and (°P) buttons to input the selection.
The display will then show a message asking if you require demo mode to be set.
Demo mode (default setting - NO)
Please set this option to "No" if not done so already - as this is for SERVICE use only. If the demo mode option is not set to "NO" when exiting the infotext menu, the wash program WILL NOT commence. Demo Mode must be set to "NO" for the wash cycle to commence. On entering "No" via the (°C Temp.) button, you will then be asked if you wish to "Exit Menu".
Exit Menu
If you are happy with the settings you have selected, you can now exit the menu by selecting "Yes" via the (x100) and (°P) buttons.
However, if you are not happy with any of the settings selected, you must select "No" to the exit menu command and you can then commence the programming from the beginning.
By pressing the (°C Temp.) button, you are able to enter and bypass each option individually until you reach the option you would like to re-set.
When you are completely satisfied with your menu selection, you may exit the menu and testing of the installation may now commence.
If, after the initial installation, you may want to change any of the menu at a later date, again run through the menu options from the beginning and change the options you want to reset.
This may be useful to change the "Set New Time" when the clocks go forward or back.
Once set, the menu options will remain in the memory of the machine even if the machine is unplugged or if a power cut occurs.
Description of controls
Program Selector Dial A
Crease guard Button E
"Aquaplus" button F
Pre-wash Button G
Select Spin H
"Wash Temperature" button I
Buttons indicator light M
Display INFOTEXT N
Door Handle O
Detergent Drawer P
Description of controls
All of the buttons and dials on the washing machine control panel are listed below.
When you have selected the desired program and any option buttons, the information you have selected will appear on the screen in the Infotext.
When programs and option buttons are compatible a bleeping sound will be heard and the light above the option button selected remain illuminated. If you select an option button that is not compatible with the program you require, a buzzing sound will be heard and the button light will not illuminate. To select an option button press it once; to deselect an option button, press it again.
Carefully read the relevant descriptions detailed below:
Program Selector Dial A
Rotates in both directions
When you turn the program selector dial and after the welcome message has disappeared, you will see a display showing the following details:
Reading from left to right:
- The spin speed
- The program name
- The wash temperature
Example
| 12 | COTTON 90 |
Start/Pause Button


START
To start a program press this button once.
The machine will now be sensing the wash load and ask you to please wait.
Example
PLEASE WAIT SET PARAMETERS
The Infotext panel will then display the time to complete the program and then the wash cycle will commence. Infotext calculates the time to the end of the selected program based upon a standard 6 Kg load, during the cycle, Infotext corrects the time to that applicable to the size and composition of the load.
Example
| 12 | END: 1H:50M WASHING | 90 |
PAUSE
The program may be paused at any time during the wash cycle by holding down the Start/Pause button for about 3 seconds and a beep will sound. A message will appear on the display to inform you that the program has been paused.
Example
| 12 | PAUSED PROGRAM DOOR LOCKED | 90 |
If you wish to add or remove items during washing, wait 2 minutes until the safety device unlocks the door.
Example
| 12 | PAUSED PROGRAMDOOR OPEN | 90 |
To restart the program press the Start/Pause button once again. The display will inform you that the program will continue.
CANCEL A PROGRAM
To cancel the program turn the program selector dial to the "OFF" position and then select a different program. The display will inform you that the program has been cancelled.
Example
CANCELLED PROGR.
Return the program selector dial to the "OFF" position.
"DEGREE OF SOILING" button
C
By selecting this button (active only on COTTON and MIXED FIBRES programs) there is a choice of 3 levels of wash intensity, depending on how much the fabrics are soiled.
Once the program and wash temperature have been selected the degree of soiling indicator is automatically set to the minimum allowed; pressing the button increases the level and the settings for the cycle duration are also adjusted accordingly.
The 3 levels of wash intensity shown in the display are:


Set Program Delay start/End Time
D
The program end time/delay start options can be used if you want the washing to be ready at a later time (but within 24 hours).
1. Set delay start
Press delay start/set end time button once and press the hours and minutes buttons (to the left and right) until the required time is set. The display returns to the program option if the button is pressed within 5 seconds.
Press the start button.
To cancel delay start, hold down the button for 5 seconds.
2. Program end time
Press delay start/set end time button twice and press the hours and minutes buttons (to the left and right) until the required time is set. When entering the program end option, the display will show the minimum time which you can set the program to end by. This time may only be extended as you require.
NOTE: When using the delay start/set end time functions, only use detergents and laundry also via the dispenser drawer. Adding detergents etc. to the drum and then leaving them to stand for long period of time may damage your laundry.
Crease guard Button

The Crease Guard function (Not available on COTTON programs) minimizes creases as much as possible with a uniquely designed anti-crease system that is tailored to specific fabrics.
MIXED FABRICS - the water is gradually cooled throughout the final two rinses with no spinning and then a delicate spin assures the maximum relaxation of the fabrics.
DELICATE FABRICS – final two rinses with no spinning and then the fabrics are left in water until it is time to unload. When you are ready to unload, press the "Crease Guard" button – this will drain.
WOLLENS/HAND WASH – after the final rinse the fabrics are left in water until it is time to unload and the button indicator blinking.
When you are ready to unload, press the "Crease Guard" button, this will drain and spin ready for emptying.
If you do not want to spin the clothes and activate drain only:
- Turn the program selector to the "OFF" position;
- Select program drain only ↓;
- Switch on the appliance again by pressing the "Start/Pause" button.
"Aquaplus" button

By pressing this button you can activate a special new wash cycle in the Cotton and Mixed Fabrics programs, thanks to the new Sensor Activa System. This option treats with care the fibres of garments and the delicate skin of those who wear them.
The load is washed in a much larger quantity of water and this, together with the new combined action of the drum rotation cycles, where water is filled and emptied, will give you garments which have been cleaned and rinsed to perfection. The amount of water in the wash is increased so that the detergent dissolves perfectly, ensuring an efficient cleaning action. The amount of water is also increased during the rinse procedure so as to remove all traces of detergent from the fibres. This function has been specifically designed for people with delicate and sensitive skin, for whom even a very small amount of detergent can cause irritation or allergy.
You are advised to also use this function for children's clothing and for delicate fabrics in general, or when washing garments made of towelling, where the fibres tend to absorb a greater quantity of detergent. To ensure the best performance for your wash, this function is always activated on the Delicates and Woollens programs.
Pre-wash Button"
P F
This option is particularly useful for heavily soiled loads and can be used only on some programs as shown in the programs table.
Detergent for this program should be added to the compartment of the soap drawer labelled “1” (Please refer to Detergent Drawer Section of manual). We recommend you use only 20% of the recommended quantities shown on the detergent pack and fabric conditioner should not be used for this program.
Select Spin
x100 H
On selecting the wash program, the display will inform you of the maximum spin speed permitted for that program. By repeatedly pressing the select spin button, the speed will decrease by increments of 100 rpm. The minimum speed permitted is 400 rpm, or by continuously pressing the select spin option, the spin may be cancelled if desired.
Note: this model is fitted with an electronic “sensor” device that checks that the load is balanced correctly. If the load is slightly unbalanced, the machine will re-balance it automatically to then carry out the normal spin.
If, after several attempts, balance is not restored, a reduced spin speed will be used. If loads are seriously unbalanced, the spin stage will be cancelled.
This helps limit vibration, reduce noise, and improve the washing machine's reliability and life.
"Wash Temperature" button
°C Temp. I
The Wash Temperature button allows a reduction in the wash temperature in each program.
Each time the button is pressed, the temperature decreases by 10°C until a minimum of 15°C (cold wash).
Note: The temperature must be adjusted before selecting DEGREE OF SOILING.
Buttons indicator light
M
The indicator light buttons will light when specific options are selected.
Display "INFOTEXT" N
Door Handle O
Press the button inside the door handle to open the door.
Door open: A special safety device prevents the door from being opened immediately after the end of the cycle. Wait for 2 minutes after the wash cycle has finished before opening the door. The display will read "DOOR OPEN" and the door may be opened. As a safety measure, check that there is no water evident in the drum.
Detergent drawer P
The detergent drawer is split into 3 compartments:
- The compartment labelled "1" is for prewash detergent;
- The compartment labelled "💡" is for special additives, fabric softeners, fragrances, starch, brighteners, etc.;
- The compartment labelled "2" is for main wash detergent.

NOTE:
Some detergents are difficult to use. Ensure to use an in-drum dispenser if recommended by the detergent manufacturer.

NOTE: Only put liquid products in the compartment labelled "♣". The machine is programmed to automatically take up additives during the final rinse stage for all wash cycles.
Detergents, washing aids, and amounts to use
Choice of detergent
General purpose detergents
- Powder detergents, for a thorough wash, with bleaching agent, particularly suitable for use in hot wash programs (60°C and over), for heavily soiled and stained laundry. – Liquid detergents, particularly suitable for grease stains, such as greasy skin marks, cosmetics, and oil. – These detergents are not suitable for washing stained laundry, as they do not contain bleach. – Biological detergents, not all the products available give a really thorough wash.
Special detergents
- Detergents for coloureds and delicates, without added bleach, also often without any optical brightening agents, to preserve the colour.
- Detergents for a thorough wash, without added bleach or enzymes, particularly suitable for handling woollen fibres.
- Detergents for curtains with optical brightening agents, resistant to light, to prevent yellowing from sunlight.
- Special detergents for programmed use of chemical substances, depending on fabric type, degree of soiling and water hardness. Here basic detergents, softeners, bleaches/stain removers can be added separately.
Additional laundry aids
– Water softener, means less detergent can be used where water hardness is classed as hard to very hard. - Prewash substances, for the programmed treatment of stains prior to the main wash. Using them means the subsequent wash can be at a low temperature or with bleach-free detergents. - Fabric softener, prevents static build-up in synthetic fabrics and softens fabrics. If you own a tumble dryer, clothes are softened even without the use of a fabric softener.
Do not put solvents in the washing machine!
Keep detergents and other laundry products out of children's reach.
Before pouring in the detergent check that there are no foreign bodies in the detergent drawer.
Dosage details are usually shown on the detergent packaging. Follow those instructions.
Dosages
Only use detergents which are suitable for use in a washing machine.
You will obtain the best results from your wash with the minimum use of chemical products and the best care for your laundry if you take into consideration the degree of soiling as well as the type of detergent to choose.
The amount of detergent to use depends on:
- water hardness, depending on the hardness of the water and the type of detergent used, it is possible to reduce the amount of detergent. – the degree of soiling, it is possible to reduce the amount of detergent used depending on the degree of soiling. – amount of laundry, it is possible to reduce the amount of detergent when washing only a small amount of laundry.
The amounts shown on pack for detergents for washing delicates often already refer to a reduced wash size.
Follow the dosage instructions!
Dosage for powder detergent
For normal and low concentration detergents: for normally soiled laundry choose a program without prewash.
Put the detergent in compartment 2 of the drawer.
For heavily soiled laundry, choose a program with prewash.
Put 1/4 of the detergent in compartment 1, 3/4 in compartment 2 of the drawer.
When using water softeners, first put in the detergent, then add the softener to compartment 2.
For highly concentrated detergents not in single dose format, follow what is shown on pack exactly as regards type and amount of dosage.
To avoid the difficulty of checking if the detergent has been taken up, use the dosage aids provided in the detergent packaging.
Liquid detergent dosage
Liquid detergents may be used in accordance with the instructions on the relevant packaging, for all programs without prewash, by using the special container which is placed in the drum or, for those models that have it, in the special insert for liquid detergents.
Program selector
For the various types of fabrics and various degrees of dirt the washing machine has 4 different program bands according to: wash cycle, temperature and length of cycle (see table of washing cycle programs).
| TABELLA PROGRAMMI | ||||
| PROGRAMMA PER: | SELEZIONE PUNTATORE MANOPOLA PROGRAMMI 6U | CARICO MAX kg | TEMP. °C | C |
| I | ||||
| Tessuti resistentiolone, line, conapa | Cotone resistente - 90 | 5 | Fixo a: 90° | (●) |
| Apoa, matt resistenti | Colorato- 60 | 5 | Fixo a: 60° | (●) |
| Cotone, matt | Delicateu- 40 | 5 | Fixo a: 40° | (●) |
| Tessuti resistenti | AA 40°C - 40 | 5 | Fixo a: 40° | |
| (●) | ||||
1. Resistant fabrics
The programs have been designed for a maximum wash and the rinses, with spin intervals, ensure perfect rinsing.
The final spin gives more efficient removal of water.
2. Mixed and synthetic fabrics
The main wash and the rinse give best results thanks to the rotation rhythms
of the drum and to the water levels.
A gentle spin will mean that the fabrics become less creased.
3. Special delicate fibres
This is a new wash cycle which alternates washing and soaking and is particularly recommended for very delicate fabrics.
The wash cycle and rinses are carried out with high water levels to ensure best results.
4. Special programs
Special "RINSE" program
This program carries out three rinses with an intermediate spin (which can be reduced or excluded by using the correct button). It can be used for rinsing any type of fabric, e.g. use after hand-washing.
Special "FAST SPIN" program
Program "FAST SPIN" carries out a maximum spin (which can be reduced by using the correct button).
Drain only
This program drains out the water.


"32 MINUTE" rapid program
The 32 minute rapid program allows a complete washing cycle to be carried out in approximately 30 minutes, with up to a maximum load of 2 kg and a temperature of 40°C.
When selecting the "32 minute rapid" program, please note that we recommend you use only 20% of the recommended quantities shown on the detergent pack.
Special program "HAND WASH"
This washing machine also has a gentle Hand Wash program cycle. This program allows a complete washing cycle for garments specified as “Hand Wash only” on the fabric care label. The program has a temperature of 30°C and concludes with 3 rinses and a slow spin.
Special program WOOLMARK

The special cycle, certified by WOOLMARK, enables to thoroughly wash garments without damaging them. The cycle comprises of alternate periods of activity and pauses. The program has a maximum temperature of 40° and concludes with 3 rinses and a short spin.
"MIX & WASH SYSTEM" PROGRAM
This is an exclusive Candy system and involves 2 great advantages for the consumer:
- to be able to wash together different type of fabrics (e.g. cotton + synthetic etc...) NON-FAST COLOUREDS;
- to wash with a considerable energy saving.
The "Mix & Wash" program has a temperature of 40°C and alternate dynamic phases (the basket that turns) to static phases (fabrics in soak in phase of rest) with a duration program that almost reaching the 3 hours.
The energy consumption for the complete cycle is only 850 W/h.




Important:
- the first washing of new coloureds fabrics must be done separately;
- In every case, never mix fast-coloured fabrics.
Main wash
Auto half load
The washing machine is fitted with a self-adjusting water level system.
This system enables the machine to use the amount of water needed to wash and rinse the laundry in relation to the particular load.
This results in a reduction of the water and electricity used, without in any way compromising the washing and rinsing performance.
In fact, the amount of water and electricity used will always be appropriate for the clothes load.
The washing machine automatically ensures excellent washing results at minimum cost whilst respecting the environment.
Sorting the laundry
- It is recommended you wash only items which are washable with water and detergent and not dry-clean items.
- If you need to wash rugs, bedspreads or other heavy items, it is best not to spin them.
- Sort the laundry according to fabric type, degree of soiling and wash temperature: follow the labelling on the garments.
Laundry for hot wash 95 Coloured, easy-care materials Delicates and wool 40


- Items labelled with the following symbols are not suitable for machine washing:
Dry clean

Do not wash

For very delicate items, such as net curtains, underwear, tights, etc., you are advised to use a laundry net or wash bag.
- Woollen items must be labelled with the «Pure New Wool» symbol to be washed in the machine ⚪, and must also be labelled «non-matting» or «machine washable». – Colour often leaks from new coloured items.
This can then colour other lighter items being washed.
We therefore recommend that coloured items should be washed for the first time separately.
For future washes, colourfast items can only be washed with white laundry up to 40°C.
Note:
when sorting laundry
- check there are no metal objects in the laundry (such as paper clips, safety pins, pins, coins, etc.);
- in the event of a machine failure during the warranty period and foreign objects are found to be the cause of the failure, a labour charge may be made for the call out of an engineer;
- button up pillowcases, fasten zips, hook & eye fasteners, belts and long dressing gown cords;
- remove curtain hooks;
- pay close attention to the labels on items;
- if you notice stubborn stains whilst sorting the laundry, remove them using a special detergent or a special stain remover.

We recommend that you do not do a full load of just towelling items as these become too heavy since they absorb a lot of water, and may become too heavy for the drum.
The correct way to wash
Preparing the laundry
A) Select and sort the laundry according to the wash care labels found on each garment. Always check the care labels.
Loading the laundry
B) Open the door.
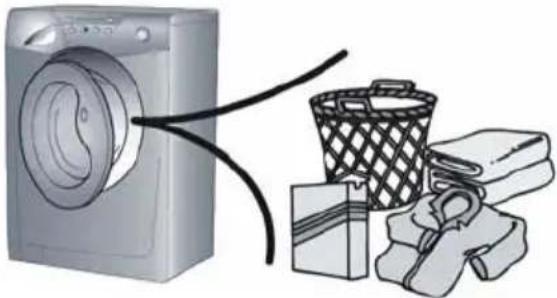
C) Put the laundry in the washing machine.
Close the door again, ensuring that no items of laundry are obstructing the lock, or door seal.
Putting detergent in machine
D) Open the drawer, choose the detergent and put in the correct amount, according to the manufacturer's instructions and the advice on page "Detergents, washing aids and amounts to use".
E) Add any other laundry aids.
F) Close the drawer again.
Liquid detergents that are to be placed directly into the drum should use the recommended dispensing device.

Selecting the wash program
Refer to the program guide to select the most suitable program.
The program is selected by turning the program selector clockwise and aligning the program number with the indicator.
Check that the tap is turned on and that the discharge hose is positioned correctly.
Adjust the wash temperature if necessary.
Press additional function buttons if you require.
Press the start button, the program will begin.

When the program has finished
- The display will read "DOOR LOCKED-WAIT TO OPEN".
- After 2 minutes the display will read "PROGRAM ENDED - DOOR OPEN".
- Switch off the machine by turning the control knob to the off position.
- Open the door and remove the laundry.
Disconnect the plug from the mains power supply and turn off the water supply after every use.
Table of programs
| PROGRAM FOR:2 | PROGRAM SELECTOR ON: | DISPLAY INFOTEXT | WEIGHT MAX, kg | TEMP., °C | CHARGE DETERGENT | ||||
| 1 | |||||||||
| Resistant fabricsCotton, linen | 1)  | COTTON 5 | Up to: 90° | ● | ● | (·) | |||
| Cotton, mixed resistant, Coloureds | 1)  | COTTON 5 | Up to: 60° | ● | ● | (·) | |||
| Mixed fabrics and syntheticsCotton, mixed fabrics, synthetics | 1)  | SYNTHETICS | 2,5 | Up to: 60° | ● | ● | (·) | ||
| Very delicate fabrics |  | ACRYLICS | 1,5 | Up to: 40° | ● | ● | |||
| Rinse |  | RINSES ONLY | - - | ● | |||||
| Fast spin |  | SPIN ONLY | - | - | |||||
| Drain only |  | DRAIN ONLY | - | - | |||||
| "Rapid 32 MINUTE" |  | DAILY FAST 32' | 2 | Up to: 40° | ● | ● | |||
| "HAND WASH" |  | HAND WASH | 1 | Up to: 30° | ● | ● | |||
| "MACHINE WASHABLE" woollens |  | WOOLLENS | 1 | Up to: 40° | ● | ● | |||
| "MIX & WASH SYSTEM" pro-gram |  | MIX & WASH | 5 | Up to: 40° | ● | ● | |||

Please read these notes!
When washing heavily soiled laundry it is recommended the load is reduced to 3 kg maximum.
** Program tested in accordance with CENELEC EN 60456 with the maximum Degree of Soiling selected.
Program also recommended for low-temperature washes (lower than the max. shown).
The spin speed may also be reduced to match any guidelines suggested on the fabric label, or for very delicate fabrics, the spin can be cancelled completely. This option is available with the spin speed button.
(●) Only with the Pre-wash button selected. (Programs with Pre-wash button available).
- Pressing the wash temperature button makes it possible to wash at any temperature below the maximum allowed.
1) For the programs shown, you can adjust the duration and intensity of the wash using the degree of soiling button.
![graph TD A["OFF"] --> B["MIX & WASH"] B --> C["32"] C --> D["↓"] D --> E["End"]](/content/2026/05/1002972/images/55b000494834a951aa1f86596da25b7398154a8594f5ce14d4427bbc89532e63.jpg)
Cleaning and routine maintenance
Do not use alcohol-based scourers and/or thinners on the outside of your washing machine; just a wipe with a damp cloth will suffice. The washing machine needs very little maintenance:
– Cleaning the drawer compartments; - Cleaning the filter.
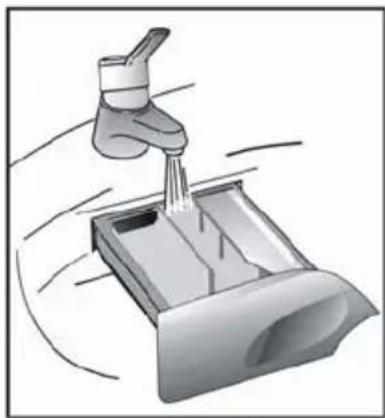
Cleaning the drawer compartments
Even if it is not strictly necessary, it is good to clean the compartments for bleaching detergents and additives occasionally.
A. To do this, you just need to pull them out firmly, but without forcing them; B. Clean everything in the compartment under running water; C. Put everything back in its proper place.
Filter cleaning
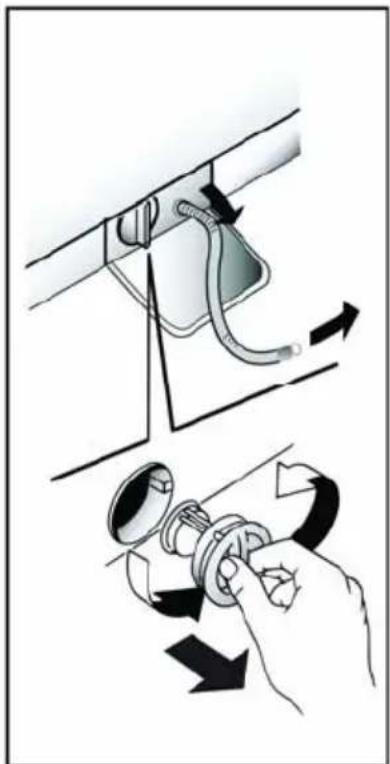
The washing machine is equipped with a special filter to retain large foreign matter which could clog up the drain, such as coins, buttons, etc. These can, therefore, easily be recovered. The procedures for cleaning the filter are as follows:
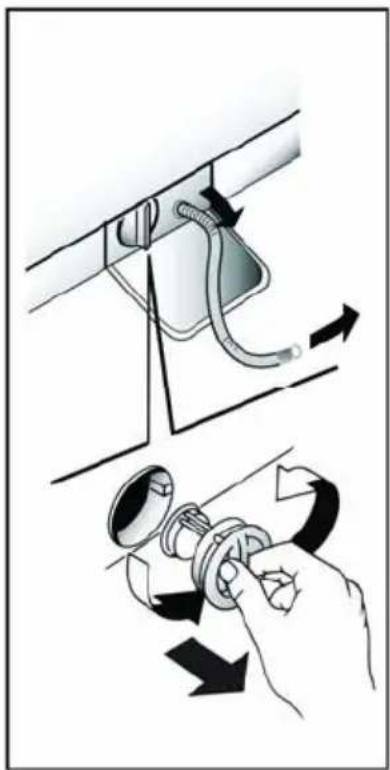
A. Open the flap; B. Only available on certain models: Pull out the corrugated hose, remove the stopper and drain the water into a container. C. Before removing the filter, place an absorbent towel below the filter cap to collect the small amount of water likely to be inside the pump; D. Turn the filter anticlockwise till it stops in vertical position. Remove and clean.
E. After cleaning, replace by turning the notch on the end of the filter clockwise. Then follow all procedures described above in reverse order.
Transporting and storing the appliance for long periods when the appliance is not in use
If the appliance is being transported or is out of use for long periods in unheated places, all remaining water must be completely removed from all hoses.
Ensure mains power is off, then unclip the hose and point it downwards into a basin until all the water has emptied out. When finished, repeat the operation in the reverse order.

Troubleshooting
What might be the cause of...
Defects you can remedy yourself
Before calling GIAS Service for technical advice, please run through the following checklist. A charge will be made if the machine is found to be working or has been installed incorrectly or used incorrectly. If the problem persists after completing the recommended checks, please call the GIAS Service; they may be able to assist you over the telephone.
| FAULT | CAUSE | REMEDY |
| 1. Does not function on any program | Plug not in socket.Not switched on.Power failure. Check and refer to “Power Failure” section.Fuse blown. Check.Door open.RCD tripped (trip switch)Has the Delay start been set. | Plug it in.Turn on mains switcher Fail-ure” section.Close door.Reset RCD.Check. |
| 2. Does not load water | See cause 1. Check.Water supply turned off. Turn on waterProgram selector not correctly posi-tioned. | supply.Position program selector correctly. |
| 3. Does not discharge water | Kink in discharge hose. Straighten dischForeign bodies in filter Examine filter.The machine has been plumbed in incorrectly. | charge hose.Check installation. |
| 4. Water on floor around washing machine | Leaking gasket between tap and water inlet hose.Strand of clothing or dirt between door rubber gasket and door glass.Incorrect plumbing. Check plumbing. | Replace gasket and tighten con- nection.Re-load the machine and keep rubber door gasket/door glass clean. |
| 5. Does not spin | Water has not yet drained away. Wait a “Spin Cancel” option selected (certain models only).Unbalanced load. | few minutes for machine to empty.Check.Rearrange load evenly. |
| 6. Machine vibrates a lot during spin | Washing machine not completely level.Load not distributed evenly.Transit brackets not removed. | Adjust the special adjustable feet.Rearrange the laundry evenly.Remove transit brackets (see installation section). |
| 7. Door will not open | Two minutes have not elapsed since the program finished. | Wait two minutes. |
| 7. Display reads error0, 1, 5, 7, 8, 9 | - | Call service. |
| 8. Display reads error 2 | No water fill. | Check water supplies are on. |
| 9. Display reads error 3 | No pump out. | Check drain is clear.Check drain hose is not kinked. |
| 10. Display reads error 4 | Machine overfilled with water. | Turn off water supply to machine.Call service. |
It is unlikely that water will be visible in the drum!
This is due to the latest technology that achieves the same standard of washing and rinsing but with far less water consumption.
Note:
The use of environmentally-friendly, phosphate-free detergents (check detergent information on pack) can have the following effects:
- Waste water from rinsing may be cloudier because of the presence of a white powder (zeolites) held in suspension, without the rinse performance being adversely affected.
- Presence of white powder on laundry after washing, which is not absorbed by the fabric and does not alter the colour of the fabric.
- The presence of foam in the final rinsing water is not necessarily an indication of poor rinsing.
- Carrying out more rinse cycles does not serve any purpose in such cases.
Customer Service
The appliance is covered by a certificate of guarantee which allows you free use of the Candy Technical Support Service. Remember to send off the guarantee certificate for validation within 10 days of the date of purchase.
You should retain the receipt issued by the retailer when you purchased the machine to show to the call out engineer, should you need to consult one.
If your washing machine shows signs of a defect or is not working properly, before you contact GIAS Service we recommend you carry out the checks detailed on page 100 within the Trouble shooting section.
If the problem with the machine persists after completing all the recommended checks, please dial the GIAS Service number on the rear cover of this manual.
For the cost of a telephone call, you will be connected directly to GIAS. It is important you tell the GIAS advisor your product's model number and serial number, which you will find on the rating label (16 characters, beginning with the number 3), found on the front of the washing machine (door area). By doing this, your enquiry will be responded to more efficiently.

This appliance is marked according to the European directive 2002/96/EC on Waste Electrical and Electronic Equipment (WEEE)
By ensuring this product is disposed of correctly, you will help prevent potential negative consequences for the environment and human health, which could otherwise be caused by inappropriate waste handling of this product.
The symbol on the product indicates that this product may not be treated as household waste. Instead it shall be handed over to the applicable collection point for the recycling of electrical and electronic equipment Disposal must be carried out in accordance with local environmental regulations for waste disposal.
For more detailed information about treatment, recovery and recycling of this product, please contact your local city office, your household waste disposal service or the shop where you purchased the product.
The manufacturer declines all responsibility in the event of any printing mistakes in this booklet. The manufacturer also reserves the right to make appropriate modifications to its products without changing the essential characteristics.


- QUICK START
- WASHING
- WARNING
- LOADING LAUNDRY
- CONTENTS PAGE
- PREFACE
- NOTES ON DISPOSAL
- GENERAL DELIVERY NOTES
- ELECTRICITY SUPPLY AND SAFETY ADVICE
- SAFETY NOTES
- WHEN THE PROGRAM HAS FINISHED
- USEFUL ADVICE FOR USERS
- WHEN IS PREWASHING REALLY NEEDED
- WHICH WASH TEMPERATURE SHOULD YOU CHOOSE
- INSTALLATION
- WATER SUPPLY
- WHEN USING YOUR NEW INFOTEXT FOR THE FIRST TIME
- A QUICK GUIDE AROUND YOUR CANDY INFOTEXT MENU
- SET CONTRAST
- ADOPT LANGUAGE ENGLISH
- SET NEW TIME HH
- SET NEW TIME MM
- SET TIME MODE ABSOLUTE
- SET FINAL BEEP YES
- ENABLE MEMORY ? YES
- SET DEMO MODE ? NO
- EXIT MENU? YES
- A DETAILED GUIDE AROUND YOUR INFOTEXT MENU
- PROGRAMMING THE MACHINE
- WELCOME
- EXAMPLE
- ENTER THE MENU
- SETTING THE LANGUAGE
- SET NEW TIME
- SETTING THE TIME MODE
- PROGRAM END
- AT
- IN 1H 30M
- ENABLE FINAL BEEPING
- ENABLE MEMORY
- DEMO MODE (DEFAULT SETTING - NO)
- EXIT MENU
- DESCRIPTION OF CONTROLS
- PROGRAM SELECTOR DIAL A
- ROTATES IN BOTH DIRECTIONS
- START/PAUSE BUTTON
- START
- PLEASE WAIT SET PARAMETERS
- PAUSE
- CANCEL A PROGRAM
- CANCELLED PROGR
- DEGREE OF SOILING" BUTTON
- SET PROGRAM DELAY START/END TIME
- SET DELAY START
- PROGRAM END TIME
- CREASE GUARD BUTTON
- AQUAPLUS" BUTTON
- PRE-WASH BUTTON
- P F
- SELECT SPIN
- X100 H
- WASH TEMPERATURE" BUTTON
- °C TEMP. I
- BUTTONS INDICATOR LIGHT
- DOOR HANDLE O
- DETERGENT DRAWER P
- NOTE
- DETERGENTS, WASHING AIDS, AND AMOUNTS TO USE
- CHOICE OF DETERGENT
- GENERAL PURPOSE DETERGENTS
- SPECIAL DETERGENTS
- ADDITIONAL LAUNDRY AIDS
- DO NOT PUT SOLVENTS IN THE WASHING MACHINE
- DOSAGES
- DOSAGE FOR POWDER DETERGENT
- LIQUID DETERGENT DOSAGE
- PROGRAM SELECTOR
- RESISTANT FABRICS
- MIXED AND SYNTHETIC FABRICS
- SPECIAL DELICATE FIBRES
- SPECIAL PROGRAMS
- SPECIAL "RINSE" PROGRAM
- SPECIAL "FAST SPIN" PROGRAM
- DRAIN ONLY
- MINUTE" RAPID PROGRAM
- SPECIAL PROGRAM "HAND WASH
- SPECIAL PROGRAM WOOLMARK
- MIX & WASH SYSTEM" PROGRAM
- IMPORTANT
- MAIN WASH
- AUTO HALF LOAD
- SORTING THE LAUNDRY
- WHEN SORTING LAUNDRY
- THE CORRECT WAY TO WASH
- PREPARING THE LAUNDRY
- LOADING THE LAUNDRY
- PUTTING DETERGENT IN MACHINE
- SELECTING THE WASH PROGRAM
- PLEASE READ THESE NOTES
- CLEANING AND ROUTINE MAINTENANCE
- CLEANING THE DRAWER COMPARTMENTS
- FILTER CLEANING
- TRANSPORTING AND STORING THE APPLIANCE FOR LONG PERIODS WHEN THE APPLIANCE IS NOT IN USE
- TROUBLESHOOTING
- DEFECTS YOU CAN REMEDY YOURSELF
- CUSTOMER SERVICE
Brand : CANDY
Model : GOY 105 TXT
Category : Washing machine