DuoClean Powered Lift-Away NZ801ANZ - Vacuum Cleaner SHARK - Free user manual and instructions
Find the device manual for free DuoClean Powered Lift-Away NZ801ANZ SHARK in PDF.

| Product Type | Upright Vacuum Cleaner with Lift-Away Canister |
| Model | DuoClean Powered Lift-Away NZ801ANZ |
| Brand | Shark |
| Dimensions (L x W x H) | Approx. 12 x 10 x 45 inches (30.5 x 25.4 x 114.3 cm) |
| Weight | 12.5 lbs (5.7 kg) |
| Power | 1200 Watts |
| Dustbin Capacity | 0.9 quarts (0.85 liters) |
| Filtration | HEPA filter with Anti-Allergen Seal |
| Cord Length | 30 feet (9.1 meters) |
| Cleaning Path Width | 11 inches (28 cm) |
| Brush Roll Type | DuoClean dual brush roll technology (soft roller and bristle brush) |
| Lift-Away Mode | Yes, detachable canister for portable cleaning |
| Powered Lift-Away | Yes, motorized brush continues to clean in Lift-Away mode |
| Surface Settings | Bare floor and carpet settings with slider switch |
| Headlights | LED headlights on nozzle |
| Accessories Included | Crevice tool, dusting brush, pet upholstery tool, wide upholstery tool |
| Warranty | 5-year limited warranty |
| Maintenance | Regularly clean filters and empty dustbin; remove hair from brush rolls |
| Safety | Overheat protection; automatic shut-off if brush roll is obstructed |
| Repairability | Replaceable filters, brush rolls, and belts; user-accessible |
Frequently Asked Questions - DuoClean Powered Lift-Away NZ801ANZ SHARK
User questions about DuoClean Powered Lift-Away NZ801ANZ SHARK
0 question about this device. Answer the ones you know or ask your own.
Ask a new question about this device
Download the instructions for your Vacuum Cleaner in PDF format for free! Find your manual DuoClean Powered Lift-Away NZ801ANZ - SHARK and take your electronic device back in hand. On this page are published all the documents necessary for the use of your device. DuoClean Powered Lift-Away NZ801ANZ by SHARK.
USER MANUAL DuoClean Powered Lift-Away NZ801ANZ SHARK
DuoClean™ Powered Lift-Away™ with Self-Cleaning Brushroll Technology
NZ801ANZ
OWNER'S GUIDE
natural_image
Front view of a black Shark vacuum cleaner with attached exhaust pipe (no visible text or symbols)THANK YOU
for purchasing the Shark® DuoClean™ Powered Lift-Away™ with Self-Cleaning Brushroll
REGISTER YOUR PURCHASE
AUS sharkclean.com.au NZ sharkclean.co.nz
AUS 02 8801 7666 NZ 0800 112 660

TIP: You can locate the date code on one of the prongs of the power cord plug.
RECORD THIS INFORMATION
Model Number: ____
Serial Number
Date Code: ____
Date of Purchase (Keep receipt): ____
Store of Purchase: ____
TECHNICAL SPECIFICATIONS
Voltage: 220-240V\~, 50-60Hz
Watts: 750W
PLEASE READ CAREFULLY AND KEEP FOR FUTURE REFERENCE.
This Owner's Guide is designed to help you get a complete understanding of your new Shark® DuoClean™ Powered Lift-Away™ with Anti-Hair-Wrap Technology.
If you have any questions, please call the customer service line at AUS 02 8801 7666 or NZ 0800 112 660.

Important Safety Instructions....3
Getting to Know Your Shark® DuoClean™ Powered Lift-Away™ with Self-Cleaning Brushroll .... 5
Assembling Your Vacuum ....7
Using Your Vacuum in Upright Mode 9
What Does the Brushroll Indicator Light Mean? 9
Using Your Vacuum in Above-Floor Mode 11
The Benefits of Suction Control 11
Using Your Vacuum in Powered Lift-Away Mode 12
Powered Lift-Away Cleaning 12
Lift-Away Cleaning 12
Compatible Accessories....13
Maintenance....15
Emptying the Dust Cup 15
Cleaning the Filters....16
Cleaning the Brushroll....17
Cleaning the Soft Roller....18
Checking the Nozzle for Blockages 18
Troubleshooting Guide....19
Warranty....20
IMPORTANT SAFETY INSTRUCTIONS
This appliance can be used by children aged from 8 years and above and persons with reduced physical, sensory or mental capabilities or lack of experience and knowledge if they have been given supervision or instruction concerning use of the appliance in a safe way and understand the hazards involved. Children shall not play with the appliance. Cleaning and user maintenance shall not be made by children without supervision.
CAUTION: THE MOTORISED FLOOR NOZZLE, WAND, HOSE AND HANDLE CONTAIN ELECTRICAL CONNECTIONS:
• These are not serviceable parts.
• DO NOT use to suck up water.
• DO NOT immerse in water for cleaning.
- The handle/wand and hose should be checked regularly and must not be used if damaged.
1 Inspect power cord and plug for any damage before use. If the supply cord is damaged, it must be replaced by Mann&Noble, its service agent or similarly qualified persons in order to avoid a hazard. DO NOT use vacuum cleaner with a damaged cord or plug. Turn off all controls before plugging in or unplugging the vacuum cleaner. Store your vacuum cleaner with the power cord secured around the two cord hooks.
2 DO NOT use outdoors or on wet surfaces. Use only on dry surfaces.
3 Unplug from electrical socket when not in use and before servicing.
4 If vacuum cleaner is not working as it should, or has been dropped, damaged, left outdoors, or immersed in water, contact Mann&Noble customer service at AU 02 8801 7666, NZ 0800 112 660 for examination, repair, or adjustment.
5 DO NOT pull or carry vacuum cleaner by the cord or use the cord as a handle.
6 DO NOT unplug by pulling on cord. Grasp the plug, NOT the cord.
7 Keep hair, loose clothing, and all parts of the body away from openings and moving parts, such as the brushroll or Pet Power Brush.
8 DO NOT handle plug or vacuum cleaner with wet hands.
9 DO NOT run the vacuum cleaner over the power cord, close a door on the cord, or pull the cord around sharp corners.
10 The use of an extension cord is NOT recommended.
11 DO NOT leave vacuum cleaner unattended when plugged in.
12 Keep cord away from heated surfaces.
GENERAL USE
13 Use only as described in this manual.
14 Keep your work area well lit.
15 Keep the vacuum cleaner moving over the carpet surface at all times to avoid damaging the carpet fibres.
16 DO NOT place vacuum cleaner on unstable surfaces such as chairs or tables.
SAVE THESE INSTRUCTIONS
PLEASE READ CAREFULLY BEFORE USE
17 DO NOT put any objects into openings. DO NOT use with any opening blocked; keep free of dust, lint, hair, and anything that may reduce airflow.
18 DO NOT allow young children to operate the appliance or use as a toy. Close supervision is necessary when any appliance is used near children.
19 DO NOT use unless brushroll, Soft Roller, dust cup, and all filters are in place.
DUST CUP/FILTERS/ACCESSORIES
Before turning on the vacuum:
20 Make sure that all filters are thoroughly dry after routine cleaning.
21 Make sure that dust cup and all filters are in place after routine maintenance.
22 Make sure accessories are free of blockages.
23 Use only Shark® brand filters and accessories. Using other brands will void warranty.
HOSE ATTACHMENTS
24 DO NOT use if airflow is restricted. If the air paths or the motorised floor nozzle become blocked, turn the vacuum cleaner off and unplug from electrical socket. Remove all obstructions before you turn on the unit again.
25 Keep the end of the hose and accessory openings away from face and body.
26 Keep cleaning tools and hose suction openings away from hair, face, fingers, uncovered feet, or loose clothing.
27 Only use manufacturer's recommended attachments.
GENERAL CLEANING
28 DO NOT vacuum up large objects.
29 DO NOT vacuum up hard or sharp objects such as glass, nails, screws, or coins that could damage the vacuum cleaner.
30 DO NOT vacuum up plaster board dust, fireplace ash, or embers.
DO NOT use as an attachment to power tools for dust collection.
31 DO NOT vacuum up smoking or burning objects such as hot coals, cigarette butts, or matches.
32 DO NOT vacuum up flammable or combustible materials (e.g., lighter fluid, petrol, or kerosene) or use vacuum in areas where they may be present.
33 DO NOT vacuum up toxic solutions (e.g., chlorine bleach, ammonia, or drain cleaner).
34 DO NOT use in an enclosed space where vapours are present from paint, paint thinner, moth-proofing substances, flammable dust, or other explosive or toxic materials.
35 DO NOT vacuum up any liquids.
36 DO NOT immerse vacuum cleaner in water or other liquids.
37 Use extra care when cleaning on stairs.
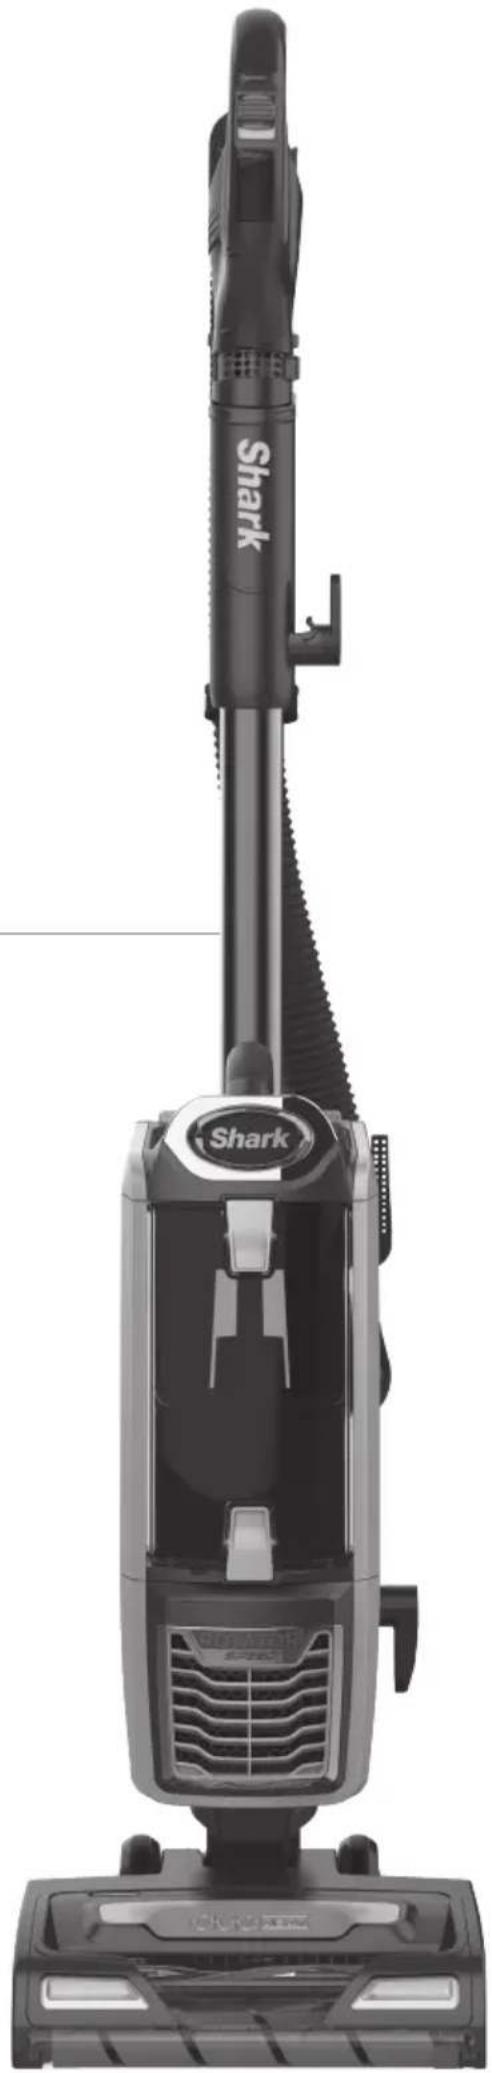
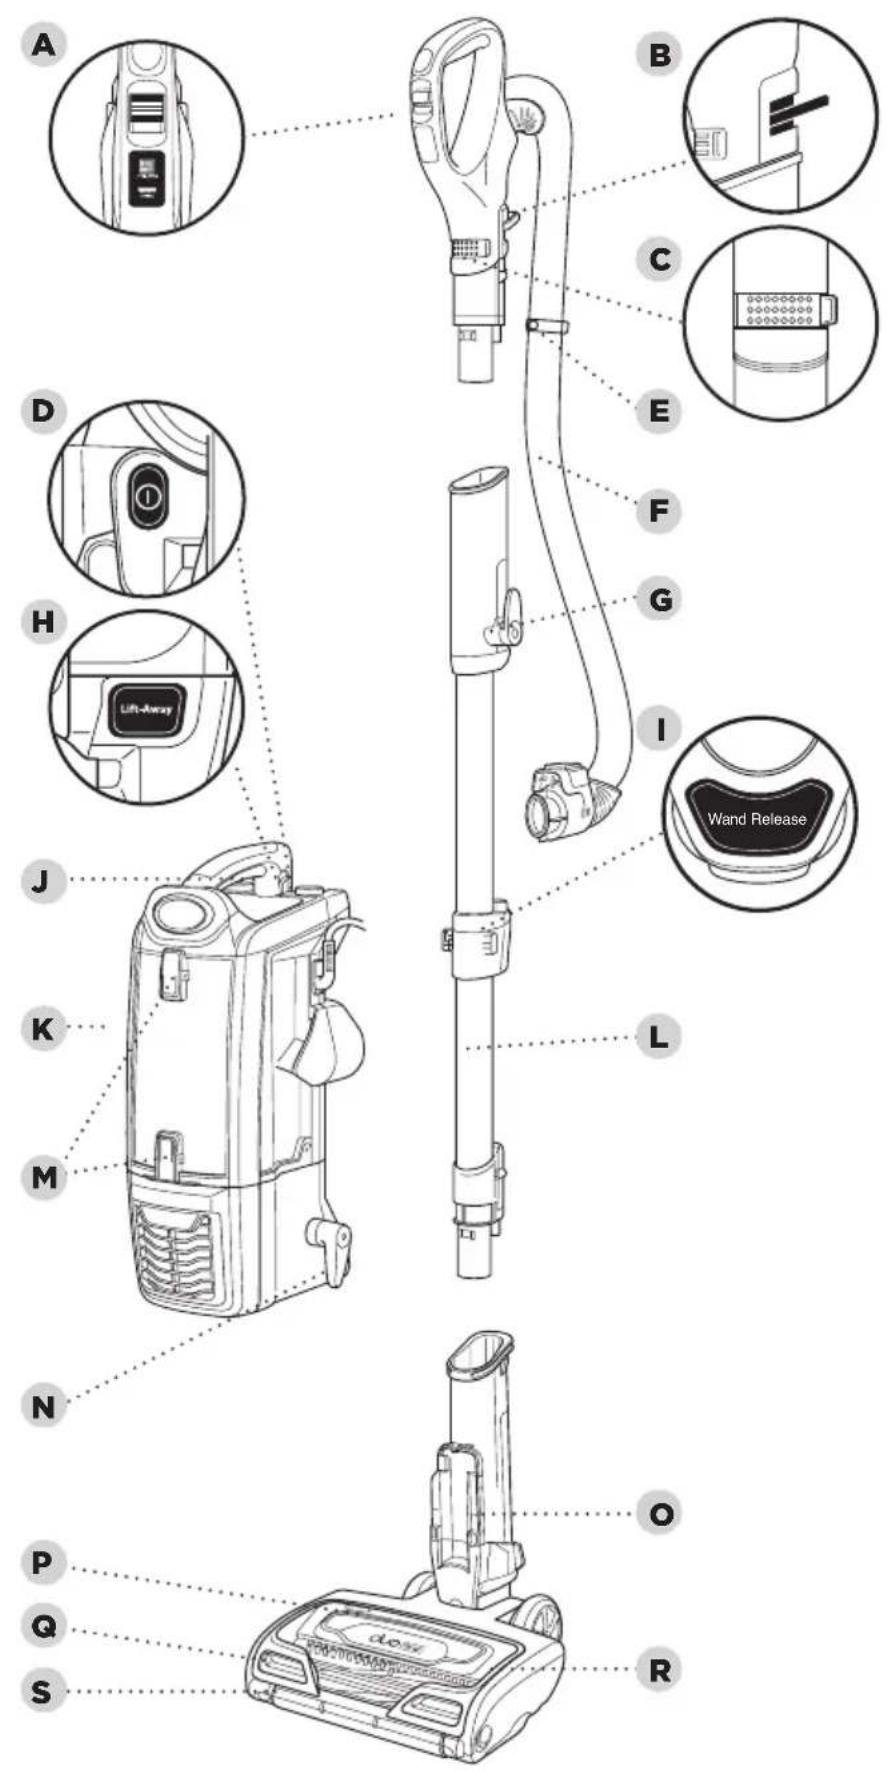
GETTING TO KNOW YOUR SHARK® DUOCLEAN™ POWERED LIFT-AWAY WITH SELF-CLEANING BRUSHROLL TECHNOLOGY
WELCOME!
Congratulations on your purchase. Use this Owner's Manual to learn about your new vacuum's great features. From assembly to use to maintenance, you will find it all in here.
MAIN UNIT
ASurfaceSelector
B Handle Release Latch
c Suction Control Slider
D Power Switch
E Hose Clip
F Hose
G Upper Cord Hook
H Lift-Away® Button
I Wand Release Button
J Dust Cup Release Latch
K Lift-Away Pod
L Wand
M Dust Cup Empty Buttons
N Lower Cord Hook
- Motorised Floor Nozzle
P Brushroll Indicator Light
Q Headlights
R Brushroll Garage
s Soft Roller
text_image
A B C D E F G H L I J K M N O P Q S R Wand Release
TIP: Push hose clip into back of wand for convenience.

natural_image
Pure diagram of a mechanical or electrical component with no text, numbers, or symbols
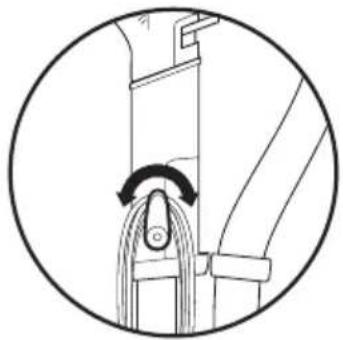
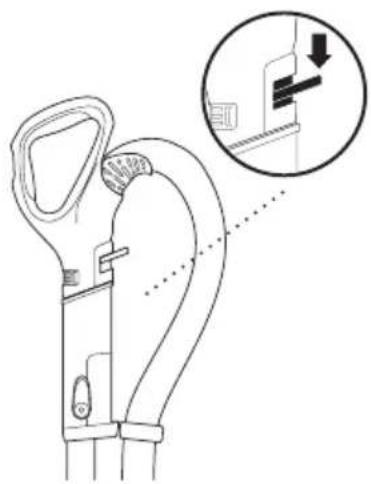
TIP: For quick cord access, rotate upper hook down and remove cord.
natural_image
Diagram of a mechanical device with a curved arrow indicating rotation or force application (no text or symbols present)
TIP: Use cord clip located on the side of wand to hold cord in place while vacuuming.
natural_image
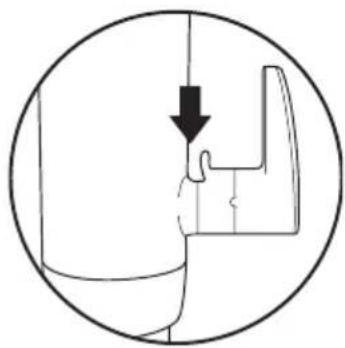
Simple line drawing of a hand pressing down on a device, enclosed in a circle (no text or symbols)STEP 1 STEP 2
natural_image
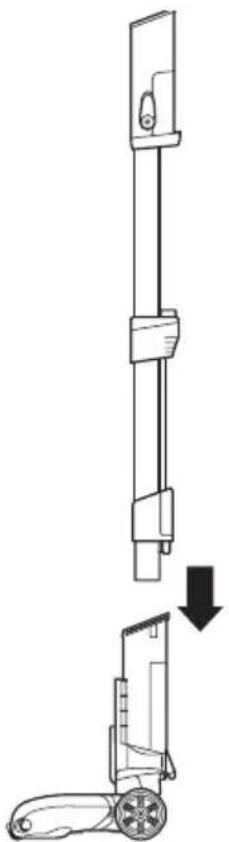
Diagram of a vertical mechanical device with a downward arrow indicating motion or assembly (no text or symbols present)1 Place motorised floor nozzle on floor and insert wand, pressing it in until it clicks securely into place.
natural_image
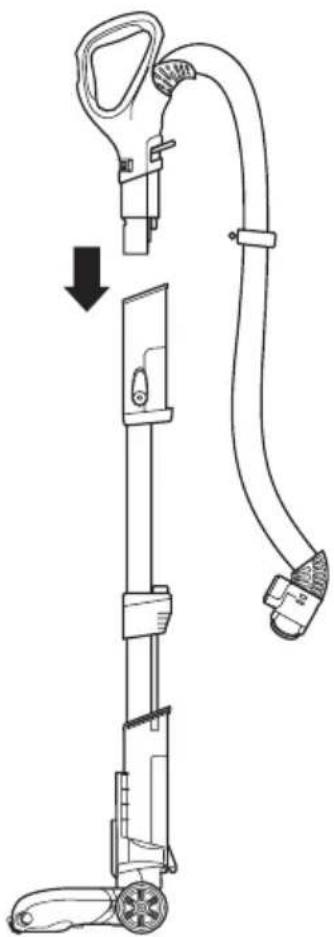
Line drawing of a mobile phone device with a handle and cable, showing a vertical assembly and a downward arrow indicating motion (no text or symbols)2 Insert handle into wand, pressing it in until it clicks securely into place.
STEP 3 STEP 4 STEP 5
natural_image
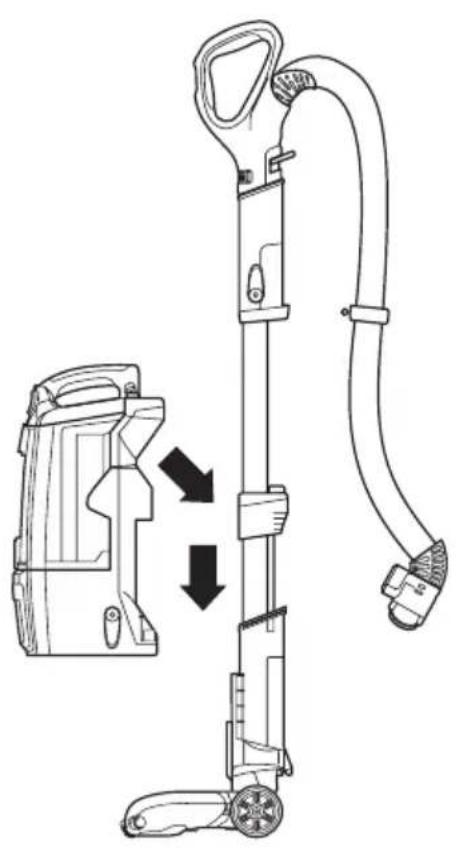
Line drawing of a vacuum cleaner with attached device and mechanical components (no text or symbols)3 Place bottom of pod onto neck of floor nozzle and slide down to connect.
natural_image
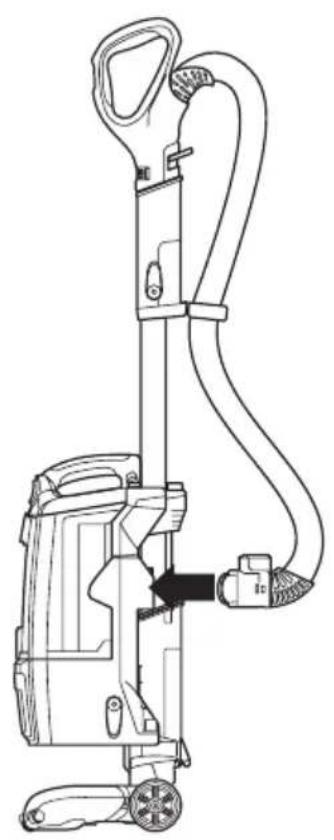
Line drawing of a handheld device with attached cable and adjustment knob (no text or symbols)4 Connect hose into back of pod, pressing it in until it clicks securely into place.
natural_image
Technical line drawing of a vacuum cleaner with attached mechanical components and a separate view showing internal structure (no text or symbols)5 Store included accessories on the accessory posts on the pod.
WHAT DOES THE BRUSHROLL INDICATOR LIGHT MEAN?
Solid Green
The brushrolls are on and working as they should.
SolidRed
There is a jam in the brushroll and/or soft roller area. Turn your vacuum off and remove any blockages.
Flashing Red\*
The motorised floor nozzle is overheating. Turn your vacuum off and wait for it to cool down.
* See Troubleshooting section for further instructions.
No Light
The brushrolls are off because the vacuum is off.
natural_image
Close-up of a car's front panel showing the hood and side profile (no text or symbols)STEP 1
text_image
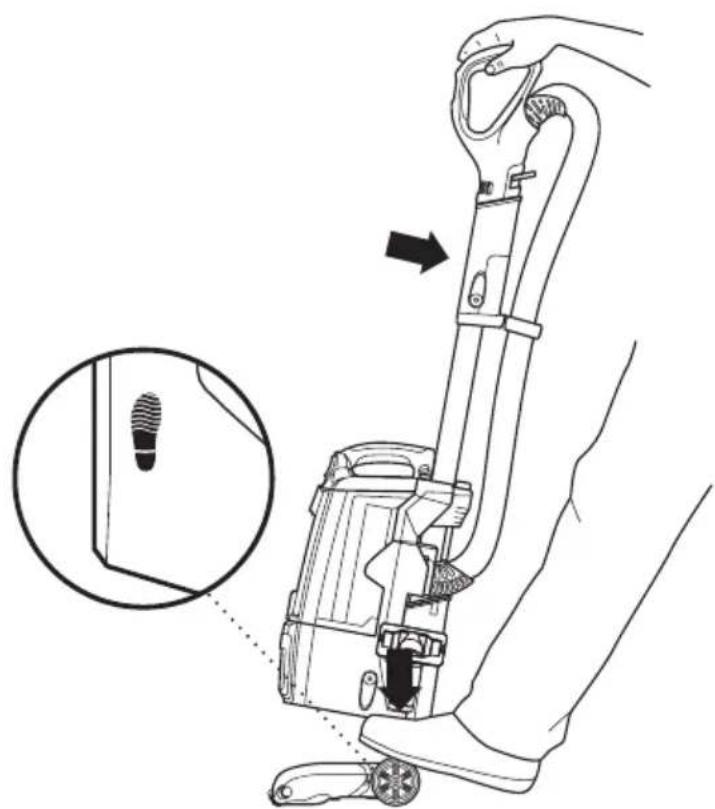
Technical diagram showing a hand operating a vacuum cleaner with an inset close-up of the component's tip and adjustment arrow.1 Plug power cord into socket. Place foot on floor nozzle and tilt handle back.
STEP 2 STEP 3
text_image
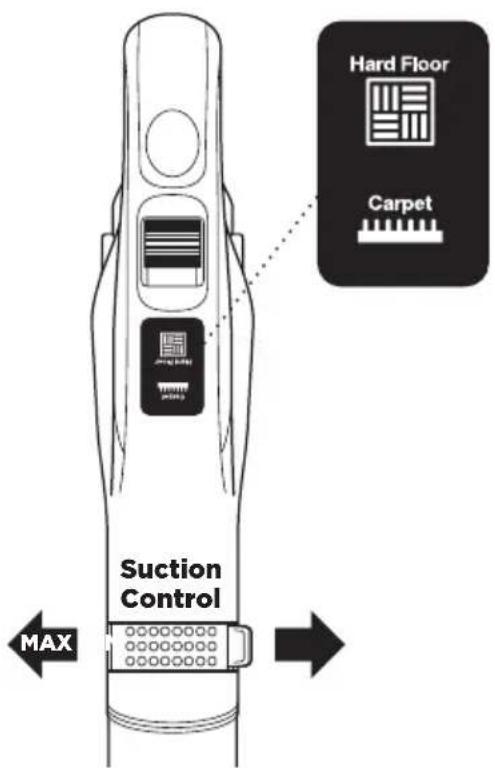
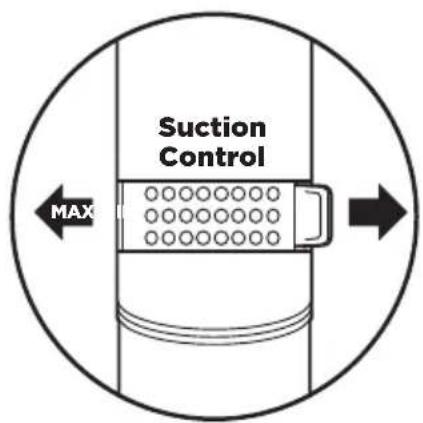
Hard Floor Carpet Suction Control MAX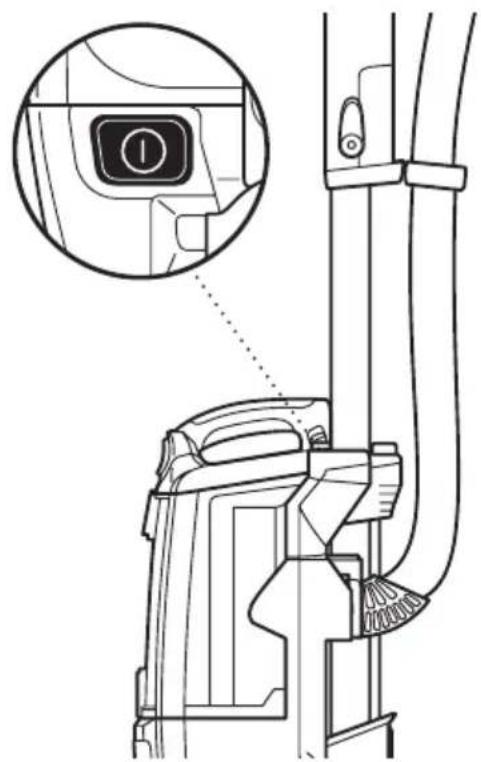
natural_image
Technical line drawing of a mechanical component with an inset close-up showing a labeled component (no text or symbols present)2 In both settings, the Soft Roller spins to pick up dust and debris. Choose the appropriate setting:
HardFloor
The brushrolls spin slowly to pick up fine dust and large debris on hard floors.
Carpet
The brushrolls spin faster to pick up debris on and below the surface of your carpets.
3 Press power button to turn vacuum on to start cleaning. Please note the brushrolls will not spin unless the handle is reclined.

CAUTION: To avoid injury, make sure your footing is stable when using Lift-Away®.
WHAT IS POWERED LIFT-AWAY™?
With Powered Lift-Away, you can remove the pod from the nozzle while maintaining the same power you have in upright mode. This is great for cleaning stairs, under furniture, and in other tight spaces.
STEP 1
text_image
Technical diagram showing a cable clamp mechanism with an inset magnified view highlighting a detail of the component.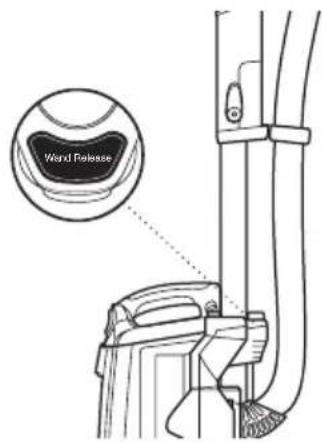
text_image
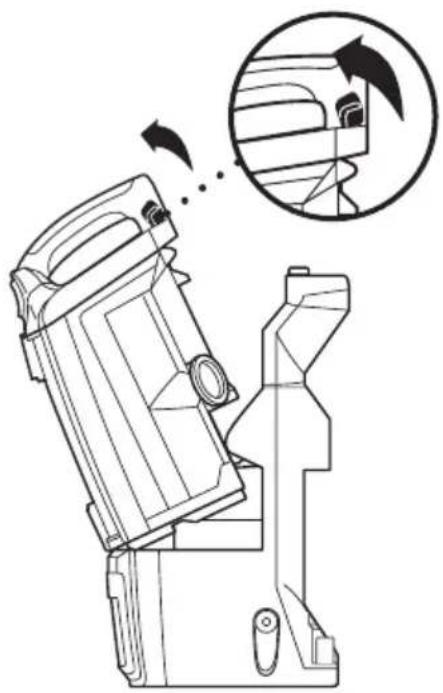
Wand Release1 To detach the handle from the top of the wand, press the handle release latch.
ORTo clean with more reach, press the Wand Release button to detach the wand from the nozzle.
STEP 2
text_image
ORSTEP 3
text_image
Suction Control MAX3 The Suction Control slider allows you to increase or decrease suction as needed. Slide to MIN to reduce suction and increase maneuverability on carpets. Slide to MAX to increase suction on bare floors.
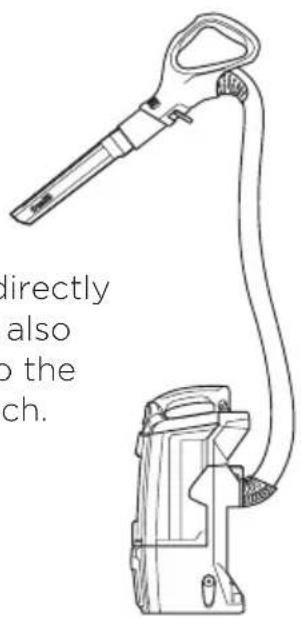
2 Insert a cleaning tool directly onto wand or handle.
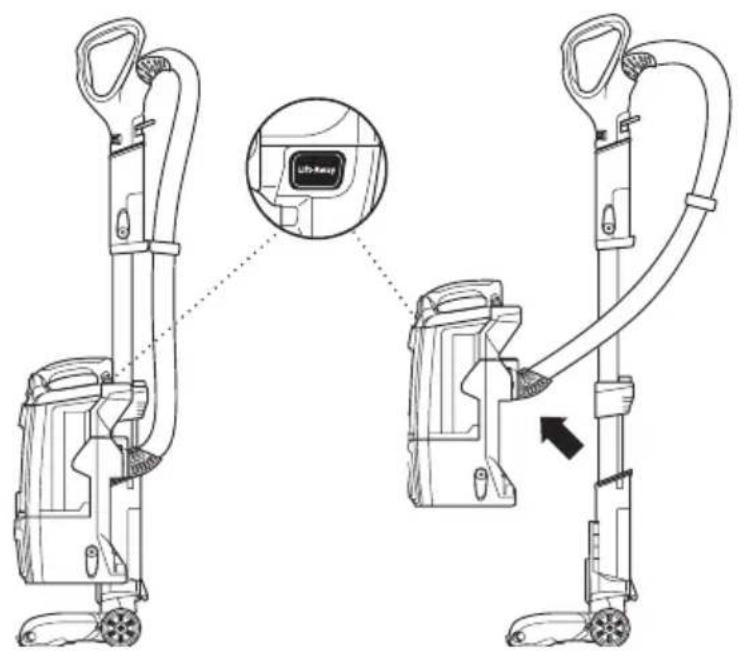
USING YOUR VACUUM IN POWERED LIFT-AWAY MODE
text_image
Diagram showing two views of a vacuum cleaner with labeled components and a magnified inset highlighting the 'Life-Keep' button.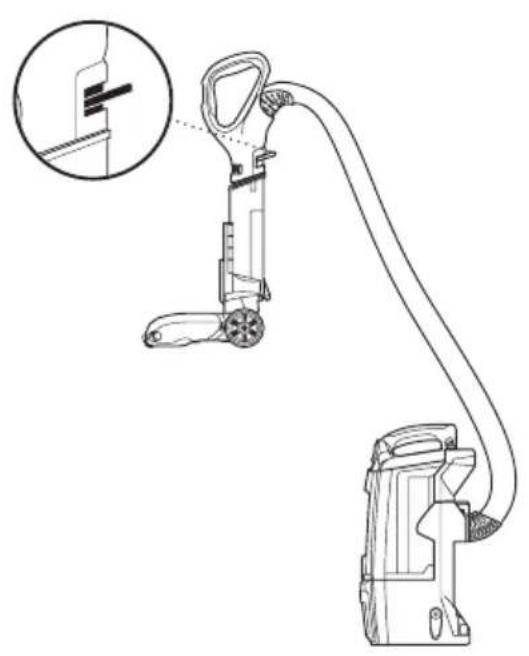
natural_image
Technical line drawing of a handheld device connected to a cable, with an inset showing a close-up detail (no text or symbols)POWERED LIFT-AWAY CLEANING
1 Press Lift-Away® button to lift pod off floor nozzle.
2 For a convenient way to clean stairs, insert handle into motorised floor nozzle.
LIFT-AWAY CLEANING
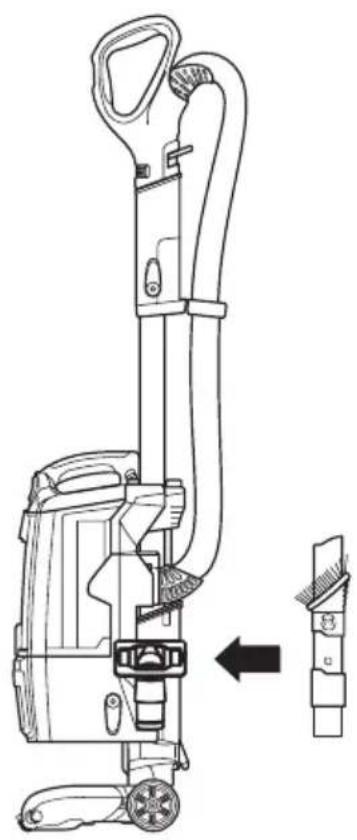
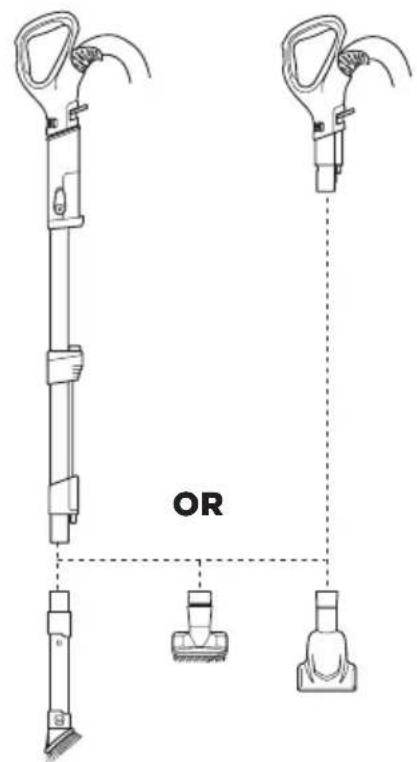
1 Attach a cleaning tool directly to the handle. You can also attach the accessory to the wand for extended reach.
text_image
directly also to the ch.There are a variety of accessories that are compatible with this vacuum series.
The top flap of your box shows the select accessories that are included with your model.
To purchase accessories, visit sharkclean.com.au or sharkclean.co.nz
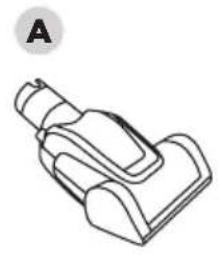
A Pet Power Brush
Removes pet hair and ground-in dirt from carpeted stairs and upholstery.
B Upholstery Tool
Perfect for large-particle pickup, dusting, and removing pet hair and lint from furniture and other upholstered surfaces.
C Duster Crevice Tool
Two cleaning tools in one: the crevice tool gives you extended reach to clean in tight spaces, while the soft brush is ideal for dusting delicate surfaces.
D Crevice Tool
Clean tight spaces and reach skirting boards and ceilings with this slim crevice tool.
E Multi-Angle Dusting Brush
This soft dusting brush adjusts to five different positions so you always have the best angle for cleaning blinds, walls, ceiling fans, and other above-floor areas.
F Under-Appliance Wand
Clean under and behind hard-to-move appliances and furniture with this adjustable 36" tool. Flip the extension piece over to clean the underside of appliances.
G Car Detail Kit
Great for cleaning and dusting crevices including door pockets, dashboards and around controls.
natural_image
Line drawing of a vacuum cleaner device with labeled section A (no text or symbols on the device itself)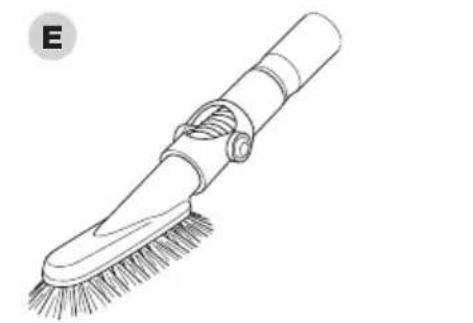
natural_image
Line drawing of a cleaning brush with bristles and handle (no text or symbols)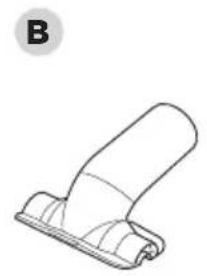
natural_image
Simple line drawing of a mechanical clip or bracket (no text or symbols)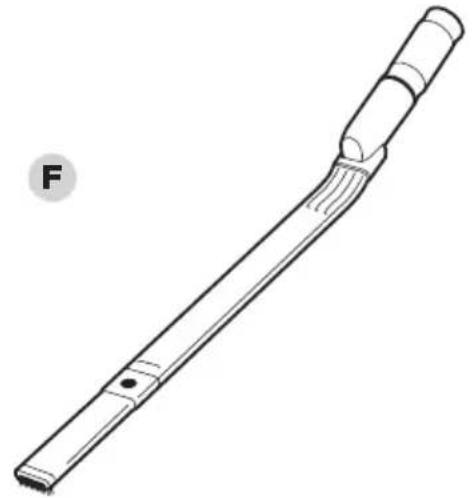
natural_image
Line drawing of a mechanical tool or tool with a curved handle and flange (no text or symbols)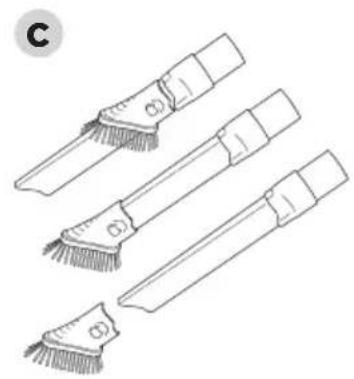
natural_image
Line drawing of four different types of hair clips with bristles, shown in different angles (no text or symbols)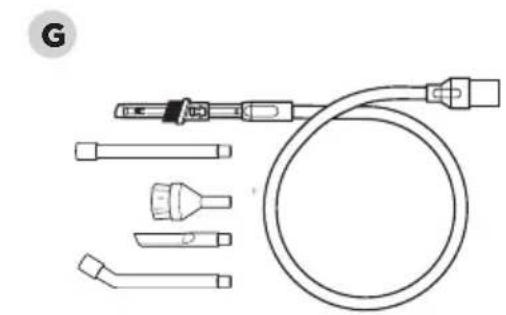
natural_image
Technical line drawing of a medical or laboratory device with tubing, connectors, and a coiled tube (no text or symbols)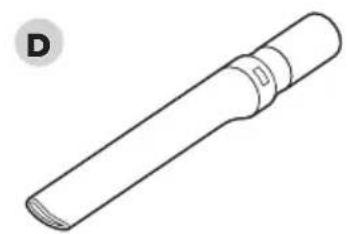
natural_image
Simple line drawing of a cylindrical object with a flanged end, labeled 'D' in the top-left corner (no text or symbols on the object itself)STEP 1 STEP 2
WARNING: To reduce the risk of shock and unintended operation, turn power off and unplug unit before servicing.
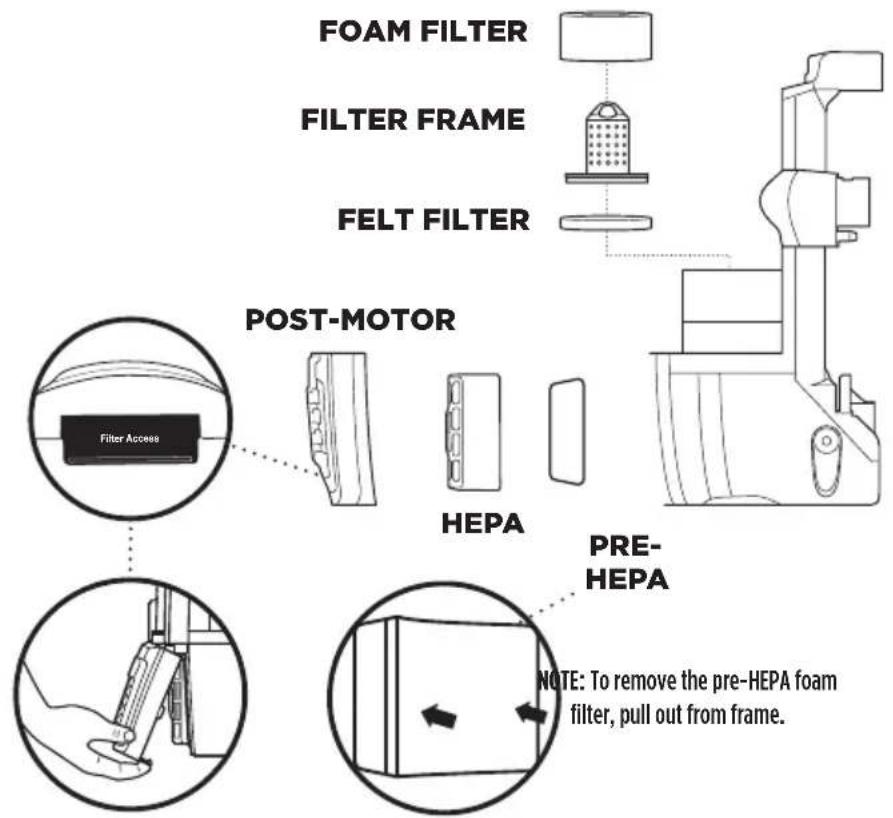
To keep suction power optimal, rinse filters regularly. Rinse with water only. Do not use soap. Allow filters to air-dry completely before reinstalling.
RECOMMENDED FILTER CLEANING SCHEDULE:
Pre-Motor Filter Kit
(Foam & Felt)
Clean every 3 months.
Post-Motor Filter
(Pre-HEPA)
Clean once a year.
Post-Motor Filter
(HEPA)
Clean once a year.
natural_image
Technical line drawing of a mechanical device with an inset showing a close-up of a component (no text or symbols present)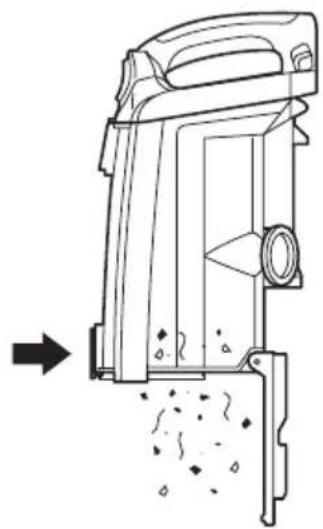
natural_image
Technical line drawing of a mechanical device with internal components and a directional arrow indicating flow or movement (no text or symbols)1 Pull up on dust cup release latch and lift dust cup off pod.
2 Hold dust cup over a trash bin and press the bottom dust cup empty latch.
STEP 3

natural_image
Technical line drawing of a mechanical component with an arrow indicating direction (no text or symbols present)PRE-MOTOR
flowchart
graph TD
    A["FOAM FILTER"] --> B["FELT FILTER"]
    B --> C["POST-MOTOR"]
    C --> D["HEPA"]
    D --> E["PRE-HEPA"]
    E --> F["NOTE: To remove the pre-HEPA foam filter, pull out from frame."]
3 Press top dust cup empty latch to access dust screen and remove built-up debris.
CLEANING THE FILTERS
1 Pre-Motor (foam and felt):
With the dust cup removed, take out the foam and felt filters, and rinse them with water only. Tap loose dirt off filters between cleanings as needed.
2 Post-Motor (HEPA):
To access the HEPA filter, reach under the filter cover, and press the Filter Access tab. Lift off the cover and remove the HEPA filter.
To remove the black foam pre-HEPA filter, simply pull it out from the frame. Rinse filters in water only and allow them to air-dry completely before reinstalling. Before reinserting the pre-HEPA filter, make sure the edges of the foam are tucked into the frame.

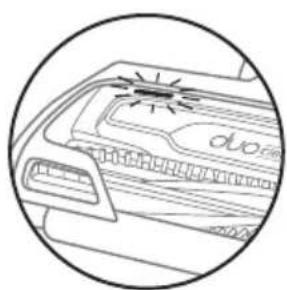
TIP: You can also check for blockages in the hose and airways. Just remove the floor nozzle, dust cup, and hose and shine a torch in the openings.
If you see any hair wrapped around the brushroll, continue cleaning, using Carpet/Low Pile mode on hard floors. This will allow the Self-Cleaning Brushroll technology to remove the hair and send it to the dust cup.
Self-Cleaning Brushroll Technology
Self-Cleaning Brushroll technology actively removes hair wrap from the brushroll while you vacuum. If you run over a hard or sharp object or notice a noise change while vacuuming, check for blockages or objects caught in the brushroll.
NOTE: If you notice hair wrap on the brushroll, continue cleaning to allow Self-Cleaning Brushroll technology to send the hair to the dust cup.
text_image
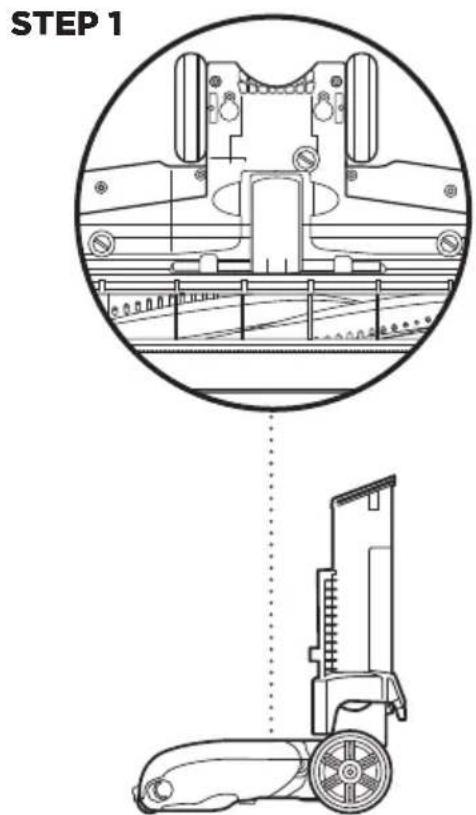
STEP 1CLEANING THE BRUSHROLL
1 Turn the nozzle over and use a coin to open the 3 locks on the bottom. Turn the locks counterclockwise to open, then lift up the cover.
2 Clear away any objects or debris.
3 To reassemble, replace base by lining it up along the front of the nozzle. Press down on the cover until it snaps into place. Turn the locks clockwise to close.
DuoClean™ Technology
DuoClean technology features a bristle brush to deep-clean carpets, and an additional soft brushroll to pull in larger particles and directly engage floors for a polished look.
natural_image
Technical diagram of a mechanical component with a downward arrow indicating a force or compression process (no text or symbols present)
natural_image
Technical diagram of a mechanical component with directional arrows indicating movement or force (no text or symbols)
natural_image
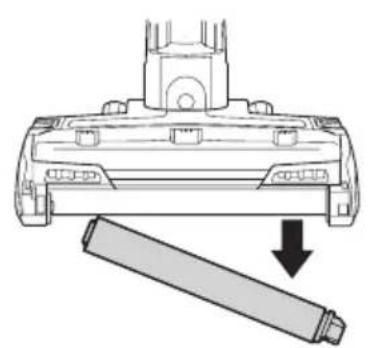
Line drawing of a hairdryer with a flash unit emitting smoke (no text or symbols)1 To remove Soft Roller from nozzle, lift it out pulling the tab on the right side.
2 Tap loose debris off the Soft Roller. Use a dry towel to wipe the Soft Roller clean, or to remove any debris caught in the teeth behind the Soft Roller.
3 Hand-wash the Soft Roller as needed. Use only water, and let air-dry completely for at least 24 hours.
4 Reinsert Soft Roller under rubber bumper in front of nozzle until it clicks into place.
CHECKING THE NOZZLE FOR BLOCKAGES
1 Tilt neck of nozzle back to straighten the airway, then remove any blockages.
WARNING: To reduce the risk of shock and unintended operation, turn power off and unplug unit before servicing.
Vacuum is not picking up debris. No suction or light suction.
(Refer to Maintenance section for more information.)
- Check filters to see if they need cleaning. Follow instructions for rinsing and drying the filters before reinserting in the vacuum.
- Dust cup may be full; empty dust cup.
- Clear blockages from hose, hose connections, nozzle, and accessories.
- Remove any string, carpet fibres, or hair that may be wrapped around the brushrolls.
Vacuum lifts area rugs.
- Turn off unit to disengage the brushrolls. Move switch to Hard Floor setting, which is optimal for bare floors and area rugs.
- Suction is powerful. Take care when vacuuming area rugs or rugs with delicately sewn edges.
- Slide Suction Control to MIN to reduce suction and increase maneuverability on carpets.
Brushrolls do not spin.
- If Brushroll Indicator Light on the floor nozzle turns red, the brushroll and/or Soft Roller have stopped spinning. Immediately turn off and unplug vacuum. Disconnect the nozzle and remove any blockages, then reconnect and turn vacuum back on.
- If Brushroll Indicator light repeatedly turns red while vacuuming carpet, try moving Suction Control slider to MIN.
- With the power on, recline the handle, which will automatically turn on the brushrolls.
Vacuum turns off on its own or Brushroll Indicator Light flashes red.
- This vacuum is equipped with a motor-protective thermostat. If your vacuum overheats, the thermostat will automatically turn the suction motor off. It may take approximately 45 minutes for the unit to cool. Perform the following steps while the vacuum cools:
- Turn vacuum off and unplug it.
- Empty dust cup and clean filters (see Maintenance section).
- Check for blockages in hose, accessories, and inlet openings.
- Allow unit to cool for a minimum of 45 minutes.
- Plug in vacuum and turn it on.
- If hose is not fully connected to the pod, it can cause a poor electrical connection and the hose can come loose, turning the vacuum off.
- Check all connection points and make sure they are securely clicked into place.
- Remove the cord from the cord hook, then pull on the hose on the back of the pod to make sure that it is fully engaged and latched into place.
Note: If vacuum still does not start, contact Customer Service at
AUS 02 8801 7666 - NZ 0800 112 660.
For guarantee claims, you will need to submit a proof of purchase in the form of a valid receipt that displays date and place of purchase. This warranty does not replace but is in addition to your statutory rights.
If your product becomes defective due to faulty material or workmanship within a period of 2 years from the date of purchase, we warrant to do the following:
- For New Zealand Consumers: We will replace the defective/faulty part with a new product, free of charge, or if the unit is deemed defective/faulty we replace the unit with an equivalent or upgraded model, at our discretion.
- For Australian Consumers: Our goods come with guarantees that cannot be excluded under the Australian Consumer Law. You are entitled to a replacement or refund for a major failure and for compensation for any other reasonably foreseeable loss or damage. You are also entitled to have the goods repaired or replaced if the goods fail to be of acceptable quality and the failure does not amount to a major failure.
Replacement items will be covered by the limited warranty for the balance of the warranty period from the date of the original purchase.
Your warranty is subject to the following conditions
- DO NOT operate the appliance with a damaged plug or cord, or if the unit has been dropped, damaged or dropped in water.
- To avoid the risk of electric shock, do not disassemble or attempt to repair the appliance on your own. If the supply cord is damaged, it must be replaced by a qualified electrician to avoid a hazard. Incorrect re-assembly or repair can cause a risk of electric shock or injury to persons when the appliance is used.
- The item has not been misused, abused, neglected, altered, modified or repaired by anyone.
• The item has been subjected to fair wear and tear. - The item has not been used for trade, professional or hire purposes.
• The item has not sustained damage through foreign objects, substances or accident
Customer costs within warranty
The customer is responsible for any inwards freight charge to return a product for warranty if requested, and outward freight charge for warranty parts and or replacement unit.
Who is covered?
This warranty applies only to the original purchaser, who bought the product from an authorised retailer and may not be transferred. Proof of purchase is required.
What is not covered?
- Filters and brushrolls
• Accessories supplied with the item. - Components that are subject to natural wear and tear caused by normal use in accordance with operating instructions.
- Unauthorised/improper maintenance/handling or overload is excluded from this warranty.
Proudly distributed by
Mann&Noble Pty Ltd
No.1 Southridge Unit Estate
2 Southridge Street
Eastern Creek NSW, Australia, 2766
AUS 02 8801 7666
NZ 0800 112 660
AUS sharkclean.com.au
NZ sharkclean.co.nz
PLEASE READ CAREFULLY AND KEEP FOR FUTURE REFERENCE.
This Owner's Guide is designed to help you get a complete understanding of your new Shark® DuoClean™ Powered Lift-Away™ with Anti-Hair-Wrap Technology™ vacuum.
Mann&Noble
Proudly distributed by:
Mann&Noble Pty Ltd
No.1 Southridge Unit Estate
2 Southridge Street
Eastern Creek NSW, Australia, 2766
AUS 02 8801 7666
NZ 0800 112 660
AUS sharkclean.com.au
NZ sharkclean.co.nz
Illustrations may differ from actual product. We are constantly striving to improve our products; therefore the specifications contained herein are subject to change without notice.