
S31 - Receiver Scosche - Free user manual and instructions
Find the device manual for free S31 Scosche in PDF.


| Product Type | Bluetooth Audio Receiver |
| Brand | Scosche |
| Model | S31 |
| Dimensions | 2.5 x 2.5 x 0.8 inches (6.4 x 6.4 x 2 cm) |
| Weight | 1.6 oz (45 g) |
| Power Source | USB (5V DC) or built-in rechargeable battery |
| Battery Capacity | 300 mAh (estimated) |
| Bluetooth Version | 5.0 |
| Bluetooth Range | 33 feet (10 meters) |
| Audio Output | 3.5mm stereo jack |
| Frequency Response | 20 Hz – 20 kHz |
| Signal-to-Noise Ratio | >85 dB |
| Functions | Wireless music streaming, hands-free calling, volume control, multi-device pairing |
| Cleaning | Wipe with a dry cloth; avoid moisture |
| Safety | Do not expose to extreme temperatures or water |
| Repairability | Non-serviceable; contact Scosche support for defects |
| General Information | Compatible with most smartphones, tablets, and computers |
Frequently Asked Questions - S31 Scosche
User questions about S31 Scosche
0 question about this device. Answer the ones you know or ask your own.
Ask a new question about this device
Download the instructions for your Receiver in PDF format for free! Find your manual S31 - Scosche and take your electronic device back in hand. On this page are published all the documents necessary for the use of your device. S31 by Scosche.
USER MANUAL S31 Scosche
MULTI-PLATFORM STEREO REPLACEMENT WITH STEERING WHEEL CONTROL INTERFACE FOR CHRYSLER, GM, FORD & TOYOTA JBL
The cutting edge S3-1 interface from Scosche allows you to replace your factory OEM stereo while retaining all necessary safety & warning features as well as retaining your original steering wheels controls (if vehicle is equipped).
STEERING WHEEL CONTROLS
NO Steering wheel programming is required! The S3-1 Interface has built-in protocols for popular aftermarket stereos including:
ALPINE CLARION JVC
KENWOOD PIONEER SONY
S3-1 INSTALLATION HARNESSES\*
A vehicle-specific harness is required for installing the S3-1 interface (*sold separately). Verify your vehicle's compatibility by checking the list included with vehicle-specific harness.
| S3CR02 | 2005-10 Select Chrysler S3-1 harness |
| S3CR04 | 2007-UP Select Chrysler S3-1 harness |
| S3FD23 | 2005-UP Select Ford, Linc, Merc S3-1 harness |
| S3GMCL2 | 2003-UP Select GM Class II S3-1 harness |
| S3GM11C | 2004-UP Select GM LAN11 24Pin S3-1 harness |
| S3GM11L | 2006-UP Select GM LAN11 14/16Pin S3-1 harness |
| S3GMLAN | 2006-UP Select GM LAN29 14/16 Pin S3-1 harness |
| S3TA03 | 2004-UP Select Toyota JBL S3-1 harness |
TECH SUPPORT: you have any questions or need
Technical Assistance with the installation, or the most
current applications, please call
1-800-621-3695x3
PRELIMINARY
S3-1 FUNCTIONALITY BY VEHICLE PLATFORM:
| Make | ACC/R.A.P. Power | Steering Wheel Controls | Warning Chimes | Premium Sound Activation | Fade F/R |
| Chrysler | Not required | No | √ | ||
| Ford Not | required No | √ | √ | ||
| GM LAN | Std. Bose only | √ | √ | √ | |
| GM Class II | Std. Bose | only | √ | ||
| Toyota Not | required Not | required JBL | Sys only No |

BEFORE BEGINNING: READ THIS INSTRUCTION MANUAL
Disconnect the negative battery terminal to avoid short circuits. Read ALL vehicle manufacturer's warnings regarding airbags and electrical systems. We recommend ONLY a volt/ohm meter when checking/testing vehicle wiring. A test light (grounded probe type) can damage a vehicle's computer and/or electronics systems.
COMPONENT OVERVIEW
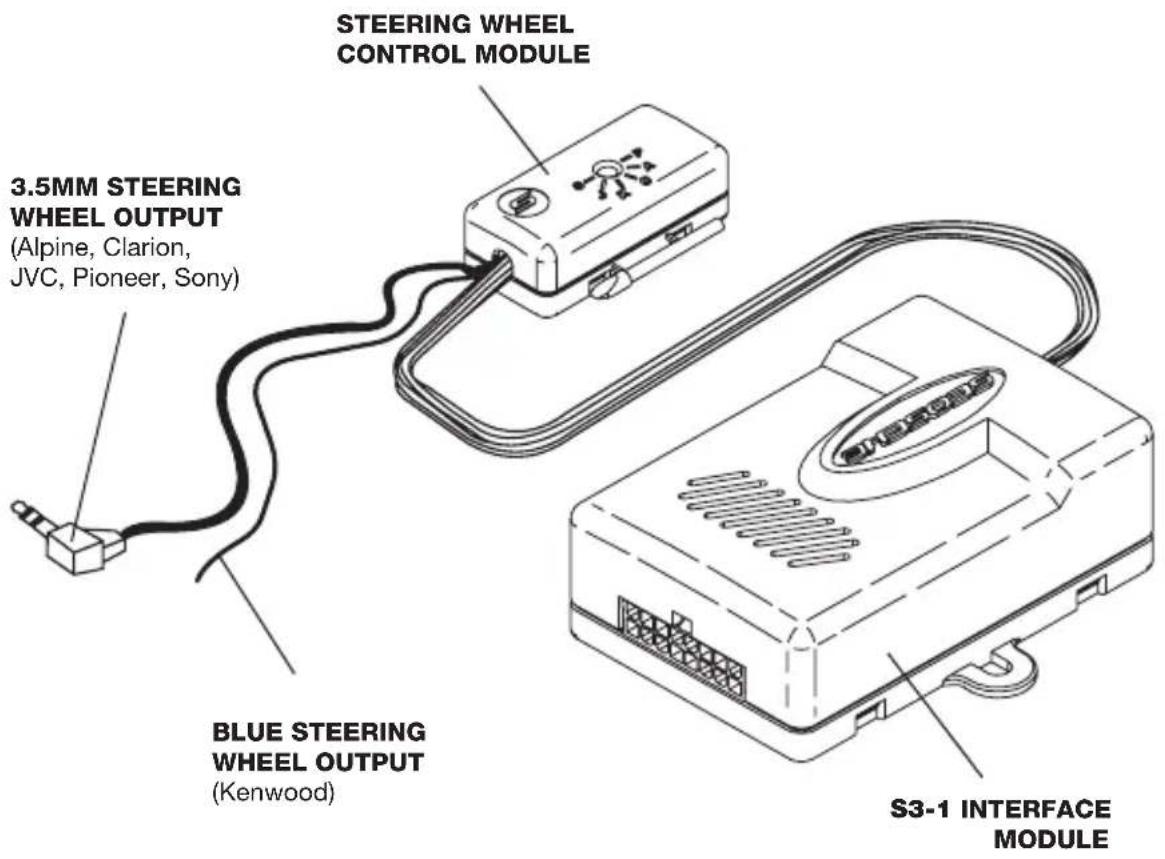
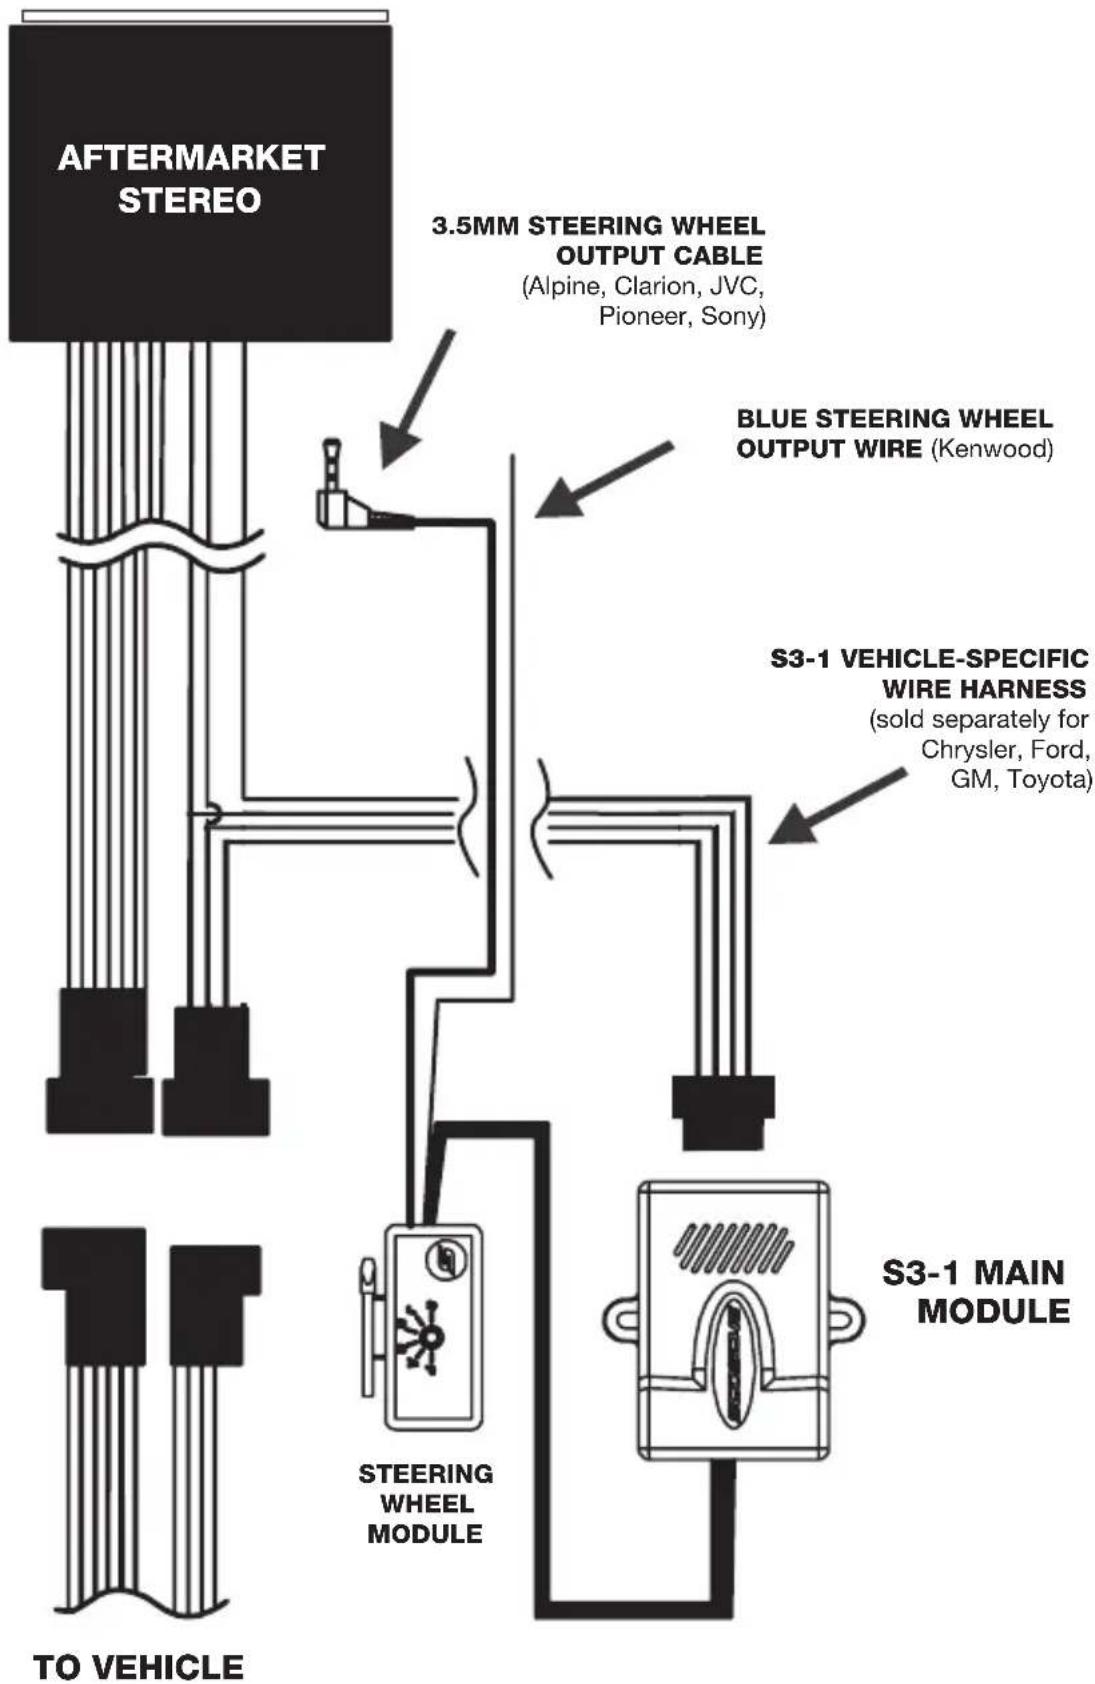
WIRE COLOR CODES
White = Left Front Positive (LF+)
Gray = Right Front Positive (RF+)
White/Black = Left Front Negative (LF-)
Gray/Black = Right Front Negative (RF-)
Green = Left Rear Positive (LR+)
Violet = Right Rear Positive (RR+)
Green/Black = Left Rear Negative (LR-)
Violet/Black = Right Rear Negative (RR-)
Black = Chassis Ground Orange = Illumination
Yellow = +12V Constant Power Blue/White = +12 Remote Output
Red = +12V Accessory/R.A.P output (Amp, radio on signal)
Blue = +12V Power Antenna
NAVIGATION CONNECTIONS:
Violet/White = VSS Vehicle speed pulse signal
Red/White = Reverse light trigger (+12V when in reverse gear)
Yellow/Black = Parking brake trigger (-12V when park brake ON)
Orange/White = Auto illumination (Data controlled lighting output on some GM LAN applications with AUTO headlights enabled)
NOTE: The RED Accessory output wire from the S3-1 interface is rated at 10A Max output for most aftermarket head unit demands. We do NOT recommended connecting additional +12V switched accessories to this output source as it may cause damage to the S3-1 module itself. If 10A output is not sufficient, then a relay is needed (Relay not included).
NOTE: Illumination & auto illumination outputs are designed for head unit connections only.
S3-1 SPEAKER / AUDIO CONNECTIONS
• GM Bose
(Excludes Prem. Bose)
• Ford Premium Sound
• Toyota JBL/Lexus
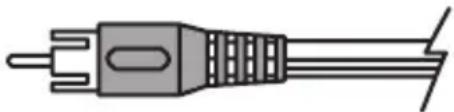
RCA LOW LEVEL
natural_image
Pure electrical outlet diagram without any text, numbers, or symbols- Chrysler
• Ford (Non-Premium)**
• GM Bose (Non-Bose)
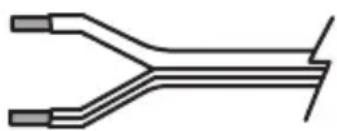
SPEAKER WIRE (Cut-off RCAs)
natural_image
Pure electrical circuit lines without any symbols**ATTN: All Ford Harness RCA cutting must be performed on vehicle side of the circuit board.
BASIC WIRING INSTRUCTIONS
The following steps are provided as a general guide. For specific information for your vehicle, consult the instructions supplied with your vehicle-specific S3-1 harness (sold separately).
- Disconnect the negative battery cable from the battery to avoid short circuits.
-
Remove and unplug factory stereo. (If needed, call Scosche Toll-free Tech for assistance with radio removal: (800) 621-3695 Ext. 3)
-
Match and connect the Power/ground wires from the S3-1 Vehicle specific harness to the wires provided with your stereo. The color codes on the Scosche harness are designed to match most aftermarket stereos.
- Take note that some of the wires for your new stereo come from the S3-1 interface box itself and not the vehicle connectors.
4a. The S3-1 speaker connections are pre-terminated with RCA jacks for installations requiring Line input: Toyota JBL, GM Standard Bose and Ford Premium sound.
4b. If your vehicle does not have a Bose or Premium system, cut off the RCAs and wire the speaker leads directly to the speaker wires from the new stereo.
4c. All FORD harnesses must have RCAs cut on vehicle side of circuit board.
5. Tape any unused wiring to prevent short circuit.
7. Reconnect the negative battery cable**.
** For GM vehicles, alternate power up (initialization steps) are required.
See General Motors specific notes section.
- As you install your new stereo, place the S3-1 module(s) and harnesses in the rear of the dash cavity behind the stereo.
OPTIONAL: Cable ties or double-sided tape can be used to secure the module, but are not included.
CHRYSLER & TOYOTA INSTALLATION NOTES
CHRYSLER: PREMIUM ALPINE, BOSTON & INFINITY SYSTEMS
These factory amplified sound systems are driven and digitally controlled by a single set of left/right input channels only. The aftermarket radio does not have the ability to control fade or balance adjustments on these types of systems. There is NO front/rear fader control. The balance and fader are set to center by interface control software.
These factory amplified sound systems are driven and digitally controlled by a single set of left/right input channels only. The aftermarket radio does not have the ability to control fader on these types of systems. There is NO front/rear fader control. The fader is set to center by interface control software.
GENERAL MOTORS INSTALLATION NOTES
HOW TO TEST FOR "PREMIUM BOSE" SYSTEMS
There are two types of Bose systems available in some models of GM vehicles. The S3-1 interface is not compatible with the Digital Premium BOSE (y91/z75 systems) To test for digital Bose systems, turn the factory radio volume up and down rapidly. If the sound system reacts immediately then the system is a Standard Bose, not a Premium Bose. If there's a slight delay in the system as you turn it up and down quickly, then this vehicle may have Premium BOSE. Note: you may also check the service parts code sticker usually located in the glove box for "y91" or "z75" equipment codes.
S3-1 GENERAL MOTORS INTEGRATED SAFETY & WARNING CHIMES
When replacing the factory stereo in your GM vehicle, the S3-1 interface will replace portions of your vehicle's audible SAFETY and WARNING CHIME systems. If the stereo is removed without the proper accessory these functions of your vehicle will be LOST including: Your vehicle's ECM (Electronics Control Module) will also store an error code if operated without the factory radio installed and you may experience difficulty in having the vehicle serviced at the dealership. The Scosche S3-1 will send the proper data commands to your vehicle's ECM (Electronics Control Module) to indicate a "healthy" status for diagnostic purposes.
WARNING & SAFETY CHIMES LIST:
- Parking assist
- Seatbelt warning chime
- Lights left on reminder
- Check engine/service indicator
- Turn signal click
- Key left in ignition reminder
- Low fuel
POWER UP (Initialization procedure)
In order to ensure the proper functionality of the S3-1's +12V RED Accessory wire, we recommend that the following procedure be followed; in sequence.
- Disconnect the Scosche Interface from the vehicle radio harness.
- Close all doors and hood, Turn off all lights and remove the keys from the ignition.
- Wait 3 to 4 minutes (without opening a door, turning on a light, inserting keys, etc.).
- Connect the Scosche Interface to the vehicle's radio harness and start vehicle.
- Test interface for functionality.
STEERING WHEEL MODULE
STEERING WHEEL MODULE SETUP
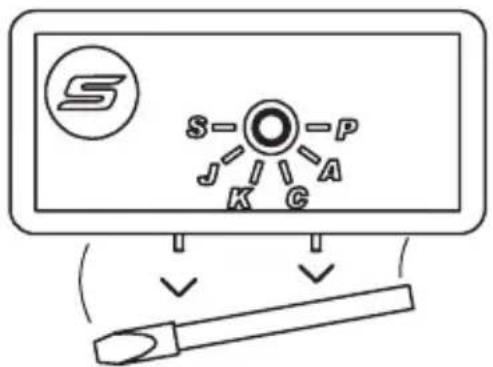
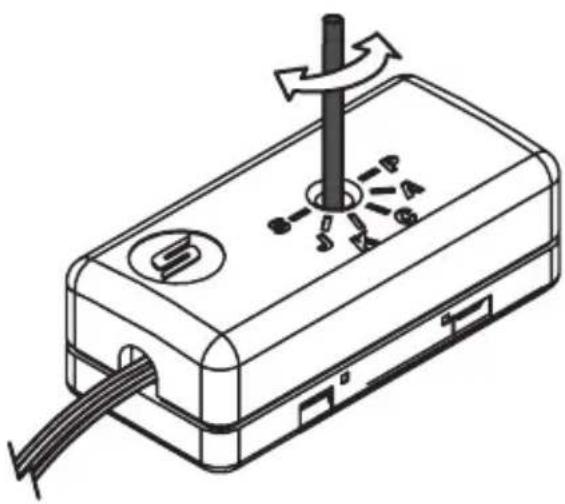
The Scosche S3-1 offers "plug and play" steering wheel control setup. No complicated learning, programming or splicing wires is required. Setup can be completed in just seconds! (Tool is provided by Scosche.)
- Break off the small flat blade adjustment driver from the side of the steering wheel module housing as shown in illustration.
- Carefully click the selector (arrow) dial to the correct letter that corresponds with the brand of aftermarket stereo you are installing: A=ALPINE, C=CLARION, J=JVC, K=KENWOOD, P=PIONEER, S=SONY
natural_image
Technical line drawing of a device with labeled components and directional arrows (no text or symbols)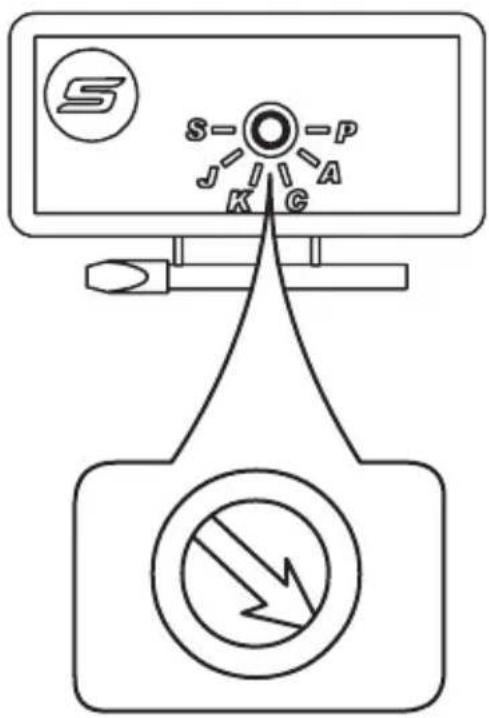
flowchart
graph TD
    S["Port S"] -->|No| Warning["Warning Symbol"]
    S -->|Yes| K["Control Button"]
    P["Port P"] -->|No| Warning
    P -->|Yes| J["Control Button"]
    J --> K
    A["Port A"] -->|No| Warning
    A -->|Yes| K
    K --> G["Control Button"]
-
Connect the steering wheel control module harness to the Main S3-1 interface via the 10-Pin connector. (This step not shown)
-
Plug the 3.5mm connector into the "Remote" jack on the back of your aftermarket stereo. For Kenwood, connect the Blue wire to the remote control input wire of the radio. (This step not shown)
CHRYSLER / DODGE / JEEP Version 1
STEERING WHEEL LEGEND 2005-08
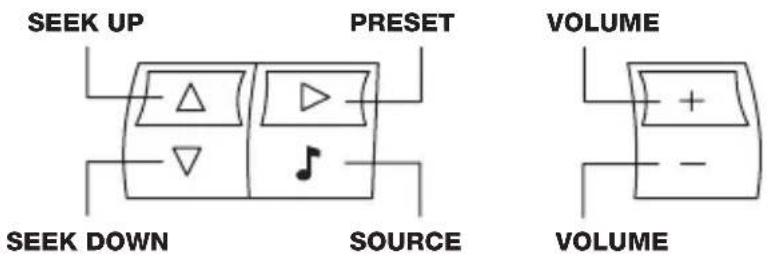
SJKCAP
| Sony JVG Kenwood Clarion Alpine Pioneer | ||||||
| Vol Up + Vol - | Vol + Vol - | Vol + Vol - | Vol + Vol - | Vol - | Vol - | Vol - |
| Source | Source | Source | Source | Source | Source | Source |
| Preset | FM Presets | FM Presets | Seek Up/Trk Up | FM Preset/Disc Trk 1 | FM Presets | FM Presets |
| Seek Up | Seek Up/Track Up | Sk Up/Trk Up | Seek Up/Trk Up | FM Preset Up/Trk Up | Seek Up/Track Up | Seek Up/Track Up |
| Seek Down | Seek Dn/Track Dn | Sk Dn/Trk Dn | Seek Dn/Trk Dn | FM Preset Dn/Trk Dn | Seek Dn/Track Dn | Seek Dn/Track Dn |
CHRYSLER / DODGE / JEEP Version 2 STEERING WHEEL LEGEND 2009-UP
(Uses controls on BACK of Steering wheel ONLY)
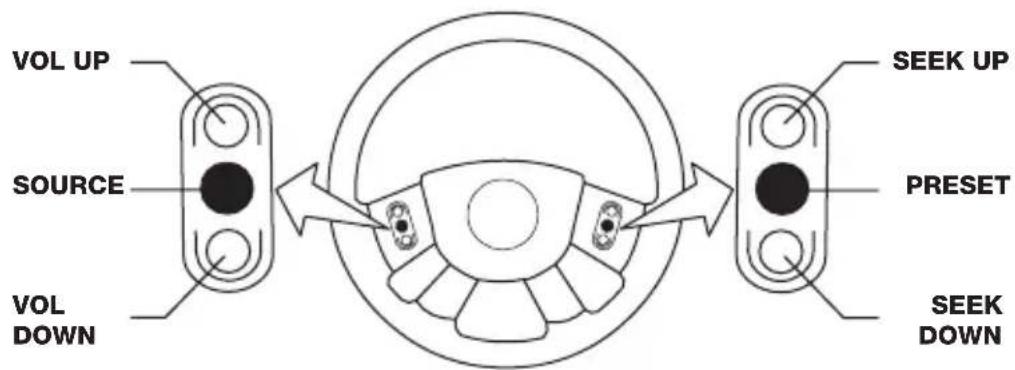
SJKCAP
| Sony JVG Kenwood Clarion Alpine Pioneer | ||||||
| Vol Up + | Vol Up | Vol Up | Vol Up | Vol Up | Vol Up | Vol Up |
| Vol Down - | Vol Dwn | Vol Dwn | Vol Dwn | Vol Dwn | Vol Dwn | Vol Dwn |
| Source | Source | Source | Source | Source | Source | Source |
| Seek Up | Seek Up/Track Up | Sk Up/Trk Up | Seek Up/Trk Up | FM Preset Up/Trk Up | FM Presets | Seek Up/Track Up |
| Seek Down | Seek Dn/Track Dn | Sk Dn/Trk Dn | Seek Dn/Trk Dn | FM Preset Dn/Trk Dn | Seek Up/Track Up | Seek Dn/Track Dn |
| Preset | Next FM Preset | Preset Up | Seek Up/Trk Up | FM Preset /Disk Trk 1 | Next FM Preset | Next FM Preset |
Volume control note:
Press once: up/down (one increment); Press and hold: up/down (continuous)
STEERING WHEEL CONTROLS: GM
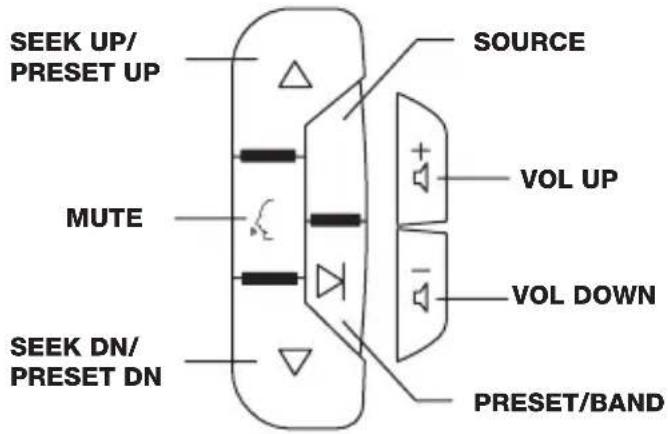
GENERAL MOTORS LAN STEERING WHEEL LEGEND 2006-UP
SJKCAP
| Sony JVC | Kenwood Clarion Alpine Pioneer | ||||||
| Vol Up Vol Up Vol Up Vol Up Vol Up | |||||||
| Vol Down | Vol Down | Vol Down | Vol Down | Vol Down | Vol Down | Vol Down | Vol Down |
| Source | Source | Source | Source | Source | Source | Source | Source |
| Speak Icon | Mute | Mute | Mute | Mute | Mute | Mute | Mute |
| Preset/Band | Preset Up | Band | Seek Up | Band | Preset Up | Preset Up | Preset Up |
| Seek Up | Seek/Track Up | Seek Up | Track Up | Preset/Track Up | Preset Up | Seek/Track Up | Seek/Track Up |
| Seek Down | Seek/Track Dn | Seek Down | Track Down | Preset/Track Down | Seek/Track Down | Seek/Track Down | Seek /Track Down |
GENERAL MOTORS CLASS II
STEERING WHEEL LEGEND
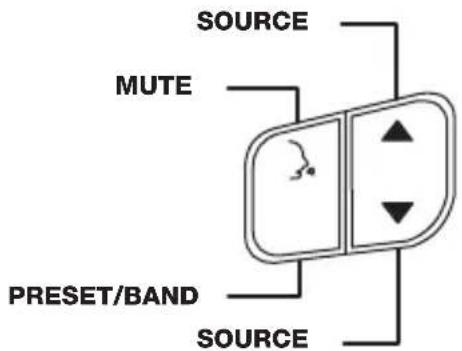
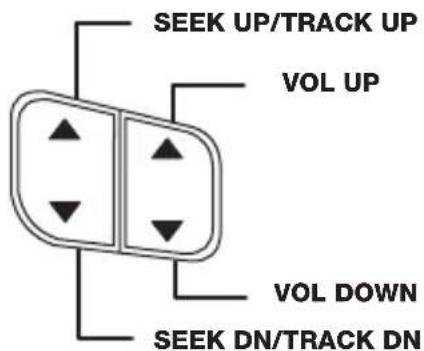
| S | J | K | C | A | P | |
| Sony | JVC | Kenwood | Clarion | Alpine | Pioneer | |
| Vol Up + | Vol Up | Vol Up | Vol Up | Vol Up | Vol Up | Vol Up |
| Vol Down - | Vol Dwn | Vol Down | Vol Down | Vol Down | Vol Dwn | Vol Dwn |
| Source Up | Source | Source | Source | Source | Source | Source |
| Source Down | Source | Source | Source | Source | Source | Source |
| Seek Up | Seek/Track Up | Seek Up | Track Up | Preset/Track Up | Seek/Track Up | Seek/Track Up |
| Seek Down | Seek /Track Down | Seek Down | Track Down | Preset/Track Dn | Seek/Track Dn | Seek/Track Dn |
| Speak Icon | Mute | Mute | Mute | Mute | Mute | Mute |
| Program | Preset Up | Band | Seek Up | Band | Preset Up | Preset Up |
Volume control note:
Press once: up/down (one increment); Press and hold: up/down (continuous)
STEERING WHEEL CONTROLS: GM
GENERAL MOTORS GM LAN 11 BIT STEERING WHEEL LEGEND
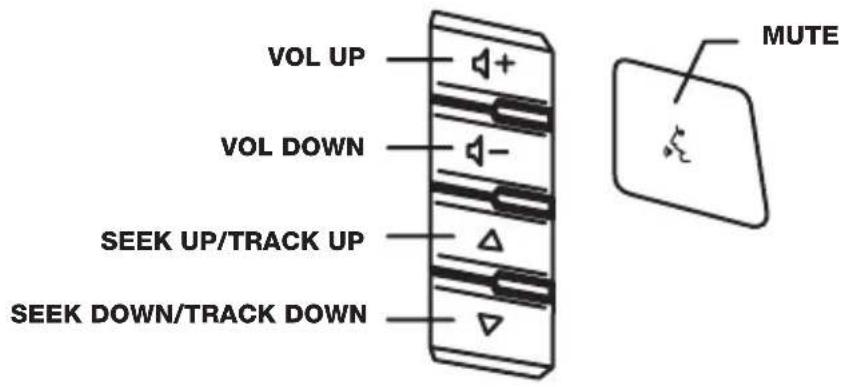
SJKCAP
| Sony JVC | Kenwood Clarion Alpine Pioneer | |||||
| Vol Up+ Vol | Vol Up Vol Up Vol Up | Vol Up | Vol Up | |||
| Vol Down- | Vol Down | Vol Down | Vol Down | Vol Down | Vol Down | Vol Down |
| Seek Up | Seek/Track Up | Seek/Trk Up | Seek/Trk Up | Seek/Track Up | Seek/Track Up | Seek/Track Up |
| Seek Down | Seek/Track Down | Seek/Trk Dn | Seek/Trk Dn | Seek/Track Down | Seek/Track Down | Seek /Track Down |
| Speak Icon | Mute | Mute | Mute | Mute | Mute | Mute |
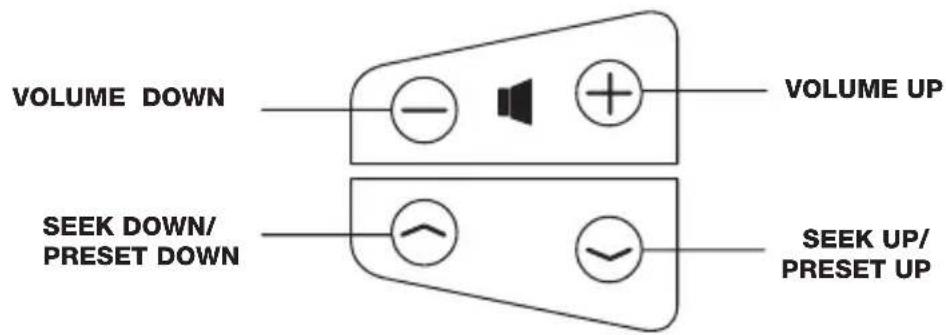
TOYOTA STEERING WHEEL LEGEND

flowchart
graph LR
    A["SOURCE"] --> B["MODE"]
| S | J | K | C | A | P | |
| Sony | JVC | Kenwood | Clarion | Alpine | Pioneer | |
| Vol Up + | Vol + | Vol + | Vol + | Vol + | Vol + | Vol + |
| Vol Down - | Vol - | Vol - | Vol - | Vol - | Vol - | Vol - |
| Mode | Source | Source | Source | Source | Source | Source |
| Seek Up | FM Presets | FM Presets | Seek Up/Trk Up | FM Preset/Disk Trk 1 | FM Presets | FM Presets |
| Seek Up | Seek Up/Track Up | Seek Up/Trk Up | Seek Up/Trk Up | FM Preset Up/Trk Up | Seek Up/Track Up | Seek Up/Track Up |
| Seek Down | Seek Dn/Track Dn | Seek Dn/Trk Dn | Seek Dn/Trk Dn | FM Preset Dn/Trk Dn | Seek Dn/Track Dn | Seek Dn/Track Dn |
Volume control note:
Press once: up/down (one increment); Press and hold: up/down (continuous)
STEERING WHEEL CONTROLS
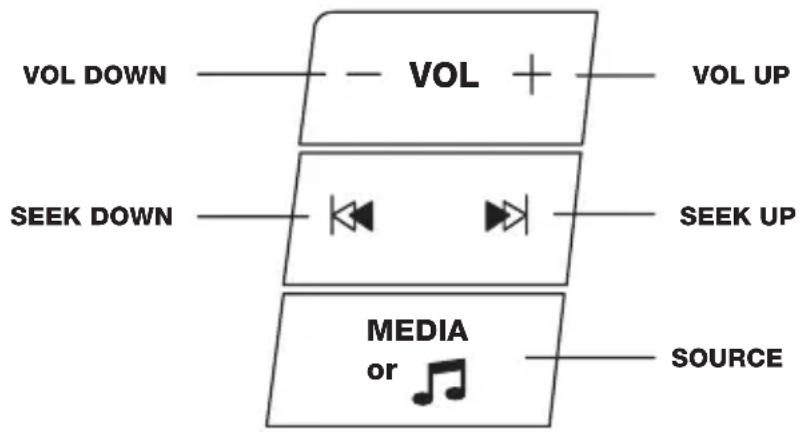
FORD STEERING WHEEL LEGEND
flowchart
graph TD
    A["VOL DOWN"] --> B["-- VOL +"]
    C["SEEK DOWN"] --> D["-- SEEK UP"]
    E["MEDIA or"] --> F["-- SOURCE"]
SJKCAP
| Sony JVC Kenwood Clarion Alpine Pioneer | ||||||
| Vol Up+ Vol Up | Vol Up Vol Up | Vol Up | Vol Up | Vol Up | Vol Up | |
| Vol Down- | Vol Down | Vol Down | Vol Down | Vol Down | Vol Down | Vol Down |
| Media/Music Note | Source | Source | Source | Source | Source | Source |
| Seek Up | Seek Up/Track Up | Sk Up/Trk Up | Seek Up/Trk Up | FM Preset Up/Trk Up | Seek Up/Track Up | Seek Up/Track Up |
| Seek Down | Seek Dn/Track Dn | Sk Dn/Trk Dn | Seek Dn/Trk Dn | FM Preset Dn/Trk Dn | Seek Dn/Track Dn | Mute |
Volume control note:
Press once: up/down (one increment); Press and hold: up/down (continuous)
STEERING WHEEL NOTES & TROUBLESHOOTING
STEERING WHEEL CONTROL NOTES & EXCEPTIONS
The illustrations of steering wheel controls and buttons in this manual are “typical”. The actual controls and placement of the controls varies between each make, model, trim level, and/or options package. The overall operation and characteristics are similar between makes. If you experience difficulty with operation or the information provided in this manual, please call our Toll-free Tech support line (800) 621-3695 Ext. 3 or visit our website for other support options including “Live” chat and email: www.scosche.com.
For Volume UP/DOWN operation, pressing either button once will increase or decrease ONE small increment. Press and hold for continuous UP or DOWN volume adjustment.
For CD Seek UP/DOWN operation, pressing either button once will skip UP or DOWN tracks. Press and hold for manual track FWD/RR.
The radio seek UP/DOWN operation varies between stereo brands. In some cases pressing the seek UP/DOWN button once will skip UP or DOWN to the next strong radio station. In other cases, this button will select through Memory preset stations on the stereo. Consult the steering wheel control pages for your particular brand and configuration.
TROUBLESHOOTING
Stereo will not respond to Factory steering controls:
Verify vehicle compatibility. Check the S3-1 harness instruction for your particular vehicle listing.
Verify / Check installation:
- Check connections at S3-1 module, verify power, ground is present.
- Check to determine if steering wheel control module is properly connected to main S3-1 module.
- Check to determine if steering wheel OUTPUT wire or 3.5mm cable is connected to the correct steering wheel INPUT at the back of the aftermarket stereo.
- Check to determine that steering wheel selection potentiometer is set to matching brand of aftermarket radio i.e. A: Alpine, C: Clarion, J: JVC, K: Kenwood, P: Pioneer, S: Sony (see page 3)
LIMITED WARRANTY
Scosche Industries Inc. warrants this product to be free from defects in material and workmanship for a period of 90 days from purchase. This Scosche product is sold with the understanding that the purchaser has independently determined the suitability of this product. This warranty is offered to the original purchaser of the product only. This warranty does not cover the product if physically damaged, subject to negligence or misuse, abuse, alteration, accident, or an act of GOD. This warranty does not apply to product which has water or physically damaged by accident or which has been misused, disassembled or altered.
The original dated sales slip or proof of purchase will establish warranty eligibility. If the product should prove defective within the warranty period, return the product with proof of purchase to Scosche Industries Inc. Scosche, at its option, will replace or repair the product free of charge and return the product postage paid.
In no event shall Scosche Industries, Inc. be responsible for claims beyond the replacement value of the defective product, or in any way be liable or responsible for consequential or incidental damages. No empress warranties and no implied warranties, whether for fitness or any particular use or otherwise, except as set forth above (which is made expressly in lieu of all other warranties) shall apply to products sold by Scosche. Scosche Industries cannot be held responsible for discrepancies/inconsistencies that may occur due to automotive manufacturing changes or option.

- MULTI-PLATFORM STEREO REPLACEMENT WITH STEERING WHEEL CONTROL INTERFACE FOR CHRYSLER, GM, FORD & TOYOTA JBL
- STEERING WHEEL CONTROLS
- S3-1 INSTALLATION HARNESSES\*
- PRELIMINARY
- BEFORE BEGINNING: READ THIS INSTRUCTION MANUAL
- COMPONENT OVERVIEW
- WIRE COLOR CODES
- NAVIGATION CONNECTIONS:
- S3-1 SPEAKER / AUDIO CONNECTIONS
- RCA LOW LEVEL
- SPEAKER WIRE (Cut-off RCAs)
- BASIC WIRING INSTRUCTIONS
- CHRYSLER & TOYOTA INSTALLATION NOTES
- CHRYSLER: PREMIUM ALPINE, BOSTON & INFINITY SYSTEMS
- GENERAL MOTORS INSTALLATION NOTES
- HOW TO TEST FOR "PREMIUM BOSE" SYSTEMS
- S3-1 GENERAL MOTORS INTEGRATED SAFETY & WARNING CHIMES
- WARNING & SAFETY CHIMES LIST:
- POWER UP (Initialization procedure)
- STEERING WHEEL MODULE
- STEERING WHEEL MODULE SETUP
- STEERING WHEEL CONTROLS: GM
- SJKCAP
- GENERAL MOTORS GM LAN 11 BIT STEERING WHEEL LEGEND
- Volume control note:
- STEERING WHEEL NOTES & TROUBLESHOOTING
- STEERING WHEEL CONTROL NOTES & EXCEPTIONS
- TROUBLESHOOTING
- Stereo will not respond to Factory steering controls:
- Verify / Check installation:
- LIMITED WARRANTY
Brand : Scosche
Model : S31
Category : Receiver