
Tirana II - Synthesizer Xaoc - Free user manual and instructions
Find the device manual for free Tirana II Xaoc in PDF.


| Product Type | Eurorack Synthesizer Module |
| Model | Tirana II |
| Brand | Xaoc Devices |
| Width | 6 HP (30.12 mm) |
| Depth | Approx. 40 mm (skiff friendly) |
| Weight | Approx. 80 g |
| Power Consumption | +30 mA / -5 mA |
| Power Connection | 10-pin ribbon cable, reverse polarity protection |
| Number of Steps | 4 (expandable via chaining) |
| Voltage Range (Unipolar) | 0 V to +10 V (default), 0 V to +5 V (with jumper) |
| Voltage Range (Bipolar) | -5 V to +5 V (jumper), -2.5 V to +2.5 V (with jumper) |
| Clock Input | Up to 320 Hz |
| Gate Output | Gate or trigger (selectable) |
| Functions | Step sequencer, modulation source, voltage bank, arpeggiator |
| Special Features | Per-step repeat/ratchet, gate muting, clock division, voltage-controlled direction/transpose/reset |
| Expandability | Chain multiple Tirana units for more steps |
| Firmware | Updateable (via chain cable with older units) |
| Warranty | 1 year from purchase date |
| Maintenance | Keep dry, clean with soft cloth; no user-serviceable parts |
| Safety | Reverse power protection; careful with power cable orientation |
Frequently Asked Questions - Tirana II Xaoc
User questions about Tirana II Xaoc
0 question about this device. Answer the ones you know or ask your own.
Ask a new question about this device
Download the instructions for your Synthesizer in PDF format for free! Find your manual Tirana II - Xaoc and take your electronic device back in hand. On this page are published all the documents necessary for the use of your device. Tirana II by Xaoc.
USER MANUAL Tirana II Xaoc

TIRAMA
UTILITY MICRO
SEQUENCER II
Model of 1960
OPERATOR'S MANUAL rev. 1960/2.0
SALUT
Thank you for purchasing this XaoC Devices product. Tirana is a compact, expandable voltage source with a wide range of uses including classic step sequencer, modulation source, voltage bank, and arpeggiator.
Tirana is equally suited to small and large systems alike, either as a single utility or chained with more Tirana units. This is a second, vastly improved revision to the original 2014 Tirana, featuring an updated circuit and a new, more powerful firmware.
INSTALLATION
The module requires 6hp worth of free space in the eurorack cabinet. The ribbon type power cable must be plugged into the bus board, paying close attention to polarity orientation. The red stripe indicates the negative 12V rail and is supposed to match a dot, -12V or RED STRIPE marks on both the unit and the bus board. The module itself is secured against reversed power connection, however reversing the 16-pin header MAY CAUSE SERIOUS DAMAGE to other components of your system, because it will short-circuit the +12V and +5V power rails. The module should be fastened by mounting the supplied screws before powering up. To better understand the device, we strongly advise the user to read through the entire manual before using the module.
MODULE OVERVIEW
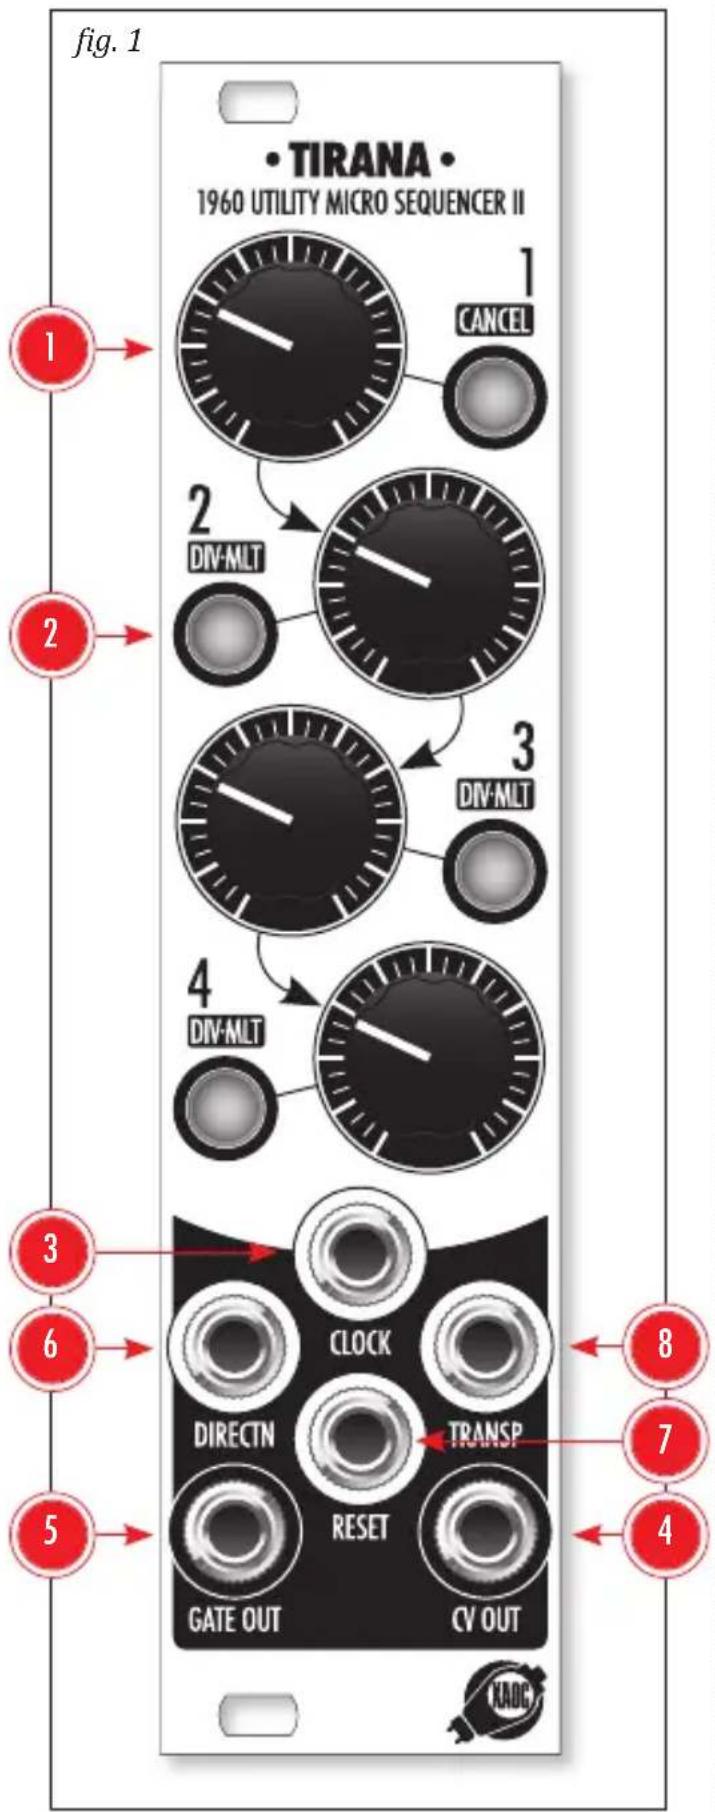
To operate, Tirana expects an external clock source (up to 320Hz) in the CLOCK input socket ③. Patching any stable clock generator—such as an LFO pulse or another sequencer's sync output—causes the sequence steps to play sequentially in a loop. The value for each step is adjustable by turning knobs 1-4 ①. By default, the voltage set by the knob is unipolar
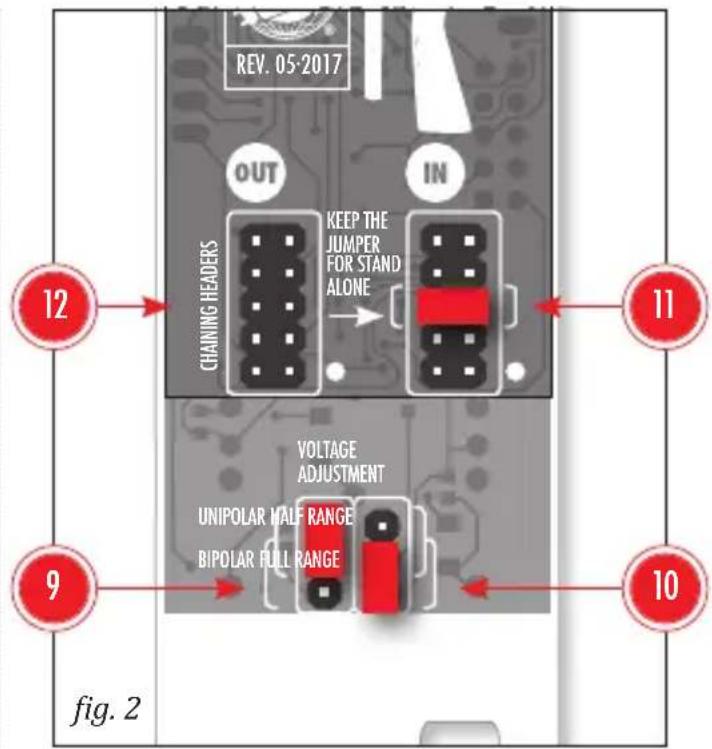
and within the 0V to 10V range. The jumper ⑨ on the back of the module allows for the selection of bipolar voltages within -5 to +5V range. Another jumper ⑩ attenuates the voltage range to 0V to 5V and -2.5V to +2.5V respectively (see fig. 2). Generated control voltages and gate/trigger impulses are available at CV OUT ④ and GATE ⑤ outputs.
Gate/trigger can be muted for each step by pressing the corresponding button 2 until its light deactivates. NOTE: Muting a step does not remove the step from the sequence. The control voltage remains present for the selected step, and only the gate/trigger itself is muted.
Sequence direction can be changed by patching a trigger impulse into the DIRECTN input socket 6. Sequence can be reset to STEP 1 by patching a trigger impulse into the RESET input 7. Sequence can be transposed (offset) by patching a control voltage into the TRANSP input 8.
TOGGLING GATE VS. TRIGGER
Hold STEP 1 and STEP 4 buttons simultaneously for 2 seconds to change whether the GATE output generates a gate or trigger impulse. NOTE: Dynamic gate width modulation is possible because Tirana's gate width directly matches that of the external clock impulse.
STEP MULTIPLICATION AND DIVISION
Each step can be multiplied (repeated) up to four times (resulting in up to 16 steps in the sequence). The note length is retained upon repeat. Alternatively, each step can be divided to achieve the popular ratcheting effect. The trigger/gate impulse is generated 2, 3 or 4 times per note. To program these events on a given step, enter the step menu as follows:
STEP REPEAT
To set a desired number of repeats for a given step, enter the DIV·MLT menu by holding the corresponding step's button for 2 seconds. The number of repeats is indicated by one blinking button and three unlit buttons. Press STEP 2 for one repeat (2 total triggers), STEP 3 for two repeats (3 total triggers), or STEP 4 for three repeats (4 total triggers) of the given step. To reset the desired step back to a single trigger, press CANCEL (STEP 1 button). Tirana automatically exits the DIV·MLT menu mode once a choice is made.
RATCHETING
To set a desired number of ratchets for a given step, enter the DIV·MLT menu by pressing the corresponding step's button for 2 seconds. The number of divisions is indicated by one blinking button and three unlit buttons. Hold STEP 2 for two triggers (step divided by 2), STEP 3 for three triggers (step divided by 3), or STEP 4 for four triggers (step divided by 4) within the given step.
To reset the desired step back to a single trigger, press CANCEL (STEP 1 button). Tirana automatically exits the DIV·MLT menu mode once a choice is made.
While in DIV·MLT menu, a slowly-blinking button indicates multiplication and a quickly-blinking button indicates division (see fig. 4). All settings are memorized and recalled after power reset.
CLOCK DIVISION
Tirana can be set to internally divide the incoming clock by 2, 3 or 4. Division value can be set by holding step buttons in the following combinations: Buttons 1+2 for division by 2. Buttons 1+2+3 for division by 3. Buttons 1+2+3+4 for division by 4. NOTE: Choosing any of these combinations a second time sets the module back to the default (not divided) original clock rate. The succession is always: orig. clock → division → orig. clock → division, etc. Division choice is confirmed by a quick glimpse of all the buttons (see fig. 4). All settings are memorized and recalled after power reset.
CHAINING MULTIPLE UNITS
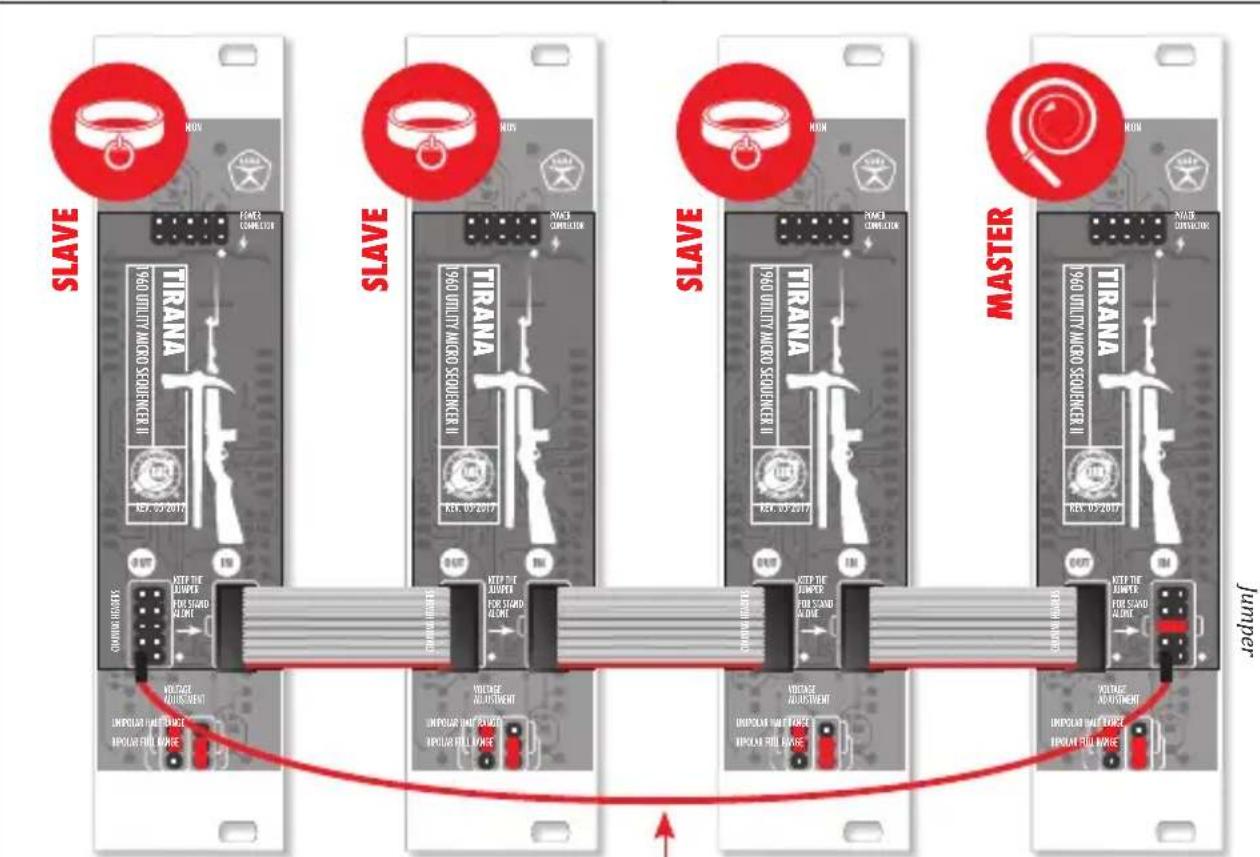
Multiple Tirana units may be chained (using the supplied 10-pin ribbon cable) to form a multistep sequencer. Every module ships with one 10-pin ribbon cable. To connect multiple units, attach the cables exactly as shown in fig. 3. The first unit in the chain is the master and therefore should have a jumper present on the IN header. Remove the IN header 11 jumper from every slave unit and connect the OUT header 12 of each preceding unit to the IN header of each subsequent unit using the sup-
flowchart
graph TD
    subgraph_Slave_1["SLAVE"]
        A["TIRANA 1960 utility micro sequence II"] --> B["OUT"]
        C["TIRANA 1960 utility micro sequence II"] --> D["IN"]
        E["SLAVE"] --> F["OUT"]
        G["SLAVE"] --> H["IN"]
        I["MASTER"] --> J["OUT"]
        K["MASTER"] --> L["IN"]
    end

    subgraph_Slave_2["SLAVE"]
        M["TIRANA 1960 utility micro sequence II"] --> N["OUT"]
        O["TIRANA 1960 utility micro sequence II"] --> P["IN"]
        Q["TIRANA 1960 utility micro sequence II"] --> Q
        R["SLAVE"] --> S["OUT"]
        T["SLAVE"] --> U["IN"]
        V["SLAVE"] --> W["IN"]
        X["MASTER"] --> X["OUT"]
        Y["MASTER"] --> Y
        Z["VOLTAGE ADJUSTMENT"] --> AA["VOLTAGE ADJUSTMENT"]
        AB["VOLTAGE ADJUSTMENT"] --> AC["VOLTAGE ADJUSTMENT"]
        AD["VOLTAGE ADJUSTMENT"] --> AE["VOLTAGE ADJUSTMENT"]
    end

    subgraph_Slave_3["SLAVE"]
        AF["TIRANA 1960 utility micro sequence II"] --> AG["OUT"]
        AH["TIRANA 1960 utility micro sequence II"] --> AI["IN"]
        AJ["TIRANA 1960 utility micro sequence II"] --> AI
        AK["TIRANA 1960 utility micro sequence II"] --> AL["IN"]
        AM["TIRANA 1960 utility micro sequence II"] --> AL
        AN["VOLTAGE ADJUSTMENT"] --> AO["VOLTAGE ADJUSTMENT"]
        AP["VOLTAGE ADJUSTMENT"] --> AQ["VOLTAGE ADJUSTMENT"]
    end

    subgraph_Slave_4["SLAVE"]
        AR["TIRANA 1960 utility micro sequence II"] --> AS["OUT"]
        AT["TIRANA 1960 utility micro sequence II"] --> AS
        AU["TIRANA 1960 utility micro sequence II"] --> AS
        AV["TIRANA 1960 utility micro sequence II"] --> AS
        AW["VOLTAGE ADJUSTMENT"] --> AX["VOLTAGE ADJUSTMENT"]
        AY["VOLTAGE ADJUSTMENT"] --> AZ["VOLTAGE ADJUSTMENT"]
    end

    subgraph_Master_A["MASTER"]
        BA["TIRANA 1960 utility micro sequence II"] --> BB["OUT"]
        BC["TIRANA 1960 utility micro sequence II"] --> BB
        BD["TIRANA 1960 utility micro sequence II"] --> BB
        BE["MASTER"] --> BF["OUT"]
        BG["MASTER"] --> BH["IN"]
    end

    subgraph_Jumper_A["Jumper"]
        BI["VOLTAGE ADJUSTMENT"] --> BJ["VOLTAGE ADJUSTMENT"]
    end

    style Slave_1 fill:#f9f,stroke:#333
    style Slave_2 fill:#f9f,stroke:#333
    style Slave_3 fill:#f9f,stroke:#333
    style Master_A fill:#ccf,stroke:#333
    style Jumper_A fill:#cfc,stroke:#333
fig. 3
Stability loop cable (optional, see text)
STEP MULTIPLICATION & DIVISION
fig. 4

Hold any step button for 2 seconds to enter the step editing menu. Slowly blinking step button (2-4) indicates step repeat. Fast blinking indicates step ratcheting.

STEP 1 blinking indicates that neither step repeat nor ratcheting has been set for the currently edited step.

Press STEP 1 button to cancel multiplication/ division on a given step. Tirana automatically exits the step editing menu after a choice is made.

Press any of STEP 2-4 buttons to set a multiplication (step repeat) value. Tirana automatically exits the step editing menu after a choice is made.

Hold any of STEP 2-4 buttons for 2 seconds to set a division (ratcheting) value. Tirana automatically exits the step editing menu after a choice is made.
CLOCK DIVISION GATE VS. TRIGGER

Simultaneously hold STEP 1+2 buttons for 2 seconds to set a clock division by /2. The choice will be confirmed by a glimpse of all four buttons.

Simultaneously hold STEP 1+2+3 buttons for 2 seconds to set a clock division per /3. The choice will be confirmed by a glimpse of all four buttons.

Simultaneously hold STEP 1+2+3+4 buttons for 2 seconds to set a clock division per /4. The choice will be confirmed by a glimpse of all four buttons.

To cancel the clock rate division, select any of the above combinations a second time. To make another choice, first cancel the previous one, then select a new choice.

Simultaneously hold STEP 1+4 buttons for 2 secs to toggle between trigger and gate mode. The choice will be confirmed by a glimpse of all the buttons.
plied 10-pin ribbon cable(s). NOTE: Use only the master unit's sockets for patching.
Older Tirana revisions can be chained to newer revisions as long as the rev. II unit is the master. To chain, first update the older unit(s) to the latest firmware, then, connect the units as shown in fig. 3 making sure to use the 1-pin stability loop cable that shipped with the original Tirana.
RESET BEHAVIOUR ADJUSTMENT
Tirana has four user-selectable latency values which can be adjusted to accommodate any
timing inaccuracies between clock and reset impulses. To select a new value, first make sure the module is not chained with other Tiranas and disconnect the chaining cable (not the power cable) if necessary. Then, during system power up, hold the STEP 1 button to enter factory maintenance mode as indicated by all buttons slowly blinking. Next, select the STEP 1 button for 0.35ms of latency; STEP 2 button for 0.7ms; STEP 3 button for 1.4ms (default); STEP 4 for 2.8ms. Latency choice can be confirmed by a quick glimpse of the selected button. All settings are memorized and recalled after power reset.
WARRANTY TERMS
XAOC DEVICES WARRANTS THIS PRODUCT TO BE FREE OF DEFECTS IN MATERIALS OR WORKMANSHIP, AND TO CONFORM WITH THE SPECIFICATIONS AT THE TIME OF SHIPMENT FOR A PERIOD OF ONE YEAR FROM THE DATE OF PURCHASE. DURING THAT PERIOD ANY MALFUNCTIONING OR DAMAGED UNITS WILL BE REPAIRED, SERVICED, AND CALIBRATED ON A RETURN-TO-FACTORY BASIS. THIS WARRANTY DOES NOT COVER ANY PROBLEMS RESULTING FROM DAMAGES DURING SHIPPING, INCORRECT INSTALLATION OR POWER SUPPLY, IMPROPER WORKING ENVIRONMENT, ABUSIVE TREATMENT OR ANY OTHER OBVIOUS USER-INFLICTED FAULT.
LEGACY SUPPORT
IF SOMETHING WENT WRONG WITH A XAOC PRODUCT AFTER THE WARRANTY PERIOD IS OVER, NO NEED TO WORRY, AS WE'RE STILL HAPPY TO HELP! THIS APPLIES TO ANY DEVICE, WHEREVER AND WHENEVER ORIGINALLY ACQUIRED. HOWEVER, IN SPECIFIC CASES, WE RESERVE THE RIGHT TO CHARGE FOR LABOR, PARTS AND TRANSIT EXPENSES WHERE APPLICABLE.
RETURN POLICY
THE DEVICE INTENDED FOR REPAIR OR REPLACEMENT UNDER WARRANTY NEEDS TO BE SHIPPED IN THE ORIGINAL PACKAGING ONLY, SO PLEASE KEEP IT JUST IN CASE. ALSO, A FILLED RMA FORM MUST BE INCLUDED. XAOC DEVICES CAN NOT TAKE ANY RESPONSIBILITY FOR DAMAGES CAUSED DURING TRANSPORT. PRIOR TO SENDING US ANYTHING, PLEASE CONTACT US AT SUPPORT@XAOCDEVICES.COM. NOTE THAT ANY UNSOLICITED PARCEL WILL BE REJECTED AND RETURNED!
GENERAL INQUIRIES
FOR USER FEEDBACK SUGGESTIONS, DISTRIBUTION TERMS, AND JOB POSITIONS FEEL FREE TO CONTACT XAOC DEVICES AT INFO@XAOCDEVICES.COM. PLEASE VISIT THE XAOCDEVICES.COM FOR INFORMATION ABOUT THE CURRENT PRODUCT LINE, USER MANUALS, FIRMWARE UPDATES, TUTORIALS, AND MERCHANDISE.
WORKING CLASS ELECTRONICS

ALL RIGHTS RESERVED. CONTENT COPYRIGHT © 2017 XAOC DEVICES. COPYING, DISTRIBUTION OR ANY COMMERCIAL USE IN ANY WAY IS STRICTLY PROHIBITED AND REQUIRES THE WRITTEN PERMISSION BY XAOC DEVICES. SPECIFICATIONS ARE SUBJECT TO CHANGE WITHOUT PRIOR NOTICE.
MAIN FEATURES
Four CV/gate steps
Per-step repetition or ratcheting
Per-step gate muting
Accepts clock rates up to 320Hz
On-board clock divider
Voltage controlled play direction, transposition, and reset
Unipolar and bipolar adjustable voltage range
Expandable by chaining more Tirana units
TECHNICAL DETAILS
Eurorack synth compatible
6hp, skiff friendly
Current draw: +30mA / -5mA
Reverse power protection

- TIRAMA
- SALUT
- INSTALLATION
- MODULE OVERVIEW
- TOGGLING GATE VS. TRIGGER
- STEP MULTIPLICATION AND DIVISION
- STEP REPEAT
- RATCHETING
- CLOCK DIVISION
- CHAINING MULTIPLE UNITS
- STEP MULTIPLICATION & DIVISION
- CLOCK DIVISION GATE VS. TRIGGER
- RESET BEHAVIOUR ADJUSTMENT
- WARRANTY TERMS
- LEGACY SUPPORT
- RETURN POLICY
- GENERAL INQUIRIES
- WORKING CLASS ELECTRONICS
- MAIN FEATURES
- TECHNICAL DETAILS
Brand : Xaoc
Model : Tirana II
Category : Synthesizer