
EWCIM350S - Sorbet maker Norpole - Free user manual and instructions
Find the device manual for free EWCIM350S Norpole in PDF.


| Product Type | Ice Cream Maker (Sorbetière) |
| Brand | Norpole |
| Model | EWCIM350S |
| Capacity | 1.5 liters |
| Power Consumption | 150 W |
| Power Supply | 220-240 V ~ 50 Hz |
| Dimensions (W x D x H) | 25 x 25 x 30 cm |
| Net Weight | 4.0 kg |
| Material | Plastic housing, aluminum bowl |
| Freezing Time | Approximately 20-30 minutes (pre-chilled bowl) |
| Functions | Ice cream, sorbet, gelato, frozen yogurt |
| Control Type | Rotary switch with ON/OFF |
| Bowl Type | Removable, double-walled with refrigerant |
| Paddle | Stirring paddle, removable |
| Lid | Transparent lid with ingredient spout |
| Cleaning | Hand wash bowl and paddle; wipe base with damp cloth |
| Safety Features | Overheat protection, non-slip feet |
| Accessories Included | Ice cream bowl, paddle, instruction manual |
| Repairability | Spare parts available (bowl, paddle, motor unit) |
| Certification | CE, RoHS |
Frequently Asked Questions - EWCIM350S Norpole
User questions about EWCIM350S Norpole
0 question about this device. Answer the ones you know or ask your own.
Ask a new question about this device
Download the instructions for your Sorbet maker in PDF format for free! Find your manual EWCIM350S - Norpole and take your electronic device back in hand. On this page are published all the documents necessary for the use of your device. EWCIM350S by Norpole.
USER MANUAL EWCIM350S Norpole
Commercial Ice Maker
Model: EWCIM350S
natural_image
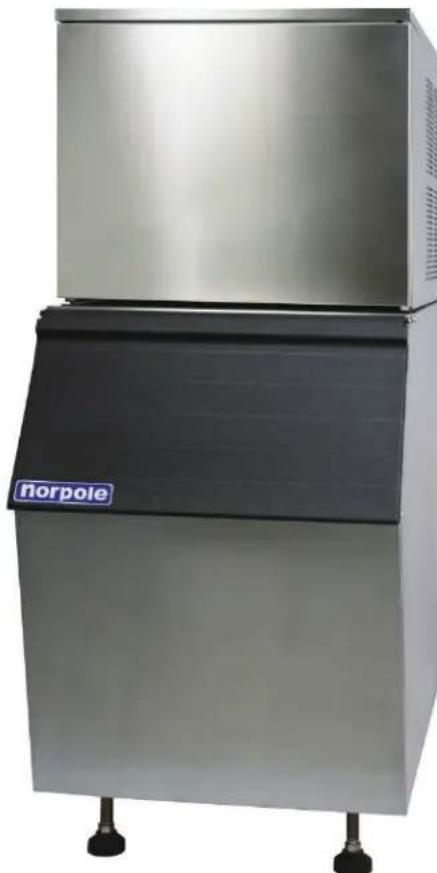
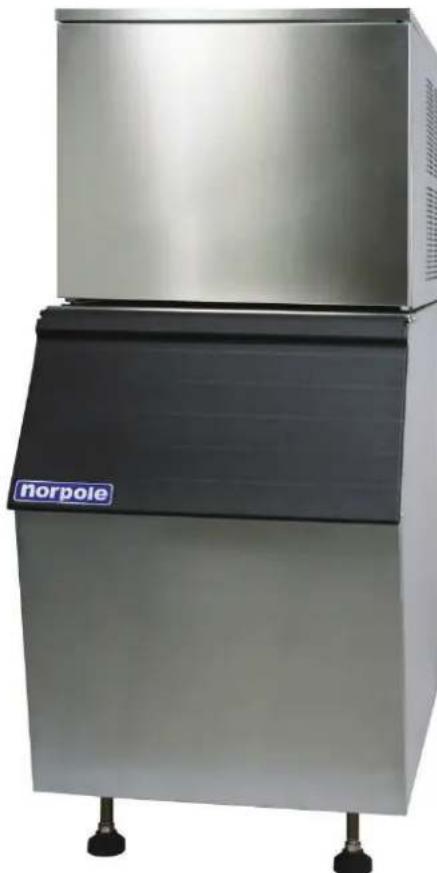
Exterior view of a stainless steel ice cream maker with 'norpole' branding on front (no additional signage or text visible)PLEASE READ THIS MANUAL CAREFULLY BEFORE USING YOUR COMMERCIAL ICE MAKER AND KEEP IT FOR FUTURE REFERENCE.
norpole™
PRODUCT REGISTRATION
Thank you for purchasing a Norpole™ product. The first step to protect your new product is to complete the product registration on our website: www.norpoleinc.com/register. The benefits of registering your product include the following:
- Registering your product will allow us to contact you regarding a safety notification or product update.
- Registering your product will allow for more efficient warranty service processing when warranty service is required.
- Registering your product could act as your proof of purchase in the event of insurance loss.
Once again, thank you for purchasing a Norpole™ product.
CONTENTS
Product Registration 02
Important Safeguards 04
Important Safety Instructions ....05
Parts and Features 06
Specifications 07
Installation 08
Operation 09
Cleaning and Maintenance 10
Troubleshooting Guide 14
Warranty 15
norpole™
IMPORTANT SAFEGUARDS

WARNING
Read and understand all safety precautions. Failure to follow all instructions described in this manual may result in electric shock, fire and/or serious personal injury. The warnings, cautions and instructions discussed in this manual cannot cover all possible conditions and situations that may occur. It must be understood by the user that common sense and caution are attributes which cannot be built into the appliance, but must be supplied by the user.
Electric Power
If an electrical circuit is overloaded with other appliances, the commercial ice maker may not operate properly. The commercial ice maker should be operated on a separate electrical circuit from other operating appliances.
3-Prong Plug (NEMA 6-20P)
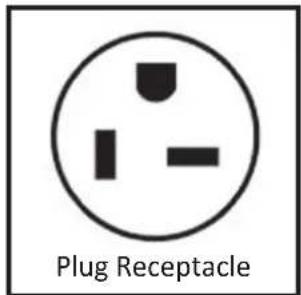
This appliance must be grounded. In the event of an electrical short circuit, the grounding plug reduces the risk of electric shock by providing an escape wire for electric current. This appliance is equipped with a power cord that has a grounding wire with a grounding plug. The plug must be plugged into an electrical outlet that is properly installed and grounded. Improper use of the grounding plug and/or outlet can result in a risk of electric shock. Consult a qualified electrician or serviceman if the grounding instructions are not completely understood.
NOTE: This plug type (NEMA 6-20P) will not fit into a standard 3-prong outlet.

CAUTION
A short power supply cord is provided to reduce the risk of becoming entangled in or tripping over a longer cord. If it is necessary to use an extension cord, use only a 3-wire extension cord that has a 3-blade grounding plug, and a 3-slot receptacle that will accept the plug on the appliance. The marked rating of the extension cord shall be equal to or greater than the electrical rating of the appliance. DO NOT alter the plug of the appliance or any extension cord used with this appliance. Arrange the extension cord so that it will not drape over the countertop or tabletop where it can be tripped over or pulled.
norpole
IMPORTANT SAFETY INSTRUCTIONS

Caution: Risk of Fire
When using your ice maker, basic safety precautions should be observed, including the following:
- Read all instructions before using the ice maker.
- As this unit has ETL sanitation, it can be used in residential and commercial settings. This appliance is intended to be used in the household and in similar applications such as:
• Staff kitchens in shops, offices and other working environments
• Farm houses and by clients in hotels, motels and other residential-type environments
• Catering and similar non-retail applications
- This appliance is not intended for use by persons (including children) with reduced physical, sensory or mental capabilities, or lack of experience and knowledge, unless they have been given supervision or instruction concerning use of the appliance by a person responsible for their safety. Children should be supervised to ensure they do not play with the appliance.
- DO NOT store explosive substances such as aerosol cans with a flammable propellant in this appliance.
- If the power supply cord is damaged, it must be replaced by the manufacturer, its service agent, or similarly qualified persons in order to avoid a hazard. Please contact our Customer Service department toll free at 1 888-775-0202 for more information.
- DO NOT unplug the ice maker by puling the cord. DO NOT put any stress on the power cord where it connects to the product.
norpole™
PARTS AND FEATURES
Please check to make sure you have the accessories listed below. If you are missing any of the below items, please contact our Customer Service Department toll-free at 888-775-0202.
a. Water Inlet Hose (1)
b. Water Drainage Hose (1)
c. Leveling Legs (4)
d. Ice Scooper (1)
Unit
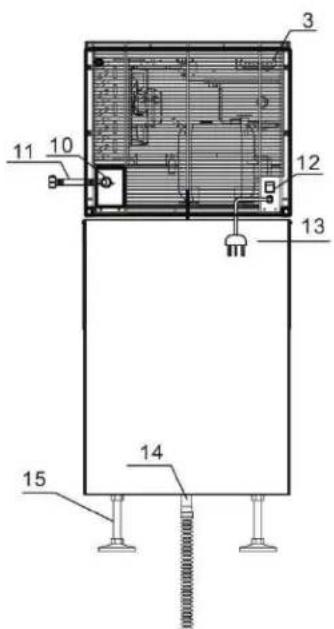
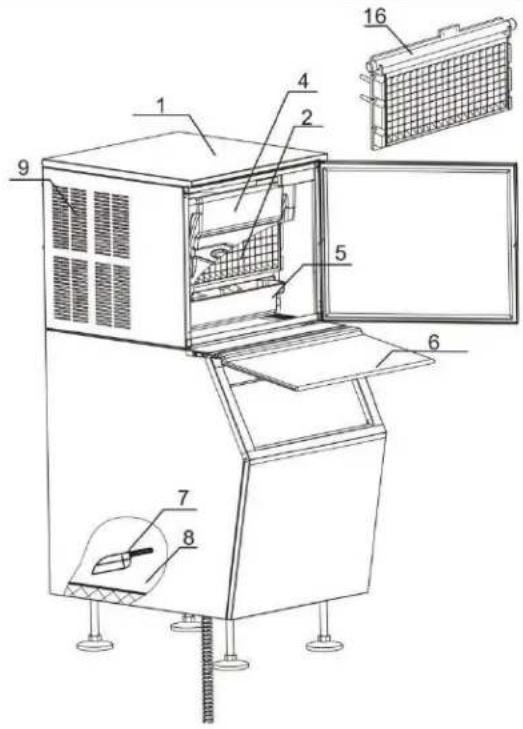
- Top Faceplate
- Evaporator
- Control Panel
- Block Water Board
- Water Box
- Ice Storage Bin Door
- Ice Scooper
- Ice Storage Bin
- Flank Intake
- Water Inlet Valve
- Water Inlet Hose
- Switch
- Plug
- Water Drainage Hose
- Adjustable Leveling Legs
- Sprinkler
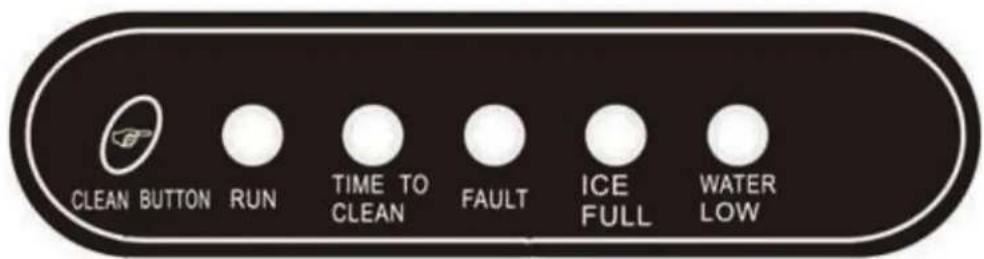
Control Panel
norpole™
SPECIFICATIONS
| Model Number EWCIM350S | |
| Ice Making Bin Dimensions | 22.3"W x 18.8"H x 22.6"D |
| Ice Storage Bin Dimensions | 22.6"W x 29.8"H x 31.3"D |
| Weight 167.6 Lbs. | |
| Ice Making Capacity 330 Lbs | /Day |
| Storage Capacity 209 Lbs. | |
| Voltage Rating 115V AC | |
| Power Rating 980 Watts | |
| Plug Type NEMA 6-20P | |
| Safety Standard ETL Sanitation |
norpole™
INSTALLATION

WARNING
Connect to a potable water supply only. It is recommended to install a water filter. The water inlet hose would connect to the filter and to the inlet valve on the machine.
- During transportation, the incline angle of the ice maker should not exceed 45^ . To prevent damage to the compressor or refrigeration systems, the ice maker should always remain right side up.
- Unpack the ice maker and remove all documents and spare parts.
- Place the ice maker in a well-ventilated area on a level and structurally sound surface away from sources of heat and corrosive gas. Allow at least 6 inches of space all around the exterior of the ice maker for proper ventilation.
- Adjust the leveling legs after placing the ice maker. Doing so will ensure the water level and ice shape will be unaffected. The outlet of the drainage tube should be lower than the cabinet to drain water easily. Wait approximately 12 hours after positioning the ice maker before use.
- Connect one end of a flexible, plastic corrugated pipe with the water drainage hose on the underside of the ice maker. The other end of the pipe should be placed in a container or sewer that can capture surplus water. We do not recommend draining into a bucket. An air gap will likely be required between the water drainage hose and the drain/waste receptacle. This must be prepared by the user.
- Connect one end of the water inlet hose (supplied with the ice maker) with the 3/4'' screw type connector to the potable water supply or filter. The water pressure of the water inlet hose is 1\~8 kg/cm^2 . The other end of the water inlet hose should be connected with the screw type connector of the water inlet valve on the rear of the ice maker.
- Be sure the gaskets are installed in both ends of the water inlet hose before connecting.
norpole™
OPERATION
Note: If there is something wrong with the water supply system, the ice maker will restart automatically in 24 hours. Otherwise, you will need to stop the ice maker and restart it.
Note: DO NOT remove the block water board while the ice maker is running.
Note: Never keep anything other than ice in the ice storage bin. Objects like wine and beer should not be stored in the ice bin as these bottles are unsanitary and the labels may slip off and plug up the drain.
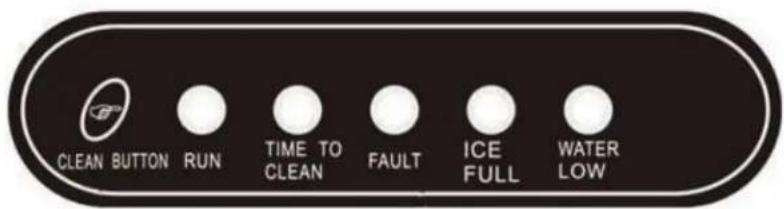
- Plug in the ice maker, turn on the switch and the run indicator light will illuminate.
- When the ice maker is being used for the first time or reused after being left idle for a long time, the first and second ice making cycles are meant to clean the tube system; DO NOT use this ice. After the water is drained, the normal ice making procedures can begin.
- All of the functions – water inlet, ice making, ice dropping and ice storing - are controlled automatically for continuous ice-making.
- If the ice storage bin is full, the ice full indicator light will illuminate and the ice maker will stop automatically. If there is a water shortage or something wrong with the water supply system, the water low indicator light will illuminate and the ice maker will stop operation. The ice maker will restart automatically in 24 hours. Otherwise, you will need to stop the unit and restart it again.
- Use potable water as a water source. If the water low indicator light is illuminated and no ice is being made when the ice maker begins, there may be air in the water inlet tube. If the hydraulic pressure is low, after 5 minutes, the machine will add water automatically. The water low indicator light will turn off when the water is full and the ice maker will begin operating.
CLEANING AND MAINTENANCE
Periodic cleaning and proper maintenance will ensure efficiency, top performance and long life.
There are four areas to keep clean:
a. The exterior
b. The interior
c. The sprinkler
d. The ice making system
Note: If the ice maker is left unused for a long time, it must be thoroughly cleaned before the next use. Carefully follow any instructions provided for cleaning or use of sanitizing solution. DO NOT leave any solution inside the ice maker after cleaning.
Note: Before proceeding with cleaning and maintenance operations, ensure the power supply is disconnected and the water line is shut off (the exception to this rule is ice maker system cleaning detailed on page 12).
Please read the detailed instructions below to properly clean each of the aforementioned areas.
Exterior Cleaning
- The door and cabinet may be cleaned with a mild detergent and warm water solution such as one ounce of dishwashing liquid mixed with two gallons of warm water. DO NOT use solvent-based or abrasive cleaners. Use a soft sponge and rinse with clean water. Wipe with a soft clean towel to prevent spotting.
- Stainless steel should be cleaned as it can discolor when exposed to chlorine gas. Clean stainless steel surfaces with a mild detergent, warm water solution and a damp cloth. Never use abrasive cleaning agents.
Note: Stainless steel exposed to chlorine gas and moisture, such as in areas with spas or swimming pools, may show some discoloration. Discoloration from chlorine gas is normal.
norpole™
CLEANING AND MAINTENANCE
Interior Cleaning
Note: The ice storage bin should be sanitized occasionally. Clean the bin before the ice maker is used for the first time and before it is reused after an extended period of time. It is typically convenient to sanitized the bin after the ice making system has been cleaned and the storage bin is empty. The ice scoop should be washed regularly. Wash it just like any other food container.
- Disconnect the power supply cord.
- Open the ice storage bin door and with a clean cloth, wipe down the interior with a sanitizing solution made of 1 ounce household bleach or chlorine and two gallons of hot water (95-115°F / 35-46°C).
- Rinse thoroughly with clean water. The waste water will drain through the drainage tube.
- Plug in the ice maker.
Sprinkler Cleaning
Note: The sprinkler should only be cleaned when you find that some ice cubes are improperly shaped. You should clean the ice making system after cleaning the sprinkler.
Note: DO NOT use solvent-based cleaning agents or abrasives on the interior. These cleaners may transmit taste to the ice cubes or damage or discolor the interior.
- Disconnect the power supply cord.
- Open the door and remove the block water board by snapping one end up and pulling forward.
- Remove the block water board from the evaporator.
- Find the sprinkler arm and raise it. Disconnect it from the water tube which is connected at the back of the sprinkler arm.
- A de-scaling solution may be prepared in a plastic basin with Nu-Calgon Nickel-Safe Ice Machine Cleaner. Mix four ounces of the ice machine cleaner per gallon of warm water.
- Remove the sprinkler arm from the interior. Thoroughly clean the sprinkler arm by soaking it in the basin filled with the de-scaling solution until it is free of any deposits. Use a soft brush to remove any thick or stubborn residue to help the dissolving action. Rinse under a stream of tap water.

CLEANING AND MAINTENANCE
- Wipe down the interior of the water sump with the de-scaling solution and warm water. Rinse thoroughly with clear water.
- Reassemble the sprinkler arm, evaporator and block water board.
- Perform steps 1, 3-5 of the Ice Making System Cleaning procedure detailed below.
Ice Making System Cleaning
- Unplug the ice maker ensuring the water connection remains intact.
- Open the door of the top cabinet, and making sure there are no ice cubes on the evaporator, remove all ice cubes from the ice storage bin.
- Remove the water box and dispose of any water before reinstalling. Then, fill the ice maker cleaner into the water box. Plug in the unit and press the clean button (5 seconds). The machine will automatically go into cleaning mode which lasts for 30 minutes. At the same time, clean the ice storage bin with the cleaner.
- After the ice maker completes the cleaning mode, remove the water box, drain the water, clean the water box and evaporator cover according to the instructions in this manual (see step 6 below). Lastly, reinstall the water box, press the clean button (5 seconds) to begin the water cycle mode and clean all residual cleaning solution.
- Repeat the process detailed in step 4 three times to ensure the cleaning solution has discharged completely.
- After completing step 5, remove the water box and evaporator cover. Clean these parts with water between 95 - 122^ F (35-50°C). Flush and clean the inner liner of the ice storage bin.
- Once you have completed the above processes, throw away the ice cubes.
norpole
CLEANING AND MAINTENANCE
Maintenance Notes
a. If the compressor stops for any reason like water shortage, too much ice, etc. DO NOT restart the unit right away. To protect the compressor, wait five minutes before restarting.
b. Regularly check the connectors of the water inlet and outlet tubes. Drain the little surplus water that may occur.
c. When not used for a long period of time, remove all items from the compartment and disconnect the power supply cord from the wall outlet. Clean the interior compartment and wipe away all water. Remove the water inlet tube from the back of the unit and drain all water. To prevent the formation of mold, leave the door open to dry the compartment completely.
d. Clean the condenser once every six months to keep it well-ventilated. Disconnect the ice maker and let the condenser cool before cleaning. DO NOT touch the aliform (wing-shaped) pieces during cleaning to avoid injury. After removing the flank intake faceplate, use a cleaner or a brush to clean it.
e. Clean the evaporator and sprinkler once every three months to keep it clean.
norpole™
TROUBLESHOOTING GUIDE
Please reference the below table to identify the cause and solution of your particular problem. If you cannot solve the problem on your own, please contact our Customer Service Department toll-free at 888-775-0202.
| PROBLEM POSSIBLE CAUSE SOLUTION | ||
| The ice maker does not work. | The voltage is lower than 98V. | Turn off the ice maker. Restart the unit only when the voltage is normal. |
| The ambient temperature is too low (<50°F/10°C). | Try using the ice maker again when the ambient temperature is above 50°F/10°C. | |
| The compressor is functioning, however no ice was made. | The refrigerant leaks. Refill the refrigerant and test for leakage. | |
| The refrigerating system is blocked. | Replace the filter for the N_2 filling system. | |
| Solenoid valve opens constantly. | Replace the solenoid valve. | |
| The condensing fan does not work. | Check whether the condensing fan works. | |
| The hall element is located on the sprinkler. It is a sensor that detects ice thickness and ice level. It may not be functioning. | Verify that the hall element is in its proper position (you may find the hall element on the lower right corner of the sprinkler) and is functioning. | |
| The compressor does not work. | Water shortage. Check the water supply system (water inlet valve and water inlet tube). | |
| Ice full. Remove some ice. | ||
| The shell temperature is too high. | Turn off the ice maker. Restart the unit in approximately 1 hour. | |
| The water low indicator light is illuminated. | There is a water shortage in the water supply system. | Ensure the water supply system is connected to a potable water supply and there are no obstructions. Then restart the ice maker. |
| The water inlet valve is damaged. | Check the water inlet valve. | |
| Water pressure is too low. | The water pressure should not be lower than 1 kg/cm2. | |
norpole™
LIMITED WARRANTY
MC Appliance Corporation warrants each new Commercial Ice Maker to be free from defects in material and workmanship and agrees to remedy any such defect or to furnish a new part(s) (at the company's option) for any part(s) of the unit that has failed during the warranty period. Parts and labor expenses are covered on this unit for a period of one year from the date of purchase. In addition, MC Appliance Corporation warrants the compressor (part only) to be free from defects in material and workmanship for a period of 5 years. The consumer is responsible for all labor and transportation expenses related to the diagnosis and replacement of the compressor after the initial one-year warranty expires. In the event the unit requires replacement or refund under this warranty, the consumer is responsible for all transportation costs to return the unit to our factory before receiving a replacement or refund. A copy of the dated sales receipt/invoice is required to receive warranty service or a refund.
This warranty covers appliances in use within the contiguous United States, Alaska, Hawaii and Puerto Rico. The warranty does not cover the following:
- Damages due to shipping damage or improper installation. Damages due to misuse or abuse.
- Content losses due to failure of the unit.
- Inside components such as door panels, door shelves, racks, evaporator, etc.
- Punctures to the evaporator system due to improper defrosting of the unit.
• Repairs performed by unauthorized service agents.
- Service calls that do not involve defects in material and workmanship as instructions on proper use of the product or improper installation.
- Replacement or resetting of house fuses or circuit breakers.
- Failure of this product if used for other than for its intended purpose.
- Disposal costs for any failed unit not returned to our factory.
- Any delivery costs incurred as the result of a unit that fails to perform as specified.
- Expenses for travel and transportation for product service if your appliance is located in a remote area where service by an authorized service technician is not available.
- The removal and reinstallation of your appliance if it is installed in an inaccessible location or is not installed in accordance with published installation instructions.
• Refunds for non-repairable products are limited to the price paid for the unit per the sales receipt.
- This warranty is non-transferable. This warranty applies only to the original purchaser and does not extend to any subsequent owners.
LIMITATIONS OF REMEDIES AND EXCLUSIONS
Product repair in accordance with the terms herein, is your sole and exclusive remedy under this limited warranty. Any and all implied warranties including merchantability and fitness for a particular purpose are hereby limited to one year or the shortest period allowed by law. MC Appliance Corporation is not liable for incidental or consequential damages and no representative or person is authorized to assume for us any other liability in connection with the sale of this product. Under no circumstances is the consumer permitted to return this unit to the factory without the prior written consent of MC Appliance Corporation.
Some states prohibit the exclusion or limitation of incidental or consequential damages, or limitations on implied warranties. This warranty gives you specific legal rights, and you may also have other rights which vary from state to state.
Model
Parts & Labor
Compressor (Part Only)
Type of Service
EWCIM350S
One Year
Five Years
On Site
For Service or Assistance, please contact us toll-free at 888-775-0202.
Or visit us on the web at www.mcappliance.com to request warranty service or order parts.

CNA International, Inc. d/b/a Norpole Inc. All rights reserved.
Norpole™ is a registered trademark of CNA International, Inc.
www.mcappliance.com
Printed In China
norpole™
norpole™
MANUAL DEL USUARIO
Máquina para fabricar hielo comercial
Modelo: EWCIM350S
natural_image
Exterior view of a stainless steel industrial ice cream maker (no visible text or symbols)Panel de Control
norpole™
ESPECIFICACIONES
- Commercial Ice Maker
- PRODUCT REGISTRATION
- CONTENTS
- IMPORTANT SAFEGUARDS
- WARNING
- Electric Power
- 3-Prong Plug (NEMA 6-20P)
- CAUTION
- IMPORTANT SAFETY INSTRUCTIONS
- Caution: Risk of Fire
- PARTS AND FEATURES
- Unit
- Control Panel
- INSTALLATION
- OPERATION
- CLEANING AND MAINTENANCE
- Exterior Cleaning
- Interior Cleaning
- Sprinkler Cleaning
- Ice Making System Cleaning
- Maintenance Notes
- TROUBLESHOOTING GUIDE
- LIMITED WARRANTY
- LIMITATIONS OF REMEDIES AND EXCLUSIONS
- norpole™
- MANUAL DEL USUARIO
- Máquina para fabricar hielo comercial
- Panel de Control
Brand : Norpole
Model : EWCIM350S
Category : Sorbet maker