
43LM5500PLA - Monitor LG - Free user manual and instructions
Find the device manual for free 43LM5500PLA LG in PDF.


| Product Type | 43-inch 4K UHD Monitor |
| Model Number | 43LM5500PLA |
| Screen Size | 43 inches (diagonal) |
| Resolution | 3840 x 2160 (4K UHD) |
| Panel Type | IPS (In-Plane Switching) |
| Refresh Rate | 60 Hz |
| Brightness | 350 cd/m² (typical) |
| Contrast Ratio | 1000:1 (Static) |
| Response Time | 5 ms (GTG) |
| Viewing Angle | 178° / 178° (Horizontal/Vertical) |
| Connectivity | 2 x HDMI 2.0, 1 x DisplayPort 1.4, 1 x USB-C (DP Alt Mode), 2 x USB 3.0 Downstream, 1 x USB 3.0 Upstream, 1 x Headphone Out |
| VESA Mount | 200 x 200 mm |
| Dimensions (W x H x D with Stand) | 967 × 622 × 256 mm |
| Weight (with Stand) | 14.5 kg |
| Power Consumption (Typical) | 85 W |
| Power Supply | AC 100-240V, 50/60Hz |
| Stand Adjustments | Tilt: -5° to 15°, Swivel: ±30°, Height: 130 mm |
| Built-in Speakers | 2 x 10W |
| Special Features | PIP/PBP, DDC/CI, Dynamic Action Sync, Black Stabilizer |
| Cleaning Instructions | Wipe with a soft, dry cloth. Do not use liquid cleaners. |
| Safety Warnings | Do not block ventilation openings. Use only with the specified power source. |
| Spare Parts | Contact LG support for replacement parts (e.g., power board, panel). |
Frequently Asked Questions - 43LM5500PLA LG
User questions about 43LM5500PLA LG
0 question about this device. Answer the ones you know or ask your own.
Ask a new question about this device
Download the instructions for your Monitor in PDF format for free! Find your manual 43LM5500PLA - LG and take your electronic device back in hand. On this page are published all the documents necessary for the use of your device. 43LM5500PLA by LG.
USER MANUAL 43LM5500PLA LG
Safety and Reference
LED TV\*
* LG LED TV applies LCD screen with LED backlights.
Please read this manual carefully before operating your set and retain it for future reference.
Warning! Safety instructions

CAUTION
RISK OF ELECTRIC SHOCK DO NOT OPEN

CAUTION : TO REDUCE THE RISK OF ELECTRIC SHOCK, DO NOT REMOVE COVER (OR BACK). NO USER-SERVICEABLE PARTS INSIDE. REFER TO QUALIFIED SERVICE PERSONNEL.
This symbol is intended to alert the user to the presence of uninsulated "dangerous voltage" within the product's enclosure that may be of sufficient magnitude to constitute a risk of electric shock to persons.
This symbol is intended to alert the user to the presence of important operating and maintenance (servicing) instructions in the literature accompanying the appliance. WARNING: TO REDUCE THE RISK OF FIRE AND ELECTRIC SHOCK, DO NOT EXPOSE THIS PRODUCT TO RAIN OR MOISTURE.
• TO PREVENT THE SPREAD OF FIRE, KEEP CANDLES OR OTHER ITEMS WITH OPEN FLAMES AWAY FROM THIS PRODUCT AT ALL TIMES.
- Do not place the TV and/or remote control in the following environments:
- Keep the product away from direct sunlight.
- An area with high humidity such as a bathroom
- Near any heat source such as stoves and other devices that produce heat.
- Near kitchen counters or humidifiers where they can easily be exposed to steam or oil.
- An area exposed to rain or wind.
- Do not expose to dripping or splashing and do not place objects filled with liquids, such as vases, cups, etc. on or over the apparatus (e.g., on shelves above the unit).
- Near flammable objects such as gasoline or candles, or expose the TV to direct air conditioning.
- Do not install in excessively dusty places.
Otherwise, this may result in fire, electric shock, combustion/explosion, malfunction or product deformation.
- Ventilation
- Install your TV where there is proper ventilation. Do not install in a confined space such as a bookcase.
- Do not install the product on a carpet or cushion.
- Do not block or cover the product with cloth or other materials while unit is plugged in.
• Take care not to touch the ventilation openings. When watching the TV for a long period, the ventilation openings may become hot. - Protect the power cord from physical or mechanical abuse, such as being twisted, kinked, pinched, closed in a door, or walked upon. Pay particular attention to plugs, wall outlets, and the point where the cord exits the device.
• Do not move the TV whilst the Power cord is plugged in.
• Do not use a damaged or loosely fitting power cord. - Be sure do grasp the plug when unplugging the power cord. Do not pull on the power cord to unplug the TV.
- Do not connect too many devices to the same AC power outlet as this could result in fire or electric shock.
• Disconnecting the Device from the Main Power
- The power plug is the disconnecting device. In case of an emergency, the power plug must remain readily accessible.
- Do not let your children climb or cling onto the TV. Otherwise, the TV may fall over, which may cause serious injury.
• Outdoor Antenna Grounding (Can differ by country):
- If an outdoor antenna is installed, follow the precautions below.
An outdoor antenna system should not be located in the vicinity of overhead power lines or other electric light or power circuits, or where it can come in contact with such power lines or circuits as death or serious injury can occur.
Be sure the antenna system is grounded to provide some protection against voltage surges and built-up static charges.
Section 810 of the National Electrical Code (NEC) in the U.S.A. provides information with respect to proper grounding of the mast and supporting structure, grounding of the lead-in wire to an antenna discharge unit, size of grounding conductors, location of antenna discharge unit, connection to grounding electrodes and requirements for the grounding electrode.
Antenna grounding according to the National Electrical Code, ANSI/NFPA 70
- Grounding (Except for devices which are not grounded.)
- TV with a three-prong grounded AC plug must be connected to a three-prong grounded AC outlet. Ensure that you connect the earth ground wire to prevent possible electric shock.
- Never touch this apparatus or antenna during a lightning storm. You may be electrocuted.
- Make sure the power cord is connected securely to the TV and wall socket if not secured damage to the Plug and socket may occur and in extreme cases a fire may break out.
- Do not insert metallic or inflammable objects into the product. If a foreign object is dropped into the product, unplug the power cord and contact the customer service.
-
Do not touch the end of the power cord while it is plugged in. You may be electrocuted.
• If any of the following occur, unplug the product immediately and contact your local customer service. -
The product has been damaged.
- If water or another substance enters the product (like an AC adapter, power cord, or TV).
- If you smell smoke or other odors coming from the TV
- When lightning storms or when unused for long periods of time.
Even the TV is turned off by remote control or button, AC power source is connected to the unit if not unplugged in.
- Do not use high voltage electrical equipment near the TV (e.g., a bug zapper). This may result in product malfunction.
- Do not attempt to modify this product in any way without written authorization from LG Electronics. Accidental fire or electric shock can occur. Contact your local customer service for service or repair. Unauthorized modification could void the user's authority to operate this product.
- Use only an authorized attachments / accessories approved by LG Electronics. Otherwise, this may result in fire, electric shock, malfunction, or product damage.
-
Never disassemble the AC adapter or power cord. This may result in fire or electric shock.
-
Handle the adapter carefully to avoid dropping or striking it. An impact could damage the adapter.
- To reduce the risk of fire or electrical shock, do not touch the TV with wet hands. If the power cord prongs are wet or covered with dust, dry the power plug completely or wipe dust off.
- Batteries
- Store the accessories (battery, etc.) in a safe location out of the reach of children.
- Do not short circuit, disassemble, or allow the batteries to overheat. Do not dispose of batteries in a fire. Batteries should not be exposed to excessive heat.
- Caution : Risk of fire or explosion if the battery is replaced by an incorrect type.
- Moving
- When moving, make sure the product is turned off, unplugged, and all cables have been removed. It may take 2 or more people to carry larger TVs. Do not press or put stress on the front panel of the TV. Otherwise, this may result in product damage, fire hazard or injury.
- Keep the packing anti-moisture material or vinyl packing out of the reach of children.
- Do not allow an impact shock, any objects to fall into the product, and do not drop anything onto the screen.
- Do not press strongly upon the panel with a hand or a sharp object such as a nail, pencil, or pen, or make a scratch on it. It may cause damage to screen.
- Cleaning
- When cleaning, unplug the power cord and wipe gently with a soft/dry cloth. Do not spray water or other liquids directly on the TV. Do not clean your TV with chemicals including glass cleaner, any type of air freshener, insecticide, lubricants, wax (car, industrial), abrasive, thinner, benzene, alcohol etc., which can damage the product and/or its panel. Otherwise, this may result in electric shock or product damage.
Preparing
- If the TV is turned on for the first time after it was shipped from the factory, initialization of the TV may take a few minutes.
• Image shown may differ from your TV. - Your TV's OSD (On Screen Display) may differ slightly from that shown in this manual.
- The available menus and options may differ from the input source or product model that you are using.
- New features may be added to this TV in the future.
- The device must be easily accessed to a location outlet near the access. Some devices are not made by turning on / off button, turning off the device and unplugging the power cord.
- The items supplied with your product may vary depending on the model.
- Product specifications or contents of this manual may be changed without prior notice due to upgrade of product functions.
- For an optimal connection, HDMI cables and USB devices should have bezels less than 10 mm thick and 18 mm width. Use an extension cable that supports USB the USB cable or USB memory stick does not fit into your TV's USB port.


$$ ^ {*} A \leq 1 0 \mathrm{mm} $$
$$ ^ {*} B \leq 1 8 m m $$
• Use a certified cable with the HDMI logo attached.
- If you do not use a certified HDMI cable, the screen may not display or a connection error may occur. (Recommended HDMI Cable Types) - Ultra High Speed HDMI® Cable (3 m or less)
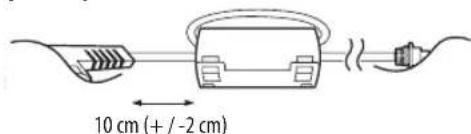
- How to use the ferrite core (Depending on model)
- Use the ferrite core to reduce the electromagnetic interference in the power cord. Wind the power cord on the ferrite core once.
[Wall side]
[TV side]
Separate Purchase
Separate purchase items can be changed or modified for quality improvement without any notification. Contact your dealer to buy these items. These devices only work with certain models.
The model name or design may be changed depending on the upgrade of product functions, manufacturer's circumstances or policies.
Wall Mounting Bracket
Make sure to use screws and wall mount bracket that meet the VESA standard. Standard dimensions for the wall mount kits are described in the following table.

| Model 32/43LM55* | |
| VESA (A x B) (mm) 200 x 200 | |
| Standard screw M6 | |
| Number of screws 4 | |
| Wall mount bracket | LSW240BMSW240 |
Lifting and moving the TV
Please note the following advice to prevent the TV from being scratched or damaged and for safe transportation regardless of its type and size.
- It is recommended to move the TV in the box or packing material that the TV originally came in.
- Before moving or lifting the TV, disconnect the power cord and all cables.
- When holding the TV, the screen should face away from you to avoid damage.

- Hold the top and bottom of the TV frame firmly. Make sure not to hold the transparent part, speaker, or speaker grill area.
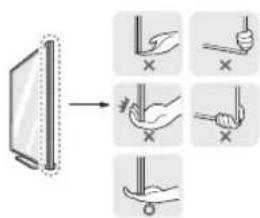
- When transporting a large TV, there should be at least 2 people.
- When transporting the TV by hand, hold the TV as shown in the following illustration.

- When transporting the TV, do not expose the TV to jolts or excessive vibration.
- When transporting the TV, keep the TV upright, never turn the TV on its side or tilt towards the left or right.
- Do not apply excessive pressure to cause flexing / bending of frame chassis as it may damage screen.
- When handling the TV, be careful not to damage the protruding buttons.

- Avoid touching the screen at all times, as this may result in damage to the screen.
- When attaching the stand to the TV set, place the screen facing down on a cushioned table or flat surface to protect the screen from scratches.
Mounting on a Table
1 Lift and tilt the TV into its upright position on a table.
- Leave a 10 cm (minimum) space from the wall for proper ventilation.

(Depending on model)
2 Connect the power cord to a wall outlet.

- Do not apply foreign substances (oils, lubricants, etc.) to the screw parts when assembling the product. (Doing so may damage the product.)
- If you install the TV on a stand, you need to take actions to prevent the product from overturning. Otherwise, the product may fall over, which may cause injury.
- Do not use any unapproved items to ensure the safety and product life span.
- Any damage or injuries caused by using unapproved items are not covered by the warranty.
- Make sure that the screws are inserted correctly and fastened securely. (If they are not fastened securely enough, the TV may tilt forward after being installed.) Do not use too much force and over tighten the screws; otherwise screw may be damaged and not tighten correctly.
Securing TV to the Wall

(Depending on model)
1 Insert and tighten the eye-bolts, or TV brackets and bolts on the back of the TV.
- If there are bolts inserted at the eye-bolts position, remove the bolts first.
2 Mount the wall brackets with the bolts to the wall. Match the location of the wall bracket and the eye-bolts on the rear of the TV.
3 Connect the eye-bolts and wall brackets tightly with a sturdy rope. Make sure to keep the rope horizontal with the flat surface.
- Use a platform or cabinet that is strong and large enough to support the TV securely.
- Brackets, bolts and ropes are not provided. You can obtain additional accessories from your local dealer.
Mounting to the Wall
Attach an optional wall mount bracket at the rear of the TV carefully and install the wall mount bracket on a solid wall perpendicular to the floor. When you attach the TV to other building materials, please contact qualified personnel. LG recommends that wall mounting be performed by a qualified professional installer. We recommend the use of LG's wall mount bracket. LG's wall mount bracket is easy to move with cables connected. When you do not use LG's wall mount bracket, please use a wall mount bracket where the device is adequately secured to the wall with enough space to allow connectivity to external devices. It is advised to connect all the cables before installing fixed wall mounts.

(Depending on model)

- Remove the stand before installing the TV on a wall mount by performing the stand attachment in reverse.
- For more information of screws and wall mount bracket, refer to the Separate Purchase.
- If you intend to mount the product to a wall, attach VESA standard mounting interface (optional parts) to the back of the product. When you install the set to use the wall mounting bracket (optional parts), fix it carefully so as not to drop.
- When mounting a TV on the wall, make sure not to install the TV by hanging the power and signal cables on the back of the TV.
- Do not install this product on a wall if it could be exposed to oil or oil mist. This may damage the product and cause it to fall.
- When installing the wall mounting bracket, it is recommended to cover the stand hole using tape, in order to prevent the influx of dust and insects. (Depending on model)

Connections
Connect various external devices to the TV and switch input modes to select an external device. For more information of external device's connection, refer to the manual provided with each device.
Antenna/Cable
Connect the TV to a wall antenna socket with an RF cable (75 Ω).
• Use a signal splitter to use more than 2 TVs.
- If the image quality is poor, install a signal amplifier properly to improve the image quality.
- If the image quality is poor with an antenna connected, try to realign the antenna in the correct direction.
• An antenna cable and converter are not supplied.
Satellite dish
Connect the TV to a satellite dish to a satellite socket with a satellite RF cable (75 Ω). (Depending on model)
CI module
View the encrypted (pay) services in digital TV mode. (Depending on model)
- Check if the CI module is inserted into the PCMCIA card slot in the right direction. If the module is not inserted properly, this can cause damage to the TV and the PCMCIA card slot.
- If the TV does not display any video and audio when CI+ CAM is connected, please contact to the Terrestrial/Cable/Satellite Service Operator.
Other connections
Connect your TV to external devices. For the best picture and audio quality, connect the external device and the TV with the HDMI cable. Some separate cable is not provided.
HDMI
- When connecting the HDMI cable, the product and external devices should be turned off and unplugged.
• Supported HDMI Audio format (Depending on model): Dolby Digital / Dolby Digital Plus (32 kHz / 44.1 kHz / 48 kHz), PCM (32 kHz / 44.1 kHz / 48 kHz / 96 kHz / 192 kHz)
External Devices
Available external devices are: Blu-ray player, HD receivers, DVD players, VCRs, audio systems, USB storage devices, PC, gaming devices, and other external devices.
• The external device connection may differ from the model.
- Connect external devices to the TV regardless of the order of the TV port.
- If you record a TV program on a Blu-ray/DVD recorder or VCR, make sure to connect the TV signal input cable to the TV through a DVD recorder or VCR. For more information of recording, refer to the manual provided with the connected device.
- Refer to the external equipment's manual for operating instructions.
- If you connect a gaming device to the TV, use the cable supplied with the gaming device.
- In PC mode, there may be noise associated with the resolution, vertical pattern, contrast or brightness. If noise is present, change the PC output to another resolution, change the refresh rate to another rate or adjust the brightness and contrast on the PICTURE menu until the picture is clear.
- In PC mode, some resolution settings may not work properly depending on the graphics card.
- When connecting via a wired LAN, it is recommended to use a CAT 7 cable. (Only when LAN is provided.)
Using Button
You can simply operate the TV functions, using the button.

natural_image
Illustration of a flat-screen TV with a power button icon below (no text or symbols)Basic functions
| Power On (Press) | |
| Power Off ^1 (Press and Hold) | |
| Menu Control (Press ^2 ) | |
| Menu Selection (Press and Hold ^3 ) |
1 All running apps will close, and any recording in progress will stop. (Depending on country)
2 You can access and adjust the menu by pressing the button when TV is on.
3 You can use the function when you access menu control.
Adjusting the menu
When the TV is turned on, press the button one time. You can adjust the Menu items using the button.
| Turns the power off. | |
| Changes the input source. | |
| Scrolls through the saved programmes. | |
| Adjusts the volume level. |
Using Remote Control
The descriptions in this manual are based on the buttons on the remote control. Please read this manual carefully and use the TV correctly.
To replace batteries, open the battery cover, replace batteries (1.5 V AAA) matching the and ends to the label inside the compartment, and close the battery cover. To remove the batteries, perform the installation actions in reverse.
Make sure to point the remote control toward the remote control sensor on the TV.

(Some buttons and services may not be provided depending on models or regions.)
To use the button, press and hold for more than 1 second.
/*: Some TVs may not support the function of this key.
(POWER) Turns the TV on or off.
TV/RAD Selects Radio, TV and DTV programme.
Q/* (SEARCH) Search for content such as TV programmes, movies and other videos, or perform a web search by entering text in the search bar. (Depending on model)
SUBTITLE Recalls your preferred subtitle in digital mode.
Settings) Accesses the Settings menu.
(INPUT) Changes the input source.
Number buttons Enters numbers.
LIST Accesses the saved programmes list.
···/* (MORE ACTIONS) Displays more remote control functions. (Depending on model)
QUICK ACCESS /*** Edits QUICK ACCESS.
- QUICK ACCESS is a feature that allows you to enter a specified app or Live TV directly by pressing and holding the number buttons. (Depending on model)
+ ◀ — Adjusts the volume level.
FAV Accesses your favourite programme list.
GUIDE Shows programme guide.
(MUTE) Mutes all sounds.
“(MUTE) Accesses the [Accessibility] menu.
▲ ⊕ ▼ Scrolls through the saved programmes.
Teletext buttons ☐ These, Blues are used for teletext.
(HOME) Accesses the Home menu.
BACK Returns to the previous level.
Navigation buttons (up/down/left/right) Scrolls through menus or options.
◎ (OK) Selects menus or options and confirms your input.
EXIT Clears on-screen displays and returns to TV viewing.
AD/*Audio descriptions function will be enabled. (Depending on model)
Q.MENU /Accesses the Quick menus. (Depending on model)
/* Streaming Service buttons Connects to the Video Streaming Service. (Depending on model)
REC/* Starts to record and displays record menu. (Only Time MachineReady supported model) (Depending on model)
□, ▷, Ⅱ, ◀◀, ▷▶(Control buttons) Controls media contents.
These stress special functions in some menus.

- Do not mix new batteries with old batteries. This may cause the batteries to overheat and leak.
- Failure to match the correct polarities of the battery may cause the battery to burst or leak, resulting in fire, personal injury, or ambient pollution.
- This apparatus uses batteries. In your community there might be regulations that require you to dispose of these batteries properly due to environmental considerations. Please contact your local authorities for disposal or recycling information.
- Batteries inside or inside the product shall not be exposed to excessive heat such as sunshine, fire or the like.
Settings
Automatically Setting Up Programme
(Settings) → [Programmes] → [Auto Tuning]
Automatically tunes the programmes.
- If Input Source is not connected properly, programme registration may not work.
- [Auto Tuning] only finds programmes that are currently broadcasting.
- If [Lock System] is turned on, a pop-up window will appear asking for password.
To select Picture Mode
Settings → [Picture] → [Picture Mode Settings] → [Picture Mode]
Select the picture mode optimized for the viewing environment or the programme.
- [Vivid] : Heightens contrast, brightness and sharpness to display vivid images.
• [Standard] : Displays images in standard levels of contrast, brightness and sharpness.
• [Eco] / [APS] : (Depending on model)
The Energy Saver feature changes settings on the TV to reduce power consumption.
• [Cinema] / [Game] : Displays the optimum picture for movie, game.
• [Sports] : (Depending on model)
Optimizes the video image for high and dynamic actions by emphasizing primary colours such as white, grass, or sky blue.
- [Expert1] / [Expert2] : Menu for adjusting picture quality that allows experts and amateurs to enjoy the best TV viewing. This is the adjustment menu provided for ISF-certified picture tuning professionals. (ISF logo can only be used on ISF-certified TVs.) ISFccc: Imaging Science Foundation Certified Calibration Control
- Depending on input signal, available range of picture modes may differ.
- isj expert mode is for picture tuning professionals to control and fine-tune using a specific image. For normal images, the effects may not be dramatic.
• The ISF function is only available on some models. - Changing [Picture Mode] may modify [Energy Saving] and [Motion Eye Care] settings, which can also affect energy consumption.
Fine-tuning Picture Mode
(Settings) → [Picture] → [Picture Mode Settings]
This feature allows you to adjust the selected picture mode in detail.
- [Backlight] : Controls the level of screen brightness by adjusting the backlight. The closer to 100, the brighter the screen.
- [Contrast] : Adjusts the contrast of the bright and dark areas of the picture. The closer to 100, the higher the contrast.
- [Brightness] : Adjusts the overall screen brightness. The closer to 100, the brighter the screen.
- [Sharpness] : Adjusts the sharpness of the image. The closer to 50, the sharper and clearer the image.
- [Colour] : Tones down or up the colours displayed on the screen. The closer to 100, the deeper the colour.
- [Tint] : Adjusts the colour balance between red and green displayed on the screen. The closer to Red 50, the more red the colour will be. The closer to Green 50, the more green the colour will be.
- [Colour Temperature] : Adjusts the colour temperature from cold to warm.
- Depending on input signal or other picture settings, the range of detailed items for adjustment may differ.
To set advanced controls
(Settings) → [Picture] → [Picture Mode Settings] → [Advanced Controls] / [Expert Controls]
Calibrates the screen for each picture mode; or adjusts picture settings for a special screen.
• [Dynamic Contrast] : Adjusts the contrast to the optimal level according to the brightness of the image.
• [Dynamic Colour] : Adjusts colours to make the image appear in more natural colours.
- [Preferred Colour] : Adjust the colours of skin, grass and sky to your personal preferences.
- [Gamma] : Sets the gradation curve according to the output of picture signal in relation to the input signal.
• [Colour Gamut] : Selects the range of colours that can be expressed.
- [Colour Filter] : Filters a specific colour spectrum in RGB colours to fine-tune colour saturation and hue accurately.
- [White Balance] : Adjusts the overall tone of the screen as desired.
- [Colour Management System] : This is a system that experts use when they adjust colour with a test pattern. They can select from six colour areas (Red / Green / Blue / Cyan / Magenta / Yellow) without affecting other colours. For normal images, adjustments may not result in noticeable colour changes.
- Depending on input signal or other picture settings, the range of detailed items for adjustment may differ.
To set additional picture options
Settings) → [Picture] → [Picture Mode Settings] → [Picture Options]
Adjusts detailed setting for images.
• [Noise Reduction] : Eliminates noise in the picture.
• [MPEG Noise Reduction] : Eliminates noise generated while creating digital picture signals.
- [Black Level] : Adjusts the brightness and contrast of the screen to suit the black level of the input picture by using the blackness (black level) of the screen.
• [Real Cinema] : Optimizes the screen for movie viewing.
- [Motion Eye Care] : Automatically adjusts brightness and reduces image blur based on image data to reduce eyestrain.
- Depending on input signal or other picture settings, the range of detailed items for adjustment may differ.
Resetting picture settings
Settings) → [Picture] → [Picture Mode Settings] → [Picture Reset]
Resets picture settings that the user customizes. Each picture mode is reset. Select the picture mode you wish to reset.
To use Energy Saving feature
Settings → [Picture] → e[Energy Saving]
Reduces power consumption by adjusting screen brightness.
• [Auto] : (Depending on model)
The TV sensor detects the ambient lighting and automatically adjusts the screen brightness.
• [Off] : Turns off the [Energy Saving] mode.
- [Minimum] / [Medium] / [Maximum] : Applies the pre-EDD [Energy Saving] mode.
- [Screen Off] : Screen is turned off and only sound is played. Press any button except Power button on the remote control to turn the screen back on.
- Depending on the [Energy Saving] ([Auto] / [Maximum]), you may not be able to adjust the [Backlight].
In this case, navigate to Ⓞ (Settings) → [Picture] → e∅ [Energy Saving] and set to [Off] or [Minimum].
To use Eye Comfort Mode feature
Settings) → [Picture] → [Additional Settings] → [Eye Comfort Mode]
If you turn this option on, colour temperature will be automatically adjusted to reduce eye strain.
• On : Automatically adjusts the screen colour temperature.
• Off: Turns off the [Eye Comfort Mode].
Selecting Sound Mode
Settings) → [Sound] → [Sound Mode Settings] → [Sound Mode]
Adjusts TV audio to an optimal level based on a selected sound mode.
• [Standard] : Optimizes the sound for all types of content.
• [Clear Voice] : Boosts voice clarity from the TV.
• [Music] : (Depending on model) Optimizes the sound for music.
• [Cinema] : Optimizes the sound for cinemas.
• [Sports] : (Depending on model) Optimizes the sound for sports.
• [Game]: Optimizes the sound for gameplay.
Adjusting audio balance
Settings → [Sound] → [Sound Mode Settings] → [Balance]
Adjust the volume of the left and right speakers.
Using the Sound Effect function
Settings → [Sound] → [Sound Mode Settings]
The user can select various sound effects.
• [Virtual Surround] : Enjoy an immersive soundscape with the virtual multi-channel surround sound effect.
- [Equalizer]: Set the desired sound by adjusting the equalizer directly.
• [Reset] : Reset the sound effect settings.
• This is only available if [Sound Mode] is set to [Standard].
To use TV speaker
(Settings) → [Sound] → [Sound Out] → [Internal TV Speaker] (Depending on model)
Sound is output through the TV speaker.
To use External Speaker
(Settings) → [Sound] → [Sound Out] → [Audio Out (Optical)] (Depending on model)
Sound is output through the speaker connected to the optical port.
- SimpLink is supported.
To use Internal TV Speaker + Audio Out (Optical)
Settings) → [Sound] → [Sound Out] → [Internal TV Speaker + Audio Out (Optical)]
(Depending on model)
Audio is played through the TV's built-in speakers and the audio device connected to the digital optical audio output port simultaneously.
To connect and use LG audio device
(Settings) → [Sound] → [Sound Out] → [LG Sound Sync (Optical)]
(Depending on model)
Connect LG audio device with the logo to the optical digital audio output port. LG audio device allows you to enjoy rich powerful sound easily.
To use Digital Sound Out
(Settings) → [Sound] → [Sound Out] → [Internal TV Speaker + Audio Out (Optical)] → [Digital Sound Out]
(Depending on model)
Sets up [Digital Sound Out].
| Item Audio Input Digital Audio Output | ||
| [Auto] | MPEGDolby DigitalDolby Digital PlusHE-AAC | PCMDolby DigitalDolby DigitalDolby Digital |
| [PCM] All PCM | ||
• Supported DTV Audio: MPEG, Dolby Digital, Dolby Digital Plus, HE-AAC
To synchronize audio and video
(Settings) → [Sound] → [AV Sync Adjustment]
(Depending on model)
Synchronizes video and audio directly when they do not match. If you set [AV Sync Adjustment] to on, you can adjust the sound output (TV speakers or External Speaker) to the screen image.
- If you select the [Bypass], Outputs the broadcast signals or the sound from external devices without any audio delay. The audio may be output before the video because of the time the TV takes to process the video input.
To use SIMPLINK
(Depending on model)
SIMPLINK is a feature that enables you to control and manage various multimedia devices conveniently via the SIMPLINK menu.
1 Connect the TV's HDMI IN terminal and the SIMPLINK device's HDMI output terminal using an HDMI cable.
• (Depending on model)
For home theatre units with a SIMPLINK function, connect HDMI terminals as above, and use an optical cable to connect Optical Digital Audio Out from the TV to Optical Digital Audio In of the SIMPLINK device.
2 Select ⚙️(Settings) → [General] → [SIMPLINK]. SIMPLINK menu window appears.
3 In SIMPLINK Setting window, set SIMPLINK function to [On].
4 Configure the [Auto Power Sync] settings to on or off.
- You can also set the SIMPLINK in (HOME) → [Inputs] → [SIMPLINK]. In SIMPLINK menu window, selects the device you want to control.
- This function is only compatible with devices with the SIMPLINK logo.
- To use the SIMPLINK function, you need to use a high-speed HDMI® cable (with CEC (Consumer Electronics Control) feature added). High-speed HDMI® cables have the No. 13 pin connected for information exchange between devices.
• If you switch to another input, the SIMPLINK device will stop.
- If a third-party device with the HDMI-CEC function is also used, the SIMPLINK device may not work normally.
• (Depending on model)
If you select or play media from a the device with a home theatre function, the [HT Speaker] (Speaker) is automatically connected. Be sure to connect with an optical cable (sold separately) to use the [HT Speaker] (Speaker) function.
SIMPLINK function description
- Direct Play : Plays the multimedia device on the TV instantly.
- Controlling devices with the TV remote control : Manages the multimedia device with the TV remote control.
- Main Power Off: If [Auto Power Sync] is set to on in the SIMPLINK settings and turn off your TV, the devices connected to your TV via SIMPLINK will also be turned off.
- Main Power On: If [Auto Power Sync] is set to on in the SIMPLINK settings, turning on a SIMPLINK-linked device will turn the TV on. (Behavior may vary depending on connected device.)
• [Speaker] : (Depending on model)
Select speaker either on the home theatre unit or the TV.
To set password
Settings → [Safety] → [Set Password]
Sets or changes the TV password.
• The initial password is set to '0000'.
- When France is selected for Country, password is not '0000' but '1234'.
- When France is selected for Country, password cannot be set to '0000'.
To return Reset to Initial Settings
Settings → [General] → [Reset to Initial Settings]
All stored information is deleted and TV settings are reset.
The TV turns itself off and back on, and all settings are reset.
- When [Lock System] is in place, a pop-up window appears and asks for password.
• Do not turn off the power during initialization.
To remove the USB device
Select the connected USB HDD from (HOME) → [Inputs] and select the [Eject] button to disconnect the USB HDD storage device. When you see a message that the USB device has been removed, separate the device from the TV.
- Once a USB device has been selected for removal, it can no longer be read. Remove the USB storage device and then re-connect it.
Using a USB storage device - warning
- If the USB storage device has a built-in auto recognition program or uses its own driver, it may not work.
• Some USB storage devices may not work or may work incorrectly. - Use only USB storage devices formatted with the Windows FAT32 or NTFS File System.
- For external USB HDDs, it is recommended that you use devices with a rated voltage of less than 5 V and a rated current of less than 500 mA.
- It is recommended that you use USB memory sticks of 32 GB or less and USB HDDs of 2 TB or less.
- If a USB HDD with power-saving function does not work properly, turn the power off and on. For more information, refer to the user manual of the USB HDD.
- Data in the USB storage device can be damaged, so be sure to back up important files to other devices. Data maintenance is the user's responsibility and the manufacturer is not responsible for data loss.
My Media supporting file
• Maximum data transfer rate: 20 Mbps (Mega bit per second)
- External supported subtitle formats: *.smi, *.srt, *.sub (MicroDVD, SubViewer1.0/2.0), *.ass, *.ssa, *.txt (TMplayer), *.psb (PowerDivX)
Supported Video Formats
• Maximum: 1,920 x 1,080 @ 30p (Only Motion JPEG 640 x 480 @ 30p)
| Extension Codec | ||
| .asf, .wmv | Video | MPEG-4 Part2, Xvid, H.264/AVC, VC1(WMV3, WVC1) |
| Audio | WMA Standard, WMA9(Pro), MP3, AAC, AC3 | |
| .avi | Video MPEG-2, MPEG-4 Part2, Xvid, H.264/AVC | |
| Audio | HE-AAC, LPCM, ADPCM, MPEG-1 Layer I, MPEG-1 Layer II, Dolby Digital, MPEG-1 Layer III (MP3) | |
| .ts, .trp, .tp, .mts, .m2ts | Video H.264/AVC, MPEG-2, H.265/HEVC | |
| Audio | MPEG-1 Layer I, MPEG-1 Layer II, MPEG-1 Layer III (MP3), Dolby Digital, Dolby Digital Plus, AAC, HE-AAC | |
| .vob | Video MPEG-1, MPEG-2 | |
| Audio | Dolby Digital, MPEG-1 Layer I, MPEG-1 Layer II, DVD-LPCM | |
| .mp4, .m4v, .mov | Video MPEG-2, MPEG-4 Part2, Xvid, H.264/AVC | |
| Audio AAC, MPEG-1 Layer III (MP3) | ||
| .mkv | Video MPEG-2, MPEG-4 Part2, Xvid, H.264/AVC | |
| Audio | HE-AAC, Dolby Digital, MPEG-1 Layer III (MP3), LPCM | |
| motion JPEG | Video MJPEG | |
| Audio LPCM, ADPCM | ||
| .mpg, .mpeg, .mpe | Video MPEG-1, MPEG-2 | |
| Audio | MPEG-1 Layer I, MPEG-1 Layer II, Dolby Digital, LPCM | |
| .dat | Video MPEG-1, MPEG-2 | |
| Audio MP2 | ||
| .flv | Video Sorenson H.263, H.264/AVC | |
| Audio MP3, AAC, HE-AAC | ||
| .3gp | Video H.264/AVC, MPEG-4 Part2 | |
| Audio AAC, AMR(NB/WB) | ||
Supported Audio Formats
| File Format | Item Info | |
| .MP3 | Bit rate 32 Kbps ~ 320 Kbps | |
| Sample freq. 16 kHz ~ 48 kHz | ||
| Support MPEG-1, MPEG-2, Layer2, Layer3 | ||
| .AAC | Bit rate Free Format | |
| Sample freq. 8 kHz ~ 48 kHz | ||
| Support ADIF, ADTS | ||
| .M4A | Bit rate Free Format | |
| Sample freq. 8 kHz ~ 48 kHz | ||
| Support MPEG-4 | ||
| .WAV | Bit rate 64 kbps ~ 1.5 Mbps | |
| Sample freq. 8 kHz ~ 48 kHz | ||
| Support LPCM | ||
| Bit depth 8 bit / 16 bit / 24 bit | ||
| .WMA | Bit rate 128 Kbps ~ 320 Kbps | |
| Sample freq. 8 kHz ~ 48 kHz | ||
| Support WMA7, WMA8, WMA9 Standard | ||
| .WMA 10 Pro | Bit rate ~ 768 Kbps | |
| Channel / Sample freq. | M0: up to 2 Channel @ 48 kHz (Except LBR mode), M1: up to 5.1 Channel @ 48 kHz, M2: up to 5.1 Channel @ 96 kHz | |
| Support WMA 10 Pro | ||
| .OGG | Bit rate 64 Kbps ~ 320 Kbps | |
| Sample freq. 8 kHz ~ 48 kHz | ||
| Support Vorbis | ||
Supported Photo Formats
| File Format Item Resolution | ||
| .jpeg, .jpg, .jpe | Available File Type | SOF0: BaselineSOF1: Extend SequentialSOF2: Progressive |
| Photo Size | Minimum: 64 (W) x 64 (H)Maximum (Normal Type):15,360 (W) x 8,640 (H)Maximum (Progressive Type):1,920 (W) x 1,440 (H) | |
| .BMP Photo Size | Minimum: 64 (W) x 64 (H)Maximum: 9,600 (W) x 6,440 (H) | |
| .PNG | Available File Type | Interlace, Non-Interlace |
| Photo Size | Minimum: 64 (W) x 64 (H)Maximum (Interlace):1,200 (W) x 800 (H)Maximum (Non-Interlace):9,600 (W) x 6,400 (H) | |
* BMP and PNG format files may be slower to display than JPEG.
To see web manual
To obtain detailed User Guide information, please visit www.lg.com.
Troubleshooting
Cannot control the TV with the remote control.
- Check the remote control sensor on the product and try again.
- Check if there is any obstacle between the product and the remote control.
- Check if the batteries are still working and properly installed (to + to -).
No image display and no sound is produced.
• Check if the product is turned on.
• Check if the power cord is connected to a wall outlet.
- Check if there is a problem in the wall outlet by connecting other products.
The TV turns off suddenly.
- Check the power control settings. The power supply may be interrupted.
- Check if the auto-off function is activated on the settings related time.
- If there is no signal while the TV is on, the TV will turn off automatically after 15 minutes of inactivity.
When connecting to the PC (HDMI), no signal is detected.
• Turn the TV off/on using the remote control.
• Reconnect the HDMI cable.
- Restart the PC with the TV on.
Abnormal Display
- If the product feels cold to the touch, there may be a small "flicker" when it is turned on. This is normal, there is nothing wrong with product.
- This panel is an advanced product that contains millions of pixels. You may see tiny black dots and/or brightly coloured dots (red, blue or green) at a size of 1 ppm on the panel. This does not indicate a malfunction and does not affect the performance and reliability of the product. This phenomenon also occurs in third-party products and is not subject to exchange or refund.
- You may find different brightness and colour of the panel depending on your viewing position(left/right/top/down).
This phenomenon occurs due to the characteristic of the panel. It is not related with the product performance, and it is not malfunction.
- Displaying a still image for a prolonged period of time may cause image sticking. Avoid displaying a fixed image on the TV screen for a long period of time.
Generated Sound
- “Cracking” noise: A cracking noise that occurs when watching or turning off the TV is generated by plastic thermal contraction due to temperature and humidity. This noise is common for products where thermal deformation is required.
- Electrical circuit humming/panel buzzing: A low level noise is generated from a high-speed switching circuit, which supplies a large amount of current to operate a product. It varies depending on the product. This generated sound does not affect the performance and reliability of the product.
Specifications
(Depending on country)
ENSOLIDH
| Broadcasting Specifications | ||||
| Digital TV Analogue TV | ||||
| Television system | DVB-S/S2DVB-T/T2DVB-C | PAL B/B,B/G, D/K,ISECAM B/G, D/K, L | ||
| Channel coverage(Band) | DVB-S/S2 DVB-C DVB-T/T2 | 46 ~ 862 MHz | ||
| 950~2150 MHz 46 ~ | 890 MHz | VHF III: 174 ~ 230 MHzUHF IV: 470 ~ 606 MHzUHF V: 606 ~ 862 MHzS Band II: 230 ~ 300 MHzS Band III: 300 ~ 470 MHz | ||
| Maximum number of storable programmes | 6,000 2,000 | |||
| External antenna impedance | 75 Ω | |||
| CI Module (W x H x D) 100 | 0 mm x 55.0 mm x 5.0 mm | |||
| Environment condition | |
| Operating Temperature 0 °C to 40 °C | |
| Operating Humidity Less than 80 % | |
| Storage Temperature -20 °C to 60 °C | |
| Storage Humidity Less than 85 % | |
HDMI-DTV supported mode
| Resolution | Horizontal Frequency (kHz) | Vertical Frequency (Hz) |
| 640 x 480 | 31.46 | 59.94 |
| 31.50 | 60.00 | |
| 720 x 480 | 31.47 | 59.94 |
| 31.50 | 60.00 | |
| 720 x 576 31.25 | 50.00 | |
| 1280 x 720 | 37.50 | 50.00 |
| 45.00 | 60.00 | |
| 44.96 | 59.94 | |
| 1920 x 1080 | 28.12 | 50.00 |
| 33.75 | 60.00 | |
| 33.72 | 59.94 | |
| 56.25 | 50.00 | |
| 67.50 | 60.00 | |
| 67.43 | 59.94 | |
| 27.00 | 24.00 | |
| 26.97 | 23.97 | |
| 33.75 | 30.00 | |
| 33.71 | 29.97 |
Component port connecting information
| Component ports on the TV Y P | _B | P_R | |
| Video output ports on DVD player | Y | P_B | P_R |
| Y B-Y | R-Y | ||
| Y Cb | Cr | ||
| Y Pb | Pr | ||
ENGLISH
| Signal Component | |
| 480i / 576i | 0 |
| 480p / 576p | 0 |
| 720p / 1080i | 0 |
| 1080p | 0(Only 50 Hz / 60 Hz) |
HDMI-PC supported mode
Use HDMI IN 1 for PC mode
| Resolution | Horizontal Frequency (kHz) | Vertical Frequency (Hz) |
| 640 x 350 31.46 | 70.09 | |
| 720 x 400 31.46 | 70.08 | |
| 640 x 480 31.46 | 59.94 | |
| 800 x 600 37.87 | 60.31 | |
| 1024 x 768 48.36 | 60.00 | |
| 1152 x 864 54.34 | 60.05 | |
| 1360 x 768 47.71 | 60.01 | |
| 1280 x 1024 ^ | 63.98 60.02 | |
| 1920 x 1080 ^ | 67.50 60.00 |
1 Except for 32LM55*
Open Source Software Notice Information
To obtain the source code under GPL, LGPL, MPL, and other open source licenses, that is contained in this product, please visit http://opensource.lge.com.
In addition to the source code, all referred license terms, warranty disclaimers and copyright notices are available for download.
LG Electronics will also provide open source code to you on CD-ROM for a charge covering the cost of performing such distribution (such as the cost of media, shipping, and handling) upon email request to opensource@lge.com.
This offer is valid for a period of three years after our last shipment of this product. This offer is valid to anyone in receipt of this information.
Licenses

HIGH-DEFINITION MULTIMEDIA INTERFACE
The terms HDMI and HDMI High-Definition Multimedia Interface, and the HDMI Logo are trademarks or registered trademarks of HDMI Licensing Administrator, Inc. in the United States and other countries.
Manufactured under license from Dolby Laboratories. Dolby, Dolby Vision, Dolby Audio, Dolby Atmos, and the double-D symbol are trademarks of Dolby Laboratories.
HEVCA Advance™ Covered by Patents at patentlist.hevcadvance.com
natural_image
Illustration of a flat-screen monitor with a power button icon below it (no text or symbols on the screen)Основные функции

HEVCAvance™ Covered by Patents at patentlist.hevcadvance.com
(Улгіге байланысты)
natural_image
Illustration of a flat-screen monitor with a power button icon below it (no text or symbols)Herizrì функциялар

Куатты косу (Басу)
The terms HDMI and HDMI High-Definition Multimedia Interface, and the HDMI Logo are trademarks or registered trademarks of HDMI Licensing Administrator, Inc. in the United States and other countries.
Covered by Patents at patentlist.hevcadvance.com
natural_image
Illustration of a flat-screen monitor with a power button icon below it (no text or symbols)Энгийн функцууд

Асаах (Дарна)
Унтраах¹ (Удаан дарна)
Цэсийн удирдлага (Дарна²)
The terms HDMI and HDMI High-Definition Multimedia Interface, and the HDMI Logo are trademarks or registered trademarks of HDMI Licensing Administrator, Inc. in the United States and other countries.
Manufactured under license from Dolby Laboratories. Dolby, Dolby Vision, Dolby Audio, Dolby Atmos, and the double-D symbol are trademarks of Dolby Laboratories.

МОНГОЛ
MORILOH
МОНГОЛ

The model and serial number of the product are located on the back and on one side of the product. Record them below in case you ever need service.
Model ____
Serial No. ____
- LED TV\*
- Warning! Safety instructions
- CAUTION
- - Batteries
- - Moving
- - Cleaning
- Preparing
- Separate Purchase
- Wall Mounting Bracket
- Lifting and moving the TV
- Mounting on a Table
- Securing TV to the Wall
- Mounting to the Wall
- Connections
- Antenna/Cable
- Satellite dish
- CI module
- Other connections
- HDMI
- External Devices
- Using Button
- Basic functions
- Adjusting the menu
- Using Remote Control
- Settings
- Automatically Setting Up Programme
- To select Picture Mode
- Fine-tuning Picture Mode
- To set advanced controls
- To set additional picture options
- Resetting picture settings
- To use Energy Saving feature
- To use Eye Comfort Mode feature
- Selecting Sound Mode
- Adjusting audio balance
- Using the Sound Effect function
- To use TV speaker
- To use External Speaker
- To use Internal TV Speaker + Audio Out (Optical)
- To connect and use LG audio device
- To use Digital Sound Out
- To synchronize audio and video
- To use SIMPLINK
- SIMPLINK function description
- To set password
- To return Reset to Initial Settings
- To remove the USB device
- Using a USB storage device - warning
- My Media supporting file
- Supported Video Formats
- To see web manual
- Troubleshooting
- Abnormal Display
- Generated Sound
- Specifications
- Open Source Software Notice Information
- Licenses
- Основные функции
- Herizrì функциялар
- Энгийн функцууд
Brand : LG
Model : 43LM5500PLA
Category : Monitor