
EFLW6 - Washing machine Esatto - Free user manual and instructions
Find the device manual for free EFLW6 Esatto in PDF.


| Product Type | Freestanding Washing Machine |
| Model | EFLW6 |
| Brand | Esatto |
| Dimensions (H x W x D) | 85 x 60 x 55 cm |
| Weight | Approx. 70 kg |
| Power Supply | 220-240 V ~ 50 Hz |
| Power Consumption | 2000 W (max) |
| Capacity | 6 kg |
| Spin Speed | Up to 1200 rpm |
| Number of Programs | 15 (including Cotton, Synthetics, Delicates, Quick, Eco, etc.) |
| Key Features | Delay timer, child lock, overflow protection, unbalanced load detection |
| Energy Class | A (typical) |
| Water Consumption | Approx. 50 L per cycle |
| Noise Level (Wash/Spin) | 56 dB / 76 dB |
| Maintenance | Clean filter, check hoses, descale periodically |
| Safety | Child lock, auto shut-off, anti-leak system |
| Spare Parts Available | Drum, motor, pump, door seal, control board, belts |
| Reparability | Modular design, parts accessible via service hatch |
Frequently Asked Questions - EFLW6 Esatto
User questions about EFLW6 Esatto
0 question about this device. Answer the ones you know or ask your own.
Ask a new question about this device
Download the instructions for your Washing machine in PDF format for free! Find your manual EFLW6 - Esatto and take your electronic device back in hand. On this page are published all the documents necessary for the use of your device. EFLW6 by Esatto.
USER MANUAL EFLW6 Esatto
Dear Customer, Congratulations on purchasing your washing
machine. The Esatto brand is proudly distributed within Australia by Residentia Group Pty Ltd.
Please refer to the warranty card at the rear of this manual for information regarding your product's parts and labour warranty, or visit us online at www.residentiagroup.com.au.
At Residentia Group, we are customer obsessed and our Support Team are there to ensure you get the most out of your appliance. Should you want to learn more about your washing machine such as the various washing modes or importantly taking care of the appliance, our Support Team are here to help.
You can use our online Support Centre at anytime by visiting http://support.residentiagroup.com.au, or you can contact us via phone by dialling: 1300 11 HELP (4357).
It is important that you read through the following use and care manual thoroughly to familiarise yourself with the installation and operation requirements of your appliance to ensure optimum performance.
Again, thank you for choosing an Esatto appliance and we look forward to being of service to you.
Kind Regards,
The Residentia Team

User Manual:
Esatto
Contents:
Page:
Safety Instructions 4
Your Esatto Washing Machine 7
Operating Instructions 8
Cleaning & Maintenance 14
Troubleshooting 16
Technical Specifications 18
Warranty information 20
Notes 22

natural_image
Three horizontal teal bars on white background (no text or symbols)Safety Instructions
CONDITIONS OF USE

This appliance is intended to be used in household and similar applications such as farm houses or by clients in serviced apartments, holiday apartments and other residential type environments.
SAFETY INSTRUCTIONS
Before the installation and use of the appliance, carefully read the supplied instructions.
The manufacturer is not responsible if an incorrect installation and use causes injuries and damages.
→ Always keep the instructions with your appliance for future reference
Warning! To prevent any damages to your and others' life or property, you have to follow the safety notes.
Warning! Caution, risk of fire!
CHILDREN & VULNERABLE PEOPLE SAFETY
Warning! Risk of suffocation, injury or permanent disability.
→ This appliance can be used by children aged from 8 years and above and persons with reduced physical, sensory or mental capabilities or lack of experience and knowledge if they have been given supervision or instruction for the operation of the appliance by a person who is responsible for their safety.
→ Do not let children play with the appliance.
→ Keep all packaging away from children.
→ Keep all detergents away from children.
→ Keep children and pets away from the appliance door when it is open.
→ Cleaning and user maintenance shall not be made by children without supervision.
INSTALLATION
→ Remove all the packaging.
→ Do not install or use a damaged appliance.
→ Obey the installation instruction supplied with the appliance.
→ Make sure that the floor where you install the appliance is flat, stable, heat resistant and clean.
→ Always remove the plug and turn off the water supply to the appliance after every use.
→ Sharp and rigid items such as coins, nails and screws may cause serious damage to this appliance- always ensure pockets of clothing are empty.
→ Always ensure that the drum has drained all water before opening the appliance door. If water is visible, do not open the appliance door.
Do not install the appliance behind a lockable door, a sliding door or a door with a hinge on the opposite side, where the appliance door can not be fully opened.
→ Always be careful when you move the appliance because it is heavy. Always wear safety gloves.
→ Always move the appliance vertically.
→ The rear surface of the appliance must be put against the wall.
→ This appliance should not be installed in a bathroom or similar wet rooms, as well as rooms with explosive or caustic gases.
→ Washing machines with a single water inlet and should only be connected to the cold water supply outlet. Models featuring two inlet valves can be connected to both the hot and cold water outlets.
→ The appliance can be installed as freestanding or below the kitchen counter with correct space.
When the appliance is put in its permanent position, check if it is fully level with the aid of a spirit level. If it is not, adjust the feet until it is.
ELECTRICAL CONNECTION
Warning! Caution, risk of fire and electrical shock!
→ The appliance must be earthed.
→ Make sure that the electrical information on the rating plate agrees with the power supply. If not, contact an electrician.
→ Always use a correctly installed shockproof socket.
→ Do not use multi-plug adapters and extension cables.
→ Make sure not to cause damage to the mains plug and to the mains cable. Should the appliance power supply cable need to be replaced, this must be carried out by our Service Centre.
→ Connect the mains plug to the mains socket only at the end of the installation. Make sure that there is access to the mains plug after the installation. Do not connect the appliance plug with a power connection board.
Do not pull the mains cable to disconnect the appliance. Always pull the mains plug.
→ Do not touch the mains cable or the mains plug with wet hands.
→ This appliance complies with the E.E.C. Directives.
APPLIANCE USE
Warning! Risk of fire, explosion, electric shock or damage to the appliance.
→ Use this appliance in a household only.
→ Before operating this appliance, ensure that all packaging and transport bolts have been removed. Otherwise, serious damage can occur to the appliance.
→ Before washing any clothes for the first time, the washing machine should be operated for one whole cycle without any clothes inside.
→ Do not climb up or sit on top of the appliance.
→ Do not change the specification of this appliance.
→ If you use fabric softener or similar products, obey the instructions on the packaging.
→ Do not sit or stand on the open door.
→ Obey the maximum load volume of 7.5 kg (refer to the “Programme chart” chapter).
→ Ensure all objects are removed from clothing pockets such as lighters and matches.
→ Please only use front load washing machine detergents. Flammable and explosive or toxic solvents are forbidden for use with this appliance. Gasolene and alcohol should not be used as a detergent.
→ Never wash carpets or rugs within the appliance.
→ Be careful to avoid burns when the machine drains hot washing water.
→ After a wash program completes, please wait two minutes before opening the door.
→ If a tumble dryer is installed on top of the washing machine, use the suitable stacking kit. The stacking kit, available from your authorized vendor, can be used only with the appliance specified in the instructions, supplied with the accessory. Read it carefully before installation (Refer to the Installation leaflet).
→ Never lean against the machine door.
→ Please do not close the machine door with excessive force and if you find it difficult to close the door, ensure that the clothing load isn't excessive.
CARE & CLEANING
Warning! Risk of injury or damage to the appliance.
→ Before maintenance, deactivate the appliance and disconnect the mains plug.
→ Do not use water spray and steam to clean the appliance.
→ Clean the appliance with a moist soft cloth. Only use neutral detergents. Do not use abrasive products, abrasive cleaning pads, solvents or metal objects.
PRODUCT DISPOSAL
→ Disconnect the appliance from the mains supply.
→ Cut off the mains cable and discard it.
→ Remove the door catch to prevent children and pets to get closed in the appliance.
Safety Instructions (Continued)
TRANSPORT
→ Always move the appliance cautiously. Do not use the machine door or the handle of the detergent dispenser, to lift the appliance.
→ Transportation bolts should be reinstalled within the machine by a specialised person, prior to transporting the appliance.
→ Ensure that all accumulated water is drained from the appliance before moving.
INSTALLATION POSITIONING
→ Ensure that your appliance is installed on solid and flat ground, in a level position.
→ Please do not place the appliance on a slope, soft carpet or wooden floor.
→ Your appliance should only be installed within an internal environment. Do not install the appliance outdoors.
REMOVING THE TRANSPORTATION BOLTS
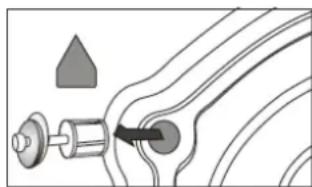
Before using this washing machine, transport bolts must be removed from the backside of this machine. Please take the following steps to remove the bolts:
→ Loosen all bolts with a spanner and then remove them.
→ Use the plugs (supplied) to plug the holes.
→ Keep the transport bolts for future use.
natural_image
Pure diagram of a mechanical or electrical component with no text, numbers, or symbolsLEVEL ADJUSTING
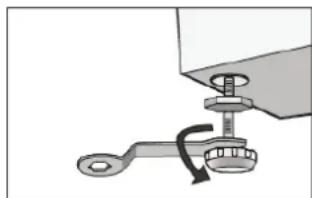
→ If the floor is obviously uneven, your appliance feet need to
be adjusted. If your appliance isn't level, it will cause your appliance to vibrate, and potentially move from its position.
Once you've positioned your washing machine, press
down from the top in all four corners to ensure that it's completely stable (i.e. not rocking in any direction).
Also use a spirit level to ensure that it is completely level in all directions.
→ Should you need to make adjustments, use a spanner to
turn the appliance legs until it makes contact with the floor. Turn the leg using one hand and then fasten the nut up against the appliance cabinet, to lock the leg in place.
→ After making any adjustments to the appliance legs,
re-check to ensure it is level and no rocking occurring.
natural_image
Mechanical assembly diagram showing a lever and handle assembly (no text or symbols)CONNECT THE INLET PIPE
→ Connect the hose elbow to the cold water outlet, screwing in a clockwise direction.
→ Connect the other end of the inlet hose to the water inlet valve on the rear of the washing machine.
→ After installation, if there are any leaks detected, remove the hose and re-install using the steps above. The hose is designed to be used on a standard washing machine cock outlet.
natural_image
Diagram of a car front view showing dashboard, steering wheel, and attached hose (no text or symbols)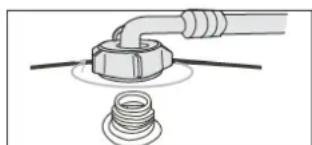
natural_image
Diagram of a pipe fitting with a bolt and washer, no text or symbols presentPOSITION THE OUTLET HOSE
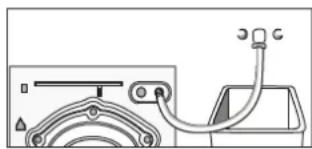
→ The outlet hose (used to drain the discharged water) is to
be ideally connected to the relevant waste pipe, although it can also be positioned to drain into a sink/trough. Note that the outlet hose has a minimum outlet position of 60cm and a maximum position of 100cm (as illustrated below).
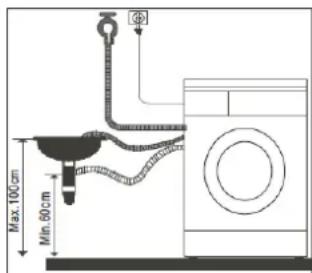
Note: If you are positioning the outlet hose to drain into
a sink or trough, please ensure that it is fixed in place and that the sink remains unblocked at all times.
Your Esatto Washing Machine
THE APPLIANCE
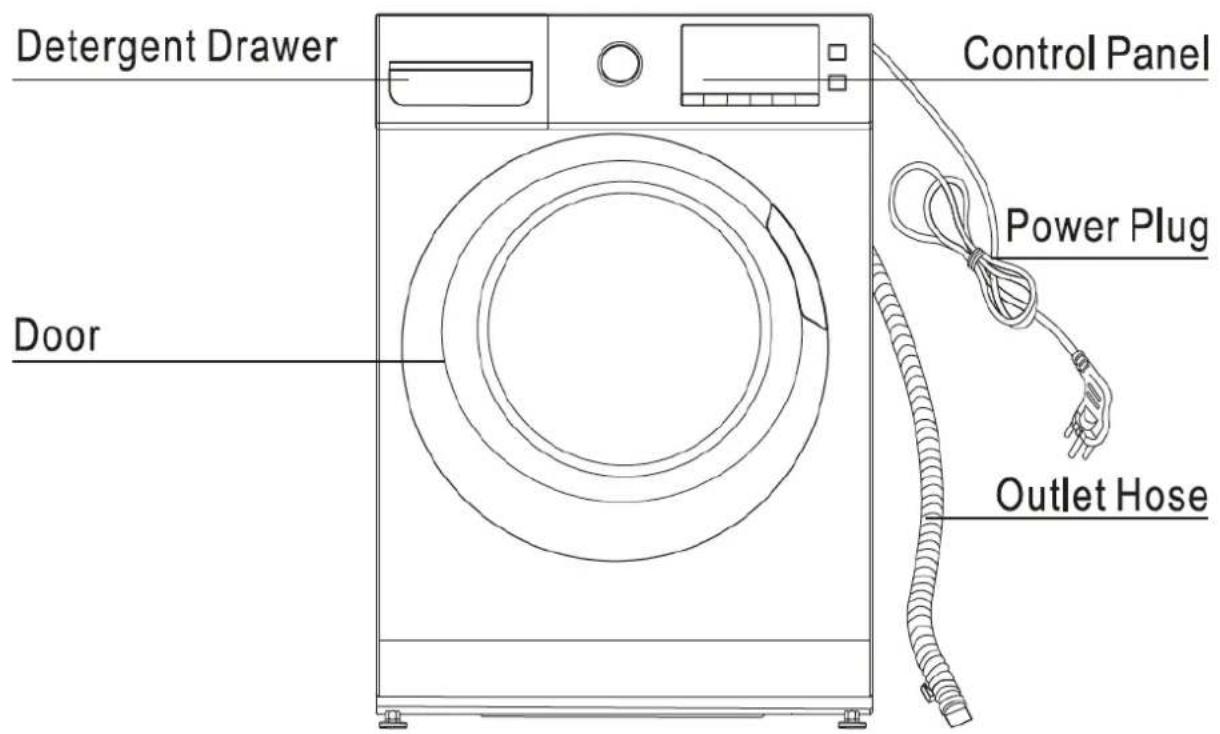
CONTROL PANEL
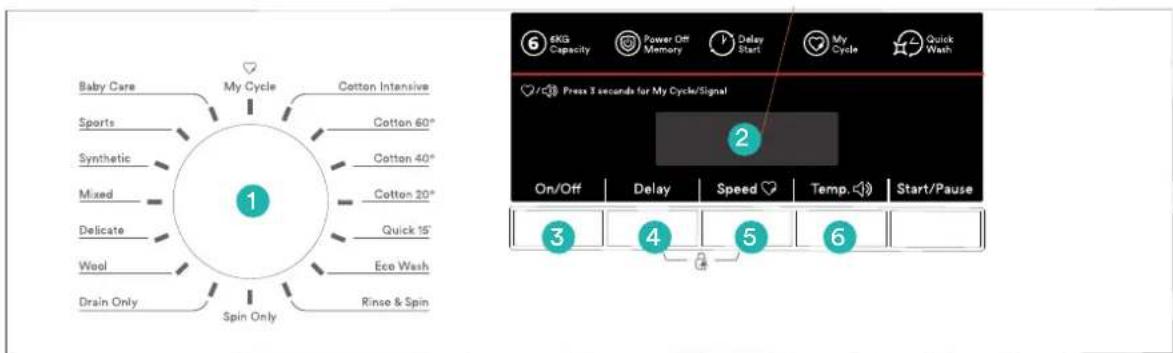
1 Program selection knob
2 LED Screen Display
3 On/Off button
4 Delay button
5 Speed button
6 Temperature button
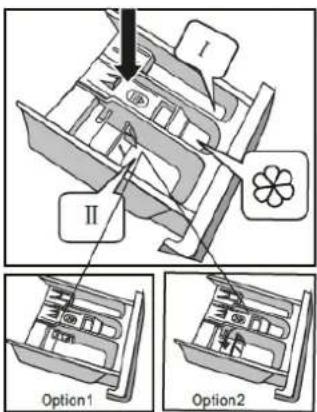
DETERGENT DRAWER
The detergent drawer of your washing machine is split into three compartments:
IPre-detergentcompartment.
Refer to the Wash Programmes Table to see which programmes utilise a pre-wash.
||
Main detergent compartment.

This is the common detergent drawer.
Washing additive compartment.
Use for fabric softeners, etc.
Operating Instructions
PREPARATION BEFORE WASHING CLOTHES
Please follow these steps carefully to avoid trouble with your washing machine and damaging your clothing.
Washing Considerations
| New clothes in particular, can leach colour onto other clothing items, particularly whites. Consider washing these and bright colours separately. | |
| → | Stained clothing should be treated with a stain remover, prior to washing. |
| → | Temperature sensitive clothes should be washed in accordance with their care direction label. Otherwise distortion and/or changes in colour could occur. |
| → | Never allow washing to sit in the machine for a long period of time- particularly when wet. Clothes can become mouldy and develop an odour. |
| → | Certain clothing can not be washed in a washing machine and their care directions may state dry cleaning or hand washing required. |
| → | Wrinkle style clothes, embossed clothes, resin clothes, etc may become distorted when immersed in water. |
| → | Avoid washing clothes without care direction labels within the appliance, to be safe. |
| → | Always remove all items from clothing pockets, as hard items can cause damage to the appliance. |
| → | Try to wash clothing colours and sizes in like loads, as this will improve the effectiveness of the washing and results. |
| → | Close all clothing zips and ensure all buttons are fastened securely. |
| → | Delicate items such as bras, handkerchiefs and ties should be washed within a special washing bag, to prevent damage to themselves and other clothes. |
| → | When washing a large single item that could become heavy (i.e. a towel or jacket), it can cause the appliance to become unbalance during it’s spin cycle. Therefore it’s recommended to add one or tow more clothing items to help the machine balance. |
| → | Try to remove any pet hair, dust and stains from clothing prior to washing. |
| → | Baby clothing should be washed separately. |
| → | Clothing that gets easily “fuzzed” or loses fibres easily, should be washed separately. |
| → | Black clothing items should be washed separately. |
| → | Do not wash waterproof materials within the washing machine. |
Pay Attention to Detergents
→ Only use suitable front load washing machine detergents with this appliance. Powders and liquid detergents only.
Only ever use the recommended quantity of detergent, as per the manufacturer's guidelines, as an excessive quantity can cause excessive bubbles and overflow to occur. It can also result in detergent residue remaining on the clothing after completion of the wash cycle.
Warning! Always keep detergents and additives out of reach from children.
Clothing Classifications
The symbol types on care labels are typically classified into the following textiles: Cotton, Blended Fibre, Synthetic Fibre, Silk, Wool and Artificial Fibre.
Confirm the Washing Capacity
Never load the machine with excessive weights, as it will effect your washing results.
Fibre type Maximum Load Capacity
Cotton 6.0kg
Synthetics 3.0kg
Wool 2.0kg
Delicates 2.5kg
QUICK START:
Follow the procedure below to operate your washing machine.
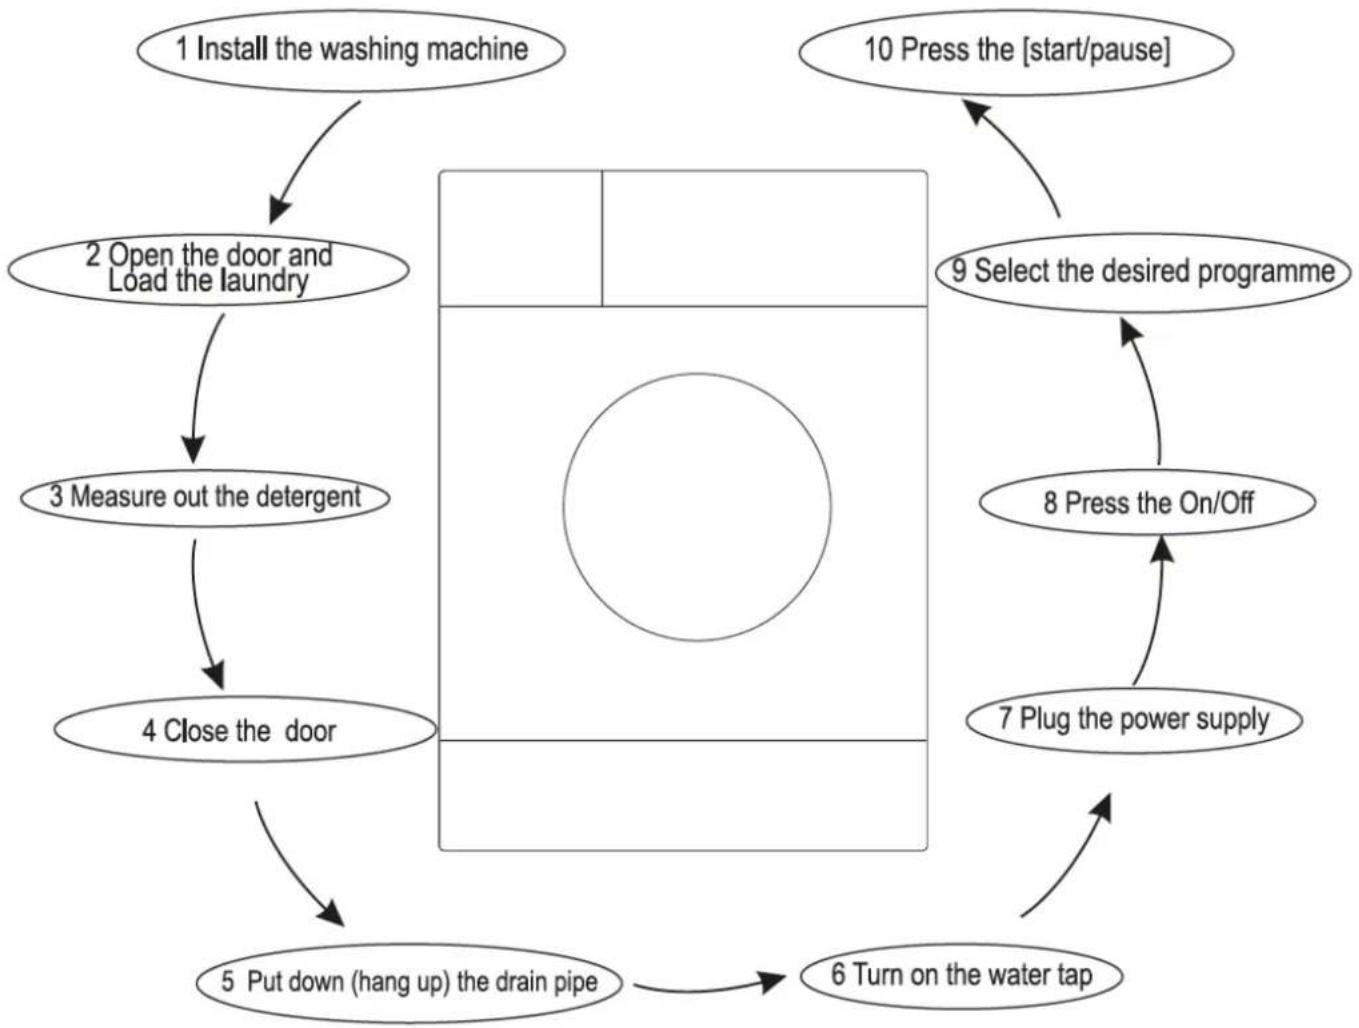
flowchart
graph TD
    A["1 Install the washing machine"] --> B["2 Open the door and Load the laundry"]
    B --> C["3 Measure out the detergent"]
    C --> D["4 Close the door"]
    D --> E["5 Put down (hang up) the drain pipe"]
    E --> F["6 Turn on the water tap"]
    F --> G["7 Plug the power supply"]
    G --> H["8 Press the On/Off"]
    H --> I["9 Select the desired programme"]
    I --> J["10 Press the [start/pause"]]
    J --> A
Note:
→ At the completion of a wash program, the washing machine will make an audible tone.
→ Always close the water supply tap when not in use.
→ Press the On/Off button to switch off the appliances and remove the power plug from the outlet.
WASHING CLOTHES FOR THE FIRST TIME
Before washing any clothes, please perform one cycle without clothes inside as follows:
→ Connect the power source and water.
→ Insert a small amount of detergent into Compartment II of the detergent drawer and close it.
→ Press the "On/Off" button on the appliance.
→ Press the "Start/Pause" button on the appliance.
→ Allow the program to complete and your washing machine is now ready for use.
Operating Instructions (continued)
SELECTING A PROCEDURE
→ You should select you washing program based on the type of clothing, quantity and dirtiness level, in combination with the following temperature table.
| Temperature Mode | Application |
| 90°C | Seriously soiled clothing, pure white cotton (i.e. bed linen, towels, table cloths, etc) |
| 60°C | Moderately soiled clothing, cotton and synthetic articles with certain decolourising degree (i.e. shirts, pajamas, etc) |
| 40°C, 30°C, 20°C, Cold Water | Lightly soiled clothing, synthetics and wool |
To select a program:
→ First turn the Program Selection Dial to the corresponding wash program, according to the type of textiles being washed.
→ Secondly, select the desired temperature based on the level of dirtiness.
Note: Generally the higher the temperature, the more power that's consumed.
Finally, select your desired spin speed. The higher the spin speed, the drier the textiles will be at completion, however more delicate textiles will be more wrinkled. Delicate textiles should be set with a lower spin speed.
Selecting the main washing program depend on the types of clothing to be washed, as follows:
Cotton Intensive You can select this procedure to wash any "daily" washable clothes. The washing period is quite long with quite a strong washing intensity. It is recommended for washing clothes for babies or worn by the persons with skin allergies.
Cotton To increase the washing results, the main washing time is increased. It is recommended for washing clothes for babies or worn by the persons with skin allergies. It is recommended for washing durable cotton articles, for example: bed sheets, quilt covers, pillowcases, gowns, underwear, etc.
Quick 15' This procedure is suitable for washing a small quantity of clothes without heavy soiling.
ECO Wash This procedure saves energy and limits the washing temperature to 40^ C. Use with a small quantity of clothes which are only lightly dirty.
Baby Care You can select this procedure to wash your baby's clothes. The rinse performance will ensure the clothing is perfectly clean and protect your baby's skin.
Sports You can select this procedure to wash active-wear.
Synthetic You can select this procedure to wash synthetic clothes. The procedure is shorter compared with that for cottons and the washing intensity is relatively gentle. It is recommended for washing synthetic articles, for example: shirts, coats, etc.
Mixed You can select this procedure to wash durable clothes that require more washing time and strength. It is ideal for daily clothes made from cotton such as t-shirts, sheets and underwear.
Delicate You can select this procedure to wash your delicate clothes. Its washing intensity is gentler and spin speed is low compared with the “Synthetic” procedure. It is recommended for washing any articles requiring a soft wash.
Wool You can select this procedure to wash wool textiles labeled with "Machine Wash". Please select the proper washing temperature according to the clothings care label. Furthermore, the proper detergent amount should be used for wool textiles, which is generally less than normal wash loads.
Spin Only This procedure provides a Spin only option. Residual soapy water shall be drained out before spinning.
Rinse & Spin This procedure provides a short rinse cycle followed by a spin cycle.
Drain Only This procedure provides a Drain only option.
My Cycle The My Cycle function can be used to define and save your favourite drying program for easier selection in the future (i.e. Use this function to save your most frequently used drying settings).
To set your My Cycle function:
→ Use the program selector dial to select your required program and select any other drying functions.
Press and hold the "Spin Speed" button for 3 seconds until the display flashes, indicating that your desired program has been saved.
To use your preset My Cycle, simply turn the program selector dial to the My Cycle position and press the "Start/Pause" button to begin.
If you wish to change your My Cycle settings, simply repeat the steps above at any time.
ADDITIONAL WASH OPTIONS
Pre-wash Function
The Pre-wash function adds an additional wash prior to the main wash. Extra detergent should be placed in the Pre-wash detergent compartment, labeled with "l".
Speed Wash Function
Adding this function to your wash program decreases the washing time.
To activate the Speed Wash Function:
→ Select your desired washing program.
→ Press the "Speed Wash" button.
→ Press the "Start/Pause" button to begin the program.
Extra Rinse Function
The laundry will undergo an extra rinse cycle at the completion of the program.
Delay Function
The Delay function can be set with this button, where the delay is 0-24 Hrs.
To set the Delay function:
→ Select a wash program;
→ Press the Delay button to choose the time;
→ Press Start/Pause to commence the delay operation.
To Cancel the Delay function:

Press the Delay button until the display shows 0H. It should be pressed prior to starting the program. If the program has already started, press the On/Off button to reset.
Reload (Add a Garment) Function
This function can be executed during operation of a washing program. When the drum of the machine is still in motion and/or there is a large amount of water inside, the machine will not allow the door to be opened.
Operating Instructions (continued)
To use the Reload function:
→ Press and hold the Start/Pause button for 3 seconds.
Once the drum stops rotating, the door will unlock and allow you to open.
→ Add your additional clothing items and close the door. → Press the Start/Pause button once again to continue the wash program.
Child Lock
To avoid the washing procedure being altered by children, you can activate the child lock function. All buttons and dials won't alter the machines settings, however the On/Off button will still function.
Note: If the machine is switched off when Child Lock is active, it will remain in Child Lock mode when switched back on.
To activate or deactivate the Child Lock:
Press and hold the "Delay" and "Speed" buttons together at the same time for 3 seconds, whilst the machine is operating.
The machine will make an audible tone to let you know that the Child Lock is activated or deactivated.
Note: At the completion of a wash program, the child lock will become deactivated automatically.
Bubble Removal Function
When excessive detergent is used, excessive bubbles may occur, effecting your wash results. Your washing machine will automatically check for excessive bubbles and work to remove them as required.
Signal Function
This function allows you to turn the audible tone on or off, to indicate that your washing program is complete. By default the audible signal is set to On.
When the Signal function is on, your appliance will make an audible tone when:
The extra function buttons are pressed (i.e. Speed Wash, Anti-Crease).
If the washing machine is operating and the program selector knob is turned, the appliance will make an audible tone to alert the user that an invalid choice has been made.
→ At the completion of a washing program, an audible tone will sound.
To activate or deactivate the Signal function:
→ Press and hold the "Temp" button for 3 seconds.
PROGRAM TABLE
| Procedure Description | Load(kg) | Detergent Box | Default Temp.(°C) | Default Time (Min) | Default Speed (rpm) | |||||
| 6.0 | 7.5 | Case I | Case II | Softener Case | 6.0/7.5 | 6.0 | 7.5 | 1200 | 1400 | |
| 1200 | 1400 | |||||||||
| Cotton Intensive | 6.0 | 7.5 | × | ● | ○ | 40 | 1:58 | 1:58 | 1000 | 1000 |
| Cotton 60° | 6.0 | 7.5 | × | ● | ○ | 60 | 4:36 | 4:41 | 1200 | 1400 |
| Cotton 40° | 6.0 | 7.5 | × | ● | ○ | 40 | 1:25 | 1:25 | 1200 | 1400 |
| Cotton 20° | 6.0 | 7.5 | × | ● | ○ | 20 | 1:13 | 1:13 | 1000 | 1000 |
| Quick 15' | 2.0 | 2.0 | × | ● | ○ | Cold | 0:15 | 0:15 | 800 | 800 |
| Eco Wash | 2.0 | 2.0 | × | ● | ○ | 30 | 1:06 | 1:06 | 800 | 800 |
| Rinse&Spin | 6.0 | 7.5 | × | × | ○ | - | 0:31 | 0:31 | 1000 | 1000 |
| Baby Care | 6.0 | 7.5 | × | ● | ○ | 60 | 1:39 | 1:39 | 1000 | 1000 |
| Sports | 3.0 | 3.5 | × | ● | ○ | 40 | 1:19 | 1:19 | 800 | 800 |
| Synthetic | 3.0 | 3.5 | × | ● | ○ | 40 | 1:33 | 1:33 | 1200 | 1200 |
| Mixed | 6.0 | 7.5 | × | ● | ○ | 40 | 1:13 | 1:13 | 1000 | 1000 |
| Delicate | 2.5 | 2.5 | × | ● | ○ | 30 | 1:00 | 1:00 | 600 | 600 |
| Wool | 2.0 | 2.0 | × | ● | ○ | 40 | 1:06 | 1:06 | 400 | 400 |
| Drain Only | - | - | × | × | × | - | 0:01 | 0:01 | 0 | 0 |
| Spin Only | 6.0 | 7.5 | × | × | × | - | 0:12 | 0:12 | 1000 | 1000 |
Note:
1 Energy labeling program: Cotton at 60°C and maximum spin speed is the program used for the AS/NZS 2442 MEPS energy rating.
2 The solid circle means compulsory, the hollow circle means optional and the X means not possible on this program.
3 The programs above are only recommendations and users can choose the appropriate program according to their personal requirements and habits.
Cleaning & Maintenance
CLEANING PROCEDURES
Warning!
Before beginning any cleaning or maintenance, always ensure the appliance is switched off, the power plug is removed from the power outlet and the water supply has been closed.
CLEANING THE WASHING MACHINE
Proper maintenance of your washing machine will keep it looking as new and extend its working life.
→ The exterior surface can be cleaned with household cleaners and a soft damp cleaning cloth.

If there is any residual water at the completion of a washing program, please use a cloth to wipe it off immediately.
Note: Never use solvents or harsh cleaning chemicals on your washing machine's exterior.
CLEANING THE INTERNAL DRUM
Should any rust form on the inside drum (i.e. water was left to sit for an extended period of time), please remove immediately using a chlorine free detergent. Never use steel wool or a harsh abrasive.
FROZEN WASHING MACHINE
Should the temperature drop below zero and your washing machine becomes frozen, you should:
→ Disconnect the power supply for the washing machine.
→ Wash the tap connection with warm water, to help you to disconnect the inlet pipe.
→ Remove the inlet pipe and immerse in warm water (i.e. within a bathtub).
→ Pour some warm water into the washing machine drum and wait for approximately 10 minutes.
→ Reconnect the inlet pipe to the tap and washing machine and open the water supply.
Wait until the room's ambient temperature returns to above 0^ before trying to operate the washing machine.
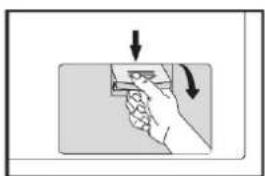
CLEANING THE DETERGENT DRAWER
You should periodically follow these steps to ensure the detergent drawer remains clean.
→ Press down on the arrow, located on the cover for the fabric softener compartment of the detergent drawer.
→ Lift the clip up and remove the fabric softener compartment cover.
→ Wash all grooves with warm water.
→ Re-install the fabric softener compartment cover into the detergent drawer, and push the drawer back into position.
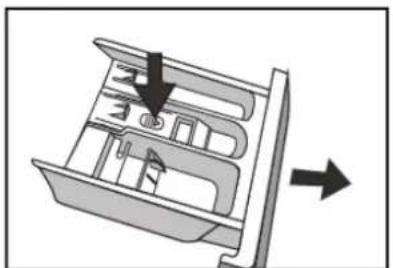
natural_image
Diagram of a mechanical device with internal compartments and directional arrows indicating movement (no text or symbols)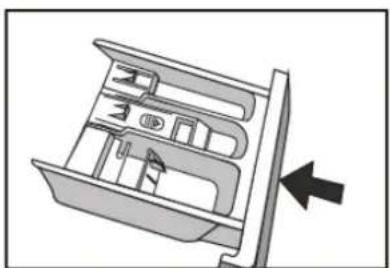
natural_image
Diagram of a mechanical device interior with internal compartments and a directional arrow (no text or symbols)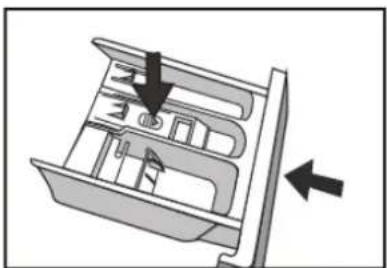
natural_image
Diagram of a mechanical device with internal compartments and directional arrows indicating movement (no text or symbols)CLEANING THE INLET FILTER
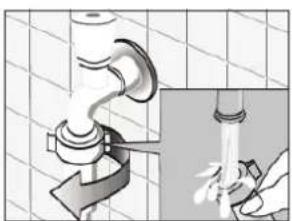
You should clean the inlet filter periodically, or if you find that insufficient water is being supplied to your washing machine when the supply tap is open.
To clean the inlet filter:
→ Close the water supply tap.
→ Select any wash program (except for Spin Only or Drain Only) and press the Start/Pause button. Allow the program to run for about 40 seconds.
→ Remove the inlet pipe from the closed tap and use water to wash the filter.
→ Reconnect the inlet pipe to the tap.
natural_image
Illustration of a hand pouring liquid into a pipe with a valve, against a tiled background (no text or symbols)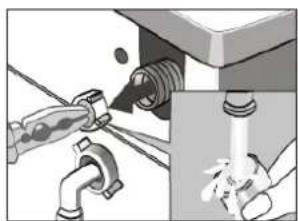
natural_image
Illustration of a faucet being inserted into a sink with water spray (no text or symbols)To clean the washing machine filter:
→ Screw off the inlet pipe from the rear of the washing machine.
→ Pull out the filter with long nose pliers, wash it thoroughly with water and re-install the filter.
→ Reconnect the inlet pipe to the rear of the washing machine.
→ Open the water supply at the tap and ensure there is no water leakage.
→ Once finished, close the water supply tap.
Note: Generally the tap inlet filter is washed first followed by the washing machine filter. If only the washing machine filter is washed, then you should still follow steps 1-3 for cleaning the inlet filter first.
REMOVING FOREIGN OBJECTS
Warning! To avoid the risk of an electric shock, always remove the power plug from the power outlet before cleaning the Drain Pump filter.
Periodically you should clean the drain pump filter to ensure normal operation of your washing machine. The type of washing, frequency and soil level of your washing cycles will alter how often this procedure needs to be undertaken, however you should inspect the filter regularly.
Should your washing machine not empty and/or spin, or your machine makes unusual noises during operation, your Drain Pump filter could be blocked. Follow this procedure to check or remove any foreign objects.
→ After disconnecting the power, open the filter cover at the front base of your washing machine.
→ Unscrew the filter in an anti-clockwise direction and remove any foreign objects.
→ Re-install the filter and close the service panel.
natural_image
Illustration of a hand holding a card with arrows indicating direction (no text or symbols)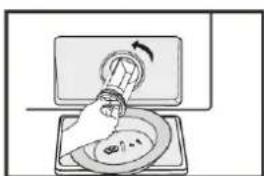
natural_image
Illustration of a hand holding a bulb above a plate with food, placed on a tray (no text or symbols)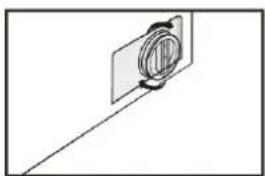
natural_image
Simple line drawing of a mechanical component with a circular feature and diagonal line (no text or symbols)Warning!
Never remove the pump cover when the washing machine is in operation, always wait until the appliance has finished and the is empty. There can be hot water within the pump, so be careful to avoid burns, should it have operated recently. When replacing the cover, be careful to ensure it is closed securely.
Troubleshooting
Warning! Only authorised technicians can carry out repairs.
Before contacting our customer service team, please refer to the table below to see if your fault can be fixed by yourself. Should a service technician visit be arranged and its found there are no faults with the appliance, a call out charge will apply.
| Problem Solution | |
| Washing Machine won't start-up | → Check that the mains plug is inserted and switched on at the power point.→ Check that the door is closed securely.→ Check that the relevant fuse hasn't blown.→ Check that the On/Off button has been pressed.→ Check that the water supply tap has been opened. |
| Door won't open | → The machine's safety protection is working. Disconnect the power and reconnect the power. |
| Heating fault | → The NTC is damaged and/or the heating pipe is aging. You should be able to wash the clothes normally however without the water heating. Please contact our customer service team. |
| Water is leaking | → The drainage waste pipe may be blocked.→ Check and fasten all water connection pipes.→ Inlet or Outlet hoses may be damaged. Check. |
| Water is overflowing from the base of the machine | → Check that the inlet pipes are connected firmly at the rear of the machine.→ Check that the outlet hose hasn't been damaged. |
| Display isn't lighting up | → Check that the power isn't disconnected.→ PC board may have issues. Please contact our customer service team. |
| Detergent residues remain in the detergent drawer | → Ensure you are using a correct amount of detergent.→ Follow the cleaning steps to remove any damp residual detergent from the drawer. |
| Washing results aren't to expectations | → Ensure you are using a sufficient amount of detergent.→ Ensure the correct quantity of clothes are being used depending on the wash program selected.→ Ensure you are using the correct wash program to suit the clothing and level of dirtiness.→ Try using an alternative detergent. |
| Washing machine is making an abnormal noise or vibrating | → Ensure the washing machine is level.→ Ensure that all transportation bolts have been removed.→ Ensure the appliance has been installed on a solid and level floor.→ Ensure that all legs are making contact with the floor and adjust as required.→ Follow the Drain Pump cleaning procedure and ensure there are no foreign objects. |
Note: If the above steps don't resolve your issue or you cannot resolve the fault by yourself:
→ Press the "On/Off" button,
→ Switch off the appliance at the power outlet and remove the plug,
→ Call our customer service team.
ERROR MESSAGES AND SOLUTIONS
| Display LED | Description | Reason | Solution |
| E30 | Door lock problem | Door is not closed properly. | Restart after the door is closed. |
| Please call up service line if there are still troubles. | |||
| E10 | Water injecting problem while washing | Tap is not opened or water flows too slowly.Inlet valve filter is blocked.Inlet pipe is twisted.If water is not supplied | Open the tap or wait till the water supply becomes normal.Check inlet valve filter.Straighten the water pipeCheck the other taps in the room. |
| Please call up service line if there are still troubles. | |||
| E21 | Drain problem while washing | Outlet hose is blocked or twistedDrain pump is blocked | Wash and straighten outlet hose.Wash drain pump filter |
| Please call up service line if there are still troubles. | |||
| Please call up the service line if there is any other problem. | |||
CARE LABELS
The care label on your clothing/fabric can assist you with selecting the best method to wash your clothing.
Normal wash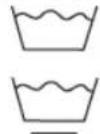 Gentle wash Gentle wash |  Warm wash(max 40°C) Warm wash(max 40°C) | Hand wash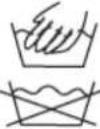 Do not wash Do not wash | Bleach Do not bleach Do not bleach | Chlorine bleachmay be used Chlorine bleachnot be used Chlorine bleachnot be used | Tumble dry. Medium (max 150°C) Tumble dry. Low heat (max 110°C) Tumble dry. Low heat (max 110°C) |
| Iron[YG4]Do not iron | Cool iron(max 110 °C)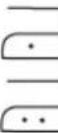 Warm iron,medium (max 150°C) Warm iron,medium (max 150°C) | Dry clean Do not dry clean Do not dry clean | Dry clean normal cycle with any solvent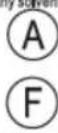 Dry clean normal cycle petroleum solvent only Dry clean normal cycle petroleum solvent only | Tumble dry normal Dry flat Dry flat | Drip dry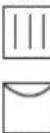 Hang to dry /Line dry Hang to dry /Line dry |
Iron with cloth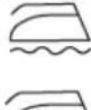 [mmammmmSteam Iron] [mmammmmSteam Iron] | Dry after wash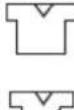 Line Dry in shade Line Dry in shade | Warmly dry clean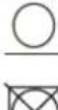 Do not tumble dry Do not tumble dry | 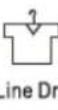 l y l y |  | No ma wash |
Technical Specifications
Below outlines the technical specifications for your Esatto Washing Machine.
Washing Capacity 6.0kg
Dimensions (w x d x h mm) 595 x 495 x 850 mm
Net Weight 61kg
Rated Power 2050W
Power Supply 220-240V, \~50Hz, 10Amp
Standard Water Pressure 0.05MPa\~1.0MPa
Warranty
WARRANTY TERMS AND CONDITIONS
LAUNDRY APPLIANCES
→ This document sets out the terms and conditions of the product warranties for Residentia
Group Appliances. It is an important document. Please keep it with your proof of purchase documents in a safe place for future reference should you require service for your Appliance.
- In this warranty
(a) ‘acceptable quality’ as referred to in clause 10 of this warranty has the same meaning referred to in the ACL;
(b) ‘ACL’ means Trade Practices Amendment (Australian Consumer Law) Act (No.2) 2010;
(c) ‘Appliance’ means any Residentia Group product purchased by you accompanied by this document;
(d) ‘ASR’ means Residentia Group authorised service representative;
(e) ‘Residentia Group’ means Residentia Group Pty Ltd of 20 Yaltara Avenue, Bundoora Victoria 3083, ACN 600 546 656 in respect of Appliances purchased in Australia;
(f) ‘major failure’ as referred to in clause 10 of this warranty has the same meaning referred to in the ACL and includes a situation when an Appliance cannot be repaired or it is uneconomic for Residentia Group, at its discretion, to repair an Appliance during the Warranty Period;
(g) 'Warranty Period' means:
(i) where the Appliance is used for personal, domestic or household use
(i.e. normal single family use) as set out in the instruction manual, the Appliance is warranted against manufacturing defects in Australia for 12 months following the date of original purchase of the Appliance;
(h) ‘you’ means the purchaser of the Appliance not having purchased the Appliance for re-sale, and ‘your’ has a corresponding meaning.
-
This warranty only applies to Appliances purchased and used in Australia and is in addition to (and does not exclude, restrict, or modify in any way) any non-excludable statutory warranties in Australia.
-
During the Warranty Period Residentia Group or its ASR will, at no extra charge if your Appliance is readily accessible for service, without special equipment and subject to these terms and conditions, repair or replace any parts which it considers to be defective. Residentia Group or its ASR may use remanufactured parts to repair your Appliance. You agree that any replaced Appliances or parts become the property of Residentia Group. This warranty does not apply to light globes, batteries, filters or similar perishable parts.
-
Parts and Appliances not supplied by Residentia Group are not covered by this warranty.
-
You will bear the cost of transportation, travel and delivery of the Appliance to and from Residential Group or its ASR. If you reside outside of the service area, you will bear the cost of:
(a) travel of an authorised representative;
(b) transportation and delivery of the Appliance to and from Residentia Group or its
ASR, in all instances, unless the Appliance is transported by Residentia Group or its ASR, the Appliance is transported at the owner's cost and risk while in transit to and from Residentia Group or its ASR.
- Proof of purchase is required before you can make a claim under this warranty.
Warranty continued
- You may not make a claim under this warranty unless the defect claimed is due to faulty or defective parts or workmanship. Residentia Group is not liable in the following situations (which are not exhaustive):
(a) the Appliance is damaged by:
(i) accident
(ii) misuse or abuse, including failure to properly maintain or service
(iii) normal wear and tear
(iv) power surges, electrical storm damage or incorrect power supply
(v) incomplete or improper installation
(vi) incorrect, improper or inappropriate operation
(vii) insect or vermin infestation
(viii) failure to comply with any additional instructions supplied with the Appliance;
(b) the Appliance is modified without authority from Residentia Group in writing;
(c) the Appliance's serial number or warranty seal has been removed or defaced;
(d) the Appliance was serviced or repaired by anyone other than Residentia Group, an authorised repairer or ASR.
- This warranty, the contract to which it relates and the relationship between you and Residentia Group are governed by the law applicable where the Appliance was purchased.
- To the extent permitted by law, Residentia Group excludes all warranties and liabilities (other than as contained in this document) including liability for any loss or damage whether direct or indirect arising from your purchase, use or non use of the Appliance.
- For Appliances and services provided by Residentia Group in Australia, the Appliances come with a guarantee by Residentia Group that cannot be excluded under the Australian Consumer Law. You are entitled to a replacement or refund for a major failure and for compensation for any other reasonably foreseeable loss or damage. You are also entitled to have the Appliance repaired or replaced if the Appliance fails to be of acceptable quality and the failure does not amount to a major failure. The benefits to you given by this warranty are in addition to your other rights and remedies under a law in relation to the Appliances or services to which the warranty relates.
- At all times during the Warranty Period, Residentia Group shall, at its discretion, determine whether repair, replacement or refund will apply if an Appliance has a valid warranty claim applicable to it.
- To enquire about claiming under this warranty, please follow these steps:
(a) carefully check the operating instructions, user manual and the terms of this warranty;
(b) have the model and serial number of the Appliance available;
(c) have the proof of purchase (e.g. an invoice) available;
(d) telephone the numbers shown below.
- You accept that if you make a warranty claim, Residentia Group and its ASR may exchange information in relation to you to enable Residentia Group to meet its obligations under this warranty.
IMPORTANT Before calling for service, please ensure that the steps in point 12 have been followed.
Service: Please call 1300 11 HELP (4357)
Spare Parts: Please call 1300 11 SPARE (7727)
Notes

E2447
Residentia
- Esatto
- Safety Instructions
- CONDITIONS OF USE
- CHILDREN & VULNERABLE PEOPLE SAFETY
- INSTALLATION
- ELECTRICAL CONNECTION
- APPLIANCE USE
- CARE & CLEANING
- PRODUCT DISPOSAL
- Safety Instructions (Continued)
- TRANSPORT
- INSTALLATION POSITIONING
- REMOVING THE TRANSPORTATION BOLTS
- LEVEL ADJUSTING
- CONNECT THE INLET PIPE
- POSITION THE OUTLET HOSE
- Your Esatto Washing Machine
- DETERGENT DRAWER
- Operating Instructions
- PREPARATION BEFORE WASHING CLOTHES
- Pay Attention to Detergents
- Clothing Classifications
- Confirm the Washing Capacity
- QUICK START:
- Note:
- WASHING CLOTHES FOR THE FIRST TIME
- Operating Instructions (continued)
- SELECTING A PROCEDURE
- To select a program:
- ADDITIONAL WASH OPTIONS
- Pre-wash Function
- Speed Wash Function
- Extra Rinse Function
- Delay Function
- Reload (Add a Garment) Function
- To use the Reload function:
- Child Lock
- To activate or deactivate the Child Lock:
- Bubble Removal Function
- Signal Function
- When the Signal function is on, your appliance will make an audible tone when:
- To activate or deactivate the Signal function:
- Cleaning & Maintenance
- CLEANING PROCEDURES
- CLEANING THE WASHING MACHINE
- CLEANING THE INTERNAL DRUM
- FROZEN WASHING MACHINE
- CLEANING THE DETERGENT DRAWER
- CLEANING THE INLET FILTER
- REMOVING FOREIGN OBJECTS
- Warning!
- Troubleshooting
- CARE LABELS
- Technical Specifications
- Warranty
- WARRANTY TERMS AND CONDITIONS
- LAUNDRY APPLIANCES
- Warranty continued
- Notes
Brand : Esatto
Model : EFLW6
Category : Washing machine