
LCM-1901 - Monitor Ikegami - Free user manual and instructions
Find the device manual for free LCM-1901 Ikegami in PDF.


| Type | Professional LCD Monitor |
| Brand | Ikegami |
| Model | LCM-1901 |
| Screen Size | 19 inches (48.3 cm) |
| Resolution | 1280 x 1024 (SXGA) or 1920 x 1080 (Full HD) |
| Aspect Ratio | 4:3 or 16:9 (depending on version) |
| Brightness | 250 cd/m² (typical) |
| Contrast Ratio | 1000:1 (typical) |
| Viewing Angle | 178° horizontal / 178° vertical |
| Inputs | VGA, DVI, Composite, S-Video |
| Power Consumption | ≤ 45 W (typical) |
| Power Supply | AC 100-240 V, 50/60 Hz |
| Dimensions (W x H x D) | 412 x 348 x 63 mm (without stand) |
| Weight | 5.2 kg (without stand) |
| VESA Mount | 100 x 100 mm |
| Operating Temperature | 0°C to 40°C |
| Storage Humidity | 20% to 80% (non-condensing) |
| Cleaning Instructions | Use a soft, dry cloth; avoid harsh chemicals |
| Safety | Do not expose to liquids; use grounded outlet |
| Spare Parts Availability | Contact Ikegami service center for replacement parts |
Frequently Asked Questions - LCM-1901 Ikegami
User questions about LCM-1901 Ikegami
0 question about this device. Answer the ones you know or ask your own.
Ask a new question about this device
Download the instructions for your Monitor in PDF format for free! Find your manual LCM-1901 - Ikegami and take your electronic device back in hand. On this page are published all the documents necessary for the use of your device. LCM-1901 by Ikegami.
USER MANUAL LCM-1901 Ikegami
- Important Safety Instructions ......2
● Safety Notices 4 - Location controls 6
● Functions and control methods .....7
● To connect the power .... 10
● Possible connections.... 11
● Troubleshooting Tip 12 - Specifications .... 13
Important Safety Instructions
Shock Hazard Marking and Associated Graphical Symbols

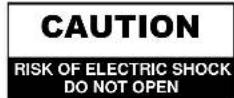

Explanation of Safety Related Symbols


CAUTION : TO REDUCE THE RISK OF ELECTRIC SHOCK, DO NOT REMOVE COVER (OR BACK). NO USER-SERVICEABLE PARTS INSIDE. REFER SERVICING TO QUALIFIED SERVICE PERSONNEL.
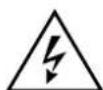
This symbol is intended to alert the user to the presence of uninsulated "dangerous voltage" within the product's enclosure that may be of sufficient magnitude to constitute a risk of electric shock to persons.

This symbol is intended to alert the user to the presence of important operating and maintenance (servicing) instructions in the literature accompanying the appliance.
WARNING – To Reduce The Risk Of Fire Or Electric Shock, Do Not Expose This Apparatus To Rain Or Moisture.

Correct Disposal of This Product (Waste Electrical & Electronic Equipment)
This marking shown on the product or its literature, indicates that it should not be disposed with other household wastes at the end of its working life. To prevent possible harm to the environment or human health from uncontrolled waste disposal, please separate this from other types of wastes and recycle it responsibly to promote the sustainable reuse of material resources.
Household users should contact either the retailer where they purchased this product, or their local government office, for details of where and how they can take this item for environmentally safe recycling.
Business users should contact their supplier and check the terms and conditions of the purchase contract. This product should not be mixed with other commercial wastes for disposal.
Important Safety Instructions

Before connecting the AC power cord to the DC adapter outlet, make sure the voltage designation of the DC adapter corresponds to the local electrical supply.
Never insert anything metallic into the cabinet openings of the Liquid Crystal Display LCD Monitor: doing so may create the danger of electric shock.
To avoid electric shock, never touch the inside of the LCD Monitor. Only a qualified technician should open the case of the LCD Monitor.
Never use your LCD Monitor if the power cord has been damaged. Do not allow anything to rest n the power cord, and keep the cord away from areas wherepeople can trip over it.
Be sure to hold the plug, not the cord, when disconnecting the LCD Monitor from an electric socket.
Openings in the LCD Monitor cabinet are provided for ventilation. To prevent overheating, these openings should not be blocked or covered. Also, avoid using the LCD Monitor on a bed, sofa, rug, or other soft surface. Doing so may block the ventilation openings in the bottom of the cabinet. If you put the LCD Monitor in a bookcase or some other enclosed space, be sure to provide adequate ventilation. Put your LCD Monitor in a location with low humidity and a minimum of dust.
Do not expose the LCD Monitor to rain or use it near water.
(in kitchen, near swimming pool, etc.). If the LCD Monitor accidentally gets wet, unplug it and contact an authorized dealer immediately. You can clean the LCD Monitor with a damp cloth when necessary, but be sure to unplug the LCD Monitor first.
Place the LCD Monitor on a solid surface and treat it carefully.
The screen is made of thin glass with a plastic front surface and be damaged if dropped, hit or scratched.
Do not clean the front panel with keton-type materials (e.g., acetone), ethyl alcohol, toluene, ethylacid, methyl, or chloride - these may damage the panel.
Locate your LCD Monitor near an easily accessible AC outlet.
SAFETY NOTES
Thank you for purchasing our product.
Before using it, please read this user's manual carefully and apply it correctly and safely.
Please keep this manual close to you so you can refer to it anytime after reading it.
Also, for the transportation of the product, please attach this manual without fail.
Please observe the notes below.
- Use at the rated power voltage.
Use of non-rated voltage may cause fire, electric shock and breakdown.
- Do not open the cabinet and external cover.
The high voltage inside of this product may cause the electric shock.
3.Do not remodel or disassemble this product.
Remodeling or disassembling in wrong method may cause fire, electric shock or breakdown.
- Do not insert or drop any foreign substance such as metals or flammable object inside from the air hole.
It may cause fire, electric shock or breakdown.
If any foreign substance is inserted inside of this product, turn off the power, pull the plug out of the socket and contact the sales department. Do not use the product with the foreign substance in.
- Do not place any vase, potted plant, cup, medicine and any container with water on this product.
If the liquid is spilt, it may cause the fire, electric shock or breakdown.
6.Do not place this product with water nor moisten it.
If water flows in it, it may cause the fire, electric shock or breakdown.
If there is water inside of the product, turn off the power immediately, pull the plug out of the socket and contact the sales
department.
Do not use the product with water in it.
- Never touch the antenna lie or power plug if it stars to thunder.
It may cause the electric shock.
- If any impact is applied, the parts inside of the product may be fallen out or broken to be the cause of fire, electric shock or
breakdown.
- Clean the dust on the power plug periodically.
The dusty power plug may cause the poor insulation due to the moisture to be the reason of fire.
- Do not destroy, process, make closer to heating device, bend or twist forcibly, place any heavy object on nor bind the power
cord or power plug. If it is used in the broken condition, it may cause fire or electric shock.
11.Do not touch the power plug with wet hands.
If you pull in or out the power plug with wet hands, it may cause electric shocks.
- Put the power plug in firmly.
Putting the plug incompletely may cause the electric shock or fire by the generation of heat.
- Do not use any non-rated power socket with numerous devices jointed on one power socket or cable device.
The wire of non-designated capacity may cause the fire due to the generation of heat.
- In case of malfunction, turn off the power switch immediately and pull out the power plug.
If this product is used in the abnormal condition such as damage to it, foreign substance inside of the product, generation of
joints, smelling, smoking, overheating and non production of signal, it may cause fire, electric shock or breakdown.
Turn off the power switch immediately, pull the power plug out of the socket and contact to the sales store.
- Leave space 10 cm or more from the wall for the installation of the device.
Do not install it close to the wall nor block the ventilation of the air.
Insufficient ventilation or accumulated heat inside of the product may cause the fire.
- Do not install it at the unstable location such as on the bouncing prop or tilted place.
It may be tipped over as it loses balance or damaged as it is fallen down.
SAFETY NOTES
-
Do not install at the place with moisture or dust. It may cause the fire or the electric shock
-
Do not install it at the place with poisonous gas. It may cause the fire.
-
Do not install it at the location with continuous vibration. It may be tipped over as it loses balance or damaged as it is fallen down.
2.0. Do not install it at the place on the strong magnetic field or current field. It may cause fire, electric shock or break down. This equipment may be observed deterioration of the picture by electromagnetic radiation in electromagnetic environment.
-
Fasten the wheel of the product or shelf with wheels when installing this product. If it moves or is tipped over, it may be damaged.
-
Do not leave it in the car under the burning sun for a long time. The high temperature may distort the cabinet or the parts inside may be broken down or heated. If you use this product in this condition, it may cause the fire, electric shock or breakdown due to the short circuit or poor insulation.
-
Do not place any fire source such as candlelight close to this product or place it on this product. If it is tipped over or fallen down, it may cause damage or fire.
-
Do not sprinkle water drops or water on this product. It may cause the fire, the electric shock or breakdown.
-
Do not place heavy objects on this product. It may be tipped over as it loses balance or damaged as it is fallen down.
-
Do not transport it with the power cord or the connection cable connected. If you move this product with the power cord or the connection cable connected, the damaged power cord, connection cable or connection terminal may cause the fire, the electric shock or breakdown.
-
Pull the power cord out while holding the plug portion. If you pull the power cord out by force, the cord may the fire or the electric shock.
2.8.Do not use it outdoor. Dust or rainstorm may cause the fire, electric shock or breakdown.
- Do not climb on this product. If you climb on it, it may damage or hurt it.
30.2 persons or more shall transport the device, which is heavier than 18 kg. If you drop or tip over the device, it may damage it. The weight is indicated on the user's manual.
-
Use the attached power cord and connection cable, or those, which are indicated on the user's manual. If you do not use the designated power cord and connection cable, it may cause the electric shock or breakdown.
-
Turn off the power switch when connecting the power cord or connection cable. If you not turn off when connecting it, it may cause the electric shock or breakdown.
-
Do not use any chemical such as the paint thinner or benzine to clean the cabinet. It may scratch the surface or disappear the indication to cause wrong operation, which can be the reason for disorder.
-
Clean the cabinet with 5\~6 time diluted neutral detergent water on smooth cloth as stirring to remove the contamination. After that, clean it with dry cloth to remove any stain.
LOCATION CONTROLS
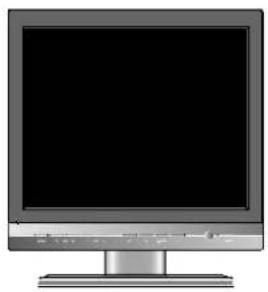
Front
Side
Rear(15"/17")
natural_image
Front view of a silver CRT computer monitor with black screen and stand (no visible text or symbols)

natural_image
Technical illustration of a computer monitor with a mounted base (no text or symbols visible)
FUNCTIONS AND CONTROL METHODS
1. POWER BUTTON
: Press to turn the LCD monitor ON. The POWER LAMP above the switch will illuminate.
2. POWER LED LAMP
: When SET is normally operated, a green lamp is turned on. The green lamp flickers in the status of STAND-BY. STAND BY : ON/OFF BUTTON is off
3. PC BUTTON
: When you press this button, PC mode is selected.
4. S-VIDEO BUTTON
: When you press this button, S-VIDEO mode is selected. If you want to see a clean and clear video through S-VIDEO input, select this.
5. V2 BUTTON
: When you press this button, VIDEO2 mode is selected. Select this button to insert the camera input or video input into VIDEO CH2 terminal.
6. V1 BUTTON
: When you press this button, VIDEO1 mode is selected. Select this button to insert the camera input or video input into VIDEO CH1 terminal.
7. VOLUME +, - BUTTON
: Adjust the volume up and down.
8. SEL BUTTON
: When you want to select the desired item in menu, press this button to move.
9. MENU BUTTON
: When you press this button, the menu window appears. When you press this button again, the menu window disappears.
10. 11. 12. 13 VIDEO IN/OUT
: This is the terminal to receive the video from the camera. It is used to connect the video, to connect & record the video, or to connect many monitors.
14. 15. 16. 17 AUDIO IN/OUTPUT
: It is the terminal to receive the audio from the camera. It can be used by connecting the external audio equipment.
18. S-VIDEO JACK
: When you want to see a high definition S-VIDEO, use the S-VIDEO input of this monitor. You can enjoy the clean and clear video.
19. PC JACK
: When you use this monitor as PC monitor, you can use it by connecting the PC Cable to PC Jack of this monitor.
20. POWER INLET
: Inlet the AC power (AC100\~240V, 50/60Hz)
21. KENSINGTON LOCK HOLE
It will be able to prevent a robbery.
FUNCTIONS AND CONTROL METHODS
MENU Operation
① When you press the MENU button, the MENU window appears on screen.
② Press SEL BUTTON to move to the desired item.
③ Press VIO+ key to select the desired item.
④ To shut down the MENU window, wait for time when the MENU window disappears or press the MENU button again.
MENU in VIDEO1, VIDEO2, and S-VIDEO
It shows the MOVE button, SEL button, and EXIT button on a bottom of MENU window.
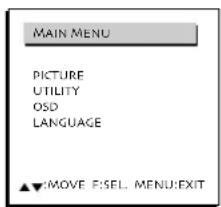
PICTURE
COLOR TEMP→ 9300/6500
You can select a temperature of desired color. (9300°K / 6500°K)
CONTRAST Adjust the screen's contrast. (Operate in VIDEO1 mode, VIDEO2 mode, and S-VIDEO mode)
BRIGHTNESS Adjust the screen's brightness. (Operate in VIDEO1 mode, VIDEO2 mode, and S-VIDEO mode)
COLOR→ Adjust the screen's color. (Operate in VIDEO1 mode, VIDEO2 mode, and S-VIDEO mode)
SHARPNESS→ Adjust the sharpness control to obtain the clearest picture.
TINT-Adjust the screen s tint. (Operate in VIDEO1 mode, VIDEO2 mode, and S-VIDEO mode)
UTILITY
ALL BLUE : OFF/ON
→ When you select ON of ALL BLUE, a full screen is blue.
OVER SCAN : 0%, 5%, 10%
→ You can select 0% (original screen), 5% (zoom-in screen), or 10% (zoom-in screen) by selecting OVER SCAN.
OSD
OSD TIMEOUT
→ You can select the time when OSD window appears on screen in 5 seconds unit up to 5\~60 seconds.
OSD TRANSPARENCY
→ You can select the OSD Transparency in the unit of 20% up to MIN \~ MAX.
LANGUAGE
ENGLISH, FRANÇAIS, DEUTSCH, ESPAÑOL, DANISH, ITALIANO
→ The above six languages are offered. You can select one of above languages
FUNCTIONS AND CONTROL METHODS
MENU in PC / DVI
When you press the MENU Button, the MENU screen appears.
It shows a resolution, vertical and horizontal frequency of current monitor on the bottom of MENU Window.
AUTO ADJUST
Adjust the screen's status in PC mode automatically.
MAIN MENU
AUTO ADJUST
SCREEN
COLOR
UTILITY
OSD
LANGUAGE
▲▼:MOVE F:SEL. MENU:EXIT
SCREEN
BRIGHTNESS → Adjust the screen's brightness
CONTRAST → Adjust the screen's contrast
H.POSITION → Adjust the screen's horizontal position
V. POSITION → Adjust the screen's vertical position
PHASE ADJUST → Adjust the screen's phase
CLOCK ADJUST → Adjust the screen's horizontal size through a increase/decrease in the number of Pixel.
COLOR
COLOR TEMP → Select the temperature of desired color
(USER / 9300°K / 6500°K)
RED → Adjust the red tint of screen
GREEN → Adjust the green tint of screen
BLUE → Adjust the blue tint of screen
UTILITY
RECALL → Go back to a basic default to be delivered from a factory
FULL AUTO → Optimize the screen status in PC mode automatically and set the color value by re-measuring it
OSD
Same as the operation in VIDEO1, VIDEO2, and S-VIDEO
LANGUAGE
Same as the operation in VIDEO1, VIDEO2, and S-VIDEO
TO CONNECT THE POWER
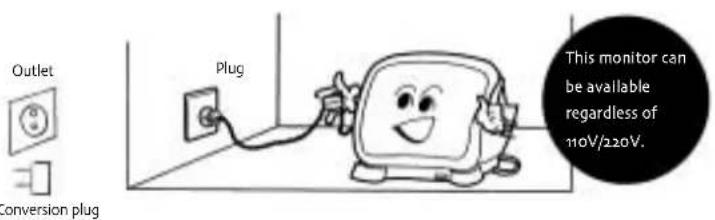
Be sure to connect the conversion plug to the power plug by the outlet!
• This monitor can be available both in AC 110V / 220V 60Hz
- Various input voltage (within a range of AC100\~240V) can be available.
(Do not use it in the voltage higher than a rated voltage)
- 110V/220V selector switch is not necessary. This monitor can be operated directly without a special operation.
CAUTION

• Make sure to operate this monitor in the rated voltage described in the user's manual or the monitor.
(When the voltage higher than the rated voltage is supplied, it may give damage to a receiver.
- If you do not use the monitor for a long time, you must pull out the power plug from the inlet for safety.
POSSIBLE CONNECTIONS
- Read the installation/operation manual thoroughly before connecting equipment.
- Turn off the power source before connecting the monitor and external equipment.
VIDEO 1 Connection (Select input VIDEO 1 button)

VIDEO 2 Connection (Select input VIDEO 2 button)

S-VIDEO / D-SUB 15PIN connection (Select input S-VIDEO, PC button)
![Video camera VCR or DVD Video Monitor PC S-VIDEO IN D-SUB 15 PIN [Analog RGB]](/content/2026/05/1001062/images/ccf4e25a26e1929d0586c9d268be73c19836561ad532ddc30c6c18a6369d36fe.jpg)
TROUBLESHOOTING TIP
If your monitor is out of order, check up the below problems firstly.
| Problems | Checkup | Troubleshoot |
The screen doesn't appear and the sound is not heard. | • Is the power cord pulled out?• Is the power turned off?• Is this monitor connected with the external equipment erroneously? | • Connect the power cord correctly• Press the power button.• Check the cord and then connect it correctly. |
The sound is heard but the video doesn't appear. | • Is the contrast and brightness wrongly controlled?• Is this monitor connected with the external equipment erroneously? | • Adjust the contrast and brightness correctly.• Check the cord and then connect it correctly. |
The video appears but it is interrupted by static. | • Is the external equipment correctly connected? | • Check the cord and then connect it correctly. |
Not the sound is heard. | • Is the volume turned down?• Is this monitor connected with the external equipment erroneously? | • Adjust the volume.• Check the cord and then connect it correctly. |
The screen color is not clear and clean. | • Is the tint and color correctly adjusted? | • Adjust the contrast and brightness correctly. |
The screen is shaken and is affected by static. | • Is the external equipment correctly connected? | • Check the cord and then connect it correctly. |
SPECIFICATIONS
| 15° LCD CCTV MONITOR | 17° LCD CCTV MONITOR | 19° LCD CCTV MONITOR | |
| PICTURE TUBE | 0.297 PIXEL PITCH | 0.264 PIXEL PITCH | 0.294 PIXEL PITCH |
| RESOLUTION | XGA (1024 x 768) | SXGA (1280 x 1024) | SXGA (1280 x 1024) |
| SOUND OUTPUT | 0.5W | 0.5W | 0.5W |
| SPEAKER | MAX 2W, 8 ohm 30x70mm | MAX 2W, 8 ohm 30x70mm | MAX 2W, 8 ohm 30x70mm |
| POWER SOURCE | AC 100-240V 50/60Hz | AC 100-240V 50/60Hz | AC 100-240V 50/60Hz |
| POWER CONSUMPTION | 28±3 [W] | 33±3 [W] | 37±3 [W] |
| BRIGHTNESS | 450cd/m² | 300cd/m² | 300cd/m² |
| DIMENSIONS(WxHxD) | 365 x 389 x 180 [mm] | 390 x 425 x 180 [mm] | 430 x 446 x 220 [mm] |
| (Without Stand) | 365 x 329 x 66 [mm] | 390 x 366 x 65 [mm] | 430 x 394 x 69 [mm] |
| WEIGHT(NET) | 5.6 Kg | 6.0 Kg | 7.0 Kg |
| (Without Stand) | 4.1 Kg | 4.5 Kg | 5.1Kg |
| TERMINALS | VIDEO CH1, 2 IN/OUT | VIDEO CH1, 2 IN/OUT | VIDEO CH1, 2 IN/OUT |
| AUDIO CH1, 2 IN/OUT | AUDIO CH1, 2 IN/OUT | AUDIO CH1, 2 IN/OUT | |
| S-VIDEO IN | S-VIDEO IN | S-VIDEO IN | |
| PC IN | PC IN | PC IN |

This monitor has received the EMI (Electromagnetic interference) test for the business.
Accordingly, a seller or user needs to know about it. If you purchase the erroneous monitor, be sure to exchange it into non-business monitor in the shop where you buy it.


- Important Safety Instructions
- Correct Disposal of This Product (Waste Electrical & Electronic Equipment)
- SAFETY NOTES
- LOCATION CONTROLS
- FUNCTIONS AND CONTROL METHODS
- POWER BUTTON
- POWER LED LAMP
- PC BUTTON
- S-VIDEO BUTTON
- V2 BUTTON
- V1 BUTTON
- VOLUME +, - BUTTON
- SEL BUTTON
- MENU BUTTON
- 11. 12. 13 VIDEO IN/OUT
- 15. 16. 17 AUDIO IN/OUTPUT
- S-VIDEO JACK
- PC JACK
- POWER INLET
- KENSINGTON LOCK HOLE
- MENU Operation
- MENU in VIDEO1, VIDEO2, and S-VIDEO
- PICTURE
- UTILITY
- OSD
- LANGUAGE
- MENU in PC / DVI
- AUTO ADJUST
- MAIN MENU
- SCREEN
- COLOR
- TO CONNECT THE POWER
- Be sure to connect the conversion plug to the power plug by the outlet!
- CAUTION
- POSSIBLE CONNECTIONS
- TROUBLESHOOTING TIP
- SPECIFICATIONS
Brand : Ikegami
Model : LCM-1901
Category : Monitor