
Quietair GQA120TB - Range hood Glem Gas - Free user manual and instructions
Find the device manual for free Quietair GQA120TB Glem Gas in PDF.


| Product Type | Chimney Range Hood |
| Model | Quietair GQA120TB |
| Brand | Glem Gas |
| Width | 120 cm |
| Depth | 50 cm |
| Height (with chimney) | Up to 110 cm adjustable |
| Weight | Approx. 20 kg |
| Power Supply | 220-240 V, 50 Hz |
| Motor Power | 200 W |
| Maximum Airflow | 800 m³/h |
| Noise Level | 55 dB (low speed) - 65 dB (high speed) |
| Grease Filter | Aluminum mesh, washable |
| Carbon Filter | Optional, for recirculation |
| Lighting | LED, 2 x 3 W |
| Controls | Electronic touch panel with 3 speeds |
| Installation Types | Ducted or recirculating (with carbon filter) |
| Energy Class | A |
| Safety Features | Thermal overload protection |
| Maintenance Interval | Clean grease filter monthly |
| Warranty | 2 years |
Frequently Asked Questions - Quietair GQA120TB Glem Gas
User questions about Quietair GQA120TB Glem Gas
0 question about this device. Answer the ones you know or ask your own.
Ask a new question about this device
Download the instructions for your Range hood in PDF format for free! Find your manual Quietair GQA120TB - Glem Gas and take your electronic device back in hand. On this page are published all the documents necessary for the use of your device. Quietair GQA120TB by Glem Gas.
USER MANUAL Quietair GQA120TB Glem Gas
OFF BOARD RANGEHOOD SOLUTIONS by GLEM
INSTALLATION AND OPERATION GUIDE
Rangehood models GQA90SC - GQA120TB - GQA90TB - GQA85UC
Quiet Air rangehoods take the noise out of the kitchen.
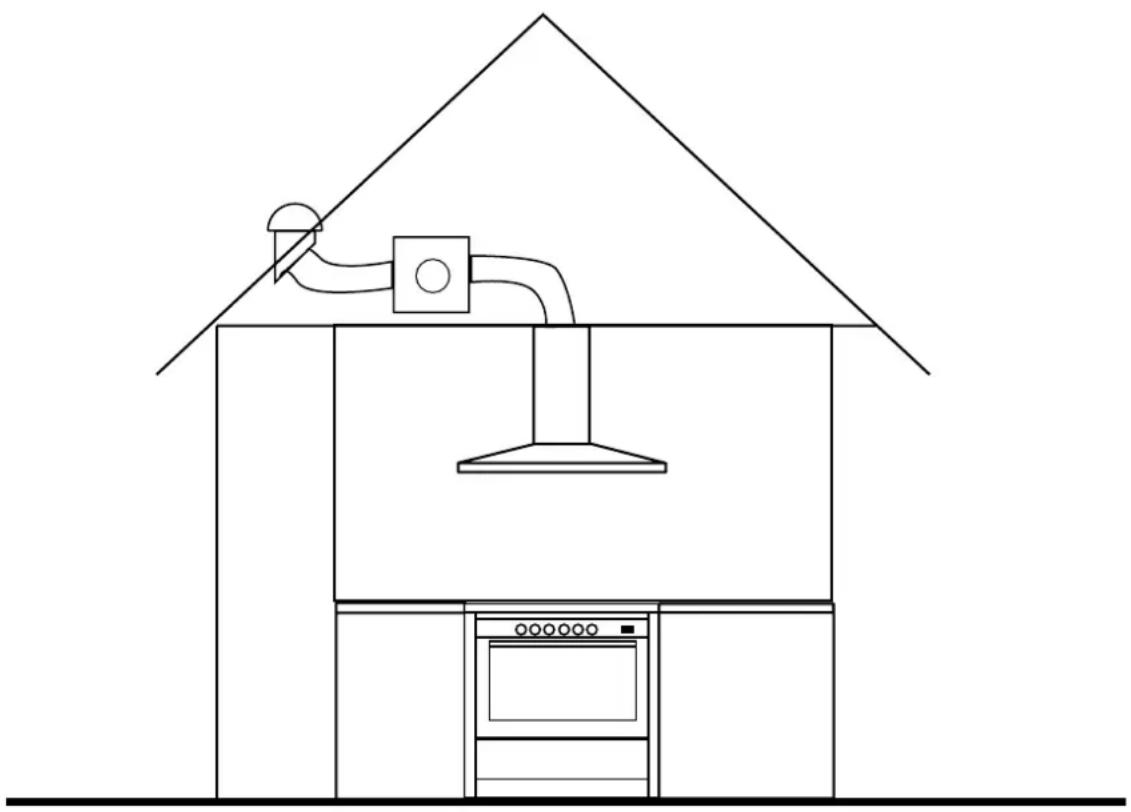
The fan motor and housing are located separate from the hood. If there isn't a space available in which to locate the fan motor (such as in an apartment) then this rangehood should be considered unsuitable for installation.
Call Glem Service on 1 300 307 917 if in doubt.
Quiet Air Rangehoods are a product of Glem Gas Australasia Pty. Ltd.


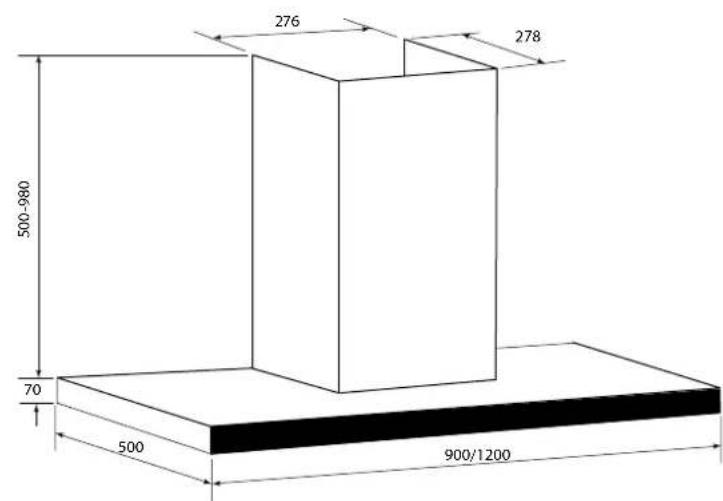
MODELS GQA90TB and GQA120TB

MODEL GQA90SC

FLEXIBLE DUCTING X 2
CONNECTOR SLEEVE X 3
REMOTE FAN MOTOR UNIT
BLACK ATTACHMENT MODULE X 3
FASTENERS AND FITTINGS
MOTOR MOUNTING BRACKET X 2
FOR VERTICAL MOUNTING
CHIMNEY TOP MOUNTING BRACKET - (CANOPY HOODS)
INSTRUCTION BOOK
2 X CHIMNEY (FLUE) LENGTHS ON CANOPY MODELS ONLY
3 MESH FILTERS - GQA90SC ONLY
CONGRATULATIONS
Thank you for purchasing the new Quiet Air rangehood.
This manual has been written to assist you and instruct you in the operation of your new Quiet Air rangehood. It will help you get the best performance an make full use of the rangehood's features. The safety precautions and warnings are listed for your safety and the safety of others when operating this rangehood.
Please keep this manual in a safe place for future reference.
This rangehood has been designed for use in a domestic cooking environment. Any other application other than for domestic (household) use is considered inappropriate. The manufacturer accepts no responsibility in the event of problems caused by improper use, incorrect use or faulty installation. A signed installation certificate including the details of the qualified installer is desirable.
IMPORTANT!
This appliance is designed and intended for use in a domestic household application. It is not suitable for any non domestic application.
IT SHOULD NOT BE USED IN A COMMERCIAL ENVIRONMENT.
The appliance guarantee will be void if the appliance is used within a non domestic environment. This includes semi commercial, commercial or communal applications such as clubs and schools.
MODEL NUMBER DETAILS ARE ON THE INSIDE OF THE RANGEHOOD.
Quiet Air Rangehoods have been designed and constructed to meet the following standards: AS/NZS 60335-1 General Requirements for Domestic electrical appliances AS/NZS 60335-2-6 Particular Requirements for Domestic electrical cooking appliances AS/NSZ 1044 Electromagnetic Compatibility Requirements.
The rangehood is not intended for use by young children or infirmed persons unless they have been properly trained in the use of the rangehood.
Please retain your proof of purchase to aid in any warranty enquiries.
| MODEL | |
| Date of Purchase | |
| Retailer or supplier | |
| Invoice number |
All Quiet Air Rangehoods are covered by a full 2 year warranty. The warranty form and conditions are detailed at the end of this manual. Proof of purchase is compulsory for any Warranty claims.
FIRST TIME USE
IMPORTANT!
Remove all packing material and literature from the rangehood before connecting the electrical supply.
A protective plastic film maybe coated on the stainless steel inside and on the outside of the rangehood. It must be removed before use.
We suggest removing the film prior to installing the rangehood.
IMPORTANT!
- DO NOT spray aerosols in the vicinity of your cooking area while it is in operation.
- DO NOT allow young children to use the rangehood
- DO NOT touch surfaces when they are hot
- DO keep the rangehood clean to avoid fires
This appliance is not recommended for use in marine craft, caravans or mobile homes.
If the rangehood fails to operate correctly, call Glem Gas Australasia Pty Ltd on 1300 307 917 or their appointed agent for service. DO NOT ATTEMPT REPAIRS YOURSELF.
Glem Gas Australasia Pty. Ltd. does not accept any responsibility for any damage coming from inappropriate, incorrect and irrational use. For more detailed information, refer to the Warranty Card. Contact Glem Gas Australasia Pty. Ltd. on 1300 307 917 for all service enquiries.
DO NOT MODIFY THIS APPLIANCE
DO NOT INSTALL IF THE RANGEHOOD IS DAMAGED
NOTE:
FAN MOTOR LOCATION
Quiet Air Rangehoods achieve low noise levels due to the remote location of the main fan motor assembly. Typically this assembly is installed remotely inside the roof space above the rangehood. In some cases the fan assembly can be installed in another location however the intention of the rangehood is for installation inside a ceiling cavity. If you are in doubt call Glem on 1300 307 917 or email on info@glemgas.com.au.
The remote motor assembly is NOT weather proof in any way and is only for internal installation.
Quiet Air Rangehoods are not considered to be suitable for installation in an apartment or dwelling that does not have sufficient space in which to locate the fan motor.

Roof Space fan motor location

SAFETY WARNINGS
Please read all points below before attempting to operate the rangehood.
1. BEFORE INSTALLATION
- The manufacturer will not be held liable for any damages resulting from incorrect or improper installation.
- Only a qualified and trained service technician can undertake the work of installation and servicing.
• The electrical technical specification is on the data plate inside the rangehood.
- Check that the main voltage corresponds to the one indicated on the rating plate fixed inside the hood. Ensure that the rangehood is correctly earthed.
- If the hood is used in conjunction with non-electrical appliances (e.g. gas burning appliances), a sufficient degree of ventilation must be guaranteed in the room in order to prevent the backflow of exhaust gas. The kitchen must have an opening directly with the open air in order to guarantee the entry of clean air.
- The minimum distance is 750mm from the range hood to a gas hob, and is 650mm to an electric hob. If the installation instructions for gas hobs specify a greater distance, this must be taken into account.
NOTE: Two or more people are required to install or move this appliance. Failure to do so can cause physical injuries.
2. CORRECT USAGE
• The range hood has been designed only for domestic use to eliminate kitchen fumes.
• Never use the hood for purposes other than what it has not been designed for.
• Never leave high naked flames under the hood when it is in operation.
- Adjust the flame intensity to direct it onto the bottom of the pan only; making sure that it does not engulf the pan sides.
- Deep fat fryers must be continuously monitored during use: overheated oil can burst into flame.
• The hood should not be used by children or persons not instructed in its correct use.
- Do not flambe under the rangehood. This will damage the rangehood and may void warranty.
• Air extraction products must be installed in accordance with local Government laws.
• Do not use the rangehood without the filters installed.
- Turn the rangehood on prior to commencement of cooking and leave it to run for 10 minutes after the cooking has finished.
• Never ignite gas burners and leave them running without a vessel.
3. MAINTENANCE
• Proper maintenance of the range hood will assure proper performance of the unit.
- Disconnect the hood from the main supply before carrying out any maintenance work.
- Clean and/or replace aluminum grease filters and activated charcoal filters after the specified period of time
- Before performing any cleaning or maintenance task disconnect the rangehood from the mains by unplugging it.
- Clean the hood using a damp cloth and a neutral liquid detergent.
IMPORTANT: Never attempt to repair this appliance yourself. Always refer to a qualified technician. if in doubt call Glem Gas service on 1 300 307 917
OPERATION
Quiet Air rangehoods have almost silent operation when installed correctly. The only sound is the movement of air through the filters. We recommend using the supplied ducting or rigid ducting for the most efficient result. We will not provide warranty or service for rangehood noise if alternate flexible ducting has been used.
Please call Glem on 1300 307 917 if you require further information.
CONTROLS
The rangehood is operated using push button or touch controls.
TOUCH CONTROL - TB models
The on/off switch turns the rangehood on and off.
The light switch turns the lights on and off.
The fan buttons turn the fan on to 3 speed settings.
Time Feature: Press the ON/OFF once & the symbol will flash - rangehood will turn off in one minute.

ELECTRONIC BUTTONS
Select the function or speed required. Press that same button to switch off or select a different fan speed by pressing another button.

GREASE FILTERS
Your rangehood was delivered with removable filters. The GQA85UC and GQA90SC have stainless steel baffle filters which can be washed in a dishwasher.
For models with aluminium mesh filters - they are easy to wash clean and can be placed in a dish-washer though some discolouration can occur over time. Mesh filters are also supplied on the model GQA90SC as an alternative for users who have a preference for mesh filters.
AVOIDING CONDENSATION
In some circumstances condensation can build up in your rangehood. While this is not essentially a major problem it is a good idea to minimise condensation where possible so it doesn't drip into the food being prepared. There are many variables that can create increases in condensation - climate, installation location and type of cooktop with induction being the biggest producer of steam.
One way to minimise condensation is to operate the rangehood for a few minutes prior to cooking. This allows the rangehood filters to heat up gradually and eliminates condensation. After cooking continue to run the rangehood for 10 minutes so the filters cool down gradually as well.
Keep the filters clean and try to make sure that you are using the most appropriate vessel size for the burner or hotplate being used. Install the rangehood so it is 750mm above the cooking surface.
INSTALLATION
This rangehood is designed for internal domestic household installation only. It is not intended for use in a commercial environment. If installed in a commercial environment the warranty will be considered to be void.
The installation must be carried out by a licenced and experienced installer. If in doubt call Glem Gas on 1300 307 917 for advice.
RANGEHOOD MOUNTING POSITIONS
Install the rangehood centrally over the cooktop.
The minimum distance above the benchtop and the lowest point of the rangehood must not be less than 750mm above a gas cooktop. The recommended minimum height above an electric cooktop is 650mm and induction cooktop 750mm.
Installations above 750mm will reduce the effectiveness of the air extraction.
NOTE:
Installations below the heights given are considered inappropriate and Glem Gas will accept no responsibility for any damage or injury caused by excess heat caused either directly or indirectly by malfunction or fire.

INSTALLATION OF THE DUCTING
NOTE: When using expandable foil ducting make sure during installation that the ducting does not come in contact with the stainless steel chimney as it can create vibration noise.
- Decide where the ductwork will run between the hood and the ceiling.
- A straight, short duct run will allow the hood to perform most efficiently.
- Long duct runs, elbows, and transitions will reduce the performance of the hood. Use as few as possible. Larger ducting may be required for best performance with longer duct runs.
- Regulations concerning the discharge of air have to be met.
- Install a wall cap. Connect round metal ductwork to cap and work back towards the hood location. Use duct tape to seal the joints between ductwork sections.
WALL MOUNTED CANOPY RANGEHOOD INSTALLATION
- Establish the position of the rangehood and cut a 160mm hole in the ceiling above the rangehood position through which to feed the 150mm ducting.
- Fix the black discharge collar into the air outlet and remove all plastic film off all parts. Secure the adapter sleeve and then the ducting.
- Mark the correct height above the cooktop. (650mm min for electric 750mm min for gas) Use the supplied paper pattern to mark all hole centres and use the appropriate wall anchor according to the type of wall. THIS IS IMPORTANT.
Models GQA120TB and GQA90TB
Secure the mounting bracket to the wall using (3) 5 x 45mm mounting screws and the correct anchor for the type of wall.
Align the body of the rangehood with the mounting bracket and gently lower the hood until it securely engages the bracket. This is a 2 person operation.

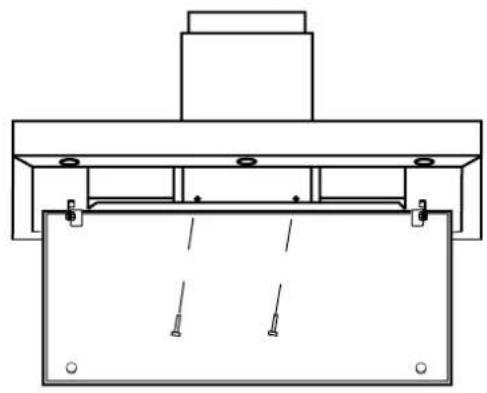
After mounting secure with 2 screws installed from the inside of the rangehood.

Model GQA90SC
Two screws locate in the key holes in the back panel of the hood. Two other screws secure the hood to the wall.
Make sure that the correct wall plugs are used to suit your wall. The plugs included with the installation kit suit most walls but if in doubt please check first.


CHIMNEY INSTALLATION
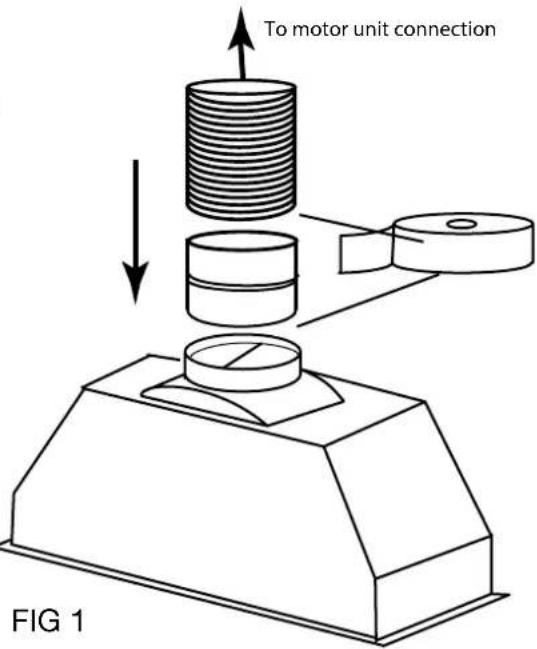
- Attach an adequate length of 150 mm round duct to the air outlet adapter and seal with duct tape. Feed it through the previously cut hole in the ceiling. FIGURE 1.
- Carefully slide the stainless steel chimney down into the chimney bottom and then place the chimney bottom into the recessed area on top of the hood.
- Secure the chimney mounting bracket to the wall using (2) 4.2 x 30mm mounting screws and anchors. FIGURE 2.
- Raise the chimney top until its holes align with the holes in the chimney mounting bracket located on the wall. FIGURE 3.
- Level the hood and secure the chimney with 2 chimney bracket screws.
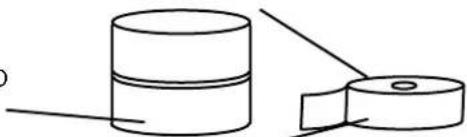
150mm flexible ducting. Stretch out the end and slide over ducting adapter sleeve. It is a tight fit. Seal the joint with duct tape.
Duct tape, not supplied
Ducting adapter sleeve, locate into slot on the discharge collar
Air Discharge Collar - snap in the 2 flaps.
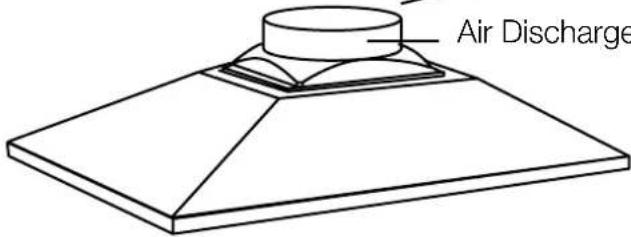
FIGURE 1

NOTE: In cases where the ceiling height means that the standard chimney (or flue) does not reach call Glem on 1 300 307 917 and check for chimney extension availability.
UNDER CUPBOARD RANGEHOOD INSTALLATION
- Before beginning installation, to better handle the hood, we advise removing all plastic film, filters and the oil catcher. The oil catcher is held by 2 thumb screws. When removed there are 3 square cut outs that provide access to the screw mounting holes.
- Attach the black air outlet adapter over the hood. Tighten it with 4 screws. Snap in the flaps.
- The ducting must be attached to the rangehood before installing the hood into the cupboard. FIG 1.
- Slide the 150 mm diameter ducting over the sleeve. Stretch the diameter of the ducting for a snug fit. Seal with duct tape.
- Before fixing the hood to the cupboard unit, drill a hole of 165mm diameter for the 150 mm diameter exhaust ducting in the top of the cupboard and ceiling.
- Check the position of the power outlet and consider where the power cable will run. A hole might have to be made in the wall unit to accommodate the plug and cable
- On the side of the hood there are 2 spring steel fittings to assist installation. Adjust the height of the spring steel to match the thickness of the mounting panel. The hood can be slid into the opening and these springs will take some of the weight while the mounting screws are fitted.
- Lift the rangehood and fit through the opening of the cabinet feeding the ducting up through the pre drilled holes.
- Secure the unit by using 6 long mounting screws, 3 into each side - FIG 2.
- Refit the oil catcher. Be careful not to scratch the rangehood. Refit the filters.


REMOTE MOTOR UNIT INSTALLATION
It is recommended that the roof space motor unit be mounted in an environment that is free of other gases and air pressure that could create blow back. The motor unit has been designed with the option of vertical or horizontal installation. Either mounted on a wall, roof purlon or ceiling joist. Some other simple support framework may need to be added to provide the best installation.
Take motor unit out of the packaging. Attached the black attachment modules using 4 screws on each side. FIGURE 1.
Attach the two rigid metal connector sleeves. FIGURE 2.
Consider the location of the ducting to minimize the length of and the number of bends in the ducting. THE DUCTING MUST BE TAUT TO PREVENT NOISE. CUT TO SUIT. The supplied ducting is in 2 lengths. Use the most appropriate length to suit the installation on the entry and exit side.
- Establish a suitable position in the roof space for the motor unit. Install it as close as practical to the rangehood and the external vent.
- Using the screws provided mount the motor unit onto a suitable structure in the roof space. Check that the direction of air is flowing the right way! Mount on a board across the roof joists if required. FIGURE 3.
- Feed the duct through from the rangehood and attach to the inlet side of the motor unit. Get the duct as taut as possible to stop noise from vibration. It is important that the duct does not rest against the stainless steel chimney.
- Attach another length of duct to the outlet side with the ducting then directed to an external vent in the roof or wall. FIGURE 2.
- Ensure that there are no leaks and seal with duct tape. The ducting fits very tightly. Stretch the end of the ducting out and it will fit very well.
- Feed the power cable from the motor unit down the chimney and plug it into the rangehood. FIGURE 4.

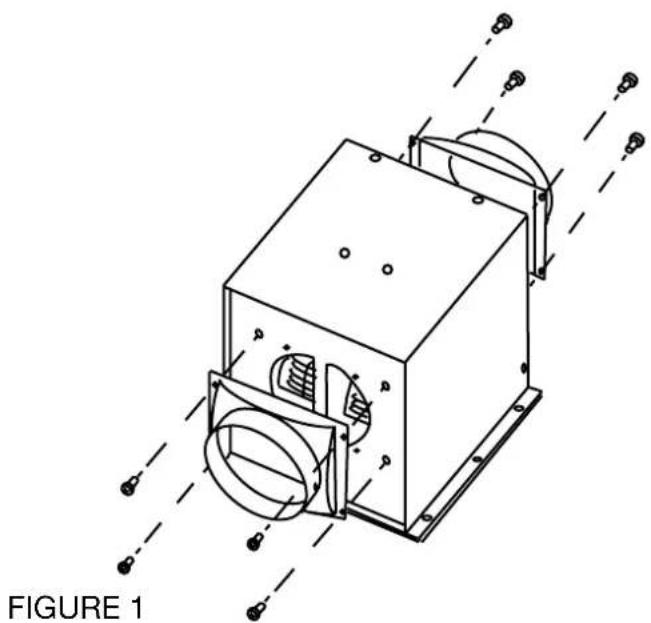
FIGURE 1 NOTE: DO NOT fit flaps on the inlet side!

FIGURE 2

Motor installed horizontally

CARE AND MAINTENANCE
NOTE - Stainless steel baffle filters are used on some models & are heavier. Support the filter to prevent it suddenly falling when removing for cleaning.
GREASE FILTERS - aluminium mesh and stainless steel
The grease filters are washable and should be cleaned frequently - every 2 months or more frequently for heavy use. Use a warm detergent solution.
To release the filter push in on the release tab, tilt the filter down and remove. FIG 1.
To install the filters align the rear tabs with the slots in the hood. Push in the metal tab, push filter into position and release. Make sure that the filter is securely engaged after assembly. On the TB models pull down the stainless steel plate to access the mesh filters.
REMOVING LED LAMPS - All models
Quiet Air Rangehoods use highly efficient LED lights. To change the lights first switch off the rangehood at the power outlet. Wait until the lights have cooled down before attempting to remove them from the rangehood.
Using a sharp blade similar to that in a “Stanley knife” slide it between the surround of the light and the stainless steel. The light will pop out.
Undo the terminal connection and replace the LED lights with the same kind. Call the Glem service number (1300 307 917) for spare parts to order replacements. Have the model number of the range-hood handy.
CLEANING THE STAINLESS STEEL HOOD UNIT
Use a non abrasive stainless steel cleaner applied with a soft cloth.
CLEANING THE REMOTE MOTOR UNIT
The roof space motor unit should be checked from time to time to make sure that it is free of debris that could obstruct airflow and check that the ducting remains in good condition.
SERVICING
It is important that the installation of the rangehood takes into account accessibility for servicing. If access requires damage to walls, tiles or finishes it will not be covered under the warranty.
We strongly recommend keeping the rangehood filters clean. They are easy to wash and with regular care will provide many years of good service.
The stainless steel should only be cleaned with a quality non abrasive cleaner. We recommend just using a soft cloth with hot water. Detergents will cause streaking and some detergents can attack the surface of the stainless steel.
In coastal areas with high levels of salinity in the air additional care must be given to all stainless steel products to prevent discolouration and corrosion.
| MODEL NUMBER G0A85UC GOA90SC GOA90TB G0A120TB | ||
| IMAGE | [Z55T] |  |
| Voltage | 850 x 282 x 300 900 x 500 8670 x 50050 6200 x 6500 x 570 - 1050 | |
| Motor Power | 265W | 265W 265W |
| Air Flow | 1200 cub mV/H | 1200 cub mV/H |
| Lights | 3 x LED lamps | 3 x LED lamps |
| Total Power | 268W | 268W |
| Switch type | Electronic button Electric button Touch Contro | Touch Control |
| Fan Speeds | 3 | 3 |
| Air outlet diameter | 150 mm DIA | 150 mm DIA |
| Filter Type | 2 x pro stainless battle filters | 2 x AIu filters |
| Supplied Ducting | 2.5 m + 1.5 m aiu flex duct | 2.5 m + 1.5 m aiu flex duct |
| Chimney | 2 x 500 mm 2 x 500 mm | 2 x 500 mm 2 x 500 mm |
PRODUCT WARRANTY
Thank you for choosing a Glem Quiet Air rangehood, the purchase of this appliance is an important investment in your home and so to protect your investment we urge you to complete the registration card attached, please return it immediately.
The benefits conferred by this warranty are in addition to all other conditions and warranties in respect of this product which the consumer may have under the Trade Practices Act 1974 of the Commonwealth of Australia and/or similar State or Territory Laws.
Our goods come with guarantees that cannot be excluded under the Australian Consumer Law. You are entitled to a replacement or refund for a major failure if the goods fail to be of acceptable quality. You are also entitled to have the goods repaired or replaced if the goods fail to be of acceptable quality and failure does not amount to a major failure.
Glem Gas Australasia Pty Ltd warrants, this appliance to be free from defects in workmanship and materials for a period of:
- a) Where the appliance is intended to be used and is used for DOMESTIC USE - 24 MONTHS FROM DATE OF INVOICE TO THE ORIGINAL PURCHASER.
b) Where the appliance is intended to be used and is used for COMMERCIAL USE - 90 DAYS FROM DATE OF INVOICE TO THE ORIGINAL PURCHASER.
Glem Gas Australasia Pty Ltd, during the period of warranty, will at its option, and subject to the terms and conditions stated below, repair or replace free of charge this appliance or any component part, which upon examination by Glem Appliances P/L. is found to be defective.
This Warranty shall not apply:
- a) If the rating plate has been removed or the serial number or other details on it have been removed or rendered illegible.
b) If the appliance is connected to amy electrical voltage other than shown on rating plate.
c) If the appliance has been subjected to misuse, abuse accident or want of care.
d) If the appliance has been installed, operated or maintained contrary to the instructions supplied by Glem Gas Australasia Pty Ltd.
e) If any defect or failure is due to connection to an inadequate or faulty power supply.
f) If damage is caused by foreign objects in or on the appliance or by reason of its use for purposes other than that for which it was delivered.
g) If a repair has been made or attempted by the purchaser
h) If you live outside the service area of the Glem Gas Australasia service agents this warranty does not cover the cost of transport of the appliance for service or the service agent's travelling time.
-
This warranty does not cover any glass damage or replacement of light bulbs.
-
Glem Gas Australasia Pty Ltd accepts no liability pursuant to this Warranty for any cost or consequential damage or economic loss whether direct or indirect, to any person or property, arising from breakdown or failure of this appliance or any part thereof, and no responsibility is to be implied or accepted over and above the replacement value of the product.
-
Parts covered under warranty that need replacing can be posted to the customer to put on at their discretion. This Warranty is given by Glem Gas Australasia Pty Ltd and no other person or organisation is authorised to vary its provisions and conditions.
Complete this section and keep for your own record.
Appliance Model No ____ Serial No ____
Purchased From ____ Date of purchase ____
Please complete the section below and return to:
Glem Gas Australasia Pty Ltd, P.O.Box 63 Blaxcell PO South Granville NSW 2142
Appliance Model No ____ Serial No ____
Purchased From ____ Date of purchase ____
Customer Name ____
Customer Address
Postcode ____
Installers signature ____ Installer License ____

- INSTALLATION AND OPERATION GUIDE
- QUIET AIR RANGEHOODS TAKE THE NOISE OUT OF THE KITCHEN
- CONGRATULATIONS
- IMPORTANT
- FIRST TIME USE
- NOTE
- FAN MOTOR LOCATION
- SAFETY WARNINGS
- BEFORE INSTALLATION
- CORRECT USAGE
- MAINTENANCE
- OPERATION
- CONTROLS
- TOUCH CONTROL - TB MODELS
- ELECTRONIC BUTTONS
- GREASE FILTERS
- AVOIDING CONDENSATION
- INSTALLATION
- RANGEHOOD MOUNTING POSITIONS
- INSTALLATION OF THE DUCTING
- WALL MOUNTED CANOPY RANGEHOOD INSTALLATION
- MODELS GQA120TB AND GQA90TB
- MODEL GQA90SC
- CHIMNEY INSTALLATION
- UNDER CUPBOARD RANGEHOOD INSTALLATION
- REMOTE MOTOR UNIT INSTALLATION
- CARE AND MAINTENANCE
- GREASE FILTERS - ALUMINIUM MESH AND STAINLESS STEEL
- REMOVING LED LAMPS - ALL MODELS
- CLEANING THE STAINLESS STEEL HOOD UNIT
- CLEANING THE REMOTE MOTOR UNIT
- SERVICING
- PRODUCT WARRANTY
- COMPLETE THIS SECTION AND KEEP FOR YOUR OWN RECORD
Brand : Glem Gas
Model : Quietair GQA120TB
Category : Range hood