
GCM135 - Coffee maker GEMINI - Free user manual and instructions
Find the device manual for free GCM135 GEMINI in PDF.


| Product Type | Drip Coffee Maker |
| Brand | Gemini |
| Model | GCM135 |
| Colour | Black |
| Dimensions (W x D x H) | 250 x 200 x 320 mm |
| Weight | 2.2 kg |
| Power Supply | 220-240V, 50/60Hz |
| Power Consumption | 900 W |
| Water Tank Capacity | 1.5 L |
| Brewing Capacity | Up to 10 cups (1.25 L) |
| Brewing Temperature | 90-96°C |
| Filter Type | Paper filter (#4 cone or basket) |
| Anti-Drip Function | Yes |
| Auto Shut-Off | After 2 hours |
| Keep Warm Function | Yes, up to 2 hours |
| Control Type | Push buttons |
| Cord Length | 0.8 m |
| Safety Features | Overheat protection, auto shut-off |
| Cleaning | Descaling recommended every 3 months |
| Included Accessories | Glass carafe, measuring spoon |
| Warranty | 2 years |
Frequently Asked Questions - GCM135 GEMINI
User questions about GCM135 GEMINI
0 question about this device. Answer the ones you know or ask your own.
Ask a new question about this device
Download the instructions for your Coffee maker in PDF format for free! Find your manual GCM135 - GEMINI and take your electronic device back in hand. On this page are published all the documents necessary for the use of your device. GCM135 by GEMINI.
USER MANUAL GCM135 GEMINI
- When using this coffeemaker, basic precaution should always be followed, included the followings:
- Readallinstructions.
- Close supervision is necessary when any appliance is used by or near children.
- To protect against electric shock, do not immerse cord, plug or any parts of the oveninwaterorotherliquids.
- Donotletcordtouchhotsurface.
- Donotletcordhangoveredgeoftableorcounter.
- Do not operate appliances with damaged cord or plug or after the appliance malfunctions, or have been damaged in any manner. Return the appliance to the nearest authorized service center for examination, repair, or adjustment.
- Donotuseothermismatchedaccessory, it may cause hazard or injury.
- Donotplaceonornearahotgasorelectricburner, orinaheatedovenorina microwave.
- Unplugfromoutletwhennotinuseandbeforecleaning.Allowtocoolbefore putting on or taking off parts, and before cleaning.
- To disconnect, press the power On/Off button located on the side of the unit, then remove the plug. Always hold the plug, but never pull the cord.
- Extreme cautions must be exercised when moving the funnel containing hot coffeegroundafterused.
- Donotcleanwithmetalscouringpadspiecescanbreakoffthepadandtouch electricparts, creatingariskofelectricshock
- Before the first using, please operate them machine with water intake to remove the smell. Please follow the steps of "CLEAN AND MAINTENANCE". (inpage 12).
- Never leave the appliances unattended while broiling or toasting.
- Do not operate the coffee machine without water or milk in the water tank and milktank.
- This appliance is for household use only, donotuse outdoor.
-
This appliance can be used by children aged from 8 years and above and persons with reduced physical, sensory or mental capabilities or lack of experience and knowledge if they have been given supervision or instruction concerning use of the appliance in asafeway and understand the hazards involved.
-
If the supply cord is damaged, it must be replaced by the After-sales Service
Center or a similarly qualified person in order to avoid a hazard. - Save this use manual for future reference.
CAUTION: PRESSURE
In order to avoid possible burns to body parts and/or other injury from hot steam and water or damages to the unit, never remove the water tank or the brew head while your coffee maker is brewing coffee or frothing. When need to change or add more coffee ground, please make sure that the machine is not in operation( while the machine is operating, there will be one symbol flashing.). If you need to add more water or milk to the tank, please make sure to switch off the unit by pressing the button on the side of the unit to make all the symbols on the panel off.
KNOWYOURCOFFEEMAKER
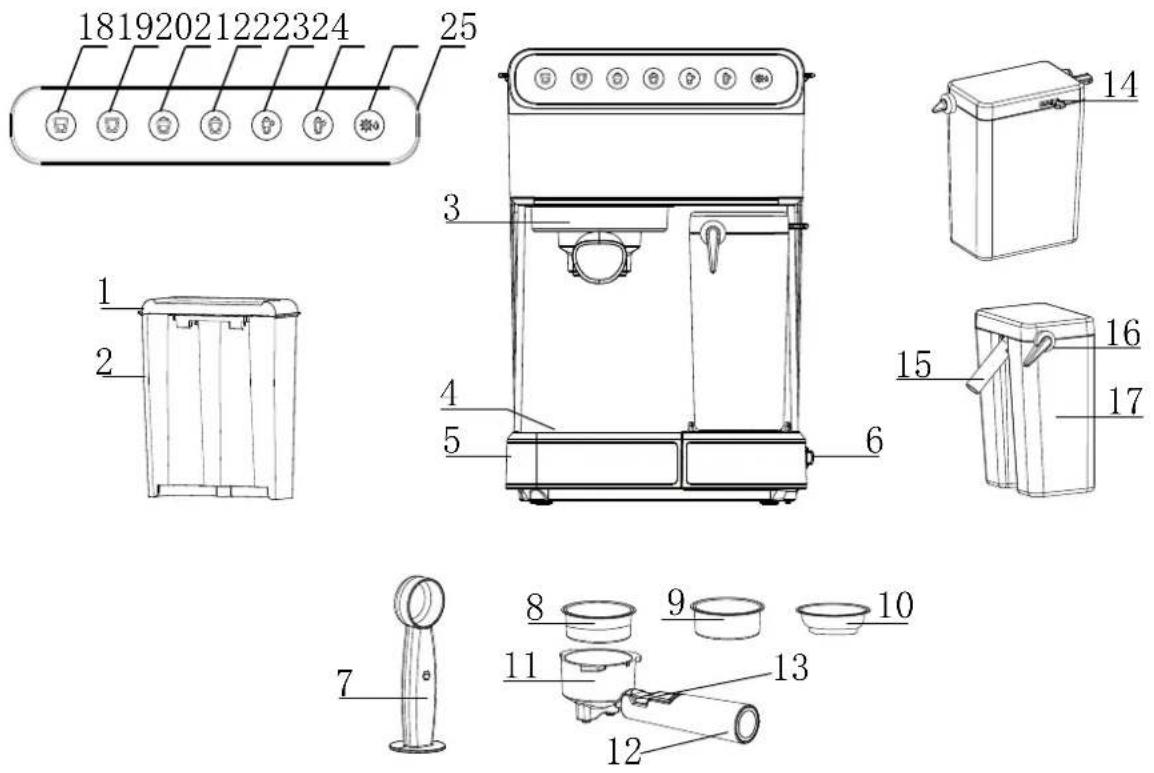
-
Water tank cover
-
Drip tray lid 5. Drip tray
-
Spoon
-
E.S.E. pod filter
-
Funnel hook
-
Froth tube lever
-
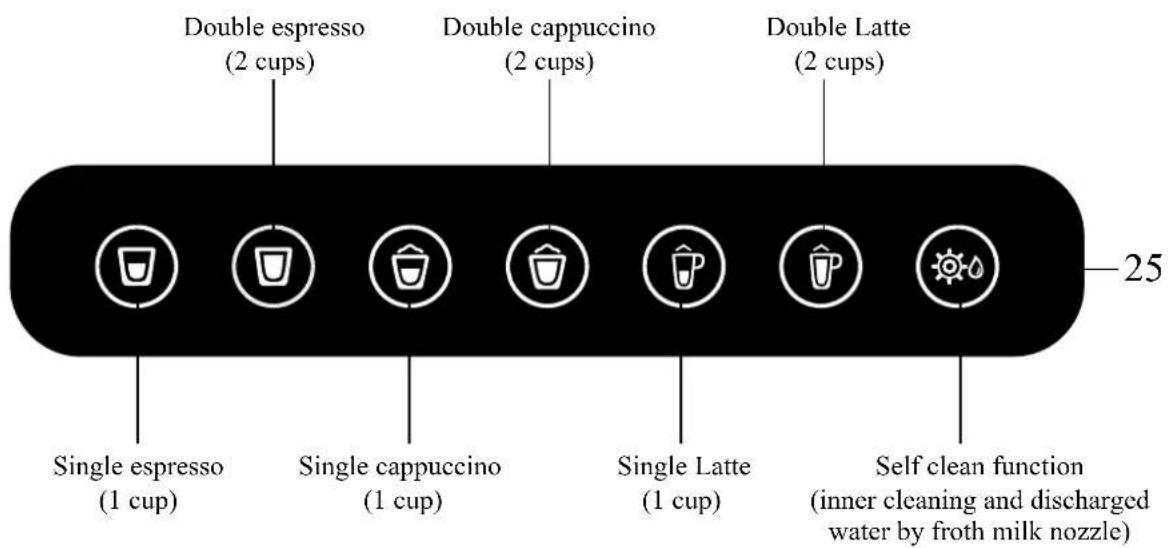
Double espresso (2 cups)
-
Single Latte (1 cup)
-
Touch sensor control panel
-
Water tank
-
Single filter for 1 cup
-
Funnel
-
Froth control knob
-
Milk tank
-
Single cappuccino (1 cup)
-
Double Latte (2 cups)
-
Brew head
f switch
-
Double filter for 2 cups
-
Funnel handle
-
Froth milk S/S detachable nozzle
-
Single espresso (1 cup)
-
Double cappuccino (2 cups)
-
Self clean function(inner cleaning and discharged water by froth milk nozzle)
FORTHEFIRSTUSE
Cleaningandprimingtheunitpriortofirstuse.
- Plesemakesurethatallthesymbolsonthepanelareoffbypassingthepower on/offbuttonlocatedonthesideoftheunit.Makesurethecoffeemakeris unpluggedfromtheelectricaloutlet.
- Firstremove and then wash the watertank, them ilktank, the brewhead, all filters, measuringspoon and drip tray in a mixture of mild detergent and water. Rinsee each thoroughly and dry completely and placethem back into the unit.
- Tocleantheinsideoftheappliance, followthestepslistedonthe“CLEANAND MAINTENANCE”section(Page12)
NOTE: In order for the coffee maker runs properly time after time, please clean it and all filters sortanks after every use.
IMPORTANT-PRIMETHEUNIT
Toprimeunit, runthesteamcycle for 90 seconds by following the steps below:
- Fillwaterinwatertankbetween the "Min" and "Max" levels.
- Fill them milktank with water between the "Min" and "Max" levels.
- Selectoneofthefilters(Single/Doublefilter)andplaceitinthefunnel.Thenplace intothebrewheadensuringitisproperlylockedandplaceacup(400ml)onthedrip tray lid. (please follow the instruction of “LOCK THE FUNNEL INTO THE BREW HEAD”inpage9).Also,makesurethetipofthemilkS/Sdetachablenozzle dispensingtubeispointedinsidethecup.
- Plug the appliance into the appropriate outlet.
- Turnthepowerbuttonon, and all the symbol on the control panel will blink 3
times with a sound “bee”, then only the symbols of “☐” (Single espresso), “☐” (Double espresso) and “☐” (Self clean function) on the control panel willlightonandothersymbolswillflash.
- Press “☐” (Self clean function) once, the machine will start to do inner cleaning, thenthewaterwillflowthroughfrominsideofthemachineandcome outfromthefrothmilkS/Sdetachablenozzle.
- Press“ (Doubleespresso) once, the water will flow through from the brew head to clean the filter and funnel.
8.Onceaboveprocesscompletedandallthesymbolslighton,thecoffeemakeris cleanedandpreheatingisready.Now,pleaseenjoymakingyourcoffee.
Note: During the preheating status, the symbols of “☐” single espresso, “☐” double espresso and “☐” self cleaning will light on, and other symbols will keep flashing;
When preheating is done, all the symbols on the panel will light on;
While the machine is making coffee or self cleaning, there is only one symbol flashing and other symbols will not light on;
If the milk tank is not set at positions, there are only the symbols of “☐”single espresso, “☐”double espresso will light on, and other symbols will not light on.
SELECT THE RIGHT CUP
Before preparing your coffee, please make sure to select the right size of cups according to the following table(ml):
| Espresso | Single  Double Double  | Minimum capacity of milk required in tank (ml) | Capacity ml | Reference cup size |
| N/A | 40-60ml90-110ml | 160ml210ml | ||
| Cappuccino(With froth milk) | Single  Double Double  | 100ml150ml | 80-150ml160-300ml | 250ml400ml |
| Latte(With froth milk) | Single  Double Double  | 200ml260ml | 160-300ml250-350ml | 400ml450ml |
Remind: it should be the minimum capacity of milk required in tank, and do not fill with milk into the milk tank over the “Max” level.
INTRODUCTION
ESPRESSO
A unique method of coffee brewing in which hot water is forced through finely ground coffee. Popular in Europe, it is a far richer and more full-bodied brew than regular drip coffee. Because of its richness, espresso is usually served in 44 to 59 ml (1.5 to 2 oz.) portions, in demitasse cups.
CAPPUCCINO
A drink made with about 1/3 espresso, 1/3 steamed milk, and 1/3 frothed milk.
LATTE
A drink made with about 1/4 espresso and 3/4 steamed milk.
SELECTTHERIGHTCOFFEE
THECOFFEE
The coffeeshouldbefreshlygroundanddarkroasted.Pre-groundcoffeewillonly retain its flavor for 7 – 8 days, provided that it is stored in an airtight container and in adarkcoolarea.Donotstoreinarefrigeratororfreezer.Wholebeansare recommendedtobegroundjustbeforeuse.Coffeebeansstoredinanairtight containerwillkeepitsflavorforupto4weeks.
THEGRIND
Thecoffeemustbeofafinegrind. Thecorrectgrindshouldlookl ikesalt.
If the grindistoofine, t hewater will not flow through the coffee powder even under pressure process. These grinds look like powder and feel like flour when rubbed between fingers.
If the grind is too coarse, the water flows through the coffee powder too fast, preventingafull-flavoredextraction.
Besuretouseaqualitygrinderforuniformconsistency.
OPERATINGINSTRUCTIONS
FILLINGTHEWATERTANK
-
Fillthetankwithwater,youmayeitheruseajartofillituporremoveitfromthe unitandthenfillitupunderthetap.Ifyouhaveremoveditfromtheunittofill upwithwater,pleasemakesuretoplaceitbacktightlyinitsplace.Fillthetank withthedesiredamountofwaterensuringitrangeswithinthe“MIN”and “MAX”markingsonthetank.Neverusewarmorhotwatertofillthewatertank.
-
Closethewatertanklidandplaceitbackintheunittightly.
FILLINGTHEMILKTANK
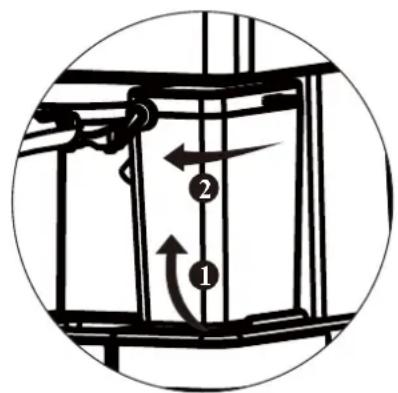
If you plant to prepare Capp uccinoor Latte coffee, removethem milktank from the unit (refer below step ① and ②) and openth elid then pour the quantity of cold milky you estimate you will need between the "Min" and "Max" levels. Whendone, placethe milktank back in the unit is ensuring fit slightly.
Note: You can choose the type of milk of your preference, i.e. whole milk, low fat milk, organic or soymilk.
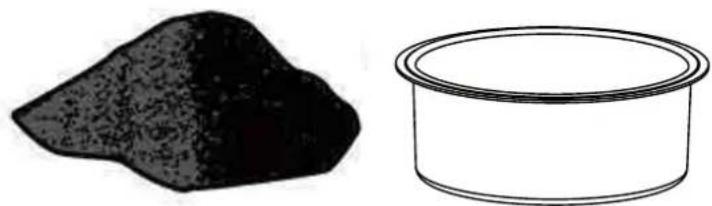
CHOOSETHEFILTER
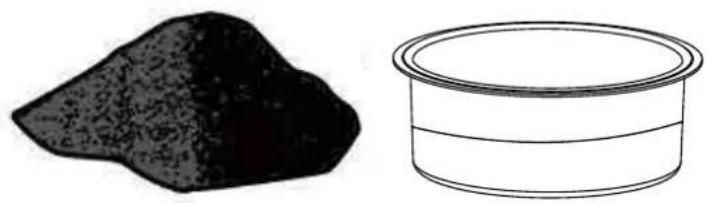
Selectthefiltertobeusedasfollows:
1.FORASINGLESHOT—usethefilterforasinglecupofespressoifusing groundcoffee.
natural_image
Two simple line drawings: a large irregular black object and a cylindrical container (no text or symbols)- FORADOUBLESHOTORTWOSINGLESHOTS-useadoublecupsfilter.
natural_image
Two simple line drawings: a dark irregular object and a cylindrical container (no text or symbols)FILLINGWITHCOFFEE
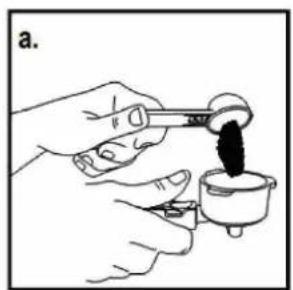
Placeselectfilterinthefunnelasfollows:
FORGROUNDCOFFEE:
a.Fillthefilterwithfresh,finegroundespressocoffee(donotoverfillthemeasuring spoon).
b. Usetheendofmeasuringspoontotampdownandcompressfirmlyandevenly groundcoffee.
c.Cleananyexcesscoffeepowd erfromtherimtoensureproperfitunderbrewhead.
natural_image
Illustration of hands pouring dark liquid from a small container into a cup (no text or symbols)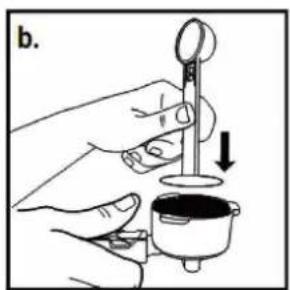
natural_image
Illustration of a hand using a measuring tool to measure a small container (no text or symbols present)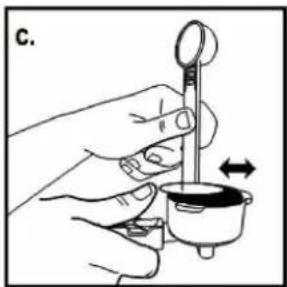
natural_image
Illustration of a hand using a dropper to measure a small object, with no visible text or symbols.FORE.S.EPOD:
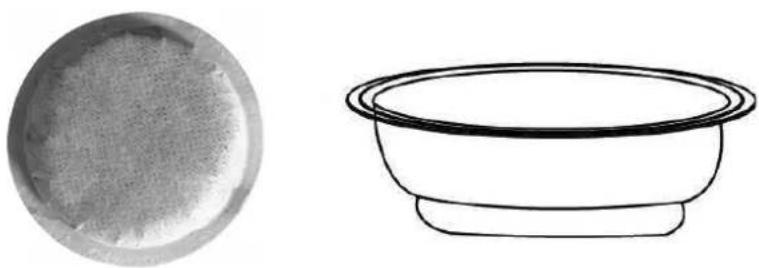
a. Place the E.SE.pod filter into the funnel, then put a E.S.E pod (diameter in 45mm) into the filler.
b. Thenlockthefunnelintothebrewhead.
natural_image
Two simple line drawings: a circular bowl with textured surface and a bowl with rounded rim (no text or symbols)LOCKTHEFUNNELINTOTHEBREWHEAD
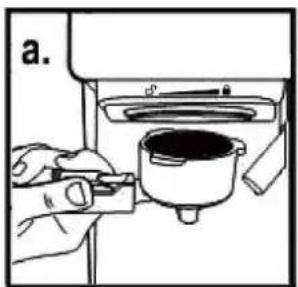
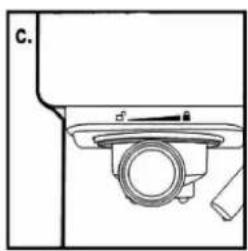
a. Position the funnel underneath the brewhead, attach funnel by first moving retainer clip back.
b.Positionhandlesothatthehandlelinesupwiththeopenlockicon"unitandfitsintothegroove.
“onthe
c. Then, slowly turn it to theright until theretention clipis aligned with the
closedlocksymbol“
"ontheunit."
natural_image
Illustration of a hand using a tool to adjust a pot on a kitchen counter (no text or symbols visible)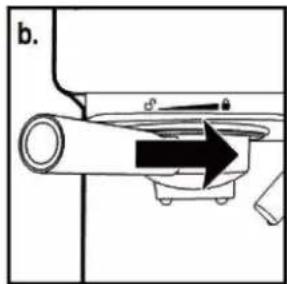
natural_image
Diagram of a mechanical device with a rotating shaft and housing, showing directional arrow (no text or symbols)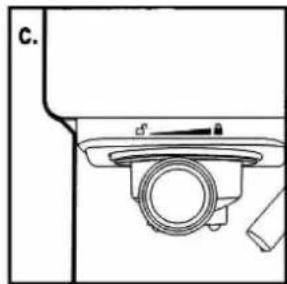
natural_image
Technical line drawing of a mechanical component with no visible text or symbolsPLACINGTHECUP(S)
a. If you are using a small "demitasse" cuptobrewespresso, turnover the driptraylidasabulge".
b. If you are using alargerceptobrewCappuccino, turnoverthedriptraylid asahollow“ ____.
c. If you are using a larger crop to brew Latte, turnover the drip tray lid as a hollow “ ____.
CAUTION: When brewing cappuccinoorlatte, pleasemakesuretoadjust the frothingtube lever inordertoposition the frothmilk S/S detachable nozzle is pointed insidetheuptobe used.
All the symbols will be blinking 3 times with a sound “bee” when the machine turned on. The symbol will be blinking during heating and until the water reaches the perfect temperature. Once all symbols become solid sate, the function is ready to use. If you press the symbol which is blinking and not ready, it will sound “bee bee bee” to tell youitisnotreadyyetandwon’tstarttheoperation.
"SLEEPSTATE"MODE
Tosave energy, the machine will auto-shut off to the “sleep state” mode after no operation within 25 minutes, and all the symbols will turn off except “☐” (Self clean function). To “wake up” the machine, press “☐” (Self clean function), and all symbols will be on again with “bee” and go back to normal state. (after waking up, it might be on warming up state which all the symbols are flashing or ready statewhichallthesymbolssolidsate.)
SELECTTHEFUNCTION
PREPARINGESPRESSO
a. Press“”(Singleespresso)oncetobrewonesingleshot.
b. Press “ 📋 ” (Double espresso) once to brew a double shot.
c. Press and hold “ 📁 ” (Double espresso) for 3 seconds to customize the brewing capacity to your flavour. When done, press it again to stop it. (If don't press it again, itwillmakecoffeein250mlMax)
The unit will start brewing the espresso according to your selection. The unit will turn off automatically and symbol will become solid indicating that the cycle has been completed. Your deliciousespressoisreadytoserve.
Please follow the table of “SELECT THE RIGHT CUP” to chose the cups with suitable capacity to avoid overflow.
Note: To brew less coffee than the preset serving, press the same symbol again to stopthebrewing processwhenthedesiredamountofcoffeeisreached.
PREPARING CAPPUCCINO
Prior to preparing your Cappuccino, adjust the quantity of frothed milk according to your preference by shifting the Froth Control Knob on the mill tank. Swing it to the rightformorefrothandtotheleftforlessfroth.
Note : The foam intensity can be adjusted during the brewing process
a. Take out the milk tank and fill the milk tank with appropriate milk (Maximum 500ml)
b.Press “”(SingleCappuccino)oncetobrewasmallcupofcappuccino.
c.Press “(DoubleCappuccino)oncetobrewalargecupofCappuccino.
The unit will start brewing the cappuccino according to your selection. Your delicious cappuccino is ready to serve when the process is completed.
Please follow the table of "SELECT THE RIGHT SIZE OF CUP" to chose the cups with suitable capacity to avoid overflow.
PREPARINGLATTE
PriortopreparingyourLa tte,adjustthequantityoffrothedmilkaccordi ngtoyour preference by turning the Froth Control Knob on the mill tank. Swing to the right for morefrothandtotheleftforlessfroth.
a. Take out the milk tank and fill the milk tank with appropriate milk (Maximum 500ml)
b. Press “(SingleLatte)oncetobrewasmallcupoflatte.
c.Press “(DoubleLatte)oncetobrewalargecupoflatte.
The unit will start brewing the Latte according to your selection. Your delicious cappuccinoisreadytoservewhentheprocessiscompleted.
Please follow the table of "SELECT THE RIGHT SIZE OF CUP" to chose the cups with suitable capacity to avoid overflow.
PREPARINGFROTHMILK
The unit also allows you to prepare froth milk separately. Please fill moderate cold milk intothemilktank, then press and hold “ ” (Double Cappuccino) for 3 seconds if you wish to add more froth to your coffee or to prepare froth milk for any other beverage, e.g. macchiatto, hot chocolate, chai latte, etc. When done, press the same symbolagaintostopit.
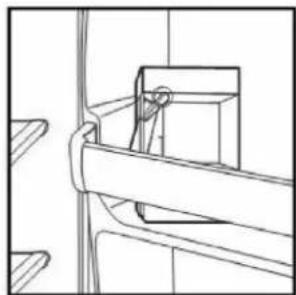
Once you prepared your coffee with milk froth, you can either store the milk tank directly in there refrigerator as below picture (readytobeused forthenexttime) or dispose of the left over milk.
natural_image
Technical line drawing of a mechanical lever assembly (no text or symbols)CORRECTUSEOFGROUNDCOFFEEFORESPRESSO MAKERS
Donotusesugarroastedgroundcoffeeorsugarroastedcoffeebeansasthesewill clogthefilteranddamagetheappliance. Aftermakingcoffee, please follow the instruction of “CLEANINGANDMAINTENANCE” (inpage 12) to keep itingood working condition.
CLEANANDMAINTENANCE
CLEANTHEMILKTANKANDFROTHINGMILKS/SNOZZLE
- Removethemilktank from the unit and removethelidofthetank.
- Pouranymilkleftandrinseandwashthemilktankanditslidthoroughlywith warm soapy water. Rinse and let them dry completely. Do not wash with abrasive cleanersandscouringpads, astheywillscratchthefinish. Themilktankandtank lidisnotfordishwasher, pleasedonotcleanitinsidethedishwasher.
- Fillthewaterintothewatertank. Placealargeemptycup(400ml)onthedriptray lidandletthefrothingmilkS/Sdetachablenozzlepointedinsideofthecup.
- Press“”(Selfcleanfunction) once, the unit will start releasing steam through the frothing milk S/S nozzle, let it run for a few seconds until you don’t see any milk come out from the frothing milk S/S nozzle. Then press the “” (Self cleanfunction) oncetostop the cleaning
- Afterthemachinecooldown, pleaseremovetheS/Snozzleandrinseundertap water. Dryandwipeitbeforereplaceitback.
CLEANTHEBREWHEAD/THEFUUNEL/FILTER
- Pleasemakesurethatallthesymbolsonthepanelareoffbypassingthepower On/Offbuttonlocatedonthesideoftheunitandunplugthepowercordfromthe electricaloutlet.
- Some of the metal parts might still be hot. Do not touch them with your hands until they had cooldown.
-
RemovethefunnelanddiscardthecoffeegroundsorE.S.Epod.(Putupthefunnel hooktoclasptherimoffunnelthenpouroffthecoffeegrounds)Washboththe funnellandfilterwithwarmsoapywaterandrinsethemwell.Donotwashthefunnel andfiltersinthedishwasher.
-
Wipelowerpartofthebrewheadintheunitwithadampclothorpapertowelto removeanycoffeegroundsthatmighthavebeenleft.
- Place the funnel (without any filter) back in the brew head in the unit.
- Place an empty large cup (probably 300 ml) under the funnel.
- Press “☐” (single Espresso) and let the unit brew with water only until it stops automatically. (Make sure that the water tank was filled with adequate water, you can repeatabovestepstocleanupuntilflowoutthecleanwater.)
CLEANTHEWATERTANK
Discardtheremainingwaterbyremovingthetankandwashthewatertankwith soapy water, then rinse it well and wipe it dry. The water tank is also dishwasher safe.
CLEANTHECOFFEEMAKER
- Wipethehousingwithasoftwetcloth.Donotuseabrasivecleanersorscouring pads.astheywillscratchthefinish.
- Donotstorethefunnelthebrewhead. This can adversely affect theseal between the brewhead and the funnel while brewinges presso.
CAUTION: Donotimmerseapplianceinwater.
DELIMING
Mineral deposits built-up in the unit will affect the operation of the appliance. Your appliance must be delimed when you begin to notice an increase in the time required to brewespresso, or when there is excessive steaming. Also, you may notice a build-up of white deposits on the surface of the brewhead.
The frequency of cleaning depends upon the hardness of the water used. The following table gives the suggested cleaning intervals.
SUGGESTEDC LEANINGINTERVALS
| TypeofWater | CleaningFrequency |
| SoftWater(FilteredWater) | Every80BrewCycles |
| HardWater(TapWater) | Every40BrewCycles |
TODELIMETHEWATERTANK:
- Fill the tank with fresh, undiluted white household vinegar.
- Allow appliance to sit overnight with the vinegar solution in the water tank then Discardvinegarbyremovingthetank.
- Rinse the water tank thoroughly with tap water by filling tank half full with water and thenpouringthewaterbackoutintothesink,repeatingthissteptwise.
TODELIMEINTERNALPARTS:
- Make sure you delime the inside of the water tank first by following the “Deliming” steps above.
- Make sure that the all symbols on the control panel are off by pressing the power On/Off button located on the side of the unit and the power cord is disconnected from the electrical outlet. Fillthetankwithwhitevinegarabovetheminimumlevelinto tank.
- Insert the funnel (with filter and no ground coffee or E.S.E pod) and place jar/carafe or regular cup on top of the drip tray and under the funnel.
4.Plugthepowercordintotheelectricaloutlet. - Press the power button to switch the unit on, once the symbol stop blinking. Place apitcherorlargecup(withatleast400mlcapacity)onthedriptraylid,thenpress
“ 📋 ” (Single Espresso icon) once, the vinegar will start flowing through the unitcomeoutfromthebrewhead.Thenitwillstopautomatically.
- Adjusting the froth milk S/S nozzle pointed inside of the cup.. Then press “(Single Cappuccino icon) once to activate the clean function. Then it will stop automatically.
Important : Repeat Steps 1 – 6 as necessary using tap water only to rinse any remainingtracesofvinegaroutofthe machine.
TROUBLESHOOTING
| PROBLEM | CAUSES | SOLUTIONS |
| Coffee does not come out. | No water in tank.Coffee powder is too fine.Too much coffee in the filter.Appliance was not turned on or plugged in.Coffee has been tamped /compressed too much. | Add water into tank Grind medium groundFill filter with less coffee.Plug unit int electrical outlet and turn it on.Refill filter basket with coffee, do not tamp too much. |
| Coffee comes out around the edge of the funnel. | Funnel not rotated to full lock position.Coffee powder stae around the filter basket rim.Too much coffee powder in the filter. | Rotate filter holder to full lock position.Wipe off rim of filter basketFill with less coffee powder. |
| Milk is not foamy after frothing or it is not coming out of the frothing tube | Run out of steamMilk is not cold enough.Frothing nozzle is blocked. | Ensure there is enough Milk in the tank..Prepare the cold milk before making cappuccino.Follow the instructions to clean the milk tank &frothing nozzle. |
| Coffee comes out too quickly | Ground coffee is too coarse.Not enough ground coffee in the filter. | Use a finer grind.Use more ground coffee. |
| Coffee is too weak | Using wrong/small filter for a double shot coffee.Ground coffee is too coarse | Use correct/large filter for double shot coffeeUse a finer grind. |
ENVIRONMENT FRIENDLY DISPOS
natural_image
Symbol of a trash bin crossed with no text or numbers, representing waste sorting or disposal (no text present)You can help protect the environment!
Please remember to respect the local
regulations: hand in the non-working electrical
equipments to an appropriate waste disposal center.
TECHNICAL DAT
MODEL NO.: GCM135
Rated Voltage: 220-240V
Rated Frequency: 50Hz
Rated Power: 1350W
Product Dimension: 210(W) x320(H) x 280(D) mm
注意事项
選擇咖啡濾網
請按以下指示選擇咖啡過濾網:
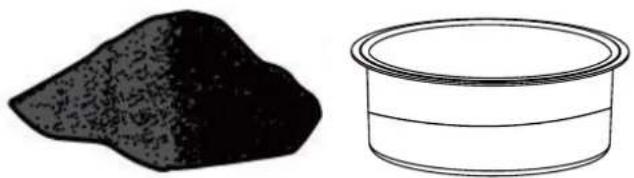
- 單份濃縮咖啡:使用單杯咖啡過濾網
natural_image
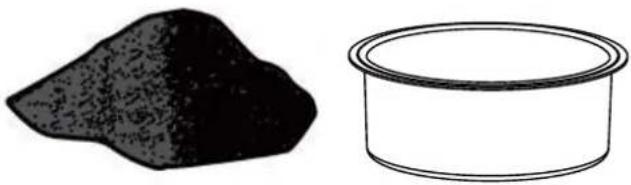
Two simple line drawings: a dark irregular object and a cylindrical container (no text or symbols)- 雙份濃縮咖啡:使用雙杯咖啡過濾網
natural_image
Simple line drawings of a coal pile and a cylindrical container (no text or symbols)放置咖啡粉
natural_image
Illustration of hands pouring dark liquid into a small container (no text or symbols)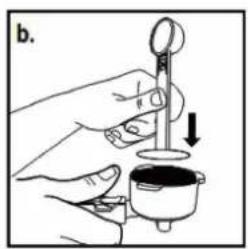
natural_image
Illustration of a hand using a dropper to measure a small container (no text or symbols present)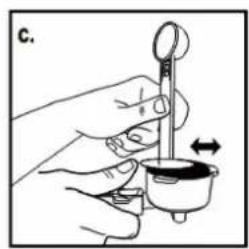
natural_image
Illustration of a hand holding a small container with a pointer and a magnifying glass above it, no text or symbols present.natural_image
Circular object with a textured surface, possibly a sample or container (no visible text or symbols)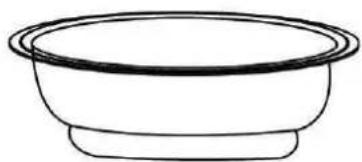
natural_image
Simple line drawing of a bowl with no text or symbols鎖緊漏斗
natural_image
Line drawing of a kitchen appliance with a hand holding a tool, no text or symbols present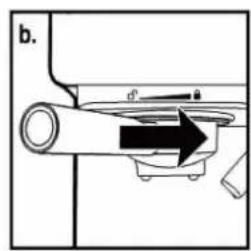
natural_image
Technical line drawing of a mechanical component with no visible text or symbols放置咖啡杯
natural_image
Pure mechanical assembly diagram showing a lever and bracket (no text or symbols)注意事项
7/F., Goodwill Industrial Building, 36-44 Pak Tin Par Street, Tsuen Wan, N.T.
a Gilman Group Company
太平家庭電器
2/F, Shing Dao Industrial Building, 232 Aberdeen Main Road, Hongkong
- CAUTION: PRESSURE
- KNOWYOURCOFFEEMAKER
- FORTHEFIRSTUSE
- IMPORTANT-PRIMETHEUNIT
- SELECT THE RIGHT CUP
- INTRODUCTION
- ESPRESSO
- CAPPUCCINO
- LATTE
- SELECTTHERIGHTCOFFEE
- THECOFFEE
- THEGRIND
- OPERATINGINSTRUCTIONS
- FILLINGTHEWATERTANK
- FILLINGTHEMILKTANK
- CHOOSETHEFILTER
- FILLINGWITHCOFFEE
- FORGROUNDCOFFEE:
- FORE.S.EPOD:
- LOCKTHEFUNNELINTOTHEBREWHEAD
- PLACINGTHECUP(S)
- "SLEEPSTATE"MODE
- SELECTTHEFUNCTION
- PREPARINGESPRESSO
- PREPARING CAPPUCCINO
- PREPARINGLATTE
- PREPARINGFROTHMILK
- CORRECTUSEOFGROUNDCOFFEEFORESPRESSO MAKERS
- CLEANANDMAINTENANCE
- CLEANTHEMILKTANKANDFROTHINGMILKS/SNOZZLE
- CLEANTHEBREWHEAD/THEFUUNEL/FILTER
- CLEANTHEWATERTANK
- CLEANTHECOFFEEMAKER
- DELIMING
- TODELIMETHEWATERTANK:
- TODELIMEINTERNALPARTS:
- TROUBLESHOOTING
- ENVIRONMENT FRIENDLY DISPOS
- TECHNICAL DAT
- 注意事项
- 選擇咖啡濾網
- 放置咖啡粉
- 鎖緊漏斗
- 放置咖啡杯
- 太平家庭電器
Brand : GEMINI
Model : GCM135
Category : Coffee maker