
IB120 - Ice cream maker EDGESTAR - Free user manual and instructions
Find the device manual for free IB120 EDGESTAR in PDF.


| Product Type | Ice Cream Maker |
| Brand | EdgeStar |
| Model | IB120 |
| Color | Black/Stainless Steel |
| Capacity | 1.5 quarts (1.4 L) |
| Dimensions (W x D x H) | 10.5 x 9.5 x 11 inches |
| Weight | 13.5 lbs |
| Power Supply | 120V / 60 Hz |
| Power Consumption | 200 W |
| Freezing Method | Compressor (self-freezing) |
| Bowl Material | Aluminum with non-stick coating |
| Mixing Paddle | BPA-free plastic |
| Functions | Ice cream, sorbet, gelato, frozen yogurt |
| Timer Settings | 60-minute timer with automatic shutoff |
| Control Panel | Digital display with touch buttons |
| Keep Cold Feature | Maintains temperature after churning |
| Noise Level | Low noise operation |
| Cleaning | Wipe bowl and paddle with damp cloth; not dishwasher safe |
| Safety Features | Automatic shutoff when lid opens; overhear protection |
| Spare Parts Available | Replacement bowls, paddles, and lids |
| Warranty | 1 year limited |
Frequently Asked Questions - IB120 EDGESTAR
User questions about IB120 EDGESTAR
0 question about this device. Answer the ones you know or ask your own.
Ask a new question about this device
Download the instructions for your Ice cream maker in PDF format for free! Find your manual IB120 - EDGESTAR and take your electronic device back in hand. On this page are published all the documents necessary for the use of your device. IB120 by EDGESTAR.
USER MANUAL IB120 EDGESTAR
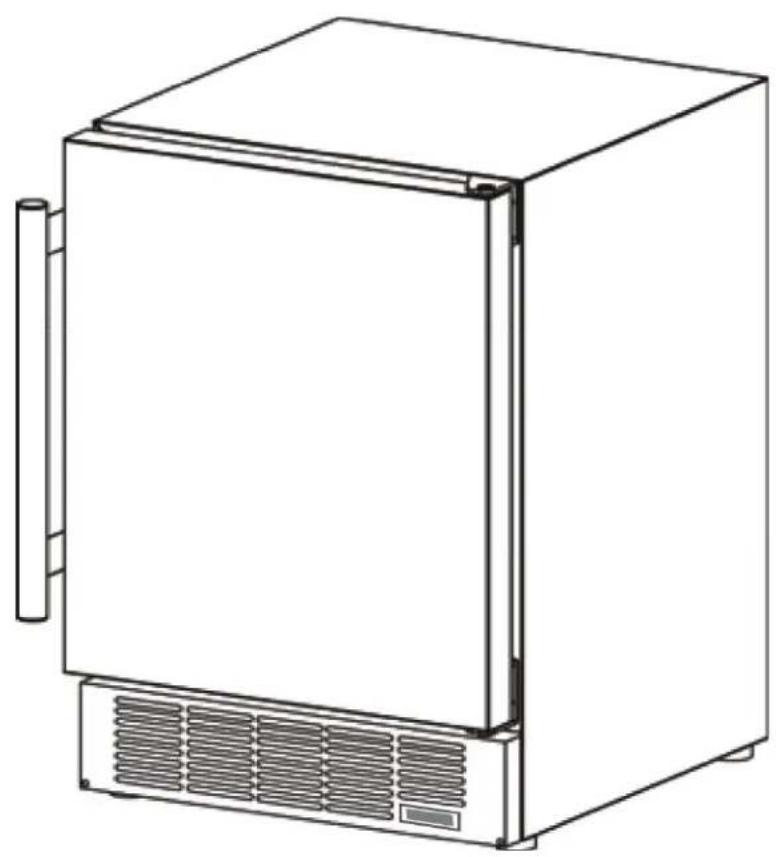
Undercounter Crescent Ice Maker
natural_image
Line drawing of a simple rectangular oven with cooling unit and side panel (no text or symbols)IB120SS
Owner's Manual
Important Safety Information
Improper handling can cause serious damage to the EdgeStar ice maker and / or injury to the user. This ice maker is designed for domestic indoor use only. Do not use the unit for industrial or commercial use. Any other use may invalidate the warranty. Please review the ratings label located on the rear panel of the unit for electrical and other technical data related to this unit. The unit must be used in a properly grounded wall outlet.
Please read and follow the safety information listed below to reduce the risk of fire, electric shock, or injury.

Electrical Safety
- Do not exceed the power outlet ratings.
- It is recommended the ice maker be connected on its own circuit.
- The unit must be installed in accordance with state and local electrical codes.
- A standard electrical supply (115 V, 60Hz), that is properly grounded in accordance with the National Electrical Code and local codes and ordinances is required.
- Use outlets that cannot be turned off by a switch or pull chain.
• Always turn the unit off and unplug it from the outlet when cleaning. - Unplug the unit if it is not going to be used for an extended period of time.
- Do not operate the unit with a power plug missing the ground plug, a damaged cord, or a loose socket.
- Be sure the ice maker is properly grounded.
- Never plug or unplug the unit with wet hands.
- Do not bypass, cut, or remove the grounding plug.
- Do not use extension cords or power strips with this unit. You may need to contact your electrician if it is necessary to use a longer cord or if you do not have a grounded outlet. Do not modify the power cord's length or share the outlet with other appliances.
- Do not start or stop the unit by switching the circuit's power on and off.
- If the power cord is damaged, it must be replaced by the manufacturer or a qualified technician.
- Never repair the unit while it is plugged in.
- Immediately unplug the unit if it makes strange sounds, emits smells, or smoke comes out of it, and contact customer service.
- Do not remove any part of the casing unless you are instructed to do so by an authorized technician.
- You should never attempt to repair the unit yourself.
- Contact customer service for service options if the unit needs service.
Important Safety Information

General Safety
- To prevent injuries, use at least two people to move and install the ice maker.
- This appliance is not intended for use by persons, including children, with reduced physical, sensory or mental capabilities, unless they have been given supervision or instruction concerning the use of the appliance by the person(s) responsible for their safety.
- Install the ice maker in a well-ventilated area where the ambient temperature is above 50^ F and below 95^ F.
- The temperature range for this refrigerator is optimized for wine storage. Perishable food items may require a different storage environment.
- Do not place hot or warm items into the refrigerator before they cool down to room temperature.
- This unit is designed to be installed indoors, and protected from rain, sleet, snow, and / or moisture.
- This unit is not intended to be used by children.
• Children should be supervised to ensure that they do not play with this product. - Never allow children to crawl inside the ice maker. If you are disposing of the unit, remove the door.
- Do not use this appliance near flammable gas or combustibles such as gasoline, benzene, or thinner.
- Do not store explosive substances such as aerosol cans with a flammable propellant in this appliance.
- Do not place the unit near heat sources such as ovens, grills, or direct sunlight.
- Only use in an upright position on a flat, level surface and provide proper ventilation.
- Do not pinch or kink the power supply line between the unit and cabinet.
- Do not leave any cleaning solutions in the unit.
- Do not use solvent-based cleaning agents or abrasive solutions to clean the unit as they may damage the interior and exterior.
- Do not place any other appliances on top of the unit.
- Do not turn the unit upside down, on its side, or at an angle off level.
- If your model of ice maker is equipped with a lock, keep the keys away from children.
- Do not move the unit without emptying the contents and securing the door in a closed position.
- This appliance is not intended for use by persons (including children) with reduced physical, sensory, or mental capabilities unless they are given supervision or instruction by a person responsible for their safety.
- This appliance is meant for use in the household or similar settings.
- Keep all ventilation openings clear of obstruction.
- Do not use mechanical devices or other means to accelerate the defrosting process.
- Do not damage the refrigerant circuit.
- Do not use other appliances inside the ice maker unless recommended by the manufacturer.
- If the supply cord is damaged, it must be replaced by the manufacturer, its service agent, or a similarly qualified individual.

DANGER: Risk of child entrapment. Before you throw away your old refrigerator or freezer, take off the doors and leave the shelves in place so that children may not easily climb inside.
Table of Contents
Important Safety Information....2
First-Time Operating Instructions 5
Introduction......5
Parts Identification....6
Installation 7
Unpacking the Ice Maker....7
Clearance Requirements....8
Electrical Requirements 8
Recommended Grounding Method 9
Leveling the Ice Maker 9
Reversing the Door Swing....10
Water Supply Connections....1
Connecting the Water line 1
Operation....12
Installation Checklist before Operation....12
Begin Using Your Ice Maker....12
Standard Ice Production....13
Cleaning and Maintenance....14
Exterior Cleaning....14
Interior Cleaning....14
Winterizing....15
Recommissioning 15
Condenser Cleaning....15
Troubleshooting....16
Specifications 17
EdgeStar Limited Warranty 18
First-Time Operating Instructions
Before use, make sure all packaging labels and materials are removed from the unit. Be sure to keep track of all included parts and pieces before discarding the packaging materials. It is advised that you keep the original box and packaging materials in case you ever need to move or ship the appliance in the future.
Let the unit stand for at least 24 hours before you use it; this allows the cooling components time to settle from transit. The instruction manual should be read before use.
Introduction
Thank you for purchasing this EdgeStar ice maker. We hope that this purchase will be the beginning of a lasting and rewarding relationship between you and EdgeStar. We will provide the customer support and exemplary products necessary to nurture that relationship.
This manual contains important information regarding the proper installation, use, and maintenance of your ice maker. Following this manual will ensure that your product will work at its peak performance and efficiency.
Please save the original product packaging in case you need to safely transport your ice maker.
For Your Records:
Please write down the model number and serial number below for future reference. Both numbers are located on the ratings label on the back of your unit and are needed to obtain warranty service. You may also want to staple your receipt to this manual as it is the proof of your purchase, and is also needed for service under your warranty.
Model Number: ____
Serial Number: ____
Date of Purchase: ____
For a more efficient experience, please do the following before contacting customer service:
- If you received a damaged product, immediately contact the retailer or dealer who sold the product.
- Read and follow this instruction manual carefully to help you install, use, and maintain your ice maker.
- Read the troubleshooting section of this manual. It will help you diagnose and solve common issues.
- Visit us on the web at www.edgestar.com to register your product, download product guides, and access additional troubleshooting resources and up-to-date information.
- For warranty service, customer service representatives are available at service@edgestar.com.
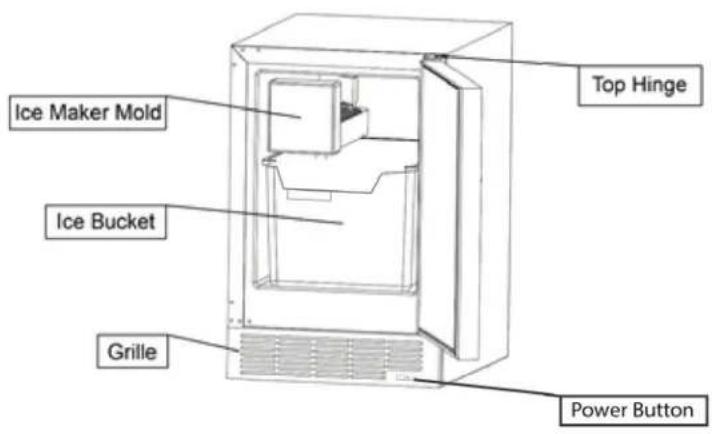
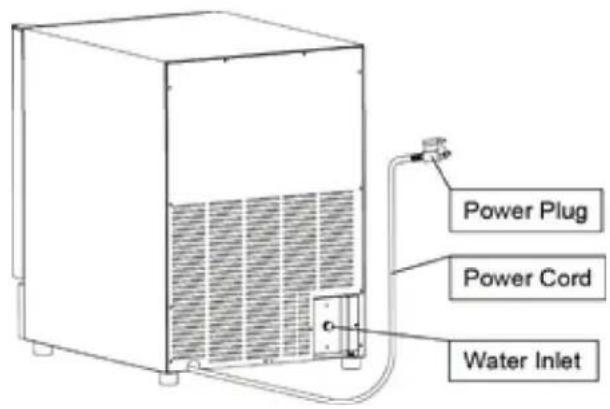
Parts Identification

Note: Gather the model and serial number from the product label and write them down before installing the wine refrigerator.
Front View:
Rear View:
Accessories
1 x Ice Scoop
1 x Ice Bucket
1 x Water Line
Tools Needed
Phillips Screwdriver
Flat Screwdriver
1/2" Open-end Wrench
Installation
The ice maker should be installed in accordance with local electrical code requirements. The ice maker should also be placed in a location that is strong enough to support its total weight, keeping in mind that it will weigh more when fully loaded than when empty. Before you plug the ice maker into a power supply, be sure to let it stand upright for at least 24 hours to allow the compressor's oils to settle.
Unpacking the Ice Maker

Warning: Use two or more people to move and install the ice maker. Failure to do so can result in back or other injury. Carefully remove the packaging materials. Remove any shipping tape and glue from your ice maker before use. Do not use sharp instruments, rubbing alcohol, flammable fluids, or abrasive cleaners to remove tape or glue. These products can damage the surface of your ice maker.

Warning: Do not remove any safety, warning, or product information labels from your ice maker.

Warning: This device does not meet Federal requirements for ignition protection. Don't install it in spaces containing gasoline engines, fuel tanks, or fuel line fittings. Failure to comply could result in accidental injury or death.
- Choose a well-ventilated installation area. This unit MUST be installed in a location protected from the elements, such as rain and water spray or drips.
- This unit should not be located next to ovens, grills, or other high heat sources.
- Installation of the ice maker requires a cold water supply inlet of 1/4" tubing with a shut-off valve within six (6) feet of the installation location.
- The installation must allow the ice maker to be pulled forward so that the rear can be accessed for service.
- This unit is designed to be operated in ambient temperatures between 50^ F and 95^ F. High ambient temperatures ( 95^ F or higher) may reduce the ice production rate. For the best performance, keep the unit out of direct sunlight and away from heat-generating equipment.
- The unit must sit on a secure and level surface. A mounting flange must NOT be used to support the unit's weight. It is important for the ice maker to be leveled in order to work properly. If needed, you can adjust the height of the ice maker by revolving the rubber leveling feet.
- If you are mounting the unit within cabinetry, make sure that the door has the desired range of motion. All doors come with the hinge on the right side, but can be reversed if desired.
- All electrical and water connections for the unit must be installed in accordance with all state and local codes.
- A standard electrical supply, properly grounded in accordance with the National Electric Code and local codes and ordinances is required.
Clearance Requirements

Notes:
-
There must be an unrestricted path for exhaust and fresh air intake. Recirculation between fresh air intake and exhaust air must be prevented.
-
Any restriction of airflow or ventilation will disrupt the normal operation of the unit resulting in damage to components and voiding the warranty.
-
Only connect the unit to a potable water supply.
-
It is highly recommended that you install the ice maker with an inline water filter.
-
If the unit is to be built in, 1" or more must be allowed behind the unit for the water line and plug clearance for proper operation.
- An additional 1/4" must be left on both sides and the top of the unit.
- This unit uses fan-forced condenser cooling. This requires air circulation through the vents in the lower front section of the unit. The grille must be unobstructed.
Electrical Requirements

ELECTRIC SHOCK HAZARD!
- Plug into a grounded 3-prong outlet.
- Never remove the grounding prong from the plug.
- Never use an adapter to bypass the grounding prong.
• DO NOT use an extension cord. - Failure to follow these instructions can result in fire, electrical shock, or death.
Before you move your ice maker into its final location, it is important to make sure you have the proper electrical connection: a standard electrical supply (115 V, 60Hz.), Properly grounded in accordance with the National Electrical Code and local codes and ordinances, is required. The ice maker should always be plugged into its own individual electrical outlet.
It is recommended that a separate circuit, serving only your ice maker, be provided. This provides the best performance and prevents overloading boat wiring circuits, which can lead to a fire hazard. Use an outlet that cannot be turned off by a switch or pull chain. Immediately repair or replace the power cord if it becomes frayed or otherwise damaged. Do not continue to use a cord that has cracks or abrasions along its length or at either end. Be careful not to damage the power cord when moving the ice maker.
If the supply cord is damaged, it must be replaced by the manufacturer, service agent, or another qualified person. The fuse (or circuit breaker) size should be at least 15 amps.
Recommended Grounding Method
For your personal safety, this appliance must be grounded. It is equipped with a power supply cord that has a 3-pronged grounding plug. To minimize possible shock hazard, the cord must be plugged into a mating 3-pronged wall socket and grounded in accordance with the National Electrical Code and local codes and ordinances. If a mating wall socket is not available, it is the personal responsibility of the customer to have a properly grounded, 3-prong wall receptacle installed by a qualified electrician.
Leveling the Ice Maker

Note: Once you are ready to install the ice maker in a cabinet or directly on the floor, you must adjust the feet to level the ice maker. If the floor is level, just rotate the two front feet to touch the floor.
It is important for the ice maker to be level in order to work properly. It can be raised or lowered by rotating the plastic sheaths around each of the feet on the bottom of the machine. If you find that the surface is not level, rotate the feet until the ice maker becomes level. You may need to make several adjustments to level it. We recommend using a carpenter's level to check the machine.
- Place a carpenter's level on top of the product to see if the ice maker is level from front to back and side to side.
- Adjust the height of the feet as follows:
Turn the leveling feet to the right to lower that side of the Refrigerator.
Turn the leveling feet to the left to raise that side of the Refrigerator.
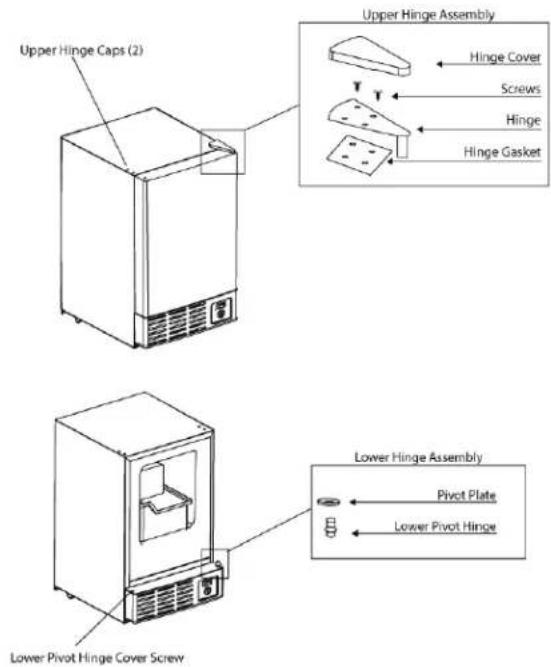
Reversing the Door Swing

Note: Before you begin, unplug the ice maker or disconnect the power.
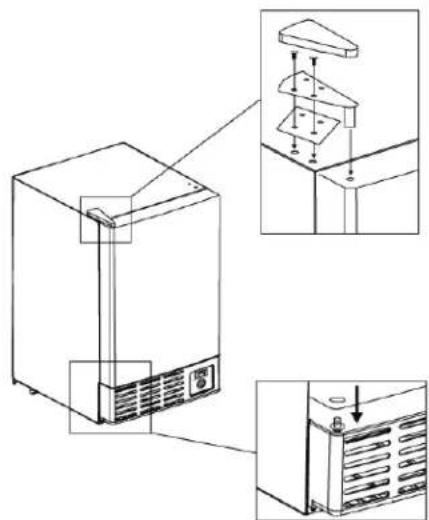
Step 1: Disassembly
- Start by removing the hinge cap covers that are located on the top of the cabinet on the side of the unit where the door is going to be installed.
- Next, pry off the upper hinge cover plate with your fingers or a flat head screwdriver being careful not to scratch the surface of the cabinet.
- Remove the Phillips head screws (2) that are securing the upper hinge in place.
- While holding door in closed position, remove the upper hinge and hinge gasket.
- Lift door upwards and remove, set aside.
Step 2: Reverse Lower Pivot Hinge
- Remove the lower pivot hinge cover screw
- Remove lower pivot plate and pivot hinge
- Insert lower pivot hinge and pivot plate on side of cabinet where door to be installed.
• Install pivot hinge screw cover on opposite side.
Step 3: Re-Install Door
- Insert upper hinge caps on upper cabinet side where door no longer installed.
- Align left side of door with bottom pivot hinge and slide into place while holding door upright at a 90° angle to avoid damaging the door or lower pivot hinge.
- Align hinge gasket and upper hinge over hinge mounting holes and secure with 2 screws making sure to slide door hinge pin into top of door frame.
NOTE: Use the hinge screw holes that correspond to the side of the cabinet on which the door is being installed. Left holes for left side installation, right holes for right side installation.
- Secure hinge into ice maker cabinet with 2 screws.
- Slip hinge cover over upper hinge and snap into place.
natural_image
Line drawing of a refrigerator with labeled components and exploded view (no text or symbols)Water Supply Connections
The water supply should be ready at the point of installation. The water supply pressure should be a minimum of 20 psig with a static pressure not more than 120 psig. (A wall outlet directly behind the ice maker will make installation easier.) The temperature of the water feeding into the ice maker should be between 41°F and 90°F for proper operation.

Notes:
- All installations must be in accordance with local plumbing code requirements.
- Make certain that the pipes are not pinched, kinked, or damaged during installation.
- Check for leaks after connection.
Connecting the Water line
- Turn off the main water supply. Turn on the nearest faucet long enough to clear the line of water.
- Find a 1/4" vertical cold water inlet of soft copper tubing with a shut-off valve near the installation location. The distance should be less than six (6) feet. The water supply hose provided with the ice maker is about six (6) feet long. Drains are not required for this unit.
- Connect the nuts of the water supply hose to the tap and water inlet valve. Tighten the nuts firmly by hand, then one-half turn with the wrench.
- Turn on the main water supply and tap. Check for water supply connection leaks. Tighten every connection (including connections at the water inlet).

Note: When you connect the water supply hose, pay attention to the "Water inlet" labels on the ice maker.
In general, it is always a good idea to filter the water. A water filter can remove taste and odors as well as particles. Where water is very hard, softened water may result in white, mushy cubes that stick together. De-ionized water is not recommended.
Operation
Installation Checklist before Operation
- Have all packing materials and tape been removed from the interior and exterior of the ice maker?
- Did you clean the ice storage bin?
- Have the installation instructions been followed, including connecting the machine to water and electricity?
- Has the machine been leveled?
- Is the ice maker in a site where the ambient temperature is between 50^ F and 95^ F and the water temperature is between 41^ F and 90^ F all year round?
- Has the water supply pressure been checked to ensure a minimum of 20 psig with a static pressure not to exceed 120 psig?
- Is there a clearance of at least 1" at the rear of the ice maker?
- Has the power supply voltage been checked or tested against the nameplate rating? And has proper grounding been installed for the ice maker?
- Is the ice maker plugged in?
- Have you turned on the main water supply and the tap?
- Have you checked for leaks at all water supply connections?
Begin Using Your Ice Maker
The power on-off switch is located towards the bottom of the ice maker. Press the power switch to turn the unit on or off. The ice maker will begin to produce ice within 60 minutes after start up. Ice production will stop automatically when the bucket is full enough to trigger the wire shut-off arm. The unit should not be turned off if the door is closed or there is ice or water inside the ice maker. A full cycle will take approximately 11 hours and use approximately 5 ounces of water.

Note: Discard all ice produced during the first 3 hours of operation.
Standard Ice Production
- When the ice bucket is full, the ice maker mold will shut off. However, the refrigeration system will continue to cool and maintain the ice cube supply.
- Due to fast freezing, ice cubes may appear “cloudy.” This is trapped air in the water and does not affect the taste or quality of the ice.
- “Hollow” ice cubes may result from fast-freezing under certain climatic conditions such as high humidity. This is not an indication of a problem with the ice maker.
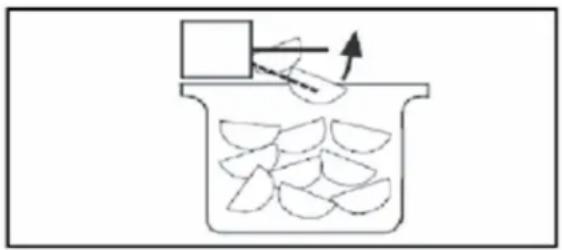
- Ice production can be interrupted by raising the wire shut-off arm into an upright and locked position as shown below. The unit will maintain its temperature for ice storage.
natural_image
Simple line drawing of a container with sliced pieces and an upward arrow, no text or symbols present.
Notes:
- Do not place cans or bottles in the ice compartment because they will freeze.
- If you are not intending to use the ice maker and turn the supply valve off, it is imperative to raise the bin arm of the ice maker. Failure to raise the bin arm may result in damage to the water valve.
- Although the unit has been tested and cleaned at the factory, due to long-term transit and storage, the first batch of cubes must be discarded.
- Never turn the water supply tap off when the ice maker is running.
- Never touch the ice maker mold when the unit is running!
- Except to take ice from the unit, keep the door closed to reduce melting and ensure proper ice formation.
Cleaning and Maintenance

Note: The ice maker must be thoroughly cleaned before the first use or if it has been left unused for a long time. Carefully follow any instructions provided for cleaning or use of sanitizing solution. Do not leave any solution inside the ice maker after cleaning.
Periodic cleaning and proper maintenance will ensure efficiency, top performance, and a long life for your ice maker. The maintenance intervals listed are based on normal conditions. You may want to shorten the intervals if you have pets, or there are other special considerations.
- Periodically vacuum dust and dirt from the condenser, which is located behind the grille at the bottom front of the unit. (Additional instructions on the next page).
- Regularly inspect the plumbing connections to ensure that no leaks are present.

Note: Never keep anything in the ice storage bin that is not ice; objects like wine or beer bottles are unsanitary.
Exterior Cleaning
The door and cabinet may be cleaned with a mild detergent or hand soap mixed with warm water. Do not use solvent based or abrasive cleaners. Use a soft sponge and rinse with clean water. Wipe with a soft clean towel to prevent water spotting. If the door panel is stainless steel, it can discolor when exposed to chlorine gas and moisture. Clean stainless steel using a cloth dampened with a mild detergent and warm water solution. Never use an abrasive or caustic cleaning agent.
Interior Cleaning
When necessary, defrost the unit and thoroughly clean the inside with mild soap and water. Do not use electrical heating devices or sharp or pointed tools when defrosting the ice maker.
When defrosting the unit or leaving it turned off, prop the door open. This allows the inside of the cabinet to air dry, reducing the chance for mildew or mold to form and damage the ice maker's components.
Winterizing

Warning: Disconnect power at the source before working on the unit. Do not winterize this unit with ANY type of anti-freeze; damage to the ice maker mold coating will occur, invalidating the product's Limited Warranty and creating a potential health hazard.
- Shut off the water supply to the unit.
- Disconnect the water supply connector behind the front grille at the solenoid valve. Remove the white plastic tubing and nut from the bottom of the solenoid valve.
- Turn the power on. Allow the unit to run for an hour. Remove any cubes that may have been ejected during this period. Turn off the power and open the door to allow the inside to defrost. After it has defrosted, wipe it dry and leave the door open.
Recommissioning
Reconnect the water supply connector, white plastic tubing, and nut discussed above, turn on the water, check for leaks, and then reconnect the unit to power. After an initial cool down of 45-60 minutes, the unit will cycle approximately every 40 minutes.
Turn on the water, check for leaks, and then turn on the power. Press the power switch (located just below the door). The fan and compressor will normally turn on immediately, resulting in air circulation through the grille and a faint hum from the compressor. If the machine was shut off during the ice harvesting cycle, it will take approximately 5 minutes to complete the cycle before the compressor and fan turn on. The interior temperature will drop below freezing. The first harvest of ice will occur within 60 minutes of startup. After the connection lines are purged of air, normal harvesting and refilling will occur every 40 minutes or less under normal conditions.
Condenser Cleaning
A dirty or clogged condenser prevents proper airflow, reduces ice making capacity, and causes higher than recommended operating temperatures that may lead to component failure. Clean the condenser at least once every 6 months.
- Unplug the ice maker.
- Remove the 2 screws on the front cover and gently remove the cover.
- Use the brush attachment of a vacuum cleaner to remove dirt and lint from the condenser and the surrounding compartment.
- Replace the front cover and screws.
- Plug in the ice maker.

Note: DO NOT touch the condenser fins. They are sharp and can be easily damaged.
Troubleshooting
| The ice maker doesn't operate. T | The ice maker is unplugged. Plug in the ice maker. | |
| The breaker is tripped. Check the | breaker. If the problem occurs again, call for service to check for a short circuit in the unit. | |
| The ice maker's power button is set to OFF. | Switch the ice maker's power button to ON. | |
| The ice storage bin is full of ice or wire shut-off arm is locked in the up position. | Remove some of the ice. Be sure the wire shut-off arm is lowered. | |
| The water doesn't feed in after the ice maker starts. | The water supply tap is turned off. | Turn on the water supply tap. |
| The water supply pipe is not properly connected. | Reconnect the water supply pipe. | |
| The machine makes ice, but at a very slow rate. | The condenser is dirty. Clean the condenser. | condenser. |
| The air flow to the ice maker is obstructed. | Check the installation to ensure the air flow to the ice maker is not blocked. | |
| The ambient temperature is high, or the unit is near a heat source. | Check the installation to ensure the ambient temperature is in the proper range. | |
| Ice harvest control is set too low. | Adjust ice harvest control to higher setting (pg. 8). | |
| Water is leaking out of the unit. T | The water supply connection is leaking. | Tighten the fitting. |
| The unit accumulates frost and has to be defrosted often. | The door is left open or opened too often. | Defrost the ice maker as needed. Keep the door closed as much as possible. |
| The ice cubes are partially formed. | There is not enough water in the water trough. | Check if the water supply pressure is below 20 psig. The water supply or filter may be restricted. |
| There is noise during operation. | The unit may not be leveled and secure. | Level and secure the unit. |
| No ice is produced. The wire shut-off arm is locked in the upright position. | Lower the wire shut-off arm. | |
| Turn on the water or contact a plumber. | ||
Specifications

Note: Technical data and performance information are provided for reference only. Specifications are subject to change. Check the rating label on the ice maker for the most accurate information.
| Description of Product Undercounter Crescent Ice | Maker |
| Model IB120SS | |
| Voltage/Frequency 115V ~ 60Hz | |
| Ice-Making / Ice-Harvest rated current 1.7A | |
| Color Stainless Steel, Black | |
| Ice Storage Capacity 7 lbs. | |
| Ice-making Capability 7.7 lbs / day | |
| Ice Shape Crescent | |
| Ice Cube Dimensions (Approximate) 1/2" X 3/4" X | 2 1/2" |
| Refrigerant R134a (2.4 oz) | |
| Unit Dimensions(Width x Depth x Height) | 14 15/16" X 17 3/4" X 25 1/8" |
| Net Weight 47.8 lbs. |

Note: Depth provided is without the handle installed. Depth with the handle is 19 15/16".
EDGESTAR®
EdgeStar Limited Warranty
One (1) Year Parts & Ninety (90) Days Labor
This product is warranted by EdgeStar and is subject to any conditions set forth as follows:
WHAT IS COVERED:
LABOR: For a period of NINETY (90) DAYS from the date of original purchase, labor will be performed free of charge at an authorized EdgeStar repair facility. At its option, EdgeStar will repair the product with new or remanufactured parts, or exchange the defective product with a new, refurbished, or remanufactured product. If a product is replaced, it will carry the remaining warranty of the original product. After the ninety (90) day period, EdgeStar will no longer be responsible for labor charges incurred. All defective products and parts covered by this warranty will be repaired or replaced on a mail-in basis to an EdgeStar authorized repair facility.
PARTS: For a period of ONE (1) YEAR from the date of original purchase, EdgeStar will supply new, rebuilt, or refurbished parts free of charge. EdgeStar may request a defective part be returned in exchange for the replacement part. All replacement parts or products will be new, remanufactured, or refurbished. All products and parts replaced by EdgeStar under warranty service become the property of EdgeStar.
This warranty applies to the original purchaser only, and only covers defects in workmanship experienced during operation of the product under normal service, maintenance, and usage conditions. This warranty applies to the purchase and use of this product in residential settings within the contiguous United States of America.
Exceptions: Commercial or Rental Use Warranty
90 days labor and parts from date of original purchase. No other warranty applies.
WHAT IS NOT COVERED- The following limitations apply to the coverage of this warranty. This warranty does not cover:
-Labor charges for installation, setup, or training to use the product.
-Shipping damage, and any damage caused by improper packaging for shipment to an authorized service center, and any damaged caused by improper voltage or any other misuse, including abnormal service, handling, or usage.
-Cosmetic damage such as scratches and dents.
-Normal wear and tear on parts or replacement of parts designed to be replaced, e.g. filters, cartridges, batteries.
-Service trips to deliver, pick-up, or repair, install the product, or to instruct in proper usage of the product.
-Damages or operating problems resulting from misuse, abuse, operation outside environmental specifications, uses contrary to instructions provided in the owner's manual, accidents, acts of God, vermin, fire, flood, improper installation, unauthorized service, maintenance negligence, unauthorized installation or modification, or commercial use.
-Labor, service transportation, and shipping charges for the removal and replacement of defective parts, beyond the initial 12 month period.
-Products that have been modified to perform outside of specifications without the prior written permission of EdgeStar.
-Products lost in shipment, or theft.
-Products sold AS IS or from an unauthorized reseller.
-Products that have had their serial numbers removed, defaced, or with serial numbers that have been invalidated.
-Damage from other than normal household use.
-Replacement or repair of household fuses, circuit breakers, wiring or plumbing.
-Damage to personal property from use of product.
-Damage from service other than from an authorized EdgeStar repair facility.
-Hoses, knobs, lint trays and all attachments, accessories and disposable parts.
-Any service charges not specifically identified as normal such as normal service area or hours.
-Any special or consequential damages arising out of the use of the product.
OBTAINING WARRANTY SERVICE: If you believe your product is defective, contact EdgeStar Customer Support for troubleshooting assistance and warranty service at www.edgestar.com or call 1-866-319-5473. Before contacting Customer Support you are required to have your model number, serial number, and proof of purchase available upon request. Once an EdgeStar authorized representative has confirmed that your product is defective and eligible for warranty service, the product must be returned to an EdgeStar authorized repair facility. EdgeStar is not responsible for damage resulting from shipper mishandling or improper packaging. Do not return a defective product to the place of purchase. Products received without a return authorization number will be refused.
THIS WARRANTY IS IN LIEU OF ANY OTHER WARRANTY, EXPRESS OR IMPLIED, INCLUDING WITHOUT LIMITATION, ANY WARRANTY OF MERCHANTABILITY OR FITNESS FOR A PARTICULAR PURPOSE. TO THE EXTENT ANY IMPLIED WARRANTY IS REQUIRED BY LAW, IT IS LIMITED IN DURATION TO THE EXPRESS WARRANTY PERIOD ABOVE. NEITHER THE MANUFACTURER NOR ITS DISTRIBUTORS SHALL BE LIABLE FOR ANY INCIDENTAL, CONSEQUENTIAL, INDIRECT, SPECIAL, OR PUNITIVE DAMAGES OF ANY NATURE, INCLUDING WITHOUT LIMITATION, LOST REVENUES OR PROFITS, OR ANY OTHER DAMAGE WHETHER BASED IN CONTRACT, TORT, OR OTHERWISE. IN NO EVENT AND UNDER NO CIRCUMSTANCE OF ANY TYPE OR KIND SHALL THE SELLER, MANUFACTURER AND/OR DISTRIBUTOR BE LIABLE FOR ANY REASON, UNDER ANY THEORY, FOR MORE THAN THE BASIC COST OF THE PRODUCT TO THE PURCHASER OR END USER. SOME STATES DO NOT ALLOW THE EXCLUSION OF INCIDENTAL OR CONSEQUENTIAL DAMAGES, SO THE ABOVE EXCLUSION MAY NOT APPLY TO YOU. THIS WARRANTY GIVES YOU SPECIFIC LEGAL RIGHTS. YOU MAY HAVE OTHER RIGHTS THAT VARY FROM STATE TO STATE.
EDGESTAR®
- Undercounter Crescent Ice Maker
- IB120SS
- Owner's Manual
- Important Safety Information
- Electrical Safety
- General Safety
- Table of Contents
- First-Time Operating Instructions
- Introduction
- For Your Records:
- Parts Identification
- Accessories
- Tools Needed
- Installation
- Unpacking the Ice Maker
- Clearance Requirements
- Notes:
- Electrical Requirements
- ELECTRIC SHOCK HAZARD!
- Recommended Grounding Method
- Leveling the Ice Maker
- Reversing the Door Swing
- Step 1: Disassembly
- Step 2: Reverse Lower Pivot Hinge
- Step 3: Re-Install Door
- Water Supply Connections
- Connecting the Water line
- Operation
- Installation Checklist before Operation
- Begin Using Your Ice Maker
- Standard Ice Production
- Cleaning and Maintenance
- Exterior Cleaning
- Interior Cleaning
- Winterizing
- Recommissioning
- Condenser Cleaning
- Specifications
- EDGESTAR®
- EdgeStar Limited Warranty
- One (1) Year Parts & Ninety (90) Days Labor
- WHAT IS COVERED:
- Exceptions: Commercial or Rental Use Warranty
- WHAT IS NOT COVERED- The following limitations apply to the coverage of this warranty. This warranty does not cover:
Brand : EDGESTAR
Model : IB120
Category : Ice cream maker