
RHSP801 - Sandwich Toaster RUSSELL HOBBS - Free user manual and instructions
Find the device manual for free RHSP801 RUSSELL HOBBS in PDF.


| Product Type | Sandwich Press |
| Brand | Russell Hobbs |
| Model | RHSP801 |
| Color Options | Red (RHSP801RED), Grey (RHSP801GRY), Pearl (RHSP801PRL) |
| Cooking Plate Material | Non-stick coated |
| Hinge Type | Floating hinge (adjusts to sandwich thickness) |
| Indicator Lights | Red power light and green temperature light |
| Handle Lock | Yes, for secure storage |
| Recommended Cooking Time | 6–8 minutes per sandwich |
| Bread Compatibility | White, Wholemeal, Multigrain, Rye, Raisin, Focaccia, Turkish, Sourdough, Baguette, Bread Rolls |
| Cleaning Method | Wipe with damp cloth or paper towel; for stubborn residue, apply oil, heat, then wipe |
| Storage | Unplug, clean, dry, lock handle, store vertically in clean dry place |
| Safety Features | Auto temperature control, non-slip base (assumed), do not immerse |
| Warranty | 2 years (from date of purchase) |
| Dimensions (Approx.) | 30 x 25 x 10 cm |
| Weight (Approx.) | 2.0 kg |
Frequently Asked Questions - RHSP801 RUSSELL HOBBS
User questions about RHSP801 RUSSELL HOBBS
0 question about this device. Answer the ones you know or ask your own.
Ask a new question about this device
Download the instructions for your Sandwich Toaster in PDF format for free! Find your manual RHSP801 - RUSSELL HOBBS and take your electronic device back in hand. On this page are published all the documents necessary for the use of your device. RHSP801 by RUSSELL HOBBS.
USER MANUAL RHSP801 RUSSELL HOBBS
natural_image
Decorative oval design with symmetrical knot-like patterns (no text or symbols)Russell Hobbs
natural_image
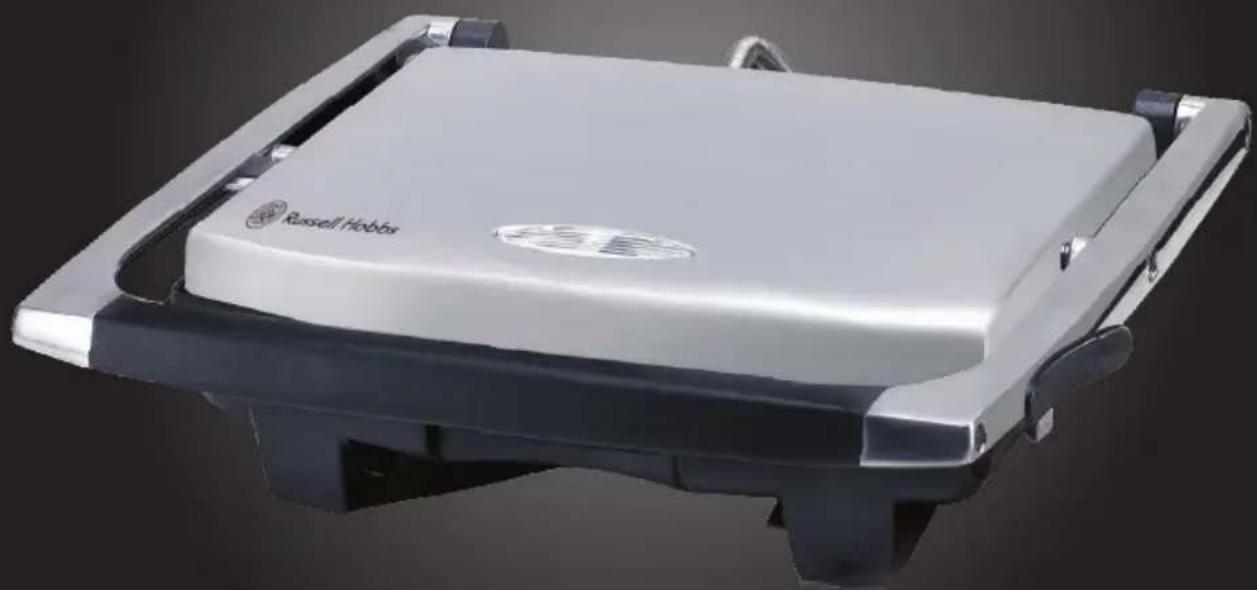
Exterior view of a stainless steel grater with a circular logo and brand name (Russell Hobbs) on the front panel, shown against a dark background.
Sandwich Press
RHSP801 RHSP801RED, RHSP801GRY, RHSP801PRL INSTRUCTIONS & WARRANTY
RHSP801_IB2_071111
Spectrum Brands Australia Pty Ltd
Locked Bag 3004 Braeside
Victoria 3195 Australia
Customer Service in Australia
TollFree: 1800 623 118
Email: info@spectrumbrands.com.au
Website: www.spectrumbrands.com.au
Spectrum Brands New Zealand Ltd
PO Box 9817 Newmarket
Auckland 1149 New Zealand
Customer Service in New Zealand
TollFree: 0800 736 776
Email: service@spectrumbrands.co.nz
Website: www.spectrumbrands.co.nz
Spectrum Brands Australia Pty Ltd and Spectrum Brands New Zealand Ltd Warranty Against Defects

In this warranty:
Australian Consumer Law means the Australian consumer law set out in Schedule 2 to the Competition and Consumer Act 2010;
CGA means the New Zealand Consumer Guarantees Act 1993;
Goods means the product or equipment which was accompanied by this warranty and purchased in Australia or New Zealand, as the case may be;
Manufacturer, We or us means:
- for Goods purchased in Australia, Spectrum Brands Australia Pty Ltd ABN, 78 007 070 573; or
- for Goods purchased in New Zealand, Spectrum Brands New Zealand Ltd, as the case may be, contact details as set out at the end of this warranty;
Supplier means the authorised distributor or retailer of the Goods that sold you the Goods in Australia or in New Zealand; and
You means you, the original end-user purchaser of the Goods.
- Our goods come with guarantees that cannot be excluded under the Australian Consumer Law, or the CGA. You are entitled to a replacement or refund for a major failure and compensation for any other reasonably foreseeable loss or damage. You are also entitled to have the goods repaired or replaced if the goods fail to be of acceptable quality and the failure does not amount to a major failure.
- The benefits provided by this Warranty are in addition to all other rights and remedies in respect of the Goods which the consumer has under either the Australian Consumer Law or the CGA. The original purchaser of the Goods is provided with the following Warranty subject to the Warranty Conditions:
- We warrant the Goods for all parts defective in workmanship or materials from the date of purchase (Warranty Period), for the period of:-
(a) Two (2) years for Russell Hobbs products (see product packaging for details)
(b) Two (2) years with five (5) year motor warranty for Russell Hobbs products (see product packaging for details)
(c) Limited Lifetime, Ten (10) years for Russell Hobbs cookware.
(d) One (1) year for George Foreman, iRobot, Westinghouse, Black & Decker and Spectrum Brands products.
If the Goods prove defective within the Warranty Period by reason of improper workmanship or material, we may, at our own discretion, repair or replace the Goods without charge.
Warranty Conditions
- The Goods must be used in accordance with the manufacturer's instructions. This Warranty does not apply should the defect in or failure of the Goods be attributable to misuse, abuse, accident or non-observance of manufacturer's instructions on the part of the user. As far as the law permits, the manufacturer does not accept liability for any direct or consequential loss, damage or other expense caused by or arising out of any failure to use the Goods in accordance with the manufacturer's instructions.
- Exhaustible components (such as batteries, filters and brushes) of the Goods are included under this Warranty only where there is a defect in workmanship or materials used.
- The warranty granted under clause 3 is limited to repair or replacement only.
- Any parts of the Goods replaced during repairs or any product replaced remain the property of the manufacturer. In the event of the Goods being replaced during the Warranty Period, the warranty on the replacement Goods will expire on the same date as for the Warranty Period on the original Goods which are replaced.
- In order to claim under the warranty granted under clause 3 you must:
(a) Retain this warranty with your receipt/proof of purchase; and
(b) Return the Goods to us at the relevant address or to the Supplier by prepaid freight within the Warranty Period accompanied with (i) the legible and unmodified original proof of purchase, which clearly indicates the name and address of the Supplier, the date and place of purchase, the product name or other product serial number and (ii) this warranty.
- This warranty is immediately void if:
(a) Any serial number or appliance plate is removed or defaced;
(b) The Goods have been serviced or otherwise repaired by a person not authorised to do so by us or where non approved replaced parts are used.
-
The Goods are designed for domestic use only. A limited 90-day Warranty applies to any industrial or commercial use of the Goods. The Goods must be connected to the electrical voltage requirements as specified in the ratings label located on the Goods.
-
This warranty does not cover the cost of claiming under the warranty or transport of the Goods to and from the Supplier or us.
- This warranty is only valid and enforceable in Australia against Spectrum Brands Australia Pty Ltd and in New Zealand against Spectrum Brands New Zealand Ltd.
Contact us or the Supplier for further details.
Register your product online
If you live in Australia please visit: www.spectrumbrands.com.au/warranty
If you live in New Zealand Please visit: www.spectrumbrands.co.nz/warranty
Registration of your warranty is not compulsory, it gives us a record of your purchase AND entitles you to receive these benefits: Product information; Hints and tips; Recipes and news; Information on special price offers and promotions.
Any questions? Please contact Customer Service for advice.
Congratulations on the purchase of your Russell Hobbs appliance. Each unit is manufactured to ensure safety and reliability. Before using the appliance for the first time, please read the instruction booklet carefully and keep it for future reference. Pass it on if you pass on the appliance.
When using electrical appliances, basic safety precautions should always be followed.
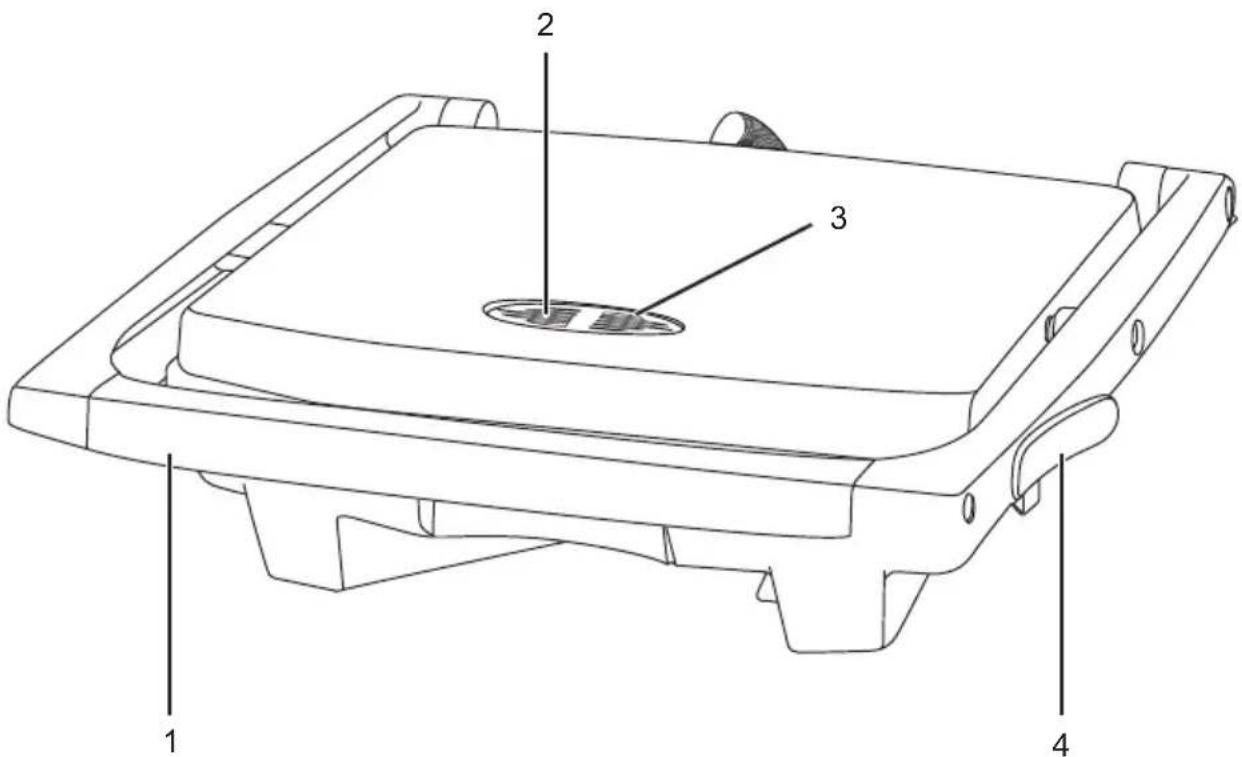
-
Handle
-
Temperature light
-
Power light
-
Handle lock
BEFORE FIRST USE
IMPORTANT: Ensure all packaging, labels and tags have been removed before connecting to the power for the first time.
- Position the Sandwich Press in a well ventilated area, on a firm, level, heat-resistant surface, clear of curtains, drapes and other combustible materials.
- Clean the cooking plates thoroughly using a soft damp cloth and dry with a kitchen towel. Lightly wipe the cooking plates with cooking oil. This will help to cure and protect the nonstick cooking plates when heated for the first time.
- With the lid closed, connect the Sandwich Press to the wall power outlet and switch it on. The red power and green temperature lights will illuminate.
-
When the Sandwich Press has reached operating temperature, the green light will extinguish. The green light will cycle on and off as the thermostat maintains the temperature.
-
After several cycles of the green temperature light, switch off the power and allow the cooking plates to cool. Wipe the plates clean with a soft cloth.
- The Sandwich Press is now ready for general use.
NOTE: When operating the Sandwich Press for the first time, the unit may emit an odour and a small amount of vapour as the new elements and cooking plates cure; this is normal.
OPERATING INSTRUCTIONS
NOTE: It is a good idea to apply a light coating of cooking oil, butter or margarine to the non-stick cooking plates before each use.
- Connect the Sandwich Press to the wall power outlet and switch it on. The red power and green temperature lights will illuminate.
- When the Sandwich Press has reached operating temperature, the green light will extinguish (the green light will cycle on and off as the thermostat maintains the temperature).
- Raise the top cooking plate using the handle and place the sandwich on the bottom cooking plate.
- Lower the top cooking plate. The top cooking plate has a floating hinge and will automatically adjust to the thickness of the sandwich as it closes.
- A sandwich may take 6-8 minutes to cook, depending on the preferred level of browning required and the type of bread used.
- Carefully monitor the cooking process as the cooking times required for different bread types can vary significantly.
- When the sandwich is cooked as desired, lift the top cooking plate using the handle. Remove the sandwich using a plastic, silicone or wooden utensil.
CAUTION: Never use metal utensils as they can damage the non-stick coating.
- When finished, switch off the wall power outlet and remove the plug.
- Allow the unit to cool and wipe the plates clean.
- Close the top lid and press the handle lock to lock the top into the closed position for storage.
HINTS FOR BEST RESULTS
TYPES OF BREAD:
- The Sandwich Press can be used to toast any shape, thickness and most types of bread; White, Wholemeal, Multigrain, Rye, Raisin Loaf, Focaccias, Turkish Bread, Sourdough, Baguettes as well as Bread Rolls.
- Each bread type will require a different amount of time cooking, so be sure to monitor your sandwich whilst cooking.
- Dense breads such as Sourdough, Turkish Bread or Rye Bread will take longer to toast than lighter breads such as White, Wholemeal or Bread Rolls.
- Sweet breads, such as Fruit Bread, that have a higher sugar content will tend to brown quicker than non-sweetened bread.
FILLINGS:
- You can toast any filling you like in your sandwich, sweet or savoury. The flat plate design also makes the Sandwich Press ideal for toasting bread without any fillings or spreads.
CAUTION: Always take care when biting into a freshly toasted sandwich containing fillings such as cheese, tomato or jam, as they retain heat and could scold your mouth.
- It is not necessary to use any butter or margarine on the outside of your toasted snack because the Sandwich Press has non-stick plates.
TIP: When toasting ingredients that melt when heated and can spill out the sides of your snack (such as cheese, mayonnaise or jam), a very light coating of cooking oil, butter or margarine on the plates will assist with cleaning the plates and prolong the lifespan of the non-stick surface, whilst adding minimum fat to your sandwich.
CLEANING & MAINTENANCE
• After use, wait for the unit to cool properly before cleaning and storing.
- Wipe the inside and edges of the heating plates with absorbent paper towel or a soft cloth.
- Should any filling be difficult to remove, pour a little cooking oil onto the heating plate and re-heat the unit for two minutes. Wait for the unit to cool for five minutes then try to remove the filling again.
- Always remember to unplug the unit from the electrical outlet when not in use and before cleaning.
- The body of the appliance should be cleaned with a damp cloth. Do not allow water to enter the appliance.
- Do not use bleach, abrasive substances or solvents to clean your appliance as these can be damaging to the finish.
- To remove stubborn spots/marks, wipe the surfaces with a cloth slightly dampened in soapy water or mild non-abrasive cleaner. Rinse and dry, with a clean soft cloth.
STORING THE APPLIANCE
- Ensure that the Sandwich Press plug is removed from the power outlet.
- Ensure the unit has been cleaned and dried thoroughly before storing.
- To store the unit effectively, press the handle lock to lock the top of the Sandwich Press into the closed position and store in a vertical position.
• Always store in a clean, dry place.
SERVICING THE APPLIANCE
There are no user serviceable parts in this appliance. If the unit is not operating correctly, please check the following:
- You have followed the instructions correctly.
- That the plug is firmly in the wall power outlet.
- That the wall power outlet is switched on.
- That the mains power supply is on.
If the appliance still does not work after checking the above, contact Customer Service department
IMPORTANT SAFEGUARDS
When using electrical appliances, basic safety precautions should always be followed, including but not limited to the following:
- To protect against electrical hazards, do not immerse the appliance, power cord or plug in water or any other liquid.
- Do not use in the bathroom or near any source of water. (insert do not use in shower icon)
- Do not use outdoors.
- Always use the appliances handles as some parts may be hot.
- This appliance is not intended for use by persons (including children) with reduced physical, sensory or mental capabilities, or lack of experience and knowledge, unless they have been given supervision or instruction concerning use of the appliance by a person responsible for their safety.
- Always turn off and unplug from the power outlet before cleaning the appliance.
- Do not operate this appliance with a damaged cord/plug or after the appliance has malfunctioned, dropped or damaged in any manner. Contact Customer Service for replacement, examination, repair or adjustment.
- There are no user serviceable parts. If power cord is damaged, it must be replaced by the manufacturer or similarly qualified person in order to avoid a hazard.
- Do not use on an inclined plane or unstable surface.
- Do not move the appliance while it is switched on.
- Do not cover the appliance when in use.
- Do not cook food items too large for the appliance.
- Take care when opening the lid of the appliance, there may be some steam.
- Always take care when removing food after cooking as it is hot.
- Food may burn. Always monitor the cooking process when using this appliance.
- Do not use the appliance near or below any curtains or other combustible materials.
- Keep the appliance and the power cord away from the edge of tables or countertops and out of reach of children and infirm persons.
- To disconnect, turn off the wall power outlet, then grasp the plug and remove from wall power socket. Never pull by the cord.
- Do not cook food wrapped in plastic film or, polythene bags. It will cause a fire hazard.
- Always clean the appliance after use.
- Do not place on or near any heat sources.
- Do not leave the appliance unattended when in use.
- Follow the instructions when cleaning this appliance
- Do not use appliance for other than its intended purpose.
- This appliance is not a toy. Children should be supervised to ensure that they do not play with the appliance.
- This appliance is not intended to be operated by means of an external timer or separate remote control system.
- For added safety, electrical appliances should be connected to a power outlet that is protected by a residual current device (RCD), also often referred to as a 'Safety Switch'. Your switchboard may already incorporate an RCD. If unsure, call an electrician for verification and fitting if necessary.
SAVE THESE INSTRUCTIONS
www.russellhobbs.com.au
www.russellhobbs.co.nz

- Russell Hobbs
- Sandwich Press
- Spectrum Brands Australia Pty Ltd
- Customer Service in Australia
- Spectrum Brands New Zealand Ltd
- Customer Service in New Zealand
- Spectrum Brands Australia Pty Ltd and Spectrum Brands New Zealand Ltd Warranty Against Defects
- Manufacturer, We or us means:
- Warranty Conditions
- Register your product online
- BEFORE FIRST USE
- OPERATING INSTRUCTIONS
- HINTS FOR BEST RESULTS
- TYPES OF BREAD:
- FILLINGS:
- CLEANING & MAINTENANCE
- STORING THE APPLIANCE
- SERVICING THE APPLIANCE
- IMPORTANT SAFEGUARDS
Brand : RUSSELL HOBBS
Model : RHSP801
Category : Sandwich Toaster