
320E-ES-RM - Snow blower Snow Joe - Free user manual and instructions
Find the device manual for free 320E-ES-RM Snow Joe in PDF.


| Product Type | Electric Snow Blower |
| Brand | Snow Joe |
| Model | 320E-ES-RM |
| Motor Power | 15-amp electric motor |
| Clearing Width | 20 inches |
| Intake Height | 13 inches |
| Throw Distance | Up to 30 feet |
| Chute Control | 180-degree rotatable chute with remote control |
| Wheels | 10-inch pneumatic tires |
| Weight | Approximately 40 lbs |
| Dimensions (L x W x H) | 40 x 22 x 24 inches |
| Power Source | 120 V AC, 60 Hz |
| Power Cord Type | 14 AWG, 3-wire grounded extension cord required (not included) |
| Auger Material | Steel |
| Housing Material | Lightweight plastic |
| Safety Switch | Two-hand safety start system |
| Maintenance | Check auger and chute for debris after each use; lubricate moving parts annually |
| Warranty | 2-year limited warranty with Snow Joe+ subscription (optional) |
| Included Accessories | Owner's manual, chute control cable, replacement shear pins |
| Compliance | ETL certified |
Frequently Asked Questions - 320E-ES-RM Snow Joe
User questions about 320E-ES-RM Snow Joe
0 question about this device. Answer the ones you know or ask your own.
Ask a new question about this device
Download the instructions for your Snow blower in PDF format for free! Find your manual 320E-ES-RM - Snow Joe and take your electronic device back in hand. On this page are published all the documents necessary for the use of your device. 320E-ES-RM by Snow Joe.
USER MANUAL 320E-ES-RM Snow Joe
A Division of Snow Joe®, LLC Model 320E-ES-RM Form No. SJ-320E-ES-RM-880E-M-V1
THANKS FOR YOUR PURCHASE OF A REMANUFACTURED PRODUCT.
To make sure you get the most out of your product, be sure to register online at
snowjoe.com
to enjoy full product support.
PASTE UPC LABEL HERE
A Division of Snow Joe®, LLC Model 320E-ES-RM Form No. SJ-320E-ES-RM-880E-M-V1
IMPORTANT!
Safety Instructions
All Operators Must Read These Instructions Before Use
Read all instructions before using this electric snow shovel. Basic safety precautions should always be followed to reduce the risk of fire, electric shock and personal injury.
General Safety WARNINGS!
You and any other operator of this snow shovel must read, understand and follow these instructions in their entirety, and should reread them at the start of each snow season. Failure to follow these instructions may result in ELECTRIC SHOCK, FIRE and/or serious PERSONAL INJURY.
Notice the personal safety alert symbol △ used in this manual to draw your attention to a WARNING given along with the particular operating instruction. This means that the operation requires special ATTENTION, CAUTION and AWARENESS.
- Keep work area clean and well lit – Cluttered, dark areas invite accidents.
- Use the right product – Do not use this machine for any job except that for which it is intended.
- Replacement parts – When servicing this unit, use only identical replacement parts. Replace or repair damaged cord immediately.
Do not use on gravel surfaces unless the snow shovel is adjusted for such surfaces in accordance with the operator's manual.
- Keep children, bystanders and pets away – All spectators, including pets, should be kept a safe distance away from the work area.
- Dress properly – Do not wear loose articles of clothing or jewelry. They can become caught in moving parts. Wear rubber boots.
The electric snow shovel should not be operated in the hand-held position except when the instructions provided in this manual deem such use permissible.
- Avoid accidental starting – Do not carry the electric snow shovel with your finger on the switch. Make sure the switch is off before plugging in the unit.
If the cord is damaged in any manner during operation, pull the extension cord from the wall receptacle.
- Moving parts – Keep hands and feet away from moving parts. Keep guards in place and in proper working order.
-
⚠CAUTION! Exercise caution to avoid slipping or falling. Wear protective footwear that will protect your feet and improve your footing on slippery surfaces.
-
Use safety glasses – Also use safety footwear, snug-fitting clothing, protective gloves, hearing and head protection.
-
Stay alert – Watch what you are doing. Use common sense. Do not operate the electric snow shovel when you are tired or under the influence of alcohol or drugs.
-
Do not force the tool – It will perform better with less likelihood of personal or mechanical injury if it is used at the rate for which it was designed.
-
Do not overreach – Keep proper footing and balance at all times.
-
If the electric snow shovel strikes a foreign object, follow these steps:
-
Stop the electric snow shovel.
- Inspect for damage.
-
Repair any damage before restarting and operating the snow shovel.
-
Disconnect the tool – Disconnect the electric snow shovel from the power supply when it is not in use, before servicing it, when changing accessories and when performing any other maintenance task.
-
Store idle tool indoors – When not in use, the electric snow shovel should be stored indoors in a dry, locked place out of the reach of children.
-
Maintain the electric snow shovel with care – Follow the applicable maintenance instructions for replacing parts and changing accessories. Lubrication is not required.
This is the safety alert symbol. It is used to alert you to potential personal injury hazards. Obey all safety messages that follow this symbol to avoid possible injury or death.
Improperly using or maintaining this electric snow shovel could result in injury or death. To reduce this potential, comply with the following safety instructions.
This electric snow shovel can amputate hands and feet if used incorrectly. It can also pick up foreign objects, which can become dangerous projectiles when thrown into the air. Failure to observe the following safety instructions could result in serious personal injury.
Training
- Read, understand and follow all instructions on the machine and in the manual before operating this unit. Thoroughly familiarize yourself with the controls and the proper use of the equipment. Know how to stop the unit and disengage the controls quickly.
- Children should never be allowed access to the equipment. Adults should never operate the equipment without carefully reading and understanding these instructions.
- Keep the area of operation clear of all persons, particularly small children and pets.
• Exercise caution to avoid slipping or falling.
Preparation
- Thoroughly inspect the area where the equipment is to be used and remove all doormats, sleds, boards, wires and other foreign objects.
- Do not operate the equipment without wearing adequate winter garments. Avoid loose fitting articles of clothing that can become caught in moving parts. Wear footwear that will improve footing on slippery surfaces.
- Do not attempt to clear snow from a gravel or crushed rock surface. This product is intended for use only on paved surfaces.
- Never attempt to make any adjustments while the motor is running (except when specifically recommended by the manufacturer).
- Always wear safety glasses or eye shields during operation or while performing an adjustment or repair to protect your eyes from foreign objects that may be thrown from the machine.
Operation
- Do not put hands or feet near or under rotating parts. Keep clear of the discharge opening at all times.
- Exercise extreme caution when operating on or crossing gravel drives, walks or roads. Stay alert for hidden hazards or traffic.
• After striking a foreign object, stop the motor. Thoroughly inspect the electric snow shovel for any damage, and repair the damage before restarting and operating the electric snow shovel. - If the unit should start to vibrate abnormally, stop the motor and check the unit immediately to ascertain the cause. Vibration is generally a sign of trouble.
-
Stop the motor and disconnect the electric snow shovel from the power supply whenever you leave the operating position, when transporting the unit, before unclogging the rotor blade housing and when making any repairs, adjustments or inspections to the unit.
-
When cleaning, repairing or inspecting the electric snow shovel, make sure that all moving parts have come to a complete stop before beginning work.
• Exercise extreme caution when operating on slopes. - Never operate the electric snow shovel without proper guards and other safety devices in place and in proper working order.
- Never direct the discharge toward people or areas where property damage can occur. Keep children, pets and other bystanders away from the work area.
- Do not overload the machine capacity by attempting to clear snow at too fast a rate.
- Look behind and use care when backing up with the electric snow shovel.
- Never operate the electric snow shovel without good visibility or light. Always be sure of your footing, and keep a firm hold on the handles. Walk, never run, with the unit.
Clearing a Clogged Rotor Housing
Hand contact with the rotating rotor blades inside the rotor housing is the most common cause of injury associated with electric snow shovels. Never use your hands to clear a clogged rotor housing.
To clear the rotor housing:
- Shut the motor off and disconnect the unit from the power supply.
- Wait 10 seconds to be sure the rotor blades have come to a complete stop.
- Always use a clean-out tool, not your hands, to free the rotating blades.
Maintenance and Storage
- Check all fasteners at frequent intervals for proper tightness to ensure that the equipment is in safe working condition.
- Always refer to the operator's manual for important details, such as how to properly store your electric snow shovel for an extended period of time.
- Maintain or replace safety and instruction labels as needed.
- Run the machine a few minutes after throwing snow to prevent the rotor blades from freezing.
Double-Insulated Appliances
In a double-insulated appliance, two systems of insulation are provided instead of grounding. No grounding means is provided on a double-insulated appliance, nor should a means for grounding be added to the appliance. Servicing a double-insulated appliance requires extreme care and knowledge of the system, and should be performed only by qualified service personnel at an authorized Snow Joe ^® + Sun Joe ^® dealer. Replacement parts for a double-insulated appliance must be identical to the parts they replace.
A double-insulated appliance is marked with the words "Double Insulation" or "Double Insulated." The symbol (square within a square) may also be marked on the appliance.

DOUBLE-INSULATED: GROUNDING NOT REQUIRED. WHEN SERVICING, USE ONLY IDENTICAL REPLACEMENT PARTS.
This electric snow shovel is double-insulated, eliminating the need for a separate grounding system. Use only identical replacement parts. Read the instructions before servicing double-insulated appliances. Use this snow shovel only as described in this manual.
Electrical Safety
- Ground fault circuit interrupter (GFCI) protection should be provided on the circuit(s) or outlet(s) to be used for this electric snow shovel. Receptacles are available having built-in GFCI protection and may be used for this measure of safety.
- To prevent electric shock, use only with an extension cord suitable for outdoor use, such as SW-A, SOW-A, STW-A, STOW-A, SJW-A, SJOW-A, SJTW-A, or SJTOW-A.
Before use, check that the extension cord is in good condition. When using an extension cord, make sure to use one heavy enough to carry the current your product will draw. An undersized cord will cause a drop in line voltage resulting in loss of power and overheating.

WARNING

Electric shock may cause SEVERE INJURY or DEATH. Heed these warnings:
- Do not allow any part of the electric snow shovel to make contact with water while it is in operation. If the appliance becomes wet while turned off, wipe dry before starting.
- Use only a UL-, CSA- or ETL-rated extension cord for outdoor, all-weather use.
- Do not use an extension cord over 100 ft (30 m).
- Do not touch the appliance or its plug with wet hands or while standing in water. Wearing rubber boots offers some protection.
EXTENSION CORD CHART
| Extension Cord Length | Up to 50 ft (15 m) | +50 ft - 100 ft (+15 m - 30 m) |
| Wire Gauge (A.W.G.): | 16 14 |
- To reduce the risk of electric shock, this appliance has a polarized plug (i.e. one blade is wider than the other). Use this appliance only with a polarized UL-, CSA-, or ETL-listed extension cord recommended for outdoor, all-weather use. The appliance plug will fit into a polarized extension cord only one way. If the appliance plug does not fit fully into the extension cord, reverse the plug. If the plug still does not fit, obtain a correct polarized extension cord. A polarized extension cord will require the use of a polarized wall outlet. The extension cord plug will fit into the polarized wall outlet only one way. If the plug does not fit fully into the wall outlet, reverse the plug. If the plug still does not fit, contact a qualified electrician to install the proper wall outlet. Do not modify the appliance plug, extension cord receptacle, or extension cord plug in any way.
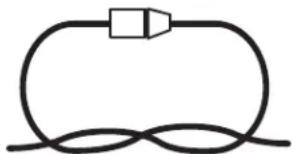
- To prevent the appliance cord from disconnecting from the extension cord during operation, make a knot with the two cords as shown in Table 1.
Table 1. Method of Securing Extension Cord

(A) Tie cord as shown
natural_image
Simple line drawing of a resistor connected in series with two leads (no text or symbols)(B) Connect plug and receptacle
- Do not abuse the cord. Never pull the snow shovel by the cord or yank the cord to disconnect it from the receptacle. Keep the cord away from heat, oil, and sharp edges.
Safety Symbols
The following table depicts and describes safety symbols that may appear on this product. Read, understand and follow all instructions on the machine before attempting to assemble and operate.
| Symbols SymbolsDescriptions Descriptions | |||
 | READ THE OPERATOR'S MANUAL(S) - Read, understand and follow all instructions in the user manual(s) before attempting to assemble and operate. |  | WARNING! Electrical shock hazard. |
 | SAFETY ALERT - Indicates a precaution, a warning or a danger. |  | WARNING! Do not expose the unit to rain or wet conditions.Keep dry. |
 | Wear hearing protection.Wear eye protection.Wear breathing protection. |  | DANGER! Cutting/dismemberment hazard - Keep feet away from the rotating auger. |
 | Keep the flexible power supply cord away from the cutting blades. |   | DANGER! Cutting/dismemberment hazard - Keep hands away from the rotating auger. Do not use hands to unclog rotor housing. Stop motor before removing debris. |
 | Wear safety gloves during use to protect hands. |  | Wear safety footwear at all times to provide protection against objects that may accidentally fall on feet. |
 | Keep bystanders and children a safe distance (at least 11 yd/10 m) away from the work area. |  | CAUTION! Beware of stones and other foreign objects that could be thrown from the appliance. |
 | Always keep the power cable away from heat sources, oils or sharp edges. Immediately remove plug from the mains if the cable is damaged, frayed or entangled. |  | WARNING! Turn the machine OFF and disconnect it from the power supply before inspecting, cleaning, changing accessories or conducting any other maintenance task. |
 | Double Insulation. |  | The rotating part will continuously run for several seconds after you turn off the machine. |
Know Your Electric Snow Shovel
Read the owner's manual and safety rules carefully before operating your electric snow shovel. Compare the illustration below to the actual unit in order to familiarize yourself with the location of the various controls and adjustments. Save this manual for future reference.

- Upper handle
- Safety switch
- ON/OFF trigger switch
- Appliance cord
- Handle knob
- Joint-fixing knob, washer and bolt (2)
- Middle pole
- Lower pole
- Motor housing
- Scraper blade
- 2-Blade paddle auger
- Upper pole
- Auxiliary handle
Technical Data
Rated Voltage 120 V \~ 60 Hz
Motor 9 amp
No Load Speed 4800 ± 10% rpm
Rotor 2-blade paddle auger
Clearing Width 10 in. (25.4 cm)
Depth of Snow Cut 6 in. (15 cm)
Throw Distance Max 25 ft (7.6 m)
Plowing Capacity Max 333 lbs/minr
(151 kg/min)
Weight 12.1 lbs (5.5 kg)
Unpacking
Carton Contents
• Upper pole assembly
- Lower pole assembly
- Middle pole
• Joint-fixing knob, washer and bolt (x2)
• Manuals with registration card
-
Carefully remove the electric snow shovel and check to see that all of the above items are supplied.
-
Inspect the product carefully to make sure no breakage or damage occurred during shipping. If you find damaged or missing parts, DO NOT return the unit to the store. Please call the Snow Joe® + Sun Joe® customer service center at 1-866-SNOWJOE (1-866-766-9563).
NOTE: Do not discard the shipping carton and packaging material until you are ready to use your new electric snow shovel. The packaging is made of recyclable materials. Properly dispose of these materials in accordance with local regulations.
IMPORTANT! The equipment and packaging material are not toys. Do not let children play with plastic bags, foils or small parts. These items can be swallowed and pose a suffocation risk!
Assembly
Connecting the Poles
- Slide the upper pole into the middle pole and the middle pole into the lower pole. Align the screw holes (Fig. 1).
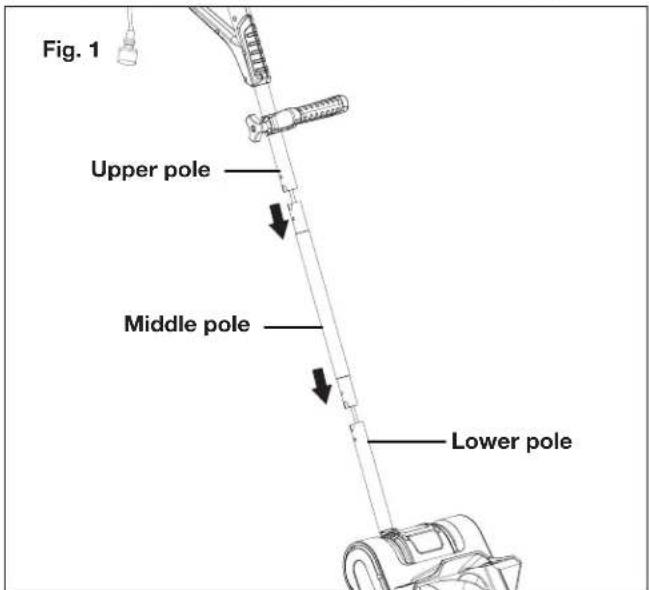
- Insert the bolts through the aligned holes in the poles and secure the other end with the washers and the joint-fixing knobs (Fig. 2). Twist until tight.
NOTE: You may have to carefully move the wiring inside the tube to one side if it blocks the path of the bolt.

Handle Adjustment
- To adjust the angle of the auxiliary handle, loosen the auxiliary handle by turning the handle knob counterclockwise.
- Rotate the auxiliary handle to a comfortable position (Fig. 3).

- Retighten handle knob securely by turning it clockwise (Fig. 3).
NOTE: In order to prevent the auxiliary handle from moving around or sliding on the pole, be sure to tighten securely.
Operation
IMPORTANT: This electric snow shovel is intended for outdoor, residential use only. Do not use this appliance indoors or for commercial or industrial purposes.
Connecting to a Power Source
To reduce the risk of electric shock, this appliance has a polarized plug (i.e. one blade is wider than the other; see Fig. 4).
Fig. 4

Use this appliance only with a polarized UL-, CSA- or ETL-listed extension cord recommended for outdoor, all-weather use. The appliance plug will fit into a polarized extension cord only one way. If the appliance plug does not fit fully into the extension cord, reverse the plug. If the plug still does not fit, obtain a correct polarized extension cord. A polarized extension cord will require the use of a polarized wall outlet. The extension cord plug will fit into the polarized wall outlet only one way. If the plug does not fit fully into the wall outlet, reverse the plug. If the plug still does not fit, contact a qualified electrician to install the proper wall outlet. Do not modify the appliance plug, extension cord receptacle or extension cord plug in any way.
IMPORTANT: Check the extension cord frequently during use for holes or cracks in the insulation. Do not use a damaged cord. Do not run the cord through standing water or wet grass.
Use only an extension cord recommended for outdoor use.
Securing the Extension Cord
- Make a loop with the extension cord (Fig. 5).

- Insert the loop through the opening in the back of the upper handle and secure the loop onto the extension cord restraint hook (Fig. 6).

- Connect the extension cord to the appliance cord (Fig. 6).
NOTE: Securing the extension cord in this way helps to prevent you from accidentally disconnecting the extension cord from the appliance during operation.
- Plug the extension cord into a wall outlet.
⚠ WARNING! Keep the area to be cleared free of stones, toys or other foreign objects that the rotor blades might pick up and throw. Such items could be covered by snow and are easy to overlook, so be sure to conduct a thorough inspection of the area before beginning work.
Starting + Stopping
- To start the electric snow shovel, push and hold the safety lock switch on the side of the handle grip with your thumb and then squeeze the trigger switch with your fingers. Once the machine powers on, you can release the safety lock switch and proceed with operation (Fig. 7).
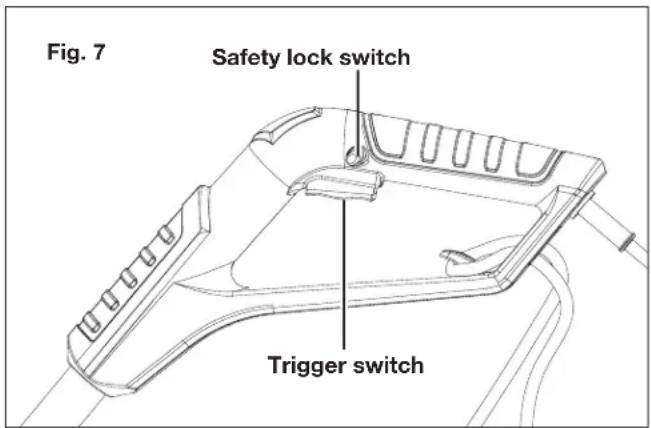
- To stop the electric snow shovel, release the trigger switch.
Operating Tips
- Ensure that the scraper blade at the base of the unit contacts the ground and start the electric snow shovel. Push the shovel forward at a comfortable rate, yet slow enough to clear the path completely. The clearing width of the snow shovel and the depth of snowfall should dictate your forward speed.
- Direct the snow discharge to the right or to the left by holding the electric snow shovel at a slight angle.
- To remove snow most efficiently, throw the snow downwind and slightly overlap each swath.
- If you need to clear snow from a crushed rock or gravel surface, tilt the handle down to raise the scraper bar up enough to clear any loose material that could be picked up and thrown by the auger.
- This electric snow shovel cuts a path 10 in. (25.4 cm) wide and up to 6 in. (15 cm) deep in one pass.
- When clearing deeper drifts, hold the electric snow shovel by the upper and lower handles and use a swinging or sweeping motion. Remove up to 6 in. (15 cm) of snow with each pass and repeat as many times as needed.
- Keep the cord clear of obstructions, sharp objects and the rotating auger. Do not pull sharply on the cord or abuse it in any manner. Frequently inspect the cord for signs of damage. If damage is found, replace the cord immediately.
- Disconnect the extension cord after using the electric snow shovel. Hang the extension cord with the shovel so it will not be misplaced or damaged.
Maintenance
To order genuine replacement parts or accessories for the Snow Joe ^® 320E-ES-RM electric snow shovel, please visit snowjoe.com or contact the Snow Joe ^® + Sun Joe ^® customer service center at 1-866-SNOWJOE (1-866-766-9563).
⚠ WARNING! Disconnect the extension cord before performing any maintenance task.
If the extension cord is plugged into the appliance, someone could accidentally turn on the unit while you are performing maintenance on it, which could result in serious personal injury.
Lubricating the Electric Snow Shovel
This electric snow shovel does not need lubrication. All bearings are lubricated at the factory for the life of the product.
Storage
- Examine the electric snow shovel thoroughly for worn, loose or damaged parts. Should you need to repair or replace a part, contact an authorized Snow Joe ^® + Sun Joe ^® dealer or call the Snow Joe ^® + Sun Joe ^® customer service center at 1-866-SNOWJOE (1-866-766-9563) for assistance.
- Examine the extension cord thoroughly for signs of excess wear or damage. If it is worn or damaged, replace it immediately.
- Disconnect the extension cord from the electric snow shovel before storing.
- Store the cord with the electric snow shovel indoors in a clean, dry and locked location out of the reach of children and animals.
NOTE: Devices for retaining extension cords are commercially available, should you wish to purchase one. - For added protection against snow, ice, sun damage, rain, dust, tree sap and birds, cover your electric snow shovel with the Snow Joe® Universal Fit Snow Shovel Cover (Model SJCVR-13). To order this cover online, visit snowjoe.com or, to order by phone, call 1-866-SNOWJOE (1-866-766-9563).
Service and Support
If your Snow Joe ^® 320E-ES-RM electric snow shovel requires service or maintenance, please call the Snow Joe ^® + Sun Joe ^® customer service center at 1-866-SNOWJOE (1-866-766-9563).
Model and Serial Numbers
When contacting the company, reordering parts or arranging service from an authorized dealer, you will need to provide the model and serial numbers, which can be found on the decal located on the housing of the unit. Copy these numbers into the space provided below.
Record the following numbers from the housing or handle of your new product:

Optional Accessories
WARNING! ALWAYS use only authorized Snow Joe® + Sun Joe® replacement parts and accessories. NEVER use replacement parts or accessories that are not intended for use with this electric snow shovel. Contact Snow Joe® + Sun Joe® if you are unsure whether it is safe to use a particular replacement part or accessory with your electric snow shovel. The use of any other attachment or accessory can be dangerous and could cause injury or mechanical damage.
| ModelAccessor | ||
1 | Universal 13-inch snow shovelprotective cover | SJCVR-13 |
NOTE: Accessories are subject to change without any obligation on the part of Snow Joe ^® + Sun Joe ^® . Accessories can be ordered online at snowjoe.com or via phone by contacting the Snow Joe ^® + Sun Joe ^® customer service center at 1-866-SNOWJOE (1-866-766-9563).
NOTES
NOTES
NOTES
SNOW JOE® + SUN JOE® REFURBISHED GOODS WARRANTY
GENERAL CONDITIONS:
Snow Joe ^® + Sun Joe ^® operating under Snow Joe ^® , LLC warrants this refurbished product to the original purchaser for 90 days against defects in material or workmanship when used for normal residential purposes. If a replacement part or product is needed, it will be sent free of charge to the original purchaser except as noted below.
The duration of this warranty applies only if the product is put to personal use around the household. It is the owner's responsibility to correctly perform all maintenance and minor adjustments explained in the owner's manual.
HOW TO OBTAIN YOUR REPLACEMENT PART OR PRODUCT:
To obtain a replacement part or product, please visit snowjoe.com/help or email us at help@snowjoe.com for instructions. Please be sure to register your unit beforehand to speed up this process. Certain products may require a serial number, typically found on the decal affixed to the housing or guard of your product. All products require a valid proof of purchase.
EXCLUSIONS:
- Wearing parts like belts, augers, chains and tines are not covered under this warranty. Wearing parts can be purchased at snowjoe.com or by calling 1-866-SNOWJOE (1-866-766-9563).
- Batteries are covered in full for 90-days from the date of purchase.
Snow Joe ^® + Sun Joe ^® may from time to time change the design of its products. Nothing contained in this warranty shall be construed as obligating Snow Joe ^® + Sun Joe ^® to incorporate such design changes into previously manufactured products, nor shall such changes be construed as an admission that previous designs were defective.
This warranty is intended to cover product defects only. Snow Joe®, LLC is not liable for indirect, incidental or consequential damages in connection with the use or misuse of the Snow Joe® + Sun Joe® products covered by this warranty. This warranty does not cover any cost or expense incurred by the purchaser in providing substitute equipment or service during reasonable periods of malfunction or non-use of this product while waiting for a replacement part or unit under this warranty. Some states do not allow exclusions of incidental or consequential damages so the above exclusions may not apply in all states. This warranty may give you specific legal rights in your state.
HOW TO REACH US:
We're here to help Monday through Friday from 9AM to 7PM EST and Saturday and Sunday 9AM to 4PM. You can reach us at 1-866-SNOWJOE (1 866-766-9563), online at snowjoe/com, via email at help@snowjoe.com or tweet us @snowjoe.
EXPORTS:
Customers who have purchased Snow Joe ^® + Sun Joe ^® products exported from the United States and Canada should contact their Snow Joe ^® + Sun Joe ^® distributor (dealer) to obtain information applicable to your country, province or state. If for any reason, you are not satisfied with the distributor's service, or if you have difficulty obtaining warranty information, contact your Snow Joe ^® + Sun Joe ^® seller. If in the event your efforts are unsatisfactory, please reach out to us directly.
- THANKS FOR YOUR PURCHASE OF A REMANUFACTURED PRODUCT.
- IMPORTANT!
- Safety Instructions
- All Operators Must Read These Instructions Before Use
- General Safety WARNINGS!
- Training
- Preparation
- Operation
- Clearing a Clogged Rotor Housing
- To clear the rotor housing:
- Maintenance and Storage
- Double-Insulated Appliances
- DOUBLE-INSULATED: GROUNDING NOT REQUIRED. WHEN SERVICING, USE ONLY IDENTICAL REPLACEMENT PARTS.
- Electrical Safety
- WARNING
- Electric shock may cause SEVERE INJURY or DEATH. Heed these warnings:
- Safety Symbols
- Know Your Electric Snow Shovel
- Technical Data
- Unpacking
- Carton Contents
- Assembly
- Connecting the Poles
- Handle Adjustment
- Connecting to a Power Source
- Securing the Extension Cord
- Starting + Stopping
- Operating Tips
- Maintenance
- Lubricating the Electric Snow Shovel
- Storage
- Service and Support
- Model and Serial Numbers
- Optional Accessories
- NOTES
- SNOW JOE® + SUN JOE® REFURBISHED GOODS WARRANTY
- GENERAL CONDITIONS:
- HOW TO OBTAIN YOUR REPLACEMENT PART OR PRODUCT:
- EXCLUSIONS:
- HOW TO REACH US:
- EXPORTS:
Brand : Snow Joe
Model : 320E-ES-RM
Category : Snow blower