
CL8150 - Schnurloses Telefon GEEMARC - Kostenlose Bedienungsanleitung
Finden Sie kostenlos die Bedienungsanleitung des Geräts CL8150 GEEMARC als PDF.


| Produkttyp | GSM-Mobiltelefon |
| Marke | Geemarc |
| Modell | CL8150 |
| Dual-SIM | Ja (2 SIM-Karten) |
| SOS-Funktion | Ja (SOS-Taste, bis zu 5 Notrufnummern) |
| Display | LCD-Bildschirm |
| Kamera | Ja (erfordert microSD-Karte) |
| Bluetooth | Ja (Passwort 0000) |
| FM-Radio | Ja |
| Audio-Player | Ja (MP3, MP4) |
| Akku | Li-Polymer, wiederaufladbar, erste Ladung min. 4 Stunden |
| Ladeanschluss | Mini-USB |
| Speichererweiterung | microSD-Karte bis 32 GB |
| SAR-Werte | Kopf: 0,07 W/kg, Körper: 0,83 W/kg, Gliedmaßen: 3,41 W/kg |
| Garantie | 2 Jahre |
| Herstellungsland | China |
| Netzwerk | GSM |
| Sicherheit | PIN-Code, Telefon-Passwort (Standard 0000) |
| Sprachen der Menüführung | Englisch, Französisch, Spanisch, Italienisch, Niederländisch, Deutsch |
| Lieferumfang | Netzteil, USB-Kabel, Akku, Bedienungsanleitung |
Häufig gestellte Fragen - CL8150 GEEMARC
Benutzerfragen zu CL8150 GEEMARC
0 Frage zu diesem Gerät. Beantworten Sie die, die Sie kennen, oder stellen Sie Ihre eigene.
Eine neue Frage zu diesem Gerät stellen
Laden Sie die Anleitung für Ihr Schnurloses Telefon kostenlos im PDF-Format! Finden Sie Ihr Handbuch CL8150 - GEEMARC und nehmen Sie Ihr elektronisches Gerät wieder in die Hand. Auf dieser Seite sind alle Dokumente veröffentlicht, die für die Verwendung Ihres Geräts notwendig sind. CL8150 von der Marke GEEMARC.
BEDIENUNGSANLEITUNG CL8150 GEEMARC
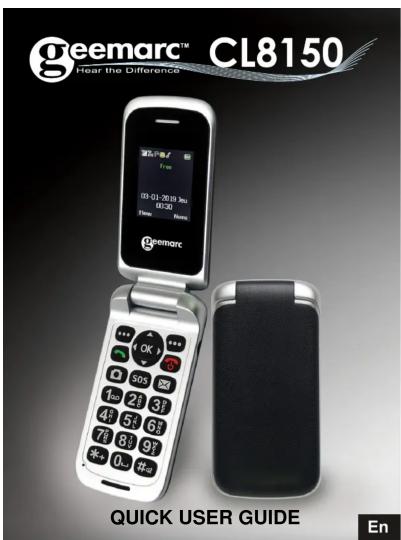
!!! Please refer to our website: www.geemarc.com for an up to date user guide, as there may be important updates and changes you need to be aware of !!!
General Description
HandsetDescription

1
Description
| 1 | Earpiece | |
| 2 | Display | |
| 3 | Left / Right keyThese are soft keys i.e. they take on different functions depending on the menu displayed.The current function is always displayed by the text above the key. | |
| 4 | Navigation ButtonOK key : To valid or confirm a choice.Up keyScroll up through lists and menu options.This is a dedicated key in Standby (Shortcuts). It can be set up in Handset Settings in standby modeScroll up the volume in conversation.Scroll up the ringer volume during the ringer.Down keyScroll down through lists and menu options.This is a dedicated key in Standby (Calendar). It can be set up in Handset Settings.Scroll down the volume in conversation.Scroll down the ringer volume during the ringer.Right keyThis is a dedicated key in Standby (Audio player).It can be set up in Handset Settings.Left keyThis is a dedicated key in Standby (User profiles).It can be set up in Handset Settings. | |
| 5 | Call keyMake a call after dialling the number.Receive a call.Choose one of the last number dialled. | |
| 6 | Press this key to enter in Camera function. | |
| 7 | To enter phone numberAsterisk keyPress this key quickly to insert one or more symbol(+ or P/W) while composing a message or editing a phonebook entry name. Then use the navigation keys to move to the symbols you want to insert.Hash KeyPress to switch between different input modes while composing a text message or editing a contact name. | |
| 8 | After to press 3 seconds, the procedure is started | |
| 9 | Press this key to write a new message. | |
| 10 | Power key / On-hook keyLong press to power the telephone on and off.End a call.Cancel current process and return to standby. | |
| 11 | Headset jack 3.5mm | |
| 12 | Camera lens | |
| 13 | Loudspeaker |
LCD Screen Description
| Signal Strength iconThis is always displayed when your telephone is switched on. It shows the current signal strength. More bars indicate more signal strength. There is one of these icons per SIM. | |
| Alarm iconThe alarm has been set to ring at a specified time. |
2
| Battery Status iconThis is always displayed when your telephone is switched on. It shows the level of battery charge. More bars indicate more battery charge. | |
| Roaming iconA roaming call is taking place i.e. International call-outgoing or incoming. | |
| SMS iconA new SMS (text message) has been received. | |
| Mute iconThe microphone is temporarily muted during the conversati | |
| Silent iconThe telephone is in silent mode. There will be no call alert.Only vibrator active.Ringer + vibrator activated.Only ringer activated. | |
| Headset iconThe headset is plugged in. | |
| Missed call | |
| Bluetooth function activated |
Unpacking the Telephone
When unpacking the telephone, you should find the following in the box:
● 1 GSM CL8150 mobile telephone handset
- 1 Mains power adaptor+ 1 USB cable - 1 x Li Polymer rechargeable battery
● 1 X Li-Polymer rechargeable ● 1 User Guide
Install SIM Card and Battery
Install SIM Card and Battery
Always switch the telephone off and disconnect the charger before removing the battery.
Unclip the cover in the direction shown and pull it off (diagram a).
Remove the battery (if battery already inside).
Slide a SIM with the gold contacts face down under the silver SIM holder as shown below (diagram b).

Micro SD card.
You can insert one micro SD card to save the pictures. Maximum 32G. You can insert 2 SIM cards into this telephone. There are many reasons to do this, however, one important reason is that if you use two SIMS from different providers you will probably get better network coverage. However, just using one will be fine too!
Observe the battery contacts (the gold coloured contacts must face towards the bottom right). and insert the battery.
Place the battery cover into position and press down lightly (schéma c).
Charging the Battery
Plug the charger into a wall socket.
Connect the lead from the charger into the Mini USB port on the bottom of the telephone. During charging, the battery icon starts to fill.
Before the handset is first used, the battery must be charged for a minimum of 4 hours.
Switching On / Off
Press 📞 for 3 seconds or longer to switch the telephone on.
If no SIM card has been inserted, LIMITED SERVICE will be displayed if you try to dial a number. Only emergency calls can be made until the SIM has been inserted.
Press 📞 again for 3 seconds to switch the telephone off.
First commissioning
During the first start-up you will be asked to select the language and to enter the time and date.
- Enter the PIN for your SIM card(s) and press OK (Left soft key).
- Press YES (left soft key) two times, select the language with the keys ▲▼ and press OK.
- Press YES and enter the hours and the minutes.
- Press ▼ and enter the date.
-
Press "SAVE" (1st, 2016)
-
Press on SAVE (Left soft key).
Making a Call
| Flip open the cover and dial the number on the keypad. | |
| Press CLEAR soft key to delete an incorrect digit. | |
| Press , the number is automatically dialled. | |
| To end the call simply press . |
Receiving a Call
When an incoming call is received on the telephone, the caller's telephone number will be displayed. If this caller's number is stored in the Phonebook, the associated name will be displayed.

To end the call simply press 📞 or flip the cover closed.
Rejecting a Call
| To reject an incoming call, simply pressor soft key SILENTand then REJECT. |
Options During a Call
You can use a variety of functions during a call by pressing the OPTION soft key.
You get the option to do the following.
Place a call on Hold / End a Single Call
Enter the Phonebook / View Call History
Messages / Sound Recorder - Record the call Mute / Volume
Create a Phone Book Entry
-
Press Names or Menu → Phonebook.
-
Select Add New Contact then press OK.
-
Select → To SIM or To Phone then press OK
-
Enter name and telephone number (press each time OPTIONS→ Edit → Enter the information → Options and select Done press
▼ and make the same procedure. Entry using the numeric keypad 5. Options → Save.
The numeric keypad also has characters printed on the keys. These characters are used for entering text for the purposes of phonebook entry and modification, SMS text writing and searching for an entry in the phonebook.
Press each key the relevant number of times to get the letter you need e.g. to get the letter J, press the 5 key once, to get the letter S, press the 7 key four times in quick succession.
To move on to the next letter, wait a few seconds and the cursor will appear | after the last letter you entered. You may now enter the next letter. To switch between upper and lower case use the #a key.
You can also switch to numbers using #_at key. The input mode will be indicated on the right hand side of the name entry field indicated by a pencil.
Press 0 to insert a space.
Options within Phonebook
-
Menu → Phonebook then press OK key.
-
Use ▼ and ▲ to scroll through the list until you find the desired contact.
4
-
Press OPTIONS soft key.
-
Options available to be performed on that contact record are as follows:
VIEW / Send Text Message
Call / Edit / Delete/ Copy
Add to black list / Mark several
Groups / Phonebook Settings
Within Phonebook Settings you can do the following
1) Assign the preferred storage location (SIM, Phone or All)
2) Extra number
2) Extra number.
3) Memory Status: View how much storage has been used on the
5) Memory Status: VIV SIM and the Phone.
View and Call Phone Book Entries
- Press NAMES option key to access at the phonebook list.
-
Use ▼ and ▲ to scroll through the list until you find the desired contact. Or, you can search for a contact in the phonebook via an alphabetic search. Simply, type the first character of their name and you will be automatically positioned at the correct part of the phonebook.
-
Then press 📞 launch the call.
Send a Text Message
A text message using this telephone can contain up to 160 characters. This figure includes spaces.
1. Menu → Message → Write Message. Write your text message.
2. Options → Send to → Enter Number and then enter the actual number or Select from the Phonbook List
number of Select from the Phonebook List.
4. Options → Send then press OK key
Receiving a Text Message
On receiving a text, an alert tone will be audible. 1 UNREAD MESSAGE will be displayed on the LCD
1. Press VIEW soft key followed by OK key to display the message
2. Press OPTIONS soft key to see all the options available that can be performed on this selected text message.
3. These options include Reply, Call Sender, Forward, Delete and Advanced (Use number: dial the number, save it in the phonebook or send a SMS to this number and USE USSD: if the SMS contains an USSD, you can use it).
Text Message Settings
Service Centres distribute SMS messages. Your mobile telephone must have the telephone number for the service centre programmed into memory. Generally, this will have already been set up by your service provider.
There are many settings options:
SIM in which you can alter settings such as
Profile setting: Choose the correct messagery.
Validity period
You can stipulate how long an attempt at delivering a message should be
should be.
Message type
You can choose the type of message in the list
Delivery Report
Every time a text is sent you will get a message to say it has been sent successfully (or not).
Reply Path
If you activate this feature, when you reply to a message, the cost of sending it is charged to the recipient's account instead of your own.
Voicemail Server
Set up the location of the voicemail server.
Memory Status
A useful option is to request to see how much memory is occupied
and how much is free on both the SIM card and the telephone e.g. SIM 17/40, 2/40.
Text Message
Text Message Counter Saw Seat Messages
Save Sent Messages
Preferred Storage
If you select SIM, when you receive a new message it will be stored
on the SIM card by default. When the SIM card memory is full new messages will be stored in the phone.
Long text message.
Display Missed Calls
When you have a missed call, a message MISSED CALLS will appear on the display e.g. 3 MISSED CALLS. Press VIEW soft key to review the details or press CANCEL to exit. You can also review missed calls via the menu as follows :
-
Menu → Call History → Missed Calls then press OK key.
-
Use ▼ and ▲ to scroll through the list until you find the desired contact
-
Press the soft key OPTIONS, the following will be available to perform on that call record entry :
View / Call / Send Text Message
Save to Phonebook / Add to blacklist
Edit before call / Delete.
Multimedia
There are multimedia options available on the CL8150. For the camera you need to insert a micro SD card 32 Gb.
There are Camera, Audio Player, Audio viewer, Sound Recorder and FM Radio functions.
Organizer
There are many useful functions within organizer.
Bluetooth
CL8150 supports Bluetooth. Other Bluetooth devices can be searched for and likewise the CL8150 can be found. Bluetooth password is
for and likewise the CE8150 can be found. Bluetooth password is 0000. You can connect with a Bluetooth headset or perhaps with
another phone. This would enable file transfer via Bluetooth.e.g. Photo transfer, MP3 and MP4.
You can also stop the Bluetooth function so that other devices will not find it.
Alarm
An alarm can also be set to sound at specific times if required. The alarm can be set to go off only once or repeatedly on a weekly sche
Five different alarm times can be set up. Press any key to stop the alarm sound. The alarm will keep ringing every 5 minutes until you.
alarm sound. The alarm will keep ringing every 5 minutes until it actually turn the alarm setting to Off or press M1 or simply press
[NO TEXT]
The alarm still works when the telephone is switched off.
Ensure the phone ringing tones are not set to silent, otherwise you will not hear the alarm!
Calendar
Today is marked. Use the navigation key to select a day (or press Options and use « jump to date »).
Calculator
Enter the first number (decimal point with the # key), select the
calculation operation with the navigation key and enter the next number.
SIM TOOL : scope and offer depend on the SIM card used.
File Manager
All the files used in the many applications on the phone can be found within File Manager.
You can do standard file manipulation follow the options available.
Phone Settings
In standby, press Menu, select Settings then press OK.
Dual Sim Settings: Set the setting to use one or
Profiles: There are 4 types of profile available: General / Silent / Meeting / Outdoor
General / Silent / Meeting / Outdoor
You can make changes to the detail of the profile selected. A profile is made up of the following settings:
Alert type, Ring Type, SIM1 Ringtone, SIM2 Ringtone, Ringtone
Volume, Message, Keypad, Key tone Volume, cover open, cover close.
Within Phone Settings you can adjust the following functions:
Time and date: Set home city, Set the time and date, set format (12hr or 24hr and DDMMYYYY or MMDDYYYY or YYYYMMDD) and update with time zone.
Language: There are 6 languages available to display the menu
i.e. English, French, Spanish, Italian, Dutch and German
Preferred input methods e.g. Capitals or lower case
Display: You can set Wallpaper, LCD contrast and show date & Time.
Dedicated keys: You can set the phone so as you only need to press one navigation key to enter the desired menu on the telephone.
one navigation key to enter the desired menu on the Auto update time: The time is setting automatically.
Auto update time: The time is setting automatically. Flight mode settings
Flight mode settings
Network Settings: Network selection automatically or manually
Security Settings
SIM security: This mobile telephone allows you to set up passwords to help protect your telephone from unauthorized use.
The PIN and PIN2 codes are supplied with your SIM c
code helps to protect the SIM card from unauthorized use. The PIN2
code is required to access certain services.
Phone Security: At the start, you have the possibility to add one phone password if the function is activated. By default, the phone
password is 0000
Call settings: setting for call waiting, call divert, black list (calls from these numbers are not signaled), answer mode (Cover answer, Any key or Auto answer).
Restore settings: You can undo all the changes you have made to the telephone settings and restore to the factory settings. The default password is 0000.
SOS Function
In an emergency, you can press the SOS button for help during 3 seconds.
Up to 5 numbers can be pre-set on the SOS number. The phone will dial numbers on this SOS list automatically one by one. If a busy tone is detected or a call is aborted by user, the next number will be dialled immediately or after 30 seconds if the SOS call is not validated by pressing key 0. The phone will dial these numbers until the handset is powered off.
If you want to quit the SOS mode press SOS button again 3 seconds.
Note: When SOS is switched ON, you cannot turn the telephone OFF. You must switch the SOS mode OFF before turning the phone off.
SOS Settings
You can set up to 5 SOS numbers.
-
Menu → SOS → Mode → Select On then press OK
-
Menu → SOS → Set SOS Number → Edit → Either add from
Phonebook or Enter Number
- SOS Message Record: Record an informative message that will assist your helpers in time of emergency e.g. "This is Jane Smith calling; I have hurt myself. Please come to my house and help me." Press 0 to valid.
Menu → SOS → Voice message → Custom → Record: Recite
your message clearly Press Stop on completion (the message can be up to 20 seconds long).
- SOS wait Time: select a delay time between the pressing of the
emergency call button and the dialling of the first emergency numbe
General
Only use the power supply included with the product.
Only use the approved rechargeable battery supplied.
Do not open the handset (except to replace the handset batteries or
SIM) or base. Contact the helpline for all repairs.
Never dispose of batteries in a fire. There is a serious risk of explosion and/or the release of toxic chemicals.
If you are sure you are not going to use the telephone for over a month, remove the battery.
Usage
In summary, read these simple guidelines. Not following them may be dangerous or illegal.
SWITCH ON SAFELY
Do not switch the device on when wireless phone use is prohibited or when it may cause interference or danger.
ROAD SAFETY COMES FIRST
Obey all local laws. Always keep your hands free to operate the
vehicle while driving. Your first consideration while driving should
be road safety.
INTERFERENCE
All wireless devices may be susceptible to interference. This could affect performance.
SWITCH OFF IN HOSPITALS
Follow any restrictions. Switch the device off near medical equipment.
SWITCH OFF IN AIRCRAFT
Follow any restrictions. Wireless devices can cause interference in aircraft.
SWITCH OFF WHEN REFUELLING
Do not use the device at a refuelling point. Do not use near fuel or chemicals.
SWITCH OFF NEAR BLASTING
Follow any restrictions. Do not use the device where blasting is in progress.
USE SENSIBLY
Use only in the normal position as explained in the product
documentation.
BACK-UP COPIES
Remember to make back-up copies or keep a written record of all-important information.
GUARANTEE
From the moment your Geemarc product is purchased, Geemarc guarantee is for the period of two years. During this time, all repairs or replacements (at our discretion) are free of charge. Should you experience a problem then contact our help line or visit our website at www.geemarc.com.
The guarantee does not cover accidents, negligence or breakages to any parts. The product must not be tampered with or taken apart by anyone who is not an authorized Geemarc representative.
The Geemarc guarantee in no way limits your legal rights.
IMPORTANT: YOUR RECEIPT IS PART OF YOUR GUARANTEE AND MUST BE RETAINED AND PRODUCED IN THE EVENT OF A WARRANTY CLAIM.
Please note: The guarantee applies to the United Kingdom only.
DECLARATIONS:
CE Directives
Geemarc Telecom SA hereby declares that this product CL8150 is in compliance with the essential requirements and other relevant provisions of the Radio Equipment Directive 2014/53/UE and 2015/863/UE.
The CE declaration of conformity may be consulted at
www.geemarc.com
Recycling Directives
The WEEE (Waste Electrical and Electronic Equipment) has been put in place for the products at the end of their useful life are recycled in the best way.
When this product is finished with, please do not put it in your domestic
waste bin. Please use one of the following disposal options: - Remove the batteries and deposit them in an appropriate WEEE
- Remove the batteries and deposit them in an appropriate skip. Deposit the product in an appropriate WEEE skip.
- Or, hand the old product to the retailer. If you purchase a new one, they should accept it.
Thus if you respect these instructions you ensure human health and environmental protection.


For product support and help visit our website at www.geemarc.com
2 rue Galilée, 59791 GRANDE-SYNTHE CEDEX, FRANCE
E-mail : help@geemarc.com Telephone: 01707-287602
Telephone 01707 387602
This product is made in China To Geemarc Telecom
SAB Test
Head : 0.07W/kg
Body : 0.83W/kg
LIMBS:3.410W/
QUGCL8150_En_A3_V1.1


- Unpacking the Telephone
- Install SIM Card and Battery
- Charging the Battery
- Switching On / Off
- First commissioning
- Receiving a Call
- Rejecting a Call
- Options During a Call
- Create a Phone Book Entry
- Options within Phonebook
- VIEW / Send Text Message
- Call / Edit / Delete/ Copy
- Add to black list / Mark several
- View and Call Phone Book Entries
- Send a Text Message
- Options → Send then press OK key
- Receiving a Text Message
- Text Message Settings
- Long text message.
- Display Missed Calls
- View / Call / Send Text Message
- Save to Phonebook / Add to blacklist
- Edit before call / Delete.
- Multimedia
- Organizer
- File Manager
- Phone Settings
- General / Silent / Meeting / Outdoor
- SOS Function
- SOS Settings
- General
- Usage
- GUARANTEE
- DECLARATIONS:
- CE Directives
Marke : GEEMARC
Modell : CL8150
Kategorie : Schnurloses Telefon