
Kappa 8.1 II - Lautsprecher INFINITY - Kostenlose Bedienungsanleitung
Finden Sie kostenlos die Bedienungsanleitung des Geräts Kappa 8.1 II INFINITY als PDF.


| Produkttyp | Lautsprecher (Standlautsprecher) |
| Marke | Infinity |
| Modell | Kappa 8.1 II |
| Serie | Kappa Series II |
| Frequenzweiche | Mit elektronischem Schutz für EMIT-R Hochtöner |
| Anschlussmöglichkeiten | Einzelverstärker, Bi-Wiring, Bi-Amping (mit abnehmbaren Brücken) |
| Hochtöner | EMIT-R (elektronisch geschützt) |
| Mittelton-/Hochtönerregelung | Variable Pegelregler (Mittelton und Hochton) auf der Rückseite |
| Bassschalter | Zweistufiger Schalter (Normal/Extended) auf der Rückseite (für Kappa 9.1 II, aber auch für 8.1 II erwähnt? Hinweis: Im Handbuch wird der Schalter für 9.1 beschrieben; bei 8.1 möglicherweise vorhanden, daher vorsichtig: Laut Handbuch ist er für Kappa 9.1 Series II. Da es sich um 8.1 handelt, könnte er fehlen. Aber im Text steht "Kappa 9.1 Series II includes a switch..." Also für 8.1 vermutlich nicht. Besser weglassen oder als optional kennzeichnen. Ich lasse es weg, da nicht bestätigt.) |
| Spikes | Ja, vier Spikes im Lieferumfang (mit Kunststoffkappen und Silikonkleber) |
| Verstellbare Füße | Ja, zwei vorne verstellbar (für Neigung) |
| Gehäuse | MDF mit edler Holzoberfläche |
| Empfohlene Verstärkerleistung | Hochstromfähiger Verstärker empfohlen (4 Ohm) |
| Anschlusskabel | Mindestens 16 AWG, Polarität beachten |
| Raumakustik | Reflektierende Flächen vermeiden, Abstand zu Wänden und Ecken einhalten |
| Reinigung | Weiches Tuch und Möbelpolitur für Holz; Staubsauger (niedrige Saugleistung) für Frontstoff |
| Garantie | 5 Jahre (Teile und Arbeit) für Originalkäufer und nachfolgende Besitzer (in den USA) |
Häufig gestellte Fragen - Kappa 8.1 II INFINITY
Benutzerfragen zu Kappa 8.1 II INFINITY
0 Frage zu diesem Gerät. Beantworten Sie die, die Sie kennen, oder stellen Sie Ihre eigene.
Eine neue Frage zu diesem Gerät stellen
Laden Sie die Anleitung für Ihr Lautsprecher kostenlos im PDF-Format! Finden Sie Ihr Handbuch Kappa 8.1 II - INFINITY und nehmen Sie Ihr elektronisches Gerät wieder in die Hand. Auf dieser Seite sind alle Dokumente veröffentlicht, die für die Verwendung Ihres Geräts notwendig sind. Kappa 8.1 II von der Marke INFINITY.
BEDIENUNGSANLEITUNG Kappa 8.1 II INFINITY

natural_image
Abstract black-and-white line drawing of a twisted rope or coiled ribbon (no text or symbols)Infinity®
Kappa
SERIES I I
6.1 7.1 8.1 9.1
OWNER'S MANUAL
INTRODUCTION
You have invested in one of the finest speakers available. Your Infinity Kappa Series II speaker employs new technology in driver, crossover and cabinet construction which places it at the forefront of current speaker design. As with any high
quality product, special care must be taken to install and operate your new speaker. It is for this reason we suggest you read this manual carefully from cover to cover prior to installation.
UNPACKING
Upon opening the carton, inspect the speaker carefully for any sign of transit damage. If there is damage, immediately call your dealer or the trucking firm that made the delivery. Do not delay in
reporting the damage because the longer you wait, the more difficult it will become to file a claim.
It is suggested that you fold the carton flat and store it for future use.
ASSOCIATED COMPONENTS
Your Infinity Kappa Series II speaker is an extraordinary, highly musical system. Like all loudspeakers, it will reproduce distortion as well as music. For this reason, the choice of associated audio components is critical and should be made with care. If you are replacing existing speakers with an Infinity Kappa Series II System, there should be an audible improvement in sonic quality, assuming your other components are at least on a par with Kappa Series II in terms of low distortion, phase linearity, frequency response, and so on.
If no improvement is heard, or if the sound deteriorates, it is possible that one (or more) of your existing components is of a lower standard than your new Infinity speaker. When a speaker system is exceptionally revealing, musical colorations and other forms of distortion become more noticeable because these aberrations are no longer masked by the speaker.
Here are some suggestions which will prove useful in obtaining a well-balanced audio system:
Employ an amplifier with as much power (current capability into an impedance of 4 ohms) as possible. Since quality speakers work best when driven by high current, the choice of an amplifier
with a strong, adequate power supply and a heavy-duty and rugged output stage generally results in cleaner, better defined bass response. And, while low distortion, excellent phase characteristics and low noise are all extremely important performance parameters, sufficient power into a low impedance load (4 ohms or lower) on a continuous basis is equally important.
Another consideration is that a lower power amplifier operating at its maximum power output can damage a speaker more quickly that a high power amplifier playing at loud sound levels. This occurs because many amplifiers "clip" their output very "hard" when over-driven, creating high frequency distortion which can cause the voice coil of a tweeter to heat and eventually fail. Always choose an amplifier with high power. Your authorized Infinity dealer can best answer your questions and make recommendations.
The Kappa Series II speaker is extremely revealing and will quickly identify sonic anomalies within the listening system. Poor quality speaker cables and component interconnects can add harshness, detract from spaciousness and reduce airiness surrounding instruments and voice.
INSTALLATION OF SPIKES
Your Kappa 9.1 Series II speakers come equipped with spikes which, when used, couple the speakers to the floor. The spikes will generally result in tighter, cleaner bass along with greater clarity in the midrange; however, the speakers will perform with reasonable accuracy and musical balance without them. When installing the spikes, be very careful not to allow their sharp points to injure you or anyone helping you.
Carefully turn the speaker sideways and screw the four spikes into the holes located underneath the base. Be sure the spikes are tightly in place.
Plastic caps have been supplied to cover the tips of the spices. This can prove useful, especially when installing your speakers on an expensive floor. The silicone adhesive (also supplied) will fasten the plastic caps to the spikes. Apply a small amount of silicone into each plastic tip, then mount the plastic tips onto the spikes. Allow at least 20 minutes for the silicone to set.
CONNECTIONS USING A STEREO AMPLIFIER
Always turn off the power of your entire system before making connections to your speaker.
Connect each speaker to your amplifier's output terminals using the best wire you can obtain. The choice of speaker connecting wire is extremely important, especially when using speakers as sonically revealing as Infinity Kappa Series II. If inferior wire is used, sonic quality will suffer and the degradation of sound will be readily audible. For best results, do not use wire that is thinner than 16 gauge. NOTE: the lower the gauge number (16, 14, 12, etc.), the heavier the wire. Although gauge alone does not reveal the ultimate sonic quality of wire, it represents a good starting point, especially if you are not using a name brand speaker connecting cable. Consult your dealer if you are not certain which type of wire will make your Infinity speaker sound best.
When using regular lamp cord, look for ridges or different colored insulation to differentiate polarity. If there is a ridge on the outer insulation, use the ridge for positive (+) and the wire without the ridge for negative (−). If the insulation wrapped around one wire is red, use it for positive. Use white (or whatever the other color may be) for negative. See figure 1.
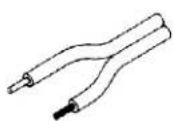
DIFFERENT COLOR CONDUCTORS
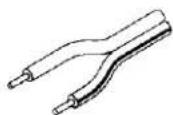
RIDGE, STRIPE OR PRINTING, ONE LEAD

ROUGH OR COLORED
INSULATION, ONE LEAD
FIGURE 1: Some examples of polarity coding on speaker cables
It is important to connect your speakers in-phase (which means that all individual drivers are moving in and out in the same direction and at the same time) in order to obtain the best localization of instruments and voice as well as the deepest, most natural bass. If a speaker is out of phase, the drivers in one channel will move in while the other channel will move out. This condition invariably results in sonic problems and must be avoided.
Using one length of speaker connecting wire, connect the RIGHT speaker to your amplifier's (or receiver's) RIGHT channel output terminals. Be sure that strands of the wire do not touch the ground terminal (and be sure to observe polarity). Even a thin stray wire can cause distortion in the system which would be very difficult to trace. Speaker Positive should be connected to amplifier Positive and speaker Negative to amplifier Negative. Connect the LEFT speaker to your amplifier's LEFT channel output terminals in a similar manner. See figure 2.
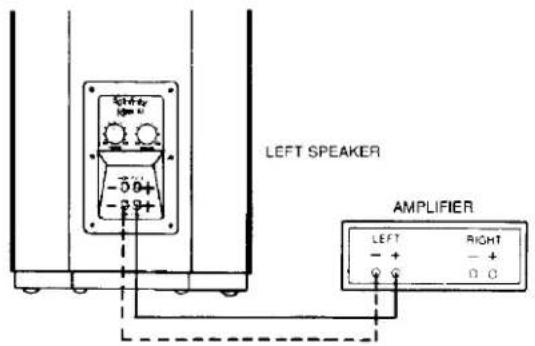
FIGURE 2: Speaker connection
CONNECTION FOR BI-AMP OPERATION
Your Infinity Kappa Series II speakers permit you to employ two power amplifiers in a bi-amp configuration. One amplifier feeds the woofer (the signal passes through the speaker's crossover network to feed the woofer) and the other amplifier drives the remainder of the speaker system. This arrangement generally results in the purest and most open sound obtainable from the speaker.
To connect your speaker to two amplifiers, merely remove the two gold-plated straps (which connect the bass and higher frequency section of the crossover network together for use with a single power amplifier) and connect one amplifier to the bass terminals and the other amplifier to the tweeter/midrange terminals. Observe polarity as detailed in the previous section.
See figure 3.
DO NOT ATTEMPT TO EMPLOY TWO SEPARATE AMPLIFIERS WITHOUT FIRST REMOVING THE SHORTING STRAPS ON THE REAR OF THE SPEAKER. DO NOT REMOVE THE SHORTING STRAPS WHEN USING ONLY A SINGLE POWER AMPLIFIER (except when bi-wiring. Refer to the next section).
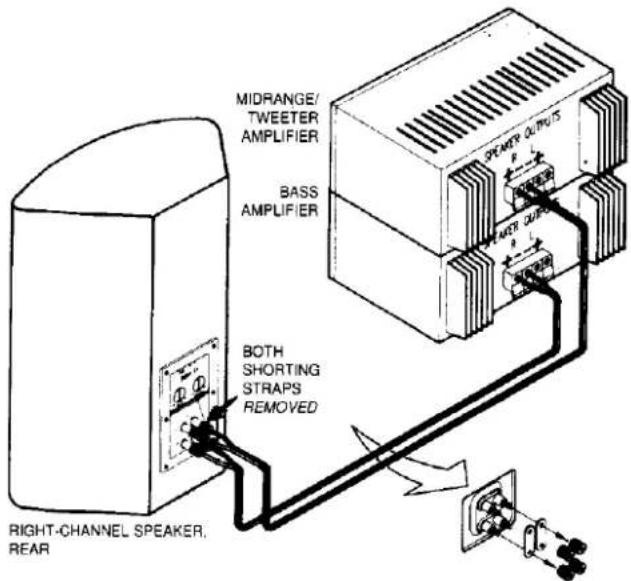
FIGURE 3: Connecting the speaker for bi-amp operation
If your amplifiers are not equal in power, always use the amplifier with the higher power (or greater current capability) to drive the woofers. When using two different amplifiers, it is recommended that at least one of the amplifiers has a level control which will permit you to set the level of one of the amplifiers to balance the other, resulting in equal output feeding the woofers and midrange/tweeter sections.
BI-WIRING
Many audiophiles recommend using two connecting wires instead of one because two wires share current through a greater conducting area.
If you wish to bi-wire your Kappa Series II speaker with a single power amplifier, remove the two shorting straps on the rear of the speaker which separates the woofer and midrange/tweeter sections of the crossover network. Two parallel speaker wires are connected to the amplifier's output (for each channel) and the other ends of the wires are connected to the woofer and midrange/tweeter sections of the speaker. See figure 4.
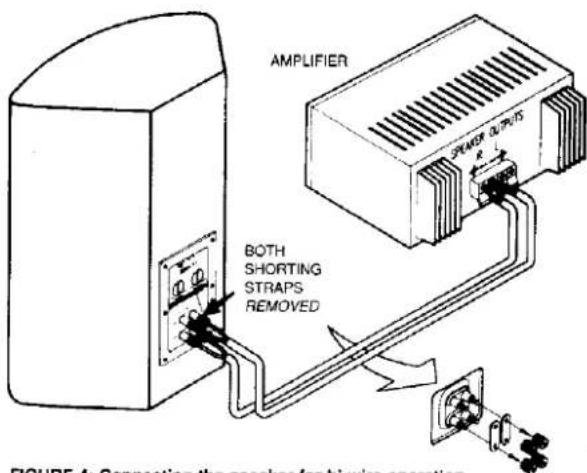
FIGURE 4: Connecting the speaker for bi-wire operation
Locating your Kappa Series II speakers in the proper position within your listening room is of primary importance if you wish to obtain the best possible performance from your audio system. Depending on room size and acoustics, moving the speakers as little as an inch (2.5 cm) forward, rearward, or sideways can result in noticeable sonic differences. We urge you, therefore, to experiment with placement until your speakers deliver their full musical potential.
As a useful starting point for best stereo imaging, place your speakers at least seven feet (2 meters) apart. Try to locate the speakers as far away as possible from walls and corners of the room to reduce reflections which generally result in sonic anomalies. Our experience has shown that speaker placement too close to a wall or corner can create hardness, smearing of the sound, lack of bass detail, and at times other forms of sonic distortion which reduce clarity and change the harmonic structure of music. Often as not, these sonic anomalies are blamed on the speakers but are really due to poor room placement. We cannot stress too strongly the importance of room placement and the role it plays in achieving excellent musical balance. See figure 5.
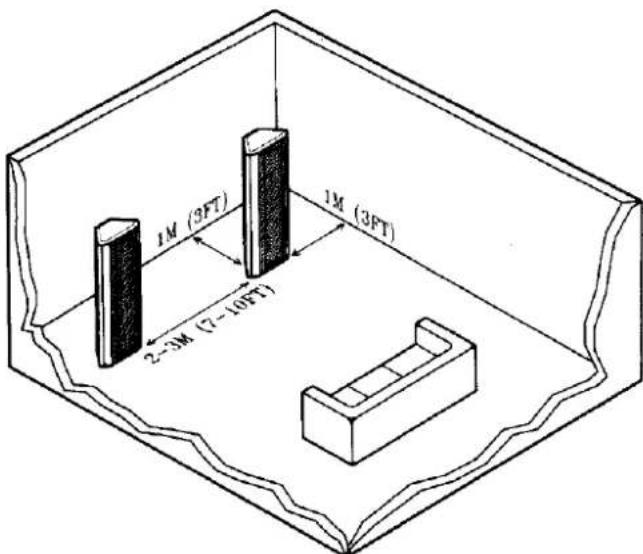
FIGURE 5: Suggested starting placements for Kappa Speakers
When the speakers are moved inward (toward each other) this generally achieves better focus of instruments and vocalists; however, moving the speakers too close together can reduce the front-to-rear stage effect and you may need to experiment with the trade-off between focus and imaging.
If your listening room is larger than average and your listening position is relatively far from the speakers, wider placement of the speakers may be required (approximately 10 feet or 3 meters apart). Try angling the speakers inward for better projection of midrange and high frequencies; however, do not angle the speakers too sharply because this may reduce stereo imaging as well as front-to-rear depth. The exact angle of toe-in must be determined by careful experimentation. There is no formula to follow because rooms differ in acoustics and the listener's position may vary considerably. See figure 6.
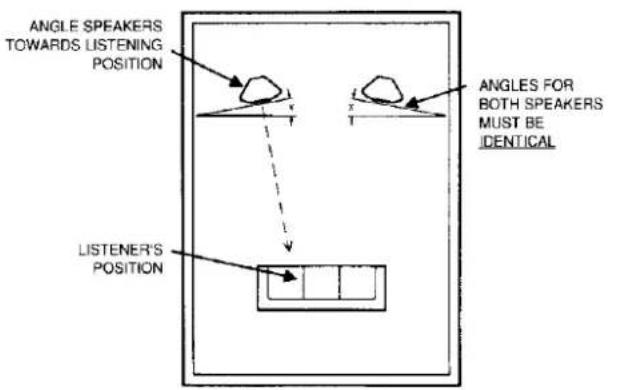
FIGURE 6: Angling Kappa Speakers
The toe-in angle for each speaker should be exactly the same for best sonic results. This can be done effectively by eye or by using a tape measure or straight edge to measure the amount of toe-in from a forward firing position.
Using the two adjustable front feet (model 6.1, 7.1, 8.1 Series II) to tilt the speakers either forward or rearward may enable you to obtain better sound balance throughout the entire middle and high frequency range. The feet may be rotated in either a clockwise or counterclockwise direction to obtain the proper alignment for your installation. Rotating the feet clockwise will tilt the speaker forward. Rotating the feet counterclockwise will tilt the speaker rearward. Be careful not to tilt the speakers too far forward or rearward since this may cause them to become unstable.
Aligning your speakers with a slight tilt either forward or rearward will help "tune" them to the room and to your listening position. If your sitting position aligns your ears on a plane that is lower than the midrange and tweeter, you may wish to tilt the speakers downward so the acoustic output from the speakers reaches your ears on a direct plane. If you are seated in a position that directs the sound toward your chest or shoulders, it may be necessary to tilt the speakers slightly rearward so the acoustic output from the midrange and tweeters reaches your ears on a direct plane.
Toe-in, tilting and moving the speakers closer and further from walls and corners are all part of the speaker tuning procedure. Don't be afraid to experiment as this will result in the best sound. If a specific location yields satisfying results and you wish to continue to experiment with speaker placement, mark the ideal location so you can always return to it.
When installing your speakers, be very careful to keep them on the same plane (exactly the same distance from the front wall). It is advisable to use a tape measure or string to measure the exact distance the speakers are located from the front wall. See figure 7.
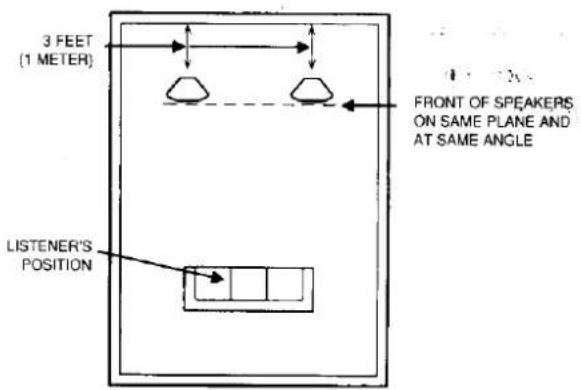
FIGURE 7: Sound is most direct when midrange and tweeter reach the listener at ear level. Tilt speaker forward or rearward to direct sound at ear level.
Room corners are difficult to cope with and you should try to keep the location of the speakers as far away from corners as possible. Corners add low frequency reinforcement and can create severe problems in bass frequencies, often accentuating bass response, making it inarticulate.
If bass response is inadequate, you may wish to move the speakers closer into the corners (or rear wall) for reinforcement; however, as a rule of thumb, always try to locate the speakers as far away from corners and walls as possible.
It is often difficult to balance bass response because it is within this particular frequency spectrum where the listening room becomes a substantial influence. In fact, the listening room, depending on how may reflective and absorptive areas there are, can influence the entire frequency range of music. It is for this reason that constant experimentation is required before a final decision is made as to where the speakers should be permanently placed. When moving the speakers around, listen for sound that is cohesive and evenly balanced across the audio spectrum. Use various types of program material when determining sonic balance.
Additional advice on room acoustics and placement is contained on the next page under the heading "Room Acoustics, Speaker Positioning and Tonal Balance".
KAPPA SERIES II EMIT-R® PROTECTION CIRCUIT
Kappa Series II models include electronic protection in the crossover network to protect the EMIT-R Tweeter from excessive power and high frequency distortion which can be created when an amplifier is forced into clipping. If the tweeter turns off while playing music, turn off your entire audio system to allow the tweeter's protection electronics to cool. The electronic protection circuit will reset itself automatically once it reaches normal operating temperature.
When the system is switched back on, reduce overall volume by a small amount.
If the tweeter protection circuit continuously turns off, your amplifier may not have adequate power to drive your speakers and the amplifier is probably being driven into severe clipping. This form of overload generates high frequency distortion which can be damaging if the energy is allowed to reach the tweeter.
Consult your dealer or contact Infinity if you are experiencing this type of difficulty.
ROOM ACOUSTICS, SPEAKER POSITIONING AND TONAL BALANCE
If you desire a more detailed description of room acoustics and speaker placement, the following information may prove helpful.
Large areas of glass, mirrors, and wood paneling will reflect sound waves and often result in brittleness and excessive brightness. You can reduce the sound waves reflected by hard surfaces with softer surfaces. Draperies or wall hangings do a good job of absorbing high frequencies. Placing a soft, absorptive piece of furniture near the hard surface often helps reduce unwanted spurious sound waves. Be careful not to absorb too much sound as this will interfere with sonic balance, causing overall sound to be dull and lifeless.
A good listening room has just the right amount of reflection and absorption. To test the sonic balance of your room, stand in the location where the speakers will be installed and clap your hands two or three times. If the room is reverberant, you will hear a sharp echo. If the room is dull, the sound of the clap will decay rapidly and there will be very little or no echo. In fact, it will seem that the higher frequencies generated by the clap will be missing.
Furniture, pictures, bookcases, tables, and lamps will help reduce reflections because they are located at random points in the room and this tends to cancel standing waves. Carpeting or throw rugs also help reduce floor reflections,
although heavy carpeting can absorb a great deal of the high frequencies which will make the room seem "bass heavy."
It is customary to place the speakers facing into the long dimension of the listening room; however, this doesn't always result in the best sound. At times, placing the speakers facing into the short dimension of the room will yield better results due to the acoustic properties of the room and the listener's position. Experiment with room placement. You may be pleasantly surprised at the results.
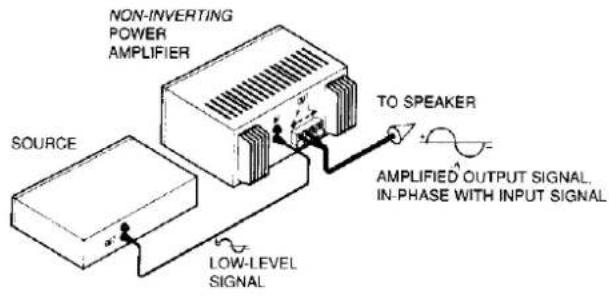
Maintaining absolute phase is an essential factor in the proper performance of your speakers. If all amplifiers (as well as the other components in the audio chain) were non-inverting (if their outputs were always in-phase with their inputs), maintaining absolute phase would simply involve observation of the polarities of the speaker connecting wires. However, since there are amplifiers (as well as preamplifiers and CD players) which invert the output from the input (see figure 8, page 7), some changes in speaker hookup may be required in order to restore the system to absolute phase.
If your amplifier, preamplifier, and CD instruction manuals do not state if these audio components are inverting, assume they are non-inverting since 98% of all audio components do
not invert the audio signal at the output. If you wish to determine whether or not your components are inverting, contact your dealer, or write to the manufacturer. If you are certain that your amplifier is an inverting type, it will be necessary to disconnect your speakers and reverse polarity (on both speakers) so that positive becomes negative and negative becomes positive.
See figure 9.
If you are using two separate amplifiers in a bi-amp mode (that are inverting types) to drive your Kappa Series II system, the aforementioned modification must be made to the wires connecting both amplifiers to the speakers.
If the only inverting component in your system is the preamplifier or CD player, all of the speaker leads (when using a single amplifier or two separate ones) must be reversed at either the amplifier output or speaker inputs. CAUTION: Be sure not to reverse the left and right channels. Left and right must always be retained as "left" and "right" to ensure proper stereo integrity.
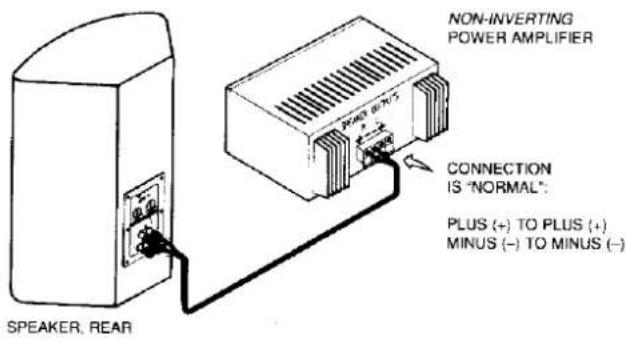
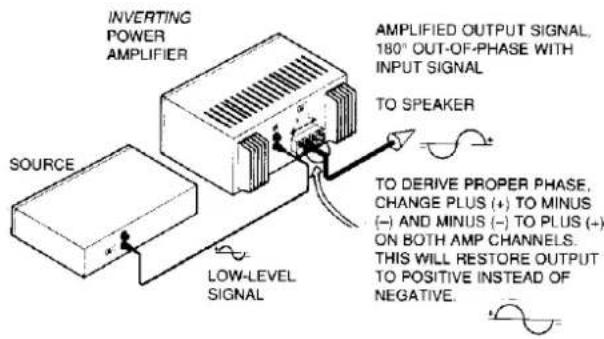
FIGURE 8: Inverting and non-inverting amplifiers
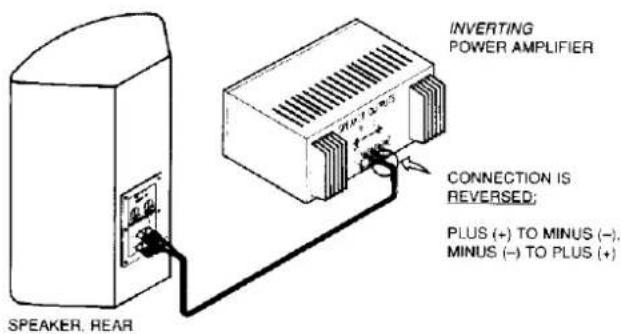
FIGURE 9: Connecting inverting and non-inverting amplifiers
SETTING THE CROSSOVER CONTROLS
Kappa Series II speakers employ variable controls to adjust the relative level of the mid-range and tweeter to match room acoustics, speaker placement and to satisfy personal taste. These controls are located on the rear of the speaker enclosure. Start your adjustment by allowing both controls to remain in the center of their rotation (which is essentially "flat") and work from there. Each control may be either boosted for greater midrange and tweeter output or reduced for less output.
Begin your adjustment with the tweeter control. This will set the proper balance between the tweeter and midrange. You will know when this balance is achieved when the higher frequencies are not exaggerated or overly bright. If highs sound dull (lack sparkle and airiness), rotate the control until the highs sparkle and sound open.
Employ various recordings which contain good high frequency content (voice, brass, strings, etc.) when making this adjustment.
Adjust the midrange ("Presence") control in a similar manner, striving for an even, smooth sounds. Setting the midrange too low will result in a distant, almost lifeless sound. Setting the midrange too high will result in a "boxy" and often nasal sound.
Adjustment should be made one at a time until proper balance is achieved. Use various types of program material (CDs, FM, records, cassettes, etc.). It may take several listening sessions before final settings can be made. It should be noted that the setting of both controls is discretionary and should be made to suit your personal taste.
SETTING THE BASS RESPONSE SWITCH
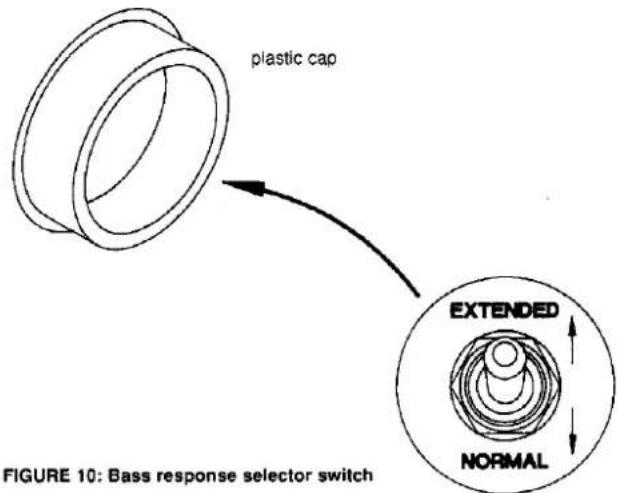
The Kappa 9.1 Series II includes a switch on the rear of the speaker located under a plastic cap that is positioned above the terminal/crossover control plate. This two-position switch selects the mode of bass performance. Should your amplifier begin to current limit or turn off completely during heavy bass passages, or if the protection fuses should blow during similar conditions, placing the switch in the NORMAL (down) position will reduce the current required by the woofers and your amplifier will no longer experience difficulty. This adjustment changes only the very lowest frequencies without affecting the voice or balance of the speaker.
If your amplifier is capable of delivering high current into a low impedance, the switch should be placed in the EXTENDED (up) position for deepest bass response.
Pry the plastic cap loose with a small screw-driver and replace it after setting the switch to the desired position. Be sure to set the switch either up or down for both speakers. See figure 10.
SETTING THE AUDIO SYSTEM CONTROLS
Never operate your audio system with the equalizer, tone and loudness controls set at maximum boost. This will place undue strain on the amplifier and could also result in damage to the speakers.
The position of the volume control setting is of little consequence in judging the amount of power a system generates. Loudness is a function of audio gain, which in itself is unimportant to the user. The only important consideration is the loudness level at which the system can be played, regardless of where the volume control is set.
Always turn down the volume of your system completely when changing a record or switching inputs from phono or CD to FM, etc. Excessively loud transients, which can result from a dropped stylus on a record or from improperly designed switches, can result in severe damage to your speakers.
Furthermore, when changing wires, pulling plugs, etc., always turn off all the equipment to prevent transients from entering the speaker. Use caution, and your speakers will repay you with many years of trouble-free service.
ACOUSTIC FEEDBACK
If, after connecting your system you find the bass response to be boomy (or lacking in tightness and solidity) or if the bass driver cones produce excessive movement, the cause can usually be attributed to acoustic feedback – vibrations from the speakers reaching a turntable and tone arm, or CD player, creating a resonance. In turn, this vibration is fed back to the electronics and speakers. Since Kappa Series II speakers extend to very low frequencies, isolating the turntable or CD player from vibrations becomes an important procedure.
The turntable or CD player should be placed on a heavy, solid support located as far from the speaker as possible. At times, using a shock mounted base helps reduce vibration pickup. If after trying various methods to reduce acoustic feedback the phenomenon still exists, contact your dealer for assistance.
NOTE: CD players which are susceptible to acoustic feedback should be mounted on solid supports to isolate them acoustically. Another method to isolate the CD player is to mount it on four rubber or plastic legs which have a predetermined amount of elasticity.
CARE OF YOUR SPEAKER
Use a soft cloth and a fine furniture oil to clean the wood finish. if you use a spray cleaner/polish, be careful not to spray the polish on the
grille cloth. The grille may be vacuumed occasionally, but always set the vacuum cleaner on low suction to avoid tearing the cloth.
IN THE EVENT OF TROUBLE
Note that you can use your amplifier's two channels of information for simple trouble-shooting. If the sound quality is distorted, listen to each speaker separately to check if the fault is present in both. If it is, then the trouble is likely to be elsewhere in your system. If the fault is in one channel only, reverse the outputs from your amplifier to the speakers (right-to-left and left-to-right). If the distortion moves to the other channel, the fault is not in the speaker. (This technique may also be used to locate a fault between the signal source and preamp/receiver and/or between preamp and power amp(s).
If you have been unsuccessful in locating the specific source of trouble (or if you have located it, but have been unable to correct it), make inquiries in the following order:
Consult the Authorized Infinity Dealer from whom you purchased the system. Infinity Dealers are audio specialists and can be of great assistance.
Get the name and address of the Authorized Infinity Service Facility nearest you by writing or calling Infinity at (818) 407-0228. Please ask for Customer Service. You may be instructed to take or send the problem part to a service facility for service under the terms of the warranty. NOTE: Do not ship any parts or whole speakers for service without prior approval ("RETURN AUTHORIZATION"), and do not ship without enclosing a copy of your original bill of sale.
If there is no authorized service facility near you, or in the unlikely event that the service facility cannot solve the problem:
Write, phone, or FAX: Infinity Systems, Inc. – CUSTOMER SERVICE 20630 Nordhoff St., Chatsworth, CA 91311 Telephone: (818) 407-0228, FAX: (818) 709-7496
Describe the difficulty as specifically as possible. The Service Department will then advise you as to the action you should take.
LIMITED WARRANTY
WHO IS PROTECTED BY THE WARRANTY?
Your Infinity warranty protects the original retail purchaser and all subsequent owners for a period of five (5) years (parts and labor) from any failure as a result of original manufacturing defect so long as: (1) your Infinity loudspeaker was purchased within the fifty United States or by military personnel from an authorized military outlet, and (2) the original dated bill of sale is presented whenever service is required during the warranty period. This warranty does not apply to products purchased elsewhere; other purchasers should contact their local Infinity distributor for warranty information.
WHAT DOES THE INFINITY WARRANTY COVER?
Except as specified below, this warranty covers all defects in original materials and workmanship. The following are not covered: damage caused by accident, misuse, abuse, neglect, product modification; damage occurring during shipment; damage caused by failure to follow instructions in the owner's manual, including failure to perform recommended periodic or routine maintenance; damage resulting from repairs by someone not authorized by Infinity; claims based upon any misrepresentations by the seller; and any Infinity product on which the serial number has been altered, defaced, or removed.
WHO PAYS FOR WHAT?
During the period of the warranty, subject to the above conditions, Infinity will pay all of the labor and material expenses to repair a warrantable defect.
HOW CAN WARRANTY SERVICE BE OBTAINED?
In the event that your Infinity loudspeaker should require service, you should first contact the Infinity dealer from whom the product was purchased or, if this is not practical, contact Infinity directly (ATTN: Customer Service) at 20630 Nordhoff St., Chatsworth, CA 91311,
(818) 407-0228, FAX (818) 709-9486. We may direct you to an authorized service center for Infinity products or ask you to send them to us for repair. In either case, you will have to present your original bill-of-sale to establish warranty coverage. Do not send your speaker to us without prior authorization from our Customer Service Department.
You are responsible for transporting your product to either Infinity or an authorized service center and for payment of all shipping charges; however, Infinity will pay the return shipping charges (in the event you return the product to us) if the repairs are covered by warranty. If you experience difficulty in transporting your product or are in need of packing materials, please advise us and we may be able to suggest alternative procedures and/or provide adequate packing materials.
LIMITATION OF IMPLIED WARRANTIES:
All implied warranties, including fitness for a particular purpose and merchantability are limited in duration and length to the warranty for your product.
LIMITATION OF INCIDENTAL OR CONSEQUENTIAL DAMAGES:
Infinity is not responsible for any incidental or consequential damage of any kind. Our liability is limited to the repair or replacement, at our option, of a defective product.
Some states do not allow limitations on how long an implied warranty lasts/or do not allow the exclusion of incidental or consequential damage, so the above limitations or exclusions may not apply to you.
This warranty gives you specific legal rights and you may also have other rights which vary from state to state.
NOTE: In the event there is a difference between this warranty and the provisions in any advertisements, product brochures or packaging cartons, the terms of this warranty will prevail.

We get you back to what it's all about. Music.
© 1994, Infinity Systems, Inc., 20630 Nordhoff St., Chatsworth, CA 91311 U.S.A.
Telephone: (818) 407-0228 • FAX: (818) 709-9486
Infinity constantly strives to update and improve existing products, as well as create new ones, therefore the specifications and construction details in this and related Infinity publications are subject to change without notice.
- Infinity®
- Kappa
- INTRODUCTION
- UNPACKING
- ASSOCIATED COMPONENTS
- INSTALLATION OF SPIKES
- CONNECTIONS USING A STEREO AMPLIFIER
- CONNECTION FOR BI-AMP OPERATION
- BI-WIRING
- KAPPA SERIES II EMIT-R® PROTECTION CIRCUIT
- ROOM ACOUSTICS, SPEAKER POSITIONING AND TONAL BALANCE
- See figure 9.
- SETTING THE CROSSOVER CONTROLS
- SETTING THE BASS RESPONSE SWITCH
- SETTING THE AUDIO SYSTEM CONTROLS
- ACOUSTIC FEEDBACK
- CARE OF YOUR SPEAKER
- IN THE EVENT OF TROUBLE
- LIMITED WARRANTY
- WHO IS PROTECTED BY THE WARRANTY?
- WHAT DOES THE INFINITY WARRANTY COVER?
- WHO PAYS FOR WHAT?
- HOW CAN WARRANTY SERVICE BE OBTAINED?
- LIMITATION OF IMPLIED WARRANTIES:
- LIMITATION OF INCIDENTAL OR CONSEQUENTIAL DAMAGES:
Marke : INFINITY
Modell : Kappa 8.1 II
Kategorie : Lautsprecher